【SpringBoot源码】一篇文章,搞懂SpringBoot是如何启动的
首先介绍SpringBoot的run()核心方法,然后对其中各个关键步骤进行代码追踪和详细解释,并给出刷新后钩子、启动后任务等代码示例,便于理解读懂后源码后可以怎么应用。
导航:
【Java笔记+踩坑汇总】Java基础+JavaWeb+SSM+SpringBoot+SpringCloud+瑞吉外卖/谷粒商城/学成在线+设计模式+面试题汇总+性能调优/架构设计+源码解析
目录
3.1 配置Headless属性:configureHeadlessProperty()
3.2 加载所有启动监听器:getRunListeners()
3.3 准备环境:prepareEnvironment():
3.4 创建应用上下文:createApplicationContext()
3.5 启动时全局异常拦截器:getSpringFactoriesInstances()
3.5.2 扩展:获取Spring工厂实例: getSpringFactoriesInstances
3.7 刷新上下文(初始化所有Bean、自动配置):refreshContext()
3.7.2 refresh():创建并初始化 Bean、自动配置
3.9.2 自定义启动后任务:ApplicationRunner 和 CommandLineRunner
一、基本介绍
1.1 SpringBoot基本介绍
与Spring 的关系:Spring Boot是Spring的脚手架框架。
优点:快速构建项目、对主流框架的无配置集成、项目可独立运行,无需外部依赖Servlet容器、提供运行时的应用监控
主要功能:
- 自动装配:springboot会自动把第三方组件jar包里的 Bean 装载到IOC 器里面, 并配置初始化参数。
- 起步依赖:一组关联度较高的依赖集合,用于快速搭建应用程序环境。
- 作用:简化依赖jar包的导入、提供自动配置功能。
- 一些starter依赖的版本信息是由 spring-boot-starter-parent(版本仲裁中心) 统一控制,例如spring-boot-starter不用指定版本。
-
约定大于配置:
- 自动装配:springboot会使用一些约定俗成的配置作为默认配置。例如自动扫描启动类所在包的bean、自动加载类路径下的配置类、自动装配starter依赖(例如redis默认端口6379,RabbitMQ客户端是5672服务端15672)。
- 自动扫描引导类所在包下的Bean:Spring Boot在启动时会自动扫描@SpringBootApplication注解所在的包及其子包,并自动注册所有标注了@Bean注解的Bean实例。不需要再配置@ComponentScan("xx.xx");
- 自动加载类路径下的配置文件:Spring Boot默认支持application.properties或application.yml格式的配置文件,并且只要这些文件放置到了classpath下,就会被自动识别并加载进来。
- 监控项目:Spring Boot Admin,监控性能、环境等信息,需要导入服务端和客户端的依赖和配置
1.2 启动流程简化版
Spring Boot的启动流程:
- 准备环境:
- 启动监听器: SpringBoot包中META-INF/spring.factories文件中的一批XxxApplicationListenner,包括清缓存、日志、文件编码等启动监听器
- 默认不跳过BeanInfo属性:spring.beaninfo.ignore默认true,即Spring 在创建 Bean 时不会尝试加载每个类的 BeanInfo 信息(每个Bean可以对应一个实现BeanInfo接口的信息扩展类)
- 创建应用上下文:如果是 web 环境,则创建注解上下文AnnotationConfigApplicationContext,如果是非 web 环境,则创建泛型上下文 GenericWebApplicationContext
- 准备上下文:给Spring容器注册Bean名生成器、启动参数等类,设置是否允许同名Bean、懒加载的配置参数,加载resources目录下配置文件
- 注册Bean名生成器、类型转换器:注册用于生成Bean名的Bean和类型转换的Bean。BeanNameGenerator(用于生成 Bean 的名称),ConversionService(用于类型转换)为Bean。
- 执行所有初始化方法:即所有实现了ApplicationContextInitializer 接口的类,执行他们的初始化方法。
- 注册启动参数为Bean:将main函数中的args参数封装成单例Bean,注册进Spring容器
- 加载resources:获取并加载resources目录下所有资源的Spring上下文
- 刷新上下文:调用Spring的refresh()方法,刷新上下文
- 初始化引导类所在包下所有Bean:扫描引导类所在包和子包下的Bean,基于类加载机制加载所有组件(如Spring Cloud)和第三方库(如Mybatis)
- 自动配置:@EnableAutoConfiguration注册了一个Selector类,查找classpath:/META-INF/spring.factories文件中的相关配置信息,找到第三方jar包里的配置类,实现自动配置
- 执行Task任务:引导类@EnableScheduling后,该注解注册了定时任务PostProcessor,和任务方法@Scheduled(cron ="xx")实现定时任务
- 实例化非懒加载的单例Bean:获取所有的bean,如果是单例且非懒加载的,就实例化
- 完成刷新、启动服务器:调用getLifecycleProcessor().onRefresh(),启动 Tomcat 或其他嵌入式服务器
- 执行刷新后钩子:留给用户扩展,目前afterRefresh()方法里面是空的。扩展方法是重写启动类,即SpringApplication子类重写这个方法
- 执行启动后任务:执行用户自定义的实现了 ApplicationRunner 接口或 CommandLineRunner 接口的类的run()方法。
1.3 启动类介绍
在每个SpringBoot项目中,都有个名为XxApplicantion的启动类。
- 这个类被@SpringBootApplication注解修饰,声明它是一个引导类;
- 这个类包含一个main方法,作为本项目的启动入口:
/**
 * @Author: vince
 * @CreateTime: 2024/11/26
 * @Description: 启动类:包含类注解@SpringBootApplication
 * @Version: 1.0
 */
@SpringBootApplication
public class DemoApplication {

    /**
     * main方法:SpringBoot项目的启动入口
     * @param args
     */
    public static void main(String[] args) {
        SpringApplication.run(DemoApplication.class, args);
    }

}
SpringBoot项目结构:

二、run():启动的核心方法
2.1 基本介绍
上面启动类DemoApplication只有一行代码,即将启动类的字节码文件作为参数,调用SpringApplication类的run()方法。

2.2 SpringApplication类:启动和初始化
SpringApplication是SpringBoot框架的核心类,用于启动并初始化整个SpringBoot项目。它主要有以下几个功能:
- 启动Spring项目:通过run()方法加载 ApplicationContext,通过close()关闭Spring容器,通过setRegisterShutdownHook()设置JVM销毁前的钩子函数。
- 管理监听器:通过addListeners()和getListeners()等方法,添加和获取事件监听器。
- 管理应用上下文:通过createApplicationContext()创建应用上下文、refreshContext()刷新上下文
- 设置属性:setDefaultProperties()设置默认属性(优先级低于application.yml)
/**
 * @Author: vince
 * @CreateTime: 2024/11/26
 * @Description: 启动类:用于从 Java 的 main 方法中引导和启动 Spring 应用程序。
 * 启动时,它会按以下步骤初始化应用程序:
 * 1.创建合适的 ApplicationContext 实例
 * 2.注册 CommandLinePropertySource:将命令行参数暴露为 Spring 属性,以供使用。
 * 3.刷新上下文:加载所有的单例 Bean。
 * 4.触发 CommandLineRunner:调用实现了 CommandLineRunner 接口的 Bean。
 * @Version: 1.0
 */
public class SpringApplication {

    /**
     * 启动并初始化SpringBoot程序
     * @param primarySource
     * @param args
     * @return {@link ConfigurableApplicationContext }
     */
    public static ConfigurableApplicationContext run(Class<?> primarySource, String... args) {
        return run(new Class<?>[] { primarySource }, args);
    }
    /**
     * 添加监听器
     * @param listeners the listeners to add
     */
    public void addListeners(ApplicationListener<?>... listeners) {
        this.listeners.addAll(Arrays.asList(listeners));
    }

    /**
     * 创建应用程序上下文
     * @return {@link ConfigurableApplicationContext }
     */
    protected ConfigurableApplicationContext createApplicationContext() {
        return this.applicationContextFactory.create(this.webApplicationType);
    }
    // ...
}
2.3 run()方法核心流程
核心流程:
- 初始化Headless和加载监听器:
- Headless模式:指缺少显示器、键盘或鼠标的服务器环境。开启后代表程序在Headless模式下也能运行
- 启动监听器: SpringBoot包中META-INF/spring.factories文件中的一批XxxApplicationListenner,包括清缓存、日志、文件编码等启动监听器
- 准备环境:
- 准备环境:
- 默认不跳过BeanInfo属性:spring.beaninfo.ignore默认true,即Spring 在创建 Bean 时不会尝试加载每个类的 BeanInfo 信息(每个Bean可以对应一个实现BeanInfo接口的信息扩展类)
- 打印启动图标:也就是启动项目时,日志打印的大大的“SpringBoot”图标。可以resources目录下添加 banner.txt替代启动图标。
- 创建应用上下文和启动时全局异常拦截器:
- 创建应用上下文:如果是 web 环境,则创建注解上下文AnnotationConfigApplicationContext,如果是非 web 环境,则创建泛型上下文 GenericWebApplicationContext
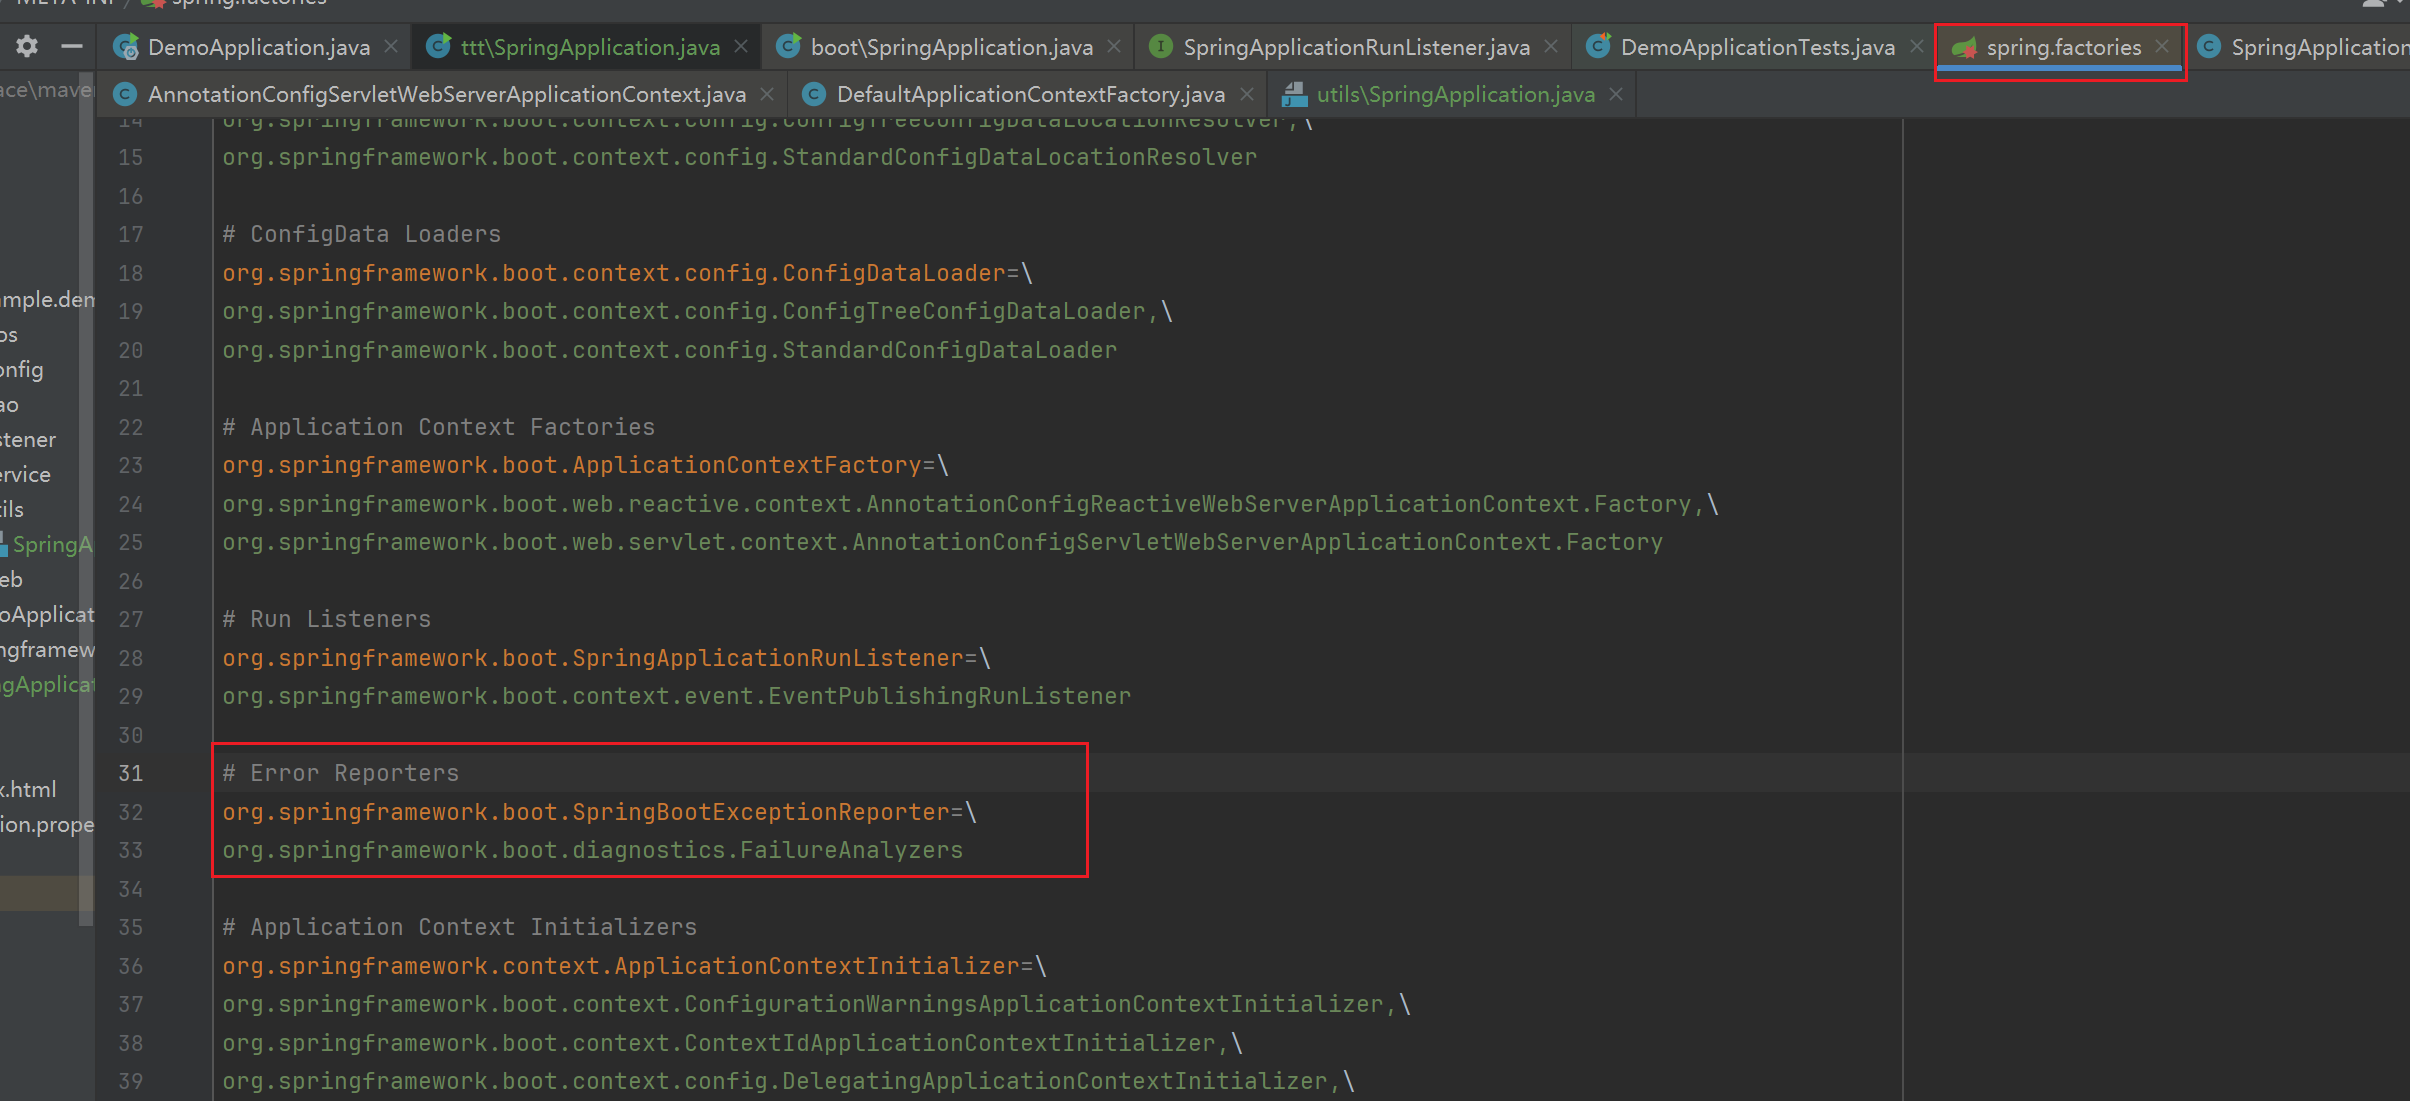
- 加载异常报告器:用于捕获启动过程中的全局异常(注意只会捕获启动过程的异常)。在spring.factories 文件里配置了默认的异常报告器
- 准备上下文:给Spring容器注册Bean名生成器、启动参数等类,设置是否允许同名Bean、懒加载的配置参数,加载resources目录下配置文件
- 设置环境变量:将之前“准备环境变量”的environment变量,赋值给AbstractApplicationContext的environment变量
- 上下文后置处理:注册用于生成Bean名的Bean和类型转换的Bean。BeanNameGenerator(用于生成 Bean 的名称),ConversionService(用于类型转换)为Bean。
- 执行所有初始化方法:即所有实现了ApplicationContextInitializer 接口的类,执行他们的初始化方法。
- 通知监听器,上下文已准备好
- 打印启动日志:如果日志开启了,则打印启动日志信息(包括应用名application.name、进程 ID (pid)、Java版本、上下文信息等)和profile信息(spring.profiles.active配置的profile信息,例如开发环境dev、测试环境test、生产环境prod)
- 注册启动参数为Bean:将main函数中的args参数封装成单例Bean,注册进Spring容器
- 设置Spring容器是否允许同名Bean:默认不允许,可以通过application.yml的spring.main.allow-bean-definition-overriding设置
- 校验懒加载:如果开启了懒加载,就给Spring上下文设置懒加载后置处理器(遍历Spring容器所有BeanDefinition,设置为lazyInit变量为true),这样所有Bean在getBean()的时候才开始加载Bean,而不是启动时实例化Bean
- 加载resources:获取并加载resources目录下所有资源的Spring上下文
- 通知监听器,上下午已经加载完毕
- 刷新上下文:调用spring容器的刷新方法(即applicationContext.refresh();),注册并初始化所有 Bean,并完成自动配置
- beanFactory 的创建和初始化:创建并给 beanFactory 设置类加载器、PostProcessor等
- beanFactory 的后置处理:执行所有PostProcessor。包括实现自动配置的ConfigurationClassPostProcessor类,专门解析@Configuration、@Import注解的类,它解析了@EnableAutoConfiguration、@EnableScheduling导入的类,实现自动配置、加载定时任务。以自动装配为例:
- 它解析了@EnableAutoConfiguration注解中导入的AutoConfigurationImportSelector类
- 该类查找classpath:/META-INF/spring.factories文件中的相关配置信息,找到第三方jar包里的配置类注册Bean,实现自动配置)。
- 自动配置:springboot会使用一些约定俗成的配置作为默认配置。例如自动扫描启动类所在包的bean、自动加载类路径下的配置类、自动装配starter依赖(例如redis默认端口6379,RabbitMQ客户端是5672服务端15672)
- 初始化消息源、事件派发器、子容器中的 bean
- 注册监听器
- 实例化所有非懒加载的单例Bean:获取所有的bean,如果是单例且非懒加载的,就实例化
- 完成刷新、启动服务器:调用getLifecycleProcessor().onRefresh(),启动 Tomcat 或其他嵌入式服务器
- 执行刷新后钩子:留给用户扩展,目前afterRefresh()方法里面是空的。扩展方法是重写启动类,即SpringApplication子类重写这个方法
- 执行启动后任务:执行用户自定义的实现了 ApplicationRunner 接口或 CommandLineRunner 接口的类的run()方法。
2.4 run()方法具体代码
org.springframework.boot.SpringApplication
    /**
     * 创建并运行一个 Spring 应用。
     * 核心流程包括以下步骤:
     * 1. 初始化配置和监听器。
     * 2. 准备应用环境(包括加载外部化配置)。
     * 3. 创建和配置应用上下文。
     * 4. 刷新上下文,启动应用。
     * 5. 执行 `ApplicationRunner` 和 `CommandLineRunner`。
     * 6. 触发相关事件,标志启动完成。
     *
     * @param args 命令行参数
     * @return {@link ConfigurableApplicationContext } 应用上下文实例
     */
    public ConfigurableApplicationContext run(String... args) {
        // 记录启动时间
        StopWatch stopWatch = new StopWatch();
        stopWatch.start();

        ConfigurableApplicationContext context = null;
        Collection<SpringBootExceptionReporter> exceptionReporters = new ArrayList<>();

        // 1. 初始化Headless和监听器。
        // 1.1 配置 Headless 属性:Headless模式指缺少显示器、键盘或鼠标的服务器环境。开启后代表程序在Headless模式下也能运行
        this.configureHeadlessProperty();

        // 1.2 加载所有初始化监听器
        SpringApplicationRunListeners listeners = this.getRunListeners(args);
        // 初始化监听器发布开启事件
        listeners.starting();

        try {
            // 封装命令行参数,如--server.port=9000
            ApplicationArguments applicationArguments = new DefaultApplicationArguments(args);

            // 2. 准备应用环境
            ConfigurableEnvironment environment = this.prepareEnvironment(listeners, applicationArguments);

            // 2.1 默认不跳过BeanInfo

            // 将 spring.beaninfo.ignore 的默认值设为true(如果yml没配置本参数的话)
            // spring.beaninfo.ignore属性:是否跳过加载BeanInfo 信息。该配置与性能优化有关,如果false即不跳过,Spring 在创建 Bean 时会尝试加载每个类的 BeanInfo 信息
            // BeanInfo 信息:通过实现BeanInfo 接口,可以为每个Bean创建一个BeanInfo类,用于描述该Bean的属性、事件和方法的元数据信息。
            this.configureIgnoreBeanInfo(environment);

            // 2.2 打印启动图标:就是我们启动SpringBoot项目时日志刷新的那个大大的“SpringBoot”图标
            // 如果想自定义启动图标:只需在resources目录下添加一个 banner.txt 的文件即可
            //   .   ____          _            __ _ _
            //  /\\ / ___'_ __ _ _(_)_ __  __ _ \ \ \ \
            // ( ( )\___ | '_ | '_| | '_ \/ _` | \ \ \ \
            //  \\/  ___)| |_)| | | | | || (_| |  ) ) ) )
            //   '  |____| .__|_| |_|_| |_\__, | / / / /
            //  =========|_|==============|___/=/_/_/_/
            //  :: Spring Boot ::               (v2.7.13)
            Banner printedBanner = this.printBanner(environment);

            // 3. 创建应用上下文和启动时全局异常拦截器
            // 如果是 web 环境,则创建注解上下文AnnotationConfigApplicationContext,如果是非 web 环境,则创建泛型上下文 GenericWebApplicationContext
            context = this.createApplicationContext();

            // 加载异常报告器:用于捕获启动过程中的全局异常(注意只会捕获启动过程的异常)。在spring.factories 文件里配置了默认的异常报告器
            exceptionReporters = this.getSpringFactoriesInstances(SpringBootExceptionReporter.class,
                    new Class[]{ConfigurableApplicationContext.class}, context);

            // 4. 准备上下文环境:
            // 给Spring容器注册Bean名生成器、启动参数等类,设置是否允许同名Bean、懒加载的配置参数,加载resources目录下配置文件
            this.prepareContext(context, environment, listeners, applicationArguments, printedBanner);

            // 5.刷新上下文
            // 刷新上下文:调用Spring上下文的refresh()方法刷新上下文,初始化所有Bean(包括所有@ComponentScan配置路径包下的Bean,引导类@SpringBootApplication内部@ComponentScan默认是引导类所在包)
            /*
            初始化所有Bean步骤:
                1.beanFactory 的创建和初始化:创建并给 beanFactory 设置类加载器、PostProcessor等
                2.beanFactory 的后置处理:执行所有PostProcessor(包括实现自动配置的ConfigurationClassPostProcessor类,专门解析@Configuration、@Import注解的类)
                    它解析了@EnableAutoConfiguration注解中导入的AutoConfigurationImportSelector类
                    该类查找classpath:/META-INF/spring.factories文件中的相关配置信息,找到第三方jar包里的配置类注册Bean,实现自动配置)。
                    自动配置:springboot会使用一些约定俗成的配置作为默认配置。例如自动扫描启动类所在包的bean、自动加载类路径下的配置类、自动装配starter依赖(例如redis默认端口6379,RabbitMQ客户端是5672服务端15672)
                3.初始化消息源、事件派发器、子容器中的 bean
                4.注册监听器
                5.实例化所有非懒加载的单例Bean:获取所有的bean,如果是单例且非懒加载的,就实例化
                6.完成刷新、启动服务器:调用getLifecycleProcessor().onRefresh(),启动 Tomcat 或其他嵌入式服务器
            */
            this.refreshContext(context);

            // 6.调用刷新后钩子:留给用户扩展使用,目前这个方法里面是空的
            this.afterRefresh(context, applicationArguments);

            // 打印启动耗时日志:我们可以看到启动完成后日志:Started DemoApplicationTests in 1.619 seconds (JVM running for 2.614)
            stopWatch.stop();
            if (this.logStartupInfo) {
                (new StartupInfoLogger(this.mainApplicationClass))
                        .logStarted(this.getApplicationLog(), stopWatch);
            }

            // 发布已开启事件给初始化监听器:告诉监听器,已经开启成功了
            listeners.started(context);

            // 7. 执行自定义run方法:执行用户自定义的实现了  CommandLineRunner 或ApplicationRunner 接口的类
            // 这两个接口实现类都只有一个run()方法,区别是CommandLineRunner的run()参数是String类型启动命令参数,ApplicationRunner的run()参数是ApplicationArguments封装的启动命令参数
            this.callRunners(context, applicationArguments);
        } catch (Throwable ex) {
            // 处理启动失败
            this.handleRunFailure(context, ex, exceptionReporters, listeners);
            throw new IllegalStateException(ex);
        }

        try {
            // 发布运行中事件给初始化监听器:如果用户自定义run方法运行成功,则代表启动已全部完成,触发 running 事件
            listeners.running(context);
            return context;
        } catch (Throwable ex) {
            this.handleRunFailure(context, ex, exceptionReporters, null);
            throw new IllegalStateException(ex);
        }
    }
三、关键步骤分析
3.1 配置Headless属性:configureHeadlessProperty()
run()方法调用了this.configureHeadlessProperty(),初始化Headless。

这个方法只有一行,即设置系统属性java.awt.headless,如果设置过则直接选用,如果未设置过则设置为本类的headless变量。
Headless模式:
Headless模式指缺少显示器、键盘或鼠标的服务器环境。开启后代表程序在Headless模式下也能运行。
设置全局系统属性:
- 方法一:System.setProperty()允许我们在运行时为Java虚拟机(JVM)或应用程序设置一些全局的系统属性
- 方法二:全局系统属性也可以通过JVM启动参数设置java -Djava.awt.headless=true -jar your-application.jar
核心流程:
- 设置headless属性:设置系统属性java.awt.headless,如果设置过则直接选用,如果未设置过则设置为本类的headless变量。
具体代码:
org.springframework.boot.SpringApplication
    /**
     * 配置Headless属性
     */
    private void configureHeadlessProperty() {
        // 设置系统属性java.awt.headless,如果设置过则直接选用,如果未设置过则设置为本类的headless变量。
        // Headless模式指缺少显示器、键盘或鼠标的服务器环境。开启后代表程序在Headless模式下也能运行(默认true)。
        // 全局系统属性:
        // 方法一:System.setProperty()允许我们在运行时为Java虚拟机(JVM)或应用程序设置一些全局的系统属性
        // 方法二:全局系统属性也可以通过JVM启动参数设置java -Djava.awt.headless=true -jar your-application.jar
        System.setProperty(SYSTEM_PROPERTY_JAVA_AWT_HEADLESS,
                System.getProperty(SYSTEM_PROPERTY_JAVA_AWT_HEADLESS, Boolean.toString(this.headless)));
    }
3.2 加载所有启动监听器:getRunListeners()
run()方法调用了this.getRunListeners(args);,获取所有监听器。

核心流程:
- 获取SpringApplication的class对象
- 获取所有启动监听器:获取spring.factories中所有启动监听器。
spring.factories:
在springboot包META-INF/spring.factories路径下,包含一些需要被注册Bean的类。
我们自己项目也可以通过在classpath:/META-INF/spring.factories文件中添加类全限定名的方式注册Bean,原理是SpringBoot的自动配置,@EnableAutoConfiguration查找classpath:/META-INF/spring.factories文件中的相关配置信息,找到第三方jar包里的配置类,实现自动配置


具体代码:
org.springframework.boot.SpringApplication
    /**
     * 加载启动监听器
     * @param args
     * @return {@link SpringApplicationRunListeners }
     */
    private SpringApplicationRunListeners getRunListeners(String[] args) {
        // 1.获取SpringApplication的class对象
        Class<?>[] types = new Class<?>[] { SpringApplication.class, String[].class };
        // 2.获取spring.factories中所有启动监听器
        return new SpringApplicationRunListeners(logger,
                getSpringFactoriesInstances(SpringApplicationRunListener.class, types, this, args),
                this.applicationStartup);
    }
3.3 准备环境:prepareEnvironment():
run()方法调用了prepareEnvironment(),准备应用环境。

核心流程:
- 获取或创建环境:环境environment包含所有外部化的配置(包括命令行参数、环境变量、配置文件等)
- 发布事件:发布环境已准备事件给启动监听器:告诉监听器,环境已准备好了
- 绑定spring.main.xx环境变量:绑定环境变量(application.yml或application.properties中的spring.main.xx配置)到Spring容器
- 转换标准环境:如果是非web环境,将环境转换成StandardEnvironment
- 配置PropertySources对它自己的递归依赖

具体代码:
    /**
     * 准备应用环境
     * @param listeners
     * @param bootstrapContext
     * @param applicationArguments
     * @return {@link ConfigurableEnvironment }
     */
    private ConfigurableEnvironment prepareEnvironment(SpringApplicationRunListeners listeners,
                                                       DefaultBootstrapContext bootstrapContext, ApplicationArguments applicationArguments) {
        // 1.获取或创建环境:环境environment包含所有外部化的配置(包括命令行参数、环境变量、配置文件等)
        ConfigurableEnvironment environment = getOrCreateEnvironment();
        // 2.配置环境:配置PropertySources和activeProfiles
        configureEnvironment(environment, applicationArguments.getSourceArgs());
        ConfigurationPropertySources.attach(environment);
        // 3.发布事件:发布环境已准备事件给启动监听器:告诉监听器,环境已准备好了
        listeners.environmentPrepared(bootstrapContext, environment);
        DefaultPropertiesPropertySource.moveToEnd(environment);
        Assert.state(!environment.containsProperty("spring.main.environment-prefix"),
                "Environment prefix cannot be set via properties.");
        // 4.绑定spring.main.xx环境变量:绑定环境变量(application.yml或application.properties中的spring.main.xx配置)到Spring容器
        bindToSpringApplication(environment);
        // 5.转换标准环境:如果是非web环境,将环境转换成StandardEnvironment
        if (!this.isCustomEnvironment) {
            EnvironmentConverter environmentConverter = new EnvironmentConverter(getClassLoader());
            environment = environmentConverter.convertEnvironmentIfNecessary(environment, deduceEnvironmentClass());
        }
        // 6.配置PropertySources对它自己的递归依赖
        ConfigurationPropertySources.attach(environment);
        return environment;
    }

    /**
     * 绑定环境变量(application.yml或application.properties中的spring.main.xx配置)到Spring容器
     * @param environment
     */
    protected void bindToSpringApplication(ConfigurableEnvironment environment) {
        try {
            // 绑定application.yml或application.properties中的spring.main.xx配置
            Binder.get(environment).bind("spring.main", Bindable.ofInstance(this));
        }
        catch (Exception ex) {
            // 如果绑定失败,则报错不合法的状态异常
            throw new IllegalStateException("Cannot bind to SpringApplication", ex);
        }
    }
3.4 创建应用上下文:createApplicationContext()
应用上下文核心流程:
- 如果是 web 环境,则创建注解上下文AnnotationConfigApplicationContext
- 如果是非 web 环境,则创建泛型上下文 GenericWebApplicationContext
具体代码:
org.springframework.boot.SpringApplication
    /**
     * 创建应用上下文:
     *  如果是 web 环境,则创建注解上下文AnnotationConfigApplicationContext
     *  如果是非 web 环境,则创建泛型上下文 GenericWebApplicationContext
     * @return 应用上下文(还未刷新)
     */
    protected ConfigurableApplicationContext createApplicationContext() {
        return this.applicationContextFactory.create(this.webApplicationType);
    }
AnnotationConfigServletWebServerApplicationContext
		public ConfigurableApplicationContext create(WebApplicationType webApplicationType) {
            /**
             * 创建应用上下文:
             *  如果是 web 环境,则创建注解上下文AnnotationConfigApplicationContext
             *  如果是非 web 环境,则创建泛型上下文 GenericWebApplicationContext
             */
			return (webApplicationType != WebApplicationType.SERVLET) ? null
					: new AnnotationConfigServletWebServerApplicationContext();
		}
3.5 启动时全局异常拦截器:getSpringFactoriesInstances()
3.5.1 基本介绍
加载异常报告器:用于捕获启动过程中的全局异常(注意只会捕获启动过程的异常)。在spring.factories 文件里配置了默认的异常报告器
具体代码:
            // 加载异常报告器:用于捕获启动过程中的全局异常(注意只会捕获启动过程的异常)。在spring.factories 文件里配置了默认的异常报告器
            exceptionReporters = this.getSpringFactoriesInstances(SpringBootExceptionReporter.class,
                    new Class[]{ConfigurableApplicationContext.class}, context);
3.5.2 扩展:获取Spring工厂实例: getSpringFactoriesInstances
上面加载异常报告器时,调用了 getSpringFactoriesInstances()方法,根据异常报告器的class对象获取SpringFactories实例。
核心流程:
- 获取类加载器
- 获取全限定名:获取指定类型 type 所有实现类的全限定类名。
- 创建工厂实例列表:将从 spring.factories 中加载到的类名,基于反射实例化为对象。
- 排序实例:调用List的sort方法,对实例集合排序。
- 返回实例
具体代码:
    /**
     * 获取工厂实例:根据参数类的class对象,获取多个spring.factories中配置的实例
     * @param type 待获取实例的类class对象
     * @param parameterTypes
     * @param args
     * @return {@link Collection }<{@link T }> 返回值是一个集合类型,代表是多个实例
     */
    private <T> Collection<T> getSpringFactoriesInstances(Class<T> type, Class<?>[] parameterTypes, Object... args) {
        // 1.获取类加载器
        ClassLoader classLoader = getClassLoader();
        // 2.获取全限定名:获取指定类型 type 所有实现类的全限定类名。
        Set<String> names = new LinkedHashSet<>(SpringFactoriesLoader.loadFactoryNames(type, classLoader));
        // 3.创建工厂实例列表:将从 spring.factories 中加载到的类名,基于反射实例化为对象。
        List<T> instances = createSpringFactoriesInstances(type, parameterTypes, classLoader, args, names);
        // 4.排序实例:调用List的sort方法,对实例集合排序。
        AnnotationAwareOrderComparator.sort(instances);
        // 返回实例集合
        return instances;
    }
3.6 准备上下文:prepareContext()
本方法主要功能是给Spring容器注册Bean名生成器、启动参数等类,设置是否允许同名Bean、懒加载的配置参数,加载resources目录下配置文件
核心流程:
- 设置环境变量:将之前“准备环境变量”的environment变量,赋值给AbstractApplicationContext的environment变量
- 上下文后置处理:注册用于生成Bean名的Bean和类型转换的Bean。BeanNameGenerator(用于生成 Bean 的名称),ConversionService(用于类型转换)为Bean。
- 执行所有初始化方法:即所有实现了ApplicationContextInitializer 接口的类,执行他们的初始化方法。
- 通知监听器,上下文已准备好
- 打印启动日志:如果日志开启了,则打印启动日志信息(包括应用名application.name、进程 ID (pid)、Java版本、上下文信息等)和profile信息(spring.profiles.active配置的profile信息,例如开发环境dev、测试环境test、生产环境prod)
- 注册启动参数为Bean:将main函数中的args参数封装成单例Bean,注册进Spring容器
- 设置Spring容器是否允许同名Bean:默认不允许,可以通过application.yml的spring.main.allow-bean-definition-overriding设置
- 校验懒加载:如果开启了懒加载,就给Spring上下文设置懒加载后置处理器(遍历Spring容器所有BeanDefinition,设置为lazyInit变量为true),这样所有Bean在getBean()的时候才开始加载Bean,而不是启动时实例化Bean
- 加载resources:获取并加载resources目录下所有资源导Spring上下文
- 通知监听器,上下午已经加载完毕
具体代码:
    /**
     * 准备上下文
     * 给Spring容器注册Bean名生成器、启动参数等类,设置是否允许同名Bean、懒加载的配置参数,加载resources目录下配置文件
     * @param context 应用上下文,代表 Spring 容器实例
     * @param environment 当前的环境对象,包含配置和属性
     * @param listeners 启动监听器,用于在不同生命周期阶段发送事件
     * @param applicationArguments 启动时传入的命令行参数
     * @param printedBanner 启动时打印的 Banner 对象
     */

    private void prepareContext(ConfigurableApplicationContext context, ConfigurableEnvironment environment,
                                SpringApplicationRunListeners listeners, ApplicationArguments applicationArguments, Banner printedBanner) {
        // 1.设置环境变量:将之前“准备环境变量”的environment变量,赋值给AbstractApplicationContext的environment变量
        context.setEnvironment(environment);
        // 2.上下文后置处理:注册用于生成Bean名的Bean和类型转换的Bean。BeanNameGenerator(用于生成 Bean 的名称),ConversionService(用于类型转换)为Bean。
        // 注册方法是通过Bean的核心工厂对象context.getBeanFactory()
        postProcessApplicationContext(context);
        // 3.执行所有初始化方法:即所有实现了ApplicationContextInitializer 接口的类,执行他们的初始化方法。
        applyInitializers(context);
        // 4.通知监听器,上下文已准备好
        listeners.contextPrepared(context);
        // 5.打印启动日志:如果日志开启了,则打印启动日志信息(包括应用名application.name、进程 ID (pid)、Java版本、上下文信息等)和profile信息(spring.profiles.active配置的profile信息,例如开发环境dev、测试环境test、生产环境prod)
        if (this.logStartupInfo) {
            // 打印启动信息,包括应用名application.name、进程 ID (pid)、Java版本、上下文信息等
            logStartupInfo(context.getParent() == null);
            // 打印profile信息:spring.profiles.active配置的profile信息,例如开发环境dev、测试环境test、生产环境prod
            logStartupProfileInfo(context);
        }
        // 获取beanFactory:获取beanFactory是Bean的核心工厂对象,用于注册Bean
        ConfigurableListableBeanFactory beanFactory = context.getBeanFactory();
        // 6.注册启动参数为Bean:将main函数中的args参数封装成单例Bean,注册进Spring容器
        beanFactory.registerSingleton("springApplicationArguments", applicationArguments);
        if (printedBanner != null) {
            // 将Banner注册为Bean:Banner是SpringBoot启动图标。如果想自定义启动图标:只需在resources目录下添加一个 banner.txt 的文件即可
            beanFactory.registerSingleton("springBootBanner", printedBanner);
        }
        // 7.设置Spring容器是否允许同名Bean:默认不允许,可以通过application.yml的spring.main.allow-bean-definition-overriding设置
        if (beanFactory instanceof DefaultListableBeanFactory) {
            // 设置不允许定义同名的BeanDefinition,重复注册时抛出异常
            ((DefaultListableBeanFactory) beanFactory)
                    .setAllowBeanDefinitionOverriding(this.allowBeanDefinitionOverriding);
        }
        // 8.校验懒加载:如果开启了懒加载,就给Spring上下文设置懒加载后置处理器(遍历Spring容器所有BeanDefinition,设置为lazyInit变量为true),这样所有Bean在getBean()的时候才开始加载Bean,而不是启动时实例化Bean
        // 懒加载可以通过yml中配置spring.main.lazy-initialization=true
        // 开启懒加载能减少项目启动时间,但是会略微影响启动后性能
        if (this.lazyInitialization) {
            context.addBeanFactoryPostProcessor(new LazyInitializationBeanFactoryPostProcessor());
        }
        // 9.加载resources:获取并加载resources目录下所有资源导Spring上下文
        Set<Object> sources = getAllSources();
        Assert.notEmpty(sources, "Sources must not be empty");
        load(context, sources.toArray(new Object[0]));
        // 10.通知监听器,上下午已经加载完毕
        listeners.contextLoaded(context);
    }
3.7 刷新上下文(初始化所有Bean、自动配置):refreshContext()
3.7.1 基本介绍
run()方法第五步调用了refreshContext(),对上面创建的应用上下文进行了刷新(通过Spring的refresh()方法)
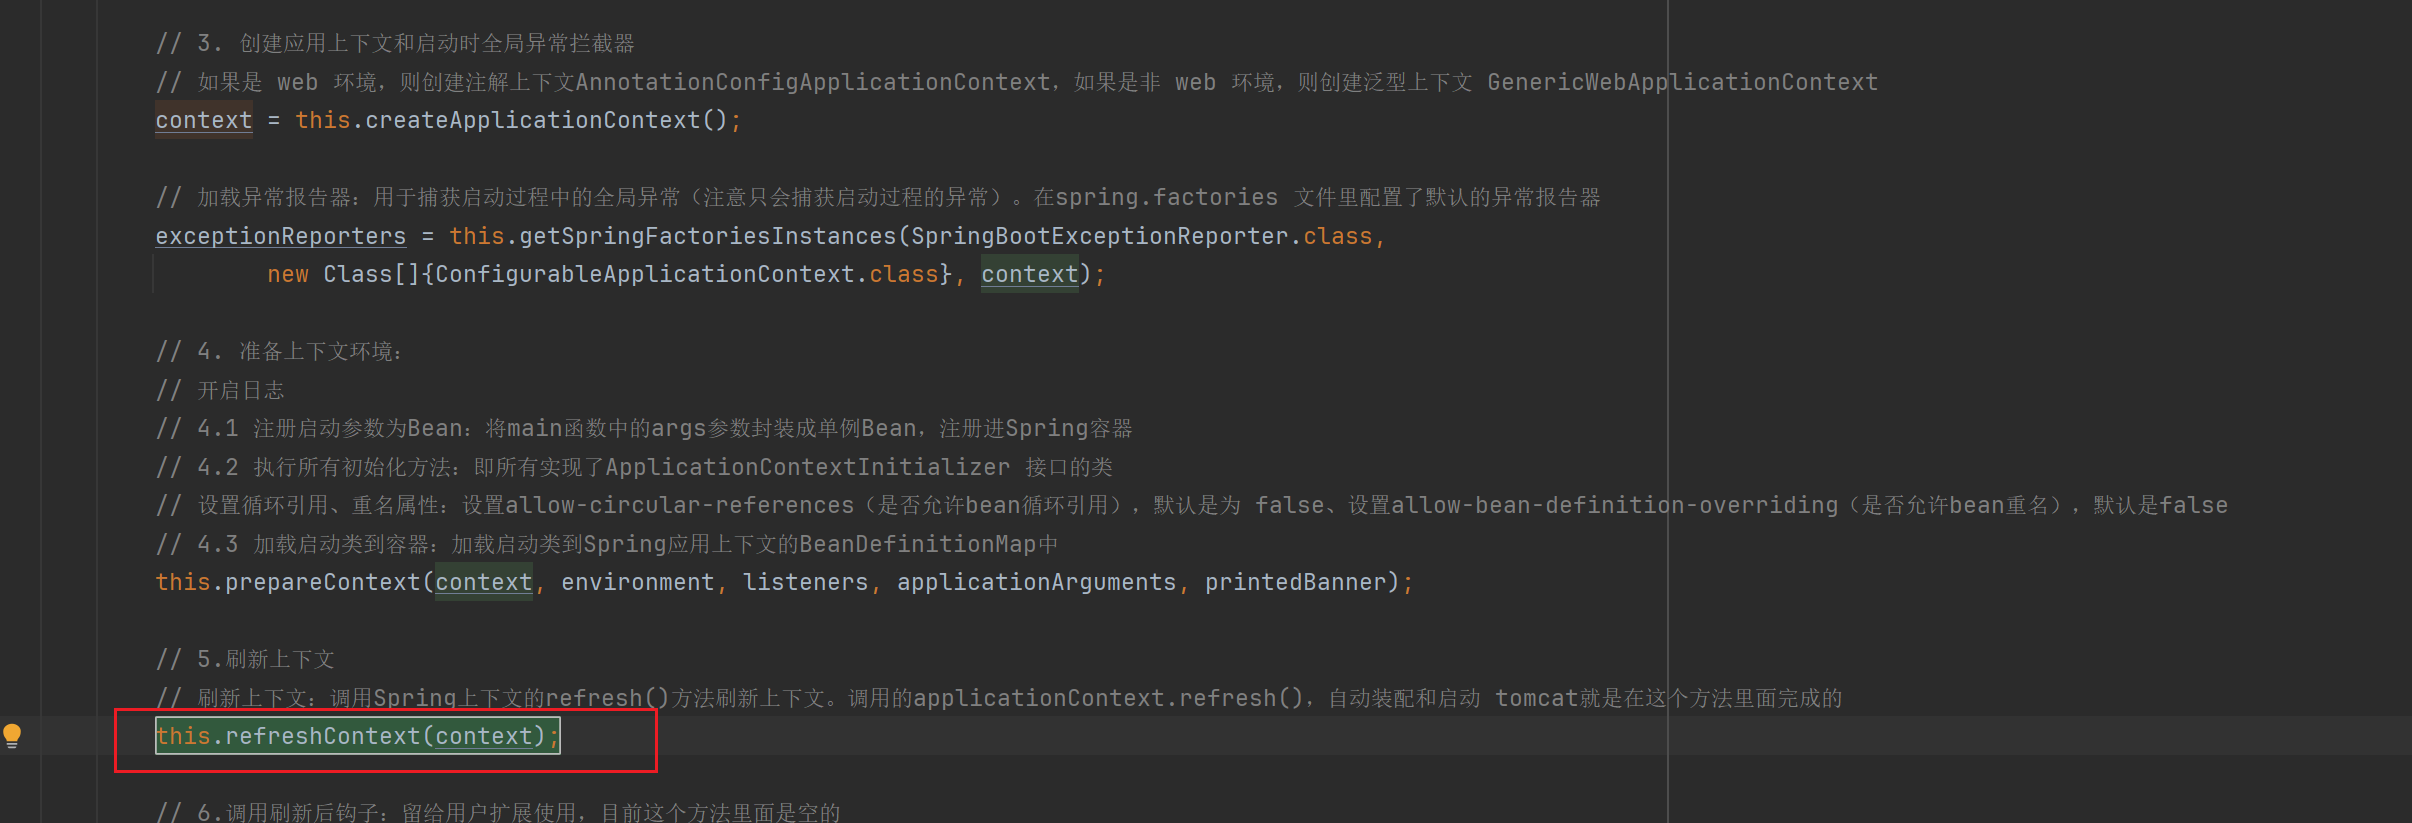
核心逻辑:
- 判断注册钩子函数:如果开启了registerShutdownHook参数,则注册JVM关闭钩子。
- 刷新上下文:调用spring容器的刷新方法,创建并初始化 Bean
- beanFactory 的创建和初始化:创建并给 beanFactory 设置类加载器、PostProcessor等
- beanFactory 的后置处理
- 初始化消息源、事件派发器、子容器中的 bean
- 注册监听器
- 实例化所有非懒加载的单例Bean:获取所有的bean,如果是单例且非懒加载的,就实例化
具体代码:
    /**
     * 调用Spring刷新上下文(初始化所有Bean )
     * @param applicationContext 待刷新的上下文
     */
    protected void refresh(ConfigurableApplicationContext applicationContext) {
        // 调用spring容器的刷新方法,刷新上下文(初始化所有Bean )
        /*
        初始化所有Bean步骤:
            1.beanFactory 的创建和初始化:创建并给 beanFactory 设置类加载器、PostProcessor等
            2.beanFactory 的后置处理:执行所有PostProcessor。包括实现自动配置的ConfigurationClassPostProcessor类,专门解析@Configuration、@Import注解的类
            它解析了@EnableAutoConfiguration、@EnableScheduling导入的类,实现自动配置、加载定时任务。
            以自动装配为例:
                a.它解析了@EnableAutoConfiguration注解中导入的AutoConfigurationImportSelector类
                b.该类查找classpath:/META-INF/spring.factories文件中的相关配置信息,找到第三方jar包里的配置类注册Bean,实现自动配置)。
                自动配置:springboot会使用一些约定俗成的配置作为默认配置。例如自动扫描启动类所在包的bean、自动加载类路径下的配置类、自动装配starter依赖(例如redis默认端口6379,RabbitMQ客户端是5672服务端15672)
            3.初始化消息源、事件派发器、子容器中的 bean
            4.注册监听器
            5.实例化所有非懒加载的单例Bean:获取所有的bean,如果是单例且非懒加载的,就实例化
            6.完成刷新、启动服务器:调用getLifecycleProcessor().onRefresh(),启动 Tomcat 或其他嵌入式服务器
        */
        applicationContext.refresh();
    }
3.7.2 refresh():创建并初始化 Bean、自动配置
上面refreshContext()最后以后调用了applicationContext.refresh();,这是Spring刷新上下文的方法。
这块内容在之前Spring源码中有详细讲过,此处不再赘述。
核心流程:
- beanFactory 的创建和初始化:创建并给 beanFactory 设置类加载器、PostProcessor等
- beanFactory 的后置处理:执行所有PostProcessor。包括实现自动配置的ConfigurationClassPostProcessor类,专门解析@Configuration、@Import注解的类,它解析了@EnableAutoConfiguration、@EnableScheduling导入的类,实现自动配置、加载定时任务。以自动装配为例:
- 它解析了@EnableAutoConfiguration注解中导入的AutoConfigurationImportSelector类
- 该类查找classpath:/META-INF/spring.factories文件中的相关配置信息,找到第三方jar包里的配置类注册Bean,实现自动配置)。
- 自动配置:springboot会使用一些约定俗成的配置作为默认配置。例如自动扫描启动类所在包的bean、自动加载类路径下的配置类、自动装配starter依赖(例如redis默认端口6379,RabbitMQ客户端是5672服务端15672)
- 初始化消息源、事件派发器、子容器中的 bean
- 注册监听器
- 实例化所有非懒加载的单例Bean:获取所有的bean,如果是单例且非懒加载的,就实例化。对应finishBeanFactoryInitialization
- 完成刷新、启动服务器:调用getLifecycleProcessor().onRefresh(),启动 Tomcat 或其他嵌入式服务器
Spring的refresh()方法详细解析:
Spring框架中Bean是如何加载的?从底层源码入手,详细解读Bean的创建流程_spring bean加载流程-CSDN博客

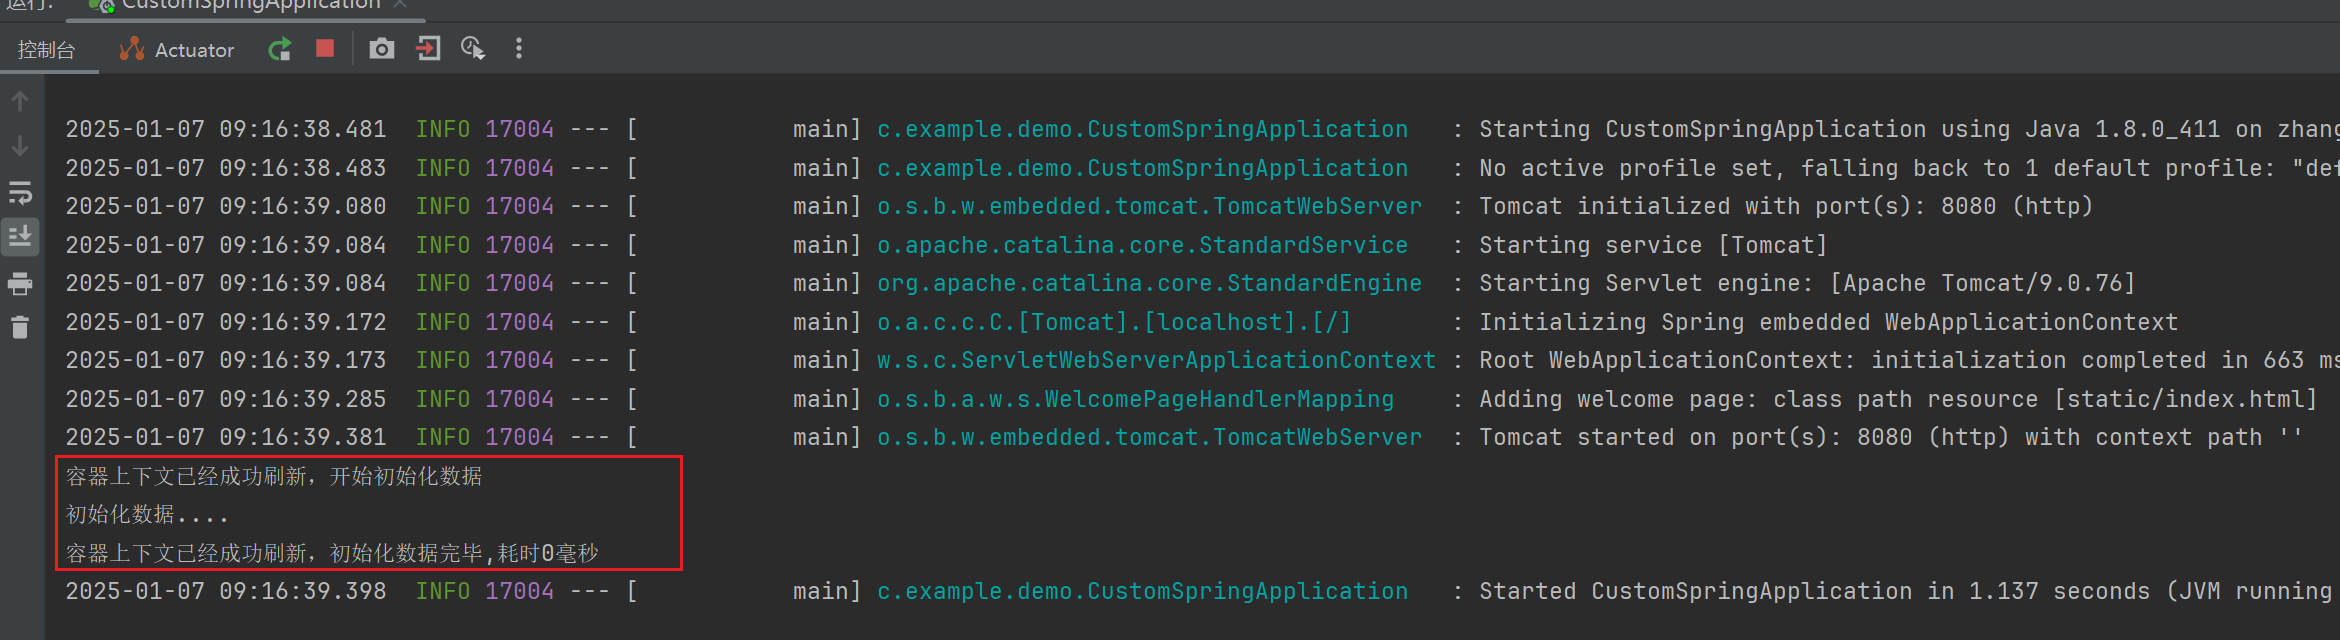
3.8 执行刷新后钩子:afterRefresh()
3.8.1 基本介绍
主方法run()第六步调用了afterRefresh()方法,用于在刷新后执行用户自定义方法:

这个方法内容是空的,需要用户自己在SpringApplication类的子类重写具体的逻辑:
    /**
     * 调用刷新后钩子:留给用户扩展使用,目前这个方法里面是空的
     * @param context 应用上下文
     * @param args 应用启动参数
     */
    protected void afterRefresh(ConfigurableApplicationContext context, ApplicationArguments args) {
    }
3.8.2 代码示例:刷新上下文后初始化数据
下面我们创建一个自定义的SpringApplication类,在刷新上下文后初始化数据:
/**
 * @Author: vince
 * @CreateTime: 2025/01/06
 * @Description: 自定义SpringBoot容器:在容器刷新上下文后初始化数据
 * @Version: 1.0
 */
@SpringBootApplication
public class CustomSpringApplication extends SpringApplication {


    public CustomSpringApplication(Class<?>... primarySources) {
        super(primarySources);
    }

    /**
     * 在容器刷新上下文后初始化数据
     * @param context
     * @param args
     */
    @Override
    protected void afterRefresh(ConfigurableApplicationContext context, ApplicationArguments args) {
        // 获取某个初始化服务 Bean,并调用其方法
        TestService testService=context.getBean(TestService.class);
        long start = System.currentTimeMillis();
        System.out.println("容器上下文已经成功刷新,开始初始化数据 " );
        testService.loadData();
        long end = System.currentTimeMillis();
        System.out.println("容器上下文已经成功刷新,初始化数据完毕,耗时" + (end - start) + "毫秒 ");
    }


    public static void main(String[] args) {
        SpringApplication application = new CustomSpringApplication(CustomSpringApplication.class);
        application.run(args);
    }
}

/**
 * @Author: vince
 * @CreateTime: 2024/10/23
 * @Description: 测试类
 * @Version: 1.0
 */
@Component("testService")
public class TestServiceImpl2 implements TestService {
    @Override
    public void loadData() {
        System.out.println("初始化数据....");
    }
} 
3.9 执行启动后任务:callRunners()
3.9.1 基本介绍
run()方法最后一步调用了callRunners()方法,用于执行所有启动后任务的run()方法

启动后任务:指所有实现了 ApplicationRunner 接口或 CommandLineRunner 接口的类
核心逻辑:
- 获取所有runner:获取 Spring 容器中所有 ApplicationRunner 和 CommandLineRunner 的实现类。
- 排序:使用 AnnotationAwareOrderComparator 对 Runner 按优先级排序(@Order注解由低到高)。
- 遍历调用run()方法:遍历去重后的 Runner 集合,依次调用其 run 方法。
具体代码:
    /**
     * 执行自定义run方法:执行用户自定义的实现了 ApplicationRunner 接口或 CommandLineRunner 接口的类
     * @param context Spring 应用上下文,用于获取 Runner 实例。
     * @param args    应用启动参数,传递给 Runner 的 run 方法。
     */
    private void callRunners(ApplicationContext context, ApplicationArguments args) {
        // 1. 获取所有runner:获取 Spring 容器中所有 ApplicationRunner 和 CommandLineRunner 实例。
        List<Object> runners = new ArrayList<>();
        runners.addAll(context.getBeansOfType(ApplicationRunner.class).values());
        runners.addAll(context.getBeansOfType(CommandLineRunner.class).values());
        // 2. 排序:使用 AnnotationAwareOrderComparator 对 Runner 按优先级排序。
        // 排序规则是@Order()从低到高排序(默认是Integer.MAX_VALUE,即2^31-1)
        AnnotationAwareOrderComparator.sort(runners);
        // 3. 遍历调用run()方法:遍历去重后的 Runner 集合,依次调用其 run 方法。
        for (Object runner : new LinkedHashSet<>(runners)) {
            if (runner instanceof ApplicationRunner) {
                callRunner((ApplicationRunner) runner, args);
            }
            if (runner instanceof CommandLineRunner) {
                callRunner((CommandLineRunner) runner, args);
            }
        }
    }
3.9.2 自定义启动后任务:ApplicationRunner 和 CommandLineRunner
这两种接口的实现类是同一个功能,用于在SpringBoot项目启动后,执行的run()方法。
两个类仅run()方法的参数类型不同。
run()方法的参数类型 :
- CommandLineRunner:原始的String命令行参数
- ApplicationRunner:由ApplicationArguments封装的命令后参数。
ApplicationArguments接口:封装了命令行参数。有以下常用方法:
- getSourceArgs():获取命令行参数数组
- getOptionNames():获取所有命令行参数name
- getOptionValues():根据name获取命令行参数
CommandLineRunner的参数是原始的String命令行参数:

ApplicationRunner参数是由ApplicationArguments封装的命令后参数:

3.9.3 代码示例:创建启动后任务
例如创建一个任务,在SpringBoot容器启动后执行:
/**
 * @Author: vince
 * @CreateTime: 2025/01/07
 * @Description: 自定义启动后任务
 * @Version: 1.0
 */
@Component
public class MyTaskScheduler implements ApplicationRunner {
    /**
     * 自定义任务
     * @param args 命令行参数
     */
    @Override
    public void run(ApplicationArguments args) {
        System.out.println("SpringBoot源码阅读,自定义启动后任务...");
    }
}
可以看到,Spring容器启动后,执行了这个任务:


有“AI”的1024 = 2048,欢迎大家加入2048 AI社区
更多推荐


 18
18 0
0- 0


 已为社区贡献42条内容

所有评论(0)