Day73.SpringMVC案例:影院系统、使用Restful风格重构
目录
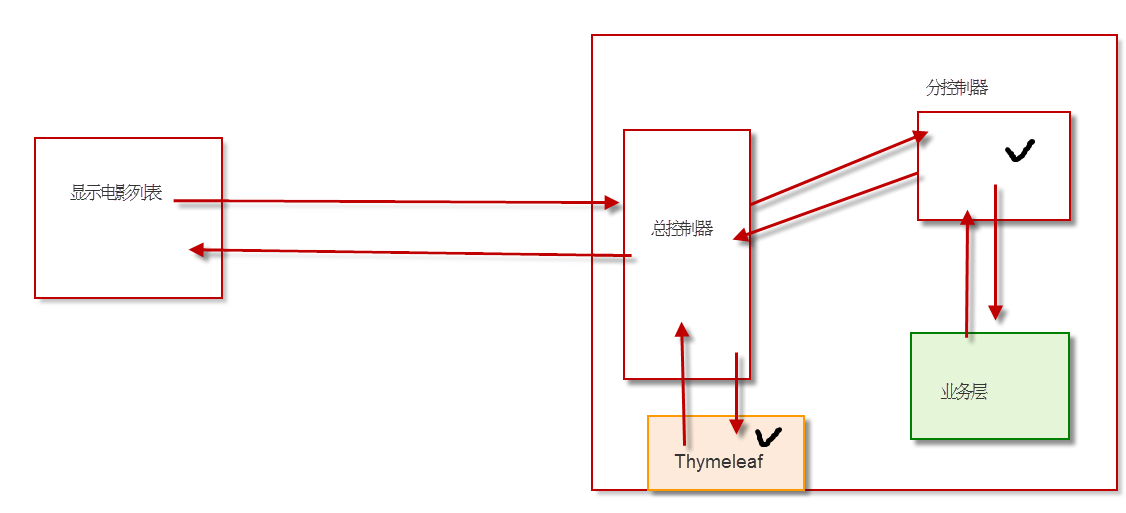
springMVC:影院系统
数据库怎么办?使用HashMap模拟。暂时不涉及和MyBatis、Spring的整合,重点就是SpringMVC的使用:先搭建SpringMVC的环境,通过页面、分控制器的操作来说功能。
一、准备SpringMVC环境
1、maven添加依赖
Servlet依赖、SpringMVC依赖、Spring和Thymeleaf的整合依赖、Lombok、日志Logback、Spring Test、Junit5
  <dependencies>
    <!-- ServletAPI -->
    <dependency>
      <groupId>javax.servlet</groupId>
      <artifactId>javax.servlet-api</artifactId>
      <version>3.1.0</version>
      <scope>provided</scope>
    </dependency>
    <!--SpringMVC-->
    <dependency>
      <groupId>org.springframework</groupId>
      <artifactId>spring-webmvc</artifactId>
      <version>5.3.1</version>
    </dependency>
    <!-- Spring5和Thymeleaf整合包 -->
    <dependency>
      <groupId>org.thymeleaf</groupId>
      <artifactId>thymeleaf-spring5</artifactId>
      <version>3.0.12.RELEASE</version>
    </dependency>
    <!--logback日志 -->
    <dependency>
      <groupId>ch.qos.logback</groupId>
      <artifactId>logback-classic</artifactId>
      <version>1.2.3</version>
    </dependency>
    <!--lombok日志-->
    <dependency>
      <groupId>org.projectlombok</groupId>
      <artifactId>lombok</artifactId>
      <version>1.18.12</version>
    </dependency>
    <!--SpringTest-->
    <dependency>
      <groupId>org.springframework</groupId>
      <artifactId>spring-test</artifactId>
      <version>5.3.1</version>
    </dependency>
    <!--Junit5-->
    <dependency>
      <groupId>org.junit.jupiter</groupId>
      <artifactId>junit-jupiter-api</artifactId>
      <version>5.7.0</version>
      <scope>test</scope>
    </dependency>
  </dependencies>
2、配置web.xml
SpringMVC总控制器、解决Post请求中文乱码问题
<?xml version="1.0" encoding="UTF-8"?>
<web-app xmlns="http://xmlns.jcp.org/xml/ns/javaee"
	xmlns:xsi="http://www.w3.org/2001/XMLSchema-instance"
	xsi:schemaLocation="http://xmlns.jcp.org/xml/ns/javaee http://xmlns.jcp.org/xml/ns/javaee/web-app_4_0.xsd"
	version="4.0">

	<!--中央控制器-->
	<servlet>
		<servlet-name>dispatcherServlet</servlet-name>
		<servlet-class>org.springframework.web.servlet.DispatcherServlet</servlet-class>
		<init-param>
			<!--配置文件-->
			<param-name>contextConfigLocation</param-name>
			<param-value>classpath:springmvc.xml</param-value>
		</init-param>
		<!--总控制器启动时机,注意必须写-->
		<load-on-startup>1</load-on-startup>
	</servlet>
	<!--Servlet映射路径-->
	<servlet-mapping>
		<servlet-name>dispatcherServlet</servlet-name>
		<url-pattern>/</url-pattern>
	</servlet-mapping>

	<!--解决乱码-->
	<filter>
		<filter-name>encodingFilter</filter-name>
		<filter-class>org.springframework.web.filter.CharacterEncodingFilter</filter-class>
		<init-param>
			<param-name>encoding</param-name>
			<param-value>utf-8</param-value>
		</init-param>
		<!--强制请求编码-->
		<init-param>
			<param-name>forceRequestEncoding</param-name>
			<param-value>true</param-value>
		</init-param>
		<!--强制响应编码-->
		<init-param>
			<param-name>forceResponseEncoding</param-name>
			<param-value>true</param-value>
		</init-param>
	</filter>
	<!--映射路径-->
	<filter-mapping>
		<filter-name>encodingFilter</filter-name>
		<url-pattern>/*</url-pattern>
	</filter-mapping>

</web-app>
3、配置 springmvc.xml
组件(@Controller @Service)扫描、Thymeleaf解析器、启用MVC注解驱动、 解决静态资源访问问题
<?xml version="1.0" encoding="UTF-8"?>
<beans xmlns="http://www.springframework.org/schema/beans"
       xmlns:xsi="http://www.w3.org/2001/XMLSchema-instance"
       xmlns:context="http://www.springframework.org/schema/context"
       xmlns:mvc="http://www.springframework.org/schema/mvc"
       xsi:schemaLocation="http://www.springframework.org/schema/beans
       http://www.springframework.org/schema/beans/spring-beans.xsd
       http://www.springframework.org/schema/context
       https://www.springframework.org/schema/context/spring-context.xsd
       http://www.springframework.org/schema/mvc
       https://www.springframework.org/schema/mvc/spring-mvc.xsd">

    <!-- 组件扫描-->
    <context:component-scan base-package="com.atguigu"></context:component-scan>
    <!-- 启用SpringMVC注解驱动-->
    <mvc:annotation-driven></mvc:annotation-driven>
    <!-- 让静态资源可以正常访问-->
    <mvc:default-servlet-handler></mvc:default-servlet-handler>
    <!--  配置视图控制器--><!--/,默认访问就是-->
    <mvc:view-controller path="/" view-name="portal"></mvc:view-controller>

    <!-- 配置Thymeleaf视图解析器-->
    <bean id="viewResolver" class="org.thymeleaf.spring5.view.ThymeleafViewResolver">
        <property name="order" value="1"/>
        <property name="characterEncoding" value="UTF-8"/>
        <property name="templateEngine">
            <bean class="org.thymeleaf.spring5.SpringTemplateEngine">
                <property name="templateResolver">
                    <bean class="org.thymeleaf.spring5.templateresolver.SpringResourceTemplateResolver">
                        <!-- 视图前缀 -->
                        <property name="prefix" value="/WEB-INF/templates/"/>
                        <!-- 视图后缀 -->
                        <property name="suffix" value=".html"/>
                        <property name="templateMode" value="HTML5"/>
                        <property name="characterEncoding" value="UTF-8" />
                    </bean>
                </property>
            </bean>
        </property>
    </bean>
</beans>
4、日志logback.xml
resources/logback.xml
<?xml version="1.0" encoding="UTF-8"?>
<configuration debug="true">
<!-- 指定日志输出的位置 -->
<appender name="STDOUT"
          class="ch.qos.logback.core.ConsoleAppender">
    <encoder>
        <!-- 日志输出的格式 -->
        <!-- 按照顺序分别是:时间、日志级别、线程名称、打印日志的类、日志主体内容、换行 -->
        <pattern>%d{HH:mm:ss.SSS} [%-5level] [%thread] <!--[%logger]--> [%msg]%n</pattern>
    </encoder>
</appender>

<!-- 设置全局日志级别。日志级别按顺序分别是:DEBUG、INFO、WARN、ERROR -->
<!-- 指定任何一个日志级别都只打印当前级别和后面级别的日志。 -->
<root level="INFO">
    <!-- 指定打印日志的appender,这里通过“STDOUT”引用了前面配置的appender -->
    <appender-ref ref="STDOUT" />
</root>

<!-- 根据特殊需求指定局部日志级别 -->
<logger name="org.springframework.web.servlet.DispatcherServlet" level="DEBUG" />
<logger name="com.atguigu.controller" level="DEBUG" />

</configuration>
5、创建目录结构
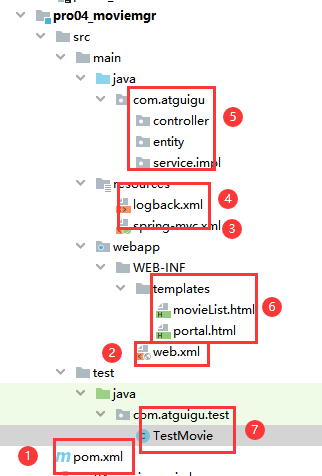
6、准备实体类
@Data
@AllArgsConstructor
@NoArgsConstructor
public class Movie {

    private String movieId;
    private String movieName;
    private Double moviePrice;
}
7、准备业务层接口和实现类代码(提供模拟数据)
public interface MovieService {
    List<Movie> getAll();
    Movie getMovieById(String movieId);
    void saveMovie(Movie movie);
    void updateMovie(Movie movie);
    void removeMovieById(String movieId);
}

@Service
public class MovieServiceImpl implements MovieService {
    private static Map<String , Movie> movieMap;
    static {
        movieMap = new HashMap<>();

        String movieId = null;
        Movie movie = null;

        movieId = "M001";
        movie = new Movie(movieId, "肖申克救赎", 10.0);
        movieMap.put(movieId, movie);
        movieId = "M002";
        movie = new Movie(movieId, "泰坦尼克号", 20.0);
        movieMap.put(movieId, movie);
        movieId = "M003";
        movie = new Movie(movieId, "审死官", 30.0);
        movieMap.put(movieId, movie);
        movieId = "M004";
        movie = new Movie(movieId, "大话西游之大圣娶亲", 40.0);
        movieMap.put(movieId, movie);
        movieId = "M005";
        movie = new Movie(movieId, "大话西游之仙履奇缘", 50.0);
        movieMap.put(movieId, movie);
        movieId = "M006";
        movie = new Movie(movieId, "功夫", 60.0);
        movieMap.put(movieId, movie);
        movieId = "M007";
        movie = new Movie(movieId, "大内密探凌凌漆", 70.0);
        movieMap.put(movieId, movie);
        movieId = "M008";
        movie = new Movie(movieId, "食神", 80.0);
        movieMap.put(movieId, movie);
        movieId = "M009";
        movie = new Movie(movieId, "西游降魔篇", 90.0);
        movieMap.put(movieId, movie);
        movieId = "M010";
        movie = new Movie(movieId, "西游伏妖篇", 11.0);
        movieMap.put(movieId, movie);
        movieId = "M011";
        movie = new Movie(movieId, "三傻大闹宝莱坞", 12.0);
        movieMap.put(movieId, movie);
        movieId = "M012";
        movie = new Movie(movieId, "唐人街探案", 13.0);
        movieMap.put(movieId, movie);
        movieId = "M013";
        movie = new Movie(movieId, "一个人的武林", 14.0);
        movieMap.put(movieId, movie);
        movieId = "M014";
        movie = new Movie(movieId, "罗马假日", 15.0);
        movieMap.put(movieId, movie);
        movieId = "M015";
        movie = new Movie(movieId, "花季雨季", 16.0);
        movieMap.put(movieId, movie);
        movieId = "M016";
        movie = new Movie(movieId, "夏洛特烦恼", 17.0);
        movieMap.put(movieId, movie);
    }
    @Override
    public List<Movie> getAll() {
        return new ArrayList<>(movieMap.values());
    }
    @Override
    public Movie getMovieById(String movieId) {
        return movieMap.get(movieId);
    }
    @Override
    public void saveMovie(Movie movie) {
        //String movieId = UUID.randomUUID().toString().replace("-", "");
        //movie.setMovieId(movieId);
        movieMap.put(movie.getMovieId(), movie);
    }
    @Override
    public void updateMovie(Movie movie) {
        String movieId = movie.getMovieId();
        movieMap.put(movieId, movie);
    }
    @Override
    public void removeMovieById(String movieId) {
        movieMap.remove(movieId);
    }
}
8、测试业务层代码
//JUint5
@SpringJUnitConfig(locations = "classpath:springmvc.xml")
//@ExtendWith(SpringExtension.class)
//@ContextConfiguration(locations = "classpath:springmvc.xml")
public class TestMovie {
    @Autowired
    private MovieService  movieService;
    @Test
    public void testGetAll(){
        List<Movie> movieList = movieService.getAll();
        movieList.forEach(movie -> System.out.println(movie));
    }
    @Test
    public void testGetMovieById(){
        Movie movie = movieService.getMovieById("M005");
        System.out.println(movie);
    }
    @Test
    public void testSaveMovie(){
        Movie movie = new Movie("M022","长津湖",67.0);
        movieService.saveMovie(movie);
        List<Movie> movieList = movieService.getAll();
        movieList.forEach(movie1 -> System.out.println(movie1));
    }
}
9、首页显示
springmvc.xml
<!-- 配置视图控制器-->
<mvc:view-controller path="/" view-name="portal"></mvc:view-controller>
<body>
<a th:href="@{/movie/getAll}">进入影院系统</a>
</body>二、首页显示所有电影
@Controller//控制层,声明分控制器
@Slf4j
@RequestMapping("/movie")
public class MovieController {
//自动匹配,业务逻辑层
@Autowired
private MovieService movieService;
@RequestMapping("/getAll")
public String getAll(Model model){
List<Movie> movieList = movieService.getAll();
model.addAttribute("movieList",movieList);
return "movieList";
}
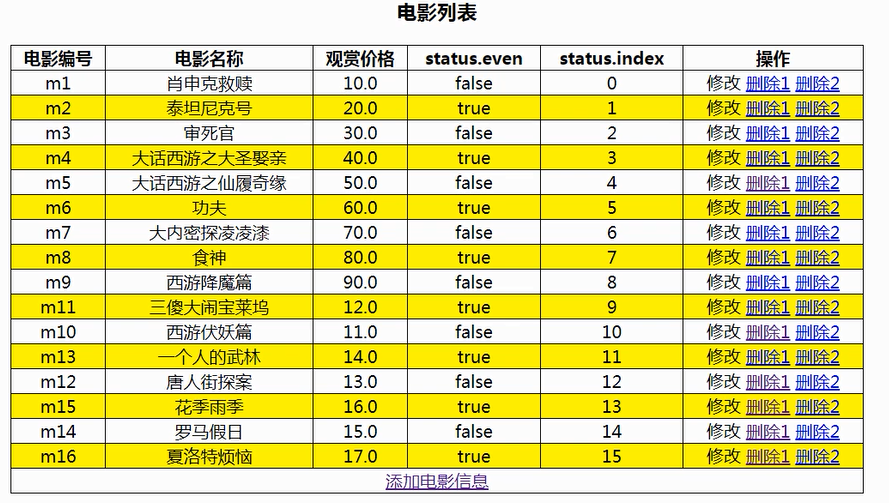
}<body>
<h3>电影列表</h3>
<table id="table1">
<tr>
<th>电影编号</th>
<th>电影名称</th>
<th>观赏价格</th>
<th>status.even</th>
<th>status.index</th>
<th>操作</th>
</tr>
<!--如果没有电影-->
<tbody th:if="${movieList==null or movieList.size==0}">
<tr>
<td colspan="11">一部电影也没有</td>
</tr>
</tbody>
<tbody th:if="${not #lists.isEmpty(movieList)}">
<tr th:each="movie,status:${movieList}" th:class="${status.even?'white':'beige'}"><!--status:风格-->
<td th:text="${movie.movieId}"></td>
<td th:text="${movie.movieName}"></td>
<td th:text="${movie.moviePrice}"></td>
<td th:text="${status.even}"></td>
<td th:text="${status.index}"></td>
<td>操作</td>
</tr>
</tbody>
</table>
</body> <!--风格-->
<style type="text/css">
h3{
text-align: center;
}
table#table1{
width: 60%;
margin: 10px auto;
border-collapse: collapse;
}
table#table1 th, td{
text-align: center;
border:1px solid black;
}
.white{
background-color: wheat;
background-color: beige;
}
</style>三、影院案例-删除指定电影信息
注意:return时,如果要跳转到分控制器的方法,而不是页面,必须要添加forward或者redirect
<td>
    <a th:href="@{/movie/getMovieById(movieId=${movie.movieId})}">修改</a>
    <a th:href="@{/movie/removeMovieById(movieId=${movie.movieId})}">只是删除</a>
    <a href="javascript:void(0)" th:onclick="confirmRemove([[${movie.movieId}]])">删除+确认</a>
</td>

<script type="text/javascript">
    function confirmRemove(movieId){
        var flag = window.confirm("您确认要删除该电影信息吗");
        if(flag){
            location.href="/day10moviemgr/movie/removeMovieById?movieId="+movieId
        }
    }
</script>
@RequestMapping("/removeMovieById")
public String removeMovieById(String movieId){
this.movieService.removeMovieById(movieId);
//return "movieList"; 不可以直接跳到movieList页面,没有经过查询没有数据
//return "getAll"; 不可以直接写getA,会当做一个页面
//return "forword:/movie/getAll"; //对于DML不建议这么来写,尤其是insert,导致表单重复提交
return "redirect:/movie/getAll";
}四、影院案例-添加新电影
跳转到添加页面、提交表单保存电影。
注意:如果使用请求转发,是跳转前的地址,会导致表单重复提交;重定向的地址,是跳转后的地址,不会导致表单重复提交
<td colspan="11">
    <a th:href="@{/movie/toAdd}">添加一部电影</a>
</td>
<!--视图控制器-->
<mvc:view-controller path="/movie/toAdd" view-name="movieAdd"></mvc:view-controller>movieAdd.html
<body>
<h1>添加电影信息</h1>
<form th:action="@{/movie/addMovie}" method="post">
电影编号:<input type="text" name="movieId"><br/>
电影名称:<input type="text" name="movieName" /><br/>
电影票价格:<input type="text" name="moviePrice" /><br/>
<button type="submit">保存</button>
</form>
</body> @RequestMapping("/addMovie")
public String addMovie(Movie movie){
this.movieService.saveMovie(movie);
return "redirect:/movie/getAll";
}五、影院案例-修改指定电影信息
通过查询,将数据回显到更新页面,更新提交表单,接收数据进行修改
<td>
    <a th:href="@{/movie/getMovieById(movieId=${movie.movieId})}">修改</a>
<td/>
@RequestMapping("/getMovieById")
public String getMovieById(String movieId,Model model){
Movie movie = this.movieService.getMovieById(movieId);
model.addAttribute("movie",movie);
return "movieUpdate";
}<h1>修改电影信息</h1>
<form th:action="@{/movie/updateMovie}" method="post">
电影编号:<input type="text" name="movieId" th:value="${movie.movieId}" readonly><br/>
电影名称:<input type="text" name="movieName" th:value="${movie.movieName}"/><br/>
电影票价格:<input type="text" name="moviePrice" th:value="${movie.moviePrice}"/><br/>
<button type="submit">保存</button>
</form> @RequestMapping("/updateMovie")
public String updateMovie(Movie movie){
this.movieService.updateMovie(movie);
return "redirect:/movie/getAll";
}六、总结
判断集合内容是否为空
|
<tbody th:if="${movieList==null or movieList.size==0}"> |
|
<tbody th:if="${not #lists.isEmpty(movieList)}"> |
如何遍历List
|
<tr th:each="movie,status:${movieList}" > |
实现隔行变色
|
.white{ |
|
<tr th:each="movie,status:${movieList}" th:class="${status.even?'white':'beige'}"> |
修改和删除的超链接,如何传递参数
|
<a th:href="@{/movie/getMovieById(movieId=${movie.movieId})}">修改</a> |
表单数据回显
|
<h3>修改电影信息</h3> |
分控制器
如何接收客户端的参数:传递基本参数和实体类
|
@RequestMapping("/removeMovieById") } |
|
@RequestMapping("/addMovie") } |
如何传递参数给下一个组件,多种方式,此处采用Model传递,底层将数据保存在request域。
|
@RequestMapping("/getAll") |
DML操作后如何跳转
- 不能直接跳转到页面来显示,应该先查询再显示
- 处理完后建议使用redirect而不是forward进行跳转,避免表单的重复提交。
|
@RequestMapping("/removeMovieById") |
七、Restful风格 重构影院系统 ★
一、路径清单
| 功能 | URL 地址 | 请求方式 |
|---|---|---|
| 访问首页√ | / | GET |
| 查询全部数据√ | /movie | GET |
| 删除√ | /movie/M001 | DELETE |
| 跳转到添加数据的表单√ | /movie/toAdd (伏笔) | GET |
| 执行保存√ | /movie | POST |
| 跳转到更新数据的表单√ | /movie/M001 (伏笔) | GET |
| 执行更新√ | /movie | PUT |
二、准备操作 (配置过滤器)
<!-- 配置将Post请求转换为put、delete请求的过滤器-->
<filter>
   <filter-name>hiddenHttpMethodFilter</filter-name>
   <filter-class>org.springframework.web.filter.HiddenHttpMethodFilter</filter-class>
</filter>
<filter-mapping>
   <filter-name>hiddenHttpMethodFilter</filter-name>
   <url-pattern>/*</url-pattern>
</filter-mapping>
三、访问首页
不需要修改
<mvc:view-controller path="/" view-name="portal"></mvc:view-controller>四、查询所有 (跳转影院页面)
<body>
    <a th:href="@{/movie}">进入电影信息列表</a>
</body>
@Controller
@RequestMapping("/movie")
public class MovieController {
@Autowired
private MovieService movieService;
//查询所有,将信息加入请求域
@GetMapping
public String getAll(Model model){
List<Movie> movieList = this.movieService.getAll();
model.addAttribute("movieList",movieList);
return "movieList";
}五、添加操作
1.跳转到添加页面,无需修改
<mvc:view-controller path="/movie/page/toAdd" view-name="movieAdd"></mvc:view-controller>2.添加操作
<h1>添加电影信息</h1>
<form th:action="@{/movie}" method="post">
    电影编号:<input type="text" name="movieId"><br/>
    电影名称:<input type="text" name="movieName" /><br/>
    电影票价格:<input type="text" name="moviePrice" /><br/>

    <button type="submit">保存</button>
</form>
//添加
@PostMapping//类上已经声明("/movie"),可以省略
public String addMovie(Movie movie){
this.movieService.saveMovie(movie);
return "redirect:/movie"; //注意此处跳转,已经发生改变。
//底层请求转发,请求转发默认为get请求
}六、修改操作 ★
1.查询指定的电影信息,回显到修改页面
<a th:href="@{|/movie/${movie.movieId}|}">修改1</a>
<a th:href="@{/movie/}+${movie.movieId}">修改2</a>
//前往更改页面
@GetMapping("/{movieId}")//获取形参,进行映射
public String getMovieById(@PathVariable("movieId")String movieId,Model model){
Movie movie = this.movieService.getMovieById(movieId);
model.addAttribute("movie",movie);
return "movieUpdate";
}2.修改电影信息
<h1>修改电影信息</h1>
<form th:action="@{/movie}" method="post">
    <!--复合请求-->
    <input type="hidden" name="_method" value="put">
    电影编号:<input type="text" name="movieId" th:value="${movie.movieId}" readonly><br/>
    电影名称:<input type="text" name="movieName" th:value="${movie.movieName}"/><br/>
    电影票价格:<input type="text" name="moviePrice" th:value="${movie.moviePrice}"/><br/>

    <button type="submit">保存</button>
</form>
//修改
@PutMapping
public String updateMovie(Movie movie){
this.movieService.updateMovie(movie);
return "redirect:/movie";
}七、删除操作 ★
需要使用vue,通过单击事件,在一个表单中进行请求类型转换
1.页面构建vue,点击事件绑定
//引入vue
    <!--<base th:href="@{/}">
    <script src="js/vue.js"></script>-->
    <script th:src="@{/js/vue.js}"></script>
<a th:href="@{|/movie/${movie.movieId}|}" @click.prevent="removeMovie">删除</a>
<a th:href="@{|/movie/${movie.movieId}|}" @click.prevent="confirmRemove">确认删除</a>2.临时表单 (重要)
将当前超链接的 href 属性赋值给表单的action属性,表单添加_method标签进行请求类型转换,然后在vue事件内进行提交。
<form id="form1" action="" method="post">
    <input type="hidden" name="_method" value="delete">
</form>
3.vue 代码
<script>
    new Vue({
        el:"#tbody1",
        data:{
        },
        methods:{
            removeMovie:function (){
                //获取当前事件源的href属性值
                var href = event.target.href;
                //将当前href的属性值赋值给表单form1的action
                document.getElementById("form1").action=href;
                //提交表单form1
                document.getElementById("form1").submit();

                //取消当前a标签默认行为链接跳转
                //event.preventDefault();
            },
            confirmRemove:function (movieId){
                var flag = window.confirm("您确认要删除该电影信息吗");
                if(flag){
                    //获取当前事件源的href属性值
                    var href = event.target.href;
                    //将当前href的属性值赋值给表单form1的action
                    document.getElementById("form1").action=href;
                    //提交表单form1
                    document.getElementById("form1").submit();

                    //取消当前a标签默认行为链接跳转
                    //event.preventDefault();
                }
            }
        }
    })
</script>
4. Controller控制层
    @DeleteMapping("/{movieId}")
    public String removeMovieById(@PathVariable("movieId")String movieId){
        movieService.removeMovieById(movieId);

        return "redirect:/movie";
    }
八、路径冲突问题、总结
点击“添加电影信息”,调用了分控制器的findById(),然后跳转到了修改页面。
原因:两个操作的请求路径相同,参数相同,请求类型都为Get。
SpringMVC会将toAdd理解为一个电影的编号()。
![]()
解决:增加层次
<!--  配置视图控制器-->
<mvc:view-controller path="/movie/page/toAddMovie" view-name="movieAdd"></mvc:view-controller>
<a th:href="@{/movie/page/toAddMovie}">添加电影</a> <!--解决冲突,添加层次-->
总结:使用Restful风格重构项目:
- 修改页面路径
- 修改分控制器的RequestMapping
- 使用@PathVariable指定对应关系
- 页面跳转到分控制器方法是注意路径。

有“AI”的1024 = 2048,欢迎大家加入2048 AI社区
更多推荐


 0
0 0
0- 0


 已为社区贡献2条内容

所有评论(0)