Mapbox 移除弹窗、监听弹窗打开、关闭事件、去除Mapbox的logo
mapbox 一些特殊用法
mapbox 在 vue 中使用
下载安装:
淘宝源:https://zhuanlan.zhihu.com/p/373461770
方法一:cdn 引用
在 html 页面中
<script src='https://api.tiles.mapbox.com/mapbox-gl-js/v1.1.1/mapbox-gl.js'></script>
<link href='https://api.tiles.mapbox.com/mapbox-gl-js/v1.1.1/mapbox-gl.css' rel='stylesheet' />
方法二:npm 下载安装
npm install --save mapbox-gl
使用 淘宝源下载:
npm install --save mapbox-gl --registry=https://registry.npm.taobao.org
在页面中使用
引入 mapbox import mapboxgl from "mapbox-gl";
引入 mapbox 样式文件 import "mapbox-gl/dist/mapbox-gl.css";
<template>
  <div id="map" class="map"></div>
</template>

<script>
import mapboxgl from "mapbox-gl";  //引入mapbox
import "mapbox-gl/dist/mapbox-gl.css"; //引入 mapbox 的样式文件

export default {
  name: "mapbox",
  data() {
    return {
      msg: "Welcome to MapBox~",
    };
  },
  mounted() {
    mapboxgl.accessToken ="pk.***......";    //你的accessToken
    var map = new mapboxgl.Map({
      container: "map",   //地图容器的id
      center: [113.2, 23.4], //中心点
      zoom:6.5,              //地图初始化时的层级
      style:"mapbox://styles/mapbox/navigation-preview-night-v2" ,   //底图样式
    });
  },
};
</script>
<style>
.map{
  width: 100px;
  height: 100px;
}
</style>
注意:(1)初始化地图的代码要写在 mounted 中,不可以写在 created 里(2)使用 marker 方式添加标记点,必须要在页面中要引入 mapbox 的样式文件,否则在页面上无法看到该标记点。(mapbox本身的相对定位有偏差)
例如:代码:
var el = document.createElement("div");
el.className = "marker";
el.style.width = "20px";
el.style.height = "20px";
el.style.background = "red";
console.log('elelele', el) //打印dom元素

new mapboxgl.Marker(el).setLngLat([113.085821, 23.096021]).addTo(that.mapInst);
未引入 mapbox 样式文件
引入 mapbox 样式文件: import "mapbox-gl/dist/mapbox-gl.css"
mapbox 特殊功能
一、移除弹窗
官方玩当中给出示例是
var popup = new mapboxgl.Popup().addTo(map);
popup.remove();
注意:
若需要全局定义 popup,vue项目中,在 export default 的 data 中定义 popup,赋值后会使地图出现黑色区域,但是在 export default 之外,<script> 中定义后赋值的话是正常的。
<script>
var areaPopup;  //全局定义弹窗(在data中定义弹窗,会出现黑色区域)
export default {
  data(){
  	return{}
  },
  methods:{
  	drawArea() {
  		areaPopup = new mapboxgl.Popup({ closeButton: false })
          .setLngLat(latLongData)
          .setDOMContent(vm.$el)
          .addTo(that.map);
  	},
  	//移除弹窗
  	removePopup(){
  	  //移除地图弹窗
      if (areaPopup) {
        areaPopup.remove();
      }
  	}
  }

}
</script>
二、监听弹窗打开、关闭事件:官网地址
var popup = new mapboxgl.Popup({
  closeButton: true,
  closeOnClick: true,
})
popup.on('close', function(e) {
    alert('监听弹窗关闭')
})
popup.on('open', function(e) {
    alert('监听弹窗打开')
})

//点击出现弹窗
map.on('click', 'state', function(e){
  popup
      .setLngLat([Number(e.lngLat.lng), Number(e.lngLat.lat)])
      .setHTML(
        ` <div class="hover-popup" >
            <div style="font-size:14px; color:#333">
              <div style="margin-top:5px"><span style="color:#999;">信息:</span><span>35个</span></div>
              <div style="margin-top:5px"><span style="color:#999;">信息:</span><span>1个</span></div>
            </div>
          </div>
        `
      )
      .addTo(map)
})
三、去除mapbox地图左下角的logo
.mapboxgl-ctrl {
  display: none !important;
}
四、更新数据源、更新图层、更改地图样式
更新数据源:改变要素数据: map.getSource('some id').setData(..)
官网API:http://www.mapbox.cn/mapbox-gl-js/api/#map#getsource
更新图层:语法 :map.setPaintProperty('my-layer', 'fill-color', '#faafee');
官网API:http://www.mapbox.cn/mapbox-gl-js/api/#map#setpaintproperty
语法: map.setStyle('mapbox://styles/mapbox/' + layerId)
官网API:http://www.mapbox.cn/mapbox-gl-js/api/#map#setstyle
五、地图回调事件
 initMap(){
      mapboxgl.accessToken =
        "pk.eyJ1IjoxxxxxxxxxxxxxxxxxxxxxxxNW6Ta_AQ";

      this.mapInst = new mapboxgl.Map({
        container: this.$refs.basicMapbox, //地图容器 id
        style: `${baseServiceHost}/vector-styles/mapbox/Blue.json`,
        center: [113.47, 22.75], // 地图初始化时的地理中心点
        zoom: 5.6, //初始缩放比
        bearing: 0,
        pitch: 0,
        optimizeForTerrain: true,
        trackResize: false,
        antialias: true,
      });
      // 地图回调事件
      this.mapInst.on("load", (e) => {
        //console.log("地图加载完成", e);
      });
      this.mapInst.on("styledata", (e) => {
        // 发现切换底图之后, 原有点位就会丢失,重新添加回来
        //console.log('更换底图后,样式加载成功' )
      });
      this.mapInst.on("error", (data) => {
        // console.log("地图error回调触发:", data);
      });
      this.mapInst.on("zoomend",()=>{
        let currentZoom = this.mapInst.getZoom()
        // console.log("缩放层级 ", currentZoom);
      })
}
六、mapbox结合three实现添加3D模型并执行点击事件
七、mapbox两个图层叠加,点击重合部分都触发事件解决方案
大概我们的 layer 两个图层是这样重合的,当你点击的时候你会发现,两个 layer 的 popup 都进行了触发:
mapbox:点击标记点时,点击了两个图层
我们所需要的就是如果重合,上面的图层才能触发 popup 下面的不会弹框
首先我们理出我们打印顺序,我们必须将上层的打印触发事件写在上面:

(这里我们上层显示的是 spot-layer )
在上层的 spot-layer 中写入:
e.preventDefault()
阻止默认事件
在下面的 project-layer 中我们可以打印他的 e ,可以看到 _defaultPrevented: false,在project-layer 中写入
if(e.defaultPrevented)return;
这样我们点击重合部分只有上层 layer 会出现弹框,同时没有重合的时候,点击下面部分也不会有影响。
--------------------------- 另外 --------------------------
再复杂一点,点击上面不触发下层,点击下层不触发上层事件,可以结合 queryRenderedFeatures 判断
map.on("click", (e) => {
          var features = map.queryRenderedFeatures(e.point, {
            layers: ["maplayer"],
          });
 });
 //features数组length判断
八、mapbox实现轨迹线—管道流效果
参考:https://blog.csdn.net/biubiubiuPlus/article/details/113540563
九、mapbox 表达式
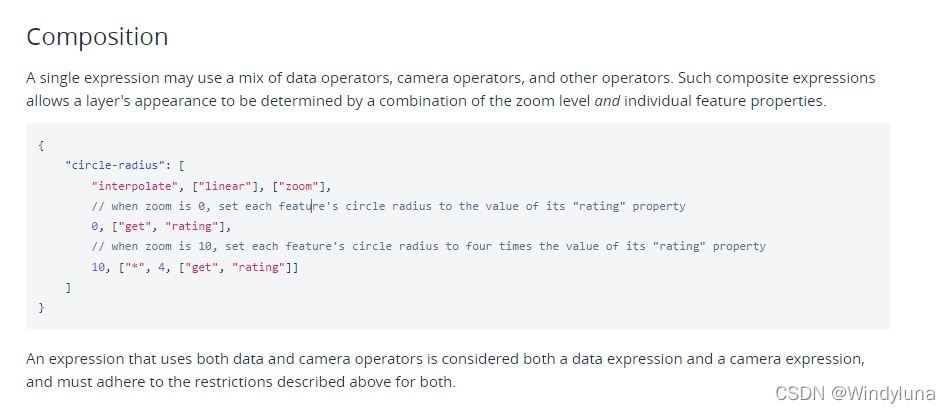
基础表达式:https://www.cnblogs.com/zhangycun/p/15344267.html
表达式参考:https://juejin.cn/post/6907068992607928328
注意:
- get 语法获取 value, 值是 Number 或 String 类型,不可以是 Array 类型
十、mapbox在标签下添加新图层
参考1:https://www.freesion.com/article/71171464405/
参考2:https://blog.csdn.net/weixin_43175246/article/details/120152787
十一、turf 官网 和 geoJson数据生成工具
turf 官网:https://turfjs.fenxianglu.cn/
geoJson 生成工具:https://datav.aliyun.com/portal/school/atlas/area_selector
十二、调整图层的顺序:
1、调整代码的执行顺序,先执行的,图层在下面。
2、使用 beforeId (当前图层它上面的图层 id)参数。
描述:在mapbox中 移动图层层级 例如让标点置于最上方
- 方法一:使用beforeId,在创建图层的时候控制图层的层级
initLayer(options, beforeId) {
    this.map.addLayer(
        {
            id: options.id,
            type: options.type,
            source: options.source,
            layout: options.layout,
            paint: options.paint,
        },
        beforeId,
    )
},
只要将需要在上方的图层ID传入 beforeId 即可
this.initLayer(
    {
        id: 'areaMapFill',
        type: 'fill',
        source: 'areaSource',
        layout: {},
        paint: {
            'fill-color': '#0599B1',
            'fill-opacity': ['case', ['boolean', ['feature-state', 'hover'], false], 0.5, 0.2],
        },
    },
    'markerPoint',
)
- 方法二:移动图层,效果相同
if (_this.map.getLayer('markerPoint') && _this.map.getLayer('areaMapFill')) {
    _this.map.moveLayer('areaMapFill', 'markerPoint')
    _this.map.moveLayer('areaMapLine', 'markerPoint')
}
十三、单机标记点marker,添加点击事件:
标记是简单的HTML元素,因此您可以通过在DOM节点上调用 addEventListener 直接向它们添加事件监听器:
map.on('click', function(e){
  var el = document.createElement('div');
  el.className = 'marker';
  el.style.height = '20px';
  el.style.width = '20px';
  el.style.backgroundColor = 'black';

  el.addEventListener('click', function(e){
    // Prevent the `map.on('click')` to also be triggered
    e.stopPropagation();
    console.log('hello');
  });

  let marker = new mapboxgl.Marker(el).setLngLat(e.lngLat).addTo(map);
});
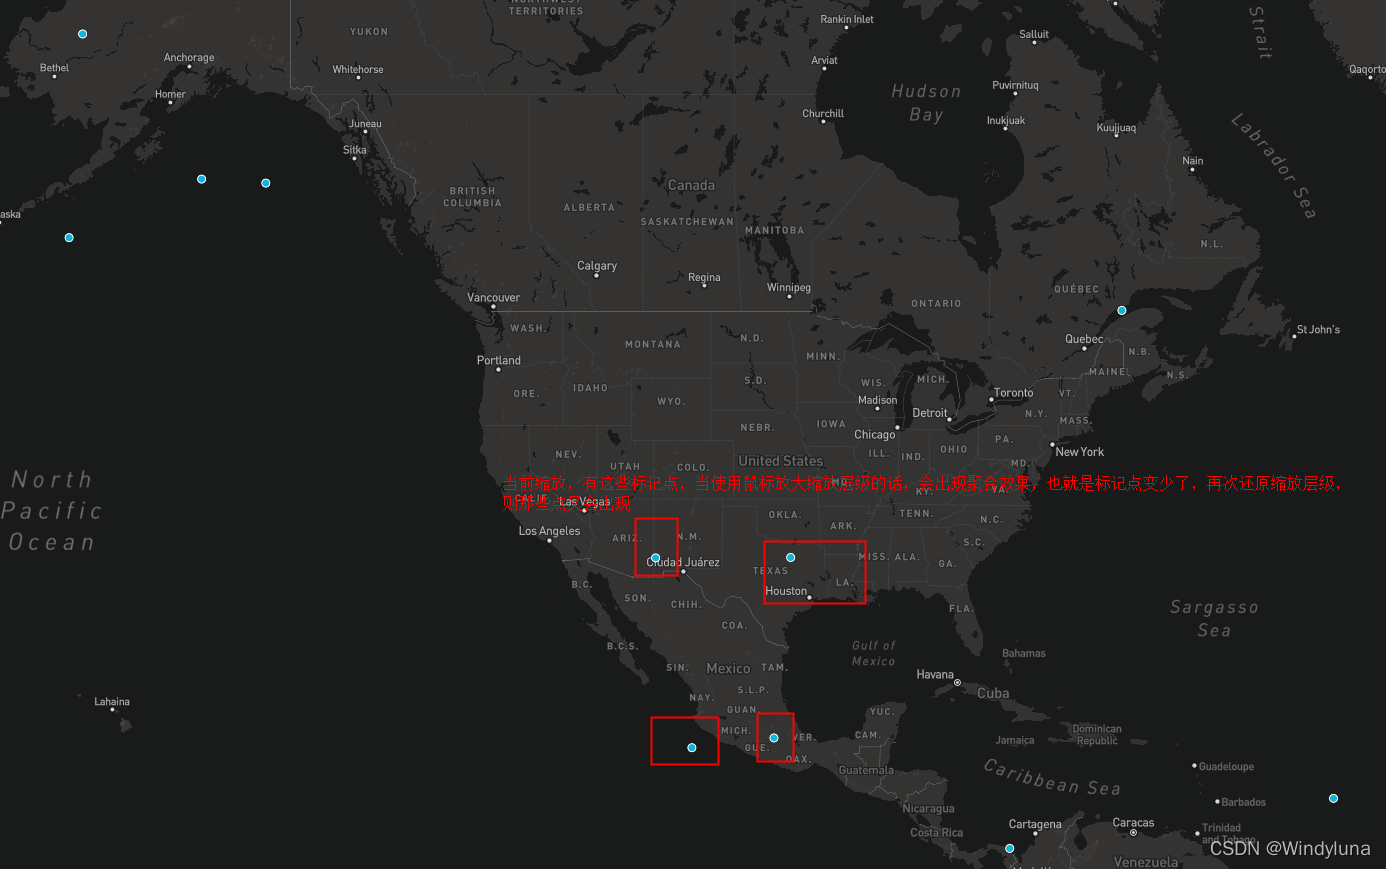
十四、添加样式聚类
功能说明:当前地图处于缩放层级 6.8,出现了这些蓝色标记点,当使用鼠标放大层级后,这些标记点的数量会变少,当缩放层级恢复到6.8,则所有的标记点会出现
类型一:标记点类型是圆点
在添加源里添加 cluster: true, 属性
this.mapInst.addSource('sourceName', {
  type: "geojson",
  data: geoJsonData,
  cluster: true, // 开启聚合效果
});
this.mapInst.on("load", function() {
  this.mapInst.addSource("earthquakes", {
    type: "geojson",
    data:
      "https://docs.mapbox.com/mapbox-gl-js/assets/earthquakes.geojson",
    cluster: true, //开启聚合效果
  });

  this.mapInst.addLayer({
    id: "unclustered-point",
    type: "circle",
    source: "earthquakes",
    filter: ["!", ["has", "point_count"]],
    paint: {
      "circle-color": "#11b4da",
      "circle-radius": 4,
      "circle-stroke-width": 1,
      "circle-stroke-color": "#fff"
    }
  });
});
类型二:标记点是图片
在 layout 里添加 "icon-allow-overlap": false, 属性
data里定义图片资源:
imagedata:[
	{
	  name: "gk1",
	  url: "./static/images/map/i_g.png",
	},
	{
	  name: "gk2",
	  url: "./static/images/map/iii_g.png",
	},
	{
	  name: "gk3",
	  url: "./static/images/map/iv_g.png",
	},
	{
	  name: "gk4",
	  url: "./static/images/map/v_g.png",
	},
]
初始化加载地图后,
this.mapInst.on("load", (e) => {
	// 加载图片进地图
	addImageInMap(imagedata) {
	  let that = this;
	  imagedata.forEach((item) => {
	    that.mapInst.loadImage(item.url, function (error, image) {
	      if (error) throw error;
	      // 检查同名的图片资源是否已存在
	      if (!that.mapInst.hasImage(item.name)) {
	        that.mapInst.addImage(item.name, image);
	      }
	    });
	  });
	},
})
添加源和图层
this.mapInst.addSource("imgSourceId", {
  type: "geojson",
  data: geoJsonData,
});

this.mapInst.addLayer({
  id: "imgLayerId",
  type: "symbol",
  source: "imgSourceId",
  layout: {
    "icon-image": [
      "match",
      ["get", "status"],
      0,
      "gk1",
      3,
      "gk2",
      4,
      "gk3",
      5,
      "gk4",
      6,
      "gk5",
      "gkn",
    ],
    "icon-size": 0.7,
    "icon-allow-overlap": false, //聚合效果(false开启、true关闭)
    visibility: "visible", // visible显示 none隐藏
  },
  filter: ["all", ["in", ["get", 'status'], 0, 3, 4, 5, 6, null]],
});
类型三:标记点是圆形
this.mapInst.addSource("earthquakes", {
  type: "geojson",
  data:
    "https://docs.mapbox.com/mapbox-gl-js/assets/earthquakes.geojson",
  cluster: true,
  clusterMaxZoom: 14
});
// 圆点图层
this.mapInst.addLayer({
  id: "clusters",
  type: "circle",
  source: "earthquakes",
  paint: {
    "circle-color": "#51bbd6",
    "circle-radius": 20
  }
});
类型四:文字图层
// 文字图层
this.mapInst.addLayer({
  id: "cluster-count",
  type: "symbol",
  source: "earthquakes",
  layout: {
    "text-field": "这是当前点位的名称", //可写死,也可根据表达式获取
    "text-font": ["DIN Offc Pro Medium", "Arial Unicode MS Bold"],
    "text-size": 12
  }
});
十四、鼠标的样式:箭头、小手等
this.canvas.style.cursor = “grabbing”;
十五、mapbox 常用功能:
https://blog.csdn.net/sinat_39366519/article/details/123262320
十六、mapbox 标记点 marker 方式聚合效果
参考:https://blog.csdn.net/j_bleach/article/details/103145507
其他
1、mapbox 方法总结:https://blog.csdn.net/dyt_1314/article/details/82998652
2、常用功能 改变地图颜色、数据源配置、图层配置:
https://blog.csdn.net/sinat_39366519/article/details/123262320

有“AI”的1024 = 2048,欢迎大家加入2048 AI社区
更多推荐

 7
7 0
0- 0


 已为社区贡献4条内容

所有评论(0)