SpringBoot面试总结
其实就是对以前文章的一个总结,单独再写一篇文章的原因是,自己对某些知识点有了一些理解,但最重要的一点是AI总结的比自己整理的简直是好太多了。
IOC
IoC(控制反转) 是一种设计思想:将对象的创建、组装和依赖关系的管理权,从代码中反转给Spring容器。你的代码不再主动 new 对象,而是由容器来创建并注入。
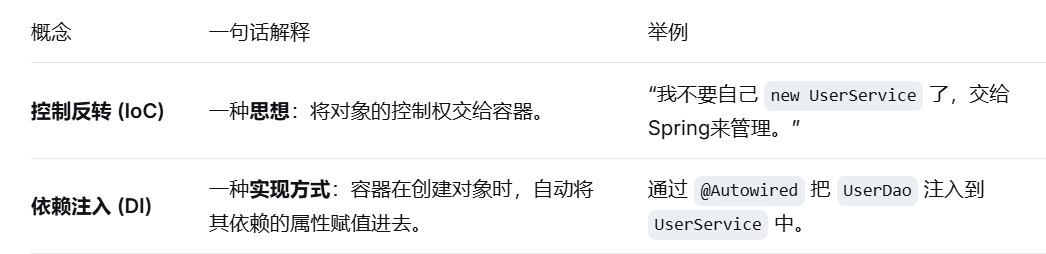
IoC容器主要管理什么(面试常问)
-
Bean的实例化:容器负责创建对象(默认是单例)。
-
Bean的依赖装配:容器负责将Bean所依赖的其他Bean注入进去(通过构造器、Setter或字段)。
-
Bean的生命周期管理:容器负责管理Bean的初始化、销毁等生命周期回调。
依赖注入的三种方式

@Resource和@Autowired的区别
都是用来自动装配的,都可以放在属性字段上
@Autowired是spring声明的,@Resource是jdk声明的
@Autowired默认按照类型注入,如果类型有多个,则按照名称注入
@Resource默认按照名称注入,如果没有该名称的对象,则按照类型注入,如果两个都找不到就报错
(这里的名称和类型实际上就是指该类的对象的名称和该类)
Spring如何实现IoC(底层原理)
-
配置阶段:通过 XML、注解或Java配置类,定义Bean及其依赖关系。
-
解析与注册:Spring容器启动时,读取配置,解析为
BeanDefinition对象,并注册到容器中。 -
实例化与装配:根据
BeanDefinition,通过反射创建Bean实例,并按照配置进行依赖注入(构造器注入、Setter注入等)。 -
生命周期回调:Bean创建完成后,执行初始化方法(如
@PostConstruct),容器关闭时执行销毁方法。
Bean的作用域(常用两个)

AOP
AOP(面向切面编程) 是一种编程范式,它允许你将那些横切关注点(如日志、事务、权限校验)从业务逻辑中抽离出来,形成独立的模块(称为切面),在运行时通过动态代理机制织入到目标方法中。
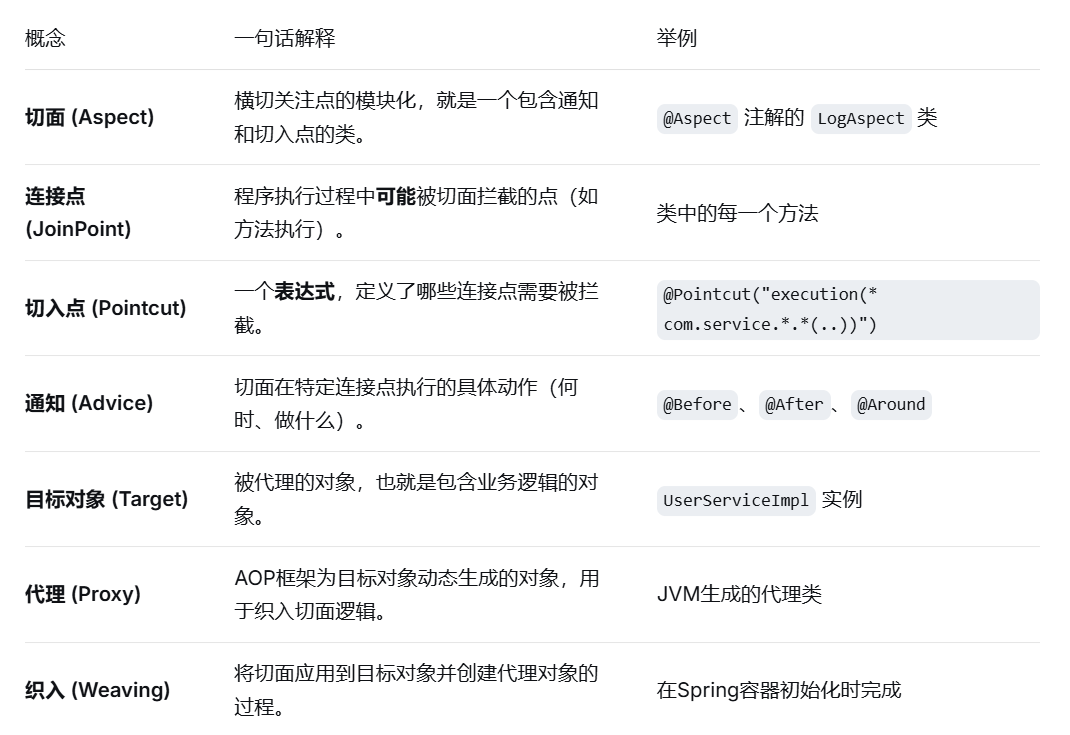
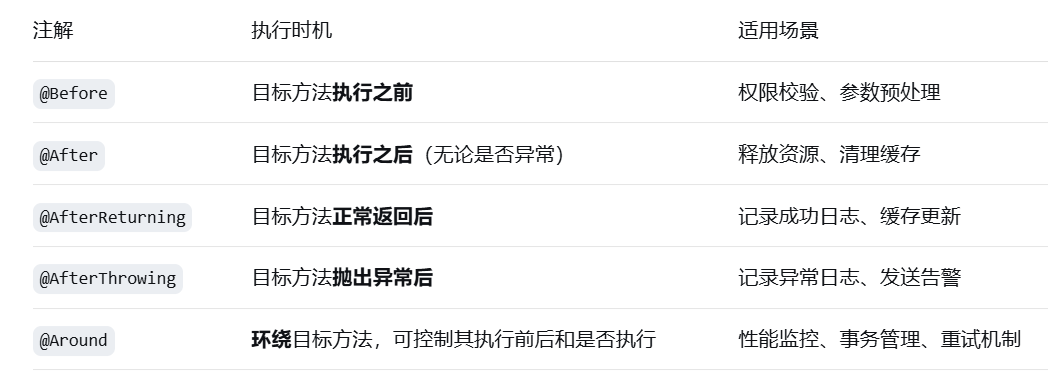
“AOP的核心思想是将横切关注点从业务代码中分离,通过动态代理在运行时织入。在Spring中,我主要用到 @Aspect 定义切面,用 @Pointcut 定义切入点表达式,用5种通知(@Before、@After、@Around等)在目标方法的不同时机执行横切逻辑。底层实现是JDK动态代理或CGLIB代理,由Spring容器在Bean初始化时自动生成代理对象。我们项目里主要用于统一日志记录、接口耗时监控和权限校验,减少重复代码,提升维护性。”
package com.example.springbootstudy.aop;


import org.apache.commons.logging.Log;
import org.apache.commons.logging.LogFactory;
import org.aspectj.lang.ProceedingJoinPoint;
import org.aspectj.lang.annotation.Around;
import org.aspectj.lang.annotation.Aspect;
import org.aspectj.lang.annotation.Pointcut;
import org.springframework.stereotype.Component;
import org.springframework.web.context.request.RequestContextHolder;
import org.springframework.web.context.request.ServletRequestAttributes;
import javax.servlet.http.HttpServletRequest;
import java.time.LocalDateTime;
import java.util.Arrays;
import java.util.stream.Collectors;

/**
 * 使用AOP切Controller打印日志
 *
 * @author 阿无
 * @version 1.0.0
 * @since 2024/8/19 - 10:57
 */
@Aspect
@Component
public class LogAspect {

    private static Log logger = LogFactory.getLog(LogAspect.class);

    // 记录保存所有controller层的日志
    @Pointcut("execution(public * com.example.springbootstudy.controller..*.*(..))")
    public void pointCutControllerLog(){
    }


    @Around("pointCutControllerLog()")
    public Object controllerLog(ProceedingJoinPoint point) throws Throwable{
        return logCommon(point,null);
    }


    // 如果非Controller层也需要保存日志,则可以使用注解的形式

    // 另一种写法是
//    @Around("@annotation(com.example.springbootstudy.aop.SysLogAnno)")
    @Around("@annotation(sysLogAnno)")
    public Object sysLog(ProceedingJoinPoint point,SysLogAnno sysLogAnno) throws Throwable{
        return logCommon(point,sysLogAnno);
    }


    public Object logCommon(ProceedingJoinPoint point,SysLogAnno sysLogAnno) throws Throwable{


        Long startTime = System.currentTimeMillis();
        LocalDateTime localDateTimeStart = LocalDateTime.now();

        String className = point.getTarget().getClass().getName();
        String message = sysLogAnno!=null ? sysLogAnno.value():null;
        String methodName = point.getSignature().getName();
        Object[] args = point.getArgs();
        // 参数全部转换为字符串并以,分割  否则就是一个空字符串
        String argsString = args!=null ? Arrays.stream(args).map(Object::toString)
                .collect(Collectors.joining(",")) : "";

        // 1. 获取request对象
        ServletRequestAttributes requestAttributes = (ServletRequestAttributes) RequestContextHolder.getRequestAttributes();
        HttpServletRequest request = requestAttributes.getRequest();

        // 1.1 请求方式
        String requestMethod = request.getMethod();
        // 1.2 请求地址/路径
        String requestURI = request.getRequestURI();
        // 1.3 访问来源ip
        String remoteAddr = request.getRemoteAddr();
        // 1.4 还可以获取用户登录的信息 我们在这儿暂时不需要
        //  可以把Object强转成User类
        // Object user_var = request.getSession().getAttribute("user_var");

        SysLog sysLog = new SysLog(className,methodName, message, argsString, null,
                null, localDateTimeStart,null,null,requestMethod,requestURI,remoteAddr);


        Object result = point.proceed();
        Long endTime = System.currentTimeMillis();
        LocalDateTime localDateTimeEnd = LocalDateTime.now();

        // 但凡执行到这儿的就是成功的,异常往上抛就行,交给全局异常处理器
        sysLog.setStatus("success");
        sysLog.setResult(result!=null ? result.toString():null);
        sysLog.setLocalDateTimeEnd(localDateTimeEnd);
        sysLog.setTotalTime(endTime - startTime);


        // 理论上这个日志应该是保存在es中的应该
        logger.info("日志记录正常");
        logger.info(sysLog);

//        2024-08-19 19:57:03.555  INFO 19756 --- [nio-8080-exec-1] c.example.springbootstudy.aop.LogAspect  :
//              SysLog(className=com.example.springbootstudy.service.LogTestService, methodName=testLog, message=LogTestService,
//              args=1,jay, result=1 jay, status=success, localDateTimeStart=2024-08-19T19:57:03.552, localDateTimeEnd=2024-08-19T19:57:03.555,
//              totalTime=3, requestMethod=GET, requestURI=/testAnnoLog/1, remoteAddr=127.0.0.1)
//        2024-08-19 19:57:03.555  INFO 19756 --- [nio-8080-exec-1] c.example.springbootstudy.aop.LogAspect  : 日志记录正常
//        2024-08-19 19:57:03.555  INFO 19756 --- [nio-8080-exec-1] c.example.springbootstudy.aop.LogAspect  :
//              SysLog(className=com.example.springbootstudy.controller.LogTestController, methodName=testAnnoLog, message=null,
//              args=1,jay, result=1 jay, status=success, localDateTimeStart=2024-08-19T19:57:03.502, localDateTimeEnd=2024-08-19T19:57:03.555,
//              totalTime=56, requestMethod=GET, requestURI=/testAnnoLog/1, remoteAddr=127.0.0.1)


        // 这里的结果就是拦截的方法的结果
        return result;
    }

}
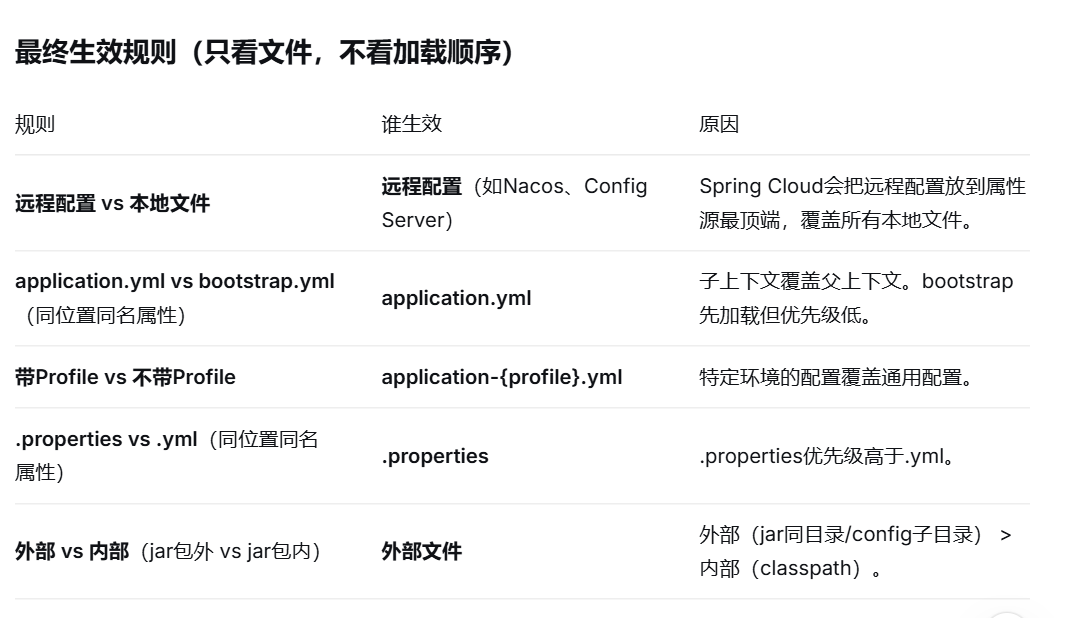
配置文件的优先级
SpringBoot中的设计模式
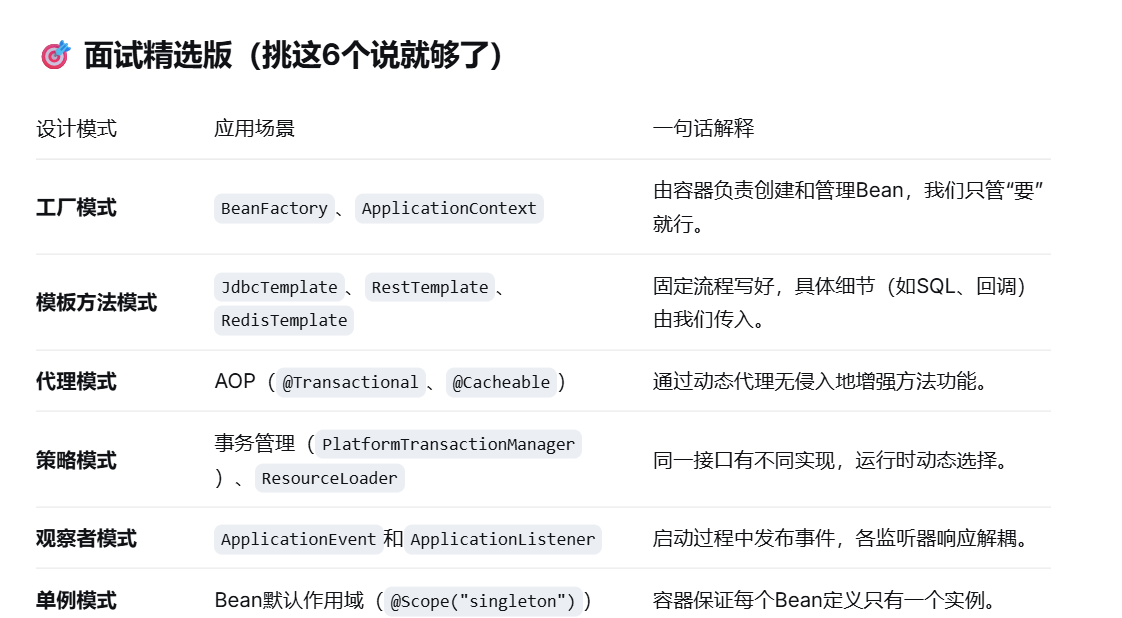
“我在项目里经常用到或接触到Spring框架中的几种设计模式,比如工厂模式、模板方法模式、代理模式、策略模式、观察者模式和单例模式。
工厂模式就像一个大管家,帮我们创建和管理对象;模板方法模式把固定流程封装好,把变化的步骤留给我们定制;代理模式是Spring AOP的底层支撑,实现无侵入式的功能增强;策略模式让算法可以灵活切换;观察者模式通过事件驱动实现组件解耦;而单例模式保证了Bean在容器中唯一实例。
-
工厂模式 —— Bean的“总管家”
BeanFactory和ApplicationContext是工厂模式的核心体现。我们通过@Autowired或@Resource获取Bean,无需关心对象是如何实例化、如何组装依赖的,这些全由Spring容器这个“大工厂”帮我们完成。 -
模板方法模式 —— 固定流程“骨架”
最典型的是JdbcTemplate。它定义了SQL执行的标准流程(获取连接、执行语句、处理结果集、关闭连接),但具体的SQL语句和结果集映射逻辑由我们通过回调接口传入。这样既复用了代码,又把变化的部分留给我们自定义。 -
代理模式 —— AOP的“幕后功臣”
Spring AOP的底层就是动态代理。比如在方法上加@Transactional,Spring会在运行时为目标对象生成代理,在代理中开启事务、执行方法、提交/回滚,实现无侵入式增强。JDK动态代理基于接口,CGLIB基于子类,Spring会根据目标类自动选择。 -
策略模式 —— 算法的“多选一”
最经典的例子是事务管理。PlatformTransactionManager接口有多个实现:DataSourceTransactionManager(JDBC/MyBatis)、JpaTransactionManager(JPA)等。Spring运行时根据配置动态选择合适的策略,我们只需要切换配置,上层代码完全无感知。 -
观察者模式 —— 启动流程的“广播系统”
Spring Boot启动过程中发布了十几种事件(如ApplicationStartingEvent、ApplicationReadyEvent),各种ApplicationListener监听并响应。这正是观察者模式的应用。我可以通过自定义监听器,在应用启动后执行初始化操作,例如缓存预热。 -
单例模式 —— Bean的“默认作用域”
Spring中Bean默认是单例的,由容器保证每个BeanDefinition只创建一个实例,所有依赖方共享同一个对象。这减少了对象创建开销,适合无状态的Service、DAO。与传统单例不同,Spring是“容器级单例”,通过@Scope(“prototype”)可随时改为多例,业务代码零改动。
SpringBoot中的实现
模板模式
// 模板类
// RestTemplate.java
public <T> T getForObject(String url, Class<T> responseType) {
    // 模板方法入口:调用 execute 方法
    return execute(url, HttpMethod.GET, null,
                   new HttpMessageConverterExtractor<T>(responseType, getMessageConverters()));
}


// RestTemplate.java
public <T> T execute(String url, HttpMethod method,
                     RequestCallback requestCallback, ResponseExtractor<T> responseExtractor) {
    // 1. 创建请求对象(固定)
    ClientHttpRequest request = createRequest(url, method);

    // 2. 执行回调,让调用者自定义请求体(变化的部分)
    if (requestCallback != null) {
        requestCallback.doWithRequest(request);
    }

    // 3. 执行请求,获取响应(固定)
    ClientHttpResponse response = request.execute();

    // 4. 处理响应状态(固定)
    handleResponse(url, method, response);

    // 5. 提取响应体,转为目标对象(变化的部分,通过 ResponseExtractor 回调)
    return responseExtractor.extractData(response);
}
// 回调接口,变化的部分

// 请求回调:让你自定义请求头、请求体
@FunctionalInterface
public interface RequestCallback {
    void doWithRequest(ClientHttpRequest request) throws IOException;
}

// 响应提取器:让你自定义如何把响应转成对象
@FunctionalInterface
public interface ResponseExtractor<T> {
    T extractData(ClientHttpResponse response) throws IOException;
}
// 测试
User user = restTemplate.getForObject("http://api.com/user/1", User.class);
项目中的使用
策略模式
-
订单创建
设计意图:将订单创建的复杂逻辑根据订单类型进行拆分,每种订单类型有独立的实现类,便于维护和扩展。- 正常+优惠券订单详情创建
- 捆绑商品订单详情创建
- 预售订单详情创建
订单改价策略
- 正常订单改价
- 预售订单改价
- 保卡订单改价
工厂模式

有“AI”的1024 = 2048,欢迎大家加入2048 AI社区
更多推荐


 4
4 0
0- 0


 已为社区贡献6条内容

所有评论(0)