【2026年6月亲测】亚博智能/野火K230嘉楠科技CanMV开发板部署YOLOv8目标检测全流程实战:模型训练、ONNX转kmodel量化、源码下载、避坑记录,成功实现人工智能水母实时检测与灯光报警
完整的项目和所有代码
用到的软件和源码和使用教程链接:https://pan.quark.cn/s/734a5fcb71cf终于成功,这个成功版本必须记录一下,好多天的努力。
感谢提供帮助的热心群众,不知道你是谁,但是你的帮助非常有用。
这个是步骤,在linux系统操作下完成,windows可能无法正确的安装nncase会导致遇到问题,本人在服务器上运行的,问售后,问朋友,调试,安装和处理各种问题,整个项目大概花费三天。
1.训练pt模型
2.转换onnx模型
3.转换kmodel模型
4.刷入固件,替换掉main代码
我让AI研究了一下这个转换代码,
就是pt模型转换到onnx这步
说可能有torch的版本的原因,如果没有版本问题直接转
1.训练pt模型----------------------------------------------------------------------------------------------------------
from ultralytics import YOLO

model = YOLO("/workspace/runs/detect/cccc/weights/best.pt")

model.export(
    format="onnx",
    imgsz=640,
    opset=11,
    simplify=False,
)
你的环境我看了一下,整体没有问题,可以导出 ONNX。
不过,我发现了几个需要注意的地方。
软件 你的版本 是否有影响
Python 3.9 ✅ 没问题
PyTorch 2.8.0 ⚠️ 需要兼容 weights_only
torchvision 0.23.0 ✅ 没问题
ultralytics 8.4.56 ✅ 新版
onnx 1.19.1 ✅ 没问题
nncase 2.9.0 ✅ 后续转换 kmodel 可以直接用
所以,你属于:
PyTorch 2.8 + Ultralytics 8.4
这种环境。
这种环境最大的坑就是
Weights only load failed
Unsupported global
所以最好直接写一个兼容版本,以后都能用。下面是兼容的转换代码
2.转换onnx模型------------------------------------------------------------------------------------------------------
# -*- coding: utf-8 -*-

"""
YOLOv8 -> ONNX
适用于:
PyTorch 2.8
Ultralytics 8.4
"""

import os

# 必须放在 import torch 前
os.environ["TORCH_LOAD_WEIGHTS_ONLY"] = "0"

import torch
from ultralytics import YOLO

# ----------------------------------------------------
# PyTorch 2.6+ Safe Globals
# ----------------------------------------------------
try:

    from ultralytics.nn.tasks import DetectionModel

    from ultralytics.nn.modules.conv import (
        Conv,
        Concat,
    )

    from ultralytics.nn.modules.block import (
        C2f,
        Bottleneck,
        SPPF,
        DFL,
    )

    from ultralytics.nn.modules.head import Detect

    from ultralytics.utils.loss import (
        v8DetectionLoss,
        BboxLoss,
    )

    from ultralytics.utils.tal import (
        TaskAlignedAssigner,
    )

    from ultralytics.utils import IterableSimpleNamespace

    from torch.nn import Sequential
    from torch.nn import Conv2d
    from torch.nn import BatchNorm2d
    from torch.nn import SiLU
    from torch.nn import ModuleList
    from torch.nn import MaxPool2d
    from torch.nn import Upsample
    from torch.nn import BCEWithLogitsLoss

    torch.serialization.add_safe_globals([
        DetectionModel,
        Sequential,

        Conv,
        Conv2d,
        BatchNorm2d,
        SiLU,

        C2f,
        Bottleneck,
        SPPF,
        DFL,

        ModuleList,
        MaxPool2d,
        Upsample,

        Concat,
        Detect,

        v8DetectionLoss,
        BboxLoss,
        TaskAlignedAssigner,

        IterableSimpleNamespace,

        BCEWithLogitsLoss,
    ])

except Exception:
    pass

# ==========================================================
# 修改这里
# ==========================================================

# 训练得到的 best.pt
MODEL_PATH = "/workspace/work/best.pt"

# 输入尺寸
IMG_SIZE = 640

# ==========================================================

print("=" * 60)
print("Loading Model...")
print(MODEL_PATH)
print("=" * 60)

model = YOLO(MODEL_PATH)

print("Exporting ONNX...")

model.export(
    format="onnx",

    imgsz=IMG_SIZE,

    opset=11,

    simplify=True,

    dynamic=False,

    half=False,

    int8=False,
)

print("\n")
print("=" * 60)
print("Export Finished!")
print("=" * 60)
转换成onnx
后
再转换成kmodel,先得把这个什么pip install nncase nncase-kpu
然后说需要安装这个
# 1. 下载微软官方安装脚本
wget https://dot.net/v1/dotnet-install.sh -O dotnet-install.sh

# 2. 赋予执行权限
chmod +x dotnet-install.sh

# 3. 安装 .NET 7.0 运行时
./dotnet-install.sh --channel 7.0 --runtime dotnet
安装上后,输入命令验证。
dotnet --list-runtimes
# 1. 赋予脚本执行权限
chmod +x dotnet-install.sh

# 2. 安装 .NET 7.0 运行时 (Runtime)
./dotnet-install.sh --channel 7.0 --runtime dotnet
验证
export DOTNET_ROOT=$HOME/.dotnet
export PATH=$HOME/.dotnet:$PATH
设置环境变量
然后验证
dotnet --list-runtimes
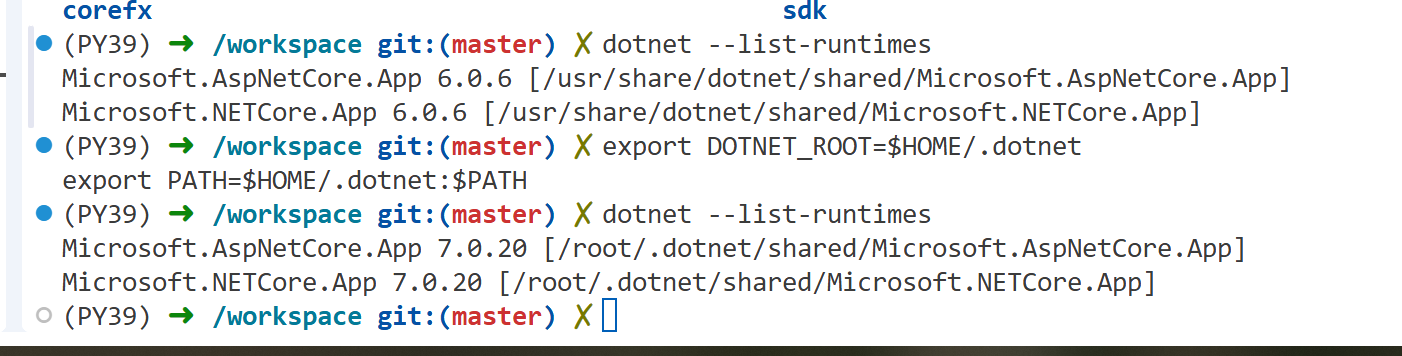
可以了得是7.几的版本好像才行
python - <<'EOF'
import nncase

print("nncase import OK")

opts = nncase.CompileOptions()
opts.target = "k230"

print("CompileOptions OK")

compiler = nncase.Compiler(opts)

print("Compiler OK")
EOF
执行这个代码验证nncase
按照2.8.0安装吧
pip install nncase==2.8.0 nncase-kpu==2.8.0
第三步
3.转换kmodel模型-----------------------------------------------------------------------------------------------
# -*- coding: utf-8 -*-

"""
YOLOv8 ONNX -> K230 kmodel (nncase 2.8/2.9)

功能:
1. 修复 Reshape allowzero
2. LetterBox 校准
3. INT8 PTQ(KLD)
4. 导出 best.kmodel
"""

import os
import glob
import random
import onnx
import nncase
import numpy as np
from PIL import Image

# ===================================================
# 配置
# ===================================================

ONNX_PATH = "best.onnx"
FIXED_ONNX = "best_fixed.onnx"
OUTPUT_KMODEL = "best.kmodel"

CALIB_DIR = "/workspace/work/data/valid/images"

INPUT_SIZE = 640

CALIB_NUM = 100

# ===================================================
# 修复 allowzero
# ===================================================

def fix_reshape(src, dst):

    model = onnx.load(src)

    fixed = 0

    for node in model.graph.node:

        if node.op_type != "Reshape":
            continue

        attrs = [a for a in node.attribute if a.name != "allowzero"]

        if len(attrs) != len(node.attribute):
            del node.attribute[:]
            node.attribute.extend(attrs)
            fixed += 1

    onnx.save(model, dst)

    print("Fix Reshape:", fixed)

# ===================================================
# LetterBox
# ===================================================

def letterbox(img):

    w, h = img.size

    scale = min(INPUT_SIZE / w, INPUT_SIZE / h)

    nw = int(w * scale)
    nh = int(h * scale)

    img = img.resize((nw, nh), Image.BILINEAR)

    canvas = Image.new(
        "RGB",
        (INPUT_SIZE, INPUT_SIZE),
        (114,114,114)
    )

    dx = (INPUT_SIZE - nw) // 2
    dy = (INPUT_SIZE - nh) // 2

    canvas.paste(img, (dx, dy))

    return canvas

# ===================================================
# PTQ Dataset
# ===================================================

def load_dataset():

    imgs = []

    for ext in ("*.jpg","*.jpeg","*.png","*.bmp"):

        imgs.extend(
            glob.glob(os.path.join(CALIB_DIR, ext))
        )

    random.shuffle(imgs)

    imgs = imgs[:CALIB_NUM]

    dataset = []

    print("Calibration Images:", len(imgs))

    for path in imgs:

        img = Image.open(path).convert("RGB")

        img = letterbox(img)

        arr = np.array(img, dtype=np.uint8)

        arr = arr.transpose(2,0,1)

        arr = np.expand_dims(arr,0)

        arr = np.ascontiguousarray(arr)

        dataset.append([arr])

    return dataset

# ===================================================
# main
# ===================================================

print("Step1 Fix ONNX")

fix_reshape(
    ONNX_PATH,
    FIXED_ONNX
)

with open(FIXED_ONNX,"rb") as f:

    model_content = f.read()

print("Step2 CompileOptions")

opts = nncase.CompileOptions()

opts.target="k230"

opts.preprocess=True

opts.input_type="uint8"

opts.input_shape=[1,3,INPUT_SIZE,INPUT_SIZE]

opts.input_layout="NCHW"

opts.output_layout="NCHW"

opts.input_range=[0,255]

opts.mean=[0,0,0]

opts.std=[255,255,255]

opts.dump_ir=False

opts.dump_asm=False

compiler = nncase.Compiler(opts)

compiler.import_onnx(
    model_content,
    nncase.ImportOptions()
)

print("Import ONNX OK")

dataset = load_dataset()

if len(dataset):

    ptq = nncase.PTQTensorOptions()

    ptq.samples_count=len(dataset)

    try:
        ptq.calibrate_method="Kld"
    except:
        pass

    try:
        ptq.quant_type="uint8"
    except:
        pass

    ptq.set_tensor_data(dataset)

    compiler.use_ptq(ptq)

    print("PTQ Enabled")

print("Compiling...")

compiler.compile()

print("Generate kmodel...")

with open(
    OUTPUT_KMODEL,
    "wb"
) as f:

    try:
        f.write(
            compiler.gencode_tobytes()
        )
    except:

        compiler.gencode(f)

print("Done")

print(
    "Output:",
    OUTPUT_KMODEL
)

print(
    "%.2f MB"
    %
    (
        os.path.getsize(OUTPUT_KMODEL)
        /
        1024
        /
        1024
    )
)
我去,真的,就是量化的问题,或者是nncase的问题
把模型放到"/sdcard/kmodel/best.kmodel"这里
第四步
4.替换掉main代码--------------------------------------------------------------
# -*- coding:utf-8 -*-

import sys
import os
import gc

#--------------------------------------------------
# 添加模块路径
#--------------------------------------------------
for p in ["/sdcard", "/sdcard/F", "/sdcard/app"]:
    if p not in sys.path:
        sys.path.insert(0, p)

from libs.PipeLine import PipeLine
from libs.YOLO import YOLOv8

#--------------------------------------------------
# 模型路径(你的模型放在 /sdcard/kmodel/best.kmodel)
#--------------------------------------------------
KMODEL = "/sdcard/kmodel/best.kmodel"

try:
    os.stat(KMODEL)
except:
    raise Exception("Cannot find: " + KMODEL)

#--------------------------------------------------
# 参数
#--------------------------------------------------
RGB_SIZE = [640, 480]
DISPLAY_SIZE = [640, 480]

# 如果你的模型是320输入,就改成[320,320]
# 如果是640输入,就保持[640,640]
MODEL_INPUT = [640, 640]

LABELS = [
    "Bag",
    "Bottle",
    "Cup"
]

CONF_THRESH = 0.25
NMS_THRESH = 0.45

#--------------------------------------------------
# 初始化显示
#--------------------------------------------------
pl = PipeLine(
    rgb888p_size=RGB_SIZE,
    display_size=DISPLAY_SIZE,
    display_mode="lcd"
)

pl.create()

#--------------------------------------------------
# 初始化YOLO
#--------------------------------------------------
yolo = YOLOv8(
    task_type="detect",
    mode="video",
    kmodel_path=KMODEL,
    labels=LABELS,
    rgb888p_size=RGB_SIZE,
    model_input_size=MODEL_INPUT,
    display_size=DISPLAY_SIZE,
    conf_thresh=CONF_THRESH,
    nms_thresh=NMS_THRESH,
)

yolo.config_preprocess()

print("==============================")
print("YOLOv8 Start")
print("Model:", KMODEL)
print("==============================")

frame = 0

#--------------------------------------------------
# 主循环
#--------------------------------------------------
try:

    while True:

        os.exitpoint()

        img = pl.get_frame()

        if img is None:
            continue

        result = yolo.run(img)

        yolo.draw_result(result, pl.osd_img)

        pl.show_image()

        frame += 1

        if frame % 30 == 0:
            gc.collect()

except KeyboardInterrupt:
    pass

except Exception as e:
    sys.print_exception(e)

finally:

    yolo.deinit()

    pl.destroy()
好了
这个检测就能够成功了,

有“AI”的1024 = 2048,欢迎大家加入2048 AI社区
更多推荐


 7
7 0
0- 0


 已为社区贡献6条内容

所有评论(0)