声明式Agent实战
答案是Yes,我们可以将智能体的核心行为和配置通过声明式文件(如yaml文件)来进行定义,这就使得智能体的定义可以像代码一样被纳入版本控制系统,遵循DevOps的最佳实践,提高了协作效率和部署的一致性。在之前的博文中,我们都是将智能体的定义(如系统提示词等)内嵌在代码中,这样其实对非IT技术人员不太友好,是否有一种声明式的方法将代码和定义分开呢?可以看到上面的内容其实实现了我们之前对智能体的系统提
1 声明式Agent
在之前的博文中,我们都是将智能体的定义(如系统提示词等)内嵌在代码中,这样其实对非IT技术人员不太友好,是否有一种声明式的方法将代码和定义分开呢?
答案是Yes,我们可以将智能体的核心行为和配置通过声明式文件(如yaml文件)来进行定义,这就使得智能体的定义可以像代码一样被纳入版本控制系统,遵循DevOps的最佳实践,提高了协作效率和部署的一致性 。
2 快速开始:多语言客服助手
这里我们来做一个quick start,体验声明式智能体定义的好处。这个智能体是一个客服助手,可以提供多语言的友好回复。
在开始之前,我们创建了一个控制台应用,并安装了以下NuGet包:
<PackageReference Include="Microsoft.Agents.AI.Declarative" Version="1.0.0-rc5" />
<PackageReference Include="Microsoft.Agents.AI.OpenAI" Version="1.0.0" />
CustomerSupportAgent.prompt.yml
首先,我们创建一个yaml文件,内容如下:

kind: Prompt
name: CustomerSupportAgent
description: 多语言客服助手
instructions: |
  你是一个专业的客服助手。
  你的任务是:
  1. 使用用户的语言回答问题
  2. 提供清晰、礼貌、专业的回复
  3. 判断问题类型(订单/退款/技术/其他)
  4. 判断用户情绪(正面/中性/负面)
  注意:
  - 回答要简洁
  - 如果是负面情绪,语气要更安抚
  - 不要编造信息
model:
  options:
    temperature: 0.3
    topP: 0.9
outputSchema:
  properties:
    language:
      type: string
      description: 用户使用的语言
      required: true
    category:
      type: string
      description: 问题分类(order/refund/technical/other)
      required: true
    sentiment:
      type: string
      description: 情绪(positive/neutral/negative)
      required: true
    answer:
      type: string
      description: 客服回复内容
      required: true

可以看到上面的内容其实实现了我们之前对智能体的系统提示词以及模型参数的设置,甚至还定义了模型的输出格式是一个包含4个字段的强类型schema。
这里为了正确解析到回答的内容,我们定义一个模型类:
public sealed record CustomerSupportResponse(
    [property: JsonPropertyName("language")] string Language,
    [property: JsonPropertyName("category")] string Category,
    [property: JsonPropertyName("sentiment")] string Sentiment,
    [property: JsonPropertyName("answer")] string Answer);
准备工作:创建ChatClient
其次,我们创建ChatClient,老面孔了:

var config = new ConfigurationBuilder()
    .AddJsonFile($"appsettings.json", optional: false, reloadOnChange: true)
    .Build();
var openAIProvider = config.GetSection("OpenAI").Get<OpenAIProvider>();
var chatClient = new OpenAIClient(
        new ApiKeyCredential(openAIProvider.ApiKey),
        new OpenAIClientOptions { Endpoint = new Uri(openAIProvider.Endpoint) })
    .GetChatClient(openAIProvider.ModelId)
    .AsIChatClient();

基于yaml文件创建Agent
这里我们读取yaml文件内容,并基于yaml来创建Agent:
var text = await File.ReadAllTextAsync("CustomerSupportAgent.prompt.yml");
var agentFactory = new ChatClientPromptAgentFactory(chatClient);
var agent = await agentFactory.CreateFromYamlAsync(text);
Console.WriteLine("✅ 基于YAML定义创建Agent成功");
Console.WriteLine();
测试回答问题
既然是多语言客服助手,我们就来测试一个中文一个英文吧:

var session = await agent.CreateSessionAsync();
Console.WriteLine("━━━━━━━━━━━━━━━━━━━━━━━━━━━━━━━━━━━━━━━━━━━━━━");
Console.WriteLine($"开始测试:使用中文回答");
var question1 = "用中文回答为什么我的订单货还没有到。";
Console.WriteLine($"👤 用户: {question1}");
Console.WriteLine();
Console.WriteLine("━━━━━━━━━━━━━━━━━━━━━━━━━━━━━━━━━━━━━━━━━━━━━━");
Console.WriteLine($"🤖 Agent:");
var response1 = await agent.RunAsync(question1, session);
var responseModel1 = JsonSerializer.Deserialize<CustomerSupportResponse>(response1.Text);
Console.WriteLine(responseModel1.Answer);
Console.WriteLine("━━━━━━━━━━━━━━━━━━━━━━━━━━━━━━━━━━━━━━━━━━━━━━");
Console.WriteLine();

Console.WriteLine($"开始测试:使用英文回答");
var question2 = "When my order can be handled?";
Console.WriteLine($"👤 用户: {question2}");
Console.WriteLine();
Console.WriteLine("━━━━━━━━━━━━━━━━━━━━━━━━━━━━━━━━━━━━━━━━━━━━━━");
Console.WriteLine($"🤖 Agent:");
var response2 = await agent.RunAsync(question2, session);
var responseModel2 = JsonSerializer.Deserialize<CustomerSupportResponse>(response2.Text);
Console.WriteLine(responseModel2.Answer);
Console.WriteLine("━━━━━━━━━━━━━━━━━━━━━━━━━━━━━━━━━━━━━━━━━━━━━━");
Console.WriteLine();

测试结果如下图所示:
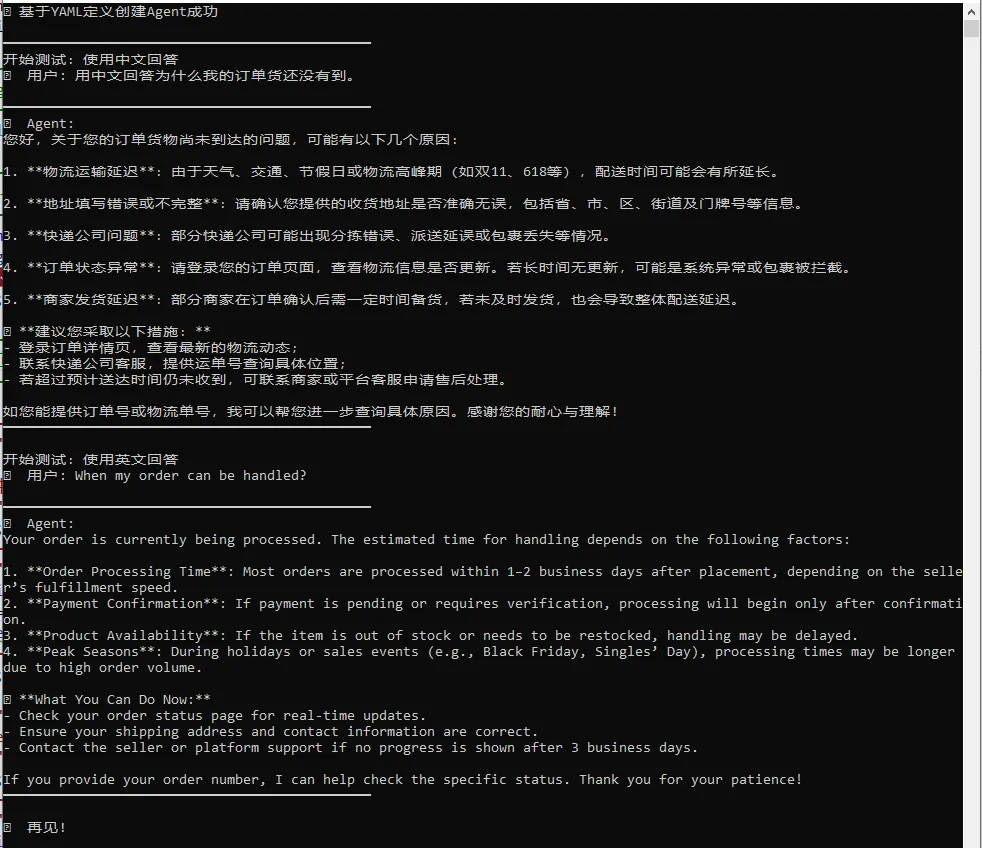
可以看到,无论是中文还是英文,它都按照定义输出了回答的具体内容。

有“AI”的1024 = 2048,欢迎大家加入2048 AI社区
更多推荐


 10
10 0
0- 0


 已为社区贡献1条内容

所有评论(0)