从 0 搭建 Claude Code:一个工具,一个 Handler,Agent 工具扩展之道
本文介绍了一种通过DispatchMap模式扩展AI Agent工具能力的方法。核心思路是保持主循环不变,通过字典映射将工具名与处理函数关联,实现零成本工具扩展。文章详细解析了路径沙箱(safe_path)安全机制、四个专用工具(read/write/edit文件及bash)的实现,以及如何通过TOOL_HANDLERS字典实现工具分发。这种设计遵循开放-封闭原则,新增工具只需注册到字典而无需修改
循环从未改变——我们只是往 dispatch map 里多塞了几个函数。这一章揭示 Agent 能力边界是如何以近乎零成本扩张的。
上一篇我们用一个 while 循环 + 一把 bash 工具,搭出了 AI Agent 的最小骨架。但在实际使用中,你很快会发现:所有操作都走 shell,既危险,又笨拙。
这一章要解决的,正是这个问题。而解法出乎意料地简单——循环不动,只扩展工具层。

为什么不能只靠 bash
用 bash 当唯一工具,表面上万能,实则暗藏三个隐患:
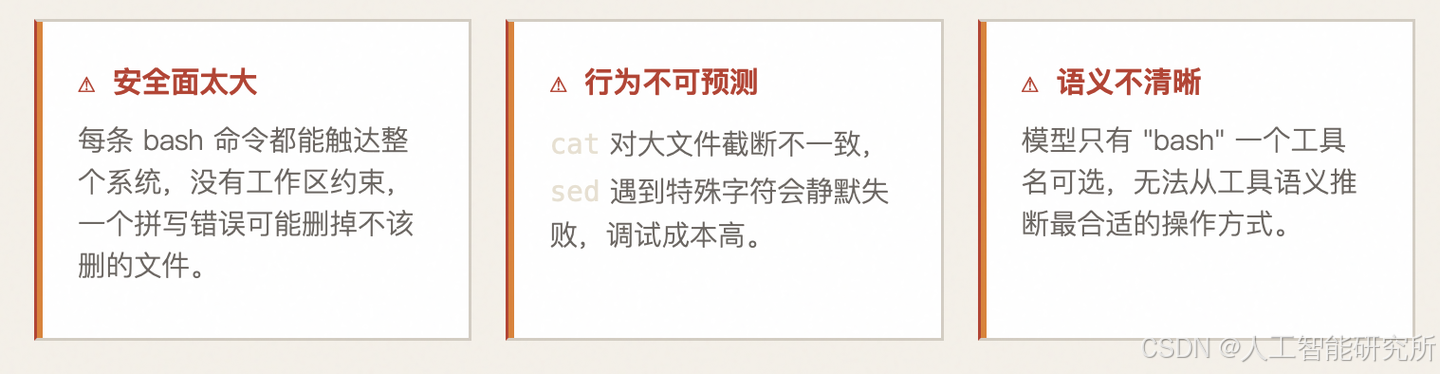
解决思路是:用专用工具替代通用 shell。为读文件、写文件、编辑文件各建一个有明确约束的工具,同时保留 bash 处理其他杂项命令。
架构:Dispatch Map 模式
新的架构引入了一个核心概念——Dispatch Map(分发表):一个将工具名映射到处理函数的字典,代替原来硬编码的 if/elif 链。
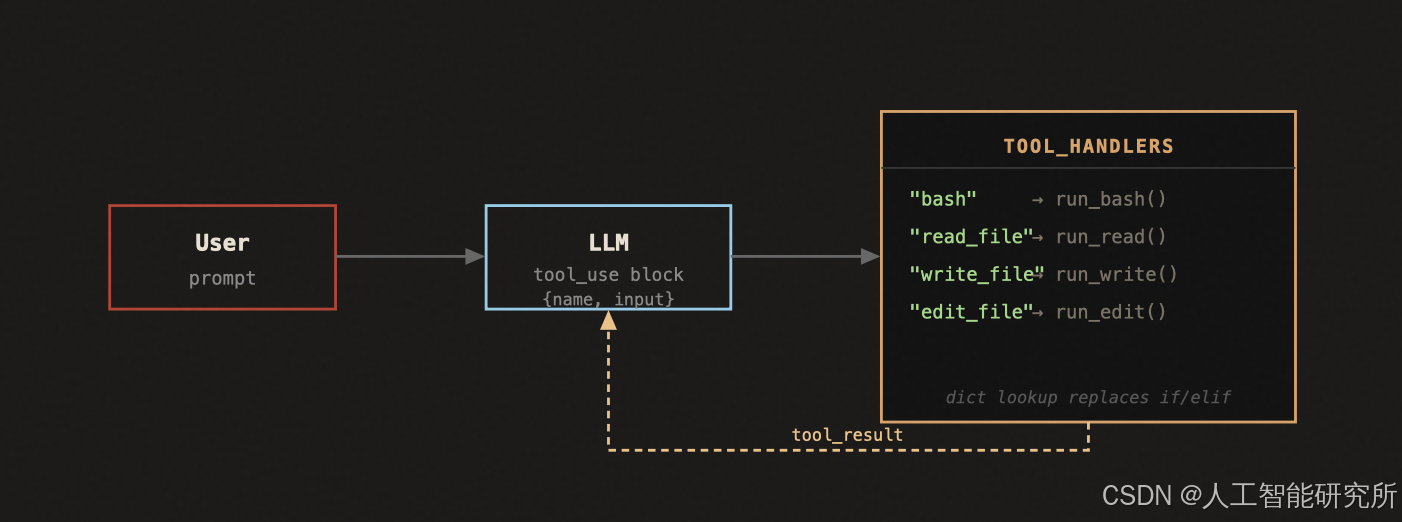
关键在于:模型输出的 tool_use 块里包含 name 字段(如 "read_file"),循环用这个名字在字典里查一次,就能路由到正确的处理函数。加新工具 = 往字典加一行,循环体永远不变。
为什么 Dispatch Map 优于 if/elif
对比:IF/ELIF VS DISPATCH MAP
# ❌ if/elif 写法:每次加工具都要改循环
if block.name == "bash":
    output = run_bash(...)
elif block.name == "read_file":
    output = run_read(...)
elif block.name == "write_file":
    output = run_write(...)
# ... 8 个 elif,每次加工具改这里

# ✅ Dispatch Map:加工具只加字典,循环永远不动
handler = TOOL_HANDLERS.get(block.name)
output = handler(**block.input) if handler else f"Unknown tool: {block.name}"
"加一个工具,只加一个 handler"
——工具层扩展对循环层零侵入
Dispatch Map 的好处不只是代码简洁——它把"工具注册"和"工具分发"分离成两个关注点。工具越来越多时,循环逻辑依然是两行,不会因工具数量膨胀而变复杂。这是 开放-封闭原则 在 Agent 设计中的实践:对扩展开放,对修改封闭。
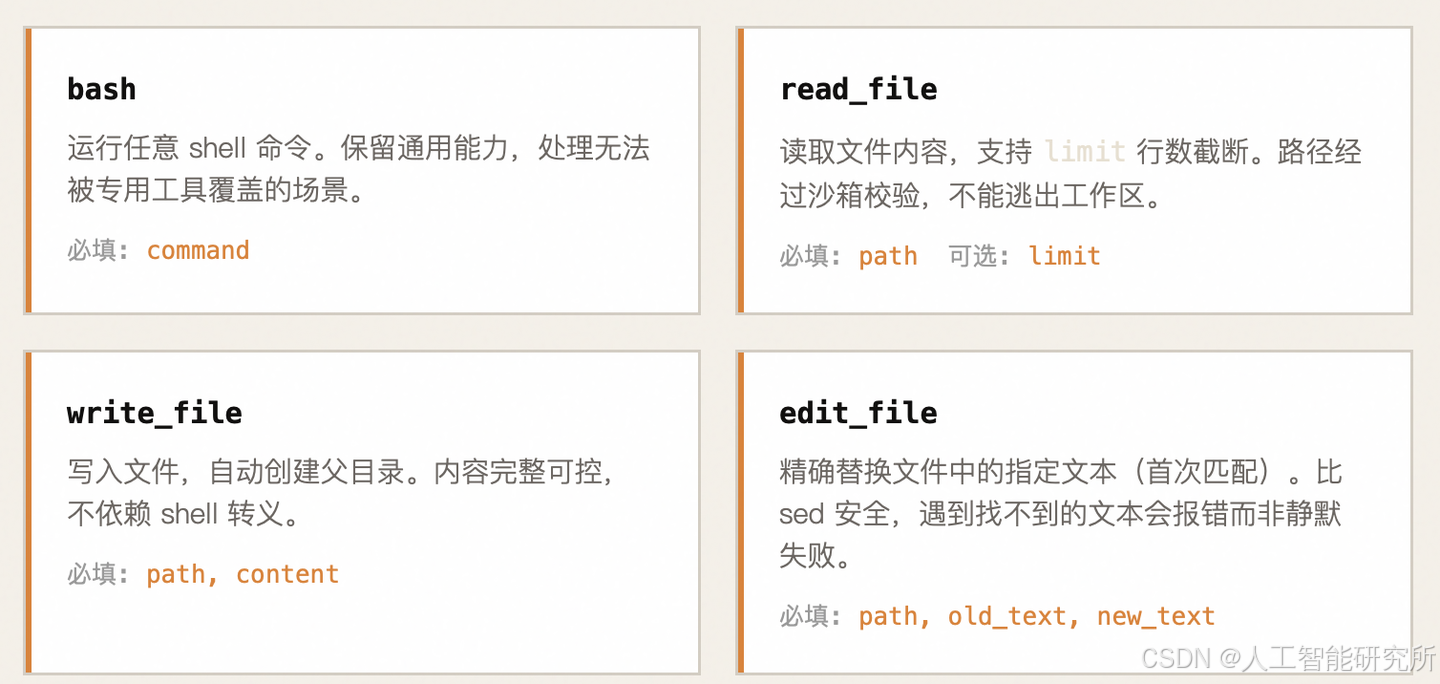
四个工具,各司其职
S01 → S02:到底变了什么?
先看一张对比图,绿色是新增,红色是删除,灰色是不变:
S01                              S02
─────────────────────────────    ─────────────────────────────
                                 ✅ safe_path()        ← 新增
                                 ✅ run_read()          ← 新增
  run_bash()    (不变)           ✅ run_write()         ← 新增
                                 ✅ run_edit()          ← 新增
                                 ✅ TOOL_HANDLERS 字典  ← 新增
                                 ✅ TOOLS 数组扩展到4个  ← 修改

  agent_loop()  (几乎不变)       agent_loop()          ← 仅改 2 行
─────────────────────────────    ─────────────────────────────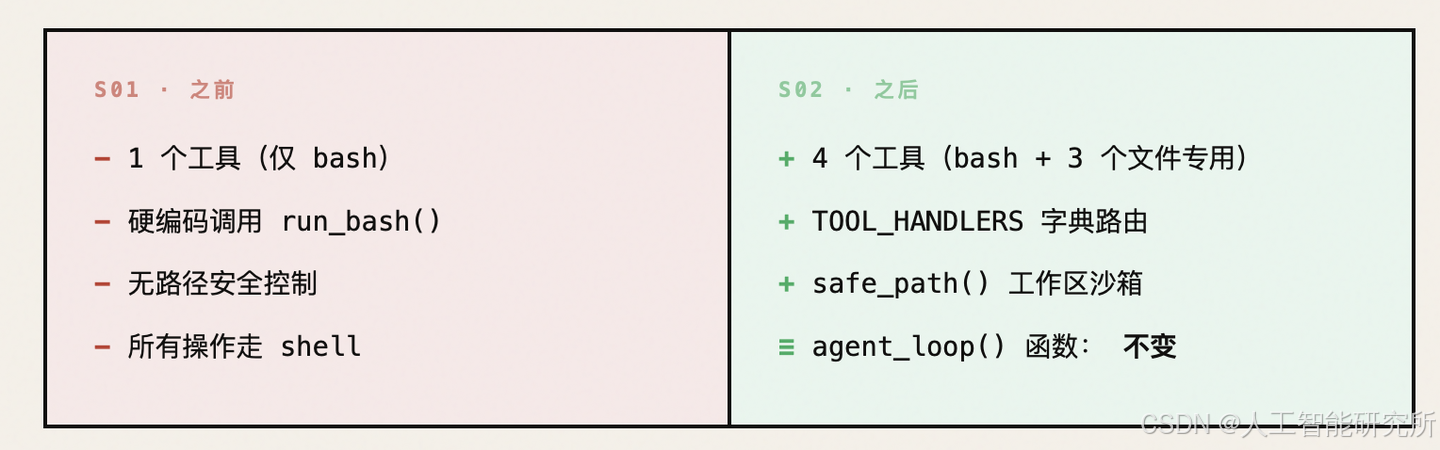
核心论点:循环体没动,只是把"硬编码的 bash 调用"换成了"字典查找的分发"。
二、新增部分解析
WORKDIR—— 工作区锚点
WORKDIR = Path.cwd()
# s01 中:
cwd=os.getcwd()          # 每次调用 run_bash 时传字符串
# s02 中:
WORKDIR = Path.cwd()     # 启动时确定一次,Path 对象
对比	os.getcwd() (字符串)	Path.cwd() (Path对象)
类型	str	pathlib.Path
路径拼接	os.path.join(cwd, p)	WORKDIR / p
解析相对路径	需要额外调用	.resolve() 一行搞定
判断子路径	字符串匹配,易出错	.is_relative_to() 精确判断
💡 改用 Path 不是风格偏好,而是为了后面 safe_path() 的精确路径校验做准备。
safe_path()—— 路径沙箱(最重要的新增)
def safe_path(p: str) -> Path:
    path = (WORKDIR / p).resolve()
    if not path.is_relative_to(WORKDIR):
        raise ValueError(f"Path escapes workspace: {p}")
    return path
第一步:拼接 + 解析
path = (WORKDIR / p).resolve()
WORKDIR = Path("/home/user/project")
p = "../secrets/passwords.txt"
# WORKDIR / p  →  Path("/home/user/project/../secrets/passwords.txt")
# .resolve()   →  Path("/home/user/secrets/passwords.txt")  ← 自动解析了 ..
.resolve() 会:
- 解析所有 ..(上级目录)
- 解析所有 .(当前目录)
- 解析符号链接(symlinks)
- 返回绝对路径
没有 resolve(),../ 攻击就防不住。
第二步:判断是否逃逸
if not path.is_relative_to(WORKDIR):
    raise ValueError(f"Path escapes workspace: {p}")
# WORKDIR = Path("/home/user/project")

"/home/user/project/src/main.py"  .is_relative_to(WORKDIR)  → True  ✅ 允许
"/home/user/secrets/passwords"    .is_relative_to(WORKDIR)  → False ❌ 拦截
"/etc/passwd"                     .is_relative_to(WORKDIR)  → False ❌ 拦截
攻击防御示例
模型尝试: read_file(path="../../etc/passwd")
         │
         ▼ safe_path 处理
WORKDIR / "../../etc/passwd" → resolve() → "/etc/passwd"
         │
         ▼ is_relative_to 检查
"/etc/passwd".is_relative_to("/home/user/project") → False
         │
         ▼ 抛出异常
ValueError: Path escapes workspace: ../../etc/passwd
         │
         ▼ run_read 捕获异常
返回 "Error: Path escapes workspace: ../../etc/passwd"
这就是为什么需要专用工具而不是全部走 bash——bash 里的 cat ../../etc/passwd 很难完美拦截,但 read_file 在入口处就一把锁住。

三个新工具处理函数
run_read()—— 读文件
def run_read(path: str, limit: int = None) -> str:
    try:
        text = safe_path(path).read_text()       # 路径沙箱 + 读取
        lines = text.splitlines()                # 按行拆分
        if limit and limit < len(lines):
            lines = lines[:limit] + [f"... ({len(lines) - limit} more lines)"]
        return "\n".join(lines)[:50000]          # 截断保护
    except Exception as e:
        return f"Error: {e}"
机制	作用
safe_path(path)	第一道防线:路径沙箱
limit 参数	模型可以只读前 N 行,避免把 10000 行的文件全塞进上下文
"... (N more lines)"	明确告知模型"文件没读完",让它知道还有内容
[:50000]	第二道防线:即使 limit 没设,也硬截断
try/except	文件不存在、权限不足等异常全部优雅处理
对比 bash 方式读文件的痛点:
# bash 方式的问题:
cat file.py                    # 大文件直接爆炸
head -100 file.py              # 截断不可预测(按字节不是按行)
sed -n '1,100p' file.py       # 特殊字符可能出错
run_write()—— 写文件
def run_write(path: str, content: str) -> str:
    try:
        fp = safe_path(path)
        fp.parent.mkdir(parents=True, exist_ok=True)  # 自动创建父目录
        fp.write_text(content)
        return f"Wrote {len(content)} bytes to {path}"
    except Exception as e:
        return f"Error: {e}"
# 关键行解析:
fp.parent.mkdir(parents=True, exist_ok=True)
参数	含义
parents=True	递归创建所有不存在的父目录(类似 mkdir -p)
exist_ok=True	目录已存在时不报错
💡 这样模型不需要先 mkdir 再写文件,一步到位。
run_edit()—— 精确编辑文件
def run_edit(path: str, old_text: str, new_text: str) -> str:
    try:
        fp = safe_path(path)
        content = fp.read_text()
        if old_text not in content:                  # 精确匹配检查
            return f"Error: Text not found in {path}"
        fp.write_text(content.replace(old_text, new_text, 1))  # 只替换第一个
        return f"Edited {path}"
    except Exception as e:
        return f"Error: {e}"
这个工具的设计哲学是 “查找-替换” 而非 “行号编辑”:
# ❌ 行号方式(Cursor、早期 Copilot 的做法):
# "把第 10 行改成 xxx"
# 问题:如果前面加了/删了行,行号全错

# ✅ 文本匹配方式(Claude Code 的做法):
# "把 'def hello():' 替换成 'def hello(name):'"
# 精确匹配,不怕行号漂移
content.replace(old_text, new_text, 1)
#                                     ↑
#                          count=1,只替换第一个匹配
#                          防止文件中多处相同文本被全部替换
if old_text not in content:
    return f"Error: Text not found in {path}"
这行很重要——如果模型"幻觉"了要替换的文本(文件里根本没有),立即报错让它重试,而不是静默失败。
TOOL_HANDLERS—— 分发字典(架构核心)
TOOL_HANDLERS = {
    "bash":       lambda **kw: run_bash(kw["command"]),
    "read_file":  lambda **kw: run_read(kw["path"], kw.get("limit")),
    "write_file": lambda **kw: run_write(kw["path"], kw["content"]),
    "edit_file":  lambda **kw: run_edit(kw["path"], kw["old_text"], kw["new_text"]),
}
为什么用 lambda 包一层?
直接写 "bash": run_bash 不行吗?不行,因为参数签名不匹配:
# LLM 调用工具时,传入的是统一格式的字典:
block.input = {"command": "ls -la"}      # bash
block.input = {"path": "a.py", "limit": 50}  # read_file

# 如果直接映射函数:
handler = TOOL_HANDLERS["bash"]
handler(block.input)
# 等价于 run_bash({"command": "ls -la"})
# 但 run_bash 期望的签名是 run_bash(command: str)
# 会报错:TypeError: run_bash() got an unexpected keyword argument 'command'
# 等等...其实这个例子刚好能工作

# 但 read_file 就有问题了:
handler = TOOL_HANDLERS["read_file"]
handler(block.input)
# 等价于 run_read(path="a.py", limit=50)  ← 这个其实也能工作

# 那为什么要 lambda?主要是为了:
# 1. 参数重命名(如果 LLM 参数名和函数参数名不一致)
# 2. 参数校验和默认值处理(如 kw.get("limit") 处理可选参数)
# 3. 统一的调用接口:所有 handler 都接受 **kw
对比S01的硬编码方式
# s01:硬编码 bash
for block in response.content:
    if block.type == "tool_use":
        output = run_bash(block.input["command"])   # 写死了 bash

# s02:字典分发
for block in response.content:
    if block.type == "tool_use":
        handler = TOOL_HANDLERS.get(block.name)     # 按名字查找
        output = handler(**block.input)              # 统一调用

s01 的扩展方式:                    s02 的扩展方式:
                                   ┌─────────────────────┐
if block.name == "bash":           │ TOOL_HANDLERS = {   │
    run_bash(...)                  │   "bash": ...,      │
elif block.name == "read":         │   "read_file": ..., │
    run_read(...)                  │   "write_file": ...,│
elif block.name == "write":        │   "edit_file": ..., │
    run_write(...)                 │   # 加新工具?       │
elif block.name == "edit":         │   "grep": ...,      │  ← 只加一行
    run_edit(...)                  │ }                   │
else:                             └─────────────────────┘
    error                         O(1) 查找,一行扩展
# O(n) 的 if-elif 链
# 加一个工具要加一个 elif
TOOLS—— 工具定义数组(告诉 LLM 有什么工具)
TOOLS = [
    {"name": "bash", "description": "Run a shell command.",
     "input_schema": {"type": "object", "properties": {"command": {"type": "string"}}, "required": ["command"]}},
    {"name": "read_file", "description": "Read file contents.",
     "input_schema": {"type": "object", "properties": {"path": {"type": "string"}, "limit": {"type": "integer"}}, "required": ["path"]}},
    {"name": "write_file", "description": "Write content to file.",
     "input_schema": {"type": "object", "properties": {"path": {"type": "string"}, "content": {"type": "string"}}, "required": ["path", "content"]}},
    {"name": "edit_file", "description": "Replace exact text in file.",
     "input_schema": {"type": "object", "properties": {"path": {"type": "string"}, "old_text": {"type": "string"}, "new_text": {"type": "string"}}, "required": ["path", "old_text", "new_text"]}},
]
四个工具的职责划分:
┌─────────────┬──────────────────────────────────┬──────────────┐
│ 工具         │ 职责                             │ 安全机制      │
├─────────────┼──────────────────────────────────┼──────────────┤
│ bash        │ 通用:ls, git, pip, pytest 等    │ 关键词黑名单  │
│ read_file   │ 专精:读文件内容                  │ 路径沙箱      │
│ write_file  │ 专精:创建/覆写文件               │ 路径沙箱      │
│ edit_file   │ 专精:精确局部修改                │ 路径沙箱+匹配  │
└─────────────┴──────────────────────────────────┴──────────────┘

设计原则:
- 能用专用工具就不用 bash(更安全、更精确)
- bash 作为兜底,处理专用工具覆盖不了的场景
每个工具的 input_schema 中:
- required 列表中的参数是必填的
- 不在 required 中的参数(如 limit)是可选的
# read_file 的 schema:
"required": ["path"]     # path 必填
# limit 不在 required 中 → 可选
# 模型可以调用 read_file(path="a.py") 或 read_file(path="a.py", limit=50)
agent_loop()—— 循环体的微妙变化
# s01                                          # s02
for block in response.content:                 for block in response.content:
    if block.type == "tool_use":                   if block.type == "tool_use":
        print(f"\033[33m$ {block.input              handler = TOOL_HANDLERS.get(block.name)
            ['command']}\033[0m")                    output = handler(**block.input) if handler \
        output = run_bash(block.input                      else f"Unknown tool: {block.name}"
            ["command"])                             print(f"> {block.name}:")
        print(output[:200])                           print(output[:200])
        results.append({...})                          results.append({...})
变化的只有工具执行部分,循环结构完全一致:
s01:  硬编码 run_bash(block.input["command"])
s02:  handler = TOOL_HANDLERS.get(block.name)     ← 字典查找
      output = handler(**block.input)              ← 统一调用
      if handler else "Unknown tool"               ← 优雅降级
新增的 else f"Unknown tool: {block.name}" 是防御性编程——如果模型"幻觉"了一个不存在的工具名,不会崩溃,而是返回错误信息让它重试。
三、用一个实际例子走完整个流程
用户输入:Edit greet.py to add a docstring to the function
假设 greet.py 当前内容:
def greet(name):
    print(f"Hello, {name}!")
循环第 1 轮
────────────────────────────────────────────────
messages = [{ role: "user", content: "Edit greet.py to add a docstring..." }]
│
▼ 发给 LLM(TOOLS 包含 4 个工具)
LLM 思考:"我需要先读文件看看当前内容"
│
▼ 响应
response.stop_reason = "tool_use"
response.content = [
{ type: "tool_use", name: "read_file", input: { path: "greet.py" } }
]
│
▼ 分发执行
handler = TOOL_HANDLERS["read_file"] → run_read
│
▼ safe_path 检查
"greet.py" → resolve → "/home/user/project/greet.py" ✅ 在工作区内
│
▼ 执行
> read_file:
def greet(name):
print(f"Hello, {name}!")
│
▼ 结果追加到 messages
messages = [..., assistant: [tool_use: read_file], user: [tool_result: 文件内容]]
循环第 2 轮
────────────────────────────────────────────────
│
▼ 发给 LLM(现在模型看到了文件内容)
LLM 思考:"我看到了函数,用 edit_file 在 def 下方插入 docstring"
│
▼ 响应
response.stop_reason = "tool_use"
response.content = [
{ type: "tool_use", name: "edit_file",
input: {
path: "greet.py",
old_text: "def greet(name):\n print(f\"Hello, {name}!\")",
new_text: "def greet(name):\n \"\"\"Greet someone by name.\"\"\"\n print(f\"Hello, {name}!\")"
}
}
]
│
▼ 分发执行
handler = TOOL_HANDLERS["edit_file"] → run_edit
│
▼ safe_path 检查 ✅
│
▼ 精确匹配检查
old_text 在文件内容中? → ✅ 找到了
│
▼ 替换(只替换第一个匹配)
> edit_file:
Edited greet.py
│
▼ 结果追加
循环第 3 轮
────────────────────────────────────────────────
│
▼ 发给 LLM
LLM 思考:"编辑成功了,任务完成"
│
▼ 响应
response.stop_reason = "end_turn" ← 不再是 "tool_use"!
response.content = [
{ type: "text", text: "Added a docstring to the greet function." }
]
│
▼ 退出循环,输出最终回复
"Added a docstring to the greet function."
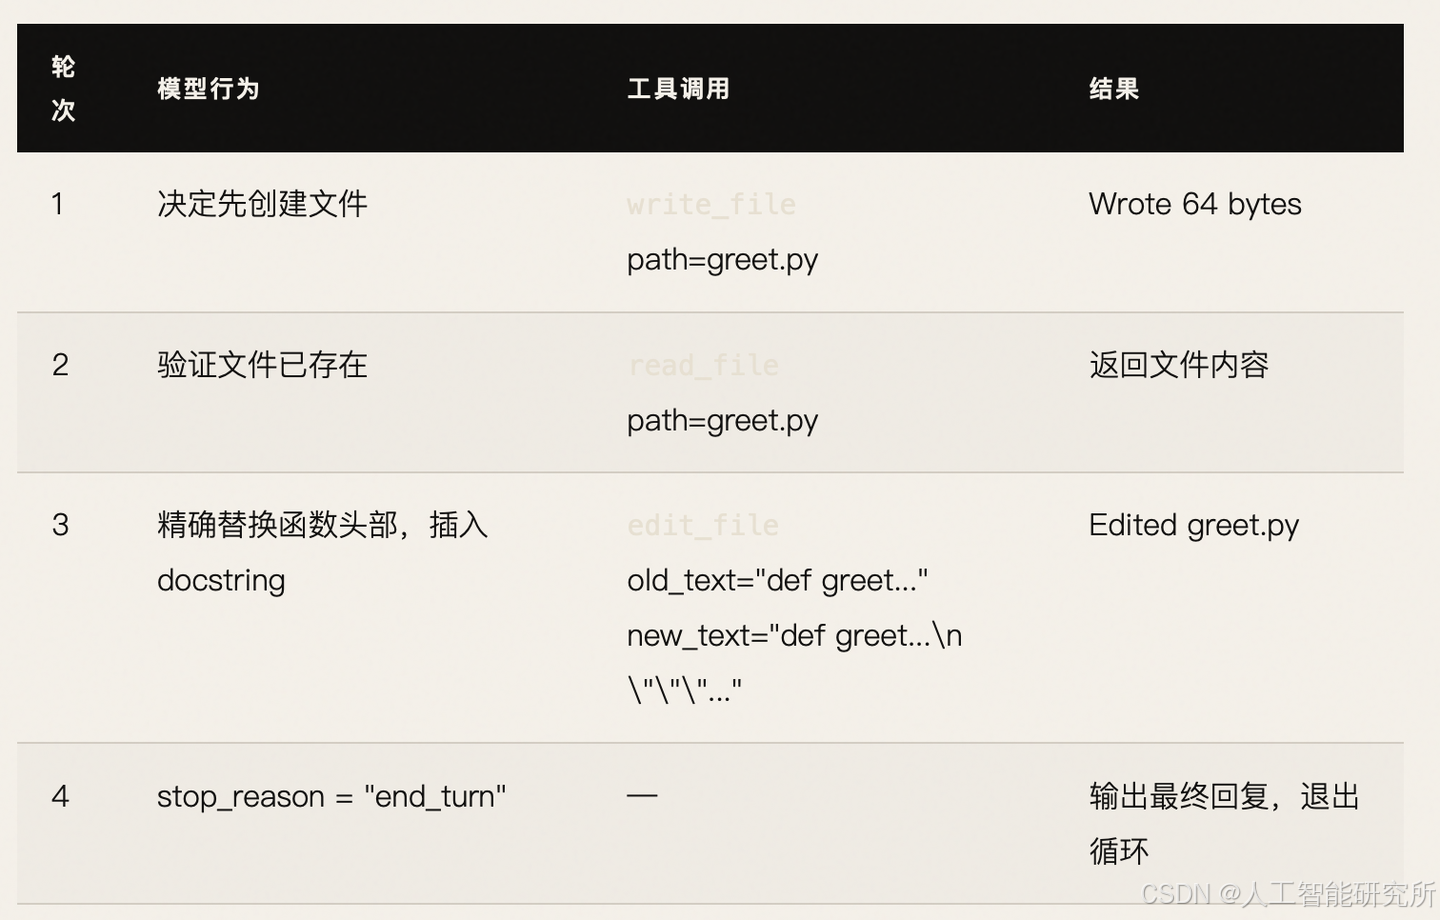
3 轮循环,调用了 2 个不同的工具(read_file → edit_file),这正是多工具分发的价值。
四、安全机制全景图
                    用户输入
                       │
                       ▼
              ┌─── LLM 决定调用工具 ───┐
              │                        │
              ▼                        ▼
         bash 工具                 文件工具
              │                  (read/write/edit)
              ▼                        │
    ┌─── dangerous 检查 ───┐           │
    │ rm -rf /            │           ▼
    │ sudo                │    ┌── safe_path 检查 ──┐
    │ shutdown            │    │ resolve() 解析 ..  │
    │ reboot              │    │ is_relative_to()   │
    │ > /dev/             │    │ 拒绝逃逸工作区     │
    └─────────┬───────────┘    └────────┬───────────┘
              │                        │
              ▼                        ▼
    ┌─── timeout 120s ───┐    ┌── 输出截断 50000 ──┐
    └─────────┬───────────┘    │ edit: 匹配检查     │
              │                └────────┬───────────┘
              │                        │
              └──────────┬─────────────┘
                         │
                         ▼
                   工具结果返回给 LLM
两层安全防御:
层级 bash 文件工具
入口检查 关键词黑名单(粗糙但快速) 路径沙箱(精确且可靠)
出口保护 超时 120s + 输出截断 输出截断 + 精确匹配
这就是 s02 说的"专用工具在工具层面做路径沙箱"——不是所有操作都走 bash 的粗糙黑名单,而是针对文件操作做精确的路径隔离。
五、扩展性:加一个新工具需要改什么?
假设要加一个 grep 工具,只需 两步:
# 第一步:写处理函数
def run_grep(pattern: str, path: str = ".") -> str:
    try:
        sp = safe_path(path)
        if sp.is_file():
            text = sp.read_text()
            matches = [l for l in text.splitlines() if pattern in l]
            return "\n".join(matches) if matches else "(no matches)"
        # 目录处理省略...
    except Exception as e:
        return f"Error: {e}"

# 第二步:注册到分发字典 + 工具定义
TOOL_HANDLERS["grep"] = lambda **kw: run_grep(kw["pattern"], kw.get("path", "."))

TOOLS.append({
    "name": "grep",
    "description": "Search for a pattern in files.",
    "input_schema": {
        "type": "object",
        "properties": {
            "pattern": {"type": "string"},
            "path": {"type": "string"}
        },
        "required": ["pattern"]
    }
})

# agent_loop?一行都不用改。
加工具 = 写 handler + 注册字典 + 加 schema
循环永远不变 ←←←←←←←←←←←←←←← 这是 s02 最重要的设计原则
到这里,你已经掌握了 Agent 工具扩展的核心设计模式:Dispatch Map + 路径沙箱 + 专用工具。循环从未改变,改变的只是它能调用的工具集合。
本节你学会了 agent 如何调用工具,那么模型如何管理多任务,对话越长,越容易忘记上下文,这些都是后期我们要介绍的内容了。
更多transformer,VIT,swin tranformer
参考头条号:人工智能研究所
v号:人工智能研究Suo, 启示AI科技
动画详解transformer 在线视频教程


有“AI”的1024 = 2048,欢迎大家加入2048 AI社区
更多推荐


 1
1 0
0- 0


 已为社区贡献58条内容

所有评论(0)