【Titan RA8P1 Board】MNIST 数字识别
本文介绍了瑞萨 Titan RA8P1 开发套件结合 MNIST 数据集、RUHMI 工具和 UART 串口功能实现手写数字识别的项目设计,包括环境搭建、工程构建、固件生成、命令行烧录、效果演示等,为相关产品在边缘 AI 领域的快速开发和应用设计提供了参考。
【Titan RA8P1 Board】MNIST 数字识别
本文介绍了瑞萨 Titan RA8P1 开发套件结合 MNIST 数据集、RUHMI 工具和 UART 串口功能实现手写数字识别的项目设计,包括环境搭建、工程构建、固件生成、命令行烧录、效果演示等。
项目介绍
- 环境搭建:pyOCD 部署、Keil CMSIS Pack 获取;
- 工程测试:工程创建、关键代码、工程编译;
- 固件上传:使用 pyOCD 工具将生成的 hex 固件通过命令行上传至板端;
MNIST
MNIST 数据集是一个大量手写数字集合,常用于训练各种图像处理系统。它是机器学习和计算机视觉领域的基础数据集。

MNIST 数据集由 Yann LeCun 及其同事于1994年创建。它包含7万张手写数字图像,其中6万张用于训练,1万张用于测试。每张图片为28x28像素的灰度图像,代表0到9的数字。该数据集来源于美国国家标准与技术研究院(NIST),经过归一化和调整尺寸以适应 28x28 格式。
数据集分为四个部分:
- 训练图像:train-images-idx3-ubyte.gz(9.45 MB,60,000 个样本)
- 训练标签:train-labels-idx1-ubyte.gz(28.2 KB,60,000 标签)
- 测试图像:t10k-images-idx3-ubyte.gz(1.57 MB,10,000 个样本)
- 测试标签:t10k-labels-idx1-ubyte.gz(4.43 KB,10,000个标签)。
每张图像以 28x28 像素矩阵表示,0 代表黑色,1 代表白色。标签以单热编码格式提供,表示图像所代表的数字。
MNIST 数据集可从官方网站下载:MNIST 数据集。
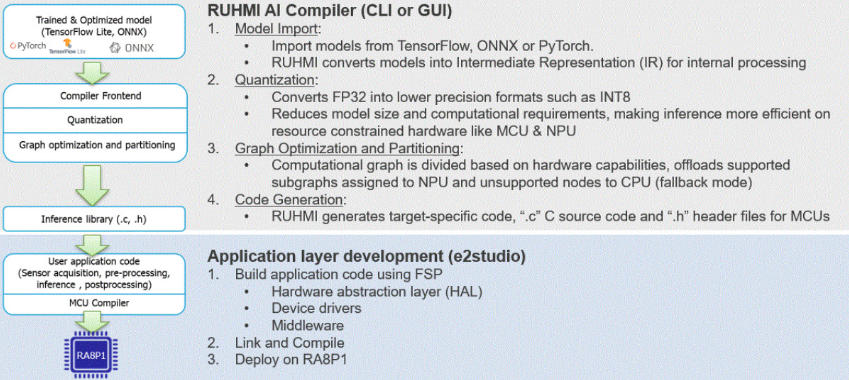
RUHMI
Robust Unified Heterogenous Model Integration(RUHMI) 是瑞萨电子推出的AI部署工具,旨在简化嵌入式设备中深度神经网络模型的部署。
-
该部署工具集成了 EdgeCortix® Mera™ 2.0 编译器,支持 TensorFlow Lite 和 ONNX 模型导入,可自动生成优化后的 C 源代码、头文件,以及二进制运行文件,可轻松编译并部署到 Renesas 开发板。
-
RUHMI 提供图形化界面(GUI):通过集成在 e2 studio 中的图形化界面,直观完成模型转换、生成代码和二次开发。
详见:renesas/ruhmi-framework-mcu .
UART
使用板载 USB-DEB 调试器虚拟串口,输出手写数字识别结果。
- 根据 Titan Board 原理图可知,DAP-Link 虚拟串口对应引脚为 SCI8 ;

- 虚拟串口连接 RA8P1 引脚为 P500 (RXD8) 和 P501 (TXD8);

详见:RT-Thread-Studio/sdk-bsp-ra8p1-titan-board .
工程创建
- 文件 - 新建 - 瑞萨 C/C++ 项目 -
Renesas RA; - 自定义设备选择
R7KA8P1KFLCAC,调试器选择 J-Link ; - 项目创建完成后,选择进入透视图模式;
- 配置时钟树,使能 SCICLK - HOLO 分频并设置为 48MHz;
- 进入
Stacks标签页,新建串口堆栈,配置串口参数,- 频道 6 ,波特率 115200,回调函数
user_uart6_callback;
- 频道 6 ,波特率 115200,回调函数
- 进入 BSP 标签页,配置属性
- Main stack size 设置为
0x4000 - Heap size 设置为
0x2000
- Main stack size 设置为
- 点击
Generate Project Content按钮,生成项目框架; - 右键项目文件夹,构建工程,确认无报错;
详见:PyOCD 调试 .
模型转换
使用 RUHMI 工具转换 MNIST 数据集模型 mnist-12.onnx 为 C 源码。
- 进入菜单栏
Renesas AI-AI Navi工具选项,选择Use Your Project & AI Model;

-
进入
Convert AI Model标签页,点击Convert...按钮; -
选择工程,设备 RA8 系列,工具为 RUHMI 编译器,模型选择 onnx 格式,配置输出路径,点击下一步;
-
配置
RUHMI Framework AI Compiler为已安装的 .venv 虚拟环境所在路径; -
点击
Start Quantization,待进度条完成,点击Next; -
进入转换流程,选择仅使用 CPU 推理的方案,配置权重保存位置等参数,点击
Start Conversion执行转换程序; -
待进度条完成,控制台输出
Success command字样,表明模型转换完成。
详见:RUHMI 环境搭建 .
C 源码
-
将 RUHMI 转换后的 C 源码文件
./conversion_results/converted/build/MCU/compilation/src/复制到./src目录;
-
编译和构建项目,确认无报错。
工程代码
包含串口通信测试、MNIST 通信测试代码。
UART
打开 ./src/hal_entry.c 文件,添加如下代码
#include "hal_data.h"
#include <stdio.h>

fsp_err_t err = FSP_SUCCESS;
volatile bool uart_send_complete_flag = false;
void user_uart8_callback (uart_callback_args_t * p_args)
{
    if(p_args->event == UART_EVENT_TX_COMPLETE)
    {
        uart_send_complete_flag = true;
    }
}

/*------------- 串口重定向 -------------*/
#ifdef __GNUC__
    #define PUTCHAR_PROTOTYPE int __io_putchar(int ch)
#else

#endif

PUTCHAR_PROTOTYPE
{
        err = R_SCI_B_UART_Write(&g_uart8_ctrl, (uint8_t *)&ch, 1);
        if(FSP_SUCCESS != err) __BKPT();
        while(uart_send_complete_flag == false){}
        uart_send_complete_flag = false;
        return ch;
}

int _write(int fd,char *pBuffer,int size)
{
    for(int i=0;i<size;i++)
    {
        __io_putchar(*pBuffer++);
    }
    return size;
}

/*******************
      * main()
********************/
void hal_entry(void)
{
    /* TODO: add your own code here */
    err = R_SCI_B_UART_Open(&g_uart8_ctrl, &g_uart8_cfg);
    assert(FSP_SUCCESS == err);
    while(1){
        printf("hello world!\n");
        R_BSP_SoftwareDelay (500, BSP_DELAY_UNITS_MILLISECONDS);
    }

#if BSP_TZ_SECURE_BUILD
    /* Enter non-secure code */
    R_BSP_NonSecureEnter();
#endif
}
保存代码文件,构建工程,生成 hex 固件;
MNIST
打开 ./src/hal_entry.c 文件,添加如下代码
#include "hal_data.h"
#include "compute_sub_0000.h"
#include <stdio.h>
#include <math.h>
#include <stdint.h>

#if (1 == BSP_MULTICORE_PROJECT) && BSP_TZ_SECURE_BUILD
bsp_ipc_semaphore_handle_t g_core_start_semaphore =
{
    .semaphore_num = 0
};
#endif

fsp_err_t err = FSP_SUCCESS;
volatile bool uart_send_complete_flag = false;
void user_uart8_callback (uart_callback_args_t * p_args)
{
    if(p_args->event == UART_EVENT_TX_COMPLETE)
    {
        uart_send_complete_flag = true;
    }
}

/*------------- 串口重定向 -------------*/
#ifdef __GNUC__
    #define PUTCHAR_PROTOTYPE int __io_putchar(int ch)
#else

#endif

PUTCHAR_PROTOTYPE
{
        err = R_SCI_B_UART_Write(&g_uart8_ctrl, (uint8_t *)&ch, 1);
        if(FSP_SUCCESS != err) __BKPT();
        while(uart_send_complete_flag == false){}
        uart_send_complete_flag = false;
        return ch;
}

int _write(int fd,char *pBuffer,int size)
{
    for(int i=0;i<size;i++)
    {
        __io_putchar(*pBuffer++);
    }
    return size;
}

/*------------- MNIST推理相关定义 -------------*/

/* 查看 compute_sub_0000.h 获取实际大小,MNIST-12通常为:
 * 输入:1x1x28x28 = 784
 * 输出:10
 * 中间缓冲区:kBufferSize_sub_0000
 */

/* 输入缓冲区:28x28 = 784个int8 */
static int8_t s_input_buffer[784];

/* 输出缓冲区:10个数字类别 */
static int8_t s_output_buffer[10];

/* 中间缓冲区 */
static uint8_t s_compute_buffer[kBufferSize_sub_0000];

/* 手写数字的测试数据(28x28灰度图,数值范围0-255) */
static const uint8_t digit_1_28x28[784] = {
 0,  0,  0,  0,  0,  0,  0,  0,  0,  0,  0,  0,  0,  0,  0,  0,  0,  0,  0,  0,  0,  0,  0,  0,  0,  0,  0,  0,
 0,  0,  0,  0,  0,  0,  0,  0,  0,  0,  0,  0,  0,  0,  0,  0,  0,  0,  0,  0,  0,  0,  0,  0,  0,  0,  0,  0,
 0,  0,  0,  0,  0,  0,  0,  0,  0,  0,  0,  0,  0,  0,  0,  0,  0,  0,  0,  0,  0,  0,  0,  0,  0,  0,  0,  0,
 0,  0,  0,  0,  0,  0,  0,  0,  0,  0,  0,  0,  0,  0,  0,  0,  0,  0,  0,  0,  0,  0,  0,  0,  0,  0,  0,  0,
 0,  0,  0,  0,  0,  0,  0,  0,  0,  0,  0,  0,  0,  0,  0,  0,  0,  0,  0,  0,  0,  0,  0,  0,  0,  0,  0,  0,
 0,  0,  0,  0,  0,  0,  0,  0,  0,  0,  0,  0,  0,  0,  0,  0,  0,  0,  0,  0,  0,  0,  0,  0,  0,  0,  0,  0,
 0,  0,  0,  0,  0,  0,  0,  0,  0,  0,  0,  0,  0,  0,  0,  0,  0,  0,  0,  0,  0,  0,  0,  0,  0,  0,  0,  0,
 0,  0,  0,  0,  0,  0,  0,  0,  0,  0,  0,  0,  0, 36, 56,137,201,199, 95, 37,  0,  0,  0,  0,  0,  0,  0,  0,
 0,  0,  0,  0,  0,  0,  0,  0,  0,  0,  0, 45,152,234,254,254,254,254,254,250,211,151,  6,  0,  0,  0,  0,  0,
 0,  0,  0,  0,  0,  0,  0,  0,  0, 46,153,240,254,254,227,166,133,251,200,254,229,225,104,  0,  0,  0,  0,  0,
 0,  0,  0,  0,  0,  0,  0,  0,153,234,254,254,187,142,  8,  0,  0,191, 40,198,246,223,253, 21,  0,  0,  0,  0,
 0,  0,  0,  0,  0,  0,  8,126,253,254,233,128, 11,  0,  0,  0,  0,210, 43, 70,254,254,254, 21,  0,  0,  0,  0,
 0,  0,  0,  0,  0,  0, 72,243,254,228, 54,  0,  0,  0,  0,  3, 32,116,225,242,254,255,162,  5,  0,  0,  0,  0,
 0,  0,  0,  0,  0,  0, 75,240,254,223,109,138,178,178,169,210,251,231,254,254,254,232, 38,  0,  0,  0,  0,  0,
 0,  0,  0,  0,  0,  0,  9,175,244,253,255,254,254,251,254,254,254,254,254,252,171, 25,  0,  0,  0,  0,  0,  0,
 0,  0,  0,  0,  0,  0,  0,  0, 16,136,195,176,146,153,200,254,254,254,254,150, 16,  0,  0,  0,  0,  0,  0,  0,
 0,  0,  0,  0,  0,  0,  0,  0,  0,  0,  0,  0,  0,  0,162,254,254,241, 99,  3,  0,  0,  0,  0,  0,  0,  0,  0,
 0,  0,  0,  0,  0,  0,  0,  0,  0,  0,  0,  0,  0,118,250,254,254, 90,  0,  0,  0,  0,  0,  0,  0,  0,  0,  0,
 0,  0,  0,  0,  0,  0,  0,  0,  0,  0,  0,  0,100,242,254,254,211,  7,  0,  0,  0,  0,  0,  0,  0,  0,  0,  0,
 0,  0,  0,  0,  0,  0,  0,  0,  0,  0,  0, 54,241,254,254,242, 59,  0,  0,  0,  0,  0,  0,  0,  0,  0,  0,  0,
 0,  0,  0,  0,  0,  0,  0,  0,  0,  0,  0,131,254,254,244, 64,  0,  0,  0,  0,  0,  0,  0,  0,  0,  0,  0,  0,
 0,  0,  0,  0,  0,  0,  0,  0,  0,  0, 13,249,254,254,152,  0,  0,  0,  0,  0,  0,  0,  0,  0,  0,  0,  0,  0,
 0,  0,  0,  0,  0,  0,  0,  0,  0, 12,228,254,254,208,  8,  0,  0,  0,  0,  0,  0,  0,  0,  0,  0,  0,  0,  0,
 0,  0,  0,  0,  0,  0,  0,  0,  0, 78,255,254,254, 66,  0,  0,  0,  0,  0,  0,  0,  0,  0,  0,  0,  0,  0,  0,
 0,  0,  0,  0,  0,  0,  0,  0,  0,209,254,254,137,  0,  0,  0,  0,  0,  0,  0,  0,  0,  0,  0,  0,  0,  0,  0,
 0,  0,  0,  0,  0,  0,  0,  0,  0,227,255,233, 25,  0,  0,  0,  0,  0,  0,  0,  0,  0,  0,  0,  0,  0,  0,  0,
 0,  0,  0,  0,  0,  0,  0,  0,  0,113,255,108,  0,  0,  0,  0,  0,  0,  0,  0,  0,  0,  0,  0,  0,  0,  0,  0,
 0,  0,  0,  0,  0,  0,  0,  0,  0,  0,  0,  0,  0,  0,  0,  0,  0,  0,  0,  0,  0,  0,  0,  0,  0,  0,  0,  0,
};

/* 打印28x28图像到串口(调试用) */
void print_image_ascii(const uint8_t *img)
{
    printf("\r\nInput Image (28x28):\r\n");
    for (int y = 0; y < 28; y++) {
        for (int x = 0; x < 28; x++) {
            uint8_t pixel = img[y * 28 + x];
            /* 简单ASCII艺术:根据灰度选择字符 */
            if (pixel > 200) printf("@@");
            else if (pixel > 150) printf("##");
            else if (pixel > 100) printf("++");
            else if (pixel > 50) printf("..");
            else printf("  ");
        }
        printf("\r\n");
    }
    printf("\r\n");
}

/* 将uint8图像数据转换为模型输入int8 */
void prepare_input(const uint8_t *src, int8_t *dst, int size)
{
    /* MNIST模型通常期望输入范围[0, 255]的int8 */
    for (int i = 0; i < size; i++) {
        /* 模型归一化 */
        dst[i] = (int8_t)src[i] / 255;
    }
}

/* 反量化并打印推理结果 */
void print_inference_result(int8_t *output)
{
    /* 假设量化参数:scale=1/255, zero_point=0 */
    /* 实际参数请查看RHU生成的模型量化信息 */
    const float scale = 1.0f / 255.0f;
    const int zero_point = 0;

    float probs[10];
    float max_prob = -1.0f;
    int predicted = 0;

    printf("\r\n========== Inference Result ==========\r\n");

    /* 反量化和softmax近似 */
    /* 注意:如果模型输出已经是概率,直接归一化即可 */

    /* 先找到最大值(数值稳定性) */
    int8_t max_val = output[0];
    for (int i = 1; i < 10; i++) {
        if (output[i] > max_val) max_val = output[i];
    }

    /* 计算exp并求和 */
    float sum_exp = 0.0f;
    for (int i = 0; i < 10; i++) {
        /* 反量化 */
        float val = (output[i] - zero_point) * scale;
        /* exp(x - max) 防止溢出 */
        probs[i] = expf(val - (max_val - zero_point) * scale);
        sum_exp += probs[i];
    }

    /* 归一化 */
    for (int i = 0; i < 10; i++) {
        probs[i] /= sum_exp;
        if (probs[i] > max_prob) {
            max_prob = probs[i];
            predicted = i;
        }
    }

    printf("Predicted Digit: %d (confidence: %.2f%%)\r\n", predicted, max_prob * 100);
    printf("\r\nProbability Distribution:\r\n");

    for (int i = 0; i < 10; i++) {
        printf("  Digit %d: %6.2f%% [", i, probs[i] * 100);

        /* 绘制条形图 */
        int bar_len = (int)(probs[i] * 30 + 0.5f);
        for (int j = 0; j < 30; j++) {
            printf(j < bar_len ? "=" : "-");
        }
        printf("]\r\n");
    }
    printf("======================================\r\n");
}

/*************************
 * main()
 ************************/
void hal_entry(void)
{
    /* TODO: add your own code here */
    err = R_SCI_B_UART_Open(&g_uart8_ctrl, &g_uart8_cfg);
    assert(FSP_SUCCESS == err);
    printf("\r\n");
    printf("========================================\r\n");
    printf("  RA8P1 MNIST-12 Inference Demo\r\n");
    printf("========================================\r\n");
    printf("\r\n");
    while(1){
        //printf("hello world!\n");
        //R_BSP_SoftwareDelay (500, BSP_DELAY_UNITS_MILLISECONDS);
        printf("--- Running inference ---\r\n");

        /* 1. 准备输入数据 */
        prepare_input(digit_1_28x28, s_input_buffer, 784);

        /* 2. 打印输入图像 */
        print_image_ascii(digit_1_28x28);

        /* 3. 执行推理 */
        compute_sub_0000(s_compute_buffer, s_input_buffer, s_output_buffer);

        /* 4. 打印推理结果 */
        print_inference_result(s_output_buffer);

        printf("Waiting 3 seconds...\r\n\r\n");
        R_BSP_SoftwareDelay (3000, BSP_DELAY_UNITS_MILLISECONDS);
    }
}
保存代码文件,构建工程,生成 hex 固件;
固件上传
-
连接开发板,检查设备管理器,存在 RA4M2 CMSIS-DAP 设备;
-
打开终端应用,执行如下指令
pyocd load --pack D:\31Pre-test\Renesas_RA8P1_Titan\code\Renesas.RA_DFP.6.4.0.pack -f 10000000 -t r7ja8p1ks D:\RenesasWorkspace\RA8P1_MNIST_UART\Debug\RA8P1_MNIST_UART.hex
待进度条走完,表明固件上传完成;

效果演示
-
运行串口调试助手软件,配置端口号、波特率等信息;
-
打开串口,可接收开发板发送的消息,连续打印
hello world文本;

数字识别
打开串口,可接收 RA8P1 的推理结果

总结
本文介绍了瑞萨 Titan RA8P1 开发套件结合 MNIST 数据集、RUHMI 工具和 UART 串口功能实现手写数字识别的项目设计,包括环境搭建、工程构建、固件生成、命令行烧录、效果演示等,为相关产品在边缘 AI 领域的快速开发和应用设计提供了参考。

有“AI”的1024 = 2048,欢迎大家加入2048 AI社区
更多推荐
 1
1 0
0- 0


 已为社区贡献24条内容

所有评论(0)