【保姆级教程】YOLO自定义模型在RDK X5上的完整部署:从训练到实时检测(踩坑全记录)
作者:Wuyang Hu全球通史
平台:地瓜派 RDK X5(Bayes-e BPU, 10 TOPS INT8)
模型:YOLO11n + HGNetV2 backbone(自定义火焰检测)
关键词:RDK X5、YOLO11、BPU量化、hobot_dnn、边缘AI部署、火焰检测
配套代码:https://github.com/1760hwy/YOLO_Native_model_quantization
📋 目录
1. 项目简介
1.1 做什么
将自定义训练的YOLO11火焰检测模型,部署到地瓜派RDK X5开发板上,实现实时检测。支持USB摄像头和RTSP网络摄像头两种输入方式。
1.2 整体流程
Windows训练 → ONNX导出 → 校准数据准备 → Docker量化 → 板端部署
    ↓              ↓              ↓              ↓           ↓
 best.pt     fire.onnx     *.f32文件     fire.bin    实时检测
1.3 硬件和软件要求
| 项目 | 要求 |
|---|---|
| 开发板 | 地瓜派 RDK X5(Bayes-e BPU) |
| 训练机器 | Windows/Linux + NVIDIA GPU |
| Docker | 地平线OE Docker镜像(openexplorer) |
| Python | 3.8+(训练机),板端自带 |
| Ultralytics | ≥8.1.0 |
主Windows电脑
YOLO训练Windows电脑
模型量化环境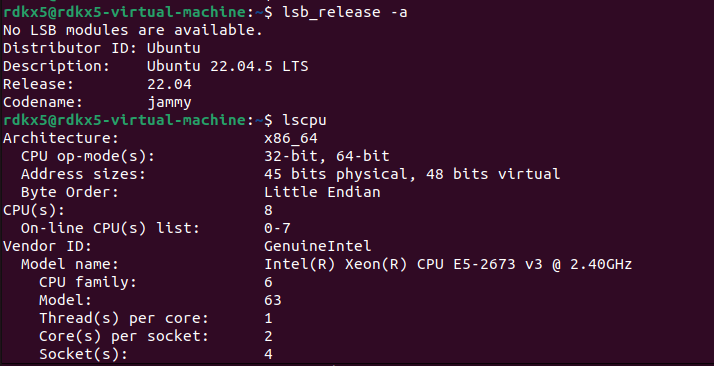
RDKX5环境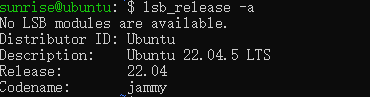
2. 环境准备
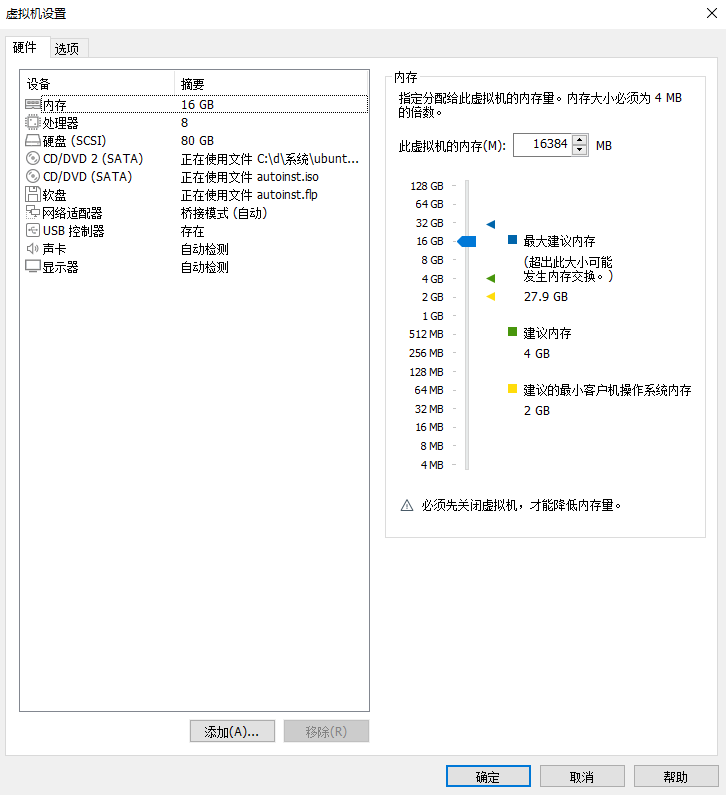
2.1 Windows训练环境
# 创建conda环境
conda create -n yolo11 python=3.10 -y
conda activate yolo11

# 安装PyTorch(根据你的CUDA版本选择)
pip install torch torchvision --index-url https://download.pytorch.org/whl/cu118

# 安装Ultralytics
pip install ultralytics

# 安装ONNX工具
pip install onnx onnxruntime
2.2 Docker量化环境
地平线提供了OE(Open Explorer)Docker镜像用于模型量化。
# 拉取Docker镜像(具体版本请参考地平线官方文档)
docker pull openexplorer/ai_toolchain:latest

# 启动容器,挂载工作目录
docker run -it --rm \
    -v /your/local/path:/fire_quant \
    openexplorer/ai_toolchain:latest \
    /bin/bash
⚠️ 重要提示:Docker容器中自带
hb_mapper工具,这是量化的核心工具。
2.3 板端环境
RDK X5出厂系统自带 hobot_dnn(pyeasy_dnn),无需额外安装。
# 在板子上验证
python3 -c "from hobot_dnn import pyeasy_dnn; print('OK')"
3. 模型训练
3.1 数据集准备
使用YOLO格式数据集。目录结构:
dataset/
├── images/
│   ├── train/
│   │   ├── img001.jpg
│   │   └── ...
│   └── val/
│       ├── img001.jpg
│       └── ...
└── labels/
    ├── train/
    │   ├── img001.txt    # 每行: class_id cx cy w h (归一化)
    │   └── ...
    └── val/
        ├── img001.txt
        └── ...
数据集配置文件 forestfire.yaml:
path: D:/LW/forestfire_yolo11/dataset
train: images/train
val: images/val

nc: 1
names: ['fire']
3.2 训练代码
# train.py
import warnings
warnings.filterwarnings('ignore')
from ultralytics import YOLO

if __name__ == '__main__':
    # 使用官方预训练权重,也可以是自己训练的权重
    model = YOLO("yolo11n.pt")

    model.train(
        data="forestfire.yaml",
        cache=False,
        imgsz=640,
        epochs=100,        # ★ 至少100个epoch,10个epoch不够用
        batch=60,
        close_mosaic=10,
        workers=1,
        device='0',
        optimizer='SGD',
        patience=0,
        project='results',
        name='fire-detect',
    )
🔴 重大坑点:如果只训练10个epoch(mAP50≈0.538),量化后在板端cls输出全部为强负数(max≈-10),sigmoid后接近0,完全无法检测。必须训练100个epoch以上。
3.3 验证训练结果
from ultralytics import YOLO

model = YOLO("results/fire-detect/weights/best.pt")
results = model.val()
print(f"mAP50: {results.box.map50:.3f}")
print(f"mAP50-95: {results.box.map:.3f}")
期望 mAP50 ≥ 0.65 才适合部署。
4. ONNX导出(关键步骤)
4.1 为什么不能直接用 model.export()
Ultralytics默认导出会把DFL(Distribution Focal Loss)解码和Sigmoid包含在ONNX图中。这些操作在BPU上量化效果极差(DFL中的Softmax会被放到CPU上执行,导致模型被分割成十几个子图,推理速度骤降)。
正确做法:自定义forward,只导出卷积输出,DFL和Sigmoid在后处理中用Python实现。
4.2 导出脚本(★ 核心文件)
# export_for_rdkx5.py
import os
os.environ["PYTORCH_ONNX_USE_LEGACY_EXPORTER"] = "1"
import warnings
warnings.filterwarnings('ignore')
import torch
import types
from ultralytics import YOLO

MODEL_PATH = "results/fire-detect/weights/best.pt"
ONNX_PATH  = "results/fire-detect/weights/fire_detect.onnx"

model = YOLO(MODEL_PATH)
head = model.model.model[-1]
print(f"Head: {head.__class__.__name__}, nc={head.nc}, nl={head.nl}")
print(f"cv2 type: {type(head.cv2)}")  # 应该是 ModuleList
print(f"cv3 type: {type(head.cv3)}")  # 应该是 ModuleList

# ★★★ 关键:6输出,保持NCHW格式,不做permute ★★★
# 这样输出格式和rdk_model_zoo的官方模型完全一致
def new_forward(self, x):
    result = []
    for i in range(self.nl):
        bbox = self.cv2[i](x[i])  # (B, 64, H, W)  ← NCHW
        cls = self.cv3[i](x[i])   # (B, nc, H, W)   ← NCHW
        result.append(bbox)        # 偶数索引: bbox
        result.append(cls)         # 奇数索引: cls
    return result

head.forward = types.MethodType(new_forward, head)

model.model.eval()
dummy = torch.randn(1, 3, 640, 640)
with torch.no_grad():
    out = model.model(dummy)

print(f"\nOutputs: {len(out)}")
for i, o in enumerate(out):
    print(f"  [{i}]: {o.shape}")
# 预期输出:
#   [0]: torch.Size([1, 64, 80, 80])  ← bbox_P3
#   [1]: torch.Size([1, 1, 80, 80])   ← cls_P3
#   [2]: torch.Size([1, 64, 40, 40])  ← bbox_P4
#   [3]: torch.Size([1, 1, 40, 40])   ← cls_P4
#   [4]: torch.Size([1, 64, 20, 20])  ← bbox_P5
#   [5]: torch.Size([1, 1, 20, 20])   ← cls_P5

torch.onnx.export(
    model.model, dummy, ONNX_PATH,
    input_names=['images'],
    output_names=[
        'bbox_P3', 'cls_P3',
        'bbox_P4', 'cls_P4',
        'bbox_P5', 'cls_P5'
    ],
    opset_version=11,
    do_constant_folding=True,
)

print(f"\n✅ Exported: {ONNX_PATH}")
print(f"   Size: {os.path.getsize(ONNX_PATH)/1024/1024:.1f} MB")

# 验证ONNX
import onnx
m = onnx.load(ONNX_PATH)
softmax_nodes = [n.name for n in m.graph.node if 'Softmax' in n.op_type]
print(f"\n   Softmax nodes: {len(softmax_nodes)}")
print(f"   Names: {softmax_nodes}")
# 应该只有1个Softmax(来自attention block),没有DFL的Softmax
运行:
cd D:\LW\forestfire_yolo11
python export_for_rdkx5.py
4.3 导出验证清单
| 检查项 | 期望值 | 说明 |
|---|---|---|
| 输出数量 | 6 | bbox×3 + cls×3 |
| 输出格式 | NCHW | 不能是NHWC! |
| bbox shape | (1,64,H,W) | 64 = 4 × reg_max(16) |
| cls shape | (1,nc,H,W) | nc=类别数 |
| Softmax节点 | 仅1个 | 来自attention,不含DFL |
🔴 巨坑:NCHW vs NHWC
之前我在导出时加了
.permute(0,2,3,1)转成NHWC,导致输出shape变成(1,80,80,64)而不是(1,64,80,80)。而官方rdk_model_zoo中所有能正常检测的模型都是NCHW格式。
虽然BPU可以处理NHWC,但后处理代码(reshape方式)与NCHW是强耦合的。不做permute,保持NCHW是最安全的做法。
5. 校准数据准备(最大坑点)
5.1 这是整个流程中最容易出错的一步
校准数据的格式必须与量化配置yaml中的设定严格匹配。搞错了量化不会报错,但模型输出会完全崩溃。
5.2 量化yaml中的关键参数
input_parameters:
  input_type_rt: 'nv12'          # 板端运行时输入NV12
  input_type_train: 'rgb'        # 训练时输入RGB
  input_layout_train: 'NCHW'     # 训练时layout
  norm_type: 'data_scale'
  scale_value: '0.003921568627451'  # = 1/255
这段配置的含义是:
- BPU会自动做
×(1/255)归一化 - 所以校准数据应该是 0~255范围的原始像素值
- 颜色通道是 RGB(不是BGR)
- Layout是 NCHW
5.3 校准数据生成脚本(★ 最关键的文件)
# prepare_calibration.py
"""
校准数据预处理脚本 - RDK X5
输出:RGB, float32, NCHW, 0~255范围
保存为 .f32 二进制文件

★★★ 绝对不能做 /255 归一化!BPU的scale_value会自动做!★★★
"""
import cv2
import numpy as np
import os
from pathlib import Path
import random
import sys

def prepare_calibration_data(
    src_dir: str,
    dst_dir: str,
    input_size: int = 640,
    num_samples: int = 100,
    seed: int = 42
):
    os.makedirs(dst_dir, exist_ok=True)

    exts = [".jpg", ".jpeg", ".png", ".bmp", ".webp"]
    image_files = []
    for e in exts:
        image_files += list(Path(src_dir).glob(f"*{e}"))
        image_files += list(Path(src_dir).glob(f"*{e.upper()}"))

    print(f"Found {len(image_files)} images in: {src_dir}")
    if len(image_files) == 0:
        return 0

    if len(image_files) < num_samples:
        print(f"Warning: only {len(image_files)} images, using all")
        num_samples = len(image_files)

    random.seed(seed)
    random.shuffle(image_files)
    image_files = image_files[:num_samples]

    print(f"Generating {num_samples} calibration files")
    print(f"  Input size: {input_size}x{input_size}")
    print(f"  Format: RGB float32 NCHW, 0~255 range")

    ok = 0
    for p in image_files:
        img = cv2.imread(str(p))
        if img is None:
            continue

        h, w = img.shape[:2]

        # Step 1: Letterbox resize(和训练时一致)
        scale = min(input_size / h, input_size / w)
        nh, nw = int(h * scale), int(w * scale)
        resized = cv2.resize(img, (nw, nh), interpolation=cv2.INTER_LINEAR)

        canvas = np.full((input_size, input_size, 3), 114, dtype=np.uint8)
        top = (input_size - nh) // 2
        left = (input_size - nw) // 2
        canvas[top:top + nh, left:left + nw] = resized

        # Step 2: BGR → RGB
        rgb = cv2.cvtColor(canvas, cv2.COLOR_BGR2RGB)

        # Step 3: 转float32,保持0~255范围
        # ★★★ 不做 /255!BPU的scale_value: 0.003921568627451 会自动归一化 ★★★
        rgb_f32 = rgb.astype(np.float32)

        # Step 4: HWC → CHW (NCHW)
        nchw = rgb_f32.transpose(2, 0, 1)  # (3, 640, 640)

        # Step 5: 保存为二进制
        out_path = os.path.join(dst_dir, f"{ok:06d}.f32")
        nchw.tofile(out_path)
        ok += 1

        if ok % 20 == 0 or ok == num_samples:
            print(f"  Processed {ok}/{num_samples}")

    file_size_mb = input_size * input_size * 3 * 4 / 1024 / 1024
    print(f"\nDone! {ok} files generated")
    print(f"  Per file: {file_size_mb:.2f} MB")
    print(f"  Output dir: {dst_dir}")
    return ok

if __name__ == "__main__":
    src = sys.argv[1] if len(sys.argv) > 1 else "./dataset/images/train"
    dst = sys.argv[2] if len(sys.argv) > 2 else "./calibration_f32"
    size = int(sys.argv[3]) if len(sys.argv) > 3 else 640
    num = int(sys.argv[4]) if len(sys.argv) > 4 else 100

    cnt = prepare_calibration_data(src, dst, size, num)
    if cnt == 0:
        print("ERROR: No calibration files generated!")
        sys.exit(1)
运行:
# 在Windows或Linux上运行
python prepare_calibration.py ./dataset/images/train ./calibration_f32 640 100
5.4 校准数据验证
生成后务必验证:
# verify_calibration.py
import numpy as np
import os

cal_dir = "./calibration_f32"
files = sorted([f for f in os.listdir(cal_dir) if f.endswith('.f32')])
print(f"Total files: {len(files)}")

# 检查第一个文件
data = np.fromfile(os.path.join(cal_dir, files[0]), dtype=np.float32)
print(f"Shape: {data.shape} (should be {3*640*640} = 1228800)")
data = data.reshape(3, 640, 640)
print(f"Min: {data.min():.1f} (should be ~0)")
print(f"Max: {data.max():.1f} (should be ~255)")
print(f"Mean: {data.mean():.1f} (should be ~100-140)")

# ★ 如果max接近1.0而不是255,说明做了错误的/255归一化!
if data.max() < 2.0:
    print("\n🔴 ERROR: Data appears to be normalized to 0~1!")
    print("   Calibration data MUST be in 0~255 range!")
    print("   BPU's scale_value will handle the /255 normalization!")
🔴🔴🔴 这是整个项目中最大的坑 🔴🔴🔴
之前我的校准数据做了两次归一化:
- 校准脚本中
/255→ 数据范围变成 0~1- BPU的
scale_value: 0.003921568627451(=1/255) 又做了一次结果等效于
pixel / 255 / 255 = pixel / 65025这导致量化后的cls输出全部崩塌为强负数(max≈-10~-21),sigmoid后全部为0,一个检测框都出不来。
而且这个错误不会在量化过程中报错,Chebyshev distance看起来还不错,只有在板端推理时才会发现问题。
6. Docker环境量化
6.1 准备文件
将以下文件传入Docker挂载目录:
/fire_quant/
├── fire_detect.onnx          # ONNX模型
├── fire_detect_config.yaml   # 量化配置
└── calibration_f32/          # 校准数据目录
    ├── 000000.f32
    ├── 000001.f32
    └── ... (100个文件)
6.2 量化配置文件
# fire_detect_config.yaml
model_parameters:
  onnx_model: './fire_detect.onnx'
  march: 'bayes-e'
  output_model_file_prefix: 'fire_detect'
  node_info: {
    "/model.10/m/m.0/attn/Softmax": {
      'ON': 'BPU',
      'InputType': 'int16',
      'OutputType': 'int16'
    }
  }

input_parameters:
  input_name: 'images'
  input_type_rt: 'nv12'
  input_type_train: 'rgb'
  input_layout_train: 'NCHW'
  input_shape: '1x3x640x640'
  norm_type: 'data_scale'
  scale_value: '0.003921568627451'

calibration_parameters:
  cal_data_dir: '/fire_quant/calibration_f32'
  cal_data_type: 'float32'
  calibration_type: 'max'

compiler_parameters:
  compile_mode: 'latency'
  optimize_level: 'O3'
  debug: False
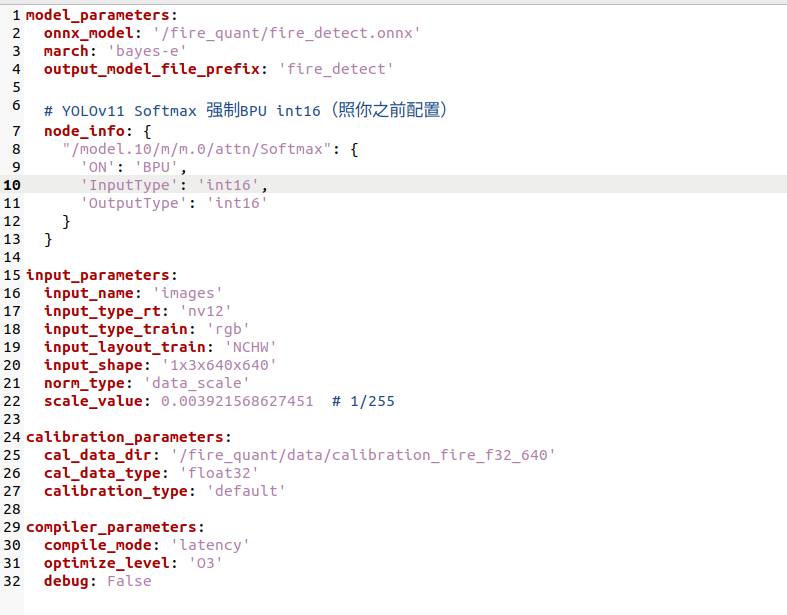
6.3 关于 node_info 的说明
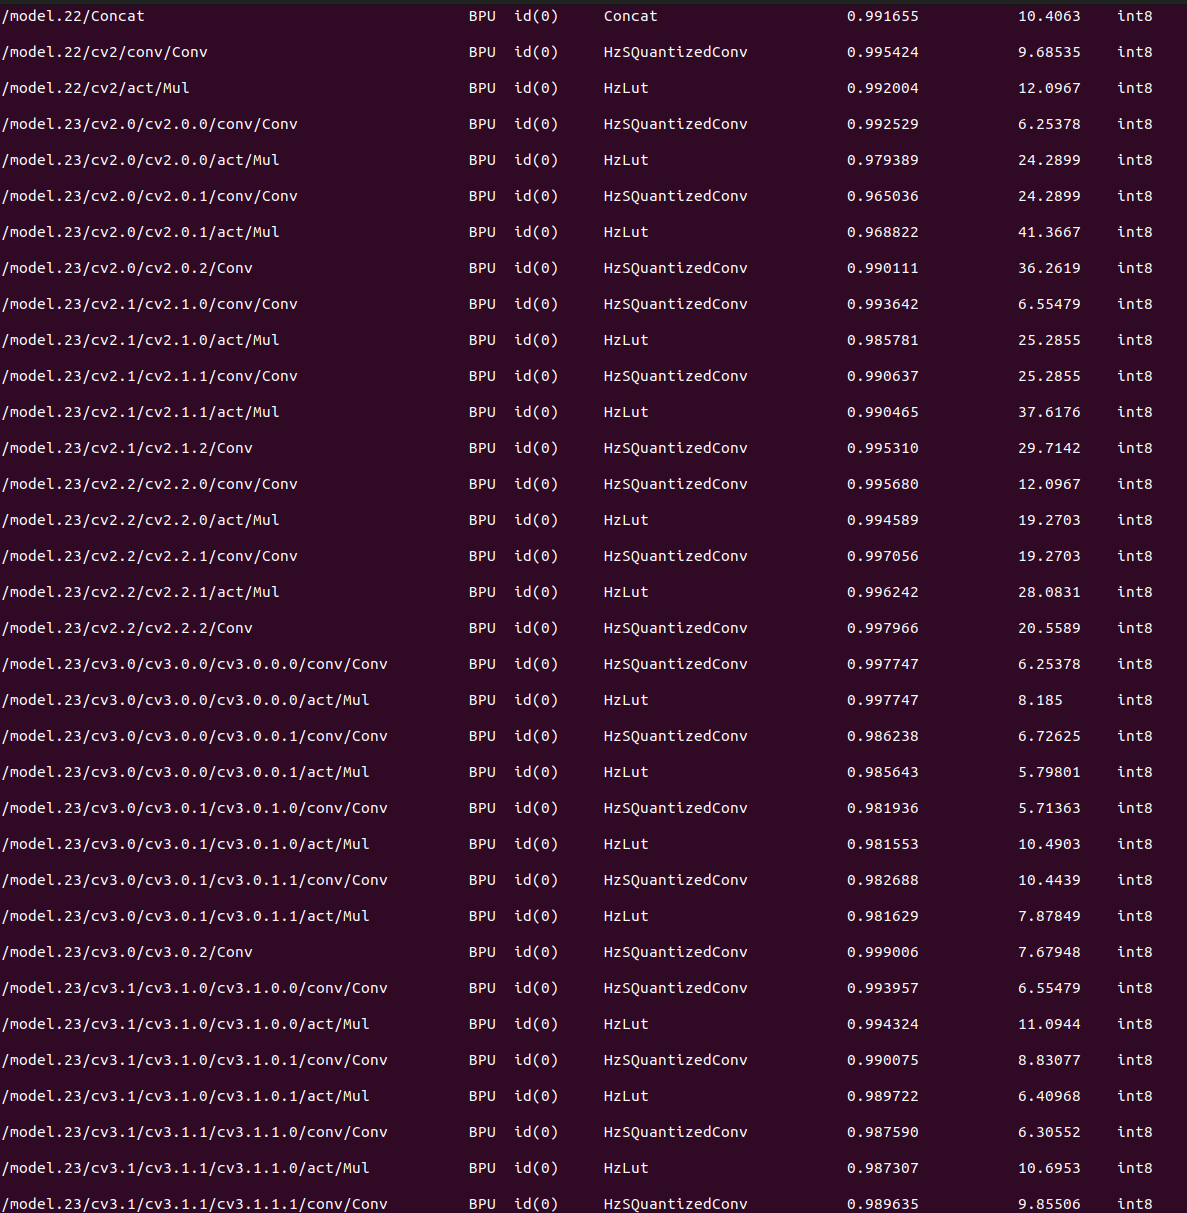
YOLO11的attention block包含一个Softmax节点,默认会被放到CPU上执行。这会将模型拆分成多个子图,推理速度从100+ FPS暴跌到个位数FPS。
通过 node_info 强制将Softmax放到BPU上以INT16精度执行,可以保持模型为单图或少量子图。
如何确定Softmax节点名:
# 在Docker中运行
python3 -c "
import onnx
m = onnx.load('fire_detect.onnx')
for n in m.graph.node:
    if 'Softmax' in n.op_type:
        print(f'{n.name} -> {n.op_type}')
"
- YOLO11n: 通常只有1个 →
/model.10/m/m.0/attn/Softmax - YOLO11s/m: 可能有2个 → 都需要在node_info中指定
- 不同的yaml配置(backbone结构不同),节点路径可能不同
6.4 执行量化
cd /fire_quant

# Step 1: 检查ONNX
hb_mapper checker \
    --model-type onnx \
    --march bayes-e \
    --model fire_detect.onnx

# 查看输出:
# - subgraph数量(越少越好,理想是1-2个)
# - FPS估算

# Step 2: 执行量化
hb_mapper makertbin \
    --model-type onnx \
    --config fire_detect_config.yaml

# 输出文件在 model_output/ 目录下
ls -la model_output/
# fire_detect.bin     ← 这就是板端用的量化模型
# fire_detect_quantized_model.onnx  ← 量化后的ONNX(用于验证)
6.5 量化结果验证
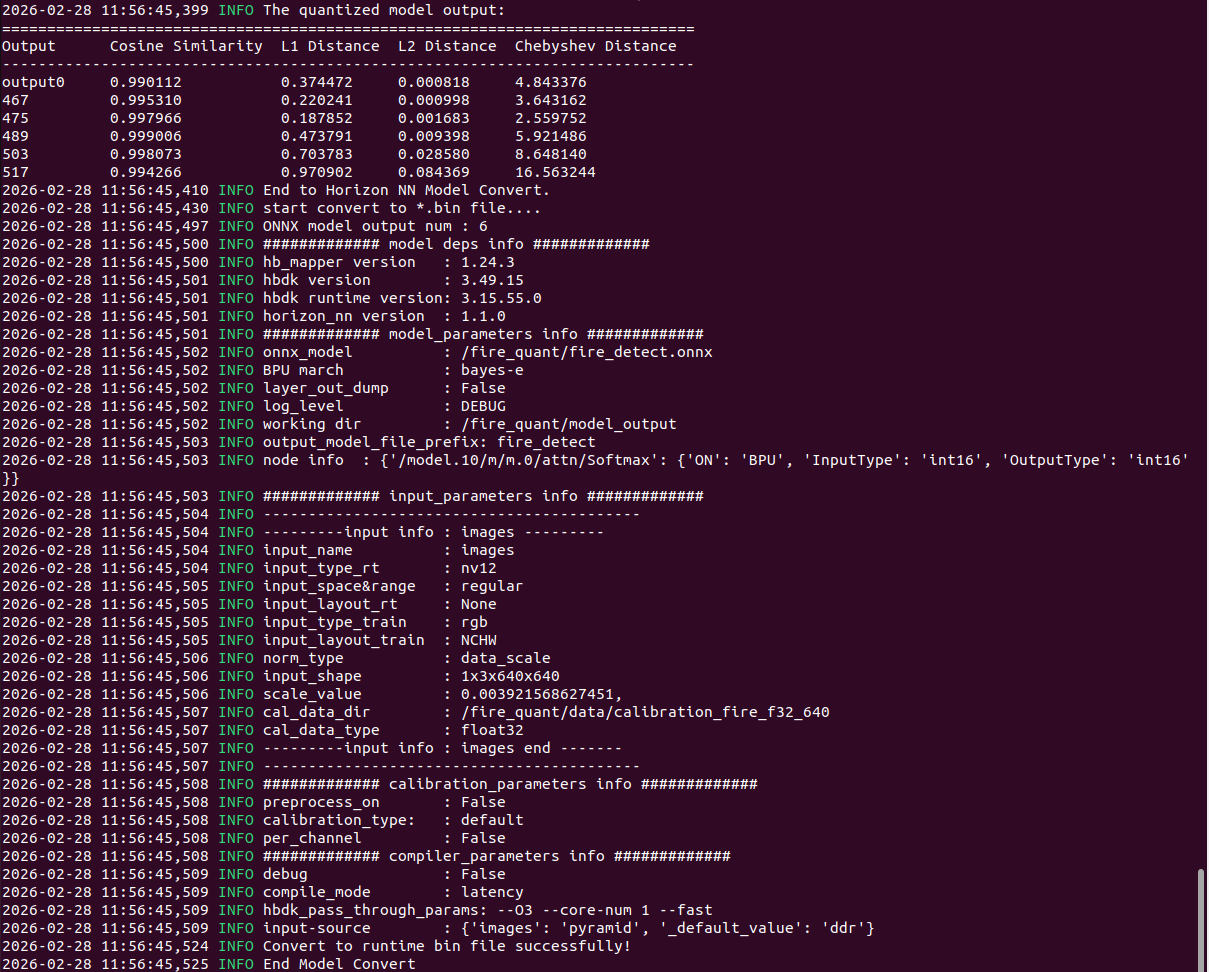
量化日志中关注以下指标:
| 指标 | 好的值 | 差的值 | 说明 |
|---|---|---|---|
| Cosine Similarity | ≥0.99 | <0.95 | 越接近1越好 |
| Chebyshev Distance | <0.5 | >2.0 | 越小越好 |
| 子图数 | 1-2 | >5 | 越少越好 |
关于Chebyshev Distance:
- cls输出的Chebyshev < 0.5 基本就能正常检测
- 如果 > 2.0,检测会出问题
- bbox输出的Chebyshev可以稍大一些(因为DFL解码有容错性)
6.6 在Docker中验证float推理
在传到板子之前,先在Docker中用float32验证模型能否检测:
# docker_verify.py
import onnxruntime as ort
import numpy as np
import cv2

sess = ort.InferenceSession('./fire_detect.onnx')

# 读取一张有火焰的测试图
img = cv2.imread('/fire_quant/calibration_f32/../test_fire.jpg')
h, w = img.shape[:2]
scale = min(640/h, 640/w)
nh, nw = int(h*scale), int(w*scale)
resized = cv2.resize(img, (nw, nh))
canvas = np.full((640, 640, 3), 114, dtype=np.uint8)
top, left = (640-nh)//2, (640-nw)//2
canvas[top:top+nh, left:left+nw] = resized

# BGR→RGB, HWC→NCHW, /255
rgb = cv2.cvtColor(canvas, cv2.COLOR_BGR2RGB)
data = rgb.astype(np.float32).transpose(2, 0, 1)[np.newaxis] / 255.0

outputs = sess.run(None, {'images': data})
for i, out in enumerate(outputs):
    print(f"Output[{i}]: shape={out.shape}")
    if out.shape[1] == 1:  # cls output
        from scipy.special import expit as sigmoid
        sig = sigmoid(out)
        print(f"  cls sigmoid max: {sig.max():.4f}")
        # 如果这个值 > 0.5,说明float模型本身能检测到火焰
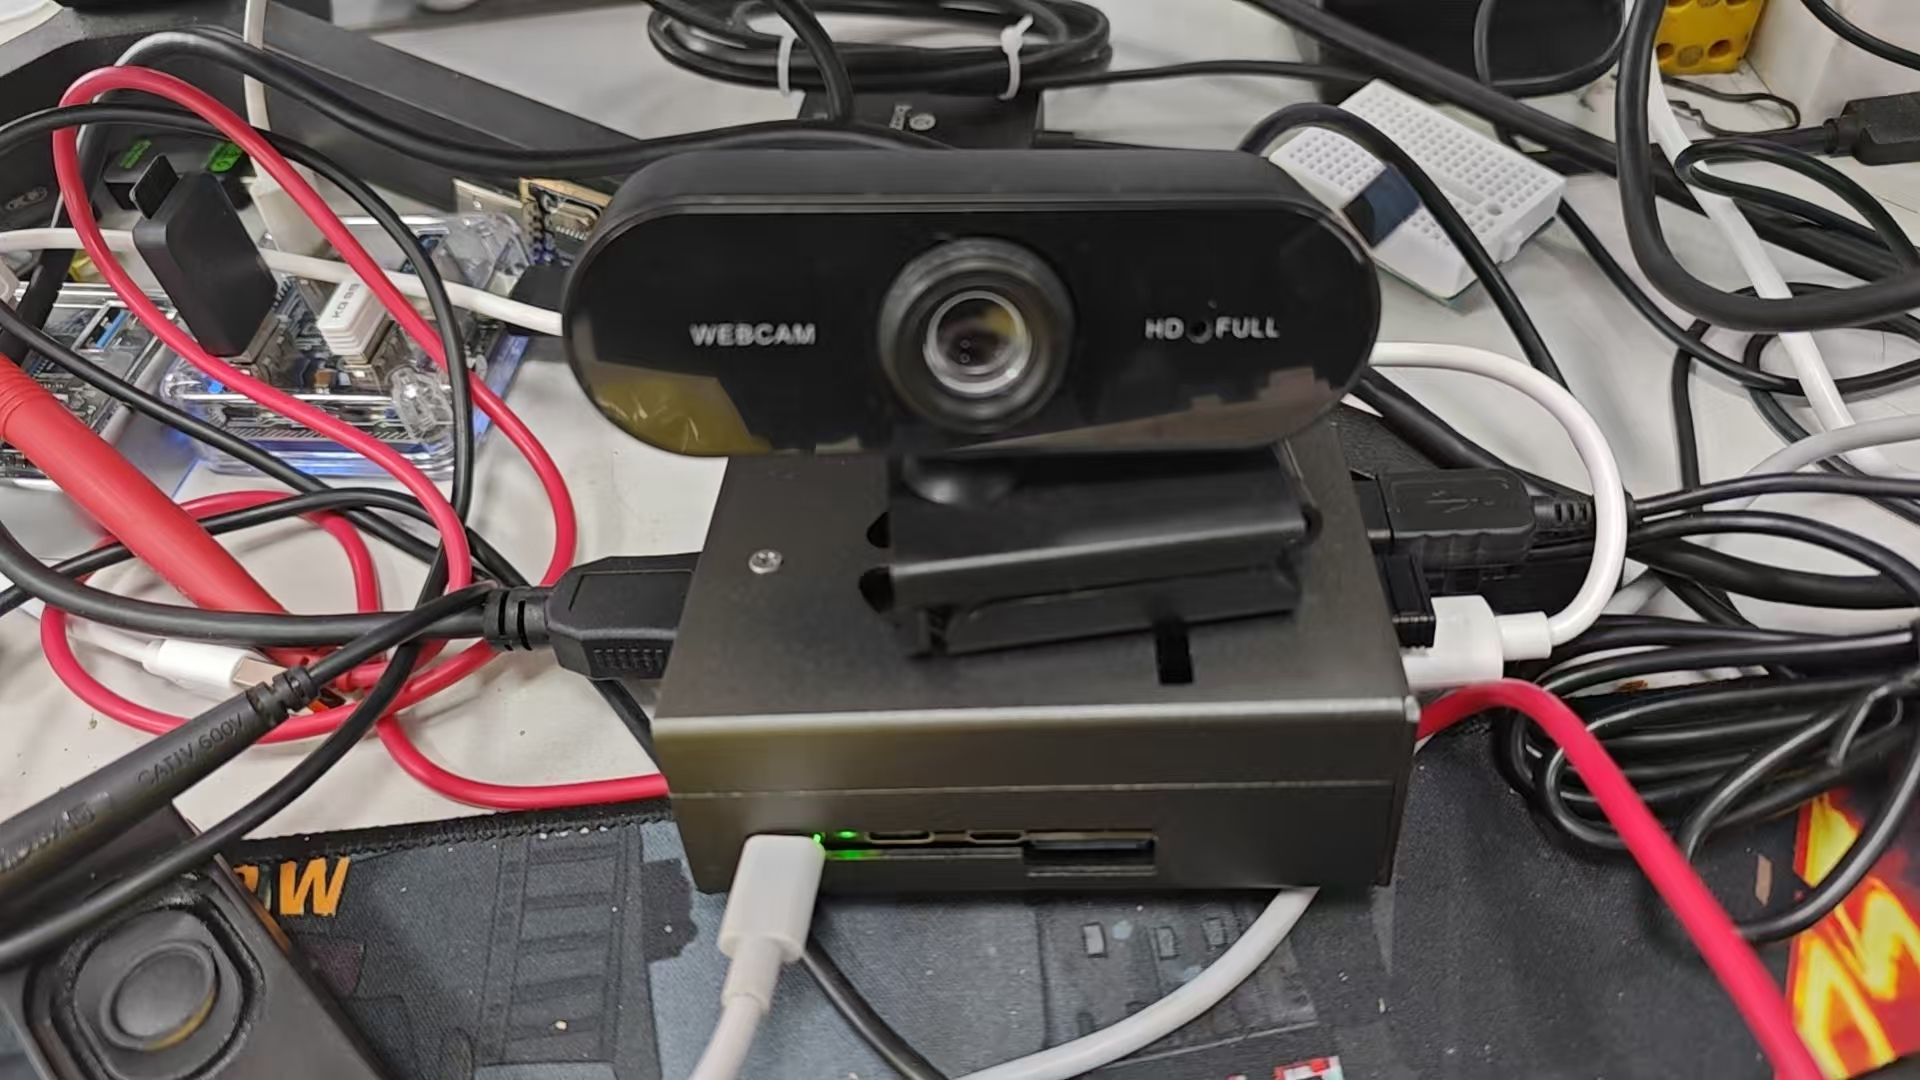
7. 板端部署与推理
7.1 传输模型到板子
# 从Docker容器拷贝到宿主机
docker cp <container_id>:/fire_quant/model_output/fire_detect.bin ./

# 从宿主机传到板子
scp fire_detect.bin sunrise@<板子IP>:/home/sunrise/
7.2 验证模型加载
# 在板子上运行
python3 << 'EOF'
from hobot_dnn import pyeasy_dnn as dnn
import numpy as np

models = dnn.load('/home/sunrise/fire_detect.bin')
model = models[0]

print(f"Outputs: {len(model.outputs)}")
for i, out in enumerate(model.outputs):
    p = out.properties
    print(f"  Output[{i}]: shape={p.shape}, layout={p.layout}")

# 期望输出(和grapes等官方模型完全一致):
# Output[0]: shape=(1, 64, 80, 80), layout=NCHW
# Output[1]: shape=(1, 1, 80, 80),  layout=NCHW
# Output[2]: shape=(1, 64, 40, 40), layout=NCHW
# Output[3]: shape=(1, 1, 40, 40),  layout=NCHW
# Output[4]: shape=(1, 64, 20, 20), layout=NCHW
# Output[5]: shape=(1, 1, 20, 20),  layout=NCHW
EOF
🔴 如果你的输出是NHWC格式(如
(1,80,80,64)),说明导出时多做了permute,需要回去重新导出。
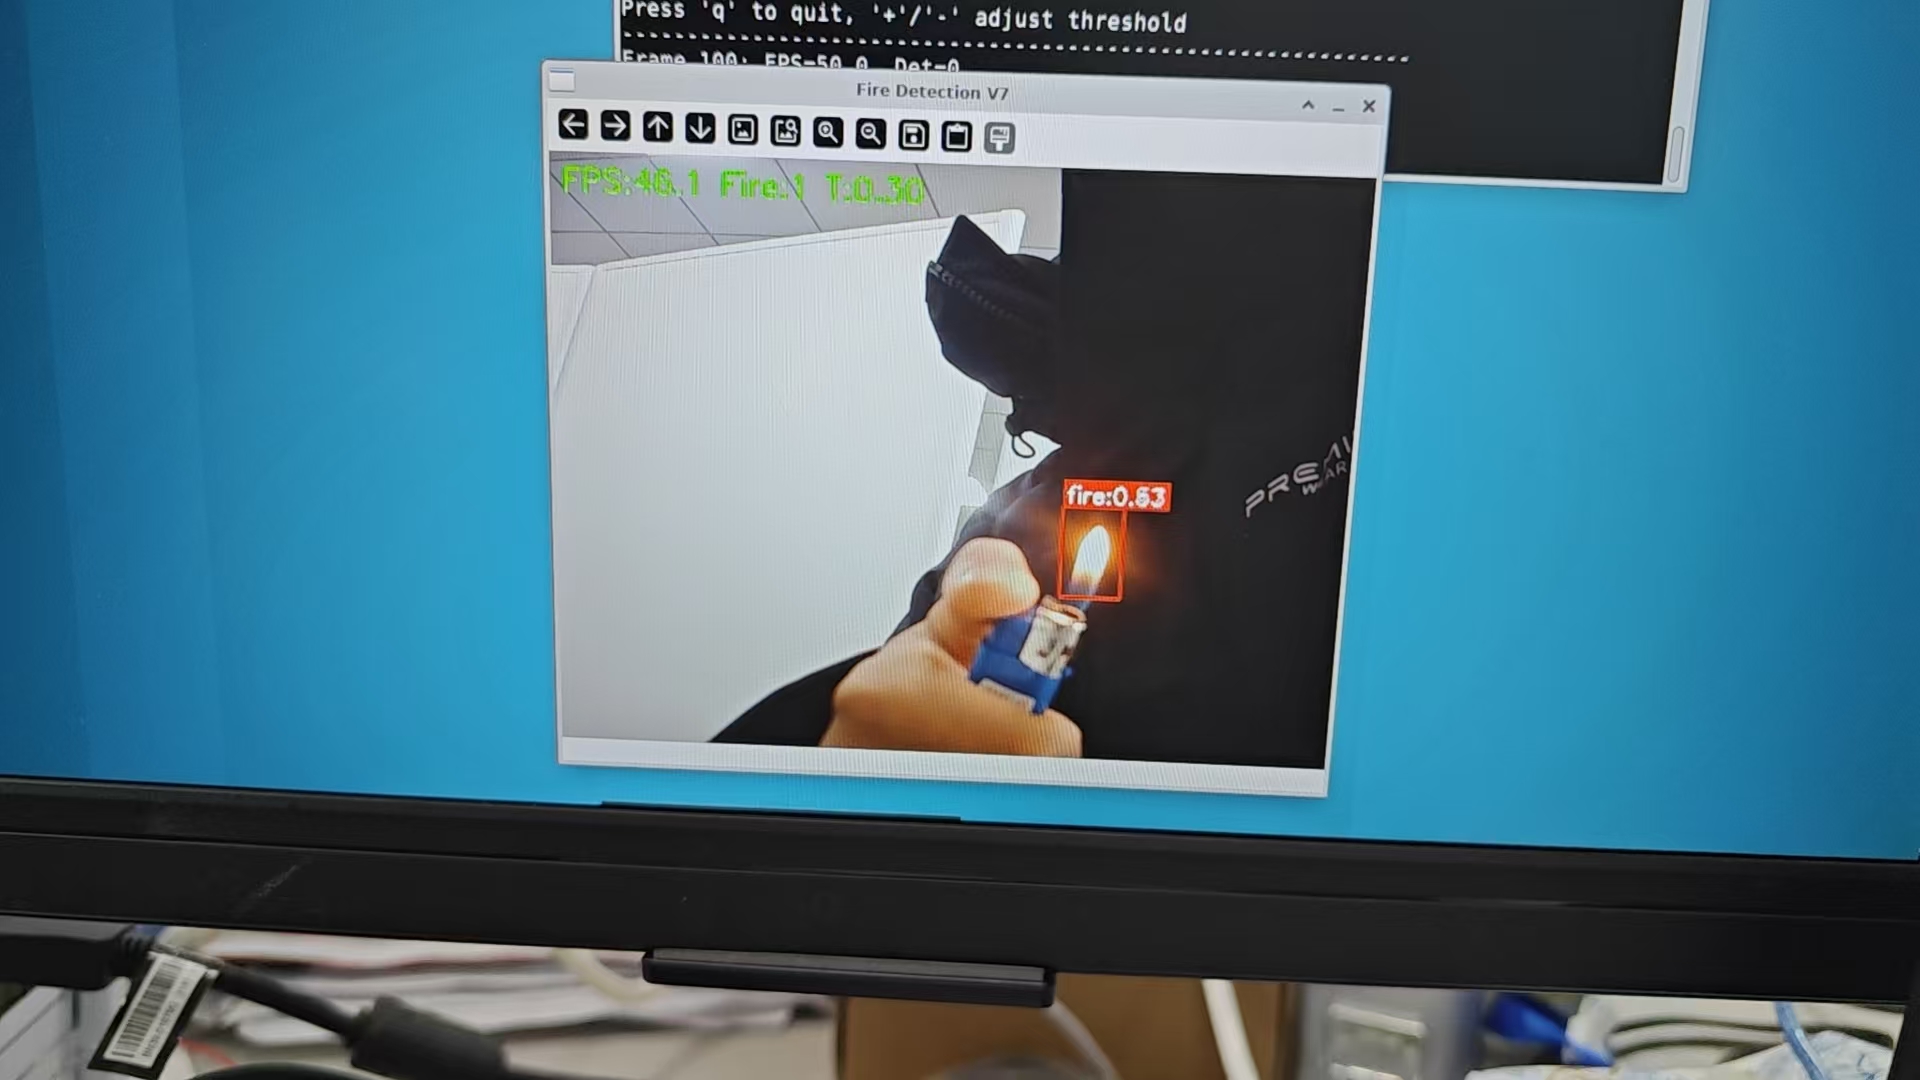
7.3 推理脚本(V7最终版)
完整代码见仓库 scripts/rtsp_fire_v7.py,这里说明核心逻辑:
7.3.1 NV12预处理
def bgr_to_nv12(self, img):
    """BGR转NV12(带letterbox)"""
    h, w = img.shape[:2]
    scale = min(self.input_h / h, self.input_w / w)
    new_h, new_w = int(h * scale), int(w * scale)
    resized = cv2.resize(img, (new_w, new_h))

    # Letterbox padding (灰色114)
    canvas = np.full((self.input_h, self.input_w, 3), 114, dtype=np.uint8)
    top = (self.input_h - new_h) // 2
    left = (self.input_w - new_w) // 2
    canvas[top:top+new_h, left:left+new_w] = resized

    # BGR → YUV_I420 → NV12
    yuv = cv2.cvtColor(canvas, cv2.COLOR_BGR2YUV_I420)
    y = yuv[:self.input_h, :]
    u = yuv[self.input_h:self.input_h + self.input_h//4, :].reshape(
        self.input_h//2, self.input_w//2)
    v = yuv[self.input_h + self.input_h//4:, :].reshape(
        self.input_h//2, self.input_w//2)
    uv = np.stack([u, v], axis=-1).reshape(self.input_h//2, self.input_w)
    nv12 = np.concatenate([y, uv], axis=0)
    return nv12, scale, left, top
7.3.2 输出解析(自动适配NCHW/NHWC)
def _parse_heads(self):
    """按shape自动匹配bbox(64ch)和cls(nc ch)输出"""
    bbox_map, cls_map = {}, {}
    for idx, out in enumerate(self.model.outputs):
        shp = list(out.properties.shape)
        if shp[1] == 64:       # NCHW bbox
            bbox_map[(shp[2], shp[3])] = (idx, "NCHW")
        elif shp[-1] == 64:    # NHWC bbox
            bbox_map[(shp[1], shp[2])] = (idx, "NHWC")
        elif shp[1] in (1, self.num_classes):  # NCHW cls
            cls_map[(shp[2], shp[3])] = (idx, "NCHW")
        elif shp[-1] in (1, self.num_classes):  # NHWC cls
            cls_map[(shp[1], shp[2])] = (idx, "NHWC")

    # 按空间分辨率匹配bbox和cls
    heads = []
    for hw in sorted(bbox_map.keys(), key=lambda x: -x[0]):
        b_idx, b_fmt = bbox_map[hw]
        c_idx, c_fmt = cls_map[hw]
        stride = self.input_h // hw[0]
        heads.append({...})
    return heads
7.3.3 DFL解码
def dfl_decode(self, bbox_raw):
    """
    DFL: 64通道 → 4个ltrb偏移值
    64 = 4方向 × 16个bin
    """
    bbox = bbox_raw.reshape(-1, 4, 16)
    # Softmax over 16 bins
    bbox_exp = np.exp(bbox - np.max(bbox, axis=-1, keepdims=True))
    bbox_sm = bbox_exp / np.sum(bbox_exp, axis=-1, keepdims=True)
    # Weighted sum: E[x] = Σ(i * P(i))
    weights = np.arange(16, dtype=np.float32).reshape(1, 1, -1)
    ltrb = np.sum(bbox_sm * weights, axis=-1)  # (N, 4)
    return ltrb
7.3.4 坐标还原
# grid cell中心 → 像素坐标
x_center = (grid_x + 0.5) * stride
y_center = (grid_y + 0.5) * stride

# ltrb偏移 → xyxy
x1 = (x_center - ltrb[:, 0] * stride - pad_left) / scale
y1 = (y_center - ltrb[:, 1] * stride - pad_top) / scale
x2 = (x_center + ltrb[:, 2] * stride - pad_left) / scale
y2 = (y_center + ltrb[:, 3] * stride - pad_top) / scale
7.4 运行
# USB摄像头
python3 rtsp_fire_v7.py --source 0 --conf 0.3

# RTSP摄像头
python3 rtsp_fire_v7.py --source "rtsp://admin:password@192.168.1.100:554/stream1" --conf 0.3

# 调高阈值减少误检
python3 rtsp_fire_v7.py --source 0 --conf 0.5
8. 踩坑记录与解决方案
坑1:校准数据双重归一化(★★★ 最致命)
| 项目 | 错误做法 | 正确做法 |
|---|---|---|
| 像素值范围 | img / 255.0(0~1) |
img.astype(np.float32)(0~255) |
| 归一化 | 脚本做一次 + BPU再做一次 | 只让BPU做(通过scale_value) |
症状:量化完成无报错,但板端推理所有cls输出为强负数(max≈-10~-21),sigmoid后为0。
排查方法:
# 在板端打印cls输出
outputs = model.forward(nv12)
for i, out in enumerate(outputs):
    buf = np.array(out.buffer)
    if buf.shape[1] == 1:  # cls
        print(f"cls[{i}]: max={buf.max():.4f}, sigmoid={1/(1+np.exp(-buf.max())):.6f}")
# 如果sigmoid全部接近0 → 校准数据有问题
坑2:NCHW vs NHWC输出格式不匹配
| 项目 | 错误做法 | 正确做法 |
|---|---|---|
| 导出时 | bbox.permute(0,2,3,1) |
直接输出,不permute |
| 输出shape | (1, 80, 80, 64) NHWC |
(1, 64, 80, 80) NCHW |
症状:后处理reshape对不上,要么完全不出框,要么出一堆乱框。
排查方法:
# 对比你的模型和官方模型的输出格式
for i, out in enumerate(model.outputs):
    print(f"Output[{i}]: shape={out.properties.shape}, layout={out.properties.layout}")
# 应该和rdk_model_zoo的官方YOLO模型输出格式一致
坑3:BPU输出顺序可能被重排
BPU编译器可能重排输出顺序。不要硬编码 outputs[0] 一定是bbox_P3。
解决方案:按shape动态匹配,C=64的是bbox,C=nc的是cls。
坑4:Shared Conv量化失败(针对自定义Detect头)
如果使用了LSDECD等自定义Detect头(共享卷积层),单个INT8 scale无法覆盖P3/P4/P5三种不同分辨率的特征分布。
| Detect头类型 | cv2/cv3结构 | 量化结果 |
|---|---|---|
| Standard Detect | ModuleList[3],每级独立Conv |
✅ 每级独立量化scale |
| Detect_LSDECD | 单个Conv2d共享调用3次 |
❌ 单个scale覆盖不了 |
解决方案:使用Standard Detect头,或将共享Conv改为独立Conv。
坑5:训练epoch不足
| epoch数 | mAP50 | 板端效果 |
|---|---|---|
| 10 | ~0.54 | 完全无检测 |
| 50 | ~0.63 | 偶尔检测到 |
| 100 | ~0.70 | 正常检测 |
坑6:Attention Softmax未放到BPU
症状:checker显示十几个子图,FPS估算只有几帧。
解决方案:在量化yaml的node_info中指定Softmax强制上BPU。
坑7:文件传输未验证
Docker量化的bin文件和板端的bin文件md5不一致。
解决方案:每次传输后验证md5:
# Docker中
md5sum model_output/fire_detect.bin

# 板端
md5sum /home/sunrise/fire_detect.bin

# 两个值必须完全一致!
9. 性能优化建议
9.1 推理速度
| 优化项 | 效果 |
|---|---|
| Softmax强制BPU(INT16) | FPS: 7 → 40+ |
| compile_mode: latency | 比bandwidth快15%左右 |
| optimize_level: O3 | 最高优化等级 |
9.2 检测精度
| 优化项 | 说明 |
|---|---|
| 增加训练epoch | 100 → 200 可能还有提升 |
| 增加校准数据数量 | 50 → 100张 |
使用 calibration_type: kl |
某些情况下比max更好 |
| 增加面积过滤 | 去掉极小的误检框 |
| 调高conf_thresh | 0.3 → 0.5 减少误检 |
9.3 减少误检
V7版本中内置了一些措施:
- 面积过滤:去掉面积 < 100像素的框
- sigmoid clip:防止数值溢出
- 运行时阈值调节:按
+/-键实时调整
10. 完整文件清单
Windows端
| 文件 | 用途 |
|---|---|
train.py |
训练脚本 |
export_for_rdkx5.py |
ONNX导出(★关键) |
prepare_calibration.py |
校准数据生成(★最关键) |
verify_calibration.py |
校准数据验证 |
forestfire.yaml |
数据集配置 |
Docker端
| 文件 | 用途 |
|---|---|
fire_detect.onnx |
ONNX模型 |
fire_detect_config.yaml |
量化配置 |
calibration_f32/ |
校准数据目录 |
docker_verify.py |
Docker中float验证 |
板端(RDK X5)
| 文件 | 用途 |
|---|---|
fire_detect.bin |
量化后模型 |
rtsp_fire_v7.py |
推理脚本(USB/RTSP) |
diagnose.py |
输出诊断脚本 |
测试(RDK X5)
#!/usr/bin/env python3
"""
火焰检测 V7 - RDK X5
更新:红色检测框、置信度滤波优化、自动NV12/RTSP/USB
"""
import os
import cv2
import numpy as np
import time
from hobot_dnn import pyeasy_dnn as dnn
os.environ.setdefault(
"OPENCV_FFMPEG_CAPTURE_OPTIONS",
"rtsp_transport;tcp|fflags;nobuffer|flags;low_delay|max_delay;0"
)
def sigmoid(x):
return 1.0 / (1.0 + np.exp(-np.clip(x, -50, 50)))
class FireDetectorV7:
def __init__(self, model_path, conf_thresh=0.30, nms_thresh=0.50,
class_names=("fire",)):
self.conf_thresh = float(conf_thresh)
self.nms_thresh = float(nms_thresh)
self.reg_max = 16
self.class_names = list(class_names)
self.num_classes = len(self.class_names)
models = dnn.load(model_path)
self.model = models[0]
in_shape = list(self.model.inputs[0].properties.shape)
self.input_h = int(in_shape[2]) if in_shape[1] == 3 else int(in_shape[1])
self.input_w = int(in_shape[3]) if in_shape[1] == 3 else int(in_shape[2])
print(f"Model loaded: {self.input_w}x{self.input_h}")
# 解析输出头
self.heads = self._parse_heads()
for h in self.heads:
H, W = h["hw"]
gy, gx = np.meshgrid(np.arange(H), np.arange(W), indexing="ij")
h["grid"] = np.stack([gx, gy], axis=-1).reshape(-1, 2).astype(np.float32)
def _parse_heads(self):
bbox_map, cls_map = {}, {}
for idx, out in enumerate(self.model.outputs):
shp = list(out.properties.shape)
if len(shp) != 4:
continue
# 判断NCHW还是NHWC
if shp[1] == 64: # NCHW bbox
bbox_map[(shp[2], shp[3])] = (idx, "NCHW")
elif shp[-1] == 64: # NHWC bbox
bbox_map[(shp[1], shp[2])] = (idx, "NHWC")
elif shp[1] in (1, self.num_classes) and shp[2] > 1: # NCHW cls
cls_map[(shp[2], shp[3])] = (idx, "NCHW")
elif shp[-1] in (1, self.num_classes): # NHWC cls
cls_map[(shp[1], shp[2])] = (idx, "NHWC")
heads = []
for hw, (b_idx, b_fmt) in sorted(bbox_map.items(), key=lambda x: -x[0][0]):
if hw not in cls_map:
continue
c_idx, c_fmt = cls_map[hw]
stride = self.input_h // hw[0]
heads.append({
"bbox_idx": b_idx, "cls_idx": c_idx,
"hw": hw, "stride": stride, "bbox_fmt": b_fmt, "cls_fmt": c_fmt
})
print(f"Heads: {[(h['stride'], h['hw'], h['bbox_fmt']) for h in heads]}")
return heads
def bgr_to_nv12(self, img):
h, w = img.shape[:2]
scale = min(self.input_h / h, self.input_w / w)
new_h, new_w = int(h * scale), int(w * scale)
resized = cv2.resize(img, (new_w, new_h))
canvas = np.full((self.input_h, self.input_w, 3), 114, dtype=np.uint8)
top = (self.input_h - new_h) // 2
left = (self.input_w - new_w) // 2
canvas[top:top+new_h, left:left+new_w] = resized
yuv = cv2.cvtColor(canvas, cv2.COLOR_BGR2YUV_I420)
y = yuv[:self.input_h, :]
u = yuv[self.input_h:self.input_h + self.input_h//4, :].reshape(
self.input_h//2, self.input_w//2)
v = yuv[self.input_h + self.input_h//4:, :].reshape(
self.input_h//2, self.input_w//2)
uv = np.stack([u, v], axis=-1).reshape(self.input_h//2, self.input_w)
nv12 = np.concatenate([y, uv], axis=0)
return nv12, scale, left, top
def dfl_decode(self, bbox_raw):
bbox = bbox_raw.reshape(-1, 4, self.reg_max)
bbox_exp = np.exp(bbox - np.max(bbox, axis=-1, keepdims=True))
bbox_sm = bbox_exp / np.sum(bbox_exp, axis=-1, keepdims=True)
weights = np.arange(self.reg_max, dtype=np.float32).reshape(1, 1, -1)
return np.sum(bbox_sm * weights, axis=-1)
def _extract_feat(self, out, idx, fmt, H, W, C):
buf = np.array(out[idx].buffer, copy=False).astype(np.float32)
if fmt == "NCHW":
return buf.reshape(1, C, H, W).transpose(0, 2, 3, 1).reshape(-1, C)
else:
return buf.reshape(-1, C)
def detect(self, frame):
orig_h, orig_w = frame.shape[:2]
nv12, scale, pad_left, pad_top = self.bgr_to_nv12(frame)
outs = self.model.forward(nv12)
all_boxes, all_scores, all_cls = [], [], []
for h in self.heads:
H, W = h["hw"]
stride = h["stride"]
grid = h["grid"]
bbox_feat = self._extract_feat(outs, h["bbox_idx"], h["bbox_fmt"], H, W, 64)
cls_feat = self._extract_feat(outs, h["cls_idx"], h["cls_fmt"], H, W, self.num_classes)
# sigmoid + 快速筛选
scores = sigmoid(cls_feat)
max_scores = np.max(scores, axis=1)
keep = max_scores >= self.conf_thresh
if not np.any(keep):
continue
max_cls = np.argmax(scores, axis=1)
bbox_keep = bbox_feat[keep]
score_keep = max_scores[keep]
cls_keep = max_cls[keep]
grid_keep = grid[keep]
ltrb = self.dfl_decode(bbox_keep)
xc = (grid_keep[:, 0] + 0.5) * stride
yc = (grid_keep[:, 1] + 0.5) * stride
x1 = np.clip((xc - ltrb[:, 0] * stride - pad_left) / scale, 0, orig_w)
y1 = np.clip((yc - ltrb[:, 1] * stride - pad_top) / scale, 0, orig_h)
x2 = np.clip((xc + ltrb[:, 2] * stride - pad_left) / scale, 0, orig_w)
y2 = np.clip((yc + ltrb[:, 3] * stride - pad_top) / scale, 0, orig_h)
# 过滤面积过小的框
areas = (x2 - x1) * (y2 - y1)
valid = areas > 100
if not np.any(valid):
continue
boxes = np.stack([x1[valid], y1[valid], x2[valid], y2[valid]], axis=1)
all_boxes.append(boxes)
all_scores.append(score_keep[valid])
all_cls.append(cls_keep[valid])
if not all_boxes:
return np.empty((0, 4)), np.empty((0,)), np.empty((0,), dtype=int)
boxes = np.concatenate(all_boxes)
scores = np.concatenate(all_scores)
classes = np.concatenate(all_cls)
idxs = cv2.dnn.NMSBoxes(boxes.tolist(), scores.tolist(),
self.conf_thresh, self.nms_thresh)
if len(idxs) > 0:
idxs = np.array(idxs).flatten()
return boxes[idxs], scores[idxs], classes[idxs]
return np.empty((0, 4)), np.empty((0,)), np.empty((0,), dtype=int)
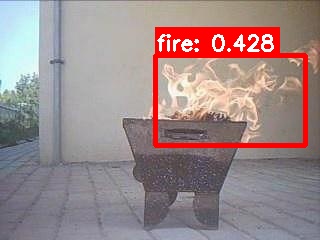
def draw(self, frame, boxes, scores, classes):
# ★ V7: 红色检测框 + 红色标签背景
RED = (0, 0, 255)
WHITE = (255, 255, 255)
for box, score, cls in zip(boxes, scores, classes):
x1, y1, x2, y2 = map(int, box)
c = int(cls)
name = self.class_names[c] if c < len(self.class_names) else str(c)
label = f"{name}:{float(score):.2f}"
# 红色矩形框(粗线)
cv2.rectangle(frame, (x1, y1), (x2, y2), RED, 2)
# 红色标签背景 + 白字
(tw, th), _ = cv2.getTextSize(label, cv2.FONT_HERSHEY_SIMPLEX, 0.6, 2)
cv2.rectangle(frame, (x1, y1 - th - 8), (x1 + tw + 4, y1), RED, -1)
cv2.putText(frame, label, (x1 + 2, y1 - 4),
cv2.FONT_HERSHEY_SIMPLEX, 0.6, WHITE, 2)
return frame
def main():
import argparse
parser = argparse.ArgumentParser(description="Fire Detection V7 - RDK X5")
parser.add_argument("--model", default="/home/sunrise/fire_detect.bin")
parser.add_argument("--source", default="0",
help="0=USB摄像头, rtsp://...=RTSP流")
parser.add_argument("--conf", type=float, default=0.30)
parser.add_argument("--nms", type=float, default=0.50)
args = parser.parse_args()
det = FireDetectorV7(args.model, conf_thresh=args.conf, nms_thresh=args.nms)
# 打开视频源
if args.source.startswith("rtsp"):
cap = cv2.VideoCapture(args.source, cv2.CAP_FFMPEG)
cap.set(cv2.CAP_PROP_BUFFERSIZE, 1)
else:
cap = cv2.VideoCapture(int(args.source))
cap.set(cv2.CAP_PROP_FRAME_WIDTH, 640)
cap.set(cv2.CAP_PROP_FRAME_HEIGHT, 480)
if not cap.isOpened():
print("ERROR: Cannot open video source")
return
print(f"Source: {args.source}")
print(f"Conf: {args.conf}, NMS: {args.nms}")
print("Press 'q' to quit, '+'/'-' adjust threshold")
print("-" * 60)
fps_list = []
frame_count = 0
try:
while True:
ret, frame = cap.read()
if not ret:
time.sleep(0.01)
continue
t0 = time.time()
boxes, scores, classes = det.detect(frame)
result = det.draw(frame, boxes, scores, classes)
dt = time.time() - t0
fps_list.append(1.0 / max(dt, 1e-6))
if len(fps_list) > 30:
fps_list.pop(0)
fps = np.mean(fps_list)
cv2.putText(result, f"FPS:{fps:.1f} Fire:{len(boxes)} T:{det.conf_thresh:.2f}",
(10, 30), cv2.FONT_HERSHEY_SIMPLEX, 0.8, (0, 255, 0), 2)
cv2.imshow("Fire Detection V7", result)
frame_count += 1
if frame_count % 100 == 0:
print(f"Frame {frame_count}: FPS={fps:.1f}, Det={len(boxes)}")
key = cv2.waitKey(1) & 0xFF
if key == ord('q'):
break
elif key == ord('+') or key == ord('='):
det.conf_thresh = min(0.95, det.conf_thresh + 0.05)
print(f"Threshold: {det.conf_thresh:.2f}")
elif key == ord('-'):
det.conf_thresh = max(0.05, det.conf_thresh - 0.05)
print(f"Threshold: {det.conf_thresh:.2f}")
finally:
cap.release()
cv2.destroyAllWindows()
if __name__ == "__main__":
main()
写在最后
这个项目的核心经验:
- 校准数据是最容易出错也最难排查的环节。量化不报错不代表量化正确。
- 保持和官方rdk_model_zoo一致的格式(NCHW、6输出、无DFL/sigmoid)是最安全的做法。
- 训练要充分,10个epoch可能让你以为是量化或代码的问题,实际上只是模型精度不够。
- 每一步都要验证:训练→导出→校准→量化→传输→推理,任何一步出错都会导致最终无输出。
希望这篇教程能帮到遇到同样问题的朋友!
配套代码仓库:https://github.com/1760hwy/YOLO_Native_model_quantization
如果对你有帮助,欢迎Star ⭐

有“AI”的1024 = 2048,欢迎大家加入2048 AI社区
更多推荐
 19
19 0
0- 0


 已为社区贡献3条内容

所有评论(0)