在腾讯云轻量服务器部署 OpenClaw + 天翼云智谱免费GLM-5 + 飞书
前言
本文记录如何在腾讯云轻量应用服务器(2核2G)上部署 OpenClaw,接入天翼云免费 GLM-5 大模型,并通过飞书实现对话交互。整套方案成本低、配置简单,适合个人助手场景。
一、服务器准备
1.1 腾讯云配置
| 配置项 | 规格 |
|---|---|
| CPU | 2 核 |
| 内存 | 2 GiB |
| 带宽 | 1 Mbps |
| 系统 | Ubuntu 22.04 LTS |
1Mbps 带宽对于文字交互完全够用,GLM-5 模型通过 API 调用,不占用本地算力。
1.2 连接服务器
ssh ubuntu@your-server-ip
二、环境安装
2.1 安装 Node.js
OpenClaw 需要 Node.js 18+,推荐使用 nvm 管理:# 安装 nvm
curl -o- https://raw.githubusercontent.com/nvm-sh/nvm/v0.39.7/install.sh | bash
source ~/.bashrc
安装 Node.js 22
nvm install 22
nvm use 22
node -v  # 确认版本
2.2 通过 npm 安装 OpenClaw
npm install -g openclaw
安装完成后验证:openclaw --version
三、初始化 OpenClaw
3.1 创建工作目录
mkdir -p ~/.openclaw/workspace
cd ~/.openclaw/workspace
3.2 初始化配置
openclaw init
按提示完成基础配置。
四、配置天翼云 GLM-5 模型
4.1 获取天翼云 API 凭证
-
登录 息壤一体化智算服务平台
-
获取 baseUrl、model_id、appKey
选择模型推理服务=>服务接入=>API快捷接入=>确认创建并选择=>选择模型(智谱GLM-5)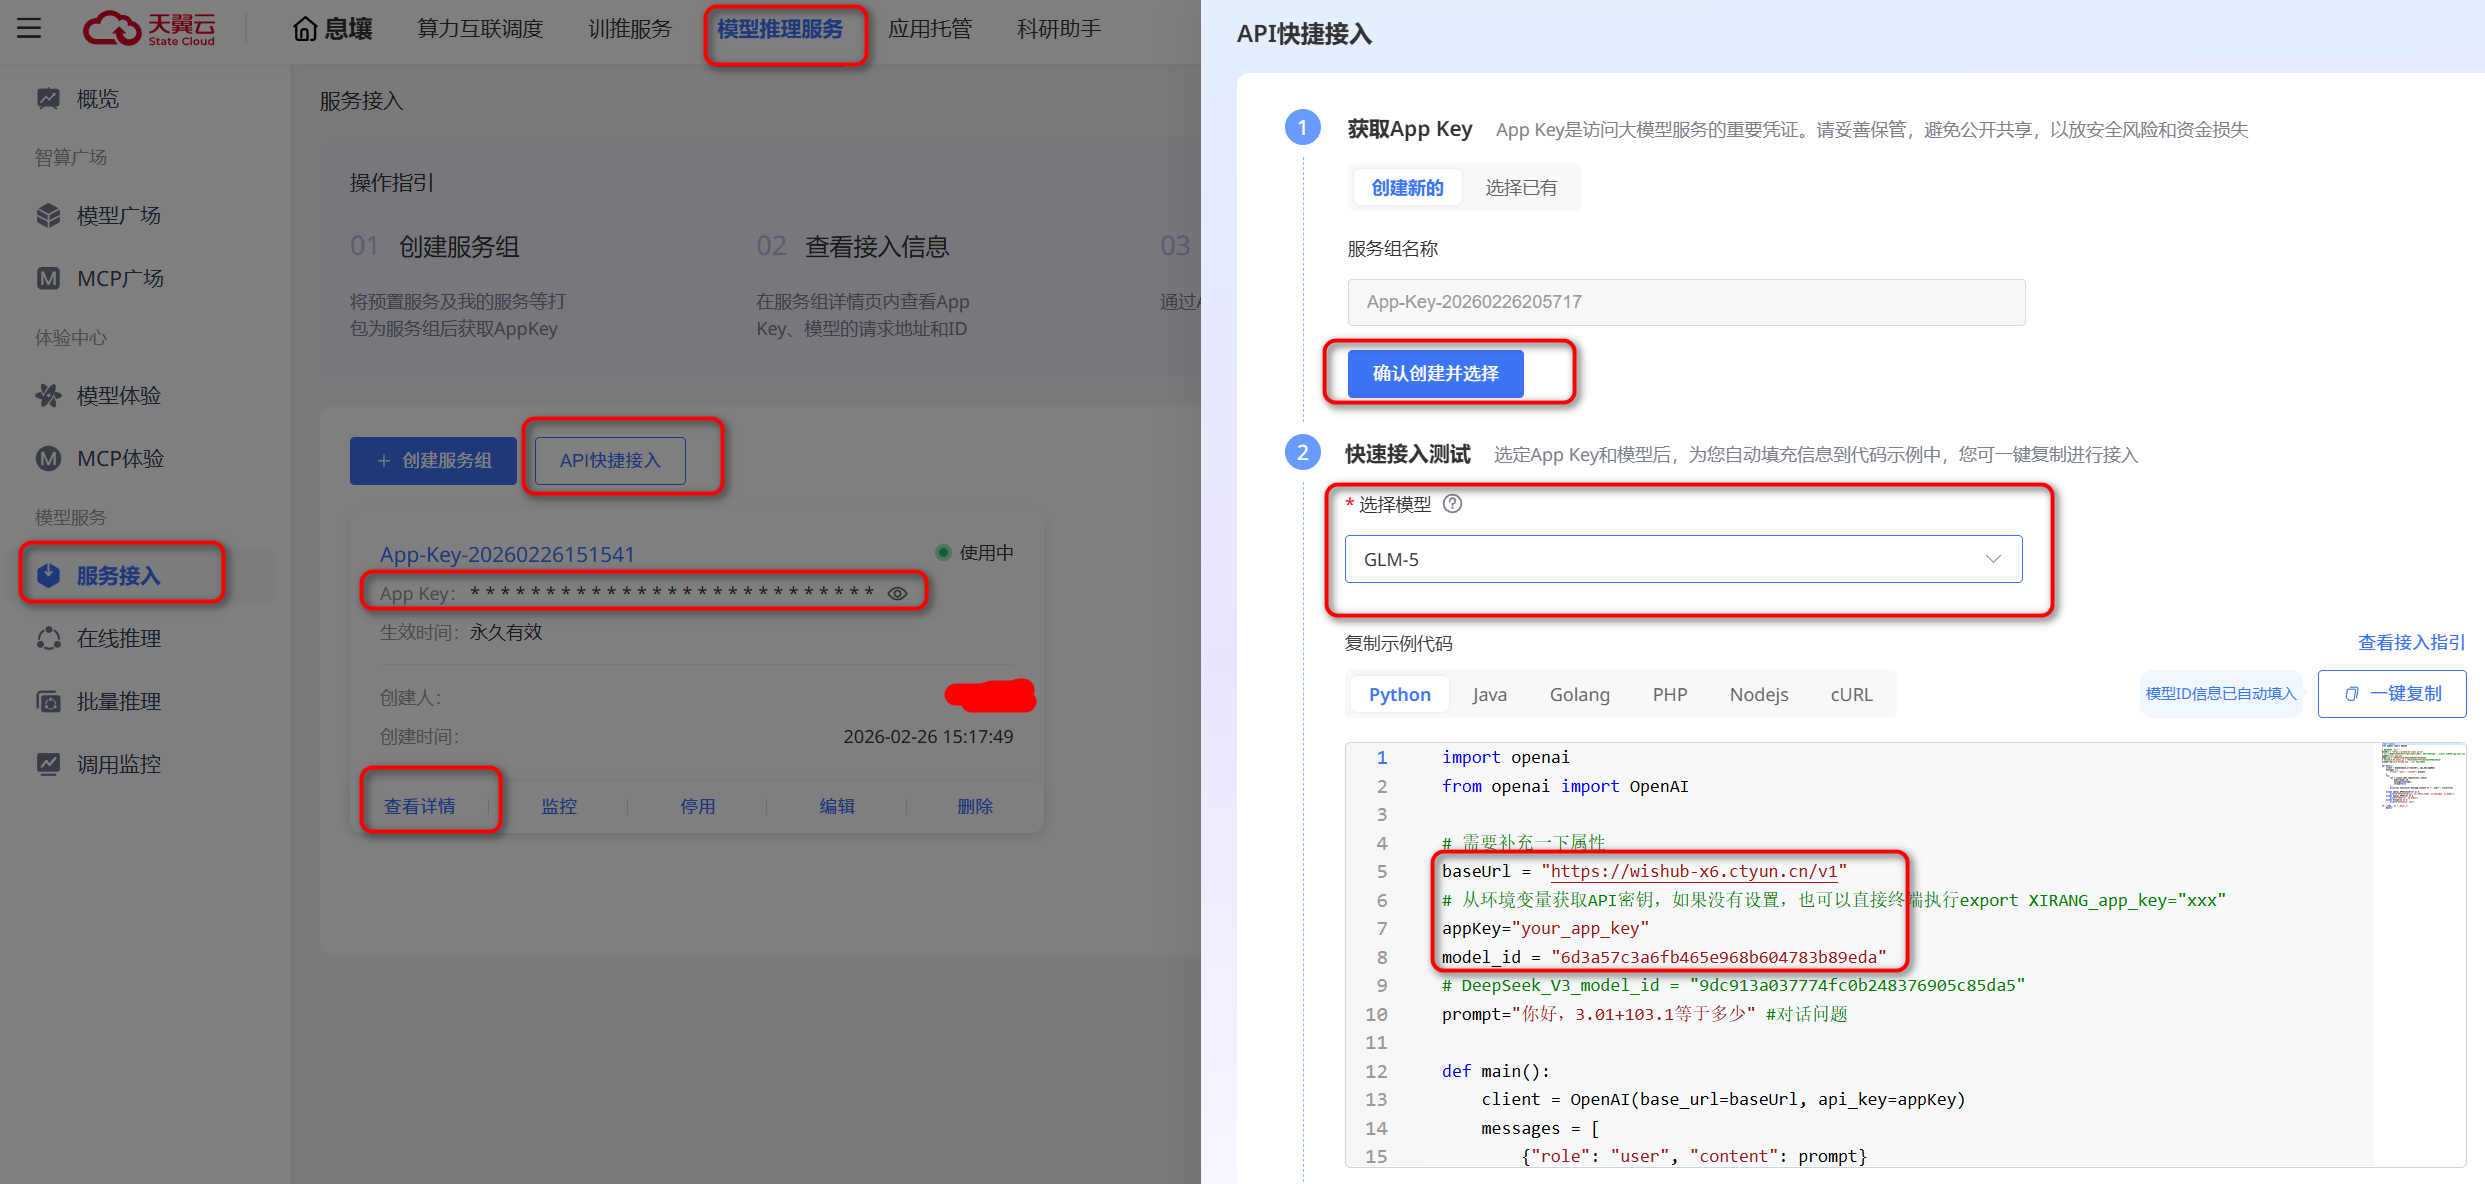
4.2 配置模型(仅供参考)
编辑 ~/.openclaw/openclaw.json
{
  "meta": {
    "lastTouchedVersion": "2026.2.24",
    "lastTouchedAt": "2026-02-25T16:16:36.207Z"
  },
  "wizard": {
    "lastRunAt": "2026-02-25T16:16:36.178Z",
    "lastRunVersion": "2026.2.24",
    "lastRunCommand": "onboard",
    "lastRunMode": "local"
  },
  "auth": {
    "profiles": {
      "ctyun:default": {
        "provider": "ctyun",
        "mode": "api_key"
      }
    }
  },
  "models": {
    "mode": "merge",
    "providers": {
      "ctyun": {
        "baseUrl": "https://wishub-x6.ctyun.cn/v1",
        "api": "openai-completions",
        "apiKey": "天翼云appKey",
        "authHeader": true,
        "models": [
          {
            "id": "天翼云model_id",
            "name": "天翼云GLM-5",
            "reasoning": false,
            "input": [
              "text",
              "image"
            ],
            "cost": {
              "input": 0,
              "output": 0
            },
            "contextWindow": 128000,
            "maxTokens": 4096
          }
        ]
      }
    }
  },
  "agents": {
    "defaults": {
      "model": {
        "primary": "ctyun/天翼云model_id"
      },
      "models": {
        "zai/glm-4.7": {
          "alias": "GLM"
        },
        "ctyun/天翼云model_id": {
          "alias": "天翼云GLM-5"
        }
      },
      "workspace": "/home/ubuntu/.openclaw/workspace",
      "compaction": {
        "mode": "safeguard"
      },
      "maxConcurrent": 4,
      "subagents": {
        "maxConcurrent": 8
      }
    }
  },
  "messages": {
    "ackReactionScope": "group-mentions"
  },
  "commands": {
    "native": "auto",
    "nativeSkills": "auto",
    "restart": true,
    "ownerDisplay": "raw"
  },
  "session": {
    "dmScope": "per-channel-peer"
  },
  "hooks": {
    "internal": {
      "enabled": true,
      "entries": {
        "session-memory": {
          "enabled": true
        }
      }
    }
  },
  "channels": {
    "feishu": {
      "enabled": true,
      "appId": "飞书appid",
      "appSecret": "飞书appSecret",
      "domain": "feishu",
      "groupPolicy": "open"
    }
  },
  "gateway": {
    "port": 18789,
    "mode": "local",
    "bind": "loopback",
    "auth": {
      "mode": "token",
      "token": "openclaw自动生成的token"
    },
    "tailscale": {
      "mode": "off",
      "resetOnExit": false
    },
    "nodes": {
      "denyCommands": [
        "camera.snap",
        "camera.clip",
        "screen.record",
        "calendar.add",
        "contacts.add",
        "reminders.add"
      ]
    },
    "controlUi": {
      "allowedOrigins": ["*"]
    }
  },
  "skills": {
    "install": {
      "nodeManager": "npm"
    }
  },
  "plugins": {
    "entries": {
      "feishu": {
        "enabled": true
      }
    },
    "installs": {
      "feishu": {
        "source": "npm",
        "spec": "@openclaw/feishu",
        "installPath": "/home/ubuntu/.openclaw/extensions/feishu",
        "version": "2026.2.24",
        "resolvedName": "@openclaw/feishu",
        "resolvedVersion": "2026.2.24",
        "resolvedSpec": "@openclaw/feishu@2026.2.24",
        "integrity": "sha512-/YNWeOH56WU2WvHD+5zu4sxRzlBoK5Vwcg8eQV4hNj2xV3fDDsdV/laAWnbzjBccCgBv0zXrEpeiK/uZ/EcZ6A==",
        "shasum": "a32f577fc752f9dceb6b058cc8e56e05e139c1df",
        "resolvedAt": "2026-02-25T15:51:30.309Z",
        "installedAt": "2026-02-25T15:51:33.559Z"
      }
    }
  }
}
五、接入飞书
5.1 创建飞书应用
-
访问 飞书开放平台
-
创建企业自建应用
-
记录 App ID 和 App Secret
5.2 配置权限
在飞书应用后台,添加以下权限:
-
contact:user.base:readonly - 获取用户基本信息
-
im:message - 消息相关权限
-
im:message:send_as_bot - 以应用身份发消息
5.3 配置事件订阅
-
在「事件订阅」页面添加请求地址:
-
订阅事件:
- im.message.receive_v1 - 接收消息
六、启动服务
6.1 启动 Gateway
openclaw gateway start
七、验证部署
7.1 检查状态
openclaw status
7.2 飞书测试
在飞书中找到你的应用,发送消息:你好
收到 GLM-5 的回复即部署成功!
八、常见问题
8.1 Message ordering conflict - please try again. If this persists, use /new to start a fresh session.
出现这个错误排查openclaw.json文件中models是否配置正确
总结
通过腾讯云轻量服务器 + OpenClaw + 天翼云智谱免费 GLM-5 + 飞书的组合,可以低成本搭建一个功能完整的个人 AI 助手。整个部署过程约 60 分钟,适合个人开发者和小团队使用。


有“AI”的1024 = 2048,欢迎大家加入2048 AI社区
更多推荐

 9
9 0
0- 0


 已为社区贡献2条内容

所有评论(0)