SpringBoot3全栈开发实战:从入门到精通的完整指南
本文全面总结SpringBoot3的核心知识,涵盖自动配置、起步依赖等核心优势,详细解析YAML配置、Web开发整合、MyBatis操作等核心功能,并深入介绍热部署、监控管理、多环境部署等高级特性。文章还特别梳理了ProblemDetails、原生镜像等新特性,适合开发者快速掌握SpringBoot3的核心要点
·
文章目录
📝 引言
SpringBoot3作为Spring框架的最新版本,带来了许多令人兴奋的新特性和改进
本文是基于之前的内容来写的
这篇文章是SpringBoot3的总结,适合想快速复习的读者
最后的思维导图总结,能够让你眼前一亮
个人主页:艺杯羹
系列专栏:SpringBoot3
1. SpringBoot3概述🎯
1.1 SpringBoot3的特点与优势
SpringBoot3在SpringBoot2的基础上进行了重大改进,主要特点包括:
- 自动配置:自动提供最优配置,可修改默认值
- 起步依赖:将功能所需坐标打包,简化依赖管理
- 嵌入式服务器:内置Tomcat,无需部署War文件
- 非功能特性:提供安全指标、健康监测等企业级功能
1.2 SpringBoot3的系统要求
| 工具 | 版本要求 |
|---|---|
| IDEA | 2021.2.1+ |
| Java | 17+ |
| Maven | 3.5+ |
| Tomcat | 10.0+ |
| Servlet | 5.0+ |
| GraalVM | Community 22.3+ |
| Native Build Tools | 0.9.19+ |
2. SpringBoot3入门指南🛠️
2.1 项目搭建方式
2.1.1 官网搭建
访问 start.spring.io 生成项目,选择合适版本和依赖。
2.1.2 IDEA脚手架搭建
在IDEA中选择"Spring Initializr",配置项目信息和依赖。
2.1.3 Maven手动搭建
<!-- 父工程 -->
<parent>
  <groupId>org.springframework.boot</groupId>
  <artifactId>spring-boot-starter-parent</artifactId>
  <version>3.1.2</version>
</parent>
<!-- 起步依赖 -->
<dependencies>
  <dependency>
    <groupId>org.springframework.boot</groupId>
    <artifactId>spring-boot-starter-web</artifactId>
  </dependency>
</dependencies>
<!-- 打包插件 -->
<build>
  <plugins>
    <plugin>
      <groupId>org.springframework.boot</groupId>
      <artifactId>spring-boot-maven-plugin</artifactId>
    </plugin>
  </plugins>
</build>
2.2 项目结构解析
src.main.java       # Java代码
  └── 启动类        # 项目入口
src.main.resources  # 配置和资源文件
  ├── static       # 静态资源(css, js, img)
  ├── templates    # 模板文件(Thymeleaf)
  └── application.yml # 配置文件
src.test.java      # 测试代码
pom.xml            # Maven配置
3. 核心功能详解⚙️
3.1 YAML配置文件
3.1.1 基本语法
# 简单数据
email: yibeigen@sxt.com
# 对象数据
my1:
  email: yibeigen@sxt.com
  password: yibeigen
# 集合数据
city1:
  - beijing
  - shanghai
  - tianjin
3.1.2 配置读取方式
// @Value方式
@Value("${email}")
private String email;
// @ConfigurationProperties方式
@ConfigurationProperties(prefix = "user")
public class UserConfig {
  private int id;
  private String username;
  // getters and setters
}
3.2 Web开发整合
3.2.1 Servlet注册
// 方式一:注解方式
@WebServlet("/first")
public class FirstServlet extends HttpServlet {
  public void doGet(HttpServletRequest request, HttpServletResponse response) {
    System.out.println("First Servlet");
  }
}
// 方式二:配置类方式
@Configuration
public class ServletConfig {
  @Bean
  public ServletRegistrationBean getServletRegistrationBean() {
    return new ServletRegistrationBean(new SecondServlet(), "/second");
  }
}
3.2.2 Thymeleaf模板引擎
<!DOCTYPE html>
<html xmlns:th="http://www.thymeleaf.org">
<head>
  <title>Thymeleaf示例</title>
</head>
<body>
  <h2 th:text="${msg}">默认值</h2>

  <!-- 条件判断 -->
  <div th:if="${sex} == '男'">性别:男</div>
  <div th:if="${sex} == '女'">性别:女</div>

  <!-- 循环遍历 -->
  <table>
    <tr th:each="user : ${users}">
      <td th:text="${user.name}"></td>
      <td th:text="${user.age}"></td>
    </tr>
  </table>
</body>
</html>
3.3 MyBatis整合
// Mapper接口
@Mapper
public interface StudentMapper extends BaseMapper<Student> {
  @Select("select * from student where id = #{id}")
  Student findById(int id);
}
// 配置文件
spring.datasource.driver-class-name=com.mysql.cj.jdbc.Driver
spring.datasource.url=jdbc:mysql:///student?serverTimezone=UTC
spring.datasource.username=root
spring.datasource.password=root
mybatis.mapper-locations=classpath:mapper/*.xml
mybatis.type-aliases-package=com.itbaizhan.springbootmybatis.pojo
4. 高级特性应用🚀
4.1 热部署
添加DevTools依赖:
<dependency>
  <groupId>org.springframework.boot</groupId>
  <artifactId>spring-boot-devtools</artifactId>
  <optional>true</optional>
</dependency>
4.2 定时任务
@Component
public class MyTask {
  @Scheduled(cron="0 0 2 * * ?") // 每天凌晨2点执行
  public void task1() {
    System.out.println("定时任务执行: " + new Date());
  }
}
@SpringBootApplication
@EnableScheduling
public class DemoApplication {
  public static void main(String[] args) {
    SpringApplication.run(DemoApplication.class, args);
  }
}
4.3 内容协商
@Controller
public class ConsultController {
  @Autowired
  private StudentMapper studentMapper;

  @RequestMapping("/student/findById")
  @ResponseBody
  public Student findById(Integer id) {
    return studentMapper.findById(id);
  }
}
5. 监控与部署📊
5.1 Actuator监控
添加依赖:
<dependency>
  <groupId>org.springframework.boot</groupId>
  <artifactId>spring-boot-starter-actuator</artifactId>
</dependency>
配置:
management:
  endpoints:
    web:
      exposure:
        include: '*'
访问端点:
/actuator/health- 健康检查/actuator/metrics- 系统指标/actuator/loggers- 日志管理
5.2 Spring Boot Admin
5.2.1 服务端配置
<dependency>
  <groupId>de.codecentric</groupId>
  <artifactId>spring-boot-admin-starter-server</artifactId>
  <version>3.1.3</version>
</dependency>
5.2.2 客户端配置
<dependency>
  <groupId>de.codecentric</groupId>
  <artifactId>spring-boot-admin-starter-client</artifactId>
  <version>3.1.3</version>
</dependency>
spring.boot.admin.client.url=http://localhost:9090
5.3 多环境部署
# application-dev.yml
server:
  port: 8080
# application-test.yml
server:
  port: 8081
# application-prod.yml
server:
  port: 80
运行时指定环境:
java -jar app.jar --spring.profiles.active=prod
6. 原理分析🔍
6.1 起步依赖原理
SpringBoot的起步依赖通过spring-boot-starter-parent实现版本管理和依赖传递。
6.2 自动配置原理
@SpringBootApplication注解等同于:
@SpringBootConfiguration
@EnableAutoConfiguration
@ComponentScan
7. SpringBoot3新特性🌟
7.1 ProblemDetails
处理异常的新方式,符合RFC 7807规范:
spring.mvc.problemdetails.enabled=true
7.2 原生镜像
使用GraalVM生成原生可执行文件:
<profiles>
  <profile>
    <id>native</id>
    <properties>
      <repackage.classifier>exec</repackage.classifier>
      <native-buildtools.version>0.9.19</native-buildtools.version>
    </properties>
    <build>
      <plugins>
        <plugin>
          <groupId>org.graalvm.buildtools</groupId>
          <artifactId>native-maven-plugin</artifactId>
        </plugin>
      </plugins>
    </build>
  </profile>
</profiles>
8. 实用工具🛠️
8.1 Lombok
简化POJO代码:
@Data
@NoArgsConstructor
@AllArgsConstructor
public class User {
  private Integer id;
  private String username;
  private String password;
}
8.2 MyBatisPlus
增强MyBatis功能:
@TableName("tb_student")
public class Student extends Model<Student> {
  @TableId(value = "sid", type = IdType.AUTO)
  private Integer id;
  @TableField("sname")
  private String name;

  // CRUD操作
  student.insert();
  student.updateById();
  student.selectById();
}
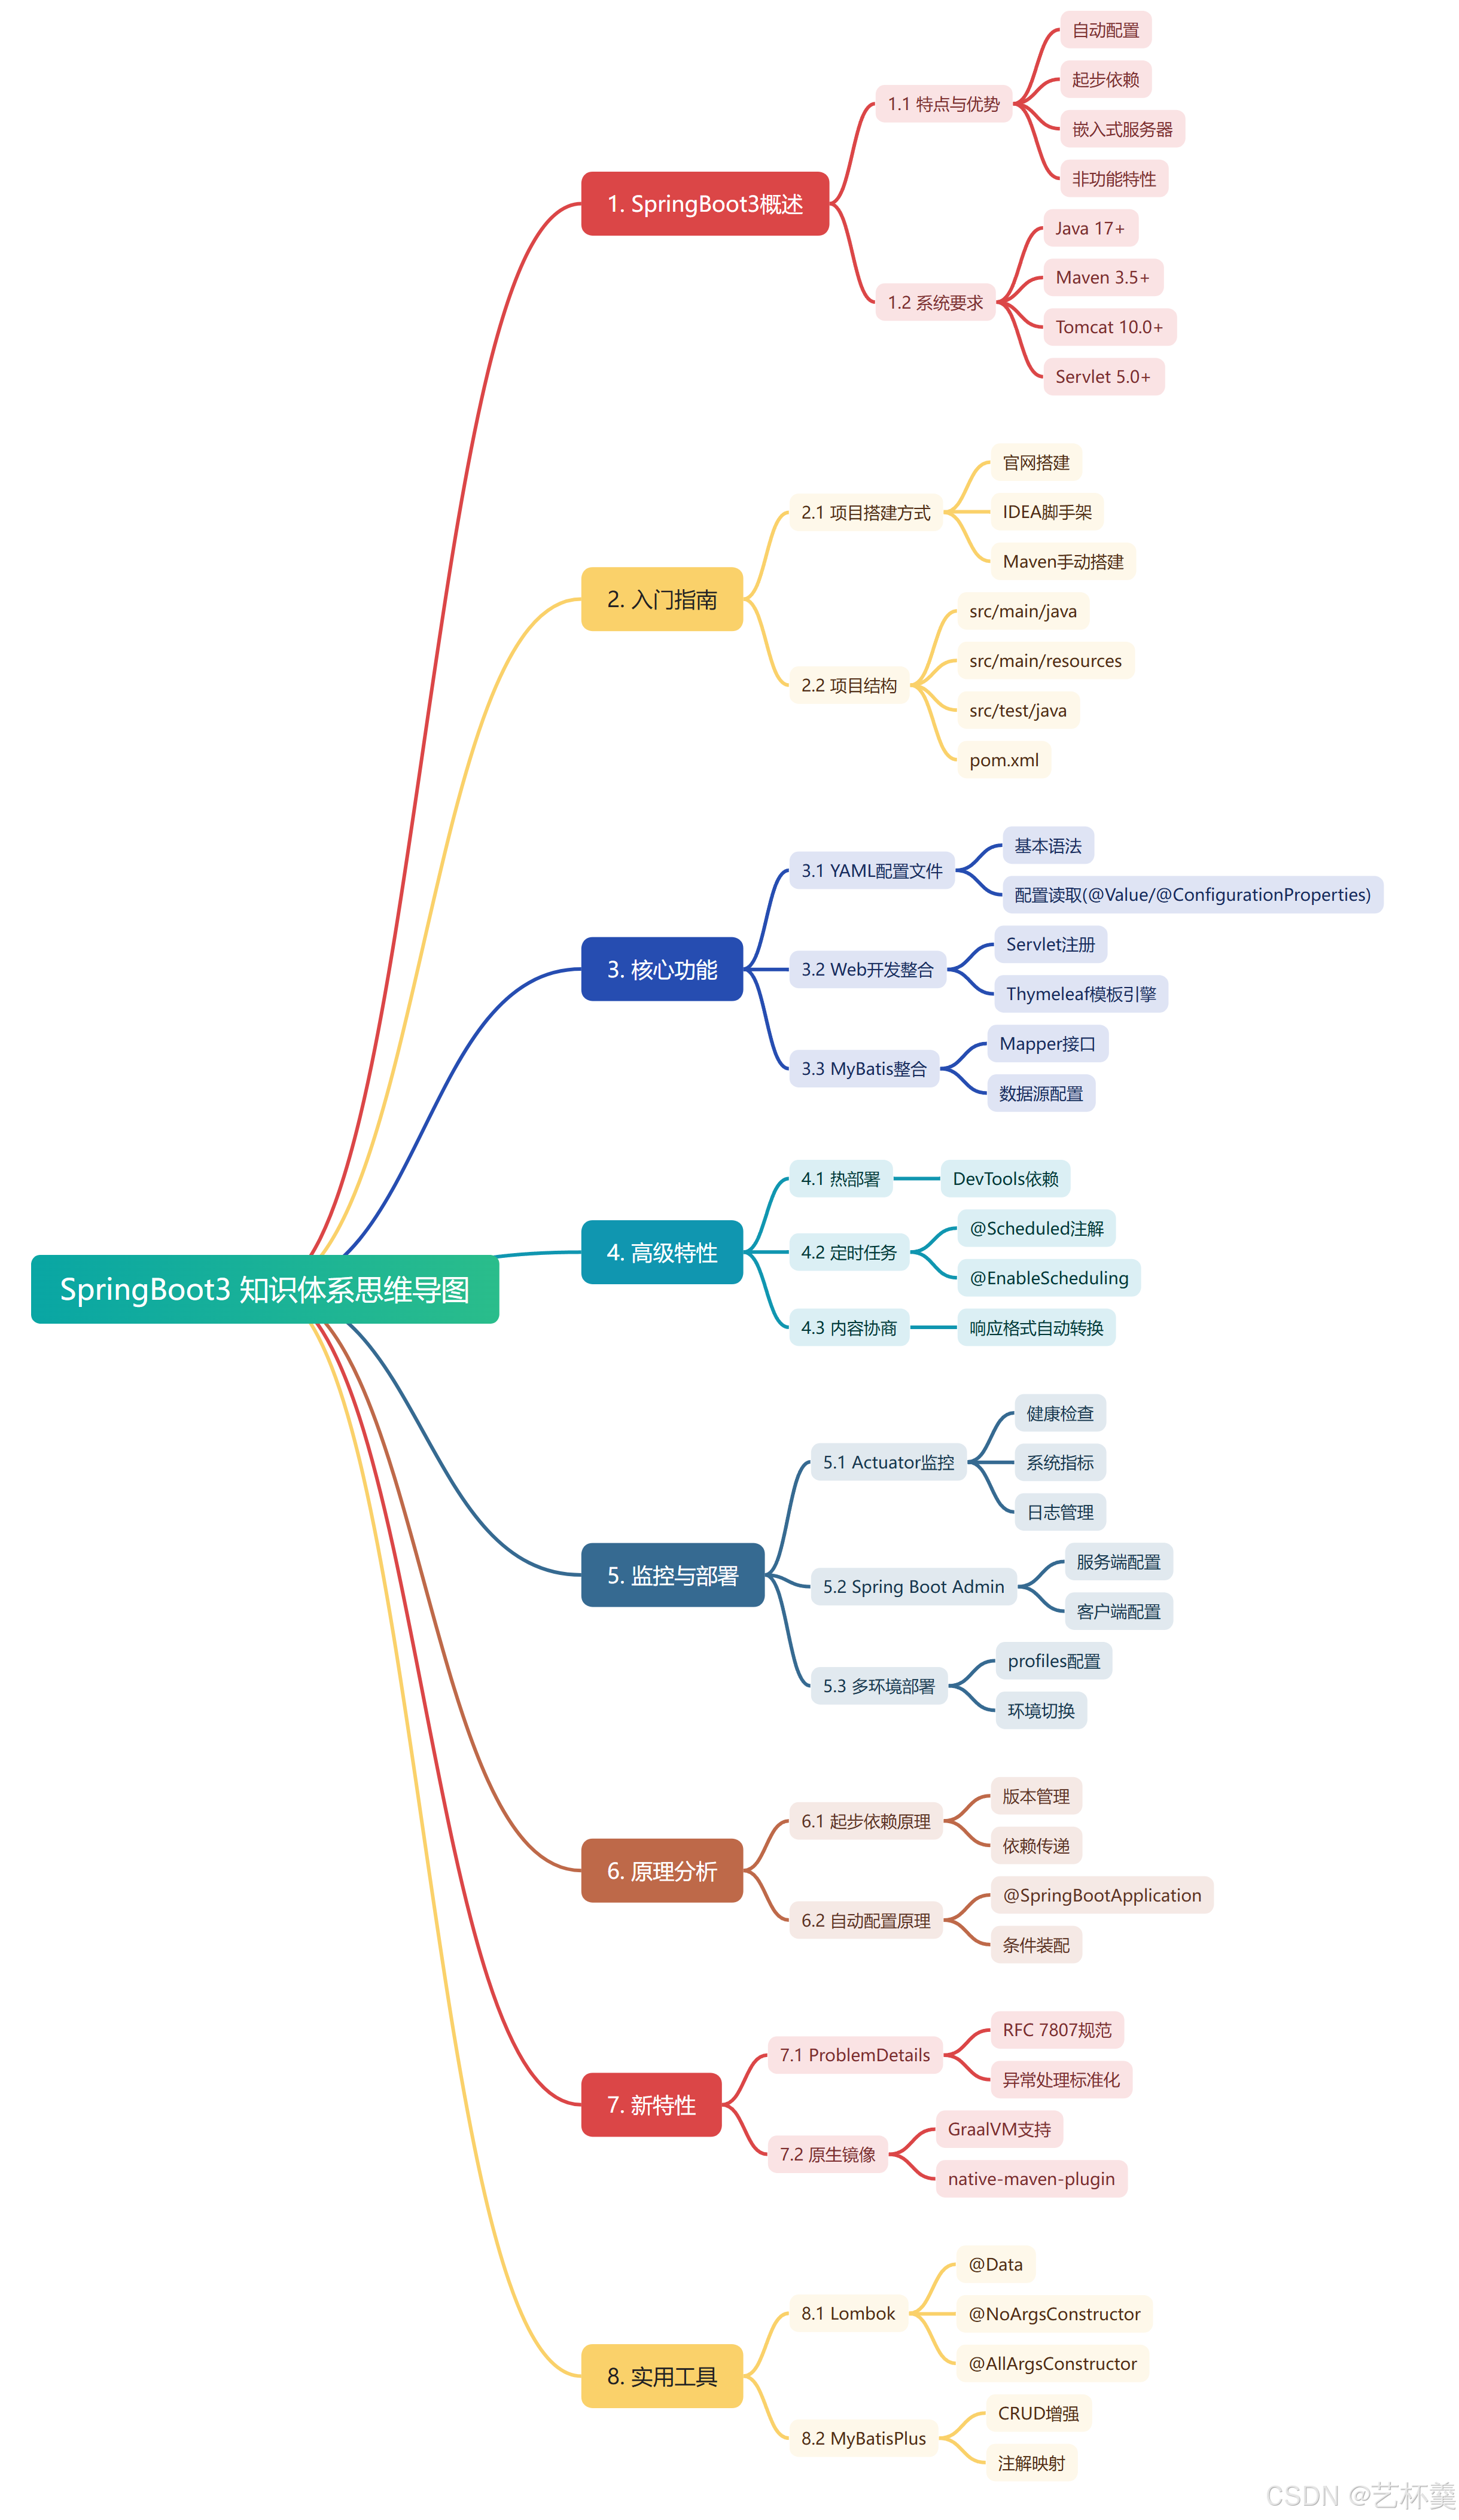
9. 思维导图总结💎
tips:如果需要Markdown格式的文件,可以来联系我哦!
制作不易,希望大家支持!😊

有“AI”的1024 = 2048,欢迎大家加入2048 AI社区
更多推荐
 37
37 0
0- 0


 已为社区贡献5条内容

所有评论(0)