Oracle AI Database 26ai Database Creation Using DBCA (Step-by-Step Guide)
Creating an Oracle AI Database 26ai using the Database Configuration Assistant (DBCA) is the final and most satisfying step after completing Grid Infrastructure and Database Home installation. This st
Creating an Oracle AI Database 26ai using the Database Configuration Assistant (DBCA) is the final and most satisfying step after completing Grid Infrastructure and Database Home installation. This stage turns your infrastructure into a fully functional, production-ready database.
In this guide, we walk through Oracle AI Database 26ai database creation using DBCA, based on a real-world setup with ASM, Oracle Restart, and best-practice defaults. The goal is not just to click Next, but to understand why each option matters.
Table of Contents
- Prerequisites Before Running DBCA
- Launching DBCA
- Step 1: Select Database Operation
- Step 2: Select Database Creation Mode
- Step 3: Select Database Deployment Type
- Step 4: Specify Database Identification
- Step 5: Select Database Storage Option
- Step 6: Select Fast Recovery Option
- Step 7: Specify Network Configuration
- Step 8: Oracle Data Vault Option
- Step 9: Specify Configuration Options (Memory)
- Step 10: Management Options
- Step 11: Specify Database User Credentials
- Step 12: Select Database Creation Option
- Step 13: Summary Review Before Creation
- Database Creation Progress
- Finish – Oracle AI Database 26ai Created Successfully
- Database Creation Progress and Completion
- Post-Creation Validation (Oracle Restart & DB Status)
- Final Thoughts
- Related Articles
Related posts

Oracle AI Database 26ai Data Guard Creation Using RMAN Active Duplicate

Oracle Database 19c to 26ai Upgrade Using AutoUpgrade: Step-by-Step Real-World Guide
This article is written for DBAs who want a clear, practical, and human-friendly DBCA walkthrough.
Prerequisites Before Running DBCA
Discover more
database
software
db
ASM, Oracle
Oracle Enterprise Manager
Storage
RMAN
SQL
Databases
Database
Before starting DBCA, ensure the following are already in place:
- Oracle Grid Infrastructure 26ai Restart installed and running
- ASM disk group (DATA) mounted and healthy
- Oracle Database 26ai software installed
- Listener running from Grid/DB home
- OS users and groups configured correctly
You can quickly validate with:
crsctl check has

asmcmd lsdg

lsnrctl status
Launching DBCA
Discover more
db
asm
Installation
Oracle Enterprise Manager
Database
software
ASM, Oracle
storage
Computer data storage
Oracle Database
Switch to the oracle user and launch DBCA from the Database Home:
cd $ORACLE_HOME/bin

dbca
The Database Configuration Assistant wizard opens, guiding you through the database creation process.
(Screenshot placeholder: DBCA welcome / Database Operation)
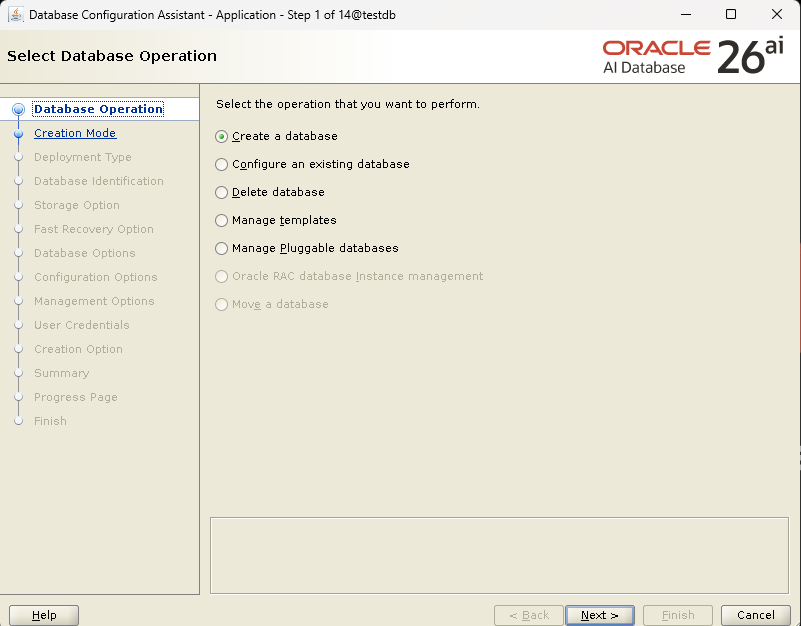
Step 1: Select Database Operation
Choose:

Create a database
This option initializes a brand-new Oracle AI Database instance.
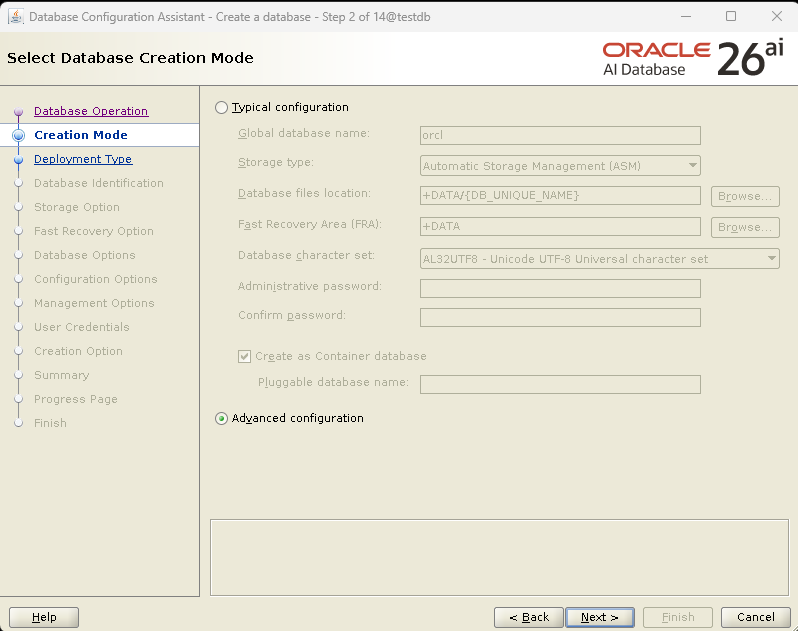
Step 2: Select Database Creation Mode
Discover more
Computer data storage
ASM
Software
database
ASM, Oracle
ASM storage
storage
software
Storage
Databases
Choose:

Advanced configuration
Although DBCA offers a Typical configuration, advanced mode provides full control over:
- Memory
- Storage
- Character set
- PDB configuration
- Security options
This is the recommended choice for DBAs.
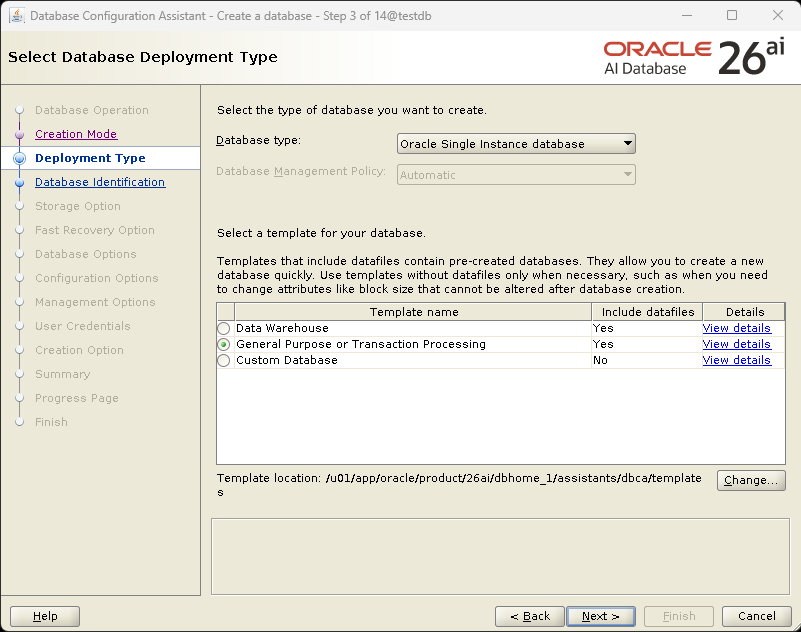
Step 3: Select Database Deployment Type
Discover more
SQL
Databases
Software
storage
Cloud computing
Storage
asm
db
ASM, Oracle
Automatic Storage Management
Select:
- Database type: Oracle Single Instance database
- Template: General Purpose or Transaction Processing
The General Purpose template provides a balanced configuration suitable for most workloads.
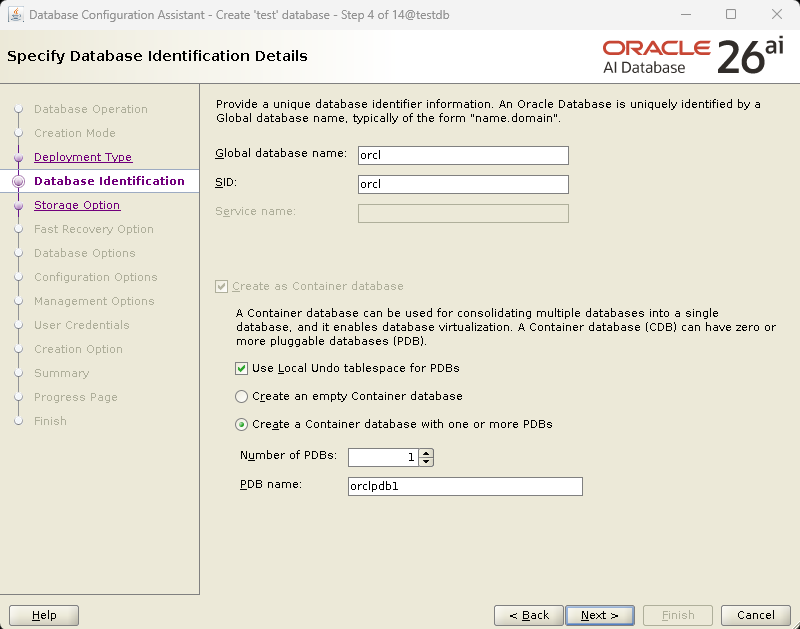
Step 4: Specify Database Identification
Discover more
Oracle Enterprise Manager
storage
Databases
asm
Cloud computing
DB
Enterprise Manager
Computer data storage
RMAN
Storage
In this step, define the database identity:
- Global database name:
orcl - SID:
orcl
Enable container database:

Create as Container database (CDB)
PDB settings:
- Number of PDBs: 1
- PDB name:
orclpdb1 -
Use local undo tablespace for PDBs
This aligns with Oracle’s multitenant architecture, which is mandatory for modern Oracle releases.
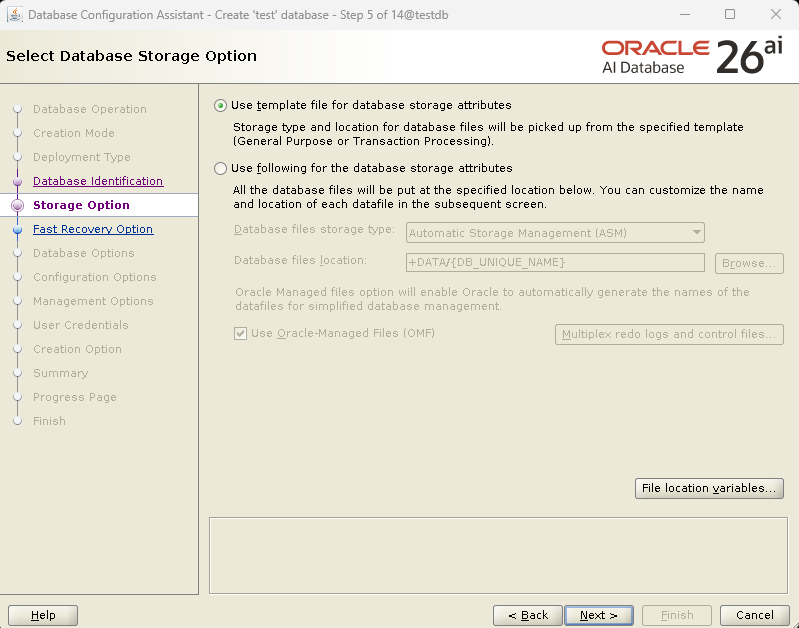
Step 5: Select Database Storage Option
Choose:

Use template file for database storage attributes
Storage configuration:
- Storage type: Automatic Storage Management (ASM)
- Database files location:
+DATA/{DB_UNIQUE_NAME} -
Use Oracle Managed Files (OMF)
Using ASM with OMF simplifies file management and improves reliability.
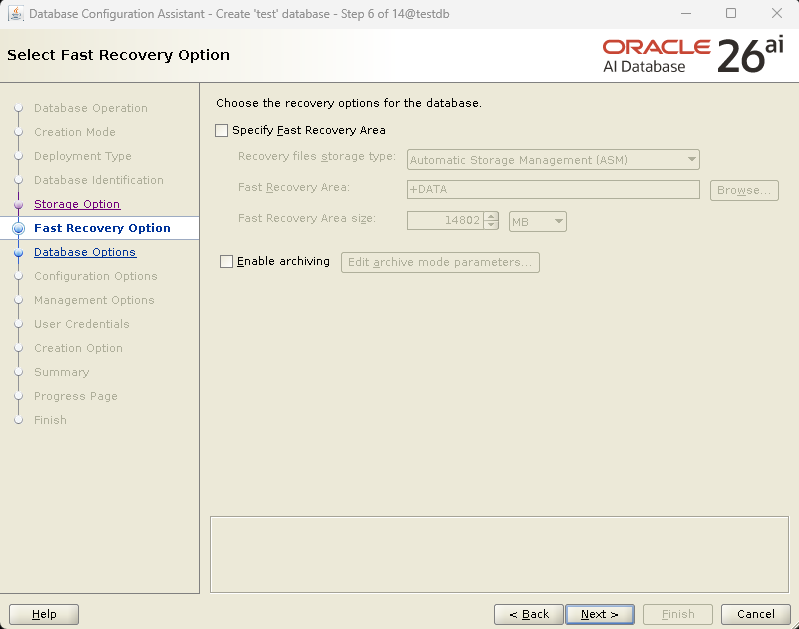
Step 6: Select Fast Recovery Option
In this setup:
- Fast Recovery Area (FRA) is not configured initially
- Archive logging is disabled at creation time
This is common for test or initial deployments. For production systems, FRA and archiving should be enabled later.
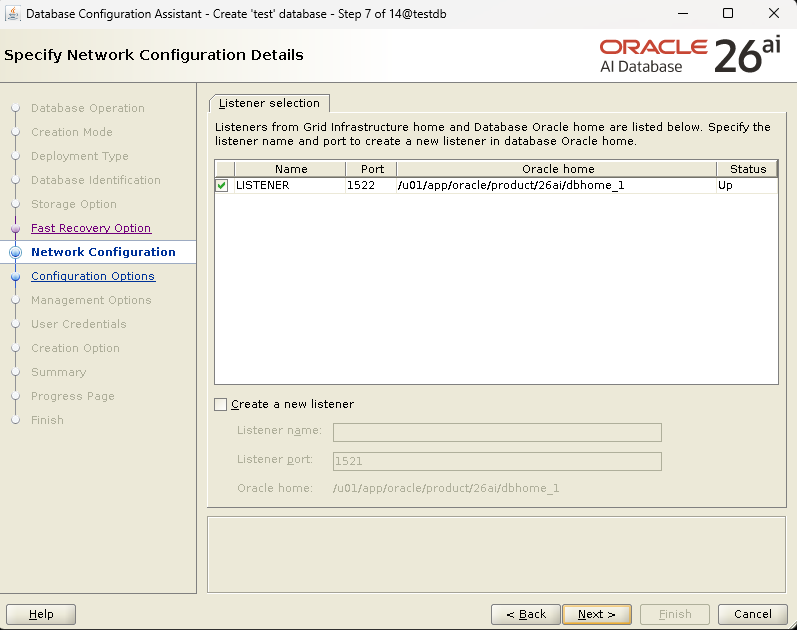
Step 7: Specify Network Configuration
DBCA detects the existing listener created during Grid/DB installation.
Listener details:
- Listener name: LISTENER
- Port: 1522
- Status: Up
No new listener is required.
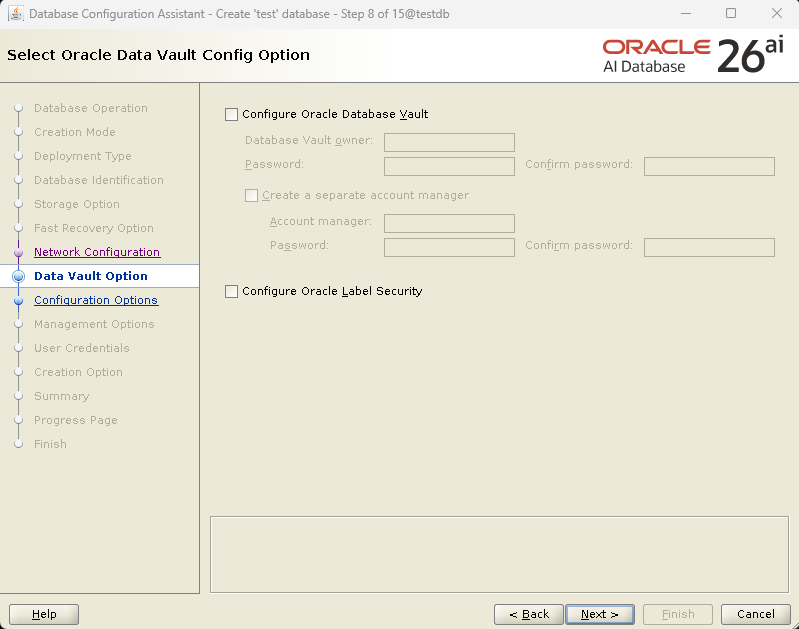
Step 8: Oracle Data Vault Option
Leave the following unchecked:
- Configure Oracle Database Vault
- Configure Oracle Label Security
These advanced security features can be enabled later if required.
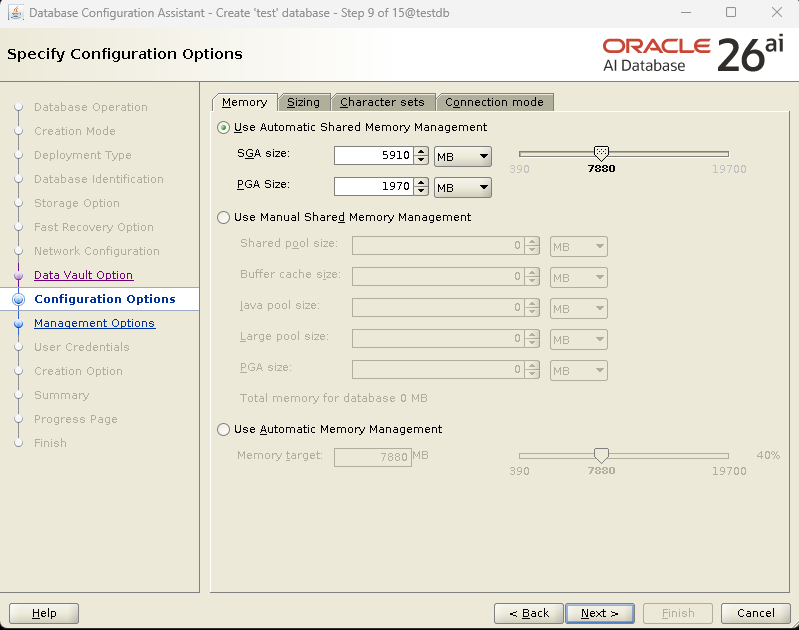
Step 9: Specify Configuration Options (Memory)
Memory configuration:

Use Automatic Shared Memory Management (ASMM)
Example values:
- SGA: ~5.9 GB
- PGA: ~1.9 GB
DBCA dynamically adjusts memory based on system capacity. This approach balances performance and simplicity.
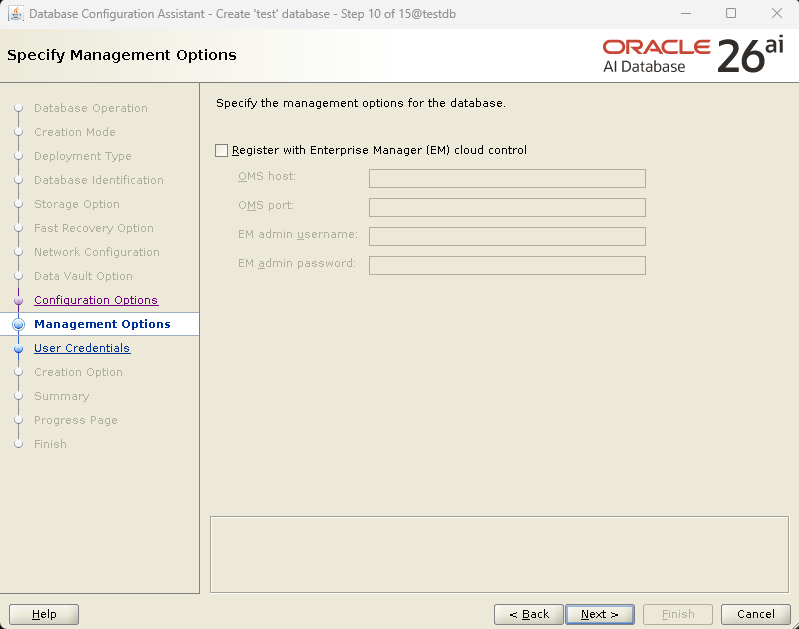
Step 10: Management Options
In the Management Options screen, DBCA allows you to register the database with Enterprise Manager (EM) Cloud Control.
In this setup:
-
Register with Enterprise Manager (EM) Cloud Control is left unchecked
This is a common and recommended approach for many environments. Most DBAs prefer to complete the database creation first and register the database with OEM later using the agent.
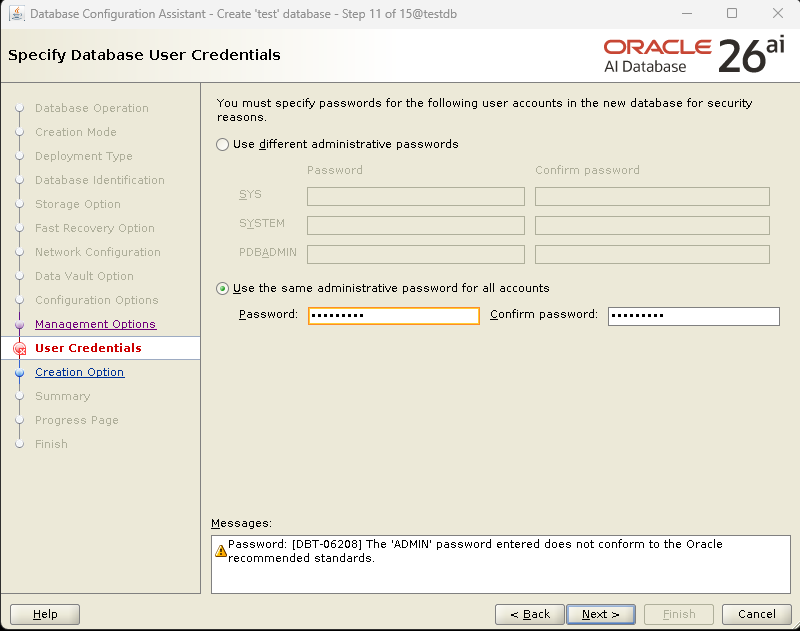
Step 11: Specify Database User Credentials
DBCA now prompts for passwords for administrative database accounts.
Accounts created:
- SYS – Primary database administrator
- SYSTEM – Secondary administrative user
- PDBADMIN – Administrator for the pluggable database
In this example:
-
Use the same administrative password for all accounts
You may see a warning such as:
The ADMIN password entered does not conform to Oracle recommended standards
This is a warning only and does not block database creation.

Best Practice: For production systems, always use strong passwords that meet Oracle complexity requirements.
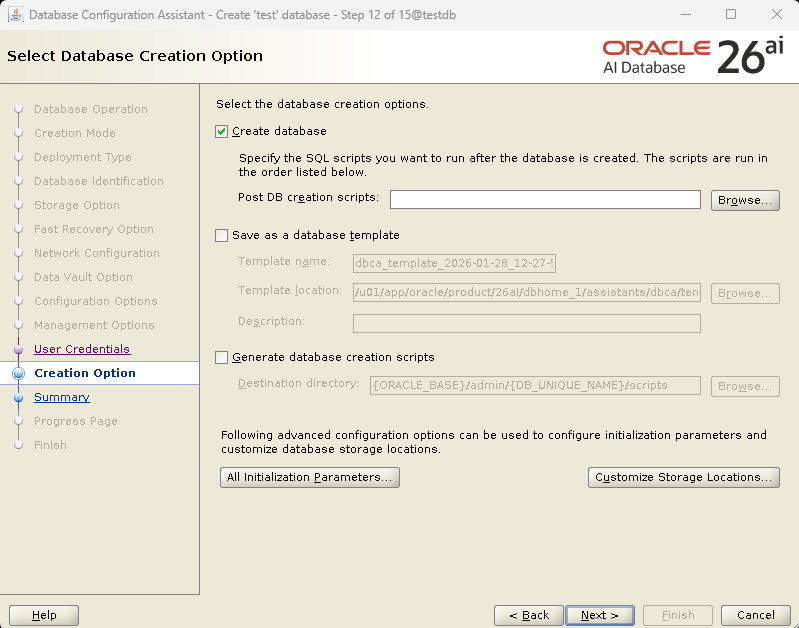
Step 12: Select Database Creation Option
On the Database Creation Option screen:
-
Create database
-
Save as a database template (optional)
-
Generate database creation scripts (optional)
Advanced options such as initialization parameters and custom storage locations can be accessed here if required.
For most environments, the default selection is sufficient.
Step 13: Summary Review Before Creation
The Summary screen provides a complete overview of the database configuration, including:
- Global database name and SID
- Oracle Single Instance deployment type
- Container database with one PDB
- ASM storage using +DATA disk group
- Memory configuration (ASMM)
- Initialization parameters

Important DBA Tip: Always review this screen carefully. Any mistake here will require recreating the database.
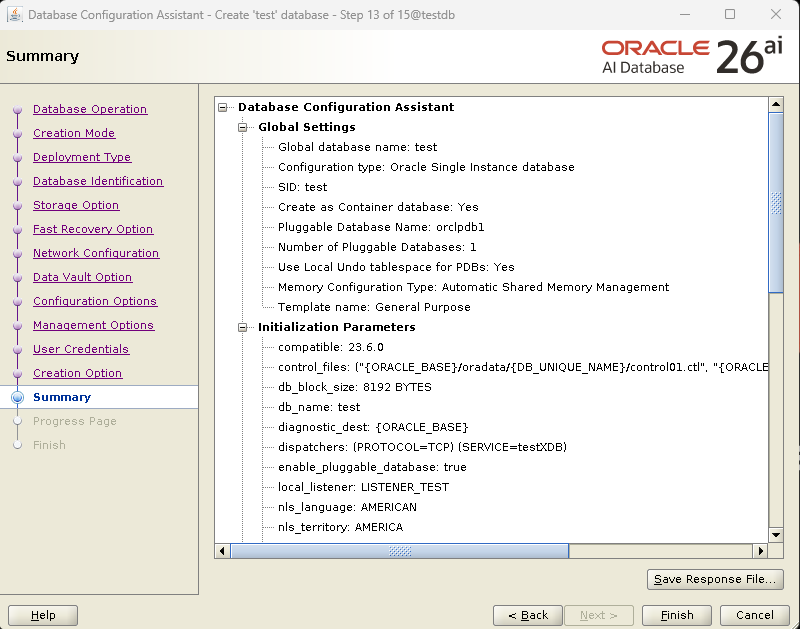
Click Finish to start database creation.
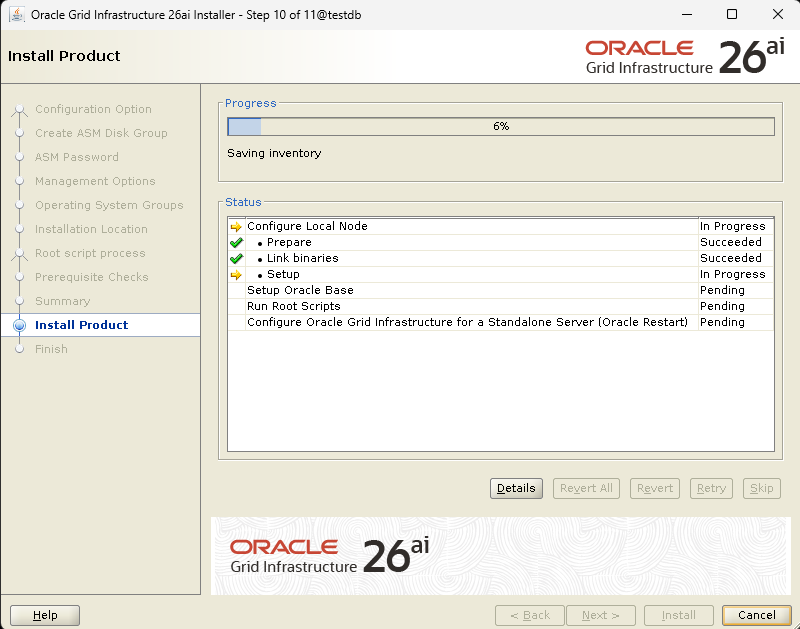
Database Creation Progress
DBCA now performs the following operations:
- Creates datafiles, control files, and redo logs in ASM
- Builds the data dictionary
- Configures CDB and PDB
- Registers the database with Oracle Restart
- Starts the database and listener services
Progress can be monitored in real time on the Progress Page.
Finish – Oracle AI Database 26ai Created Successfully
Once all steps complete, DBCA displays the Finish screen with the confirmation message:
The configuration of Oracle AI Database was successful.
This confirms that your Oracle AI Database 26ai has been created, configured, and started successfully.
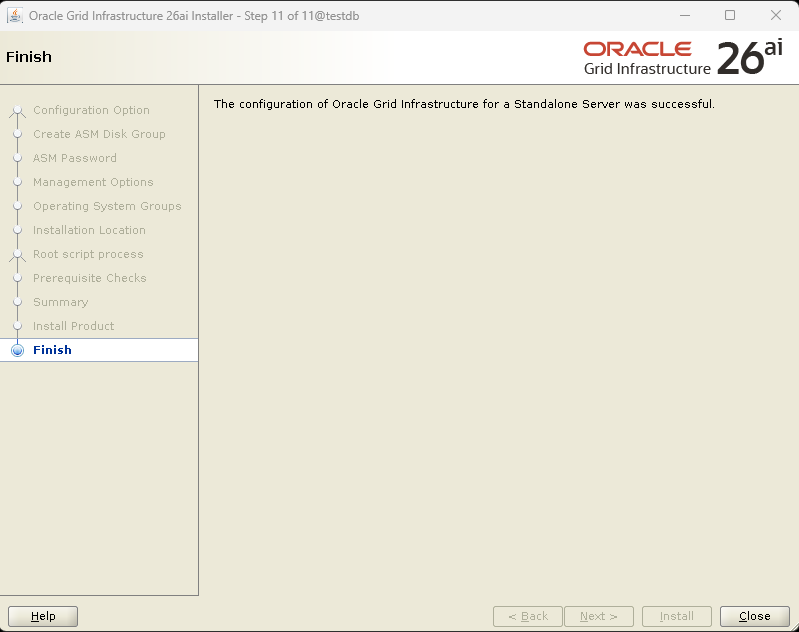
Database Creation Progress and Completion
The progress page shows real-time creation steps. Once completed, DBCA confirms successful database creation.
At this point, your Oracle AI Database 26ai is fully operational.
Post-Creation Validation (Oracle Restart & DB Status)
After DBCA completes successfully, it is important to verify that Oracle Restart, ASM, listener, database, and PDB resources are correctly registered and running.
Run the following command as the oracle user:
crsctl stat res -tSample Output Explained
--------------------------------------------------------------------------------
Name           Target  State        Server                   State details
--------------------------------------------------------------------------------
Local Resources
--------------------------------------------------------------------------------
ora.DATA.dg
               ONLINE  ONLINE       testdb                   STABLE
ora.LISTENER.lsnr
               ONLINE  ONLINE       testdb                   STABLE
ora.asm
               ONLINE  ONLINE       testdb                   Started,STABLE
ora.ons
               OFFLINE OFFLINE      testdb                   STABLE
--------------------------------------------------------------------------------
Cluster Resources
--------------------------------------------------------------------------------
ora.cssd
      1        ONLINE  ONLINE       testdb                   STABLE
ora.diskmon
      1        OFFLINE OFFLINE                               STABLE
ora.evmd
      1        ONLINE  ONLINE       testdb                   STABLE
ora.orcl.db
      1        ONLINE  ONLINE       testdb                   Open,HOME=/u01/app/o
                                                             racle/product/26ai/d
                                                             bhome_1,STABLE
ora.orcl.orclpdb.pdb
      1        ONLINE  ONLINE       testdb                   READ WRITE,STABLE
--------------------------------------------------------------------------------
What this means:
- ora.DATA.dg – ASM disk group is mounted and healthy
- ora.LISTENER.lsnr – Listener is up and managed by Oracle Restart
- ora.asm – ASM instance is running normally
- ora.ons – Oracle Notification Service is offline (expected for single-node Restart setups)
Key confirmations:
- ora.cssd – Cluster Synchronization Service is running (required even for Restart)
- ora.evmd – Event Manager daemon is online
- ora.orcl. db – Database is OPEN and managed by Oracle Restart
- ora.orcl.orclpdb.pdb – Pluggable database is OPEN in READ WRITE mode
DBA Validation Checklist

ASM disk group ONLINE

Listener ONLINE

Database OPEN

PDB READ WRITE

All resources STABLE
This confirms that:
- Oracle Restart is functioning correctly
- The database will auto-start on server reboot
- The environment is production-ready
Verify database status:
sqlplus / as sysdba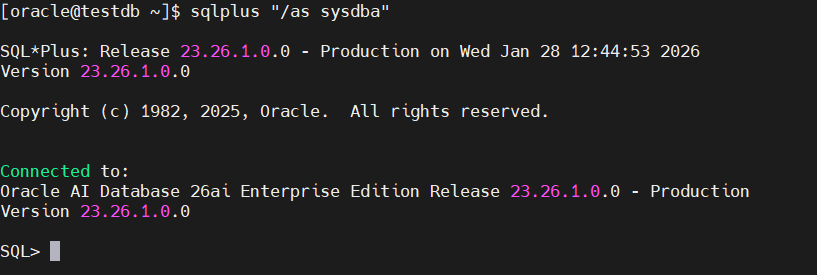
SQL> select name, open_mode from v$database;

NAME      OPEN_MODE
--------- --------------------
ORCL      READ WRITE
SQL> show pdbs;

    CON_ID CON_NAME                       OPEN MODE  RESTRICTED
---------- ------------------------------ ---------- ----------
         2 PDB$SEED                       READ ONLY  NO
         3 ORCLPDB                        READ WRITE NO
Ensure:
- Database is OPEN
- PDB is OPEN in READ WRITE mode
Final Thoughts
Creating an Oracle AI Database 26ai using DBCA is a structured, reliable process when combined with:
- Oracle Grid Infrastructure Restart
- ASM storage
- Proper OS and memory configuration
By following this approach, you get a clean, supportable, and production-ready Oracle AI Database environment.
Related Articles

有“AI”的1024 = 2048,欢迎大家加入2048 AI社区
更多推荐
 6
6 0
0- 0


 已为社区贡献221条内容

所有评论(0)