Spring Security 6.x 常用功能的案例总结
本文介绍了Spring Security的核心实现与配置方法。主要内容包括:1. 极简实现案例,通过添加starter-security依赖快速集成,演示默认登录页和密码加密配置;2. 自定义登录逻辑,实现UserDetailsService接口完成用户认证,使用BCryptPasswordEncoder进行密码加密;3. 前后端分离配置,自定义SecurityFilterChain和登录接口,实
目录
方法一:通过SecurityContextHolder手动获取(通用,支持任意层)
方法二:直接在controller的参数中加入Authentication参数
方法三:直接在controller的参数里加入Pricipal
方法四:直接在controller的参数中加入UsernamePasswordAuthenticationToken参数
一、极简实现案例
通过极简案例快速了解Spring Security。
核心依赖
<dependency>
    <groupId>org.springframework.boot</groupId>
    <artifactId>spring-boot-starter-security</artifactId>
</dependency>
集成后的效果
导入spring-boot-starter-security启动器后,Spring Security已生效,默认拦截所有请求,如果用户没有登录,跳转到内置登录页。
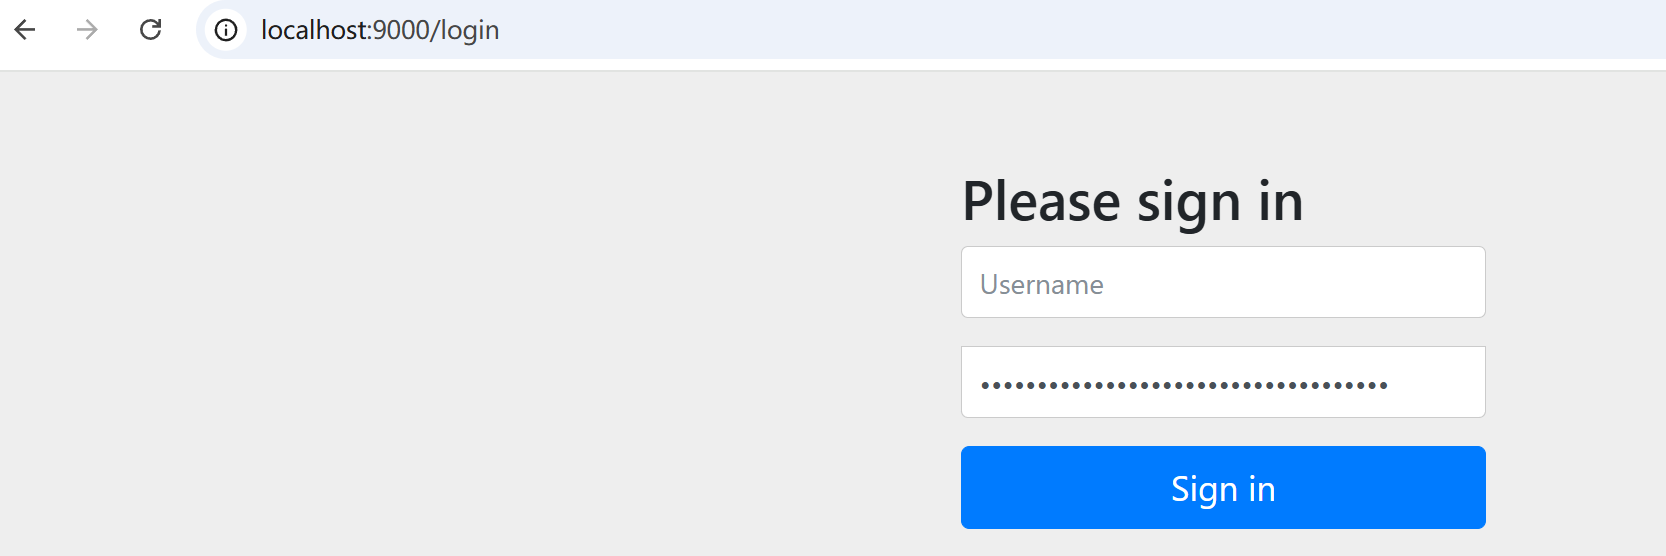
默认username为:user
默认密码为SpringSecurity自动生成的UUID,每次生成的不一样(仅限测试使用,项目中需改造这部分逻辑)
项目启动后,会自动打印到控制台:

登录成功后,默认会在浏览器cookie中存入session: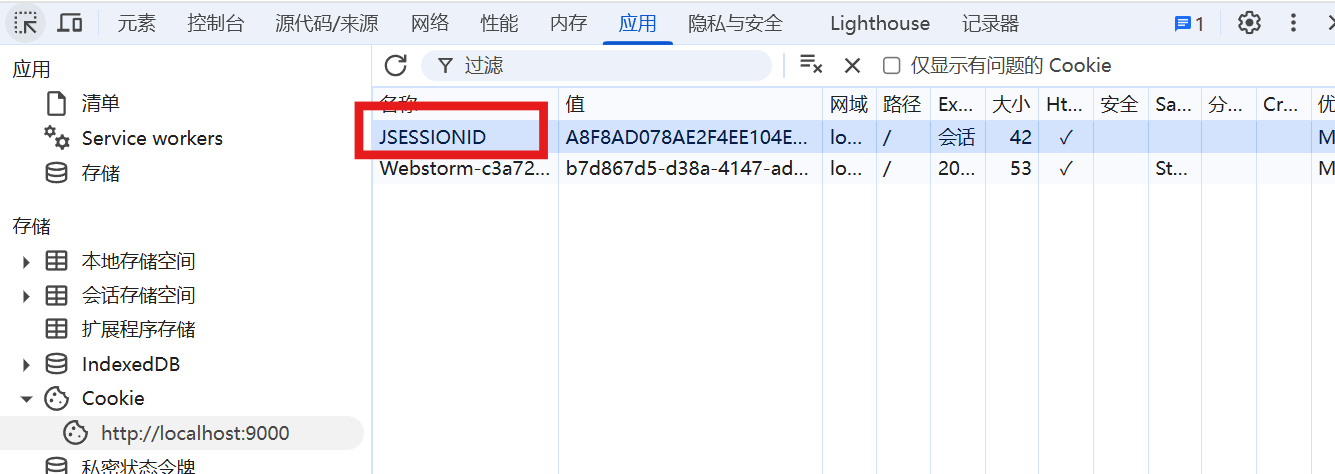
如果前端将这个session删掉,服务器就不能感知用户的状态,下次访问就会再次进行登录。
自定义用户名和密码
spring:
  security:
    # 仅限测试使用
    user:
      name: admin
      password: 123456
从源码中可以看到,这里的逻辑,若密码有设置,就会直接使用设置的密码了。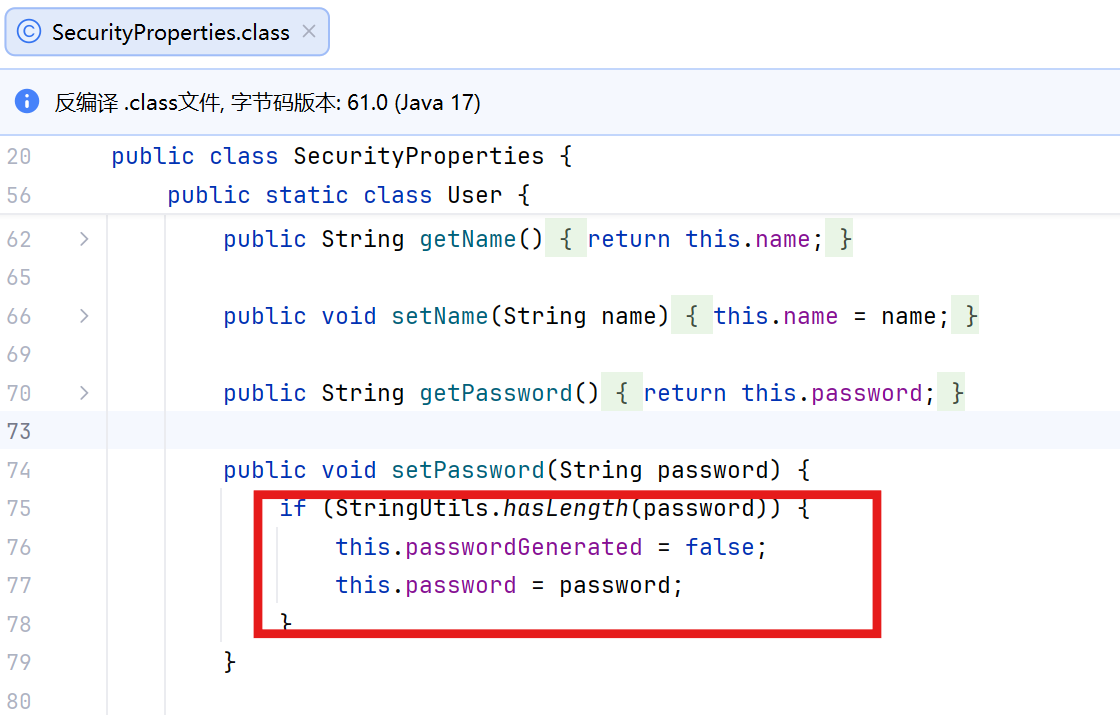
自定义登录逻辑
核心UserDetailsService
Spring Security会执行loadUserByUsername方法来实现认证逻辑。

返回的对象就是实现UserDetails接口的对象:
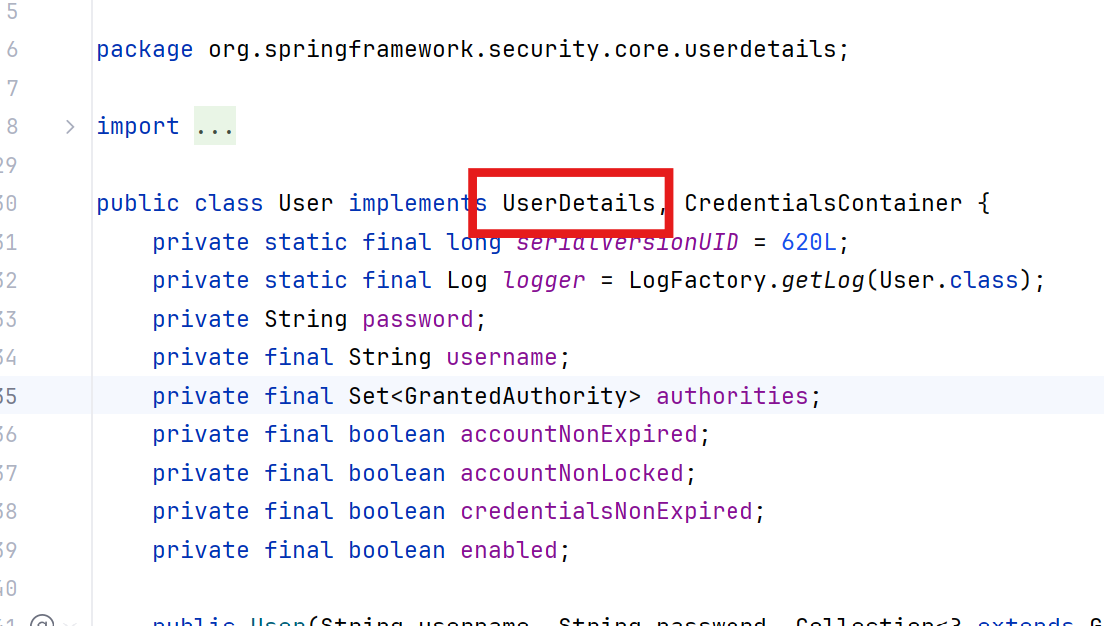
这里User类对UserDetails做了功能拓展,这个User类就是SpringSecurity提供给开发者的默认UserDetails的实现类。
我们可以按照同样的思路实现UserDetais接口来自定义自己的User对象。
完整自定义登录逻辑的流程:
首先,自定义一个类并继承UserDetailsService接口,实现该接口的loadUserByUsername核心方法;然后,创建自定义的User实体类,使其实现UserDetails接口以封装用户认证信息;最终在loadUserByUsername方法中,返回这个自定义User类的实例,完成用户认证信息的自定义封装。
loadUserByUsername:校验用户名,返回UserDetails对象。(这个方法会被过滤器自动调用)
1、创建自定义UserDetails实现类
/**
 * @author Dragon Wu
 * @created 2026/02/08 13:18
 * @description 自定义UserDetails的实现类
 */
package com.xloda.auth.pojo;

import lombok.Getter;
import lombok.Setter;
import lombok.ToString;
import org.springframework.security.core.GrantedAuthority;
import org.springframework.security.core.userdetails.UserDetails;

import java.util.Collection;
import java.util.Collections;
import java.util.Objects;
import java.util.Set;

@Getter
@Setter
@ToString
public class User implements UserDetails {
    private String password;
    private final String username;
    private final boolean enabled;
    private final Set<GrantedAuthority> authorities;

    public User(String username, String password) {
        this.username = username;
        this.password = password;
        this.enabled = true;
        this.authorities = Collections.emptySet();
    }

    public User(String username, String password, boolean enabled) {
        this.username = username;
        this.password = password;
        this.enabled = enabled;
        this.authorities = Collections.emptySet();
    }

    public User(String username, String password, boolean enabled, Set<GrantedAuthority> authorities) {
        this.username = username;
        this.password = password;
        this.enabled = enabled;
        this.authorities = authorities;
    }

    @Override
    public Collection<? extends GrantedAuthority> getAuthorities() {
        return Objects.isNull(this.authorities) ? Collections.emptySet() : this.authorities;
    }

    @Override
    public boolean isEnabled() {
        return this.enabled;
    }
}
2、自定义UserDetailsService实现类
/**
 * @author Dragon Wu
 * @created 2026/02/08 13:31
 * @description
 */
package com.xloda.auth.service.impl;

import com.xloda.auth.pojo.User;
import com.xloda.auth.service.UserService;
import com.xloda.common.core.constant.SeparatorConstants;
import com.xloda.common.core.enums.ErrorCode;
import org.springframework.security.core.userdetails.UserDetails;
import org.springframework.security.core.userdetails.UserDetailsService;
import org.springframework.security.core.userdetails.UsernameNotFoundException;
import org.springframework.stereotype.Service;

import java.util.Collections;
import java.util.Objects;

@Service
public class UserServiceImpl implements UserService, UserDetailsService {

    /**
     * 根据用户名查询用户信息
     *
     * @param username 前端提交的用户名(判断用户名中是否存在)
     * @return UserDetails 用户信息(封装了用户名、密码、权限......)
     * @throws UsernameNotFoundException 用户不存在触发异常
     */
    @Override
    public UserDetails loadUserByUsername(String username) throws UsernameNotFoundException {
        // 1、数据库中,通过username查询用户信息
        // 若用户查询成功,则存在,否则用户不存在抛出 UsernameNotFoundException
        // TODO 查询数据库返回User对象
        User mockUser = findMockUserByUsername(username);
        if (Objects.isNull(mockUser)) {
            throw new UsernameNotFoundException(username + SeparatorConstants.COLON + ErrorCode.USER_NOT_FOUND.getMessage());
        }

        return mockUser;
    }

    /**
     * 模拟查询用户的逻辑(真实环境这里应该去掉,替换为查询数据库的操作)
     *
     * @param username 用户名
     * @return 用户信息
     */
    private User findMockUserByUsername(String username) {
        if (username.equals("user")) {
            return new User("user", "123456", true, Collections.emptySet());
        }
        return null;
    }
}
重启项目,进行认证:会发现日志抛出异常:
java.lang.IllegalArgumentException: Given that there is no default password encoder configured, each password must have a password encoding prefix. Please either prefix this password with '{noop}' or set a default password encoder in `DelegatingPasswordEncoder`.
这是因为SpringSecurity会强制要求你对数据密码进行加密,若没设加密,则会抛出此异常。
3、设置密码加密器
设置PasswordEncoder的加密器
对于用户的密码保护,通常需要将密码加密后存储到数据库。
目前MD5和BCry比较流行,Spring Security默认使用BCry进行加密。
PasswordEncoder是统一的加密实现接口。(可实现密码的加密和匹配功能)所有密码加密器都需要实现此接口。
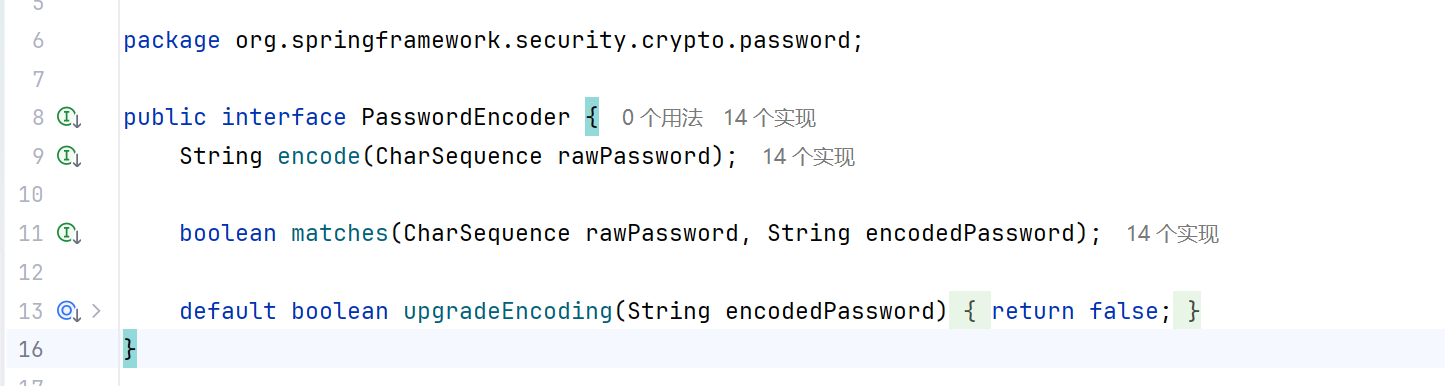
encode:将密码进行加密;
matches: 先将提交的密码进行加密,再与数据库中已加密的密码进行校验。匹配成功,返回true,失败返回false。
upgradeEncoding: 用于判断是否需要对密码进行再次加密,以使得密码更加安全,默认:false不需要。
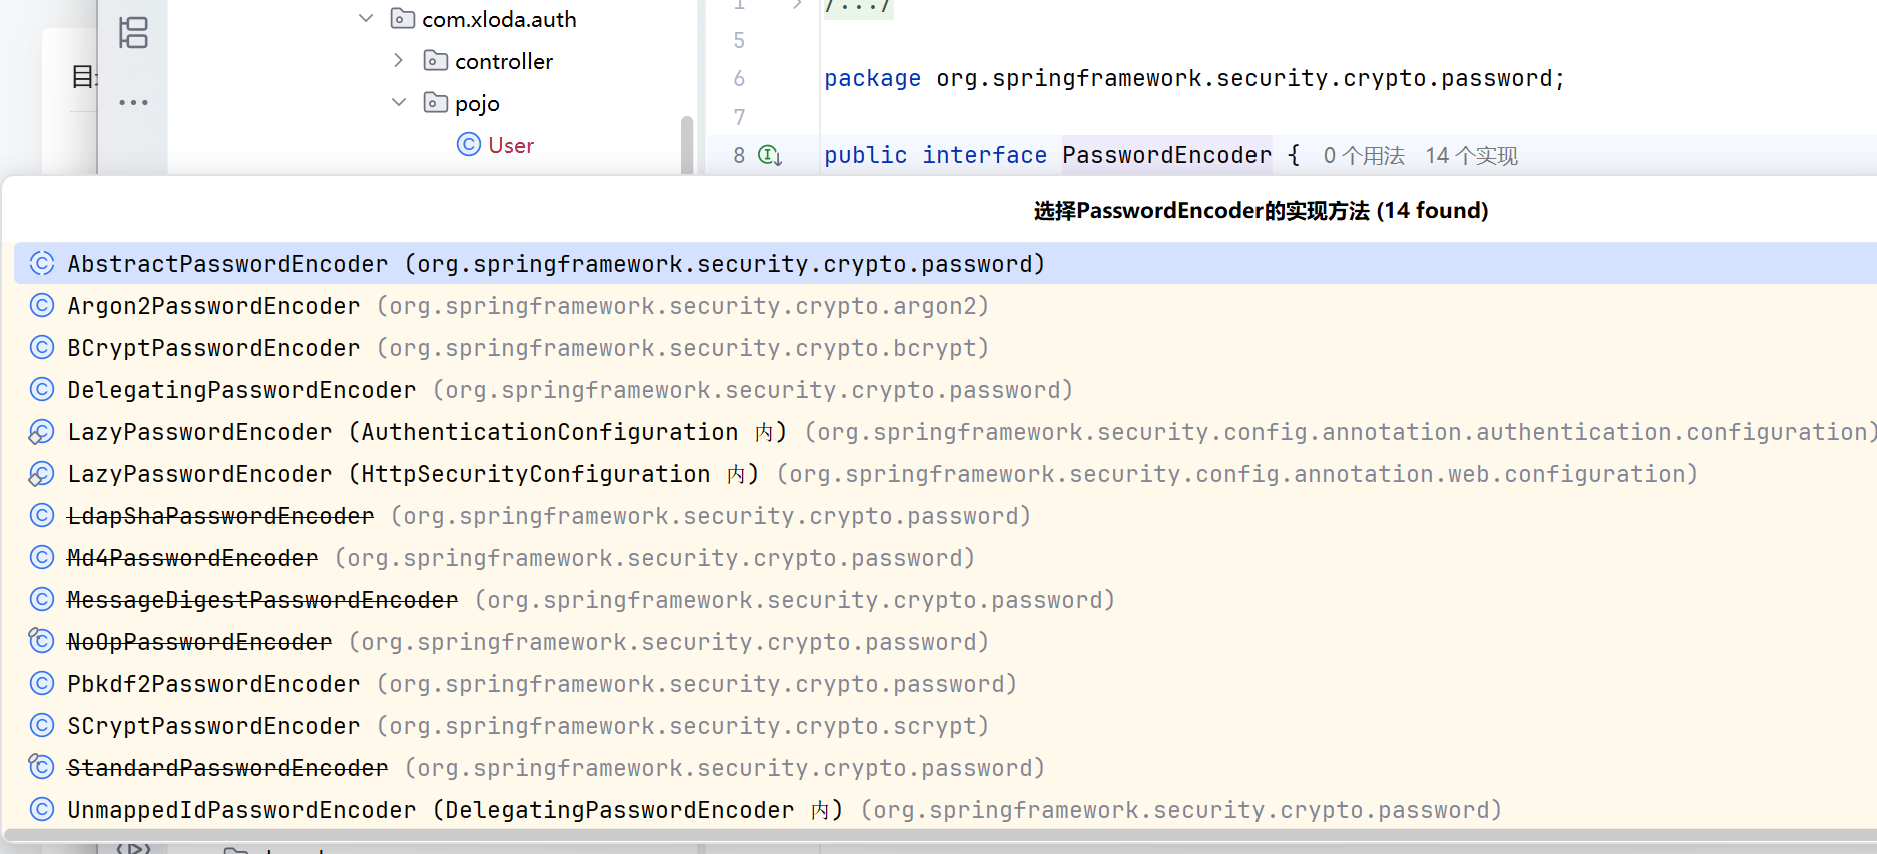
ctrl + alt点击可以看到对应的实现:
测试加密
/**
 * @author Dragon Wu
 * @created 2026/02/08 15:01
 * @description
 */
package com.xloda.auth;

import org.junit.jupiter.api.Test;
import org.springframework.boot.test.context.SpringBootTest;
import org.springframework.security.crypto.bcrypt.BCryptPasswordEncoder;
import org.springframework.security.crypto.password.PasswordEncoder;

@SpringBootTest
public class AuthApplicationTests {

    @Test
    void encodePassword() {
        String password = "123456";
        PasswordEncoder passwordEncoder = new BCryptPasswordEncoder();

        String encoded = passwordEncoder.encode(password);
        System.out.println("加密的密码:" + encoded);

        boolean isCorrect = passwordEncoder.matches("123456", encoded);
        System.out.println(isCorrect ? "密码匹配成功" : "密码匹配失败");
    }
}

BCrypt的加密原理
基于 Blowfish 算法,加盐 + 慢哈希做密码加密,不可逆,专为密码存储设计:
- 自动生成 16 字节随机盐,嵌入最终密文,无需单独存;
- 用 Cost 因子控制迭代次数(2^Cost),慢哈希防暴力破解;
- 密文整合版本 + Cost + 盐 + 哈希结果,验证时从密文解析盐和 Cost,原密码重新加密比对。
原始密码 + 自动盐 + Cost 因子 → 加密 → 盐嵌密文(一体存储)
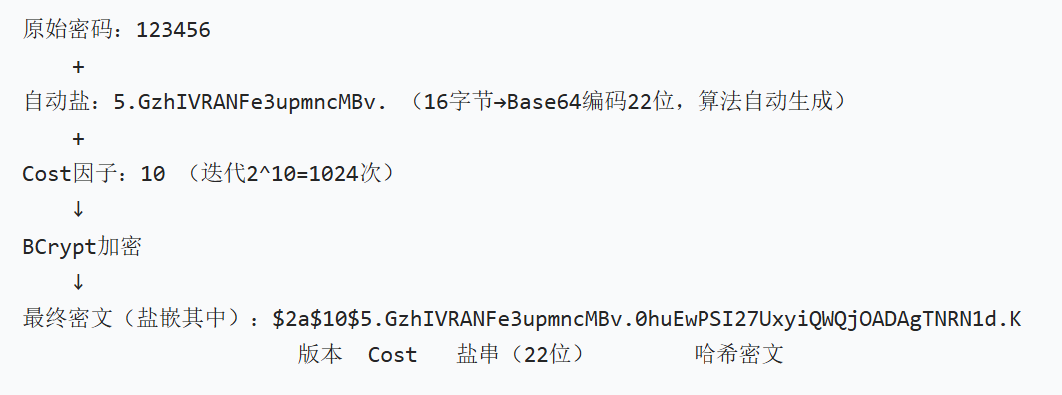
核心:自带盐 + 慢哈希,相同密码加密结果不同,破解成本极高。
| 特性 | BCrypt | MD5 |
|---|---|---|
| 加盐 | 自动生成 + 嵌入结果 | 需手动加盐,易漏加 |
| 破解难度 | 极高(慢哈希) | 极低(彩虹表可破解) |
| 不可逆性 | 完全不可逆 | 可通过彩虹表反查 |
4、创建SecurityConfig
import org.springframework.context.annotation.Bean;
import org.springframework.context.annotation.Configuration;
import org.springframework.security.config.annotation.web.configuration.EnableWebSecurity;
import org.springframework.security.crypto.bcrypt.BCryptPasswordEncoder;
import org.springframework.security.crypto.password.PasswordEncoder;

@Configuration
@EnableWebSecurity
public class SecurityConfig {

    @Bean
    public PasswordEncoder passwordEncoder() {
        return new BCryptPasswordEncoder();
    }
}
测试加密效果,这里将自定义的逻辑进行修改,再进行登录测试:
/**
 * @author Dragon Wu
 * @created 2026/02/08 13:31
 * @description
 */
package com.xloda.auth.service.impl;

import com.xloda.auth.pojo.User;
import com.xloda.auth.service.UserService;
import com.xloda.common.core.constant.SeparatorConstants;
import com.xloda.common.core.enums.ErrorCode;
import org.springframework.beans.factory.annotation.Autowired;
import org.springframework.security.core.userdetails.UserDetails;
import org.springframework.security.core.userdetails.UserDetailsService;
import org.springframework.security.core.userdetails.UsernameNotFoundException;
import org.springframework.security.crypto.password.PasswordEncoder;
import org.springframework.stereotype.Service;

import java.util.Collections;
import java.util.Objects;

@Service
public class UserServiceImpl implements UserService, UserDetailsService {

    @Autowired
    private PasswordEncoder passwordEncoder;

    /**
     * 根据用户名查询用户信息
     *
     * @param username 前端提交的用户名(判断用户名中是否存在)
     * @return UserDetails 用户信息(封装了用户名、密码、权限......)
     * @throws UsernameNotFoundException 用户不存在触发异常
     */
    @Override
    public UserDetails loadUserByUsername(String username) throws UsernameNotFoundException {
        // 1、数据库中,通过username查询用户信息
        // 若用户查询成功,则存在,否则用户不存在抛出 UsernameNotFoundException
        // TODO 查询数据库返回User对象
        User mockUser = findMockUserByUsername(username);
        if (Objects.isNull(mockUser)) {
            throw new UsernameNotFoundException(username + SeparatorConstants.COLON + ErrorCode.USER_NOT_FOUND.getMessage());
        }

        return mockUser;
    }

    /**
     * 模拟查询用户的逻辑(真实环境这里应该去掉,替换为查询数据库的操作)
     *
     * @param username 用户名
     * @return 用户信息
     */
    private User findMockUserByUsername(String username) {
        if (username.equals("user")) {
            return new User("user", passwordEncoder.encode("123456"), true, Collections.emptySet());
        }
        return null;
    }
}
再次登录,username: user,password: 123456与自定义逻辑匹配成功,获取到了相关资源。
访问流程梳理
1、访问接口;
2、被SpringSecurity的过滤器拦截。(共16个过滤器);
3、若未登录,则无法访问资源,跳转到登录页;
4、输入账号和密码然后提交;
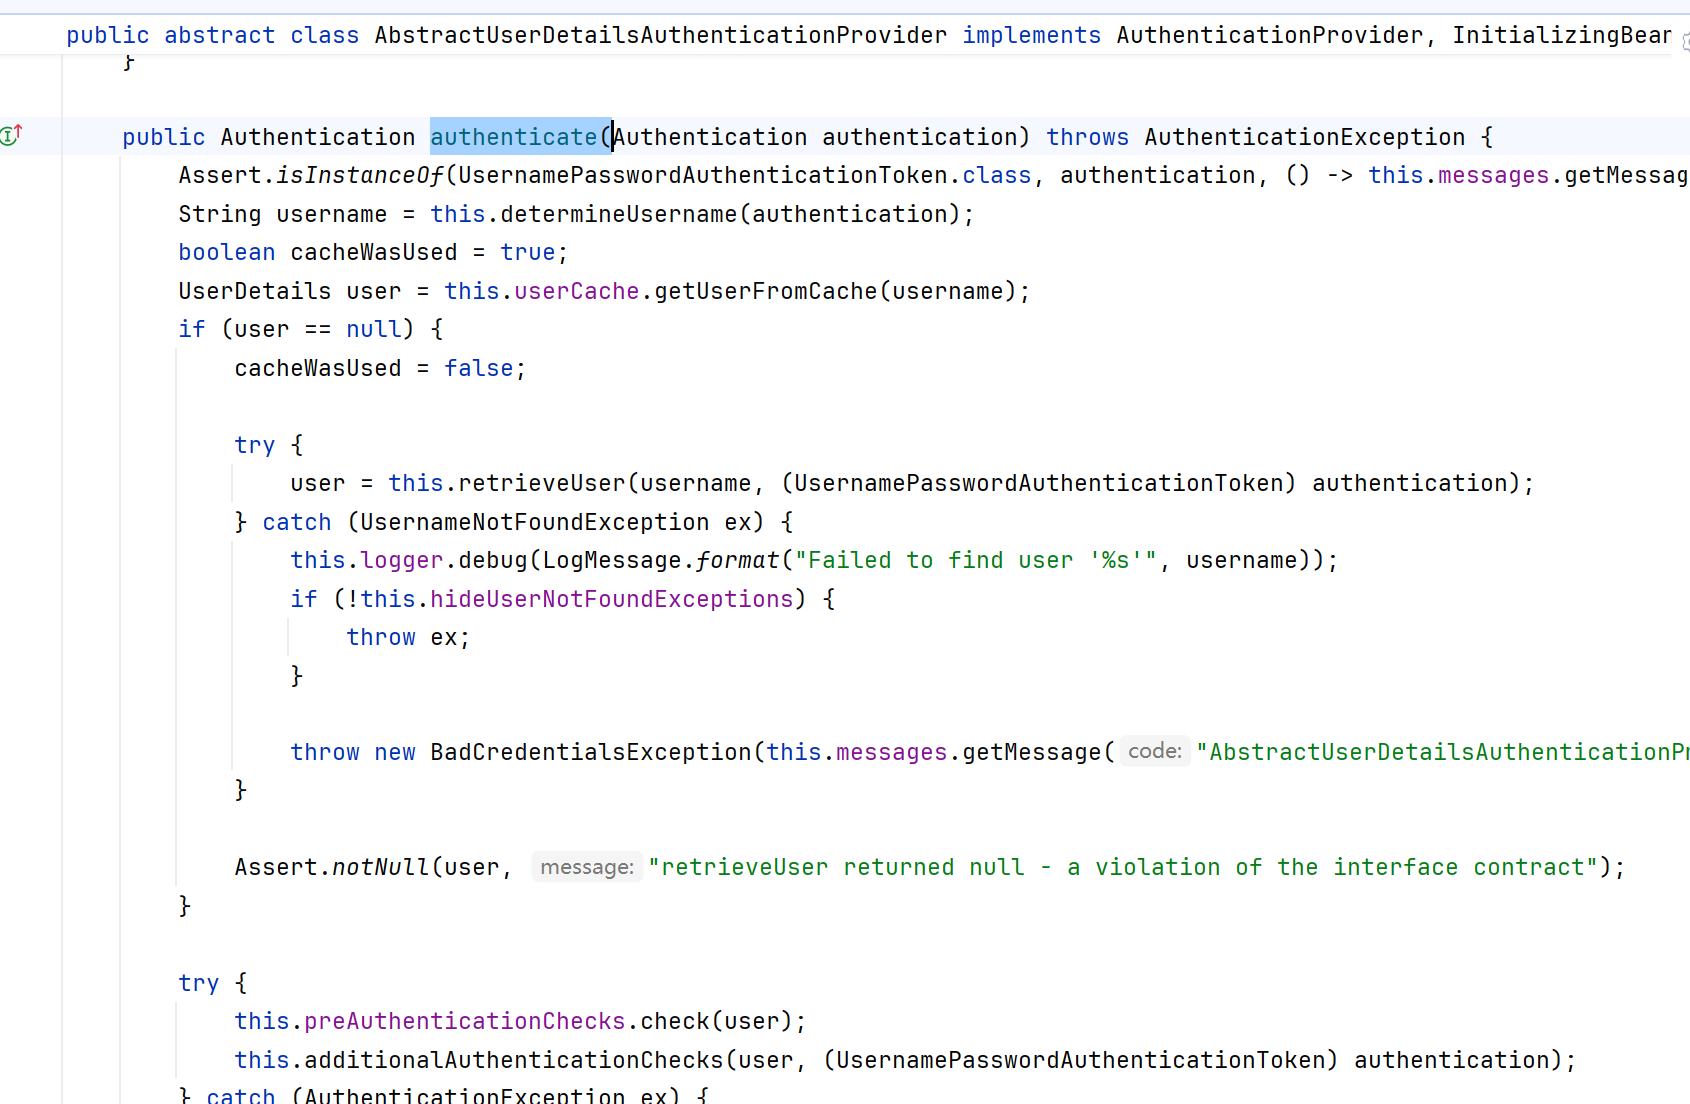
5、SpringSecurity里面的UsernamePasswordAuthenticationFilter获取到账号和密码;
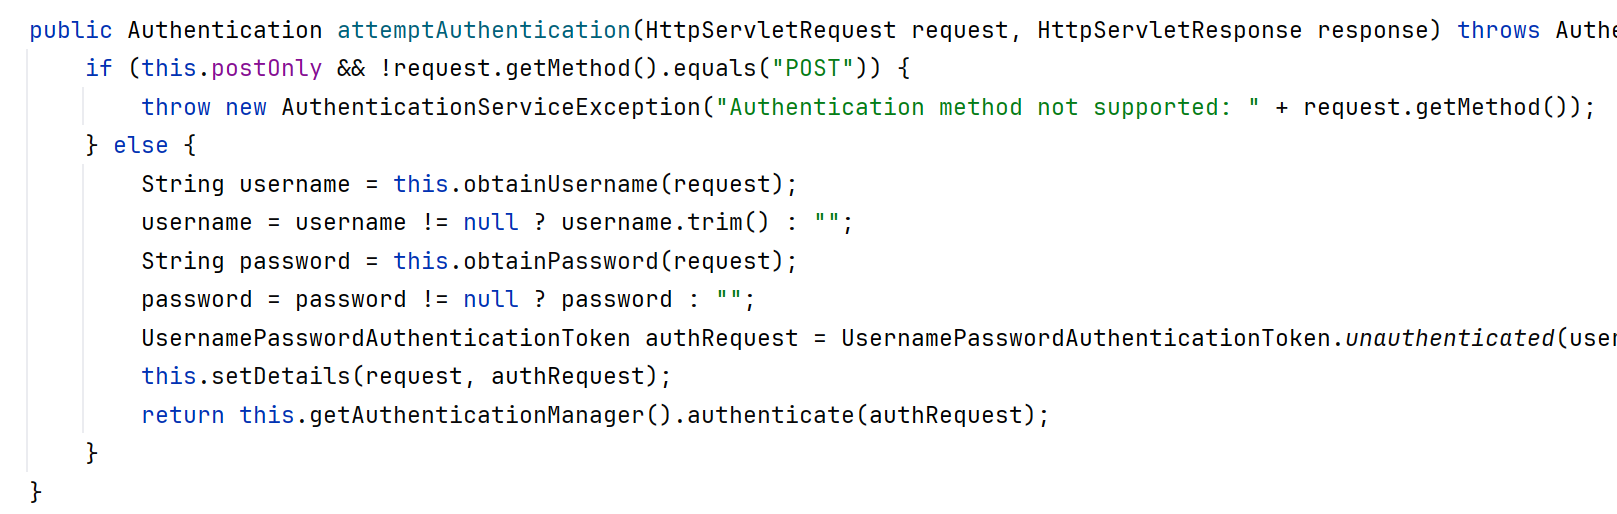
6、这个filter会调用loadUserByUsername(String username)这个方法去数据库查询用户信息;
7、去数据库查询信息后,把用户组装成User对象返回给SpringSecurity这个框架;
8、调用this.preAuthenticationChecks.check(user); 回到Filter去里面去进行用户状态的判断;
前后端分离的实现
在前后端分离项目中,我们需要自定义登录接口和配置文件。
1、自定义配置文件
import org.springframework.context.annotation.Bean;
import org.springframework.context.annotation.Configuration;
import org.springframework.http.HttpStatus;
import org.springframework.security.authentication.AuthenticationManager;
import org.springframework.security.config.annotation.authentication.configuration.AuthenticationConfiguration;
import org.springframework.security.config.annotation.method.configuration.EnableMethodSecurity;
import org.springframework.security.config.annotation.web.builders.HttpSecurity;
import org.springframework.security.config.annotation.web.configuration.EnableWebSecurity;
import org.springframework.security.config.http.SessionCreationPolicy;
import org.springframework.security.crypto.bcrypt.BCryptPasswordEncoder;
import org.springframework.security.crypto.password.PasswordEncoder;
import org.springframework.security.web.SecurityFilterChain;
import org.springframework.web.cors.CorsConfiguration;

@Configuration
@EnableWebSecurity
@EnableMethodSecurity   // 开启权限访问注解
public class SecurityConfig {

    @Bean
    public PasswordEncoder passwordEncoder() {
        return new BCryptPasswordEncoder();
    }

    @Bean
    public SecurityFilterChain securityFilterChain(HttpSecurity http) throws Exception {
        // 1. 接口权限规则(核心)
        http.authorizeHttpRequests(auth -> auth
                .requestMatchers("/public").permitAll() // 公共可访问的接口(登录/未登录都能访问)
                .requestMatchers("/login", "/register").anonymous() // 仅允许未认证用户访问(已登录用户访问会拒绝)
                .requestMatchers("/admin/**").hasRole("ADMIN") // 管理员接口需ADMIN角色
                .requestMatchers("/api/**").hasAnyRole("USER", "ADMIN") // 普通接口需USER/ADMIN角色
                .anyRequest().authenticated() // 剩余所有接口需认证
        );

        // 2. 关闭CSRF(前后端分离+非Cookie Token场景放心关)
        http.csrf(csrf -> csrf.disable());

        // 3. 禁用默认表单登录/HTTP Basic(前后端分离必配,防跳转登录页)
        http.formLogin(form -> form.disable());
        http.httpBasic(basic -> basic.disable());

        // 4. 会话管理(前后端分离建议禁用session,纯Token认证)
        http.sessionManagement(session -> session
                .sessionCreationPolicy(SessionCreationPolicy.STATELESS)
        );

        // 5. 异常处理(前后端分离统一返回JSON,而非默认页面)
        http.exceptionHandling(ex -> ex
                .authenticationEntryPoint((request, response, authException) -> {
                    // 未认证时返回401 JSON
                    response.setContentType("application/json;charset=UTF-8");
                    response.setStatus(HttpStatus.UNAUTHORIZED.value());
                    response.getWriter().write("{\"code\":401,\"msg\":\"未登录或Token过期\"}");
                })
                .accessDeniedHandler((request, response, accessDeniedException) -> {
                    // 权限不足时返回403 JSON
                    response.setContentType("application/json;charset=UTF-8");
                    response.setStatus(HttpStatus.FORBIDDEN.value());
                    response.getWriter().write("{\"code\":403,\"msg\":\"权限不足\"}");
                })
        );

        // 6. 跨域配置(前后端分离必配,解决跨域请求拦截)
        http.cors(cors -> cors.configurationSource(request -> {
            CorsConfiguration config = new CorsConfiguration();
            config.addAllowedOriginPattern("*"); // 允许所有域名(开发环境),生产需改为具体域名(如https://xxx.com)
            config.addAllowedMethod("*"); // 允许所有请求方法
            config.addAllowedHeader("*"); // 允许所有请求头
            config.setAllowCredentials(true); // 允许携带凭证
            config.setMaxAge(3600L); // 预检请求缓存时间
            return config;
        }));

        return http.build();
    }

    @Bean
    public AuthenticationManager authenticationManager(AuthenticationConfiguration configuration) throws Exception {
        return configuration.getAuthenticationManager();
    }
}
2、自定义Controller
import com.xloda.common.core.enums.ResultCode;
import com.xloda.common.core.vo.Result;
import org.springframework.beans.factory.annotation.Autowired;
import org.springframework.security.authentication.AuthenticationManager;
import org.springframework.security.authentication.UsernamePasswordAuthenticationToken;
import org.springframework.security.core.Authentication;
import org.springframework.web.bind.annotation.PostMapping;
import org.springframework.web.bind.annotation.RequestBody;
import org.springframework.web.bind.annotation.RestController;
import java.util.HashMap;
import java.util.Map;
@RestController
//@RequestMapping("/auth")
public class AuthController {
@Autowired
private AuthenticationManager authenticationManager;
@PostMapping("/login")
public Result<Map<String, Object>> login(@RequestBody Map<String, String> request) {
String username = request.get("username");
String password = request.get("password");
try {
// 1、创建认证令牌
UsernamePasswordAuthenticationToken authToken = new UsernamePasswordAuthenticationToken(username, password);
// 2、执行SpringSecurity的认证逻辑.....
Authentication authenticate = authenticationManager.authenticate(authToken);
// 3、返回数据
Map<String, Object> data = new HashMap<>();
data.put("token", "temp-token-" + System.currentTimeMillis()); //临时token,仅限测试用
data.put("username", "Dragon");
data.put("roles", "admin");
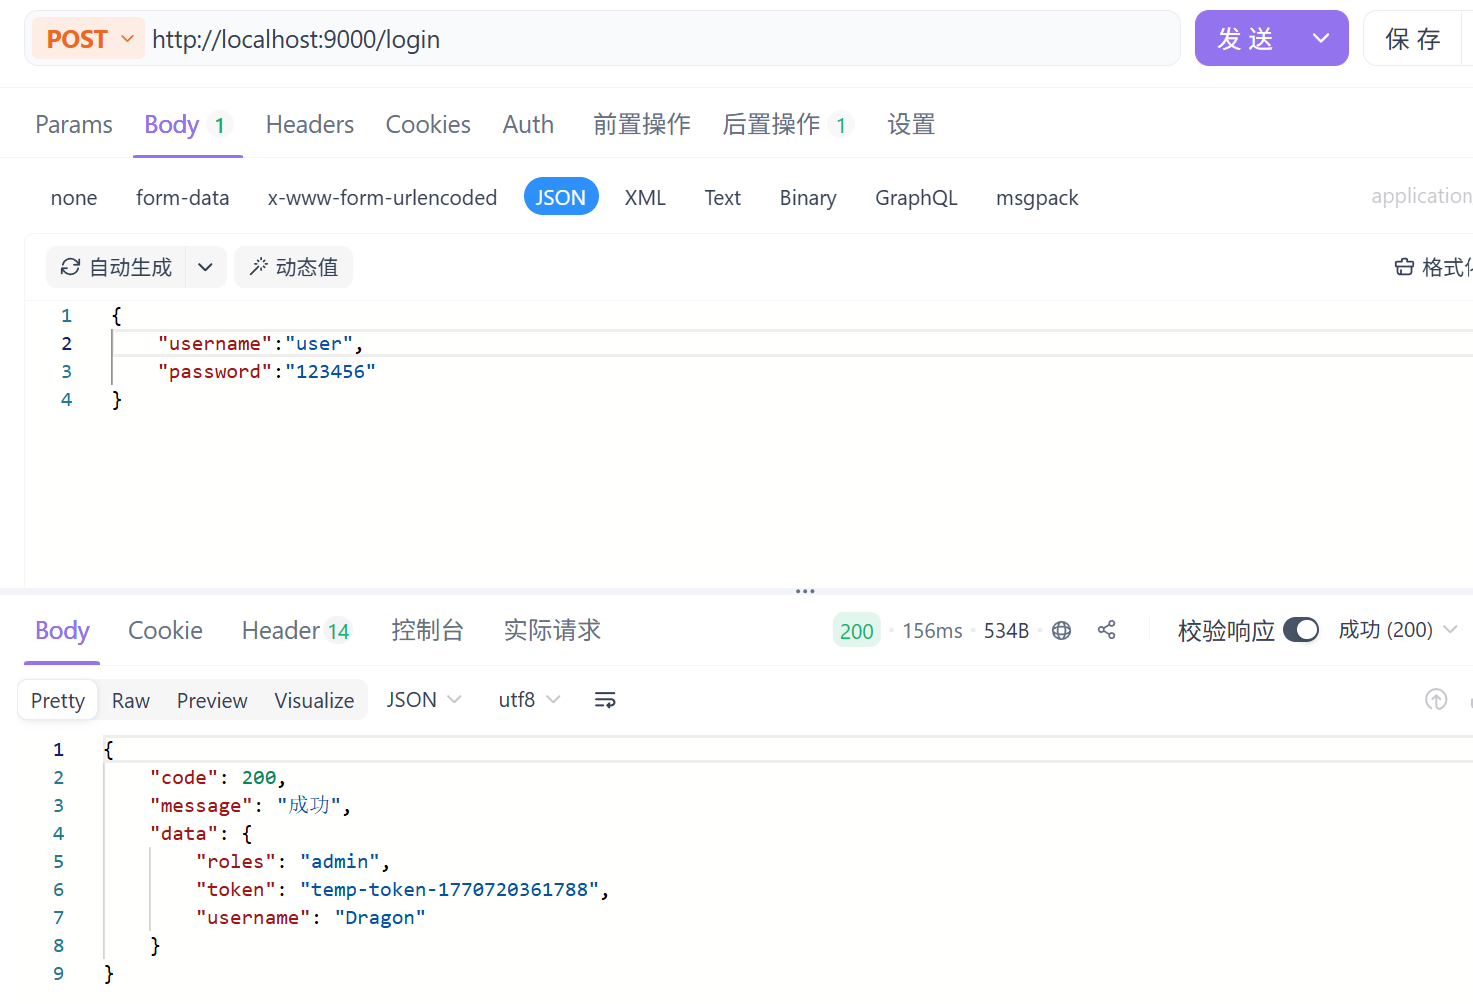
return Result.success(data);
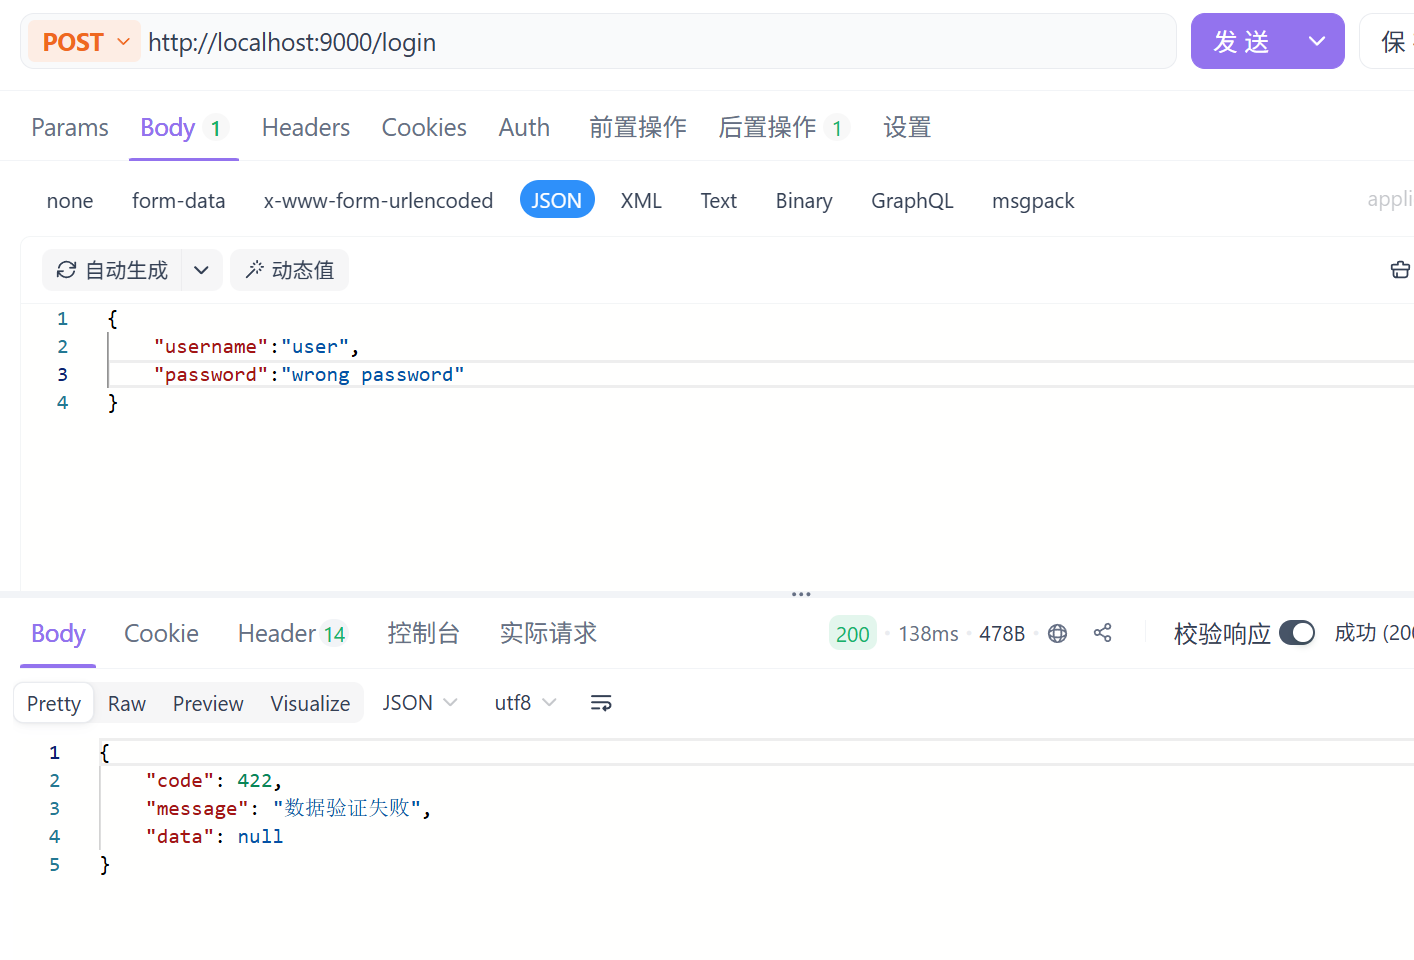
} catch (Exception e) {
return Result.fail(ResultCode.UNPROCESSABLE_ENTITY);
}
}
}
3、测试接口
二、核心配置
过滤器链SecurityFilterChain
若配置了自定义过滤器链,默认的过滤器链就会失效
    @Bean
    public SecurityFilterChain securityFilterChain(HttpSecurity http) throws Exception {
        // 1. 接口权限规则(核心)
        http.authorizeHttpRequests(auth -> auth
                .requestMatchers("/public").permitAll() // 公共可访问的接口(登录/未登录都能访问)
                .requestMatchers("/login", "/register").anonymous() // 仅允许未认证用户访问(已登录用户访问会拒绝)
                .requestMatchers("/admin/**").hasRole("ADMIN") // 管理员接口需ADMIN角色
                .requestMatchers("/api/**").hasAnyRole("USER", "ADMIN") // 普通接口需USER/ADMIN角色
                .anyRequest().authenticated() // 剩余所有接口需认证
        );

        // 2. 关闭CSRF(前后端分离+非Cookie Token场景放心关)
        http.csrf(csrf -> csrf.disable());

        // 3. 禁用默认表单登录/HTTP Basic(前后端分离必配,防跳转登录页)
        http.formLogin(form -> form.disable());
        http.httpBasic(basic -> basic.disable());

        // 4. 会话管理(前后端分离建议禁用session,纯Token认证)
        http.sessionManagement(session -> session
                .sessionCreationPolicy(SessionCreationPolicy.STATELESS)
        );

        // 5. 异常处理(前后端分离统一返回JSON,而非默认页面)
        http.exceptionHandling(ex -> ex
                .authenticationEntryPoint((request, response, authException) -> {
                    // 未认证时返回401 JSON
                    response.setContentType("application/json;charset=UTF-8");
                    response.setStatus(HttpStatus.UNAUTHORIZED.value());
                    response.getWriter().write("{\"code\":401,\"msg\":\"未登录或Token过期\"}");
                })
                .accessDeniedHandler((request, response, accessDeniedException) -> {
                    // 权限不足时返回403 JSON
                    response.setContentType("application/json;charset=UTF-8");
                    response.setStatus(HttpStatus.FORBIDDEN.value());
                    response.getWriter().write("{\"code\":403,\"msg\":\"权限不足\"}");
                })
        );

        // 6. 跨域配置(前后端分离必配,解决跨域请求拦截)
        http.cors(cors -> cors.configurationSource(request -> {
            CorsConfiguration config = new CorsConfiguration();
            config.addAllowedOriginPattern("*"); // 允许所有域名(开发环境),生产需改为具体域名(如https://xxx.com)
            config.addAllowedMethod("*"); // 允许所有请求方法
            config.addAllowedHeader("*"); // 允许所有请求头
            config.setAllowCredentials(true); // 允许携带凭证
            config.setMaxAge(3600L); // 预检请求缓存时间
            return config;
        }));

        return http.build();
    }
成功/失败处理器的配置
核心目标
无需自定义 /login 接口,直接通过 Spring Security 配置,接管默认表单登录的登录成功、登录失败 逻辑(比如返回 JSON、跳转页面、记录日志等)。
步骤 1:编写成功 / 失败 Handler 实现类
import jakarta.servlet.http.HttpServletRequest;
import jakarta.servlet.http.HttpServletResponse;
import org.springframework.security.core.Authentication;
import org.springframework.security.core.AuthenticationException;
import org.springframework.security.web.authentication.AuthenticationFailureHandler;
import org.springframework.security.web.authentication.AuthenticationSuccessHandler;
import com.fasterxml.jackson.databind.ObjectMapper;
import java.io.IOException;
import java.util.HashMap;
import java.util.Map;

// 登录成功处理器(返回JSON示例)
@Component
public class CustomLoginSuccessHandler implements AuthenticationSuccessHandler {
    private final ObjectMapper objectMapper = new ObjectMapper();

    @Override
    public void onAuthenticationSuccess(HttpServletRequest request,
                                        HttpServletResponse response,
                                        Authentication authentication) throws IOException {
        // 1. 设置响应格式
        response.setContentType("application/json;charset=UTF-8");
        // 2. 组装返回数据(含用户信息/Token等)
        Map<String, Object> result = new HashMap<>();
        result.put("code", 200);
        result.put("msg", "登录成功");
        result.put("username", authentication.getName());
        // 3. 写入响应
        response.getWriter().write(objectMapper.writeValueAsString(result));
    }
}

// 登录失败处理器(返回JSON示例)
@Component
public class CustomLoginFailureHandler implements AuthenticationFailureHandler {
    private final ObjectMapper objectMapper = new ObjectMapper();

    @Override
    public void onAuthenticationFailure(HttpServletRequest request,
                                        HttpServletResponse response,
                                        AuthenticationException exception) throws IOException {
        // 1. 设置响应格式和状态码
        response.setContentType("application/json;charset=UTF-8");
        response.setStatus(HttpServletResponse.SC_UNAUTHORIZED);
        // 2. 组装失败信息(区分异常类型)
        Map<String, Object> result = new HashMap<>();
        result.put("code", 401);
        result.put("msg", "登录失败:" + exception.getMessage());
        // 3. 写入响应
        response.getWriter().write(objectMapper.writeValueAsString(result));
    }
}
步骤 2:在 SecurityConfig 中配置 Handler
import org.springframework.context.annotation.Bean;
import org.springframework.context.annotation.Configuration;
import org.springframework.security.config.annotation.web.builders.HttpSecurity;
import org.springframework.security.config.annotation.web.configuration.EnableWebSecurity;
import org.springframework.security.web.SecurityFilterChain;
import org.springframework.security.web.authentication.AuthenticationFailureHandler;
import org.springframework.security.web.authentication.AuthenticationSuccessHandler;

@Configuration
@EnableWebSecurity
public class SecurityConfig {
    // 注入自定义的成功/失败处理器
    private final AuthenticationSuccessHandler customLoginSuccessHandler;
    private final AuthenticationFailureHandler customLoginFailureHandler;

    // 构造器注入
    public SecurityConfig(AuthenticationSuccessHandler customLoginSuccessHandler,
                          AuthenticationFailureHandler customLoginFailureHandler) {
        this.customLoginSuccessHandler = customLoginSuccessHandler;
        this.customLoginFailureHandler = customLoginFailureHandler;
    }

    @Bean
    public SecurityFilterChain securityFilterChain(HttpSecurity http) throws Exception {
        http
            // 1. 配置表单登录(非自定义接口核心)
            .formLogin(form -> form
                    .loginProcessingUrl("/login") // 默认登录接口,无需自定义
                    .successHandler(customLoginSuccessHandler) // 绑定成功处理器
                    .failureHandler(customLoginFailureHandler) // 绑定失败处理器
                    // 可选:自定义登录页(前后端分离可省略)
                    // .loginPage("/custom-login.html")
            )
            // 2. 其他基础配置(按需)
            .csrf(csrf -> csrf.disable()) // 前后端分离关闭CSRF
            .authorizeHttpRequests(auth -> auth
                    .anyRequest().authenticated()
            );

        return http.build();
    }
}
核心要点总结
- 核心逻辑:通过实现
AuthenticationSuccessHandler/AuthenticationFailureHandler接口,重写处理方法,替代默认的跳转 / 响应逻辑; - 配置关键:在
formLogin()中通过successHandler()/failureHandler()绑定自定义处理器,无需自定义/login接口; - 使用方式:直接 POST 请求
/login(默认接口),携带username/password参数,框架会自动调用对应的处理器返回 JSON; - 适配场景:适合不想自定义登录接口,仅需接管默认表单登录的成功 / 失败响应逻辑(前后端分离返回 JSON、传统项目跳转页面均适用)。
三、核心功能
获取Security登入用户的信息
SpringSecurity会将登录用户的信息(Authentication对象)存在SecurityContext中,而SecurityContext又通过ThreadLocal绑定到当前线程,保证线程安全。
Authentication对象包含两个核心信息:
principal: 用户主体,通常是UserDetails实现类或自定义用户实体类;
authorities: 用户拥有的权限集合。
方法一:通过SecurityContextHolder手动获取(通用,支持任意层)
步骤:
1、获取SecurityContext对象
2、从SecurityContext中获取Authentication对象;
3、从Authentication中获取Principal(用户信息)。
Authentication authentication = SecurityContextHolder.getContext().getAuthentication();
if (Objects.isNull(authentication)) {
    return null;
}

Object principal = authentication.getPrincipal();
if (principal instanceof User) {
    return (User) principal;
}
return null;
{"password":"$2a$10$s62lqf9zPSXMbqRHsBjevOngU0Ct9Z5dJBE43QfZQnpDO.vSeiJj2","username":"user","enabled":true,"authorities":[],"accountNonLocked":true,"credentialsNonExpired":true,"accountNonExpired":true}
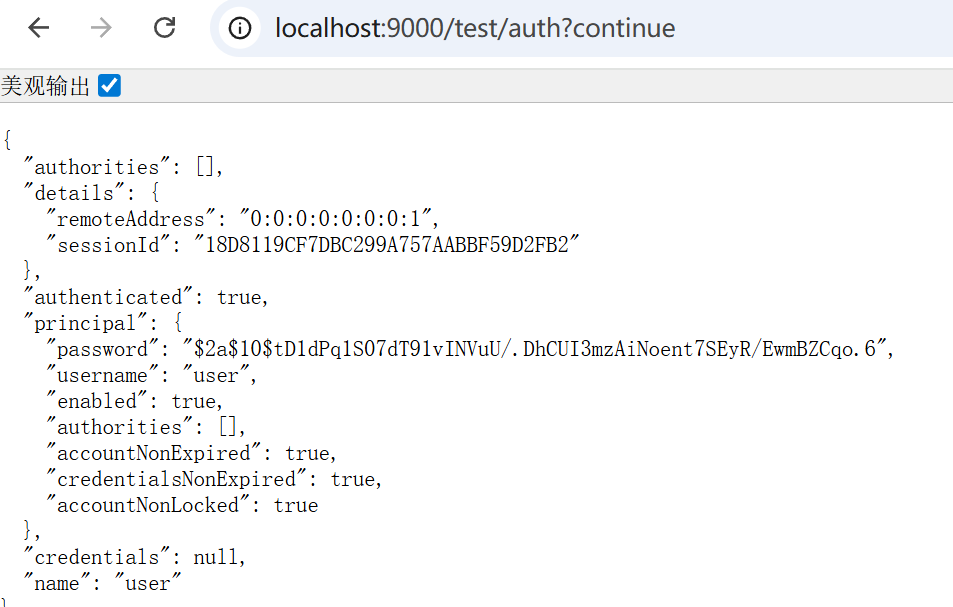
方法二:直接在controller的参数中加入Authentication参数
@GetMapping("/auth")
public Authentication auth(Authentication authentication) {
    return authentication;
}
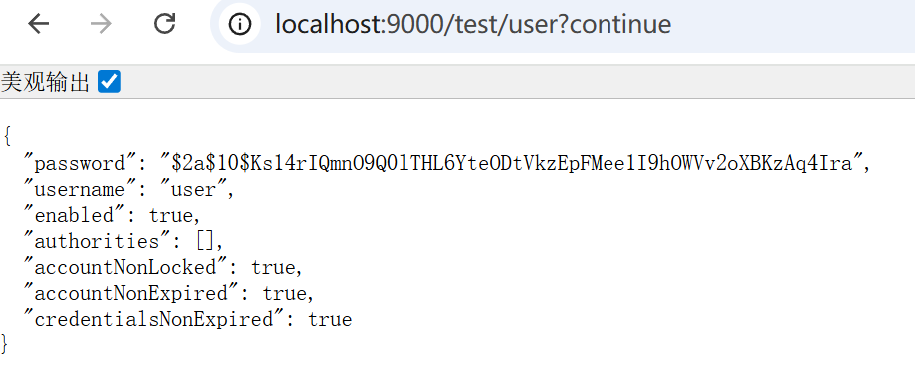
方法三:直接在controller的参数里加入Pricipal
@GetMapping("/user")
public Principal getCurrentUser(Principal principal) {
    return principal;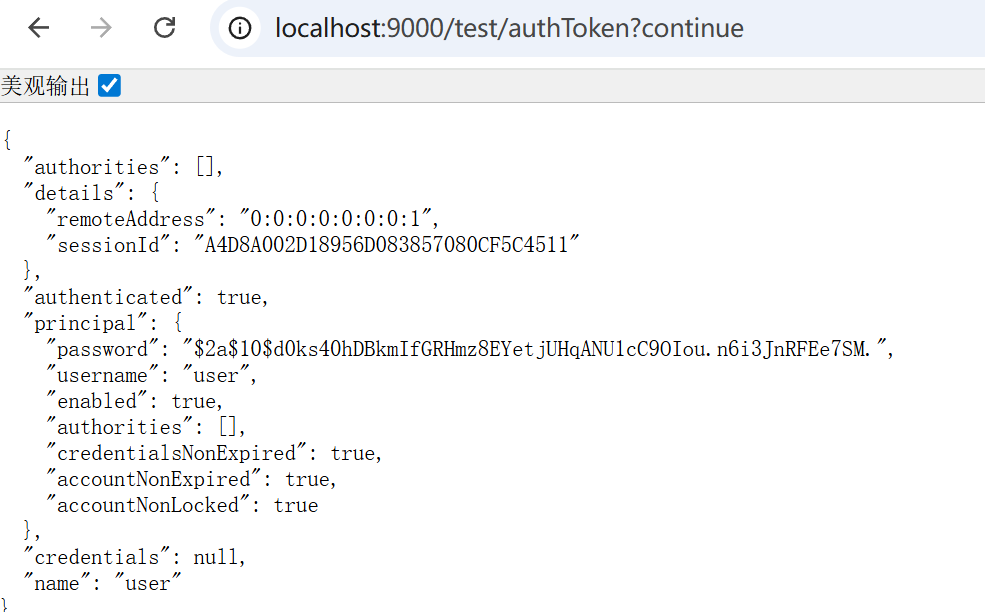
}方法四:直接在controller的参数中加入UsernamePasswordAuthenticationToken参数
@GetMapping("/authToken")
public UsernamePasswordAuthenticationToken getAuthentication(UsernamePasswordAuthenticationToken authentication) {
    return authentication;
}
效果和方法二类似,类型名字长了点:
方法五:通过controller里传入参数加注解实现
@GetMapping("/user")
public User getCurrentUser(@AuthenticationPrincipal User user) {
    return user;
}
五种方法除了第一种,其他的方法都需要在controller里传参来获取。
访问控制(授权)
这里我们通过注解来实现访问控制
开启注解访问配置
在SpringSecurity中提供了访问控制的注解。这些注解默认都是不可用的,在6.x中通过@EnableMethodSecurity来开启。
这些注解可以写在Service接口接口或方法上,也可以写在Controller或Controller的方法上。
通常情况下都是写在控制器方法上,控制器接口的Url是否允许被访问。
@Configuration
@EnableWebSecurity
@EnableMethodSecurity   // 开启权限访问注解
public class SecurityConfig {
在api接口上添加访问权限注解如下:
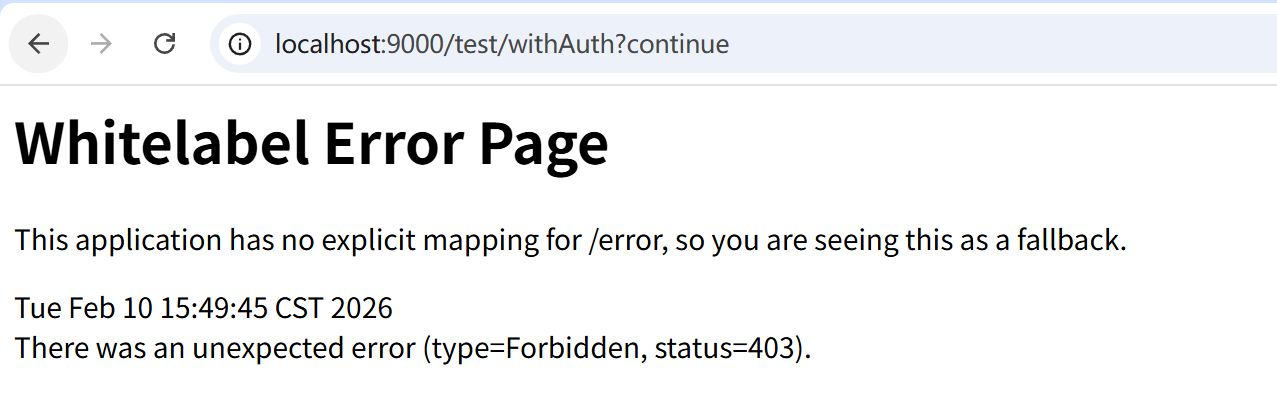
@PreAuthorize("hasAuthority('user:query')")
@GetMapping("/withAuth")
public String withAuth() {
    return "Access successfully";
}
@PreAuthorize注解(主流推荐)
基础使用案例
这里@PreAuthorize("hasAuthority('user:query')")注解会要求用户需要有user:query权限才能进行访问,否则无法访问(403),如图:
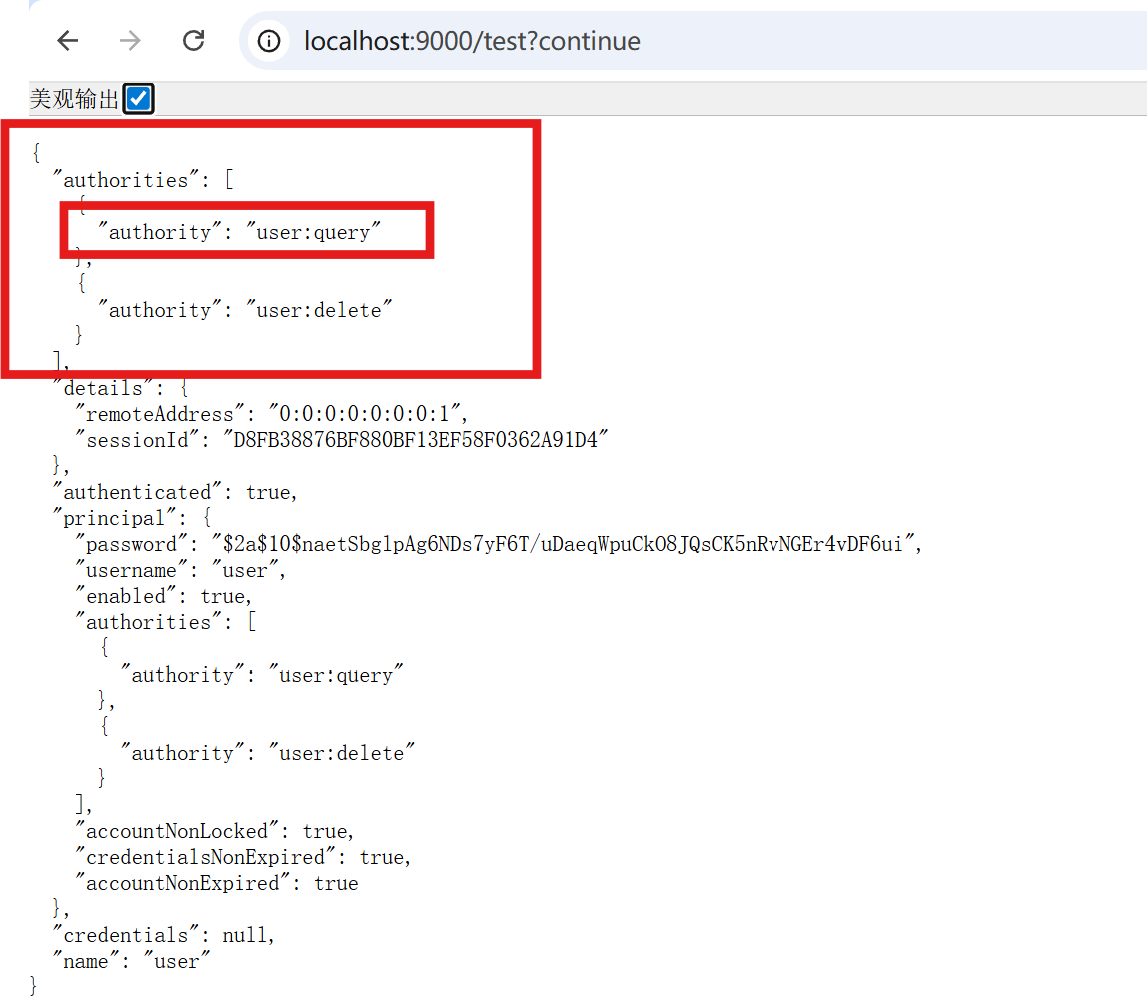
我们对自定义登录逻辑进行改造,加入模拟权限
@Service
public class UserServiceImpl implements UserService, UserDetailsService {

    @Autowired
    private PasswordEncoder passwordEncoder;

    /**
     * 根据用户名查询用户信息
     *
     * @param username 前端提交的用户名(判断用户名中是否存在)
     * @return UserDetails 用户信息(封装了用户名、密码、权限......)
     * @throws UsernameNotFoundException 用户不存在触发异常
     */
    @Override
    public UserDetails loadUserByUsername(String username) throws UsernameNotFoundException {
        // 1、数据库中,通过username查询用户信息
        // 若用户查询成功,则存在,否则用户不存在抛出 UsernameNotFoundException
        // TODO 查询数据库返回User对象
        User mockUser = findMockUserByUsername(username);
        if (Objects.isNull(mockUser)) {
            throw new UsernameNotFoundException(username + SeparatorConstants.COLON + ErrorCode.USER_NOT_FOUND.getMessage());
        }

        // TODO 数据库查询权限信息
        Set<GrantedAuthority> mockAuthorities = findMockAuthoritiesByUserId(123456L);


        return new User(mockUser.getUsername(), mockUser.getPassword(), mockUser.isEnabled(), mockAuthorities);
    }

    /**
     * 模拟查询用户的逻辑(真实环境这里应该去掉,替换为查询数据库的操作)
     *
     * @param username 用户名
     * @return 用户信息
     */
    private User findMockUserByUsername(String username) {
        if (username.equals("user")) {
            return new User("user", passwordEncoder.encode("123456"), true, null);
        }
        return null;
    }

    /**
     * 模拟查询用户的权限(真实环境这里应该去掉,替换为查询数据库的操作)
     *
     * @param userId 用户id
     * @return 用户对应的权限
     */
    private Set<GrantedAuthority> findMockAuthoritiesByUserId(Long userId) {
        return Set.of("user:query", "user:delete")
                .stream()
                .distinct()  // 生产环境中需要去重
                .map(SimpleGrantedAuthority::new)
                .collect(Collectors.toUnmodifiableSet());
    }
}
这里已加入user:query权限进行测试:

查看用户信息可以看到,用户拥有此权限所以可以访问:
使用方法列表
| 用法分类 | 示例写法 | 作用说明 | 适用场景 |
|---|---|---|---|
| 权限匹配 | @PreAuthorize("hasAuthority('user:query')") | 验证用户是否拥有指定单个权限 | 细粒度功能权限控制 |
| 角色匹配 | @PreAuthorize("hasRole('ADMIN')") | 验证用户是否拥有指定角色(自动拼接 ROLE_) | 粗粒度角色权限控制 |
| 多权限 / 角色 | @PreAuthorize("hasAnyAuthority('user:add','user:edit')") | 验证用户拥有任意一个指定权限 | 满足任一权限即可访问 |
| 逻辑组合 | @PreAuthorize("hasRole('ADMIN') and hasAuthority('user:delete')") | 同时满足角色 + 权限条件 | 多条件组合权限控制 |
| 表达式取值 | @PreAuthorize("#userId == authentication.principal.id") | 校验方法参数与当前用户 ID 一致 | 数据级别的权限隔离 |
| 否定条件 | @PreAuthorize("!hasRole('GUEST')") | 验证用户不具备指定角色 | 排除特定角色访问 |
关键补充(一眼看懂)
hasRole('ADMIN')等价于hasAuthority('ROLE_ADMIN')(框架自动加 ROLE_ 前缀);- 注解加在方法上,需配合
@EnableMethodSecurity才能生效; authentication.principal可获取当前登录用户信息,支持动态参数校验。
hasRole和hasAuthority的关系
ROLE_ 是 Spring Security 为「角色」和「权限」做的语义区分前缀:框架中 hasRole('ADMIN') 本质是对 hasAuthority('ROLE_ADMIN') 的封装,调用 hasRole 时会自动给传入的角色名拼接 ROLE_ 前缀,再去匹配用户的权限集合;而 hasAuthority 则直接匹配原始权限字符串,无自动拼接逻辑。简单说,hasRole 是「角色专用」(带前缀),hasAuthority 是「通用权限」(无前缀),框架通过这个前缀区分角色和普通权限的语义,避免两者混淆。
用户的权限集合是「普通权限字符串(如 user:query)」 + 「ROLE_前缀 + 角色名(如 ROLE_ADMIN)」的总和,Spring Security 会统一从这个集合中匹配 hasAuthority(匹配原始字符串)和 hasRole(自动拼接 ROLE_ 后匹配)。
配置中设置访问控制
@Configuration
public class SecurityConfig {
    @Bean
    public SecurityFilterChain securityFilterChain(HttpSecurity http) throws Exception {
        http
            .authorizeHttpRequests(auth -> auth
                .requestMatchers("/login", "/register", "/public/**").permitAll()
                .requestMatchers("/admin/**").hasRole("ADMIN")
                .requestMatchers("/user/**").hasAnyRole("USER", "ADMIN")
                .anyRequest().authenticated()
            )
            .formLogin() // 启用默认登录页
            .and().csrf().disable(); // 测试/非生产环境可临时关闭CSRF
        return http.build();
    }
}
通过业务代码访问控制
import org.springframework.security.core.Authentication;
import org.springframework.security.core.GrantedAuthority;
import org.springframework.security.core.context.SecurityContextHolder;
import org.springframework.security.core.userdetails.UserDetails;
import org.springframework.security.access.AccessDeniedException;
import org.springframework.stereotype.Component;

import java.util.Collection;
import java.util.Objects;
import java.util.Set;
import java.util.stream.Collectors;

/**
 * Spring Security 权限校验工具类(非注解式,业务层直接调用)
 * 这是主流且推荐的封装方式,兼顾灵活性和代码整洁性
 */
@Component
public class SecurityPermissionUtil {

    /**
     * 获取当前登录用户的认证信息
     * @return Authentication 对象
     * @throws AccessDeniedException 未登录时抛出
     */
    public Authentication getCurrentAuthentication() {
        Authentication authentication = SecurityContextHolder.getContext().getAuthentication();
        // 排除匿名用户(未登录)的情况
        if (Objects.isNull(authentication) || "anonymousUser".equals(authentication.getPrincipal())) {
            throw new AccessDeniedException("请先登录");
        }
        return authentication;
    }

    /**
     * 获取当前登录用户的用户名
     */
    public String getCurrentUsername() {
        Authentication authentication = getCurrentAuthentication();
        Object principal = authentication.getPrincipal();
        if (principal instanceof UserDetails) {
            return ((UserDetails) principal).getUsername();
        }
        return principal.toString();
    }

    /**
     * 获取当前用户的所有权限(包括角色,格式:ROLE_ADMIN、user:edit 等)
     */
    public Set<String> getCurrentAuthorities() {
        Authentication authentication = getCurrentAuthentication();
        Collection<? extends GrantedAuthority> authorities = authentication.getAuthorities();
        return authorities.stream()
                .map(GrantedAuthority::getAuthority)
                .collect(Collectors.toSet());
    }

    /**
     * 校验当前用户是否拥有指定权限(精准匹配,推荐用于细粒度权限)
     * @param authority 权限字符串(如:user:edit、order:delete)
     * @throws AccessDeniedException 无权限时抛出
     */
    public void checkAuthority(String authority) {
        Set<String> userAuthorities = getCurrentAuthorities();
        if (!userAuthorities.contains(authority)) {
            throw new AccessDeniedException("无权限:" + authority + ",请联系管理员");
        }
    }

    /**
     * 校验当前用户是否拥有指定角色(自动拼接 ROLE_ 前缀,推荐用于角色判断)
     * @param role 角色名(如:ADMIN、USER,无需加 ROLE_)
     * @throws AccessDeniedException 无角色时抛出
     */
    public void checkRole(String role) {
        checkAuthority("ROLE_" + role);
    }

    /**
     * 校验当前用户是否拥有任意一个指定权限
     * @param authorities 权限列表(如:{"user:edit", "user:delete"})
     * @throws AccessDeniedException 无任何匹配权限时抛出
     */
    public void checkAnyAuthority(String... authorities) {
        Set<String> userAuthorities = getCurrentAuthorities();
        boolean hasAny = false;
        for (String authority : authorities) {
            if (userAuthorities.contains(authority)) {
                hasAny = true;
                break;
            }
        }
        if (!hasAny) {
            throw new AccessDeniedException("无以下任一权限:" + String.join(",", authorities));
        }
    }

    /**
     * 校验当前用户是否为指定用户(数据级权限,比如只能操作自己的资源)
     * @param targetUsername 目标用户名
     * @throws AccessDeniedException 非指定用户时抛出
     */
    public void checkCurrentUser(String targetUsername) {
        String currentUsername = getCurrentUsername();
        if (!currentUsername.equals(targetUsername)) {
            throw new AccessDeniedException("仅能操作自己的资源,无权操作用户:" + targetUsername + " 的资源");
        }
    }
}
controller中调用:
import org.springframework.beans.factory.annotation.Autowired;
import org.springframework.web.bind.annotation.*;

@RestController
@RequestMapping("/user")
public class UserController {

    @Autowired
    private SecurityPermissionUtil securityPermissionUtil;

    @Autowired
    private UserService userService;

    // 示例:删除用户前校验权限
    @DeleteMapping("/{id}")
    public String deleteUser(@PathVariable Long id) {
        // 1. 校验是否有删除用户的权限(细粒度权限)
        securityPermissionUtil.checkAuthority("user:delete");

        // 2. 业务逻辑(仅权限通过后才执行)
        userService.deleteUser(id);
        return "删除用户成功";
    }

    // 示例:编辑自己的信息(数据级权限)
    @PutMapping("/self/{username}")
    public String editSelf(@PathVariable String username, @RequestBody UserDTO userDTO) {
        // 1. 校验是否是操作自己的账号
        securityPermissionUtil.checkCurrentUser(username);

        // 2. 校验是否有编辑权限
        securityPermissionUtil.checkAuthority("user:edit");

        // 3. 业务逻辑
        userService.updateUser(username, userDTO);
        return "编辑个人信息成功";
    }

    // 示例:管理员批量操作(角色校验)
    @PostMapping("/batch")
    public String batchOperate() {
        // 1. 校验是否是管理员角色
        securityPermissionUtil.checkRole("ADMIN");

        // 2. 业务逻辑
        userService.batchOperate();
        return "批量操作成功";
    }
}
service中调用:
import org.springframework.beans.factory.annotation.Autowired;
import org.springframework.stereotype.Service;

@Service
public class UserService {

    @Autowired
    private SecurityPermissionUtil securityPermissionUtil;

    public void deleteUser(Long id) {
        // 1. 先校验权限(业务层校验更安全,避免Controller漏校验)
        securityPermissionUtil.checkAuthority("user:delete");

        // 2. 模拟业务逻辑:查询用户、删除用户
        User user = getUserById(id);
        if (user == null) {
            throw new RuntimeException("用户不存在");
        }
        // 实际项目中:userMapper.deleteById(id);
    }

    public void updateUser(String username, UserDTO userDTO) {
        // 数据级权限校验(只能改自己的信息)
        securityPermissionUtil.checkCurrentUser(username);

        // 业务逻辑:更新用户信息
        // userMapper.updateByUsername(username, userDTO);
    }

    // 模拟查询用户
    private User getUserById(Long id) {
        return new User(id, "testUser");
    }
}
四、其他配置
其他开发时可能用到的配置:
在内存中注册用户用于测试
新版本,在SecurityConfig.java中直接注册你的Bean即可
     @Bean
    public InMemoryUserDetailsManager inMemoryConfiguration() {
        UserDetails userDetails = User.withUsername("dragon")
                .password(passwordEncoder().encode("123456"))
                .roles("admin")
                .build();
        return new InMemoryUserDetailsManager(userDetails);
    }
SpringSecurity的核心常用功能梳理到此!

有“AI”的1024 = 2048,欢迎大家加入2048 AI社区
更多推荐
 15
15 0
0- 0


 已为社区贡献9条内容

所有评论(0)