快速安装一个本地开源邮件系统postfix+dovecot @Ubuntu22.40
技术的升级真是让人感叹啊!现在邮箱系统比以前要复杂很多,但是安装却简单了很多。尤其是有不懂的地方,都可以问AI。尽管我用了好几天才搞定开源邮箱系统的安装这件事,也已经很开心了。
安装一个本地开源邮件系统postfix+dovecot 还是有些波折的,在FreeBSD和WSL下都没有装成,后来是在一台单独的Ubuntu机器上安装邮件系统成功。也就是实践3部分。
实践1
安装
sudo apt update
sudo apt install -y postfix dovecot-imapd dovecot-pop3d
选项
───────────────────────────┤ Postfix Configuration ├───────────────────────────┐
                   │ Please select the mail server configuration type that best meets your needs.  │
                   │                                                                               │
                   │  No configuration:                                                            │
                   │   Should be chosen to leave the current configuration unchanged.              │
                   │  Internet site:                                                               │
                   │   Mail is sent and received directly using SMTP.                              │
                   │  Internet with smarthost:                                                     │
                   │   Mail is received directly using SMTP or by running a utility such           │
                   │   as fetchmail. Outgoing mail is sent using a smarthost.                      │
                   │  Satellite system:                                                            │
                   │   All mail is sent to another machine, called a 'smarthost', for              │
                   │   delivery.                                                                   │
                   │  Local only:                                                                  │
                   │   The only delivered mail is the mail for local users. There is no            │
                   │   network.                                                                    │
                   │                                                                               │
                   │ General mail configuration type:                                              │
                   │
选择Internet site
mail name设置:mail.example.local
实践2:让opencode帮助安装
最后它给出一个帮助文档:
=== 本地邮件服务器安装指南 ===
1. 复制配置文件(需要sudo权限):
sudo cp ~/mailserver/postfix-main.conf /etc/postfix/main.cf
sudo cp ~/mailserver/dovecot-main.conf /etc/dovecot/dovecot.conf
sudo cp ~/mailserver/10-mail.conf /etc/dovecot/conf.d/10-mail.conf
sudo cp ~/mailserver/10-auth.conf /etc/dovecot/conf.d/10-auth.conf
2. 重启服务:
sudo systemctl restart postfix
sudo systemctl restart dovecot
sudo systemctl enable postfix
sudo systemctl enable dovecot
3. 创建邮件用户(使用系统用户):
sudo useradd -m -s /bin/bash testuser
sudo passwd testuser
4. 测试邮件:
# 切换到testuser
su - testuser
# 创建邮箱目录
mkdir -p ~/Maildir/{cur,new,tmp}
# 发送测试邮件
echo "Test message" | mail -s "Test" testuser@example.com
5. 配置邮件客户端:
服务器类型: IMAP
服务器地址: localhost 或 mail.example.com
端口: 143 (IMAP), 25 (SMTP)
用户名: testuser
密码: testuser的系统密码
SSL/TLS: 启用
=== 服务管理命令 ===
检查状态: sudo systemctl status postfix dovecot
查看日志: sudo journalctl -u postfix -u dovecot -f
查看端口: netstat -tlnp | grep -E ':(25|143|110)'
=== 故障排除 ===
如果服务无法启动,检查:
sudo postfix check
sudo dovecot -n
实战检验一下
sudo cp ~/mailserver/postfix-main.conf /etc/postfix/main.cf
sudo cp ~/mailserver/dovecot-main.conf /etc/dovecot/dovecot.conf
sudo cp ~/mailserver/10-mail.conf /etc/dovecot/conf.d/10-mail.conf
sudo cp ~/mailserver/10-auth.conf /etc/dovecot/conf.d/10-auth.conf
sudo systemctl enable postfix
sudo systemctl restart postfix
sudo systemctl enable dovecot
sudo systemctl restart dovecot
创建邮件账户
sudo useradd -m -s /bin/bash testuser
sudo passwd testuser
安装本地mail客户端
sudo apt install mailutils测试邮件
su - testuser
mkdir -p ~/Maildir/{cur,new,tmp}
echo "Test message" | mail -s "Test" testuser@example.local
为testuser创建Maildir
sudo -u testuser mkdir -p ~testuser/Maildir/{new,cur,tmp} 2>/dev/null
sudo chown -R testuser:testuser ~testuser/Maildir 2>/dev/null
sudo chmod -R 700 ~testuser/Maildir 2>/dev/null
# 为testuser创建Maildir
sudo -u testuser mkdir -p ~testuser/Maildir/{new,cur,tmp} 2>/dev/null
sudo chown -R testuser:testuser ~testuser/Maildir 2>/dev/null
sudo chmod -R 700 ~testuser/Maildir 2>/dev/null
修改配置文件/etc/postfix/main.cf
home_mailbox = Maildir/
重启服务
sudo systemctl restart postfix dovecot测试
echo "Test message" | mail -s "Test" testuser@example.local测试发现有问题,没有邮件
实践3
怒了,专门安装一个192.168.1.19 Ubuntu22.04服务器,安装邮件系统。
dns服务器192.168.1.3
客户端windows 10 , 192.168.0.98
先安装软件
sudo apt update
sudo apt install -y postfix dovecot-imapd dovecot-pop3d
安装postfix时的配置:
提示选择模式:
───────────────────────────┤ Postfix Configuration ├───────────────────────────┐
                         │ Please select the mail server configuration type that best meets your needs.  │
                         │                                                                               │
                         │  No configuration:                                                            │
                         │   Should be chosen to leave the current configuration unchanged.              │
                         │  Internet site:                                                               │
                         │   Mail is sent and received directly using SMTP.                              │
                         │  Internet with smarthost:                                                     │
                         │   Mail is received directly using SMTP or by running a utility such           │
                         │   as fetchmail. Outgoing mail is sent using a smarthost.                      │
                         │  Satellite system:                                                            │
                         │   All mail is sent to another machine, called a 'smarthost', for              │
                         │   delivery.                                                                   │
                         │  Local only:                                                                  │
                         │   The only delivered mail is the mail for local users. There is no            │
                         │   network.                                                                    │
                         │                                                                               │
                         │ General mail configuration type:                                              │
                         │                                                                               │
                         │                           No configuration                                    │
                         │                           Internet Site                                       │
                         │                           Internet with smarthost                             │
                         │                           Satellite system                                    │
                         │                           Local only                                          │
                         │
我问AI:本地安装邮件系统postfix,想用内网域名,比如mail.example.local,那么这里应该选哪个?
回答说应该用Internet site模式。
配置域名
填写域名example.local
安装还提示:Pending kernel upgrade
需要手工重启新内核才能生效。
提示选择重启的services
非常多,感觉比FreeBSD下的服务多太多了。
提示了重启的和没有重启的服务:
Restarting services...
 systemctl restart containerd.service cron.service irqbalance.service multipathd.service packagekit.service polkit.service ssh.service systemd-journald.service systemd-networkd.service systemd-resolved.service systemd-timesyncd.service systemd-udevd.service udisks2.service upower.service
Service restarts being deferred:
 systemctl restart ModemManager.service
 /etc/needrestart/restart.d/dbus.service
 systemctl restart docker.service
 systemctl restart networkd-dispatcher.service
 systemctl restart systemd-logind.service
 systemctl restart unattended-upgrades.service
 systemctl restart user@1000.service
配置邮件服务器
域名解析相关配置
先去192.168.1.5 dns服务器,加上了对应的域名解析:
local-data: "mail.example.local. IN A 192.168.1.19"192.168.1.19本机加上自解析,修改/etc/hosts文件:
127.0.0.1 mail mail.example.local使用sudo service --status-all看看服务状态
在192.168.1.19邮件服务器上看看邮件服务的状态:
sudo service --status-all
 [ + ]  apparmor
 [ + ]  apport
 [ - ]  console-setup.sh
 [ + ]  cron
 [ - ]  cryptdisks
 [ - ]  cryptdisks-early
 [ + ]  dbus
 [ + ]  dovecot
 [ - ]  grub-common
 [ - ]  hwclock.sh
 [ + ]  irqbalance
 [ - ]  iscsid
 [ - ]  keyboard-setup.sh
 [ + ]  kmod
 [ - ]  lvm2
 [ - ]  lvm2-lvmpolld
 [ - ]  open-iscsi
 [ - ]  open-vm-tools
 [ + ]  plymouth
 [ + ]  plymouth-log
 [ + ]  postfix
看来postfix和dovecot都启动了。
安装unbutu下的mail软件
在192.168.1.19本机安装命令行端的mail软件,以便本机测试:
sudo apt install mailutils192.168.1.19本机测试
echo "Test message" | mail -s "Test" testuser@example.local
测试完用mail看看邮件,发现有这封信:
skywalk@ub19:~$ echo "Test message" | mail -s "Test" skywalk@example.local
skywalk@ub19:~$ mail
"/var/mail/skywalk": 2 messages 2 new
>N   1 Mail Delivery Syst Fri Feb  6 12:07  71/2071  Undelivered Mail Returned to Sender
 N   2 skywalk            Fri Feb  6 12:07  14/408   Test
能发邮件,能看到邮件,这证明邮件系统成功了!
配置Windows客户端软件
Windows安装Mozilla Thunderbird 客户端软件, 配置如下,Connection security配置auto:
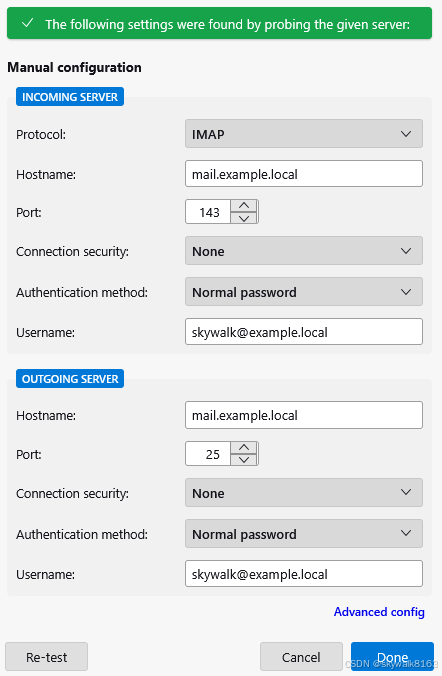
配置之后进行Re-test测试,测试通过。
save的时候有提示:
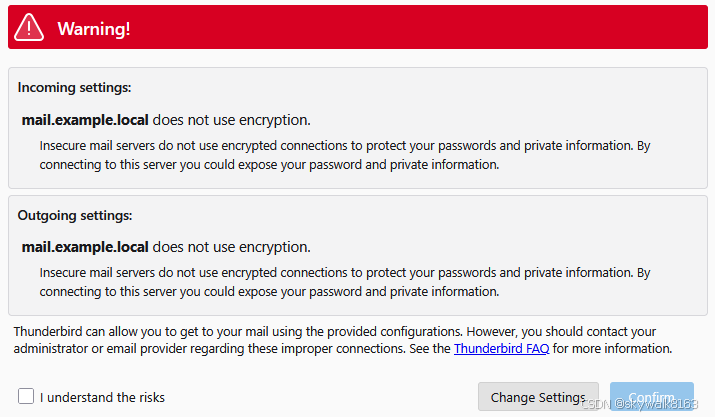
因为是本地实践,所以没有加密也没有关系。
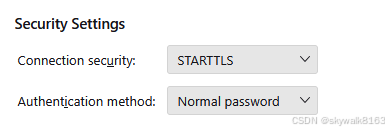
但是后来还是配置了加密!
windows上写个测试邮件

发现root账户收到了邮件,邮件内容;
Return-Path: <skywalk@example.local>
X-Original-To: root@example.local
Delivered-To: root@example.local
Received: from [192.168.0.98] (unknown [192.168.1.2])
        by ub19 (Postfix) with ESMTPS id B97872786A
        for <root@example.local>; Fri,  6 Feb 2026 13:17:16 +0000 (UTC)
Message-ID: <0db40656-39d0-481a-a0fa-5c51837359ca@example.local>
Date: Fri, 6 Feb 2026 21:17:13 +0800
MIME-Version: 1.0
User-Agent: Mozilla Thunderbird
Content-Language: en-US
To: root@example.local
From: skywalk <skywalk@example.local>
Subject: 这是从sky发送到root的测试
Content-Type: text/plain; charset=UTF-8; format=flowed
Content-Transfer-Encoding: 8bit

测试一下


hello
可以看到这是从另一台机器发送过来的。
当然,这是内网邮件服务器,使用了内网域名,所以没法发送到公网的邮箱。
总结
技术的升级真是让人感叹啊!
现在邮箱系统比以前要复杂很多,但是安装却简单了很多。
尤其是有不懂的地方,都可以问AI 。尽管我用了好几天才搞定开源邮箱系统的安装这件事,也已经很开心了。

有“AI”的1024 = 2048,欢迎大家加入2048 AI社区
更多推荐


 0
0 0
0- 0


 已为社区贡献130条内容

所有评论(0)