c++异常和智能指针
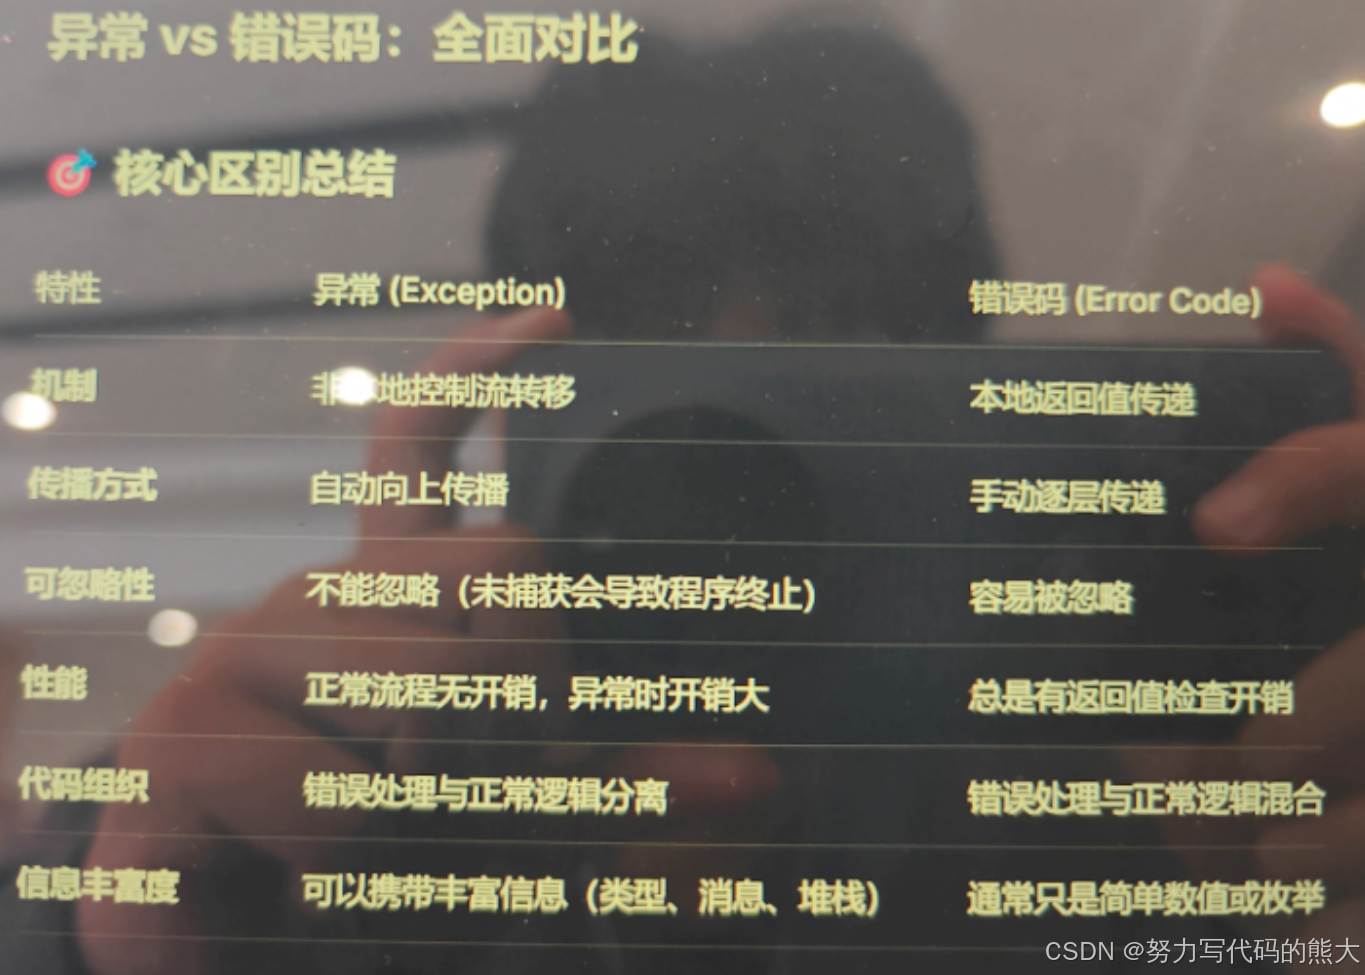
C++异常处理机制通过throw抛出异常、try-catch捕获异常的方式,实现了错误处理的流程跳转。相比C语言错误码方式,异常机制将错误处理与正常逻辑分离,通过栈展开自动调用析构函数保证资源释放。关键点包括:异常抛出后立即终止当前函数执行,沿着调用栈向上查找匹配的catch块;推荐使用const引用捕获异常;可通过基类catch统一处理派生类异常;noexcept声明不抛出异常的函数。异常机制配
一、异常(Exception)
在 C 语言里:
❌ 出错靠返回值
❌ 一层一层 if 判断在 C++ 里:
✅ 错误是一等公民
✅ 出问题就“跳出正常流程”
1.1 throw 和 catch(异常是什么)
1.1.1 异常解决的到底是什么问题?
先看一个 你一定写过的 C 风格代码:
int func(int x)
{
    if (x < 0)
        return -1;
    if (x == 0)
        return -2;
    return 100 / x;
}
调用者:
int ret = func(x);
if (ret == -1) { /* 处理错误 */ }
else if (ret == -2) { /* 处理错误 */ }
❌ 问题非常多:
- 错误码和正常值混在一起
- 容易漏判断
- 多层调用时代码爆炸
1.1.2 异常的核心思想
🔴 一句话理解异常:
错误不走“返回路径”,而是直接跳出调用链
1.1.3 throw:抛出异常
throw 10;
这行代码的含义是:
❌ 当前函数不再继续执行
🚀 直接向“外层调用者”抛一个对象
1.1.4 catch:捕获异常
try {
    // 可能出错的代码
}
catch (int e) {
    // 处理异常
}
📌 throw + catch 必须配合 try 使用
1.2 一个完整的异常示例(新手必看)
#include <iostream>
using namespace std;

int div(int a, int b)
{
    if (b == 0)
        throw "divide by zero";
    return a / b;
}

int main()
{
    try {
        cout << div(10, 0) << endl;
    }
    catch (const char* msg) {
        cout << "error: " << msg << endl;
    }

    cout << "程序还能继续运行" << endl;
}
执行流程
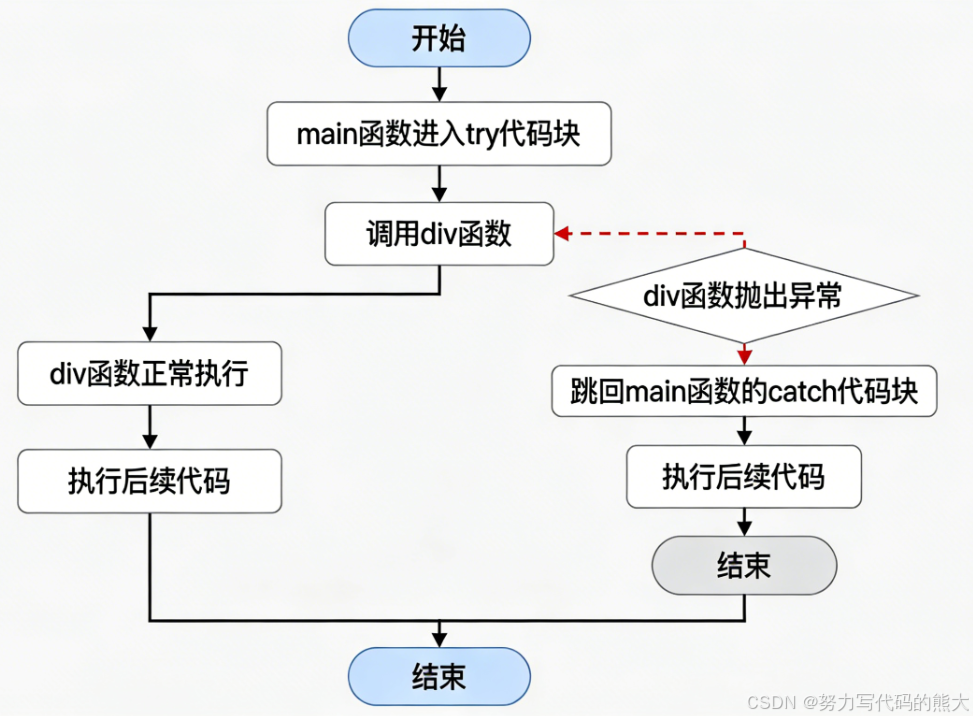
🔴 红色重点:
throw 之后
👉 当前函数后面的代码 全部不执行
1.3 栈展开(调用过程,必理解)
1.3.1 什么是“栈展开”?
看这个代码:
void f3()
{
    throw 1;
}

void f2()
{
    f3();
}

void f1()
{
    f2();
}

int main()
{
    try {
        f1();
    }
    catch (int e) {
        cout << "catch " << e << endl;
    }
}
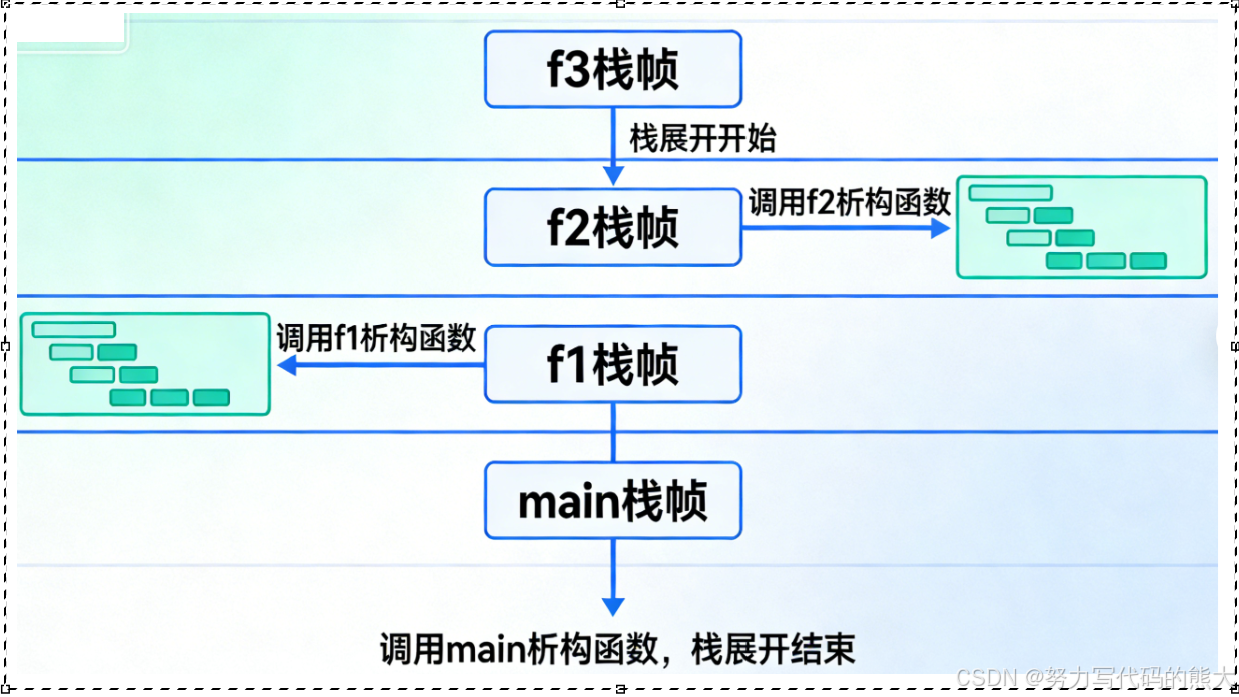
1.3.2 发生了什么?(重点)
当 f3() 执行 throw:
f3  ← 被销毁
f2  ← 被销毁
f1  ← 被销毁
main ← catch
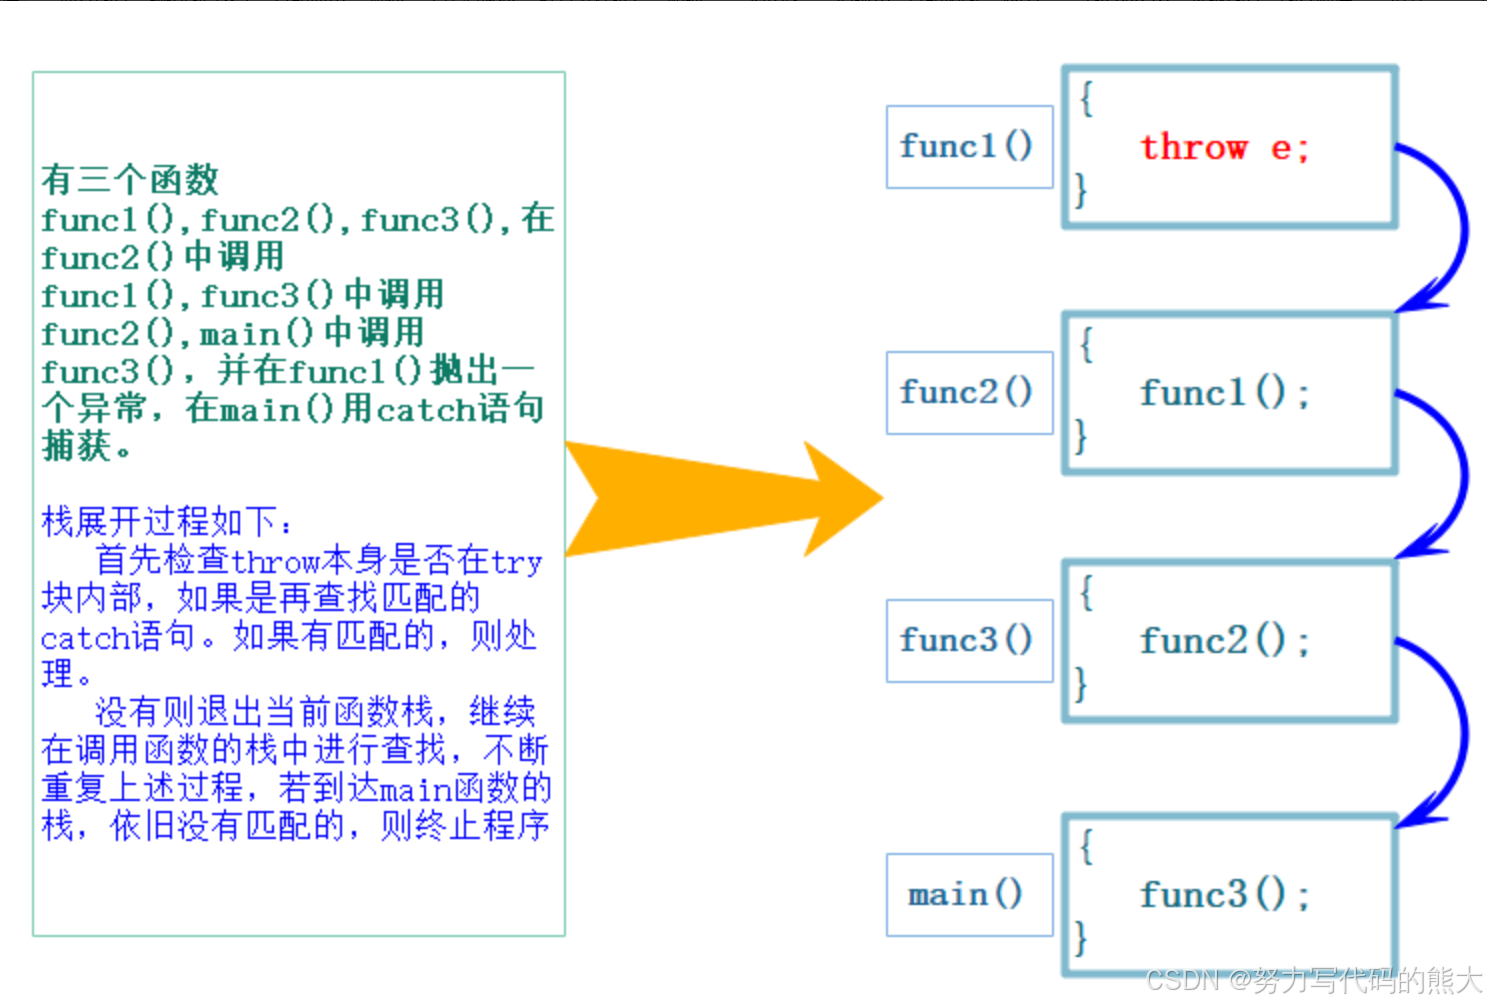
🔴 这整个过程叫:栈展开
1.3.3 栈展开期间发生的事(非常重要)
✅ 所有已经构造完成的对象
👉 都会自动调用析构函数
📌 这就是为什么 C++ 异常必须配合 RAII(后面会讲)
1.4 throw 抛出的到底是什么?
1.4.1 throw 抛的是“对象”
throw 10;              // int 对象
throw "error";         // const char*
throw string("err");   // string 对象
📌 catch 时 类型必须匹配
1.4.2 catch 的匹配规则(重点)
try {
    throw string("error");
}
catch (const string& s) {
    cout << s << endl;
}
✔ 推荐:用 const 引用接收
1.4.3 catch 的“就近原则”
try {
    throw 10;
}
catch (double d) { }
catch (int i) { }   // 这里才会进
🔴 先匹配的先尝试
1.5 重复抛异常(rethrow)
1.5.1 为什么需要“再抛一次”?
有时候:
- 当前函数只想记录日志
- 不想真正“吃掉”异常
1.5.2 正确写法(必须记住)
try {
    // ...
}
catch (...) {
    cout << "记录日志" << endl;
    throw;   // 原样抛出
}
🔴 注意区别:
| 写法 | 含义 |
|---|---|
| throw; | 原异常 |
| throw e; | 新对象(会拷贝) |
1.6 catch(…) —— 兜底异常
try {
    // 任意异常
}
catch (...) {
    cout << "未知异常" << endl;
}
📌 用途:
- 防止程序直接崩溃
- main 中非常常见
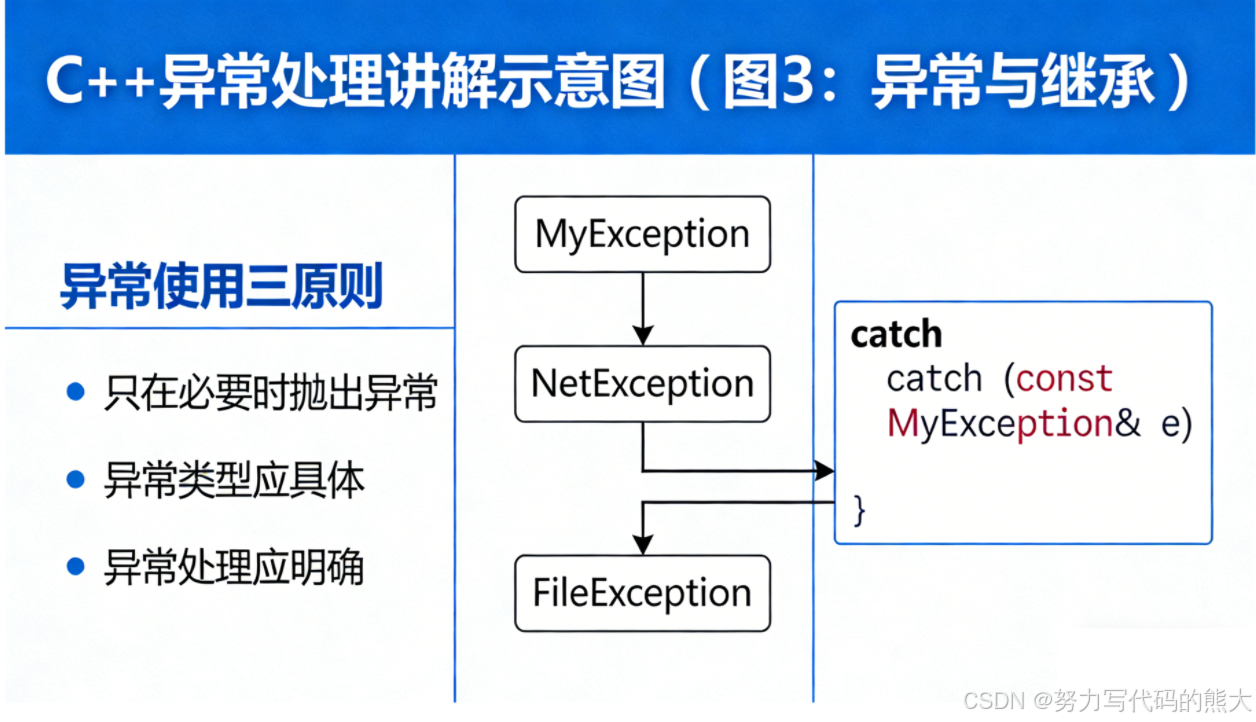
1.7 异常与继承(非常实用)
class MyException {};
class FileException : public MyException {};
class NetException  : public MyException {};
try {
    throw FileException();
}
catch (const MyException& e) {
    cout << "统一处理异常" << endl;
}
🔴 红色重点:
用 基类 catch
统一处理多个模块异常
1.8 noexcept(异常规范,了解即可)
1.8.1 noexcept 是什么?
void func() noexcept;
含义是:
👉 这个函数 保证不抛异常
1.8.2 为什么要有 noexcept?
- 提高编译器优化空间
- STL 容器在移动时会检查它
📌 你后面学 vector / move 时会再次遇到它
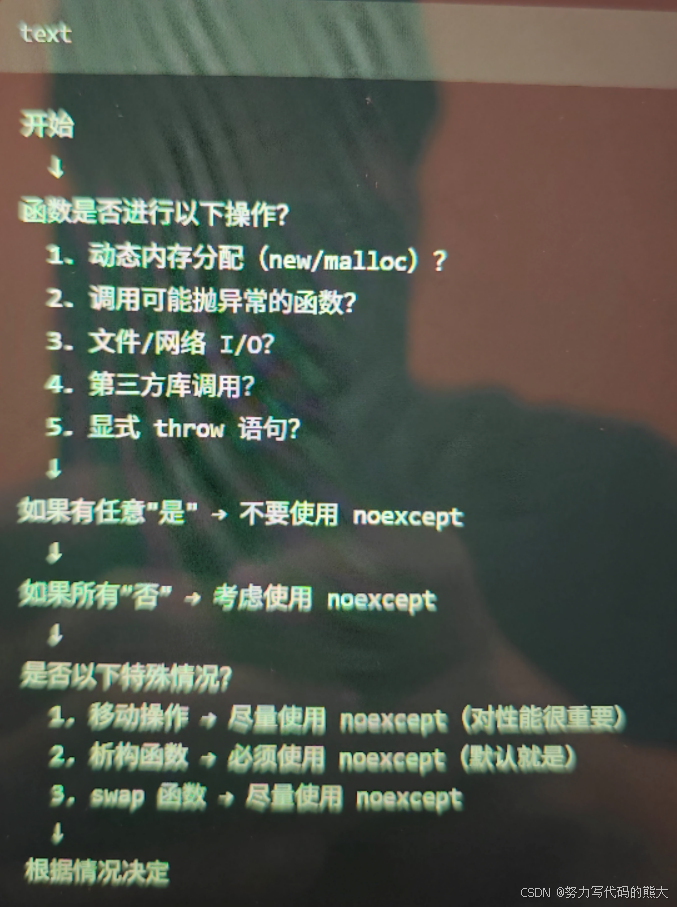
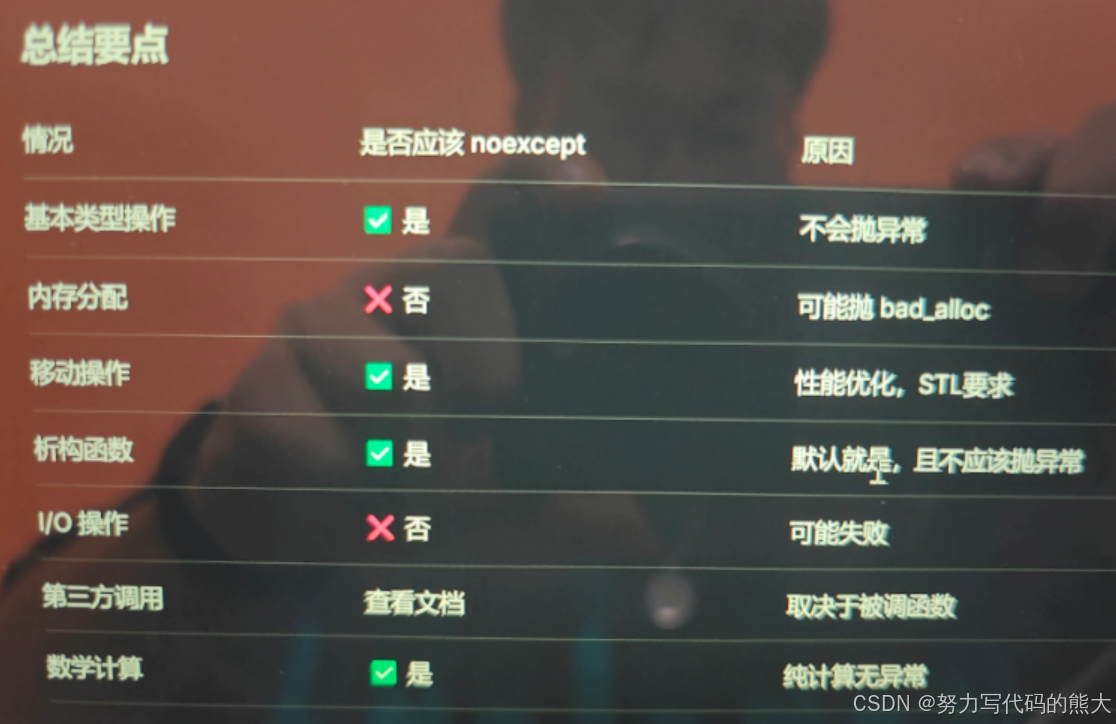
1.8.3 什么时候要noexcept?
1.9 异常和错误码的区别总结
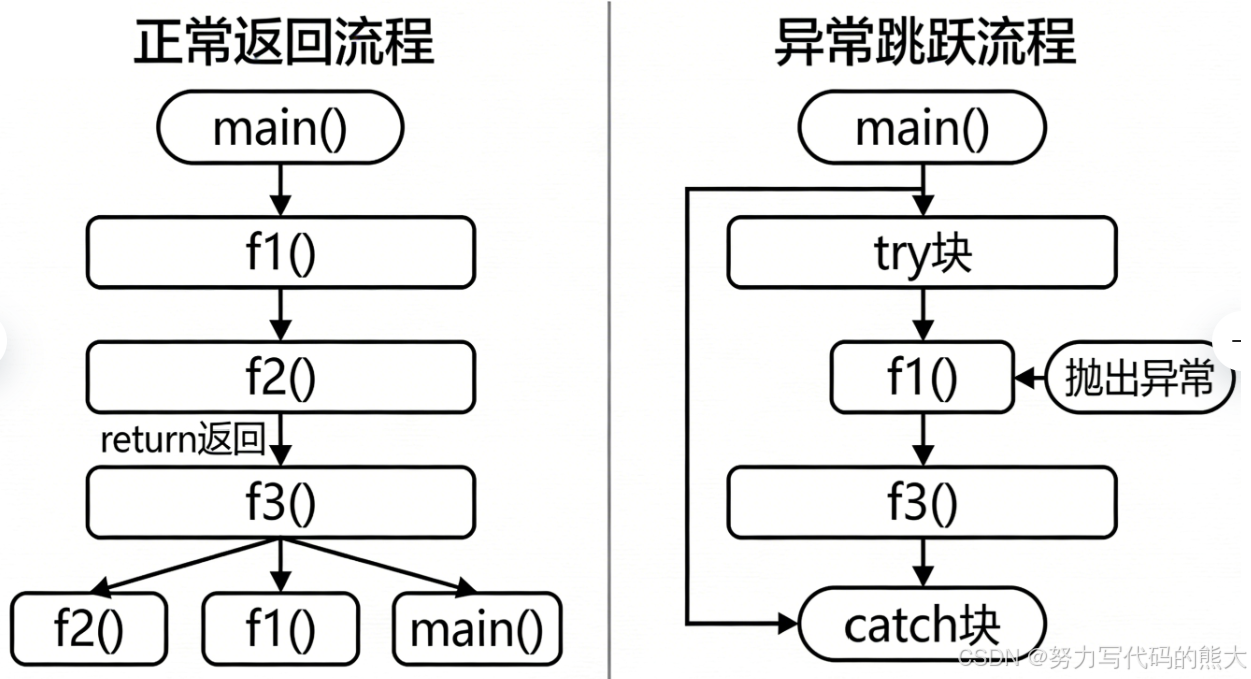
1.10 本章图形化总结(脑补图)
正常流程:
func → return → 上层

异常流程:
func → throw → 跳出多层函数 → catch
栈展开
异常与继承
1.11 第一章一句话总结(复习用)
🔴 红色重点总结:
- 异常 = 跳出正常控制流
- throw 后当前函数立即终止
- 栈展开会调用析构函数
- catch 用 const 引用
- RAII 是异常安全的核心
二、智能指针(Smart Pointer)
如果说:
- 异常解决的是「出错怎么办」
- 移动语义解决的是「性能问题」
那么:
🔴 智能指针解决的是 C++ 最致命的问题:内存管理
2.1 RAII 是什么?(必须彻底理解)
2.1.1 先回到一个“经典噩梦”
void func()
{
    int* p = new int(10);

    if (/* 出错 */)
        return;   // ❌ 内存泄漏

    delete p;
}
❌ 问题不是你不想 delete
❌ 问题是你“来不及” delete
2.1.2 RAII 的核心思想(红色重点)
🔴 RAII(Resource Acquisition Is Initialization)
资源的获取 = 对象的构造
资源的释放 = 对象的析构
📌 一句话翻译成人话:
“把资源交给对象管理,别交给人记”
2.1.3 RAII 的最小示例
class Guard {
public:
    Guard()  { cout << "获取资源\n"; }
    ~Guard() { cout << "释放资源\n"; }
};
void test()
{
    Guard g;
    throw 1;
}
💡 即使抛异常:
构造 Guard
throw
栈展开
调用 ~Guard
🔴 析构一定会执行
2.2 为什么“普通指针”在异常面前不安全?
2.2.1 再看一次栈展开
void f()
{
    int* p = new int(10);
    throw 1;
    delete p;   // 永远执行不到
}
📌 栈展开只会:
- 调用 对象析构
- ❌ 不会自动 delete 裸指针
🔴 结论:
异常 + new = 内存泄漏温床
2.3 C++ 标准库给出的答案:智能指针
2.3.1 什么是智能指针?
🔴 本质一句话:
“带析构函数的指针类”
它们都是:
- 类模板
- 内部封装了裸指针
- 析构时自动释放资源
2.4 auto_ptr(了解即可,历史产物)
auto_ptr<int> p1(new int(10));
auto_ptr<int> p2 = p1;
❌ 问题在哪里?
p1 ----X
p2 ---> 10
- 拷贝后 原指针被置空
- 访问 p1 直接炸
🔴 已被 C++11 废弃
auto_ptr的简单模拟
	template<class T>
	class auto_ptr
	{
	public:
		//构造
		explicit auto_ptr(T* ptr = nullptr)//不允许隐式类型转换(防止普通指针隐式类型转换成智能指针对象)
			:_ptr(ptr)
		{}

		//拷贝构造
		auto_ptr(auto_ptr<T>& ap)
		{
			_ptr = ap._ptr;
			//转移管理权
			ap._ptr = nullptr;
		}

		//移动构造
		auto_ptr(auto_ptr<T>&& ap)noexcept
			:_ptr(ap._ptr)
		{
			//转移
			ap._ptr = nullptr;
		}

		//赋值
		auto_ptr<T>& operator=(auto_ptr<T>& ap)noexcept
		{
			//防止自己给自己赋值
			if (this != &ap)
			{
				//资源不为空,则释放资源,用于存储ap
				if (_ptr)
				{
					delete _ptr;
				}
				_ptr = ap._ptr;
				ap._ptr = nullptr;//转移管理权
			}
			return *this;
		}

		//移动赋值
		auto_ptr<T>& operator=(auto_ptr<T>&& ap)noexcept
		{
			if (this != &ap)
			{
				if (_ptr)
				{
					delete _ptr;
				}
				_ptr = ap._ptr;
				ap._ptr = nullptr;
			}
			return *this;
		}

		//解引用
		T& operator*()noexcept
		{
			return *_ptr;
		}

		//->
		T* operator->()noexcept
		{
			return _ptr;
		}

		//析构函数
		~auto_ptr()
		{
			delete _ptr;
			_ptr = nullptr;
		}


	private:
		T* _ptr;
	};
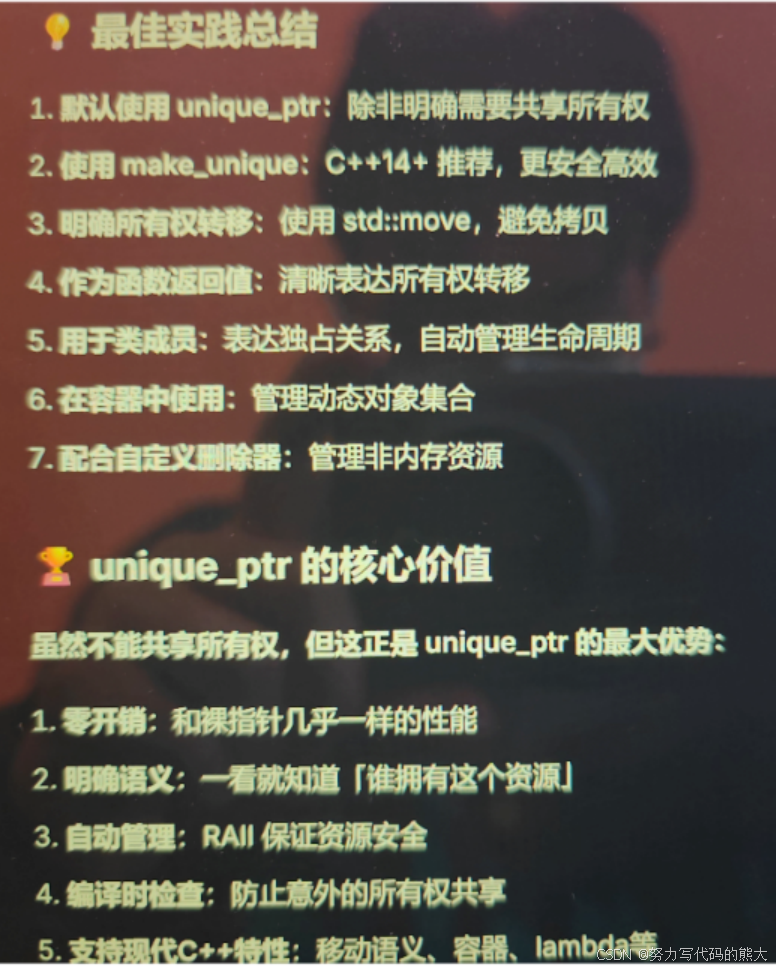
2.5 unique_ptr —— 独占所有权(非常重要)
2.5.1 unique_ptr 的设计思想
🔴 一句话:
一个资源,只能有一个主人
2.5.2 基本使用
#include <memory>

unique_ptr<int> p(new int(10));
- ❌ 不能拷贝
- ✅ 只能移动
2.5.3 为什么不能拷贝?
unique_ptr<int> p1(new int(10));
unique_ptr<int> p2 = p1;   // ❌ 编译错误
📌 因为:
delete 拷贝构造 + delete 拷贝赋值
2.5.4 unique_ptr 的移动
unique_ptr<int> p1(new int(10));
unique_ptr<int> p2 = std::move(p1);
脑补图(重点):
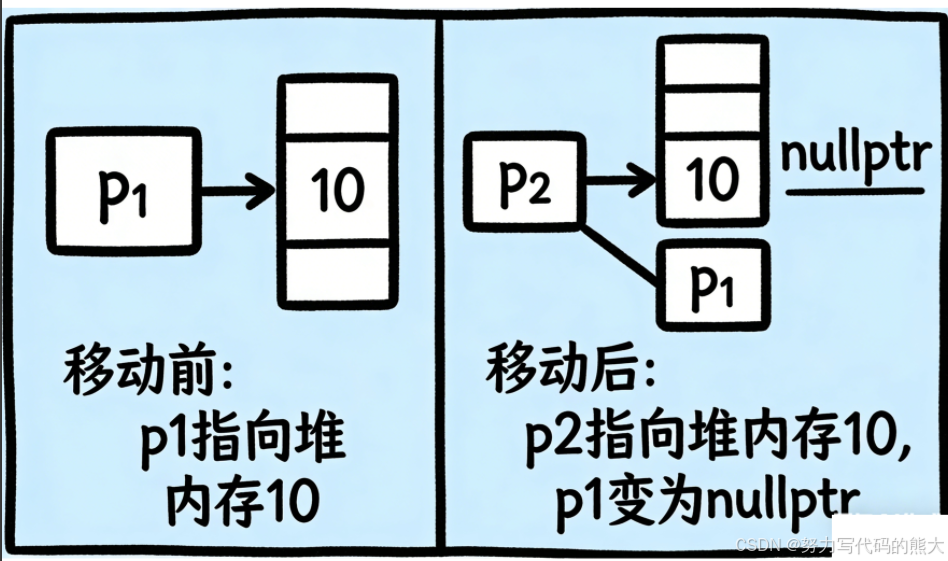
🔴 完美体现:
右值引用 + 移动构造 + RAII
2.5.5 unique_ptr 的核心成员
p.get();      // 获取裸指针(不推荐长期用)
p.reset();    // 放弃当前资源
p.release();  // 释放所有权(危险)
2.5.6 unique_ptr的简单模拟
	//不能进行拷贝构造,只能是转移资源权,具有唯一性
	template<class T, class Del = std::default_delete<T>>
	class unique_ptr
	{
	public:
		//构造函数(不支持隐式类型转换)
		explicit unique_ptr(T* ptr = nullptr)
			:_ptr(ptr)
		{
		}

		//不支持拷贝(唯一性)
		unique_ptr(unique_ptr<T>& up) = delete;

		//也不支持赋值构造(唯一性)
		unique_ptr<T>& operator=(unique_ptr<T>& up) = delete;

		//移动构造
		unique_ptr(unique_ptr<T>&& up)noexcept
			:_ptr(up._ptr)
			, _del(up._del)
		{
			up._ptr = nullptr;
		}

		//移动赋值
		unique_ptr<T>& operator=(unique_ptr<T>&& up)noexcept
		{
			if (&up != this)
			{
				//资源不为空,消除资源,为赋值准备
				if (_ptr)
				{
					_del(_ptr);
				}
				_ptr = up._ptr;
				_del = up._del;
				up._ptr = nullptr;//置空
			}
			return *this;
		}

		//*
		T& operator*()noexcept
		{
			return *_ptr;
		}

		//->
		T* operator->()noexcept
		{
			return _ptr;
		}

		//析构
		~unique_ptr()
		{
			_del(_ptr);
			_ptr = nullptr;
		}
	private:
		T* _ptr;
		Del _del;
	};
2.6 shared_ptr —— 共享所有权
2.6.1 为什么需要 shared_ptr?
有些场景:
- 多个对象要“共同使用一个资源”
- 生命周期不好明确
2.6.2 核心原理:引用计数
shared_ptr<int> p1(new int(10));
shared_ptr<int> p2 = p1;
引用计数 = 2
当:
- 一个 shared_ptr 析构
- 计数 -1
- 直到 0 才 delete 资源
2.6.3 常用接口
p.use_count();   // 引用计数
p.get();         // 裸指针
p.reset();       // 放弃资源
2.6.4 make_shared(强烈推荐)
auto p = make_shared<int>(10);
🔴 优点:
- 少一次内存分配
- 更安全
- 更高效
2.6.5 shared_ptr的简单模拟
	template<class T>
	class shared_ptr
	{
	public:
		//构造(不支持隐式类型转换)
		explicit shared_ptr(T* ptr = nullptr)
			:_ptr(ptr)
			, _pcount(new int(1))
		{
		}

		template<class Del>
		explicit shared_ptr(T* ptr, Del del)//删除器版本初始化构造
			:_ptr(ptr)
			, _pcount(new int(1))
			, _del(del)
		{
		}

		//拷贝构造
		shared_ptr(shared_ptr<T>& sp)
			:_ptr(sp._ptr)
			, _pcount(sp._pcount)
		{
			//增加引用计数
			++(*_pcount);
		}

		//移动构造
		shared_ptr(shared_ptr<T>&& sp)noexcept
			:_ptr(sp._ptr)
			, _pcount(sp._pcount)
			, _del(sp._del)
		{
			sp._ptr = nullptr;
			sp._pcount = nullptr;
		}

		//释放资源
		void release()noexcept
		{
			_del(_ptr);
			delete _pcount;
			_ptr = nullptr;
			_pcount = nullptr;
		}

		//拷贝赋值
		shared_ptr<T>& operator=(shared_ptr<T>& sp)noexcept
		{
			//判断资源是否相同
			if (_ptr != sp._ptr)
			{
				//避免释放空指针
				if (_ptr)
				{
					//判断sp指向的资源是否可以释放
					if (--(*_pcount) == 0)
					{
						release();
					}
				}
				//赋值
				_ptr = sp._ptr;
				_pcount = sp._pcount;
				_del = sp._del;
				//别忘了引用计数+1
				++(*_pcount);
			}
			return *this;
		}

		//移动赋值
		shared_ptr<T>& operator=(shared_ptr<T>&& sp)noexcept
		{
			if (_ptr != sp._ptr)
			{
				if (_ptr)
				{
					//判断删除后是否可以释放资源
					if (--(*_pcount) == 0)
					{
						release();
					}
				}
				//赋值
				_ptr = sp._ptr;
				_pcount = sp._pcount;
				_del = sp._del;
				sp._ptr = nullptr;
				sp._pcount = nullptr;
			}
			return *this;
		}

		//交换
		void swap(shared_ptr<T>& sp)noexcept
		{
			swap(_ptr, sp._ptr);
			swap(_pcount, sp._pcount);
			swap(_del, sp._del);
		}

		//reset
		void reset()noexcept
		{
			release();
		}

		//get获取资源地址
		T* get()const noexcept
		{
			return _ptr;
		}

		//*解引用
		T& operator*()noexcept
		{
			return *_ptr;
		}

		//->
		T* operator->()noexcept
		{
			return _ptr;
		}

		//统计引用计数
		long int use_count()const noexcept
		{
			return (*_pcount);
		}

		//判断资源是否为空
		explicit operator bool() const noexcept
		{
			return _ptr != nullptr;
		}

		//判断是否一个人管理资源
		bool unique() const noexcept
		{
			return (*_pcount) == 1;
		}

		~shared_ptr()
		{
			//判断引用计数是否为0,为0则彻底释放资源
			if (_ptr)
			{
				if (--(*_pcount) == 0)
				{
					release();
				}
			}
		}
	private:
		T* _ptr;
		int* _pcount;
		function<void(T*)> _del = [](T* ptr) {delete ptr; };//默认用lambda表达式(用function来包装)
	};
2.7 shared_ptr 的致命问题:循环引用
2.7.1 经典双向链表示例
struct Node {
    shared_ptr<Node> next;
    shared_ptr<Node> prev;
};
node1 <----> node2
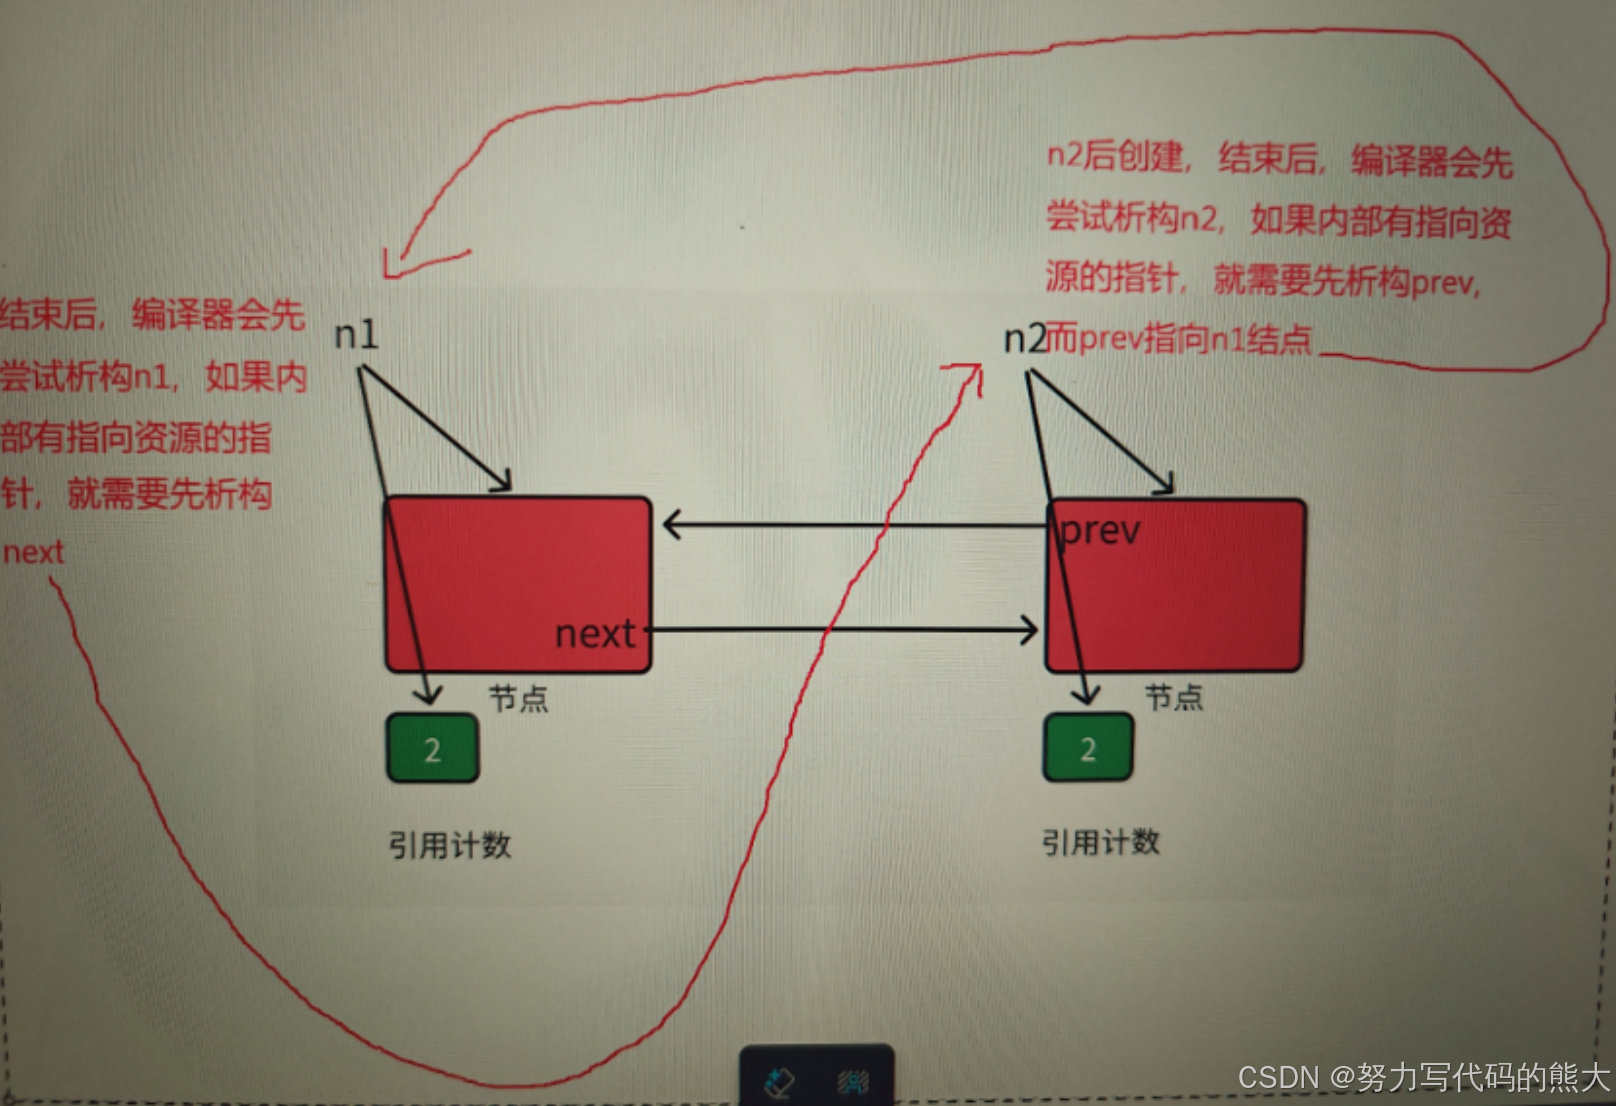
📌 结果:
- 引用计数永远不为 0
- 析构永远不发生
- ❌ 内存泄漏
2.8 weak_ptr —— 解决循环引用的关键
2.8.1 weak_ptr 的本质
🔴 一句话:
“不增加引用计数的观察者”
2.8.2 正确的双向链表写法
struct Node {
    shared_ptr<Node> next;
    weak_ptr<Node>  prev;
};
📌 prev:
- 不拥有资源
- 只观察
- 不影响生命周期
2.8.3 为什么不能直接用 weak_ptr 访问资源?
weak_ptr<int> wp;
*wp;   // ❌ 不允许
🔴 因为:
资源可能已经被释放
2.8.4 lock 的正确用法(你笔记里的重点)
if (auto sp = wp.lock()) {
    // 资源还存在
}
- 若资源已释放 → 返回空 shared_ptr
- 安全!
2.8.5 weak_ptr的简单模拟
#include"Share_ptr.h"

namespace bear
{
	template<class T>
	class weak_ptr
	{
	public:
		//构造
		weak_ptr()
		{
		}

		weak_ptr(const bear::shared_ptr<T> sp)noexcept
			:_ptr(sp.get())
		{
		}

		//拷贝
		weak_ptr(const weak_ptr<T>& wp)noexcept
		{
			_ptr = wp._ptr;
		}

		//不用写析构,只需要靠shared_ptr里面析构即可,weak_ptr的出现就是为了解决shared_ptr中的循环引用而产生内存泄漏问题

		//赋值
		weak_ptr<T>& operator=(const bear::shared_ptr<T> sp)noexcept
		{
			_ptr = sp.get();
			return *this;
		}
	private:
		T* _ptr = nullptr;
	};
}
2.8.6 shared_ptr(weak_ptr)和unique_ptr的区别

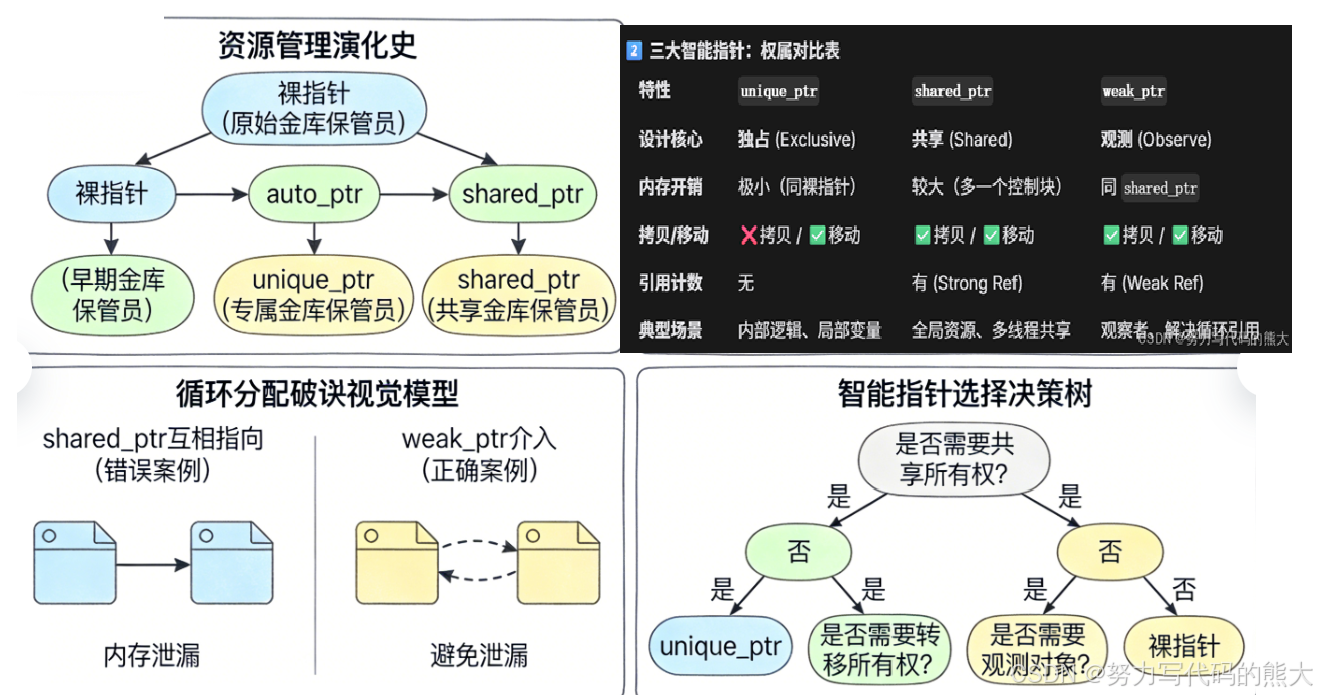
2.9 第二章图形化总结
2.10 第二章一句话总结(终极复习)
🔴 红色重点总结:
- 异常让 RAII 成为刚需
- 智能指针 = RAII 的标准实现
- unique_ptr:独占 + 移动
- shared_ptr:共享 + 引用计数
- weak_ptr:打破循环引用

有“AI”的1024 = 2048,欢迎大家加入2048 AI社区
更多推荐

 0
0 0
0- 0


 已为社区贡献2条内容

所有评论(0)