有手就行,教你从0到1快速手搓搭建个GUI Agent
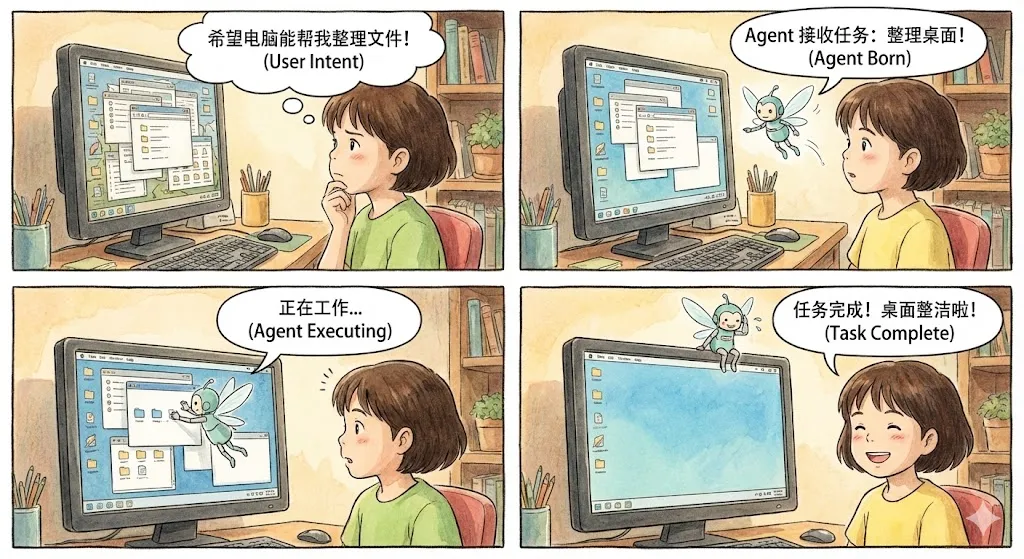
什么是GUI Agent?简单来说,就是一个能够"看懂"屏幕(mobile/pc/web)并进行自动操作的AI Agent。比如用户发送指令“整理文件”,PC GUI Agent就可以基于纯GUI界面理解页面内容,进行逐步决策&操作,直到完成用户任务。随着GUI Agent的应用前景逐渐明朗,GUI Agent在25年的发展很迅猛,其中一个比较明显的新趋势是,通用大模型也在训练GUI上的能力:因此
随着通用大模型向着agentic以及GUI理解增强的方向发展,现在Gemini 3 Flash等通用大模型已经可以直接用来搭建一个效果还不错的GUI Agent,并且实践难度大幅降低,半小时左右就可以从0到1手搓出来。本文详细介绍如何逐步搭建一个GUI Agent,从实践中也可快速了解GUI Agent的原理。
一、前言
什么是GUI Agent?简单来说,就是一个能够"看懂"屏幕(mobile/pc/web)并进行自动操作的AI Agent。比如用户发送指令“整理文件”,PC GUI Agent就可以基于纯GUI界面理解页面内容,进行逐步决策&操作,直到完成用户任务。
随着GUI Agent的应用前景逐渐明朗,GUI Agent在25年的发展很迅猛,其中一个比较明显的新趋势是,通用大模型也在训练GUI上的能力:
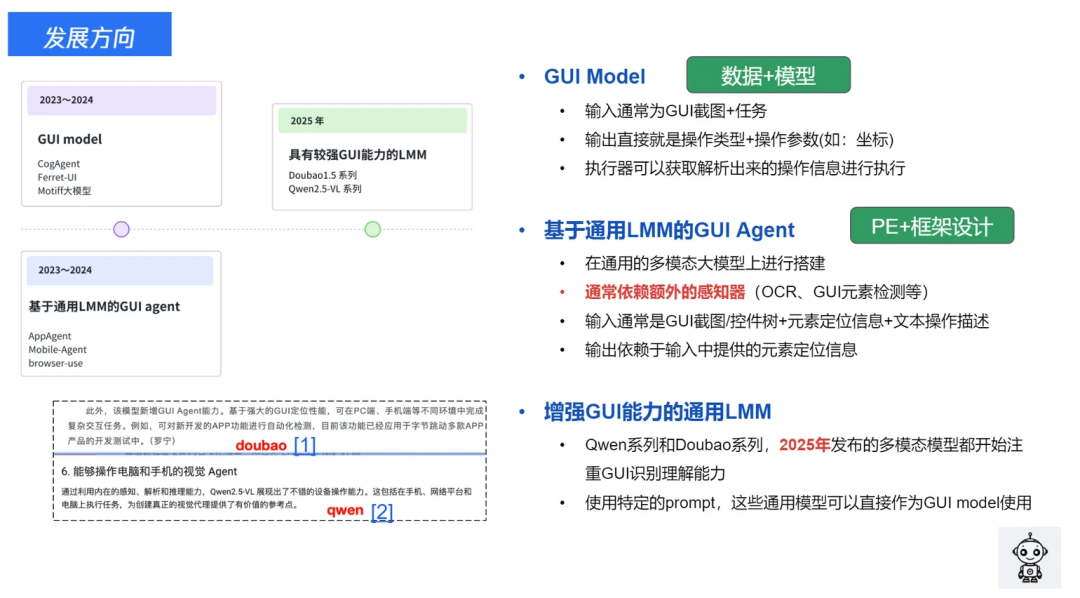
因此,搭建一个好用的GUI Agent变得越来越简单。本文介绍如何使用通用大模型API,快速从0到1搭建一个可用性强的PC GUI Agent,可以用于自动完成PC任务操作。
前置准备说明: 我使用的是Gemini 3 Flash,先看效果:
二、GUI Agent基础原理介绍
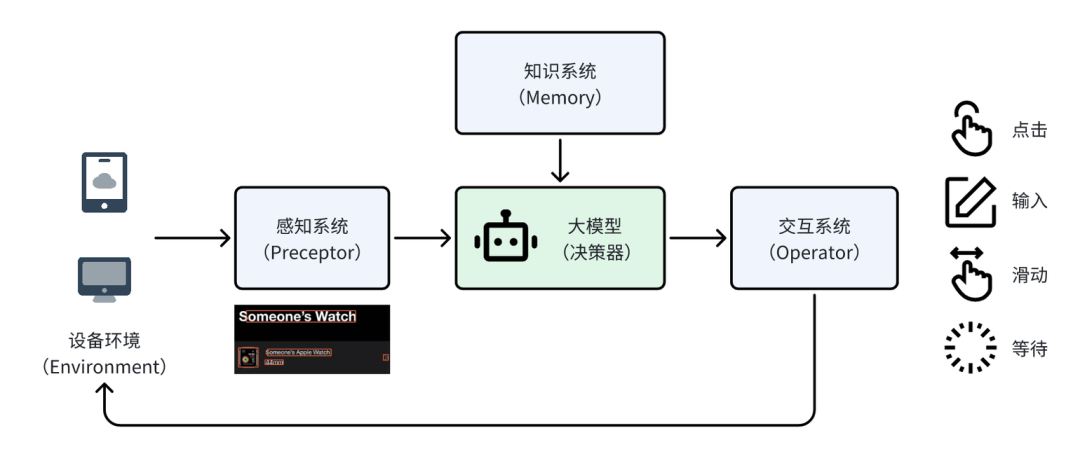
一个GUI Agent通常包含以下几个部分:
-
设备环境(Environment):比如手机、电脑这些用来操作的设备,是交互的 “载体“,本文仅以电脑为示例。
-
感知系统(Preceptor):负责 “接收信息“,这主要是针对GUI能力较弱的通用大模型。而Gemini 3 Flash这样本身具备较强GUI页面理解能力的大模型通常不再需要单独设计感知系统。
-
大模型(决策器):相当于 “大脑”—— 结合知识系统里存的信息,分析感知到的界面内容,决定要完成任务,下一步应该如何操作。
-
交互系统(Operator):相当于“手脚” —— 把大模型的决策结果(操作动作+坐标),转化为具体的操作与设备进行交互。
为了完成一个完整的任务,通常需要进行 “感知->决策->执行” 的多次循环,直到任务完成。下文具体介绍PC GUI Agent的搭建方式。
三、逐步搭建GUI Agent
1. 最简单的模型对话
在开始构建复杂的Agent之前,我们先实现最基础的功能:让AI看懂一张图片。
# utils/model.py

import os
import base64
from openai import OpenAI
from typing import List, Dict, Any

API_KEY = os.getenv("OPENAI_API_KEY")
BASE_URL = os.getenv("OPENAI_BASE_URL")

classLVMChat:
"""多模态大模型聊天类"""

def__init__(self, api_key: str = API_KEY, base_url: str = BASE_URL,
                 model: str = "gemini-3-flash-preview"):
        self.client = OpenAI(api_key=api_key, base_url=base_url)
        self.model = model

def_encode_image(self, image_path: str) -> str:
"""将图片编码为base64"""
with open(image_path, "rb") as image_file:
return base64.b64encode(image_file.read()).decode('utf-8')

defget_multimodal_response(self, text: str, image_paths: str) -> str:
"""
        最简单的图文对话

        Args:
            text: 你的问题
            image_paths: 图片路径

        Returns:
            模型的回答
        """
# 1. 加载图片
        base64_image = self._encode_image(image_paths)

# 2. 构建消息
        messages = [{
"role": "user",
"content": [
                {"type": "image_url",
"image_url": {"url": f"data:image/jpeg;base64,{base64_image}"}},
                {"type": "text", "text": text}
            ]
        }]

# 3. 调用API
        response = self.client.chat.completions.create(
            model=self.model,
            messages=messages
        )

return response.choices[0].message.content
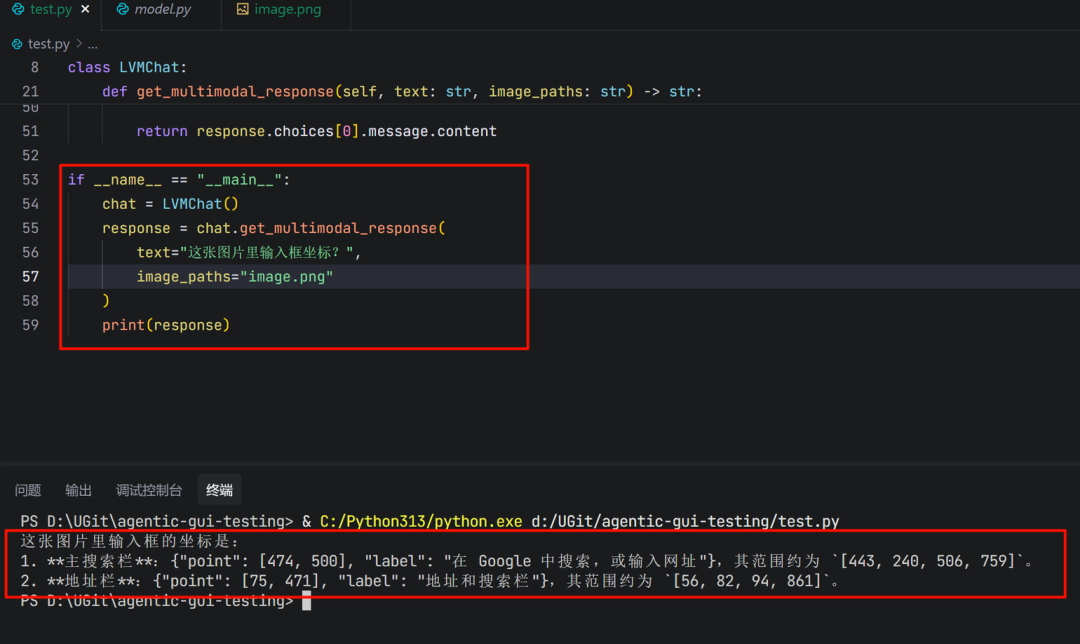
测试一下:
chat = LVMChat()
response = chat.get_multimodal_response(
    text="这张图片里输入框坐标?",
    image_paths="image.png"
)
print(response)
注意看这里!模型本身是有定位能力的(也就是说可以直接输出操作对象的坐标位置),所以不需要格外的感知器来锚定具体UI元素。
2. 加入记忆 - 让AI记住上下文
上面的代码有个问题:AI每次都是"失忆"的,不记得之前说过什么。对于GUI Agent来说,这是很致命的。举个简单的例子,任务“在输入框输入‘你好’”,如果Agent没有记忆,那么后序执行不记得自己已经决策过输入操作,就会陷入输入的循环,在输入框中多次输入‘你好’而不会停止。相反,有上文记忆的Agent,知道自己前一次已经决策了输入操作,结合当前页面内容,判断本次应为“finish”指令,就不会陷入输入循环。
为此,我们需要升级 LVMChat 类:
classLVMChat:
"""支持会话记忆的多模态聊天类"""

def__init__(self, api_key: str = API_KEY, base_url: str = BASE_URL,
                 model: str = "gemini-3-flash-preview"):
        self.client = OpenAI(api_key=api_key, base_url=base_url)
        self.model = model
# 🔥 核心改动:添加会话历史记录
        self.conversation_history: List[Dict[str, Any]] = []

defget_multimodal_response(self, text: str, image_paths: str,
                                use_history: bool = False) -> str:
"""
        支持记忆的图文对话

        Args:
            text: 你的问题
            image_paths: 图片路径
            use_history: 是否使用会话历史(记住之前的对话)
        """
# 1. 加载图片并构建当前消息
        base64_image = self._encode_image(image_paths)
        current_message = {
"role": "user",
"content": [
                {"type": "image_url",
"image_url": {"url": f"data:image/jpeg;base64,{base64_image}"}},
                {"type": "text", "text": text}
            ]
        }

# 2. 🔥 关键:如果启用历史,把之前的对话也带上
if use_history:
            messages = self.conversation_history + [current_message]
            print(f"📚 使用历史上下文,共 {len(self.conversation_history)} 条")
else:
            messages = [current_message]

# 3. 调用API
        response = self.client.chat.completions.create(
            model=self.model,
            messages=messages
        )

        result = response.choices[0].message.content

# 4. 🔥 更新历史记录
if use_history:
            self.conversation_history.append(current_message)
            self.conversation_history.append({
"role": "assistant",
"content": result
            })

return result

defclear_history(self):
"""清空记忆"""
        self.conversation_history = []
记忆的原理:
# 第一轮对话
conversation_history = [
    {"role": "user", "content": [图片1, "在输入框输入‘你好’"]},
    {"role": "assistant", "content": "{'Thought': '输入框在页面中间位置,我需要输入文案', 'Action': 'type(content=\'你好\')'}"}
]

# 第二轮对话时,把历史也带上
messages = conversation_history + [
    {"role": "user", "content": [图片2, "在输入框输入‘你好’"]}
]
# 现在AI能看到完整的对话链,知道自己做过什么决策。在第二轮返回:
{'Thought': '上一轮已经完成输入操作并且文案已经正确显示在输入框,任务已经完成', 'Action': 'finished'}
3. 搭建Agent框架
现在组装成一个完整的Agent,我们使用LangGraph来构建工作流。
(1)Agent的核心循环
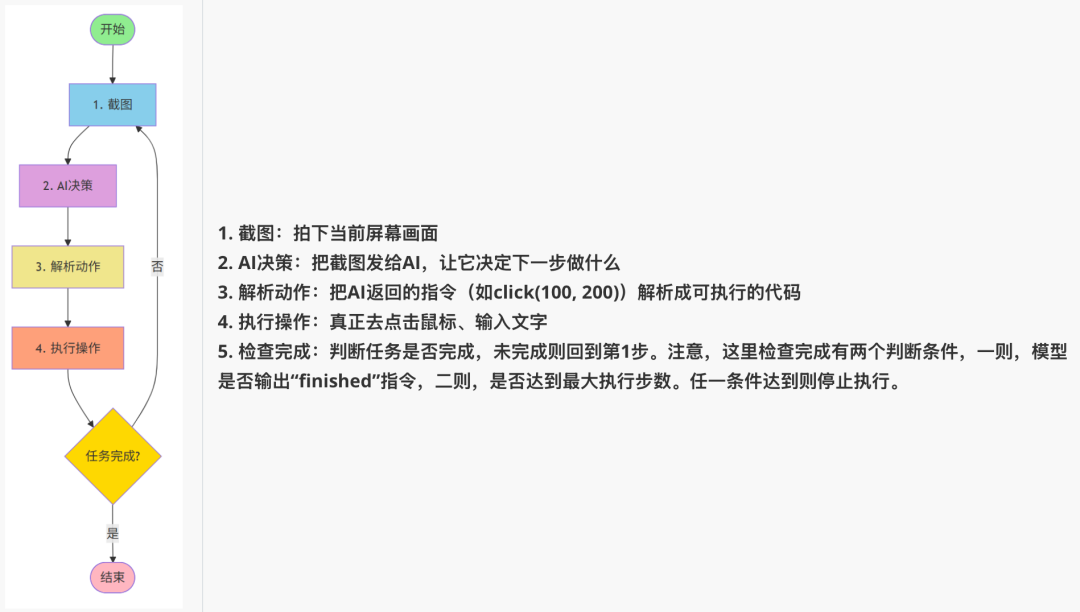
一个GUI Agent的工作流程是这样的:
(2)执行器Operator
首先,我们需要一个能够真正控制鼠标键盘的工具类。在这里强烈推荐pyautogui, 模拟键鼠操作,非常简单易用。但是有一个坑需要注意,输入操作需要用复制粘贴操作而不是打字,因为 pyautogui.write() 不支持中文!而用剪贴板粘贴可以完美支持中英文、特殊字符
# operator/execute.py -
import pyautogui
import pyperclip
import mss
import time

# 允许鼠标移动到屏幕角落(默认会触发fail-safe)
pyautogui.FAILSAFE = False

classOperation:
"""GUI操作工具类"""

defclick(self, x: int, y: int):
"""点击指定坐标"""
        print(f"🖱️  点击坐标 ({x}, {y})")
        pyautogui.click(x=x, y=y)

definput(self, text: str):
"""输入文本(使用粘贴方式,支持中文)"""
        print(f"⌨️  输入: {text}")
        pyperclip.copy(text)  # 复制到剪贴板
        pyautogui.hotkey('command', 'v')  # Mac用command,Windows用ctrl

defscreenshot(self, save_path: str):
"""截图并保存"""
with mss.mss() as sct:
            sct.shot(output=save_path)
        print(f"📸 截图已保存: {save_path}")

defhotkey(self, *keys):
"""按下组合键(如ctrl+c)"""
        print(f"⌨️  按下组合键: {' + '.join(keys)}")
        pyautogui.hotkey(*keys)

defwait(self, seconds: float = 1.0):
"""等待指定时间"""
        print(f"⏱️  等待 {seconds} 秒...")
        time.sleep(seconds)
(3)Prompt
GUI Agent的提示词告诉AI应该如何"思考"和"行动"的规则,需要定义好操作空间和输出格式,我在UI-TARS官方Prompt的基础上做了很小的改动(增加了Output Example,因为我发现Gemini 3 Flash使用UI-TARS的prompt输出格式不是很稳定)。
# utils/prompts.py
COMPUTER_USE_UITARS = """You are a GUI agent. You are given a task and your action history, with screenshots. You need to perform the next action to complete the task.

## Action Space
click(point='<point>x1 y1</point>')
left_double(point='<point>x1 y1</point>')
right_single(point='<point>x1 y1</point>')
drag(start_point='<point>x1 y1</point>', end_point='<point>x2 y2</point>')
hotkey(key='ctrl c') # Split keys with a space and use lowercase. Also, do not use more than 3 keys in one hotkey action.
type(content='xxx') # Use escape characters \\', \\\", and \\n in content part to ensure we can parse the content in normal python string format. If you want to submit your input, use \\n at the end of content.
scroll(point='<point>x1 y1</point>', direction='down or up or right or left') # Show more information on the `direction` side.
wait() #Sleep for 5s and take a screenshot to check for any changes.
finished(content='xxx') # Use escape characters \\', \\", and \\n in content part to ensure we can parse the content in normal python string format.

## Note
- Use Chinese in `Thought` part.
- Write a small plan and finally summarize your next action (with its target element) in one sentence in `Thought` part.
- One action per turn.

## Output Example
{{
    "Thought": "...",
    "Action": "..."
}}

## User Instruction
{instruction}
"""
(4)坐标归一化
不同电脑屏幕分辨率不同(1920x1080、2560x1440等),GUI Agent往往会采用千归一化坐标的策略进行处理。因此,拿到大模型的返回之后,需要将归一化坐标 (0-1000范围) 还原成实际像素坐标:
# AI返回归一化坐标: (500, 500) - 表示屏幕中心
# 在1920x1080屏幕上: (500, 500) -> (960, 540)
# 在2560x1440屏幕上: (500, 500) -> (1280, 720)

defnormalize_coords(self, x: int, y: int) -> tuple[int, int]:
"""将归一化坐标(0-1000)转换为实际像素坐标"""
    actual_x = int(x / 1000.0 * self.screen_width)
    actual_y = int(y / 1000.0 * self.screen_height)
return actual_x, actual_y
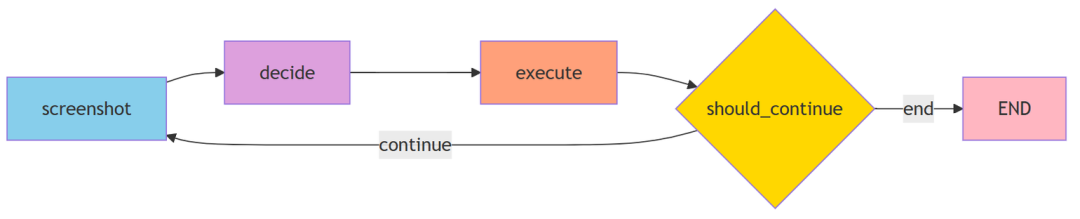
(5)LangGraph
LangGraph是一个用于构建Agent工作流的框架,图(Graph)的方式定义Agent的执行逻辑。
# 传统方式(硬编码)
defrun_agent():
whilenot finished:
        screenshot()
        decision = model_decide()
        execute(decision)
if check_finished():
break

# LangGraph方式(声明式)
workflow = StateGraph(AgentState)
workflow.add_node("screenshot", take_screenshot)
workflow.add_node("decide", model_decide)
workflow.add_node("execute", execute_action)
workflow.add_edge("screenshot", "decide")
workflow.add_edge("decide", "execute")
workflow.add_conditional_edges("execute", should_continue, {...})
优势:✅ 逻辑清晰:可视化工作流 ✅ 易于修改:添加节点/改变流程很简单 ✅ 状态管理:自动在节点间传递状态。
AgentState 是整个工作流的"记忆载体",在各个节点间传递:
# Step 1: 截图节点
state = {
"instruction": "打开浏览器",
"screenshot_path": "s/step_1.png",
"step": 1,
"finished": False
}

# Step 2: 决策节点(接收state,更新后返回)
state = {
    **state,  # 保留之前的数据
"thought": "需要点击Chrome图标",
"action": "click(point='<point>100 200</point>')"
}

# Step 3: 执行节点
state = {
    **state,  # 继续保留
# 执行点击操作...
}
(6)Agent主程序
现在把所有模块组装起来:
#!/usr/bin/env python3
# -*- coding: utf-8 -*-
"""
GUI Agent - 自动化GUI测试Agent
截图 -> 模型决策 -> 解析Action -> 执行 -> 循环,直到finished
"""
import re
import json
from datetime import datetime
from typing import TypedDict
from pathlib import Path

from langgraph.graph import StateGraph, END
from operator.execute import Operation
from utils.model import LVMChat, Model
from utils.prompts import COMPUTER_USE_UITARS


# 定义State
classAgentState(TypedDict):
    instruction: str  # 用户指令
    screenshot_path: str  # 当前截图路径
    step: int  # 当前步骤
    thought: str  # 模型思考
    action: str  # 模型输出的动作
    finished: bool  # 是否完成


classGUIAgent:
"""GUI自动化Agent"""

def__init__(self, instruction: str, model_name: str = Model.GOOGLE_GEMINI_3_FLASH_PREVIEW.value):
        self.instruction = instruction
        self.operation = Operation()
        self.lvm_chat = LVMChat(model=model_name)
        self.s_dir = Path("s")
        self.s_dir.mkdir(exist_ok=True)

# 获取屏幕尺寸用于坐标映射
import pyautogui
        self.screen_width, self.screen_height = pyautogui.size()
        print(f"🖥️  屏幕尺寸: {self.screen_width}x{self.screen_height}")

defnormalize_coords(self, x: int, y: int) -> tuple[int, int]:
"""将归一化坐标(0-1000)转换为实际像素坐标"""
        actual_x = int(x / 1000.0 * self.screen_width)
        actual_y = int(y / 1000.0 * self.screen_height)
        print(f"   归一化坐标 ({x}, {y}) -> 实际坐标 ({actual_x}, {actual_y})")
return actual_x, actual_y

deftake_screenshot(self, state: AgentState) -> AgentState:
"""步骤1: 截图并保存"""
        step = state.get("step", 0) + 1
        timestamp = datetime.now().strftime("%Y%m%d_%H%M%S")
        screenshot_path = str(self.s_dir / f"step_{step}_{timestamp}.png")

        self.operation.screenshot(screenshot_path)

return {
            **state,
"instruction": self.instruction,
"screenshot_path": screenshot_path,
"step": step,
"finished": False
        }

defmodel_decide(self, state: AgentState) -> AgentState:
"""步骤2: 模型决策(自动使用会话历史)"""
        prompt = COMPUTER_USE_UITARS.format(instruction=state["instruction"])

# 调用多模态模型(use_history=True 自动保留上下文)
        response = self.lvm_chat.get_multimodal_response(
            text=prompt,
            image_paths=state["screenshot_path"],
            res_format="json",
            use_history=True# 启用会话历史,模型会记住之前的所有交互
        )

        print(f"\n📸 Step {state['step']} - 模型响应:\n{response}\n")

# 解析JSON响应
try:
            result = json.loads(response)
            thought = result.get("Thought", "")
            action = result.get("Action", "")
except json.JSONDecodeError:
# 如果不是JSON格式,尝试正则提取
            thought_match = re.search(r'"Thought":\s*"([^"]*)"', response)
            action_match = re.search(r'"Action":\s*"([^"]*)"', response)
            thought = thought_match.group(1) if thought_match else""
            action = action_match.group(1) if action_match else""

return {
            **state,
"thought": thought,
"action": action
        }

defexecute_action(self, state: AgentState) -> AgentState:
"""步骤3: 解析并执行动作"""
        action = state["action"]

ifnot action:
            print("⚠️ 没有可执行的动作")
return {**state, "finished": True}

# 检查是否完成
if action.startswith("finished("):
            content_match = re.search(r"finished\(content='([^']*)'\)", action)
            content = content_match.group(1) if content_match else"任务完成"
            print(f"✅ 任务完成: {content}")
return {**state, "finished": True}

# 解析并执行动作
try:
            self._parse_and_execute(action)
except Exception as e:
            print(f"❌ 执行动作失败: {e}")
            print(f"   动作: {action}")

return state

def_parse_and_execute(self, action: str):
"""解析动作字符串并执行"""
        print(f"🔧 执行动作: {action}")

# click(point='<point>x y</point>') 或 click(point='x y')
if action.startswith("click("):
# 尝试带标签的格式
            point_match = re.search(r"<point>(\d+)\s+(\d+)</point>", action)
ifnot point_match:
# 尝试不带标签的格式
                point_match = re.search(r"point=['\"](\d+)\s+(\d+)['\"]", action)

if point_match:
                x, y = int(point_match.group(1)), int(point_match.group(2))
                actual_x, actual_y = self.normalize_coords(x, y)
                self.operation.click(actual_x, actual_y)
else:
                print(f"⚠️ 无法解析点击坐标: {action}")

# left_double(point='<point>x y</point>') 或 double_click(point='x y')
elif action.startswith("left_double("):
# 尝试带标签的格式
            point_match = re.search(r"<point>(\d+)\s+(\d+)</point>", action)
ifnot point_match:
# 尝试不带标签的格式
                point_match = re.search(r"point=['\"](\d+)\s+(\d+)['\"]", action)

if point_match:
                x, y = int(point_match.group(1)), int(point_match.group(2))
                actual_x, actual_y = self.normalize_coords(x, y)
                self.operation.double_click(actual_x, actual_y)
else:
                print(f"⚠️ 无法解析双击坐标: {action}")

# type(content='xxx')
elif action.startswith("type("):
            content_match = re.search(r"content=['\"]([^'\"]*)['\"]", action)
if content_match:
                text = content_match.group(1)
# 处理转义字符
                text = text.replace(r"\'", "'").replace(r'\"', '"').replace(r"\n", "\n")
                self.operation.input(text)

# hotkey(key='ctrl c')
elif action.startswith("hotkey("):
            key_match = re.search(r"key=['\"]([^'\"]*)['\"]", action)
if key_match:
                keys = key_match.group(1).split()
                self.operation.hotkey(*keys)

# scroll(point='<point>x y</point>', direction='down') 或 scroll(point='x y', direction='down')
elif action.startswith("scroll("):
# 尝试带标签的格式
            point_match = re.search(r"<point>(\d+)\s+(\d+)</point>", action)
ifnot point_match:
# 尝试不带标签的格式
                point_match = re.search(r"point=['\"](\d+)\s+(\d+)['\"]", action)

            direction_match = re.search(r"direction=['\"]([^'\"]*)['\"]", action)
if point_match and direction_match:
                x, y = int(point_match.group(1)), int(point_match.group(2))
                actual_x, actual_y = self.normalize_coords(x, y)
                direction = direction_match.group(1)
# 移动到位置并滚动
import pyautogui
                pyautogui.moveTo(actual_x, actual_y)
                scroll_amount = 3if direction in ["up", "left"] else-3
                pyautogui.scroll(scroll_amount)

# wait()
elif action.startswith("wait("):
            self.operation.wait(seconds=5)

# drag(start_point='<point>x1 y1</point>', end_point='<point>x2 y2</point>')
elif action.startswith("drag("):
# 尝试带标签的格式
            start_match = re.search(r"start_point=['\"]<point>(\d+)\s+(\d+)</point>['\"]", action)
            end_match = re.search(r"end_point=['\"]<point>(\d+)\s+(\d+)</point>['\"]", action)

ifnot start_match:
# 尝试不带标签的格式
                start_match = re.search(r"start_point=['\"](\d+)\s+(\d+)['\"]", action)
                end_match = re.search(r"end_point=['\"](\d+)\s+(\d+)['\"]", action)

if start_match and end_match:
                x1, y1 = int(start_match.group(1)), int(start_match.group(2))
                x2, y2 = int(end_match.group(1)), int(end_match.group(2))
                actual_x1, actual_y1 = self.normalize_coords(x1, y1)
                actual_x2, actual_y2 = self.normalize_coords(x2, y2)
import pyautogui
                pyautogui.moveTo(actual_x1, actual_y1)
                pyautogui.drag(actual_x2 - actual_x1, actual_y2 - actual_y1, duration=0.5)

# 等待一下让界面响应
        self.operation.wait(seconds=1)

defshould_continue(self, state: AgentState) -> str:
"""判断是否继续循环"""
return"end"if state.get("finished", False) else"continue"

defrun(self):
"""运行Agent"""
# 构建graph
        workflow = StateGraph(AgentState)

# 添加节点
        workflow.add_node("screenshot", self.take_screenshot)
        workflow.add_node("decide", self.model_decide)
        workflow.add_node("execute", self.execute_action)

# 添加边
        workflow.set_entry_point("screenshot")
        workflow.add_edge("screenshot", "decide")
        workflow.add_edge("decide", "execute")
        workflow.add_conditional_edges(
"execute",
            self.should_continue,
            {
"continue": "screenshot",
"end": END
            }
        )

# 编译并运行
        app = workflow.compile()

        print(f"🚀 开始执行任务: {self.instruction}\n")

# 设置递归限制为100步
        config = {"recursion_limit": 100}
        final_state = app.invoke(
            {"instruction": self.instruction, "step": 0},
            config=config
        )

        print(f"\n🎉 任务完成! 共执行 {final_state['step']} 步")
return final_state


if __name__ == "__main__":
    agent = GUIAgent(instruction="""打开浏览器查询GUI, 找到wikipedia的介绍页面进行查看""")
    agent.run()
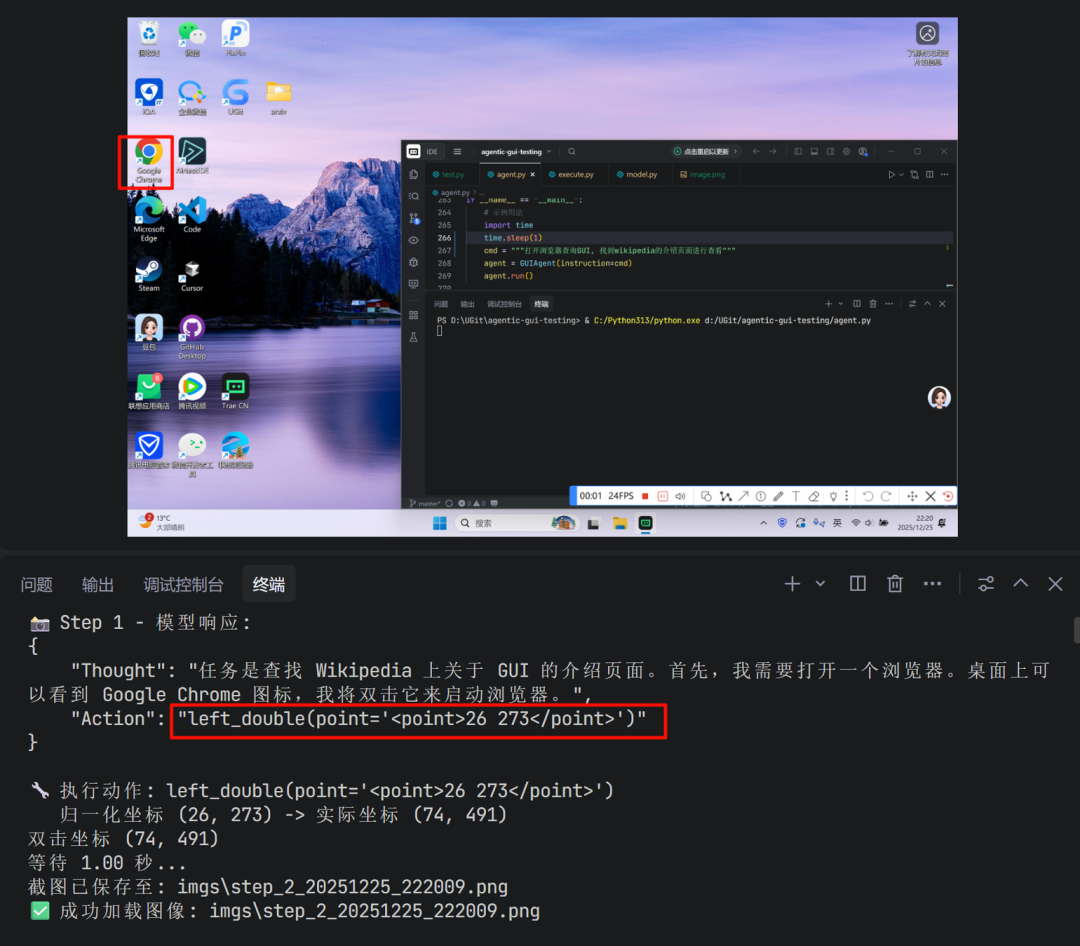
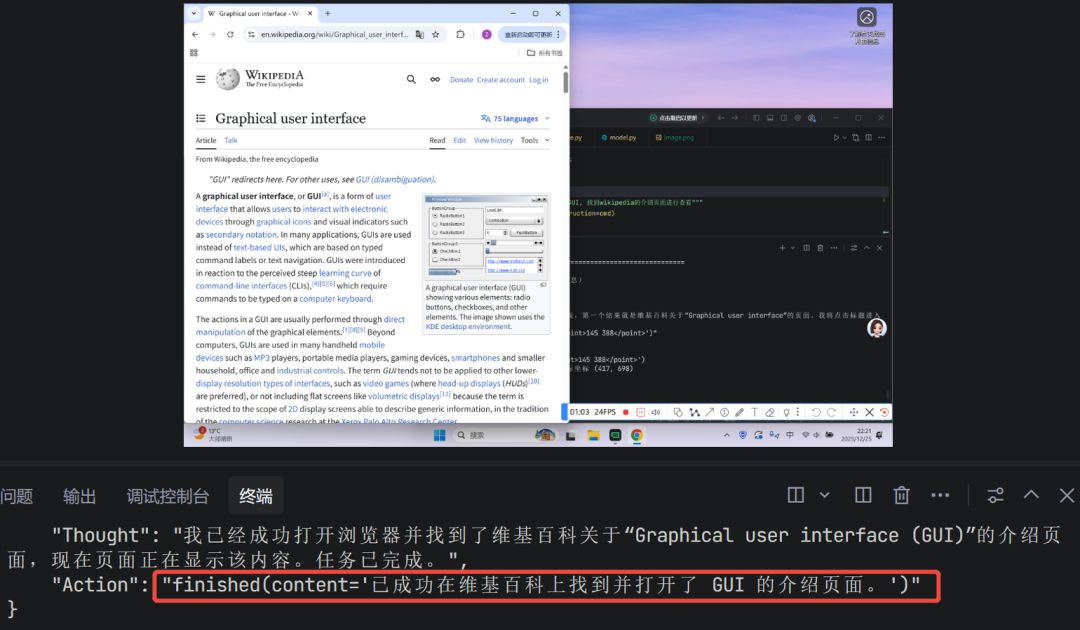
4. 执行效果
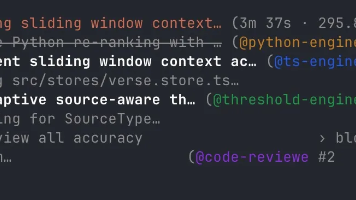
文章前言部分的demo, 模型的部分决策内容如下:
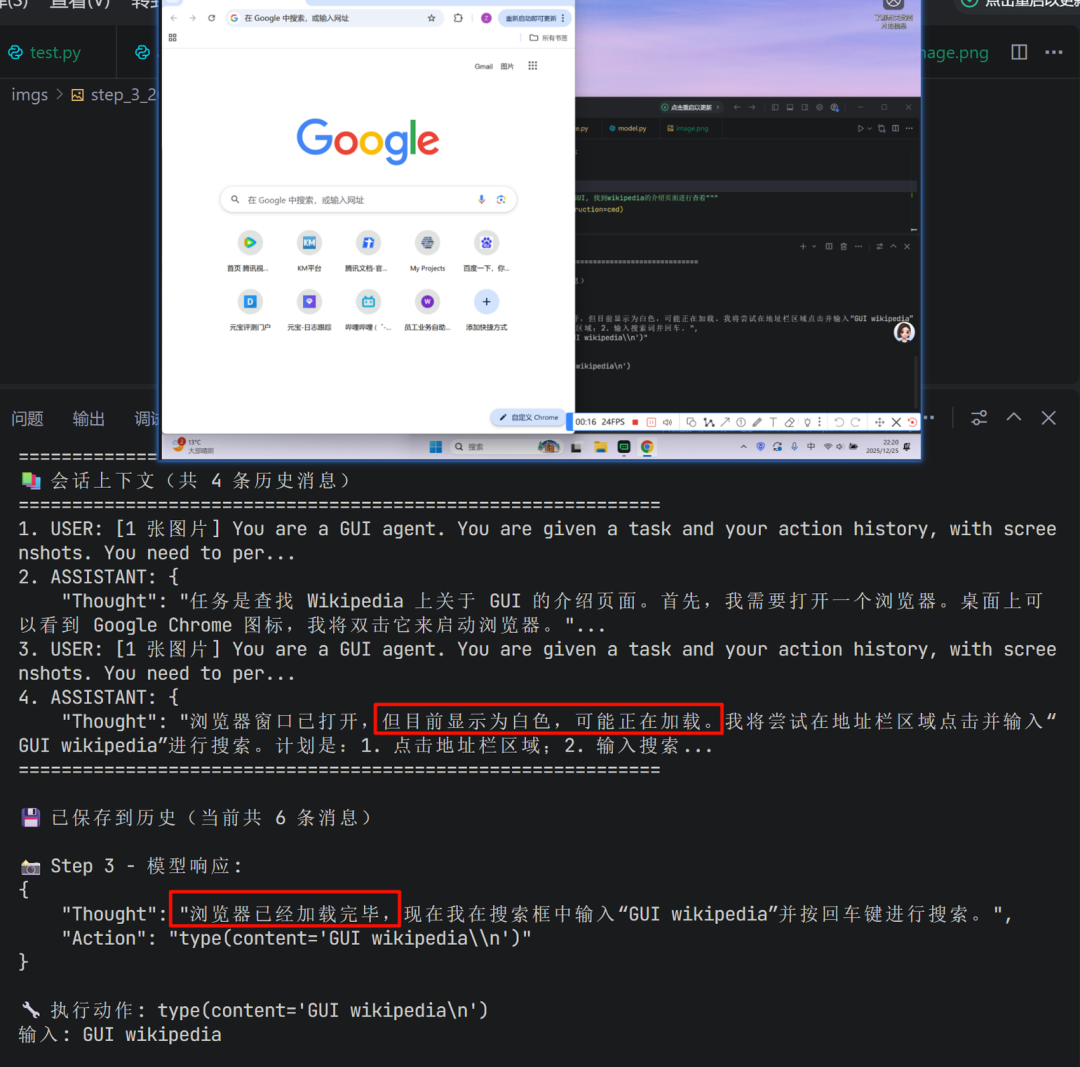
对于中间步骤,模型会利用到上文的内容,与当前页面状态一起作为决策依据:
最后,如果模型判断任务完成,会输出finished指令,程序停止
四、总结
本文采用简洁易用的方案搭建了一个 PC 端的 GUI Agent,该 Agent 不仅能在 Windows 和 macOS 系统上直接运行,还可操作 Web 应用。得益于以 pyautogui(键鼠模拟)作为核心执行器,该 Agent 能够实现跨应用的操作能力。未来可通过补充滑动、拖拽等更多样的交互方式,并结合知识库的构建,进一步强化其针对特定业务场景的适配性,打造功能更强大的 GUI Agent。
l_state
if name == “main”:
agent = GUIAgent(instruction=“”“打开浏览器查询GUI, 找到wikipedia的介绍页面进行查看”“”)
agent.run()
4. 执行效果
文章前言部分的demo, 模型的部分决策内容如下:
[外链图片转存中…(img-ICFgB8Bn-1770129131746)]
对于中间步骤,模型会利用到上文的内容,与当前页面状态一起作为决策依据:
[外链图片转存中…(img-KxSkJWK0-1770129131746)]
最后,如果模型判断任务完成,会输出finished指令,程序停止
[外链图片转存中…(img-Z2YvuVe2-1770129131747)]
四、总结
本文采用简洁易用的方案搭建了一个 PC 端的 GUI Agent,该 Agent 不仅能在 Windows 和 macOS 系统上直接运行,还可操作 Web 应用。得益于以 pyautogui(键鼠模拟)作为核心执行器,该 Agent 能够实现跨应用的操作能力。未来可通过补充滑动、拖拽等更多样的交互方式,并结合知识库的构建,进一步强化其针对特定业务场景的适配性,打造功能更强大的 GUI Agent。
普通人如何抓住AI大模型的风口?
为什么要学习大模型?
在DeepSeek大模型热潮带动下,“人工智能+”赋能各产业升级提速。随着人工智能技术加速渗透产业,AI人才争夺战正进入白热化阶段。如今近**60%的高科技企业已将AI人才纳入核心招聘目标,**其创新驱动发展的特性决定了对AI人才的刚性需求,远超金融(40.1%)和专业服务业(26.7%)。餐饮/酒店/旅游业核心岗位以人工服务为主,多数企业更倾向于维持现有服务模式,对AI人才吸纳能力相对有限。
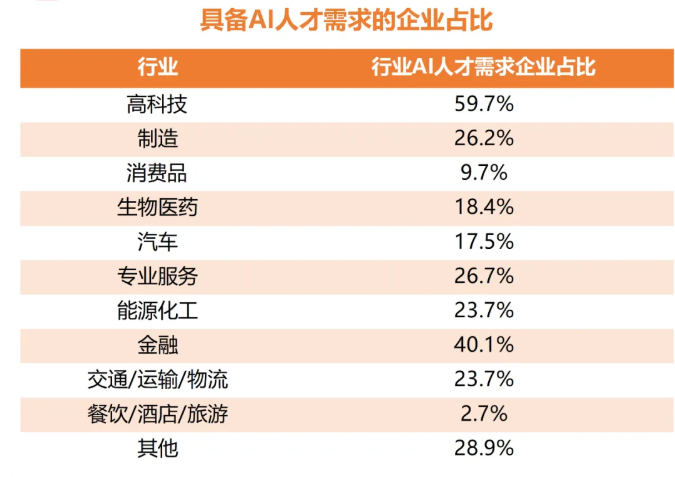
这些数字背后,是产业对AI能力的迫切渴求:互联网企业用大模型优化推荐算法,制造业靠AI提升生产效率,医疗行业借助大模型辅助诊断……而餐饮、酒店等以人工服务为核心的领域,因业务特性更依赖线下体验,对AI人才的吸纳能力相对有限。显然,AI技能已成为职场“加分项”乃至“必需品”,越早掌握,越能占据职业竞争的主动权
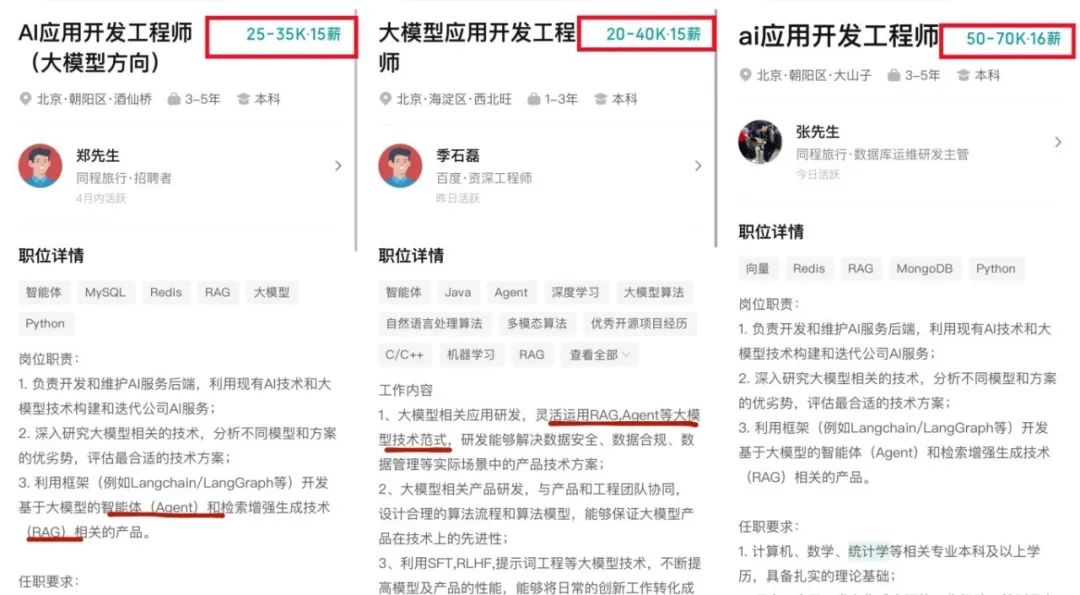
随着AI大模型技术的迅速发展,相关岗位的需求也日益增加。大模型产业链催生了一批高薪新职业:
人工智能大潮已来,不加入就可能被淘汰。如果你是技术人,尤其是互联网从业者,现在就开始学习AI大模型技术,真的是给你的人生一个重要建议!
如果你真的想学习大模型,请不要去网上找那些零零碎碎的教程,真的很难学懂!你可以根据我这个学习路线和系统资料,制定一套学习计划,只要你肯花时间沉下心去学习,它们一定能帮到你!
大模型全套学习资料领取
这里我整理了一份AI大模型入门到进阶全套学习包,包含学习路线+实战案例+视频+书籍PDF+面试题+DeepSeek部署包和技巧,需要的小伙伴文在下方免费领取哦,真诚无偿分享!!!
vx扫描下方二维码即可

部分资料展示
一、 AI大模型学习路线图
这份路线图以“阶段性目标+重点突破方向”为核心,从基础认知(AI大模型核心概念)到技能进阶(模型应用开发),再到实战落地(行业解决方案),每一步都标注了学习周期和核心资源,帮你清晰规划成长路径。

二、 全套AI大模型应用开发视频教程
从入门到进阶这里都有,跟着老师学习事半功倍。
三、 大模型学习书籍&文档
收录《从零做大模型》《动手做AI Agent》等经典著作,搭配阿里云、腾讯云官方技术白皮书,帮你夯实理论基础。

四、大模型大厂面试真题
整理了百度、阿里、字节等企业近三年的AI大模型岗位面试题,涵盖基础理论、技术实操、项目经验等维度,每道题都配有详细解析和答题思路,帮你针对性提升面试竞争力。
适用人群
第一阶段(10天):初阶应用
该阶段让大家对大模型 AI有一个最前沿的认识,对大模型 AI 的理解超过 95% 的人,可以在相关讨论时发表高级、不跟风、又接地气的见解,别人只会和 AI 聊天,而你能调教 AI,并能用代码将大模型和业务衔接。
- 大模型 AI 能干什么?
- 大模型是怎样获得「智能」的?
- 用好 AI 的核心心法
- 大模型应用业务架构
- 大模型应用技术架构
- 代码示例:向 GPT-3.5 灌入新知识
- 提示工程的意义和核心思想
- Prompt 典型构成
- 指令调优方法论
- 思维链和思维树
- Prompt 攻击和防范
- …
第二阶段(30天):高阶应用
该阶段我们正式进入大模型 AI 进阶实战学习,学会构造私有知识库,扩展 AI 的能力。快速开发一个完整的基于 agent 对话机器人。掌握功能最强的大模型开发框架,抓住最新的技术进展,适合 Python 和 JavaScript 程序员。
- 为什么要做 RAG
- 搭建一个简单的 ChatPDF
- 检索的基础概念
- 什么是向量表示(Embeddings)
- 向量数据库与向量检索
- 基于向量检索的 RAG
- 搭建 RAG 系统的扩展知识
- 混合检索与 RAG-Fusion 简介
- 向量模型本地部署
- …
第三阶段(30天):模型训练
恭喜你,如果学到这里,你基本可以找到一份大模型 AI相关的工作,自己也能训练 GPT 了!通过微调,训练自己的垂直大模型,能独立训练开源多模态大模型,掌握更多技术方案。
到此为止,大概2个月的时间。你已经成为了一名“AI小子”。那么你还想往下探索吗?
- 为什么要做 RAG
- 什么是模型
- 什么是模型训练
- 求解器 & 损失函数简介
- 小实验2:手写一个简单的神经网络并训练它
- 什么是训练/预训练/微调/轻量化微调
- Transformer结构简介
- 轻量化微调
- 实验数据集的构建
- …
第四阶段(20天):商业闭环
对全球大模型从性能、吞吐量、成本等方面有一定的认知,可以在云端和本地等多种环境下部署大模型,找到适合自己的项目/创业方向,做一名被 AI 武装的产品经理。
- 硬件选型
- 带你了解全球大模型
- 使用国产大模型服务
- 搭建 OpenAI 代理
- 热身:基于阿里云 PAI 部署 Stable Diffusion
- 在本地计算机运行大模型
- 大模型的私有化部署
- 基于 vLLM 部署大模型
- 案例:如何优雅地在阿里云私有部署开源大模型
- 部署一套开源 LLM 项目
- 内容安全
- 互联网信息服务算法备案
- …
学习是一个过程,只要学习就会有挑战。天道酬勤,你越努力,就会成为越优秀的自己。
如果你能在15天内完成所有的任务,那你堪称天才。然而,如果你能完成 60-70% 的内容,你就已经开始具备成为一名大模型 AI 的正确特征了。
这份完整版的大模型 AI 学习资料已经上传CSDN,朋友们如果需要可以微信扫描下方CSDN官方认证二维码免费领取【保证100%免费】


有“AI”的1024 = 2048,欢迎大家加入2048 AI社区
更多推荐

 26
26 0
0- 0


 已为社区贡献206条内容

所有评论(0)