企业级 RAG 实战:基于 Spring AI + MongoDB 构建智能数据检索系统
本文详细介绍了基于SpringAI框架和MongoDB向量搜索实现企业级RAG(检索增强生成)方案的全过程。主要内容包括:1)核心技术栈选择,使用SpringAI简化开发流程,MongoDB实现向量存储与检索;2)环境配置与核心依赖引入;3)关键编码实现,包括文本向量化、向量存储、相似度检索等核心环节;4)完整RAG流程演示,通过语义匹配增强大模型回答准确性。该方案有效解决了企业私有数据问答和知识
在大模型应用落地过程中,RAG(检索增强生成)是解决企业私有数据问答、知识精准匹配的核心方案。本文将聚焦实战,基于 Spring AI 框架,结合 MongoDB 的向量搜索能力,完整实现企业级数据 RAG 流程 —— 重点讲解文本编码、向量存储、相似度检索全链路编码实现,其中本地 Ollama 部署已在前期博客中介绍,本文不再赘述。

一、核心技术栈与流程概述
1.1 核心组件说明
- Spring AI:简化 AI 应用开发的 Spring 生态框架,提供统一的模型调用、文本编码(Embedding)接口;
- MongoDB:不仅存储原始文本数据,还通过 Atlas Vector Search(向量搜索)实现相似度检索;
- Ollama:本地部署的开源大模型 / Embedding 模型(本文使用qwen3-embedding:0.6b编码模型);
- Embedding 编码:将非结构化文本转换为固定维度的向量,是 RAG 的核心基础。
1.2 整体 RAG 流程
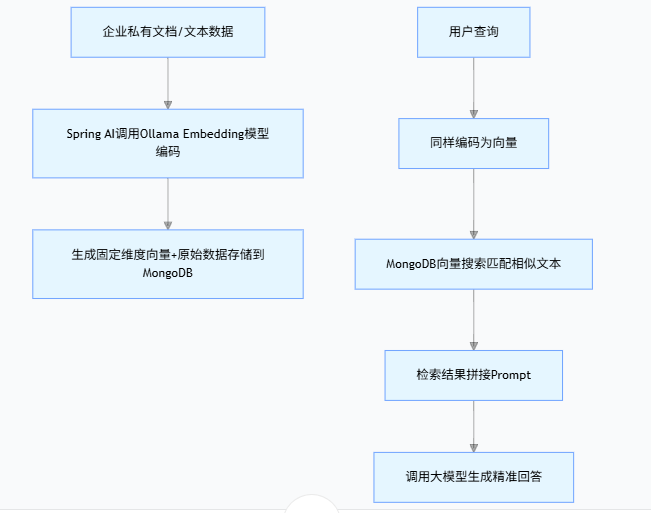
(1)企业私有文档/文本数据
(2)Spring AI调用Ollama Embedding模型编码
(3)生成固定维度向量+原始数据存储到MongoDB
(4)用户查询
(5)同样编码为向量
(6)MongoDB向量搜索匹配相似文本
(7)检索结果拼接Prompt
(8)调用大模型生成精准回答
二、环境准备与依赖配置
2.1 核心依赖(Maven)
在pom.xml中引入 Spring AI、MongoDB 相关依赖,确保版本兼容:
<?xml version="1.0" encoding="UTF-8"?>
<project xmlns="http://maven.apache.org/POM/4.0.0"
         xmlns:xsi="http://www.w3.org/2001/XMLSchema-instance"
         xsi:schemaLocation="http://maven.apache.org/POM/4.0.0 http://maven.apache.org/xsd/maven-4.0.0.xsd">
    <modelVersion>4.0.0</modelVersion>
    <parent>
        <groupId>org.springframework.boot</groupId>
        <artifactId>spring-boot-starter-parent</artifactId>
        <version>3.2.0</version>
        <relativePath/>
    </parent>

    <groupId>com.example</groupId>
    <artifactId>spring-ai-ollama</artifactId>
    <version>1.0.0</version>

    <properties>
        <maven.compiler.source>17</maven.compiler.source>
        <maven.compiler.target>17</maven.compiler.target>
    </properties>

      <dependencies>
        <dependency>
            <groupId>org.springframework.boot</groupId>
            <artifactId>spring-boot-starter-web</artifactId>
        </dependency>

        <!--ollama-->
        <dependency>
            <groupId>org.springframework.ai</groupId>
            <artifactId>spring-ai-starter-model-ollama</artifactId>
            <version>1.0.0</version>
        </dependency>

        <!-- Spring AI 向量存储核心模块(包含VectorStore/SearchRequest) -->
		<dependency>
		    <groupId>org.springframework.ai</groupId>
		    <artifactId>spring-ai-vector-store</artifactId>
		    <version>1.0.0</version> <!-- 替换为你使用的Spring AI版本,如1.0.0.RELEASE -->
		</dependency>

		<dependency>
		    <groupId>org.springframework.ai</groupId>
		    <artifactId>spring-ai-redis-store</artifactId>
		    <version>1.0.0</version>
		</dependency>

		<dependency>
		    <groupId>org.springframework.ai</groupId>
		    <artifactId>spring-ai-mongodb-atlas-store</artifactId>
		    <version>1.0.0</version>
		</dependency>

        <dependency>
		    <groupId>org.springframework.boot</groupId>
		    <artifactId>spring-boot-starter-data-mongodb</artifactId>
		    <!-- 无需指定版本,Spring Boot 父工程已管理 -->
		</dependency>

		  <!-- Spring AI 核心 -->
    <dependency>
        <groupId>org.springframework.ai</groupId>
        <artifactId>spring-ai-core</artifactId>
        <version>1.0.0-M6</version> <!-- 推荐使用 1.0.0 或更高稳定版 -->
    </dependency>

        <!--lombok-->
        <dependency>
            <groupId>org.projectlombok</groupId>
            <artifactId>lombok</artifactId>
            <optional>true</optional>
        </dependency>
        <!--hutool-->
        <dependency>
            <groupId>cn.hutool</groupId>
            <artifactId>hutool-all</artifactId>
            <version>5.8.22</version>
        </dependency>
        <dependency>
            <groupId>org.springframework.boot</groupId>
            <artifactId>spring-boot-starter-test</artifactId>
            <scope>test</scope>
        </dependency>
      </dependencies>

    <build>
        <plugins>
            <plugin>
                <groupId>org.springframework.boot</groupId>
                <artifactId>spring-boot-maven-plugin</artifactId>
            </plugin>
            <plugin>
                <groupId>org.apache.maven.plugins</groupId>
                <artifactId>maven-compiler-plugin</artifactId>
                <version>3.11.0</version>
                <configuration>
                    <compilerArgs>
                        <arg>-parameters</arg>
                    </compilerArgs>
                    <source>21</source>
                    <target>21</target>
                </configuration>
            </plugin>
        </plugins>
    </build>

    <repositories>
        <repository>
            <id>spring-milestones</id>
            <name>Spring Milestones</name>
            <url>https://repo.spring.io/milestone</url>
            <snapshots>
                <enabled>false</enabled>
            </snapshots>
        </repository>
         <repository>
	        <id>aliyunmaven</id>
	        <url>https://maven.aliyun.com/repository/public</url>
	    </repository>
    </repositories>

</project>
2.2 配置文件(application.yml)
配置 Ollama 地址、MongoDB 连接、Embedding 模型参数:
spring.ai.ollama.base-url=http://localhost:11434
spring.ai.ollama.chat.model=qwen3:0.6b

spring.ai.ollama.embedding.model=qwen3-embedding:0.6b
2.3 注册MongoDB数据库链接
package com.conca.ai.mongodb;

import com.mongodb.MongoClientSettings;
import com.mongodb.MongoCredential;
import com.mongodb.ServerAddress;
import com.mongodb.client.MongoClients;
import org.springframework.context.annotation.Bean;
import org.springframework.context.annotation.Configuration;
import org.springframework.data.mongodb.core.MongoTemplate;

import java.util.Arrays;
import java.util.Collections;

@Configuration
public class MongoConfig {

    // 从配置文件读取参数(也可以硬编码,不推荐)
    private final String mongoHost = "127.0.0.1";
    private final int mongoPort = 27017;
    private final String mongoDatabase = "chat_memory_db";
    private final String mongoUsername = "root";
    private final String mongoPassword = "123";
    private final String authDatabase = "admin";

    @Bean
    public MongoTemplate mongoTemplate() {
        // 1. 创建认证信息
        MongoCredential credential = MongoCredential.createCredential(
                mongoUsername,       // 用户名
                authDatabase,        // 认证数据库
                mongoPassword.toCharArray() // 密码
        );

        // 2. 配置 MongoClient 连接参数
        MongoClientSettings settings = MongoClientSettings.builder()
                .applyToClusterSettings(builder ->
                        builder.hosts(Collections.singletonList(new ServerAddress(mongoHost, mongoPort))))
                .credential(credential) // 添加认证信息
                .build();

        // 3. 创建 MongoClient 并初始化 MongoTemplate
        return new MongoTemplate(MongoClients.create(settings), mongoDatabase);
    }


}
2.4 VectorStore注册MongoDB向量存储类
package com.conca.ai.config;

import org.springframework.ai.embedding.EmbeddingModel;
import org.springframework.ai.vectorstore.mongodb.atlas.MongoDBAtlasVectorStore;
import org.springframework.context.annotation.Bean;
import org.springframework.context.annotation.Configuration;
import org.springframework.data.mongodb.core.MongoTemplate;

import com.conca.ai.mongodb.MongoDBVectorStore;

@Configuration
public class VectorStoreConfig {

	//MongoDB驱动包查询网址
	//https://repo.spring.io/ui/native/milestone/org/springframework/ai/
	@Bean
    public MongoDBAtlasVectorStore mongoDbAtlasVectorStore(MongoTemplate mongoTemplate,
          EmbeddingModel embeddingModel) {
		return MongoDBAtlasVectorStore
				.builder(mongoTemplate, embeddingModel)
				.build();
    }
}
Spring Boot 中MongoDB Atlas 向量存储的核心配置类,通过@Configuration和@Bean注解,构建并向 Spring 容器注册MongoDBAtlasVectorStore Bean。该 Bean 注入MongoTemplate(MongoDB 数据库操作工具)与EmbeddingModel(文本转向量模型),借助建造者模式完成实例化。其作用是打通 “文本向量化→向量存储 / 检索” 链路,支撑 RAG 核心流程。
三、核心编码实现
3.1 Embedding介绍
嵌入(Embedding)是文本、图像或视频的数值表示,能够捕捉输入之间的关系,Embedding通过将文本、图像和视频转换为称为向量(Vector)的浮点数数组来工作。这些向量旨在捕捉文本、图像和视频的含义,Embedding数组的长度称为向量的维度。
通过计算两个文本片段的向量表示之间的数值距离,应用程序可以确定用于生成嵌入向量的对象之间的相似性。
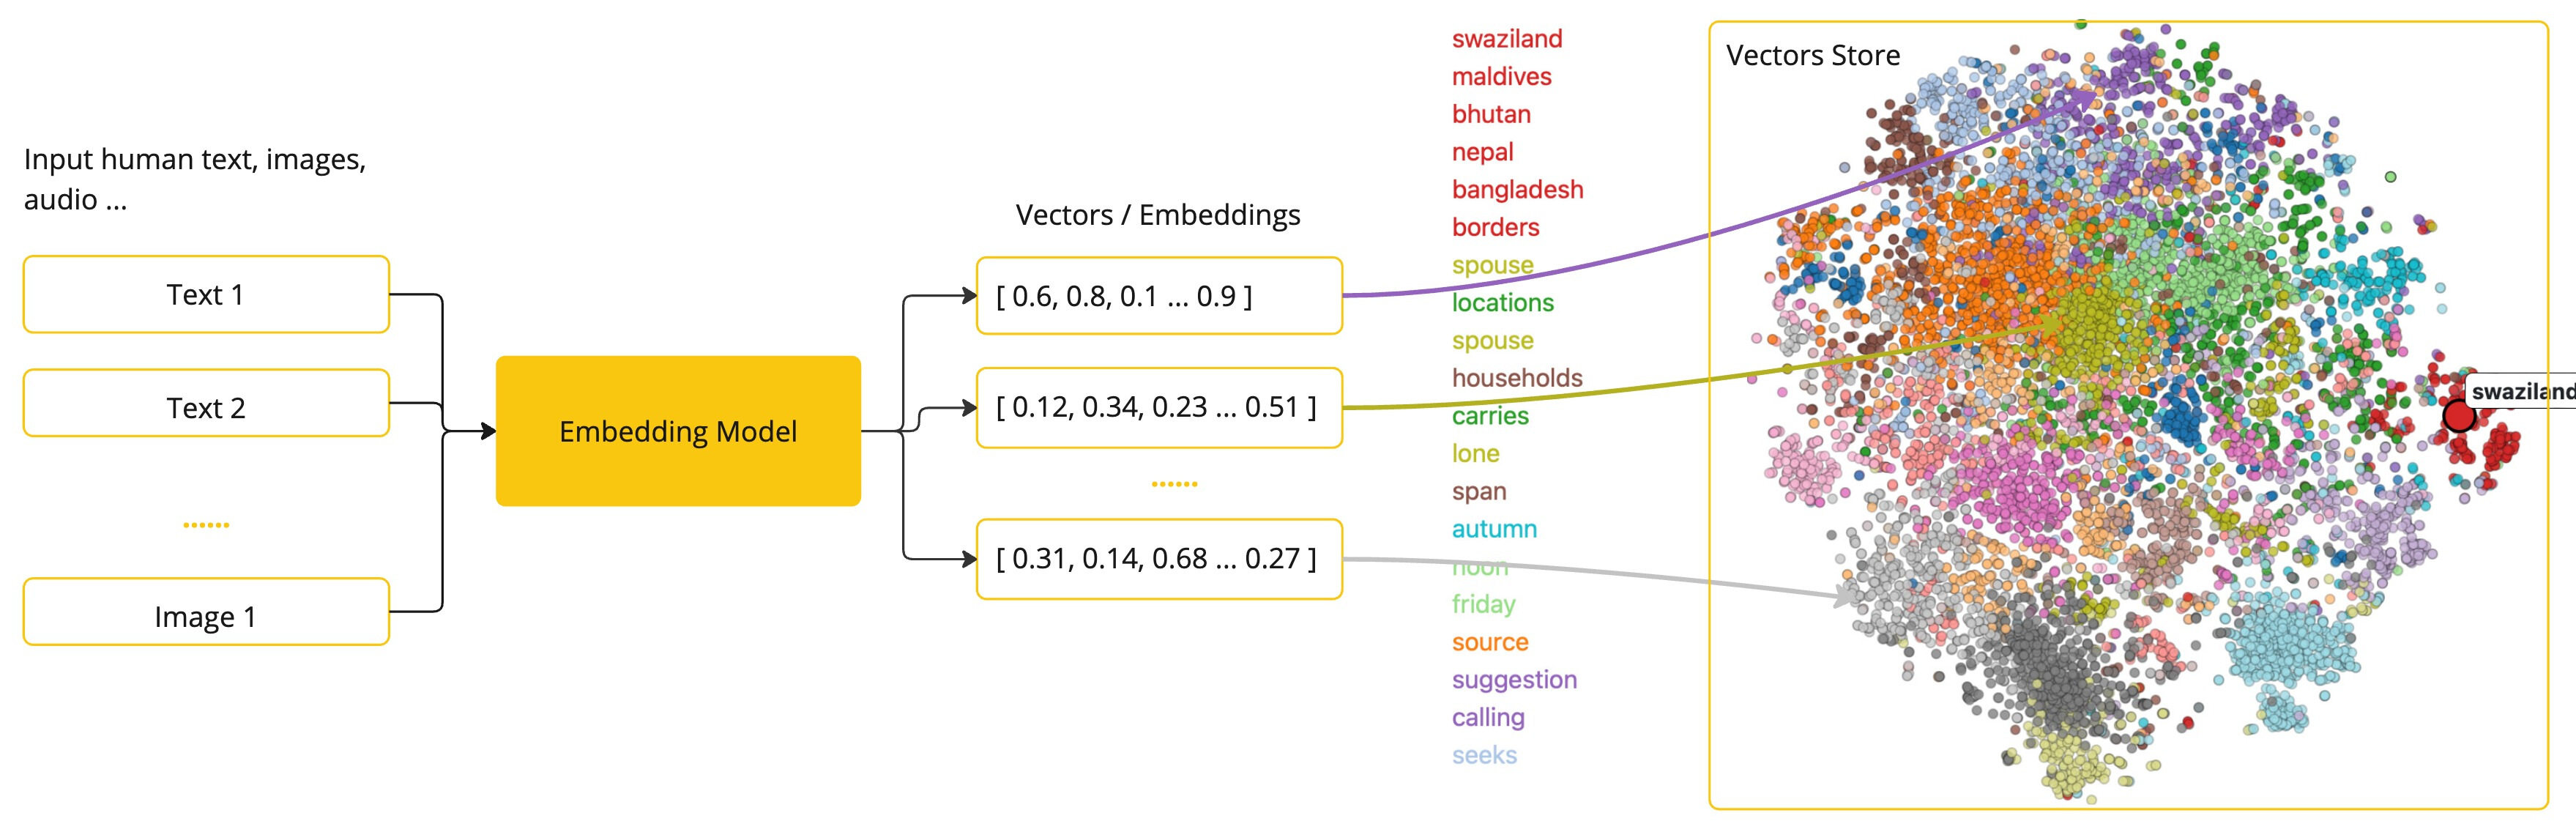
Embedding在实际应用中,特别是在检索增强生成(RAG)模式中,具有重要意义。它们使数据能够在语义空间中表示为点,这类似于欧几里得几何的二维空间,但在更高的维度中。这意味着,就像欧几里得几何中平面上的点可以根据其坐标的远近关系而接近或远离一样,在语义空间中,点的接近程度反映了意义的相似性。关于相似主题的句子在这个多维空间中的位置较近,就像图表上彼此靠近的点。这种接近性有助于文本分类、语义搜索,甚至产品推荐等任务,因为它允许人工智能根据这些点在扩展的语义空间中的“位置”来辨别和分组相关概念。
3.2 Embedding文本向量化测试
@RestController
@Slf4j
public class Embed2VectorController
{
    @Resource
    private EmbeddingModel embeddingModel;

    @Resource
    private VectorStore vectorStore;

    /**
     * 文本向量化
     * http://localhost:8080/text2embed?msg=凡人忘记了自己
     * @param msg
     * @return
     */
    @GetMapping("/text2embed")
    public EmbeddingResponse text2Embed(String msg)
    {
        //EmbeddingResponse embeddingResponse = embeddingModel.call(new EmbeddingRequest(List.of(msg), null));

        EmbeddingResponse embeddingResponse = embeddingModel
        		.call(new EmbeddingRequest(List.of(msg),
        				OllamaOptions.builder()
        					.model("qwen3-embedding:0.6b")
        						.build()));

        float[] result = embeddingResponse.getResult().getOutput();
        System.out.println(msg+",编码之后数组个数"+result.length+",数组详细内容是:"+Arrays.toString(result));

        return embeddingResponse;
    }
}浏览器请求http://localhost:8080/text2embed?msg=凡人忘记了自己
服务器返回的结果内容如下:
{"metadata":{"model":"qwen3-embedding:0.6b","usage":{"promptTokens":5,"completionTokens":0,"totalTokens":5},"empty":true},"result":{"index":0,"metadata":{"modalityType":"TEXT","documentId":"","mimeType":{"type":"text","subtype":"plain","parameters":{},"charset":null,"wildcardType":false,"wildcardSubtype":false,"subtypeSuffix":null,"concrete":true},"documentData":null},"output":[-0.058538623,-0.0058290255,-0.010434008,-0.06523201,-0.014648297,-0.020060834,0.03873559,0.047251683,-0.08105227,0.0092706345,-0.04480236,-0.06263533,0.0032264413,-0.010711343,-0.03501756,0.048393957,0.023457542,0.031936675,0.109057814,-0.05657388,0.010981104,-0.033473387,0.017478459,-0.09445127,0.0065462245,0.008600976,-0.01919329,0.04529097,0.010755551,-0.014876863,-0.052771617,-0.028445413,-0.08259223,-0.05460281,-0.05997166,-0.013657973,-0.025953956,-0.03753862,-0.005781066,0.021342203,-0.045391303,-0.02894707,0.02802638,0.014725661,0.013222906,-0.035469536,-0.016309062,-0.029174102,0.04625049,0.041790277,0.026282342,-0.024446158,-0.0047506895,-0.0012911551,0.0044921837,-0.0765293,-0.0252269,-0.045601994,0.04378501,-0.01814867,-0.05569642,0.041443206,0.015273571,0.013721665,0.003330066,0.07587648,0.034175776,-0.017552752,-0.05168339,-0.027378444,0.010885586,0.008624203,-0.034437,0.0098517435,-9.0537715E-4,-0.021464024,0.028259434,-0.04674571,0.0026693994,-0.022953995,-0.011265735,-0.008716412,0.019593855,0.017334491,-0.0049523017,0.044114463,0.0020852236,-0.0022547194,0.03855163,0.052876048,6.153725E-4,0.06626719,0.023744356,0.044997394,,......................]}
'凡人忘记了自己'是7个汉字,但是数组个数是1024。你想知道为什么用 qwen3-embedding:0.6b 模型处理 7 个汉字的文本,返回的嵌入向量数组长度是 1024,而不是和汉字数量对应的 7 或 14,这是一个非常关键且基础的嵌入模型认知问题。
第一点:嵌入向量的本质是 “语义特征向量”嵌入模型的作用不是简单地给每个字 / 词分配一个数值,而是把整段文本的语义信息压缩 / 映射到一个固定维度的数值空间中。这个固定维度是模型在训练时就确定的,和输入文本的长度(字符数、单词数)无关
第二点:qwen3-embedding:0.6b 这款模型在研发时就被设定为输出1024 维的嵌入向量,无论你输入的是 1 个汉字、7 个汉字,还是 100 个汉字,它都会输出长度为 1024 的数组。
(1)1024 维是嵌入模型的常见设计维度(其他常见维度还有 768、384、2048 等),维度越高,理论上能承载的语义信息越丰富,但计算和存储成本也越高。
(2)你看到的 usage.promptTokens:5 是模型对输入文本的 “令牌(Token)” 切分结果(中文文本通常一个汉字 / 词对应 1 个或多个 Token),和输出向量维度无关。
3.3 文本编码存储到MongoDB
实现文本到向量的转换,并将结果持久化到 MongoDB:
/**
* 文本向量化 后存入向量数据库MongoDB
* http://localhost:8080/embed2vector/add
*/
@GetMapping("/embed2vector/add")
public String add()
{
// 初始化数据
List<Document> documents = List.of(
new Document("A0200:用户登录验证失败二级宏观错误码"),
new Document("A0201:用户名或密码错误"),
new Document("A0202:用户token过期失效"),
new Document("B2222:订单接口调用失败"),
new Document("B2223:库存扣减接口超时"),
new Document("B3333:物流查询接口返回异常"),
new Document("C1111:Kafka消息发送失败"),
new Document("C1112:Kafka消费组重平衡异常"),
new Document("C3333:Redis缓存写入失败"),
new Document("C3334:Redis连接池耗尽"),
new Document("D0001:数据库错误一级宏观错误码"),
new Document("D0100:数据库连接超时二级宏观错误码"),
new Document("D0101:SQL执行报错"),
new Document("D0102:事务提交失败"),
new Document("E0001:第三方服务错误一级宏观错误码"),
new Document("E0100:短信发送服务调用失败二级宏观错误码"),
new Document("E0101:人脸识别接口返回异常"),
new Document("F0001:文件处理错误一级宏观错误码"),
new Document("F0100:文件上传超出大小限制二级宏观错误码"),
new Document("F0101:文件格式解析失败"),
new Document("00000:系统OK正确执行后的返回"),
new Document("C2222:Kafka消息解压严重"),
new Document("B1111:支付接口超时"),
new Document("A0100:用户注册错误二级宏观错误码"),
new Document("A0001:用户端错误一级宏观错误码")
);
vectorStore.add(documents);
return embeddingModel.toString();
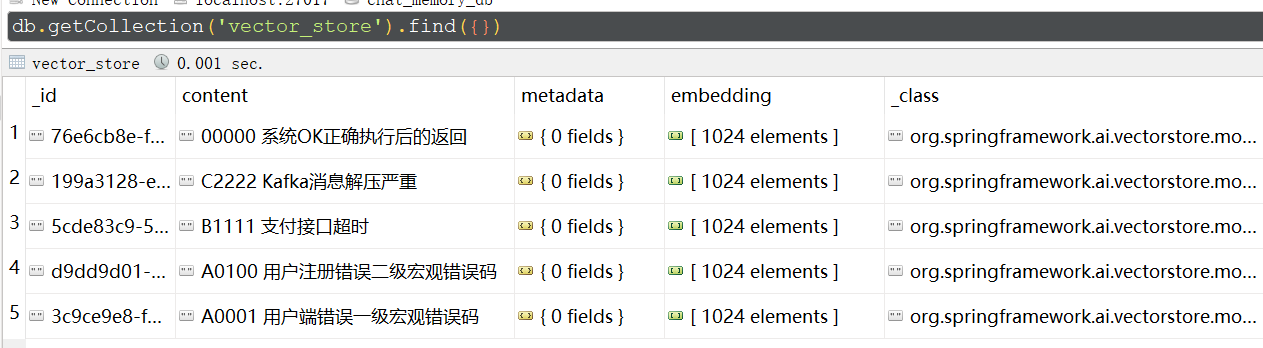
}Embedding上面数据,把原始内容和Embedding之后的数据存储到MongoDB表vector_store
3.4检索增强生成(RAG)
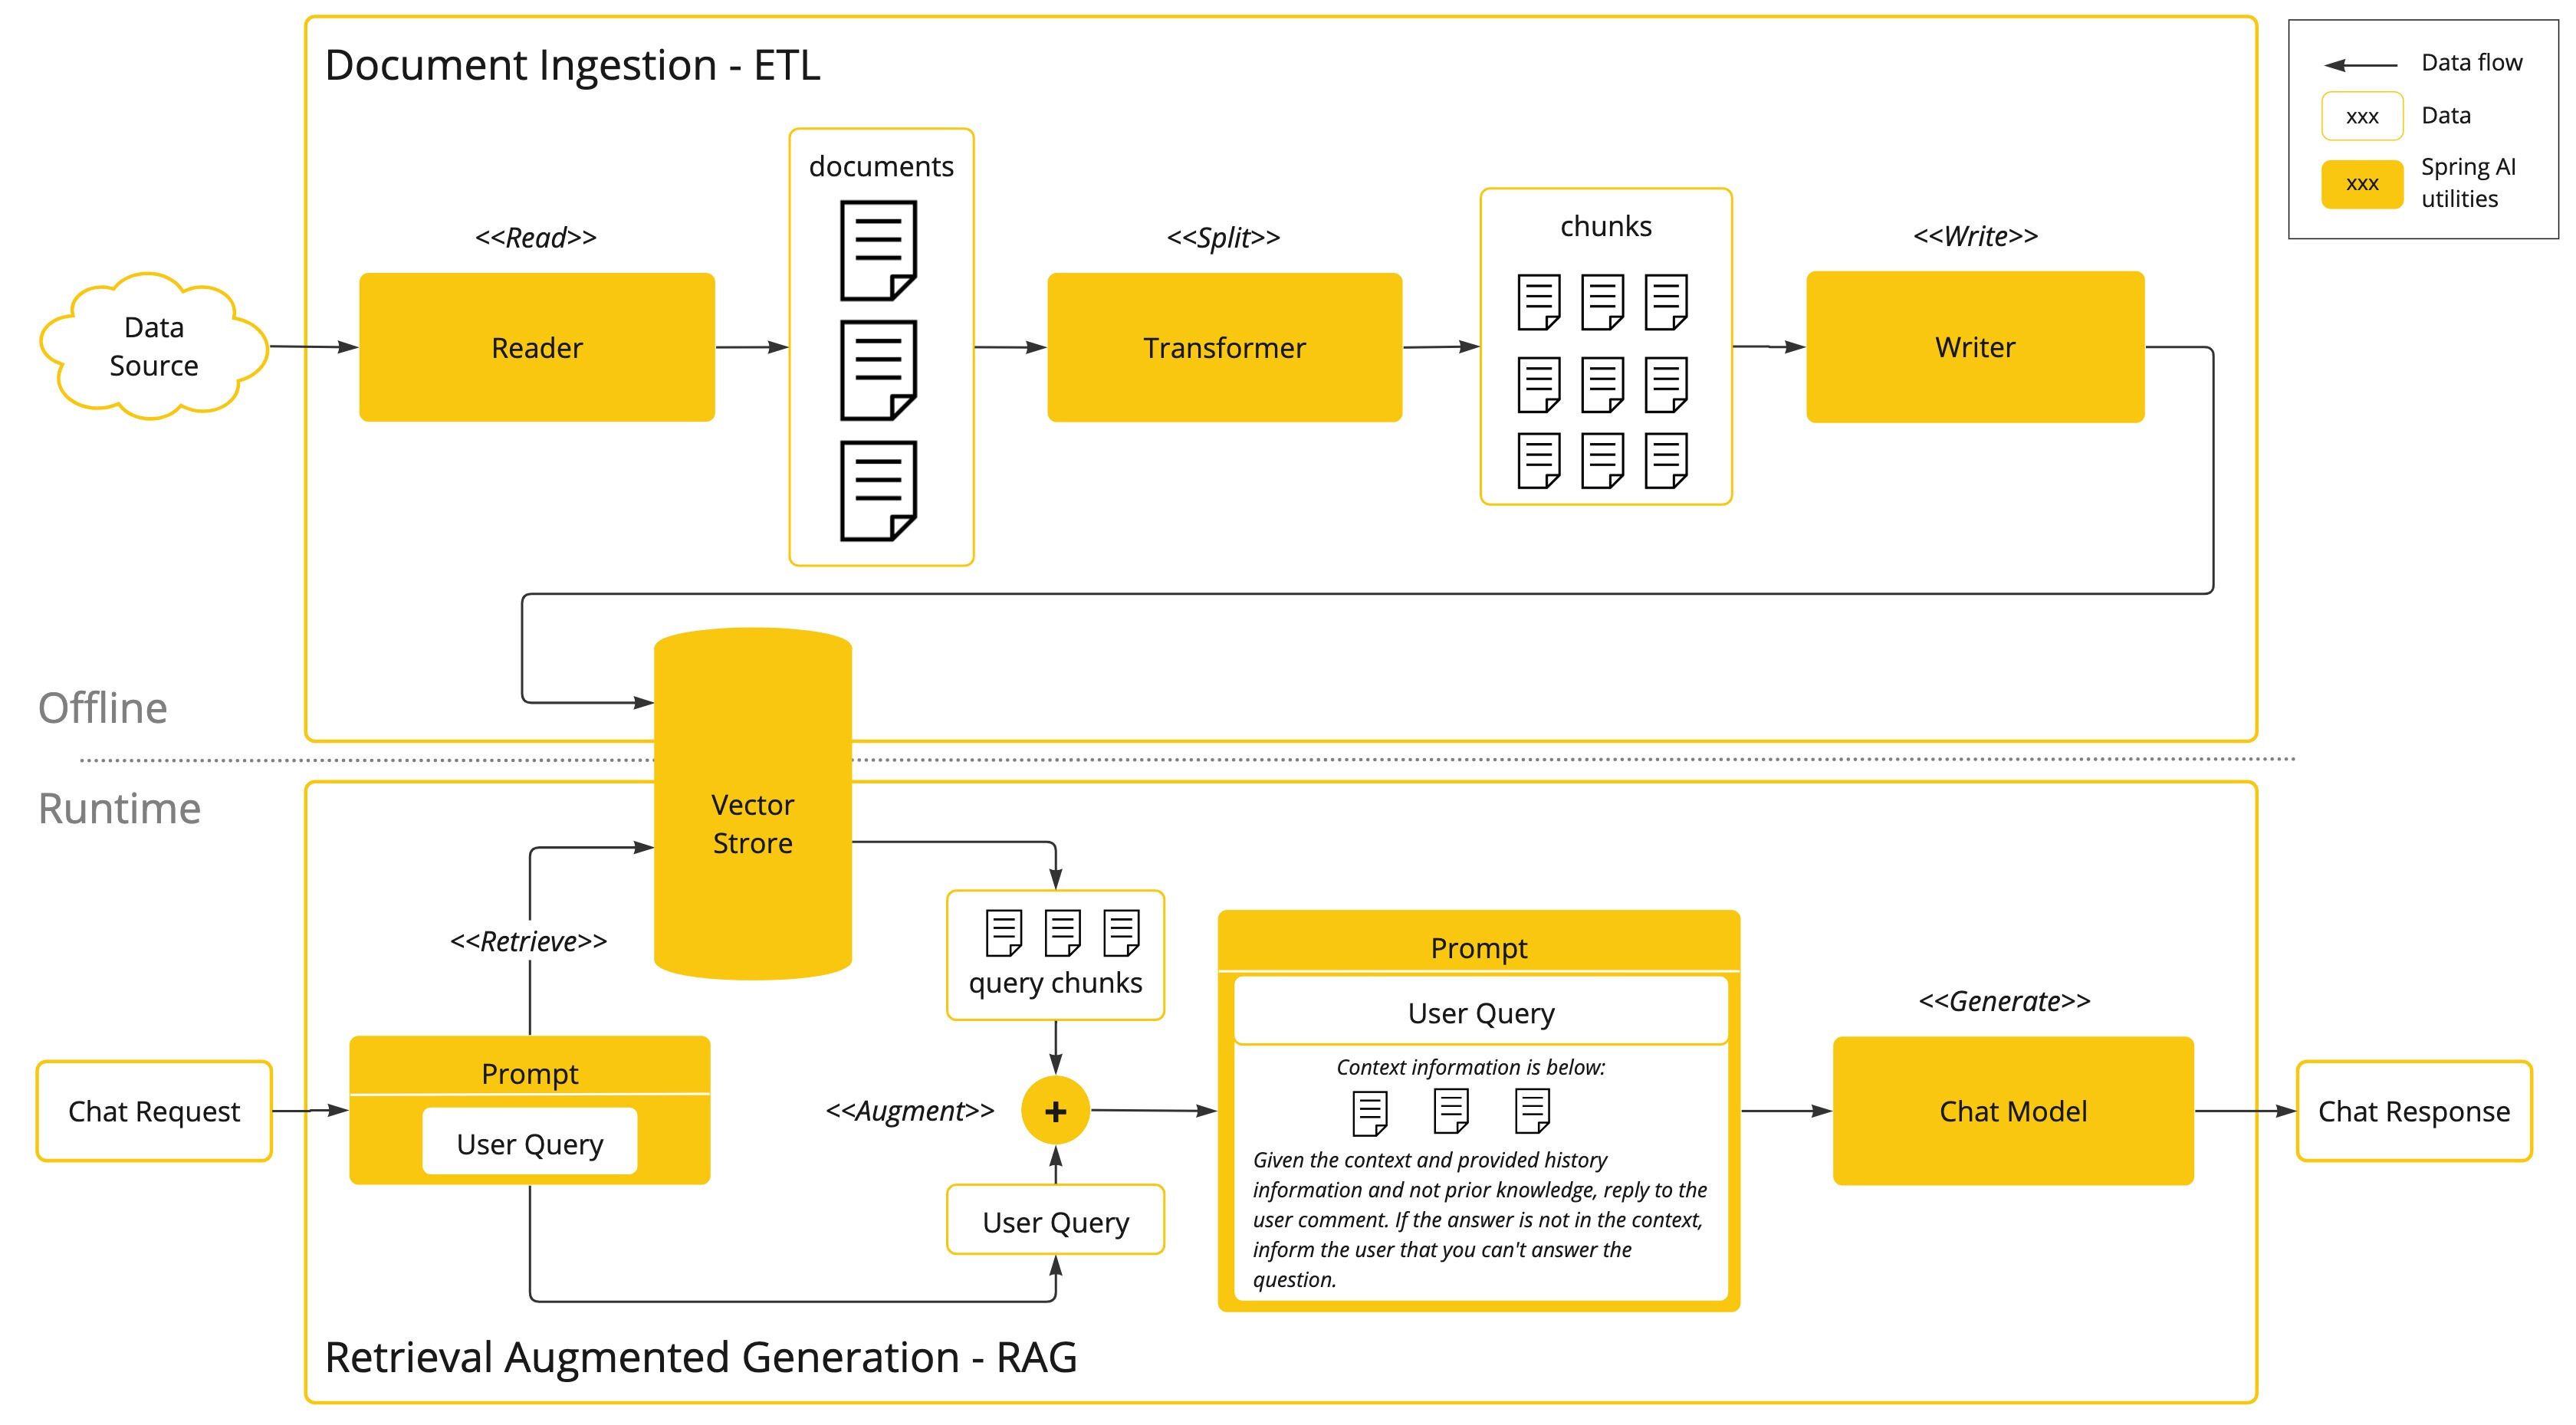
一种称为检索增强生成 (RAG) 的技术已经出现,旨在解决为 AI 模型提供额外的知识输入,以辅助模型更好的回答问题。
该方法涉及批处理式的编程模型,其中涉及到:从文档中读取非结构化数据、对其进行转换、然后将其写入矢量数据库。从高层次上讲,这是一个 ETL(提取、转换和加载)管道。矢量数据库则用于 RAG 技术的检索部分。
在将非结构化数据加载到矢量数据库的过程中,最重要的转换之一是将原始文档拆分成较小的部分。将原始文档拆分成较小部分的过程有两个重要步骤:
- 将文档拆分成几部分,同时保留内容的语义边界。例如,对于包含段落和表格的文档,应避免在段落或表格中间拆分文档;对于代码,应避免在方法实现的中间拆分代码。
- 将文档的各部分进一步拆分成大小仅为 AI 模型令牌 token 限制的一小部分的部分。
RAG 的下一个阶段是处理用户输入。当用户的问题需要由 AI 模型回答时,问题和所有“类似”的文档片段都会被放入发送给 AI 模型的提示中。这就是使用矢量数据库的原因,它非常擅长查找具有一定相似度的“类似”内容。
3.5 MongoDB 向量搜索(RAG 核心检索)
实现基于用户查询的向量相似度检索,获取最相关的文本:
package com.conca.ai;

import jakarta.annotation.Resource;

import java.util.List;

import org.springframework.ai.chat.client.ChatClient;
import org.springframework.ai.chat.client.advisor.RetrievalAugmentationAdvisor;
import org.springframework.ai.document.Document;
import org.springframework.ai.rag.retrieval.search.VectorStoreDocumentRetriever;
import org.springframework.ai.vectorstore.VectorStore;
import org.springframework.beans.factory.annotation.Autowired;
import org.springframework.web.bind.annotation.GetMapping;
import org.springframework.web.bind.annotation.RestController;
import reactor.core.publisher.Flux;

/**
 * @Description 知识出处:
 * https://docs.spring.io/spring-ai/reference/api/retrieval-augmented-generation.html#_advanced_rag
 */
@RestController
public class RagController
{
    @Resource(name="ollamaDeepseekMongoChatClient")
    private ChatClient chatClient;
    @Resource
    private VectorStore vectorStore;

    /**
     * http://localhost:8080/rag?msg=00000
     * @param msg
     * @return
     */
    @GetMapping("/rag")
    public Flux<String> rag(String msg)
    {
        String systemInfo = """
                你是一个运维工程师,按照给出的编码给出对应故障解释,否则回复找不到信息。
                """;

        RetrievalAugmentationAdvisor advisor = RetrievalAugmentationAdvisor.builder()
                .documentRetriever(VectorStoreDocumentRetriever.builder().vectorStore(vectorStore).build())
                .build();

        return chatClient
                .prompt()
                .system(systemInfo)
                .user(msg)
                .advisors(advisor)
                .stream()
                .content();
    }
}
核心逻辑是:注入定制化的 ChatClient(ollamaDeepseekMongoChatClient)和向量存储 VectorStore,构建 RetrievalAugmentationAdvisor 检索增强器(从向量库检索相关文档);接口接收用户查询后,结合系统提示(运维故障解释),通过 ChatClient 整合检索到的文档上下文与用户提问,流式返回 AI 回答。若检索不到匹配信息,AI 则回复 “找不到信息”,整体实现了基于向量检索的智能问答能力,适配运维故障解释场景。
3.6 MongoDB怎么实现RAG检索的?
MongoDBAtlasVectorStore是MongoDB官方提供的向量存储检索功能包,具体怎么实现的检索,评分获取出相近的记录,实现topN 的?
@Override
	public List<Document> doSimilaritySearch(SearchRequest request) {

		String nativeFilterExpressions = (request.getFilterExpression() != null)
				? this.filterExpressionConverter.convertExpression(request.getFilterExpression()) : "";

		float[] queryEmbedding = this.embeddingModel.embed(request.getQuery());
		var vectorSearch = new VectorSearchAggregation(EmbeddingUtils.toList(queryEmbedding), this.pathName,
				this.numCandidates, this.vectorIndexName, request.getTopK(), nativeFilterExpressions);

		Aggregation aggregation = Aggregation.newAggregation(vectorSearch,
				Aggregation.addFields()
					.addField(SCORE_FIELD_NAME)
					.withValueOfExpression("{\"$meta\":\"vectorSearchScore\"}")
					.build(),
				Aggregation.match(new Criteria(SCORE_FIELD_NAME).gte(request.getSimilarityThreshold())));

		return this.mongoTemplate.aggregate(aggregation, this.collectionName, org.bson.Document.class)
			.getMappedResults()
			.stream()
			.map(d -> mapMongoDocument(d, queryEmbedding))
			.toList();
	}
这段代码是向量存储中相似度检索的核心实现:首先处理检索请求的过滤表达式,将用户查询文本通过嵌入模型转为浮点型向量;接着构建 MongoDB 向量检索聚合操作,指定检索向量、向量字段名、候选数、索引名、返回条数及过滤条件;然后添加相似度得分字段,并过滤掉得分低于阈值的结果;最后执行聚合查询,将 MongoDB 返回的文档映射为 Spring AI 的 Document 对象,完成相似文档检索。整体基于 MongoDB 向量检索能力,结合嵌入模型实现文本语义相似度匹配,是 RAG 场景中检索环节的核心逻辑。
3.5 测试控制器(API 调用)
提供 HTTP 接口,浏览器访问:http://localhost:8080/rag?msg=00000
浏览器返回:系统OK正确执行后的返回
扩展问题:RAG为什么用向量数据库而不是用ES?
RAG 场景中为什么优先用向量数据库而非 Elasticsearch(ES),核心原因是两者的设计目标和检索逻辑完全不同 —— 向量数据库专为语义相似度检索优化,而 ES 擅长关键词 / 结构化检索.
RAG 的核心是 “语义匹配”,向量数据库将文本转为高维向量,通过余弦相似度等算法计算语义相似度,能精准匹配 “意思相近但关键词不同” 的内容(如 “电脑卡了” 和 “主机运行缓慢”);而 Elasticsearch(ES)基于倒排索引,依赖关键词匹配,易因关键词差异导致检索失效。
ES 虽支持向量检索(7.0+),但仅为附加功能,缺乏向量索引优化、批量向量操作、高维向量降维等核心能力,检索效率和精度远低于专业向量数据库(如 Milvus、Pinecone、MongoDB Atlas Vector Search)。
总结
- 基于 Spring AI 可快速对接 Ollama 实现文本编码,将非结构化文本转换为固定维度的向量;
- MongoDB 的 Atlas Vector Search 提供了高效的向量相似度检索能力,是企业级 RAG 的优质存储方案;
- 完整的 RAG 流程需实现 “文本编码→向量存储→查询编码→向量检索→大模型回答” 全链路,且需保证编码维度、MongoDB 索引、配置参数三者

有“AI”的1024 = 2048,欢迎大家加入2048 AI社区
更多推荐
 17
17 0
0- 0


 已为社区贡献7条内容

所有评论(0)