LangChain4j实战之十五:RAG (检索增强生成),Easy RAG
体验最简单的RAG方案,把本地文档发给LLM进行整理
·
欢迎访问我的GitHub
这里分类和汇总了欣宸的全部原创(含配套源码):https://github.com/zq2599/blog_demos
LangChain4j实战全系列链接
- 准备工作
- 极速开发体验
- 细说聊天API
- 集成到spring-boot
- 图像模型
- 聊天记忆,低级API版
- 聊天记忆,高级API版
- 响应流式传输
- 高级API(AI Services)实例的创建方式
- 结构化输出之一,用提示词指定输出格式
- 结构化输出之二,function call
- 结构化输出之三,json模式
- 函数调用,低级API版本
- 函数调用,低级API版本
- RAG (检索增强生成),Easy RAG
关于RAG(检索增强生成)
- 简单来说,RAG 是一种在发送给 LLM 之前,从你提供的数据中找到并注入相关信息片段到提示词中的方法,如果您看过前面函数调用的文章就很容易理解了,函数调用是把本地函数的结果给LLM,而RAG是基于本地资料搜索一些结果给LLM
- RAG 过程分为两个不同的阶段:索引和检索。 LangChain4j 为这两个阶段提供了工具
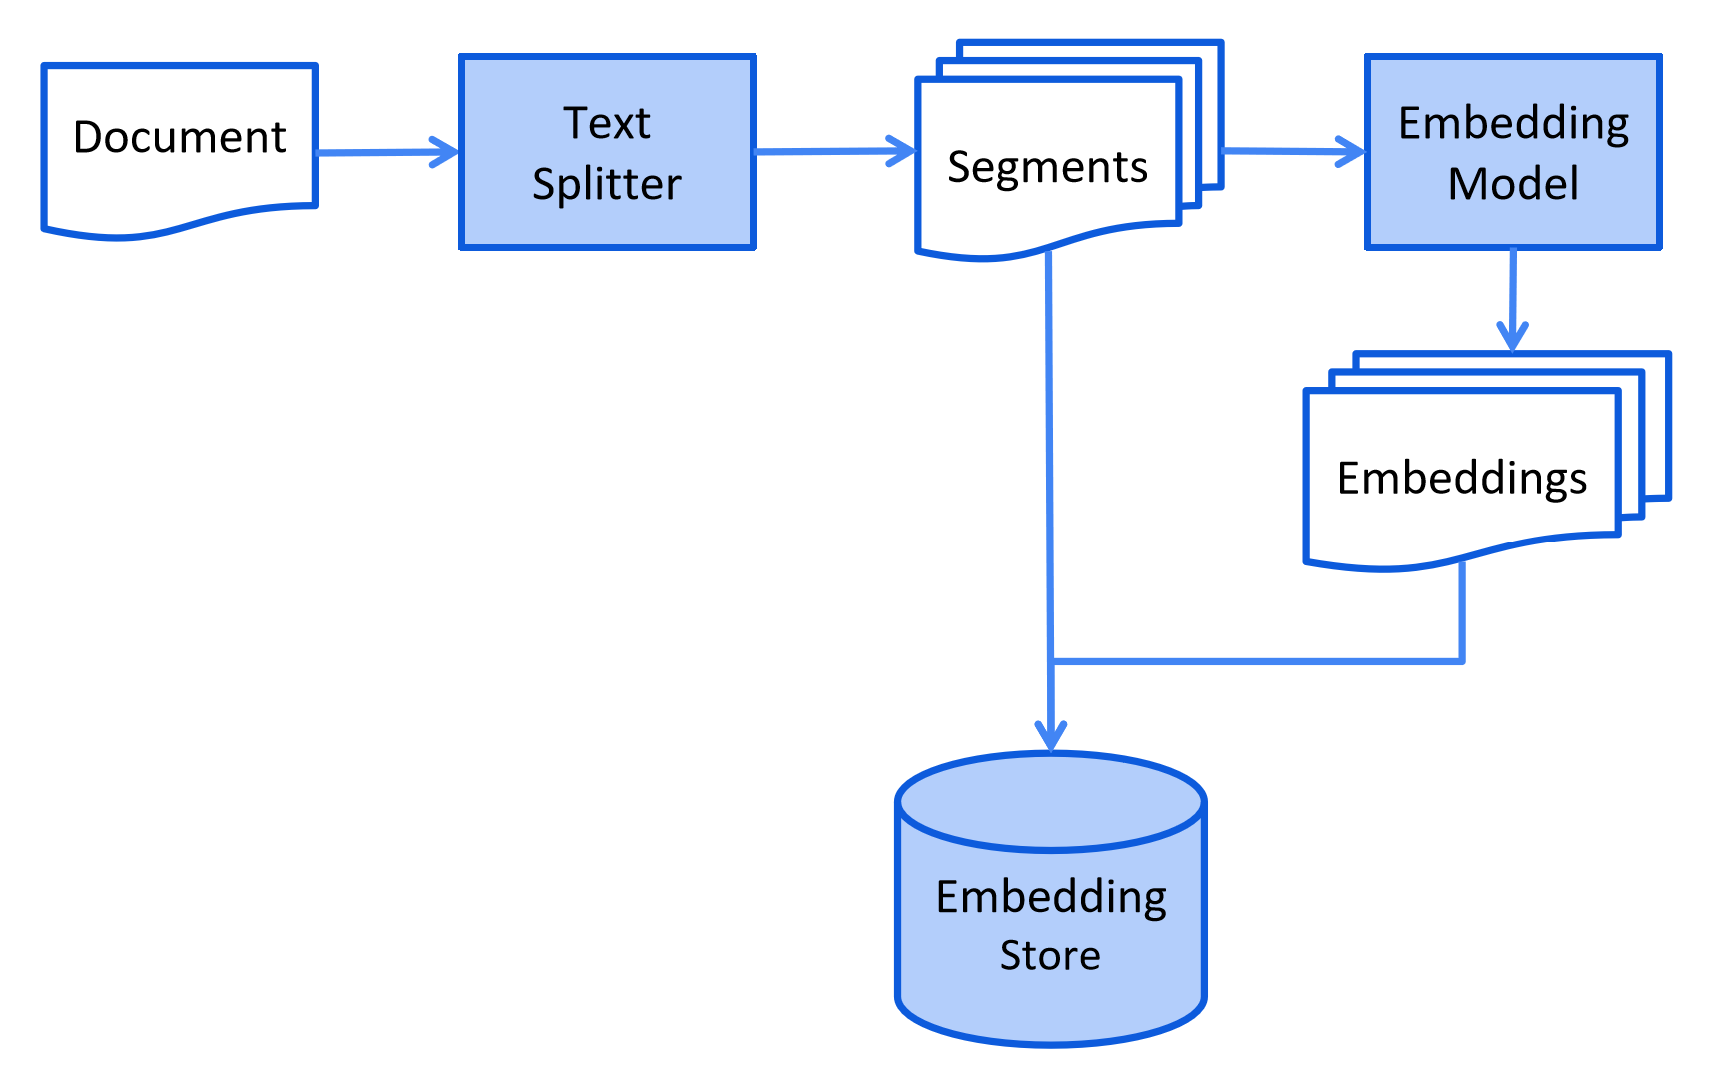
- 对于向量搜索,索引阶段涉及到文档分割和存储,以下是索引阶段的简化图表
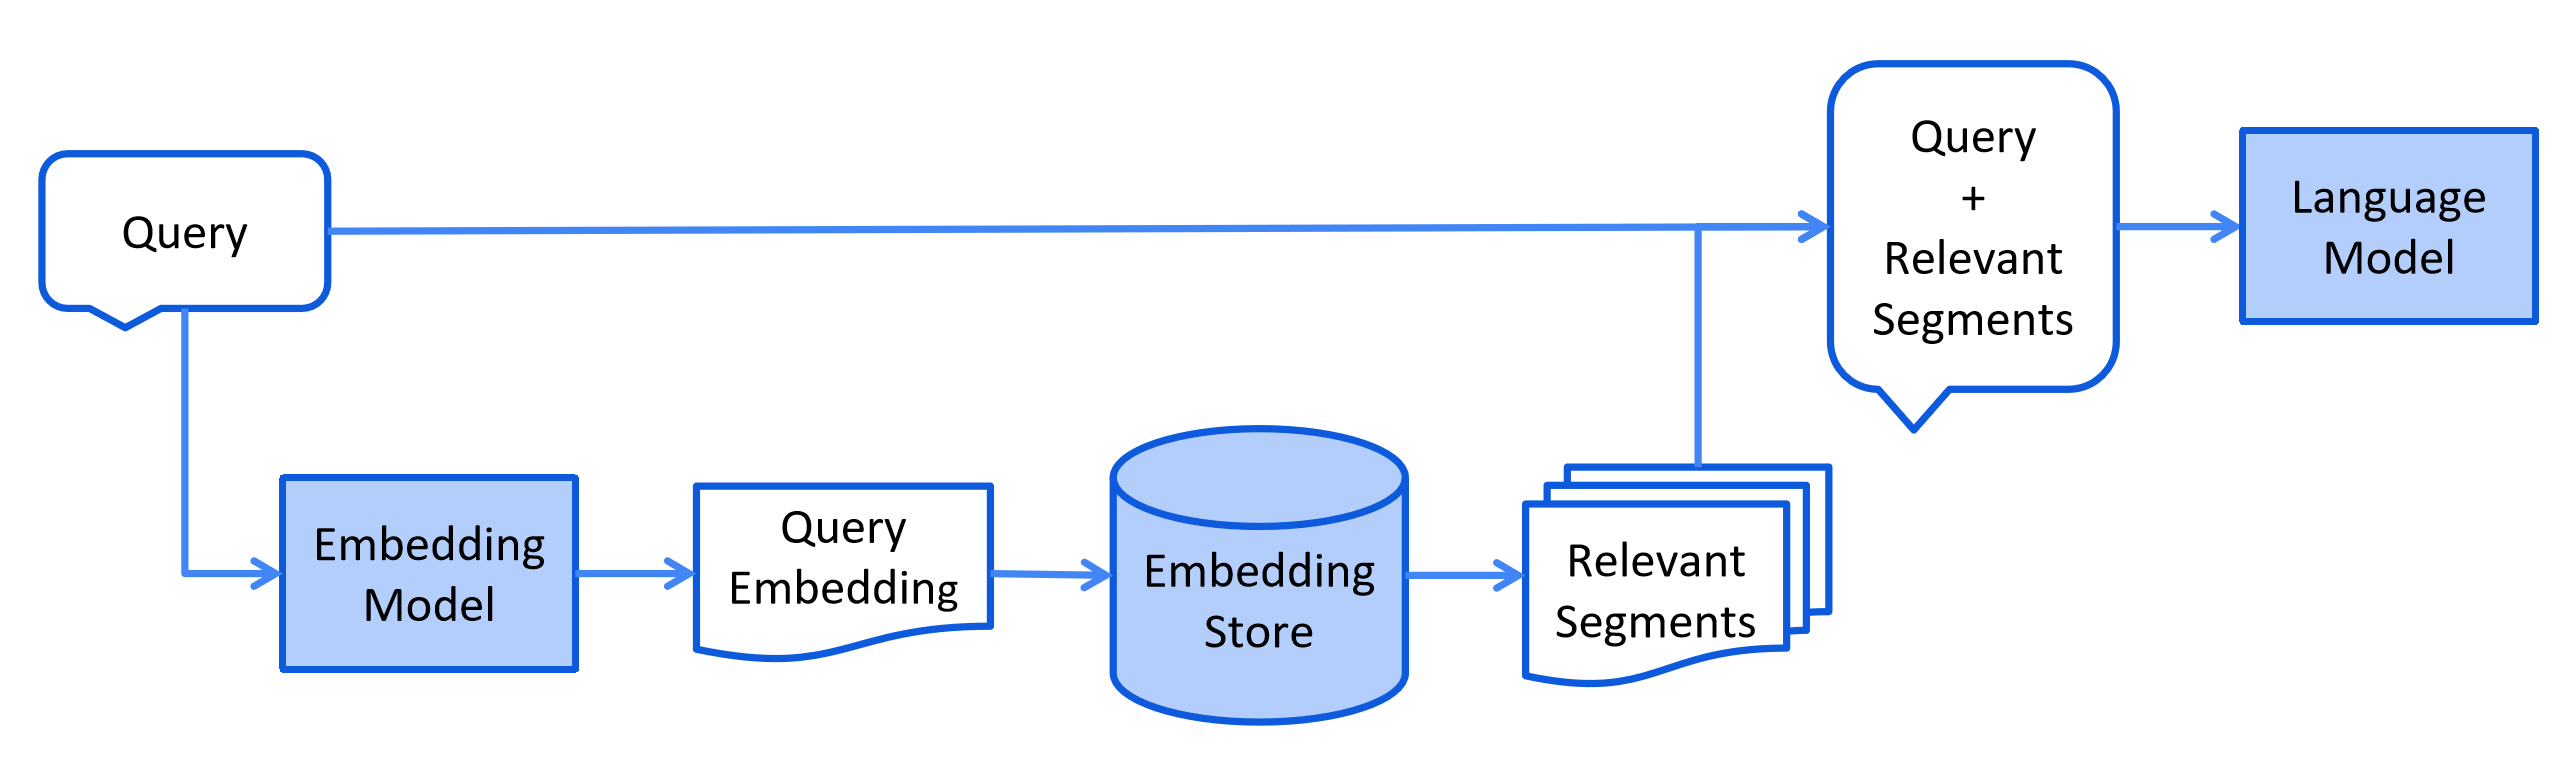
- 当用户提交一个应该使用索引文档回答的问题时触发检索逻辑,对于向量搜索,这通常涉及嵌入用户的查询(问题) 并在嵌入存储中执行相似度搜索。 然后将相关片段(原始文档的片段)注入到提示中并发送给 LLM
- 以下是检索阶段的简化图表
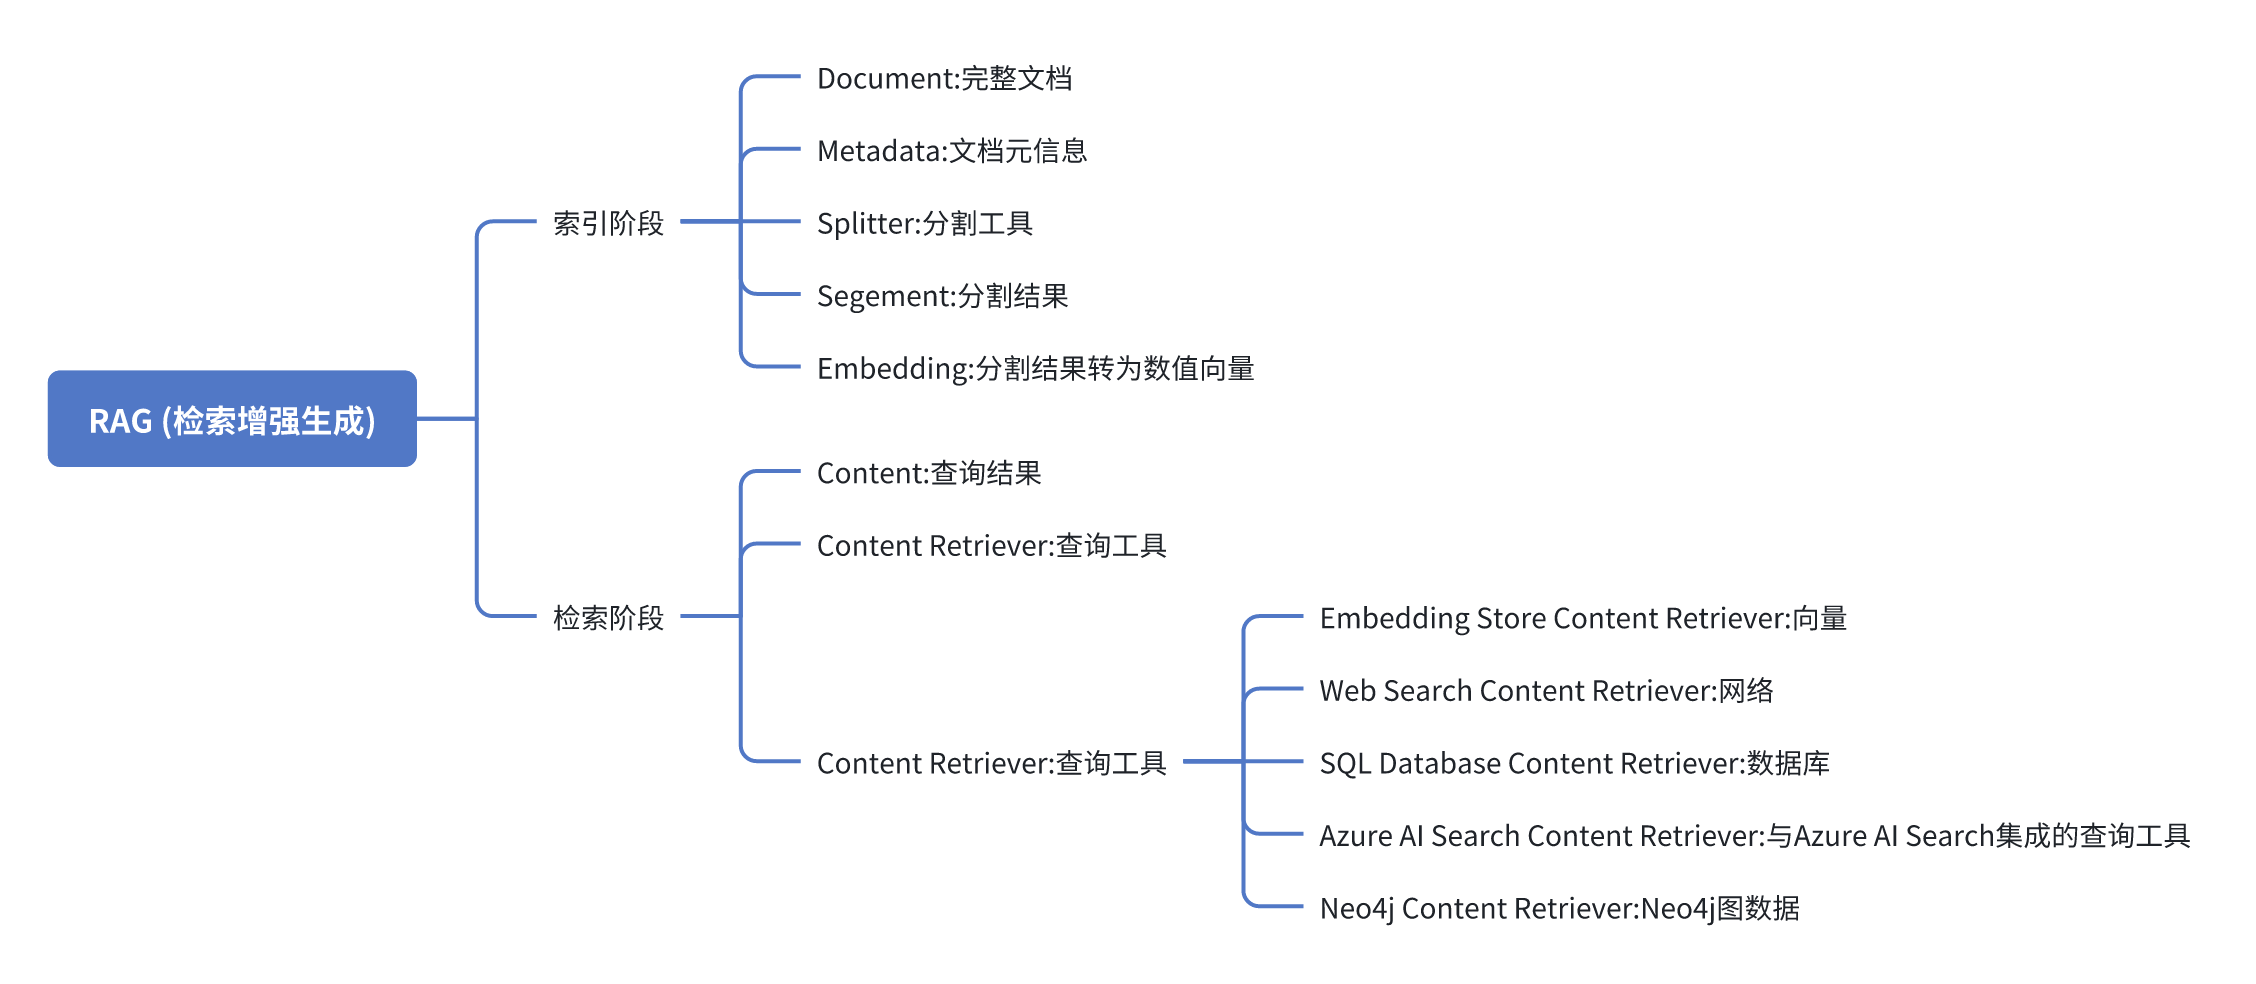
- 涉及到的核心概念整理如下,希望能加速您的理解
LangChain4j对RAG的支持
- LangChain4j提供了三种方式来支持RAG
- Easy RAG:开始使用 RAG 的最简单方式,细节被LangChain4j封装
- Naive RAG:使用向量搜索的基本 RAG 实现
- Advanced RAG:一个模块化的 RAG 框架,允许额外的步骤,如 查询转换、从多个来源检索和重新排序
- 上述内容都会逐个实战学习,又是一次深度之旅,不过LangChain4j的大部分核心知识点咱们都已经掌握了,胜利的曙光已经不远啦
本篇概览
- 本篇从最简单的开始学习,也就是Easy RAG
- 使用Easy RAG无需了解嵌入、向量存储、嵌入模型、 解析分割等等RAG的重要功能点,只需指向文档所在目录,其他复杂的事情都交给LangChain4j来完成即可,所以本篇只需要写少量代码就能完成
- Easy RAG有三个关键点,如下
- 加载文本、分割段落、转为向量、存储向量
- 创建向量查询服务类,并关联步骤1存储的向量
- 把向量查询服务类绑定到高级API服务,这样对话的时候就会执行RAG
- 这里再给出一次用户提问的完整时序图
准备工作
- 体验RAG功能要用到本地文档,所以咱们要去找些能用的资料文档,我这里打算用维基百科的内容,您也可以按需要自己去准备
- 完整纯文本维基百科的下载地址如下
https://dumps.wikimedia.org/enwiki/latest/enwiki-latest-pages-articles.xml.bz2
- 执行以下命令,就把zhwiki-latest-pages-articles.xml.bz2能解压成三个文件wiki_00、wiki_01、wiki_02:,这三个文件内部其实已经是一份一份纯文本条目,只是被“合并”到同一个文件里而已
python3 -m wikiextractor.WikiExtractor \
       --no-templates \
       -b 1024M \
       -o zhwiki_txt \
       zhwiki-latest-pages-articles.xml.bz2
- 上面的命令生成的文件大小是1G,如果您觉得太大,可以调整参数-b 1024M,让每个文件小一些,不过文件数量会变多
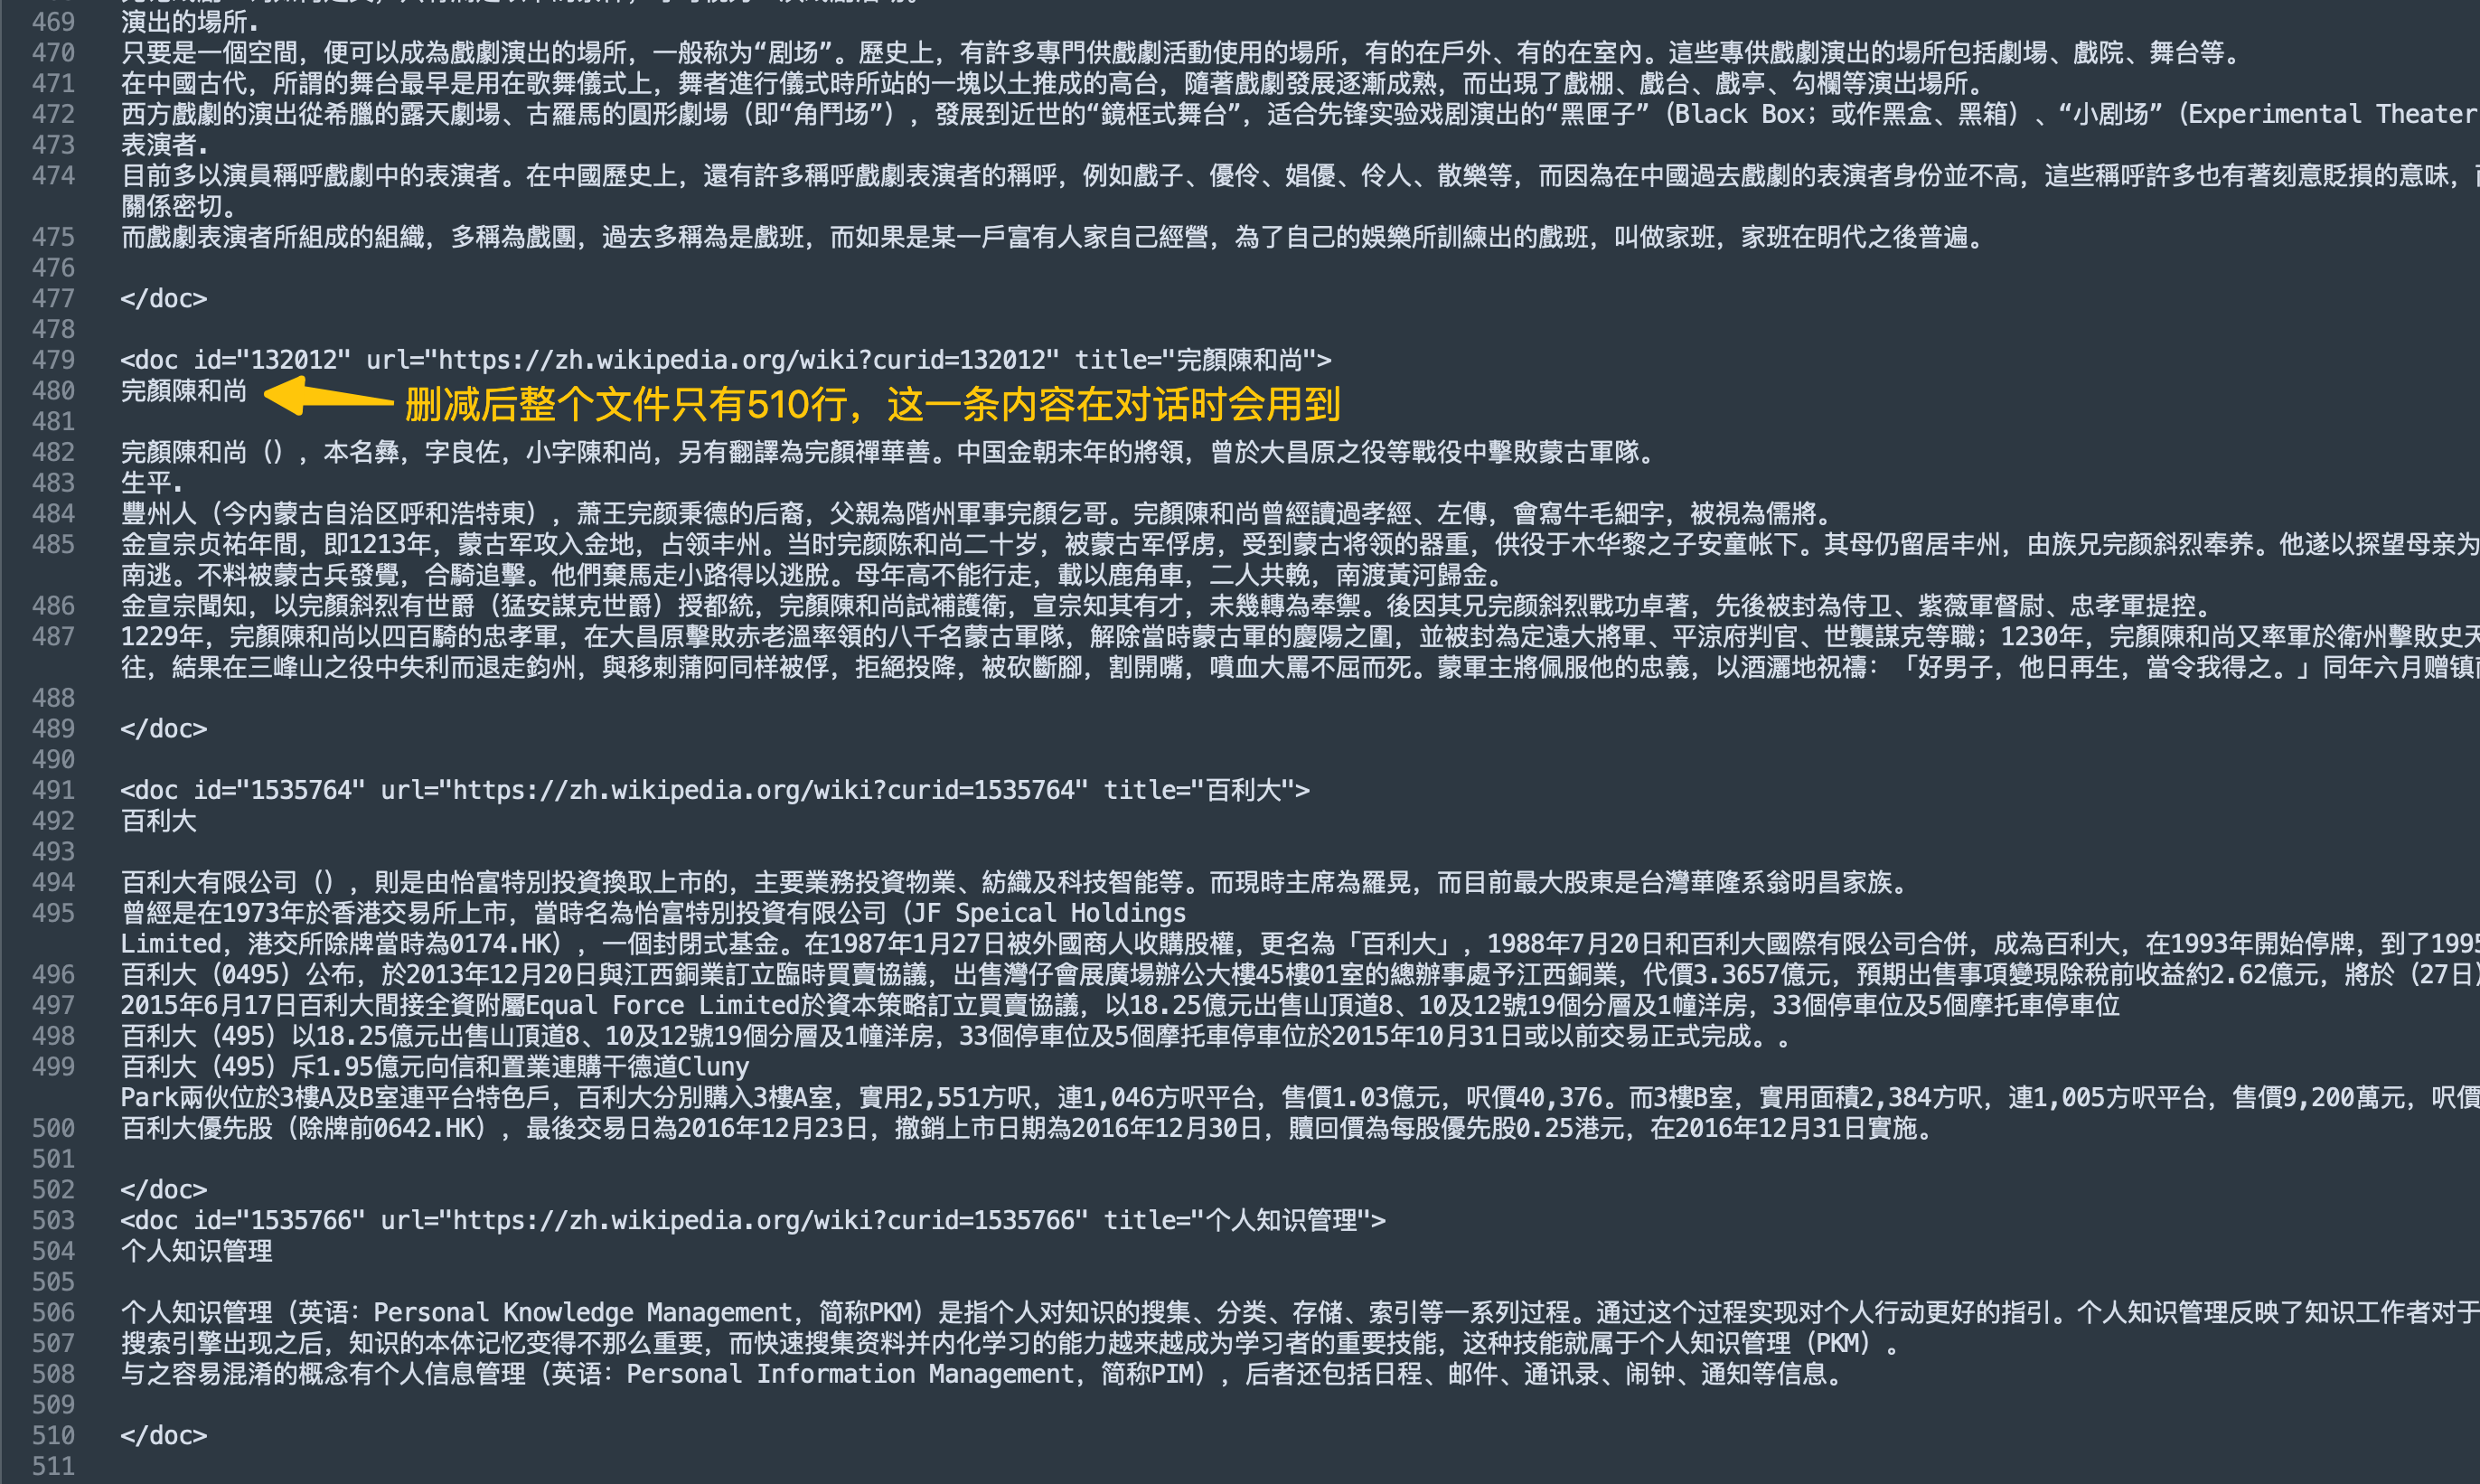
- 这里要注意:上面得到的是完整维基百科内容,数据量太大,咱们接下来写的代码要想加载这些信息要消耗大量时间和电脑资源,这显然不是本篇的目标,所以我这里做了简化:只留一个文件,并把这个文件中的内容删掉大部分,最后这个文件只有141KB,如下图
- 准备完毕,开始编码吧
源码下载(觉得作者啰嗦的,直接在这里下载)
- 如果您只想快速浏览完整源码,可以在GitHub下载代码直接运行,地址和链接信息如下表所示(https://github.com/zq2599/blog_demos):
| 名称 | 链接 | 备注 |
|---|---|---|
| 项目主页 | https://github.com/zq2599/blog_demos | 该项目在GitHub上的主页 |
| git仓库地址(https) | https://github.com/zq2599/blog_demos.git | 该项目源码的仓库地址,https协议 |
| git仓库地址(ssh) | git@github.com:zq2599/blog_demos.git | 该项目源码的仓库地址,ssh协议 |
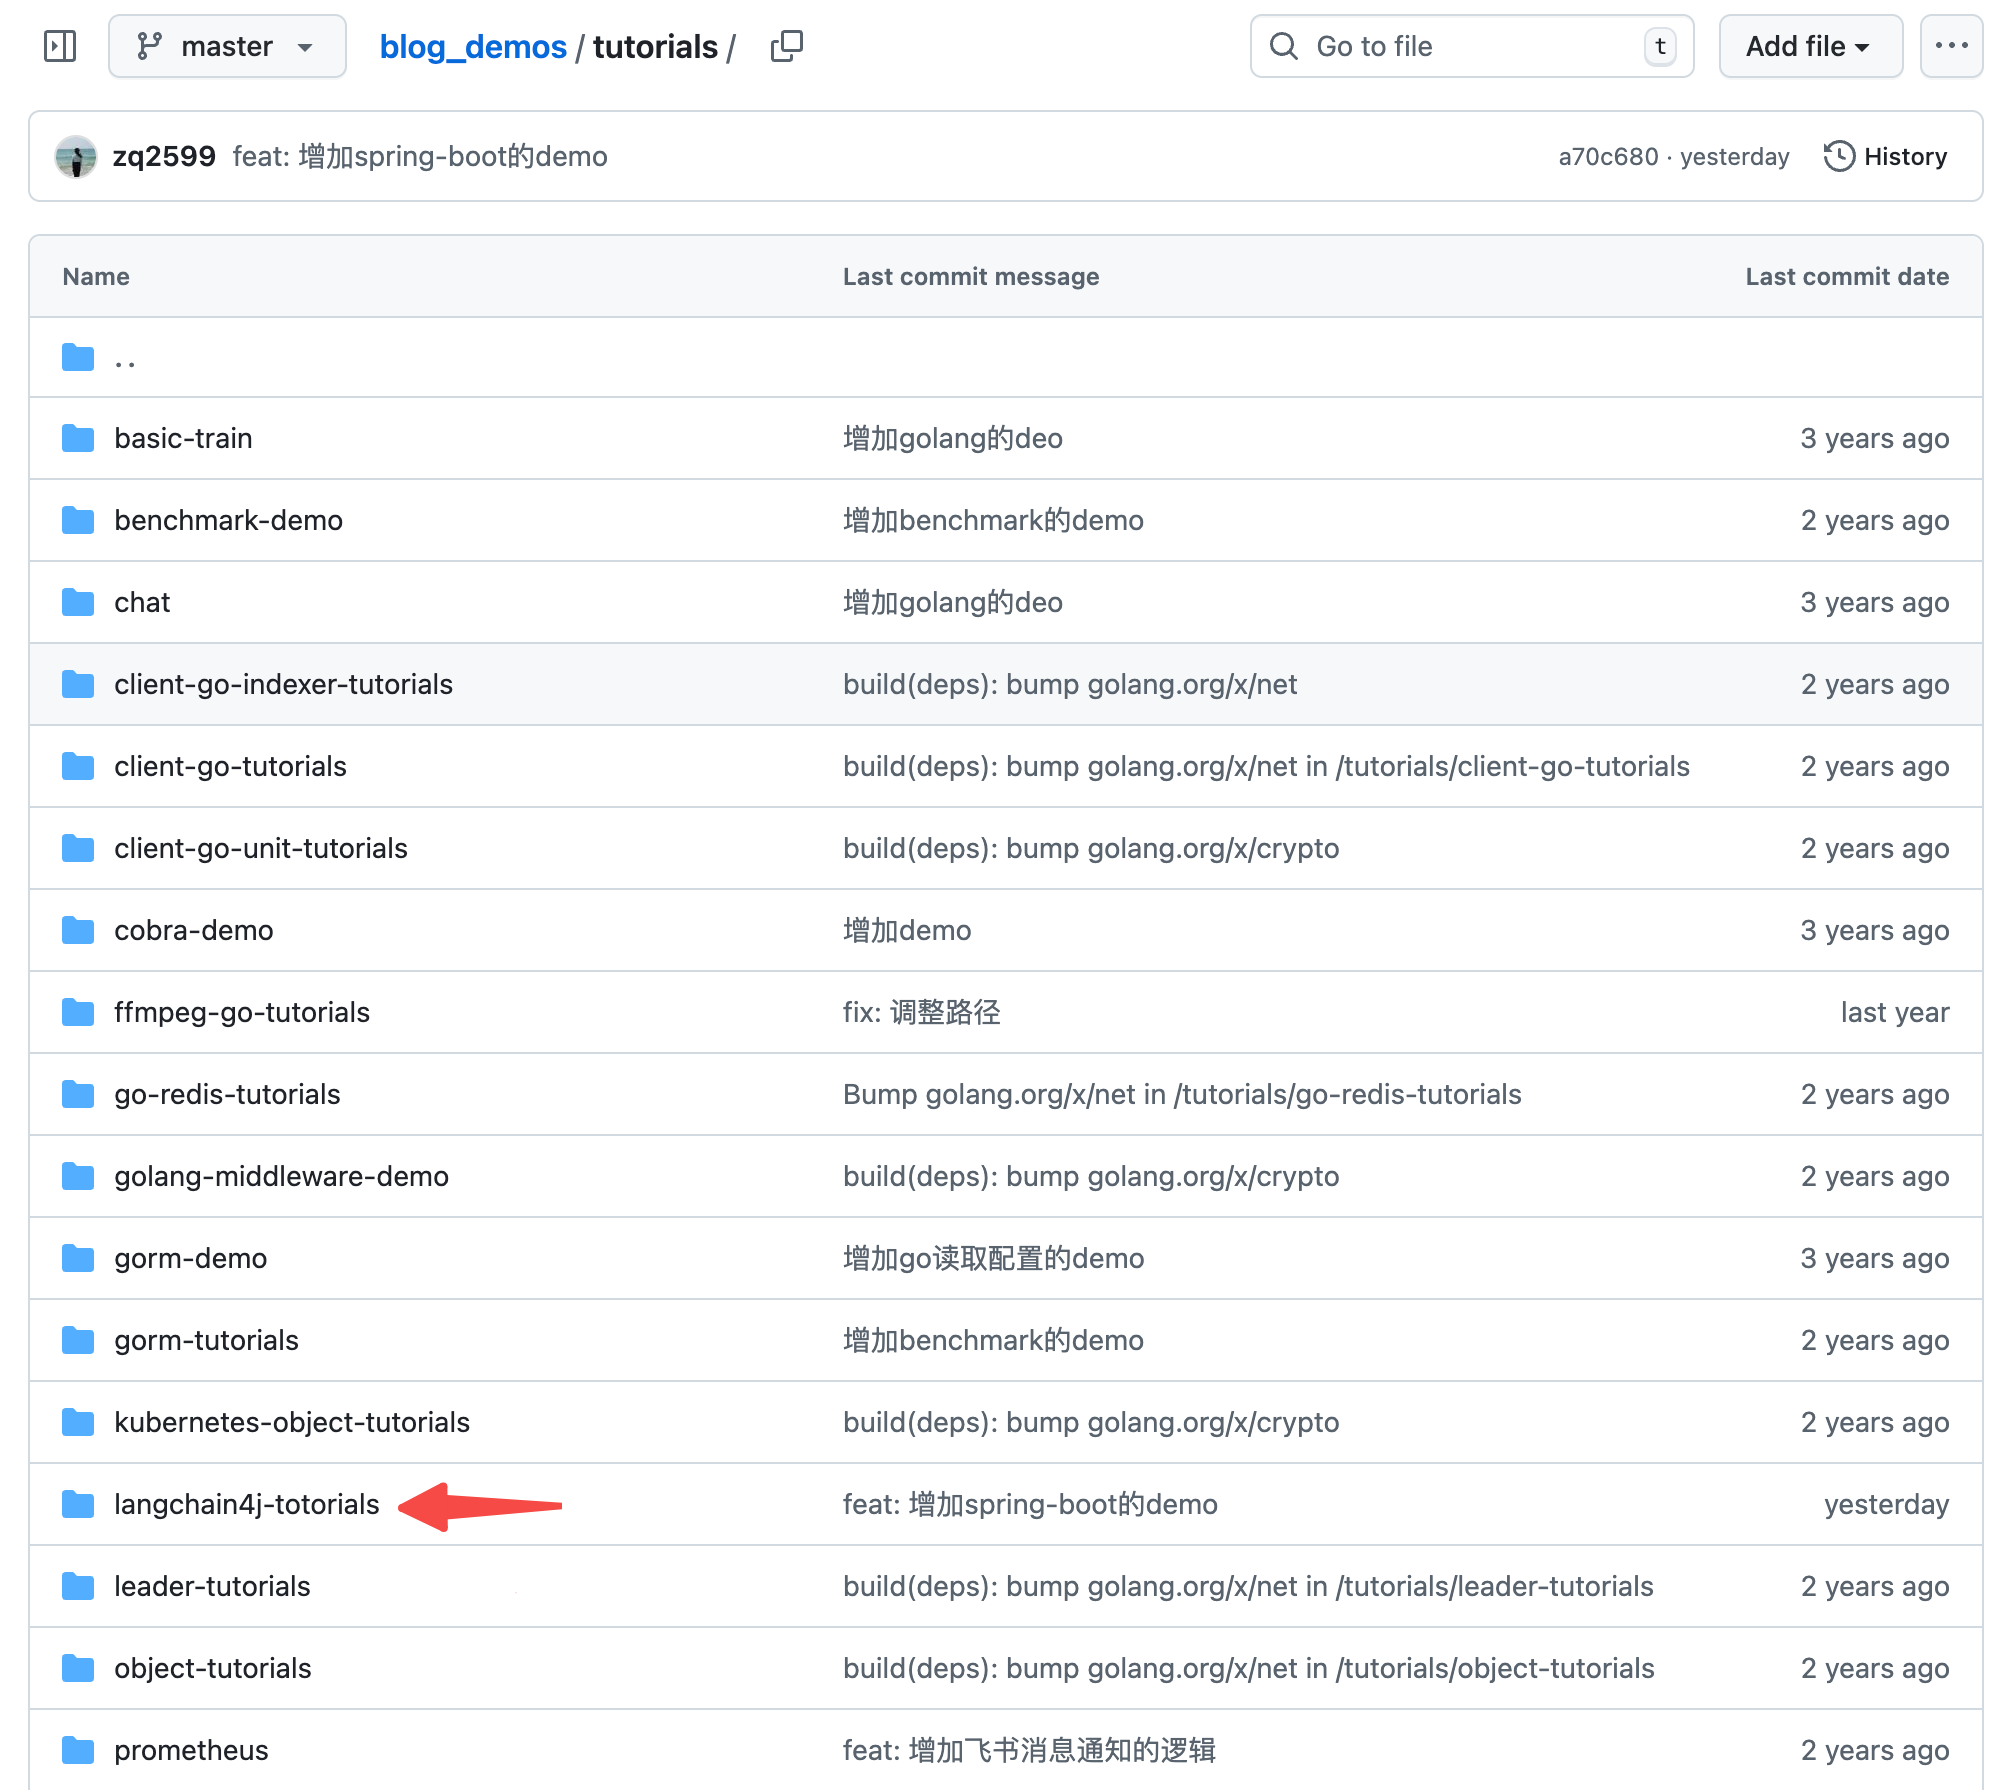
- 这个git项目中有多个文件夹,本篇的源码在langchain4j-tutorials文件夹下,如下图红色箭头所示:
编码:父工程调整
- 《准备工作》中创建了整个《LangChain4j实战》系列代码的父工程,本篇实战会在父工程下新建一个子工程,所以这里要对父工程的pom.xml做少量修改
- modules中增加一个子工程,如下图黄框所示

编码:新增子工程
- 新增名为rag-easy的子工程
- langchain4j-totorials目录下新增名rag-easy为的文件夹
- rag-easy文件夹下新增pom.xml,内容如下
<?xml version="1.0" encoding="UTF-8"?>
<project xmlns="http://maven.apache.org/POM/4.0.0"
         xmlns:xsi="http://www.w3.org/2001/XMLSchema-instance"
         xsi:schemaLocation="http://maven.apache.org/POM/4.0.0 http://maven.apache.org/xsd/maven-4.0.0.xsd">
    <modelVersion>4.0.0</modelVersion>

    <parent>
        <groupId>com.bolingcavalry</groupId>
        <artifactId>langchain4j-totorials</artifactId>
        <version>1.0-SNAPSHOT</version>
    </parent>

    <!-- 配置编译编码 -->
    <properties>
        <project.build.sourceEncoding>UTF-8</project.build.sourceEncoding>
        <project.reporting.outputEncoding>UTF-8</project.reporting.outputEncoding>
        <maven.compiler.encoding>UTF-8</maven.compiler.encoding>
    </properties>

    <artifactId>rag-easy</artifactId>
    <packaging>jar</packaging>

    <dependencies>
        <!-- Lombok -->
        <dependency>
            <groupId>org.projectlombok</groupId>
            <artifactId>lombok</artifactId>
            <optional>true</optional>
        </dependency>

        <!-- Spring Boot Starter -->
        <dependency>
            <groupId>org.springframework.boot</groupId>
            <artifactId>spring-boot-starter</artifactId>
        </dependency>

        <!-- Spring Boot Web -->
        <dependency>
            <groupId>org.springframework.boot</groupId>
            <artifactId>spring-boot-starter-web</artifactId>
        </dependency>

        <!-- Spring Boot Test -->
        <dependency>
            <groupId>org.springframework.boot</groupId>
            <artifactId>spring-boot-starter-test</artifactId>
            <scope>test</scope>
        </dependency>

        <!-- JUnit Jupiter Engine -->
        <dependency>
            <groupId>org.junit.jupiter</groupId>
            <artifactId>junit-jupiter-engine</artifactId>
            <scope>test</scope>
        </dependency>

        <!-- Mockito Core -->
        <dependency>
            <groupId>org.mockito</groupId>
            <artifactId>mockito-core</artifactId>
            <scope>test</scope>
        </dependency>

        <!-- Mockito JUnit Jupiter -->
        <dependency>
            <groupId>org.mockito</groupId>
            <artifactId>mockito-junit-jupiter</artifactId>
            <scope>test</scope>
        </dependency>

        <!-- LangChain4j Core -->
        <dependency>
            <groupId>dev.langchain4j</groupId>
            <artifactId>langchain4j-core</artifactId>
        </dependency>

        <!-- LangChain4j OpenAI支持(用于通义千问的OpenAI兼容接口) -->
        <dependency>
            <groupId>dev.langchain4j</groupId>
            <artifactId>langchain4j-open-ai</artifactId>
        </dependency>

        <!-- 官方 langchain4j(包含 AiServices 等服务类) -->
        <dependency>
            <groupId>dev.langchain4j</groupId>
            <artifactId>langchain4j</artifactId>
        </dependency>

        <dependency>
            <groupId>dev.langchain4j</groupId>
            <artifactId>langchain4j-community-dashscope</artifactId>
        </dependency>

        <dependency>
            <groupId>dev.langchain4j</groupId>
            <artifactId>langchain4j-spring-boot-starter</artifactId>
        </dependency>

        <dependency>
            <groupId>dev.langchain4j</groupId>
            <artifactId>langchain4j-easy-rag</artifactId>
        </dependency>
    </dependencies>

    <build>
        <plugins>
            <!-- Spring Boot Maven Plugin -->
            <plugin>
                <groupId>org.springframework.boot</groupId>
                <artifactId>spring-boot-maven-plugin</artifactId>
                <version>3.3.5</version>
                <executions>
                    <execution>
                        <goals>
                            <goal>repackage</goal>
                        </goals>
                    </execution>
                </executions>
                <configuration>
                    <jvmArguments>-Dfile.encoding=UTF-8 -Dsun.stdout.encoding=UTF-8 -Dsun.stderr.encoding=UTF-8</jvmArguments>
                </configuration>
            </plugin>

            <!-- Maven Resources Plugin -->
            <plugin>
                <groupId>org.apache.maven.plugins</groupId>
                <artifactId>maven-resources-plugin</artifactId>
                <version>3.3.1</version>
                <configuration>
                    <encoding>UTF-8</encoding>
                    <propertiesEncoding>UTF-8</propertiesEncoding>
                </configuration>
            </plugin>

            <!-- Maven Compiler Plugin -->
            <plugin>
                <groupId>org.apache.maven.plugins</groupId>
                <artifactId>maven-compiler-plugin</artifactId>
                <version>3.13.0</version>
                <configuration>
                    <source>21</source>
                    <target>21</target>
                    <encoding>UTF-8</encoding>
                </configuration>
            </plugin>
        </plugins>

        <!-- 确保资源文件使用UTF-8编码 -->
        <resources>
            <resource>
                <directory>src/main/resources</directory>
                <filtering>true</filtering>
            </resource>
        </resources>
    </build>

</project>
- 在langchain4j-totorials/rag-easy/src/main/resources新增配置文件application.properties,内容如下,主要是三个模型的配置信息,记得把your-api-key换成您自己的apikey,rag.file.path是存放本地文档的目录(就是前面维基百科那个文件)
# Spring Boot 应用配置
server.port=8080
server.servlet.context-path=/

# LangChain4j 使用OpenAI兼容模式配置通义千问模型
# 注意:请将your-api-key替换为您实际的通义千问API密钥
langchain4j.open-ai.chat-model.api-key=your-api-key
# 通义千问模型名称
langchain4j.open-ai.chat-model.model-name=qwen3-max
# 阿里云百炼OpenAI兼容接口地址
langchain4j.open-ai.chat-model.base-url=https://dashscope.aliyuncs.com/compatible-mode/v1

# 日志配置
logging.level.root=INFO
logging.level.com.bolingcavalry=DEBUG
logging.pattern.console=%d{HH:mm:ss.SSS} [%thread] %-5level %logger{36} - %msg%n
# 日志编码配置,解决中文乱码问题
logging.charset.console=UTF-8
logging.charset.file=UTF-8
# 应用名称
spring.application.name=rag-easy

# rag文件路径
rag.file.path=/home/will/temp/202601/15/zhwiki_txt
- 新增启动类,依旧平平无奇
package com.bolingcavalry;

import org.springframework.boot.SpringApplication;
import org.springframework.boot.autoconfigure.SpringBootApplication;

/**
 * Spring Boot应用程序的主类
 */
@SpringBootApplication
public class Application {

    public static void main(String[] args) {
        SpringApplication.run(Application.class, args);
    }
}
- 由于本篇是高级API,所以增加一个自定义接口用于对话
package com.bolingcavalry.service;

public interface Assistant {
    /**
     * 通过提示词range大模型返回JSON格式的内容
     *
     * @param userMessage 用户消息
     * @return 助手生成的回答
     */
    String byRagEasy(String userMessage);
}
- 接着是本篇的重点代码:配置类,有几处重点稍后会说明
package com.bolingcavalry.config;

import org.springframework.beans.factory.annotation.Value;
import org.springframework.context.annotation.Bean;
import org.springframework.context.annotation.Configuration;

import com.bolingcavalry.service.Assistant;

import dev.langchain4j.agent.tool.ToolExecutionRequest;
import dev.langchain4j.data.document.Document;
import dev.langchain4j.model.chat.listener.ChatModelErrorContext;
import dev.langchain4j.model.chat.listener.ChatModelListener;
import dev.langchain4j.model.chat.listener.ChatModelRequestContext;
import dev.langchain4j.model.chat.listener.ChatModelResponseContext;
import dev.langchain4j.model.chat.response.ChatResponse;
import dev.langchain4j.model.openai.OpenAiChatModel;
import dev.langchain4j.rag.content.retriever.ContentRetriever;
import dev.langchain4j.rag.content.retriever.EmbeddingStoreContentRetriever;
import dev.langchain4j.service.AiServices;
import dev.langchain4j.store.embedding.EmbeddingStoreIngestor;
import dev.langchain4j.store.embedding.inmemory.InMemoryEmbeddingStore;
import dev.langchain4j.data.document.loader.FileSystemDocumentLoader;
import dev.langchain4j.data.message.AiMessage;
import dev.langchain4j.data.message.ChatMessage;
import dev.langchain4j.data.segment.TextSegment;
import dev.langchain4j.memory.chat.MessageWindowChatMemory;

import java.util.List;

import org.slf4j.Logger;
import org.slf4j.LoggerFactory;

@Configuration
public class LangChain4jConfig {

    private static final Logger logger = LoggerFactory.getLogger(LangChain4jConfig.class);

    @Value("${langchain4j.open-ai.chat-model.api-key}")
    private String apiKey;

    @Value("${langchain4j.open-ai.chat-model.model-name:qwen-turbo}")
    private String modelName;

    @Value("${langchain4j.open-ai.chat-model.base-url}")
    private String baseUrl;

    @Value("${rag.file.path}")
    private String ragFilePath;

    @Bean
    public OpenAiChatModel chatModel() {

        ChatModelListener listener = new ChatModelListener() {
            @Override
            public void onRequest(ChatModelRequestContext reqCtx) {
                // 1. 拿到 List<ChatMessage>
                List<ChatMessage> messages = reqCtx.chatRequest().messages();
                logger.info("发到LLM的请求: {}", messages);

            }

            @Override
            public void onResponse(ChatModelResponseContext respCtx) {
                // 2. 先取 ChatModelResponse
                ChatResponse response = respCtx.chatResponse();
                // 3. 再取 AiMessage
                AiMessage aiMessage = response.aiMessage();

                // 4. 工具调用
                List<ToolExecutionRequest> tools = aiMessage.toolExecutionRequests();
                for (ToolExecutionRequest t : tools) {
                    logger.info("LLM响应, 执行函数[{}], 函数入参 : {}", t.name(), t.arguments());
                }

                // 5. 纯文本
                if (aiMessage.text() != null) {
                    logger.info("LLM响应, 纯文本 : {}", aiMessage.text());
                }
            }

            @Override
            public void onError(ChatModelErrorContext errorCtx) {
                errorCtx.error().printStackTrace();
            }
        };

        return OpenAiChatModel.builder()
                .apiKey(apiKey)
                .modelName(modelName)
                .baseUrl(baseUrl)
                .listeners(List.of(listener))
                .build();
    }

    @Bean
    public Assistant assistant() {
        ContentRetriever contentRetriever = createContentRetriever(ragFilePath);
        return AiServices.builder(Assistant.class)
                .chatModel(chatModel())
                .chatMemory(MessageWindowChatMemory.withMaxMessages(10))
                .contentRetriever(contentRetriever)
                .build();
    }

    private static ContentRetriever createContentRetriever(String ragFilePath) {
        // 向量数据存储的服务类,这里用的是内存存储,实际场景中可以用数据库或其他存储
        InMemoryEmbeddingStore<TextSegment> embeddingStore = new InMemoryEmbeddingStore<>();

        long start = System.currentTimeMillis();
        logger.info("开始加载索引文件:{}", ragFilePath);
        List<Document> documents = FileSystemDocumentLoader.loadDocuments(ragFilePath);
        logger.info("加载索引文件完成,耗时: {}秒, 文件数量: {}",
                (System.currentTimeMillis() - start) / 1000, documents.size());

        logger.info("开始索引RAG文件: {},共{}个文档", ragFilePath, documents.size());
        start = System.currentTimeMillis();

        EmbeddingStoreIngestor ingestor = EmbeddingStoreIngestor.builder()
                .embeddingStore(embeddingStore)
                .build();

        int totalDocuments = documents.size();

        // 逐个处理文档,添加进度日志
        for (int i = 0; i < totalDocuments; i++) {
            Document doc = documents.get(i);

            if (i % 10 == 0) {
                logger.info("处理进度: {}/{}", i + 1, totalDocuments);
            }

            ingestor.ingest(doc);
        }

        long end = System.currentTimeMillis();
        logger.info("所有文档索引完成,总耗时:{}秒", (end - start) / 1000);

        return EmbeddingStoreContentRetriever.from(embeddingStore);
    }
}
- 配置类代码中的重点共有三个
- createContentRetriever方法,这里面先加载文件,然后用EmbeddingStoreIngestor.ingest完整向量存储,最后调用EmbeddingStoreContentRetriever.from创建了查询服务类
- 在创建高级API服务类的时候,通过调用contentRetriever方法把查询服务类绑定进来
- chatModel方法负责创建模型服务类,这里绑定了自定义监听器,使得和LLM的通信内容会通过日志打印出来
-
其实以上代码就是今天的核心了,可见RAG的索引过程被LangChain4j封装好了,我们并未做太多处理
-
接下来是服务类,按部就班调用自定义接口即可
package com.bolingcavalry.service;

import org.slf4j.Logger;
import org.slf4j.LoggerFactory;
import org.springframework.beans.factory.annotation.Autowired;
import org.springframework.stereotype.Service;

/**
 * 通义千问服务类,用于与通义千问模型进行交互
 */
@Service
public class QwenService {

    private static final Logger logger = LoggerFactory.getLogger(QwenService.class);

    @Autowired
    private Assistant assistant;

    /**
     * 通过提示词range大模型返回JSON格式的内容
     *
     * @param prompt
     * @return
     */
    public String byRagEasy(String prompt) {
        String answer = assistant.byRagEasy(prompt);
        logger.info("响应:" + answer);
        return answer + "[from byRagEasy]";
    }
}
- 最后是controller类,这里准备个http接口响应,用来调用前的服务类的功能
package com.bolingcavalry.controller;

import org.springframework.http.ResponseEntity;
import org.springframework.web.bind.annotation.PostMapping;
import org.springframework.web.bind.annotation.RequestBody;
import org.springframework.web.bind.annotation.RequestMapping;
import org.springframework.web.bind.annotation.RestController;

import com.bolingcavalry.service.QwenService;

import lombok.Data;

/**
 * 通义千问控制器,处理与大模型交互的HTTP请求
 */
@RestController
@RequestMapping("/api/qwen")
public class QwenController {

    private final QwenService qwenService;

    /**
     * 构造函数,通过依赖注入获取QwenService实例
     *
     * @param qwenService QwenService实例
     */
    public QwenController(QwenService qwenService) {
        this.qwenService = qwenService;
    }

    /**
     * 提示词请求实体类
     */
    @Data
    static class PromptRequest {
        private String prompt;
        private int userId;
    }

    /**
     * 响应实体类
     */
    @Data
    static class Response {
        private String result;

        public Response(String result) {
            this.result = result;
        }
    }

    /**
     * 检查请求体是否有效
     *
     * @param request 包含提示词的请求体
     * @return 如果有效则返回null,否则返回包含错误信息的ResponseEntity
     */
    private ResponseEntity<Response> check(PromptRequest request) {
        if (request == null || request.getPrompt() == null || request.getPrompt().trim().isEmpty()) {
            return ResponseEntity.badRequest().body(new Response("提示词不能为空"));
        }
        return null;
    }

    @PostMapping("/rag/easy")
    public ResponseEntity<Response> byRagEasy(@RequestBody PromptRequest request) {
        ResponseEntity<Response> checkRlt = check(request);
        if (checkRlt != null) {
            return checkRlt;
        }

        try {
            String response = qwenService.byRagEasy(request.getPrompt());
            return ResponseEntity.ok(new Response(response));
        } catch (Exception e) {
            // 捕获异常并返回错误信息
            return ResponseEntity.status(500).body(new Response("请求处理失败: " + e.getMessage()));
        }
    }
}
- 至此代码就全部写完了,现在把工程运行起来试试,在rag-easy目录下执行以下命令即可启动服务
mvn spring-boot:run
- 启动日志如下,可见索引过程是很耗时的,500多行的内容用了25秒,要是用完整维基百科来索引其耗时应该难以接受(真要是索引全部维基百科,就必须用单独的服务将向量数据做持续化存储,而非启动时在内存中存储)
12:33:54.474 [main] INFO  o.s.b.w.s.c.ServletWebServerApplicationContext - Root WebApplicationContext: initialization completed in 874 ms
12:33:54.526 [main] INFO  c.b.config.LangChain4jConfig - 开始加载索引文件:/home/will/temp/202601/15/zhwiki_txt
12:33:55.189 [main] INFO  c.b.config.LangChain4jConfig - 加载索引文件完成,耗时: 0秒, 文件数量: 1
12:33:55.190 [main] INFO  c.b.config.LangChain4jConfig - 开始索引RAG文件: /home/will/temp/202601/15/zhwiki_txt,共1个文档
12:33:59.246 [main] INFO  ai.djl.util.Platform - Found matching platform from: jar:file:/home/will/.m2/repository/ai/djl/huggingface/tokenizers/0.31.1/tokenizers-0.31.1.jar!/native/lib/tokenizers.properties
12:34:00.024 [main] WARN  a.d.h.t.HuggingFaceTokenizer - maxLength is not explicitly specified, use modelMaxLength: 512
12:34:00.025 [main] INFO  c.b.config.LangChain4jConfig - 处理进度: 1/1
12:34:20.969 [main] INFO  c.b.config.LangChain4jConfig - 所有文档索引完成,总耗时:25秒
12:34:21.361 [main] INFO  o.s.b.w.e.tomcat.TomcatWebServer - Tomcat started on port 8080 (http) with context path '/'
12:34:21.369 [main] INFO  com.bolingcavalry.Application - Started Application in 28.16 seconds (process running for 28.497)
- 用vscode的 REST Client插件发起http请求,参数如下,和前文用提示词指定JSON不同,这里并没有要求LLM返回JSON格式
###  用提示词实现json格式的输出
POST http://localhost:8080/api/qwen/rag/easy
Content-Type: application/json
Accept: application/json

{
  "prompt": "一百字介绍完颜陈和尚"
}
- 收到响应如下,可见LLM的回复内容是基于本地文档整理而成
HTTP/1.1 200 OK
Content-Type: application/json
Transfer-Encoding: chunked
Date: Thu, 15 Jan 2026 13:11:27 GMT
Connection: close

{
  "result": "完顏陳和尚(本名彝,字良佐),金末名將,豐州人(今內蒙古呼和浩特東),為蕭王完顏秉德後裔。通曉《孝經》《左傳》,擅寫牛毛細字,有儒將之風。曾於大昌原之役等戰役中屢敗蒙古軍,展現卓越軍事才能。[from byRagEasy]"
}
- 再看日志,可见本地检索到三条与提示词有关的结果(向量查询),这些结果被送到LLM,再由LLM返回最终结果
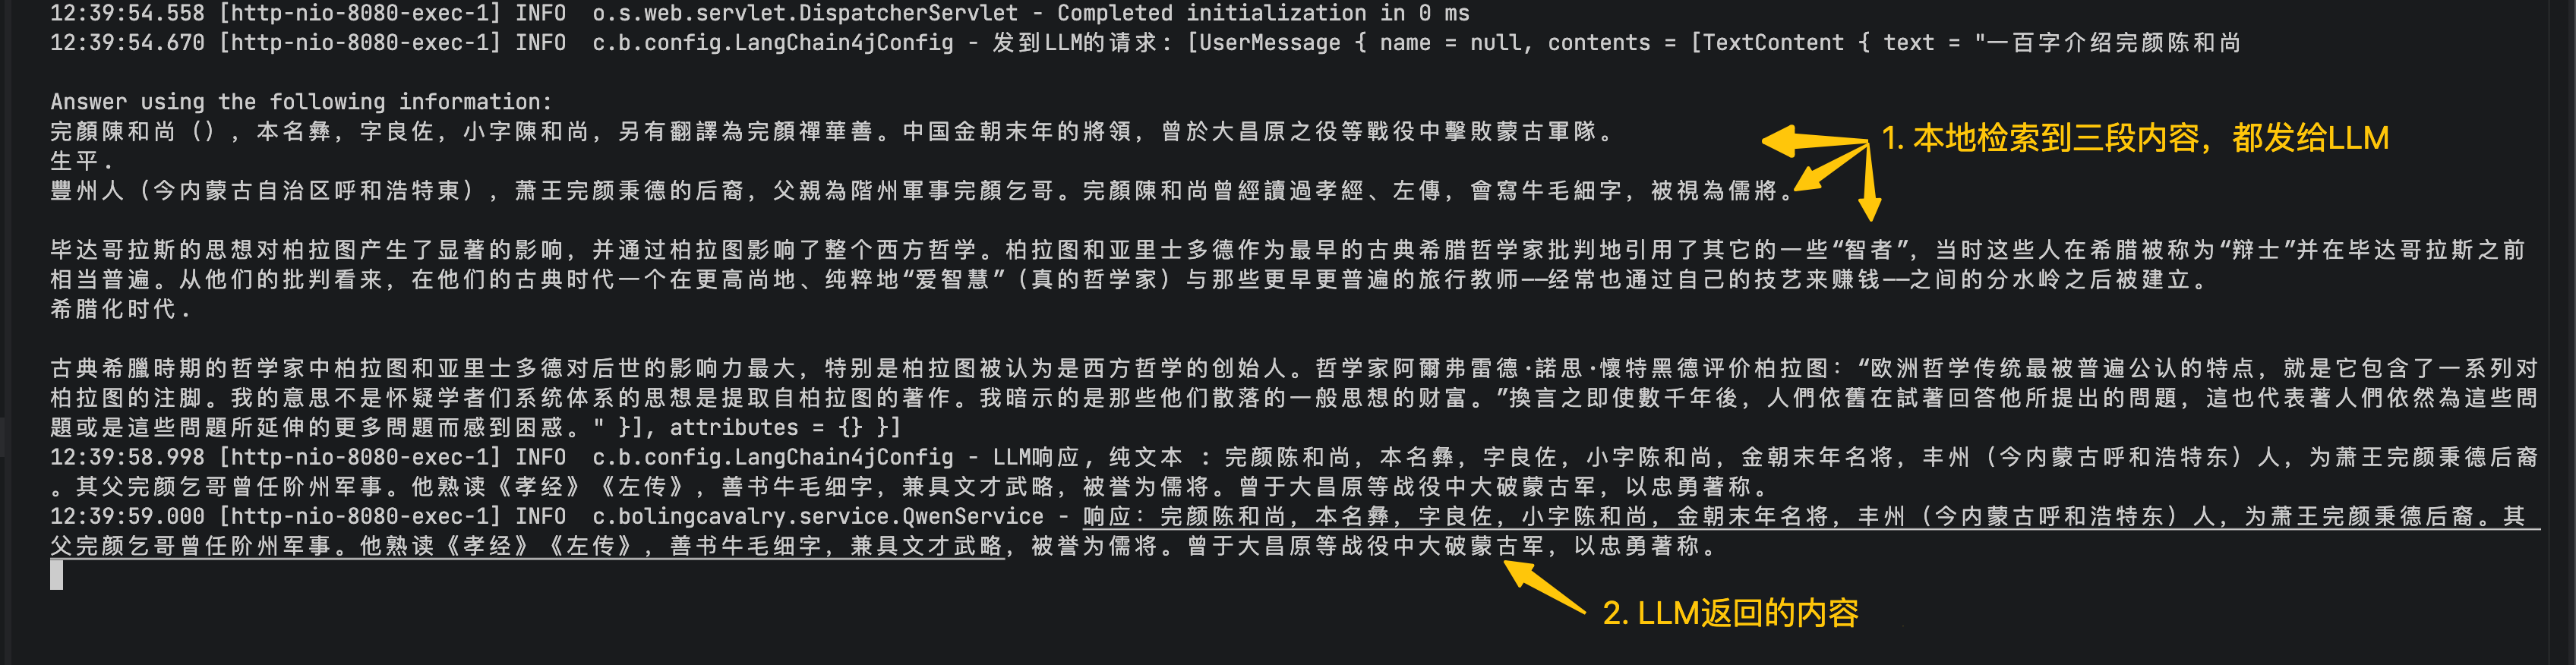
- 至此,最简单的RAG就完成了,对于LLM没有的内容(例如自己写的从未公开的资料文档),要想得到更准确的结果,RAG方式是最有效的补充手段
- Easy RAG虽然简单,却由于LangChain4j的高度封装导致灵活性不足,接下来的文章咱们继续深入学习RAG,体验Naive版,这里有更灵活的配置
你不孤单,欣宸原创一路相伴

有“AI”的1024 = 2048,欢迎大家加入2048 AI社区
更多推荐
 19
19 0
0- 0


 已为社区贡献35条内容

所有评论(0)