【AI大模型舆情分析】微博舆情分析可视化系统(pytorch2+基于BERT大模型训练微调+flask+pandas+echarts) 实战(下)
本教程详细介绍了基于BERT大模型的微博舆情分析系统开发过程。主要内容包括:1)使用8000条训练数据和2000条测试数据构建自定义数据集;2)通过BERT分词器对文本进行编码处理;3)在BERT模型基础上添加全连接层实现二分类任务;4)采用3轮训练微调模型,准确率从78%提升至92%;5)将训练好的模型封装成接口,替换原有snowNLP分析模块;6)优化批量处理逻辑提高系统响应速度。实验表明,基
大家好,我是锋哥。最近发布一条【AI大模型舆情分析】微博舆情分析可视化系统(pytorch2+基于BERT大模型训练微调+flask+pandas+echarts)高级实战。分上下节。
实战简介:
前面的2026版【NLP舆情分析】基于python微博舆情分析可视化系统(flask+pandas+echarts+爬虫) 二次开发,前面课程舆情分析用得是snowNLP,我们现在改用基于BERT开源大模型微调,来实现舆情分析,提高舆情分析的准确率。重点讲解基本BERT大模型实现舆情分析,二分类问题。
视频教程和源码领取:
链接:https://pan.baidu.com/s/1_NzaNr0Wln6kv1rdiQnUTg
提取码:0000
BERT大模型进行微调训练实现舆情分析功能
基于BERT模型进行增量微调训练
1,自定义数据集
我们首先要安装下datasets库。
pip install datasets -i http://mirrors.aliyun.com/pypi/simple/ --trusted-host mirrors.aliyun.com然后我们准备下训练和测试数据。
8千多条的训练集数据,2千多条的测试集数据。
我们之所以要自定义数据集,是因为需要去适配训练模型需要的数据格式。
自定义数据集参考代码:
from datasets import load_dataset
from torch.utils.data import Dataset
# 自定义数据集
class MyDataset(Dataset):
def __init__(self, split):
# 加载训练集
train_dataset = load_dataset(path="csv", data_files="weibo_senti_8k_train.csv")
# 加载测试集
test_dataset = load_dataset(path="csv", data_files="weibo_senti_2k_test.csv")
if split == 'train':
self.data = train_dataset['train']
elif split == 'test':
self.data = test_dataset['train']
# 获取数据集大小
def __len__(self):
return len(self.data)
# 获取数据集的某个元素
def __getitem__(self, index):
sentence = self.data[index]['sentence']
label = self.data[index]['label']
return sentence, label
if __name__ == '__main__':
train_dataset = MyDataset('train')
test_dataset = MyDataset('test')
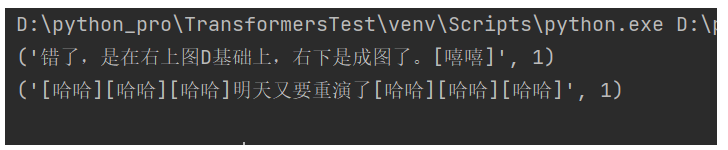
print(train_dataset[0])
print(test_dataset[0])
for data in test_dataset:
print(data)运行结果:
2,对训练输入文本进行编码
对传入的数据进行训练之前,我们需要对数据进行编码。
我们通过分词器的batch_encode_plus方法进行批量编码;
实例代码:
from transformers import BertTokenizer

import config

# 加载分词器
tokenizer = BertTokenizer.from_pretrained(config.model_path + '/Bert-base-chinese')

# 准备测试文本
sents = ['床前明月光,疑似地上霜,举头望明月,低头思故乡', '今天天气不错', '很开心']

# 批量编码句子
out = tokenizer.batch_encode_plus(
    batch_text_or_text_pairs=sents,  # 输入的文本
    add_special_tokens=True,  # 添加特殊标记
    max_length=10,  # 最大长度
    padding='max_length',  # 填充
    truncation=True,  # 截断
    return_tensors='pt',  # 返回pytorch张量
    return_token_type_ids=True,  # 返回token_type_ids  区分不同句子或段落的类型标识
    return_attention_mask=True,  # 返回attention_mask  标记有效token位置的掩码
    return_special_tokens_mask=True  # 返回special_tokens_mask 标识特殊token(如[CLS]、[SEP])的位置掩码
)
print(out)
for k, v in out.items():
    print(k, v)

# 解码文本数据
for i in range(len(sents)):
    print(sents[i] + "--解码后:", tokenizer.decode(out['input_ids'][i]))
运行输出:
{'input_ids': tensor([[ 101, 2414, 1184, 3209, 3299, 1045, 8024, 4542, 849, 102],
[ 101, 791, 1921, 1921, 3698, 679, 7231, 102, 0, 0],
[ 101, 2523, 2458, 2552, 102, 0, 0, 0, 0, 0]]), 'token_type_ids': tensor([[0, 0, 0, 0, 0, 0, 0, 0, 0, 0],
[0, 0, 0, 0, 0, 0, 0, 0, 0, 0],
[0, 0, 0, 0, 0, 0, 0, 0, 0, 0]]), 'special_tokens_mask': tensor([[1, 0, 0, 0, 0, 0, 0, 0, 0, 1],
[1, 0, 0, 0, 0, 0, 0, 1, 1, 1],
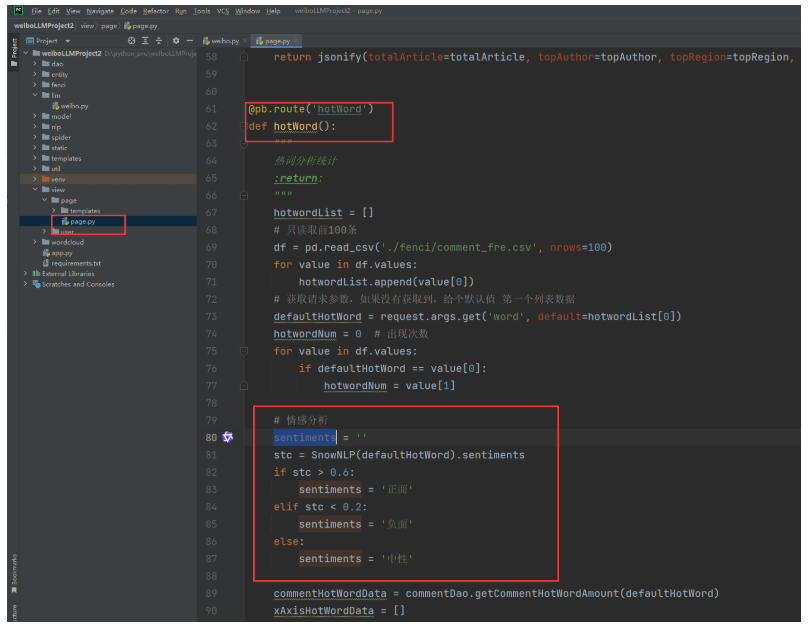
[1, 0, 0, 0, 1, 1, 1, 1, 1, 1]]), 'attention_mask': tensor([[1, 1, 1, 1, 1, 1, 1, 1, 1, 1],
[1, 1, 1, 1, 1, 1, 1, 1, 0, 0],
[1, 1, 1, 1, 1, 0, 0, 0, 0, 0]])}
input_ids tensor([[ 101, 2414, 1184, 3209, 3299, 1045, 8024, 4542, 849, 102],
[ 101, 791, 1921, 1921, 3698, 679, 7231, 102, 0, 0],
[ 101, 2523, 2458, 2552, 102, 0, 0, 0, 0, 0]])
token_type_ids tensor([[0, 0, 0, 0, 0, 0, 0, 0, 0, 0],
[0, 0, 0, 0, 0, 0, 0, 0, 0, 0],
[0, 0, 0, 0, 0, 0, 0, 0, 0, 0]])
special_tokens_mask tensor([[1, 0, 0, 0, 0, 0, 0, 0, 0, 1],
[1, 0, 0, 0, 0, 0, 0, 1, 1, 1],
[1, 0, 0, 0, 1, 1, 1, 1, 1, 1]])
attention_mask tensor([[1, 1, 1, 1, 1, 1, 1, 1, 1, 1],
[1, 1, 1, 1, 1, 1, 1, 1, 0, 0],
[1, 1, 1, 1, 1, 0, 0, 0, 0, 0]])
床前明月光,疑似地上霜,举头望明月,低头思故乡--编码后: [CLS] 床 前 明 月 光 , 疑 似 [SEP]
今天天气不错--编码后: [CLS] 今 天 天 气 不 错 [SEP] [PAD] [PAD]
很开心--解码后: [CLS] 很 开 心 [SEP] [PAD] [PAD] [PAD] [PAD] [PAD]3,定义增量模型,也就是下游任务
我们定义增量模型,主要是在Bert模型最后加一个全连接层,实现二分类任务。进行前向传播的时候,我们要使用torch.no_grad()冻结Bert模型参数,不需计算梯度,获取最后一层Bert隐藏层输出,调用自定义的全连接层,进行增量模型训练。
示例代码:
# 使用设备(GPU/CPU)
import torch
from transformers import BertModel

import config

device = torch.device("cuda" if torch.cuda.is_available() else "cpu")
print(device)

# 加载预训练模型
pretrained_model = BertModel.from_pretrained(config.model_path + '/Bert-base-chinese').to(device)


# 定义下游任务(增量模型)
class DownStreamModel(torch.nn.Module):

    def __init__(self):
        super(DownStreamModel, self).__init__()
        # 下游加一个全连接层,实现二分类任务
        self.fc = torch.nn.Linear(768, 2)

    def forward(self, input_ids, attention_mask, token_type_ids):
        with torch.no_grad():  # 冻结Bert模型参数,不需计算梯度
            # 获取最后一层隐藏层输出
            output = pretrained_model(input_ids=input_ids, attention_mask=attention_mask, token_type_ids=token_type_ids)
        # 增量模型参与训练
        out = self.fc(output.last_hidden_state[:, 0, :])
        return out
output.last_hidden_state[:, 0, :] 是用来获取模型输出的隐藏状态(通常是进入模型的最后一层隐藏状态)的一个特定切片。让我们逐个参数进行详细解析:
1. output
output 通常是通过对输入数据(如文本、图像等)运行某个深度学习模型(例如 BERT、GPT、Transformers 等)后返回的对象,它包含多个属性,其中一个重要的属性是 last_hidden_state。
2. last_hidden_state
last_hidden_state 是模型最后一层的隐藏状态,它的形状通常是 (batch_size, sequence_length, hidden_size),具体的含义如下:
-
batch_size:处理的样本数量。在一次前向传播中,模型可以并行处理多个输入样本。
-
sequence_length:输入序列的长度。对于处理文本来说,它表示词汇的数量,可以是句子中词的个数。
-
hidden_size:每个隐藏状态的维度,代表模型的输出特征维数。通常在模型架构中定义,例如对于 BERT-base 隐藏大小为 768。
3. [:, 0, :]
这里的切片操作用来访问 last_hidden_state 的一部分,具体解释如下:
-
::表示选择所有的样本。由于
batch_size是第一个维度,所以把:放在这个位置表示选取当前批次的所有样本。 -
0:表示选择第一个时刻的隐藏状态。在 NLP 中,特别是像 BERT 这样的模型中,第一位置的隐藏状态通常对应于
[CLS]token(分类 token),它是用来进行句子级别的任务(例如分类)的。 -
::表示选择所有的特征维度(
hidden_size)。这意味着我们提取每个样本的第一个位置(即[CLS]token)对应的全部隐藏状态特征。
综合
因此,output.last_hidden_state[:, 0, :] 表示提取所有输入样本的 [CLS] token 的隐藏状态向量,这通常用于下游任务,如文本分类、问答、情感分析等,因为 [CLS] token 的表示通常是整段文本的语义聚合。
例子
如果有一个输入批次大小为 4,并且每个输入序列的隐藏状态大小为 768,那么 output.last_hidden_state[:, 0, :] 的返回结果将是一个形状为 (4, 768) 的张量,其中每一行对应一个输入样本的 [CLS] token 的隐藏状态。
4,训练模型
前面我们已经定义好了数据集,以及文本编码处理,包括增量模型定义。接下来我们来进行增量模型微调训练。
实例代码:
import torch
from datasets import load_dataset
from torch.utils.data import Dataset, DataLoader
from transformers import BertTokenizer, BertModel

import config


# 自定义数据集
class MyDataset(Dataset):

    def __init__(self, split):
        # 加载训练集
        train_dataset = load_dataset(path="csv", data_files="weibo_senti_8k_train.csv")
        # 加载测试集
        test_dataset = load_dataset(path="csv", data_files="weibo_senti_2k_test.csv")
        if split == 'train':
            self.data = train_dataset['train']
        elif split == 'test':
            self.data = test_dataset['train']

    # 获取数据集大小
    def __len__(self):
        return len(self.data)

    # 获取数据集的某个元素
    def __getitem__(self, index):
        sentence = self.data[index]['sentence']
        label = self.data[index]['label']
        return sentence, label


# 加载分词器
tokenizer = BertTokenizer.from_pretrained(config.model_path + '/Bert-base-chinese')

# 使用设备(GPU/CPU)
device = torch.device("cuda" if torch.cuda.is_available() else "cpu")
print(device)

# 加载预训练模型
pretrained_model = BertModel.from_pretrained(config.model_path + '/Bert-base-chinese').to(device)


# 定义下游任务(增量模型)
class DownStreamModel(torch.nn.Module):

    def __init__(self):
        super(DownStreamModel, self).__init__()
        # 下游加一个全连接层,实现二分类任务
        self.fc = torch.nn.Linear(768, 2)

    def forward(self, input_ids, attention_mask, token_type_ids):
        with torch.no_grad():  # 冻结Bert模型参数,不需计算梯度
            # 获取最后一层隐藏层输出
            output = pretrained_model(input_ids=input_ids, attention_mask=attention_mask, token_type_ids=token_type_ids)
        # 增量模型参与训练
        out = self.fc(output.last_hidden_state[:, 0, :])
        return out


# 对传入数据进行编码
def collate_fn(data):
    sents = [i[0] for i in data]
    labels = [i[1] for i in data]
    # 编码
    # 批量编码句子
    out = tokenizer.batch_encode_plus(
        batch_text_or_text_pairs=sents,  # 输入的文本
        add_special_tokens=True,  # 添加特殊标记
        max_length=80,  # 最大长度
        padding='max_length',  # 填充
        truncation=True,  # 截断
        return_tensors='pt',  # 返回pytorch张量
        return_token_type_ids=True,  # 返回token_type_ids  区分不同句子或段落的类型标识
        return_attention_mask=True,  # 返回attention_mask  标记有效token位置的掩码
        return_special_tokens_mask=True  # 返回special_tokens_mask 标识特殊token(如[CLS]、[SEP])的位置掩码
    )
    return out['input_ids'], out['attention_mask'], out['token_type_ids'], torch.tensor(labels)


# 创建数据集
train_dataset = MyDataset('train')  # 训练集
train_loader = DataLoader(
    dataset=train_dataset,  # 数据集
    batch_size=200,  # 批次大小
    shuffle=True,  # 是否打乱数据
    drop_last=True,  # 丢弃最后一个批次数据
    collate_fn=collate_fn  # 对加载的数据进行编码
)

test_dataset = MyDataset('test')  # 测试集
test_loader = DataLoader(
    dataset=test_dataset,  # 数据集
    batch_size=200,  # 批次大小
    shuffle=True,  # 是否打乱数据
    drop_last=True,  # 丢弃最后一个批次数据
    collate_fn=collate_fn  # 对加载的数据进行编码
)

if __name__ == '__main__':
    model = DownStreamModel().to(device)  # 创建模型
    optimizer = torch.optim.AdamW(model.parameters())  # 优化器
    criterion = torch.nn.CrossEntropyLoss()  # 定义损失函数
    best_val_acc = 0  # 保存最好的准确率
    EPOCH = 3  # 训练轮数
    for epoch in range(EPOCH):  # 训练轮数
        for i, (input_ids, attention_mask, token_type_ids, labels) in enumerate(train_loader):  # 批次数据
            out = model(input_ids=input_ids.to(device), attention_mask=attention_mask.to(device),
                        token_type_ids=token_type_ids.to(device))  # 模型输出
            loss = criterion(out, labels.to(device))  # 计算损失
            optimizer.zero_grad()  # 清空梯度
            loss.backward()  # 反向传播
            optimizer.step()  # 优化器更新参数
            # 每隔5个批次输出训练结果
            if i % 5 == 0:
                out = out.argmax(dim=1)  # 获取预测结果
                acc = (out == labels.to(device)).sum().item() / len(labels)  # 计算准确率
                print("EPOCH:{}--第{}批次--损失:{}--准确率:{}".format(epoch + 1, i + 1, loss.item(), acc))
运行结果:
cuda
EPOCH:1--第1批次--损失:0.5008983016014099--准确率:0.78
EPOCH:1--第6批次--损失:0.5052810907363892--准确率:0.75
EPOCH:1--第11批次--损失:0.4850313067436218--准确率:0.755
EPOCH:1--第16批次--损失:0.4301462471485138--准确率:0.83
EPOCH:1--第21批次--损失:0.39388778805732727--准确率:0.85
EPOCH:1--第26批次--损失:0.3695535361766815--准确率:0.855
EPOCH:1--第31批次--损失:0.35825812816619873--准确率:0.855
EPOCH:1--第36批次--损失:0.3288692533969879--准确率:0.875
EPOCH:2--第1批次--损失:0.31738394498825073--准确率:0.885
EPOCH:2--第6批次--损失:0.3121739625930786--准确率:0.87
EPOCH:2--第11批次--损失:0.30510687828063965--准确率:0.895
EPOCH:2--第16批次--损失:0.305753618478775--准确率:0.865
EPOCH:2--第21批次--损失:0.24456100165843964--准确率:0.92
EPOCH:2--第26批次--损失:0.2233615517616272--准确率:0.93
EPOCH:2--第31批次--损失:0.2816208302974701--准确率:0.89
EPOCH:2--第36批次--损失:0.24931633472442627--准确率:0.915
EPOCH:3--第1批次--损失:0.3053100109100342--准确率:0.885
EPOCH:3--第6批次--损失:0.2515011727809906--准确率:0.9
EPOCH:3--第11批次--损失:0.24241474270820618--准确率:0.915
EPOCH:3--第16批次--损失:0.2211739420890808--准确率:0.925
EPOCH:3--第21批次--损失:0.24276195466518402--准确率:0.91
EPOCH:3--第26批次--损失:0.27010777592658997--准确率:0.895
EPOCH:3--第31批次--损失:0.24304606020450592--准确率:0.9
EPOCH:3--第36批次--损失:0.26476508378982544--准确率:0.905
5,评估模型
模型训练好之后,我们要对模型进行性能评估,以及保存最优模型参数。
示例代码:
import torch
from datasets import load_dataset
from torch.utils.data import Dataset, DataLoader
from transformers import BertTokenizer, BertModel

import config


# 自定义数据集
class MyDataset(Dataset):

    def __init__(self, split):
        # 加载训练集
        train_dataset = load_dataset(path="csv", data_files="weibo_senti_8k_train.csv")
        # 加载测试集
        test_dataset = load_dataset(path="csv", data_files="weibo_senti_2k_test.csv")
        if split == 'train':
            self.data = train_dataset['train']
        elif split == 'test':
            self.data = test_dataset['train']

    # 获取数据集大小
    def __len__(self):
        return len(self.data)

    # 获取数据集的某个元素
    def __getitem__(self, index):
        sentence = self.data[index]['sentence']
        label = self.data[index]['label']
        return sentence, label


# 加载分词器
tokenizer = BertTokenizer.from_pretrained(config.model_path + '/Bert-base-chinese')

# 使用设备(GPU/CPU)
device = torch.device("cuda" if torch.cuda.is_available() else "cpu")
print(device)

# 加载预训练模型
pretrained_model = BertModel.from_pretrained(config.model_path + '/Bert-base-chinese').to(device)


# 定义下游任务(增量模型)
class DownStreamModel(torch.nn.Module):

    def __init__(self):
        super(DownStreamModel, self).__init__()
        # 下游加一个全连接层,实现二分类任务
        self.fc = torch.nn.Linear(768, 2)

    def forward(self, input_ids, attention_mask, token_type_ids):
        with torch.no_grad():  # 冻结Bert模型参数,不需计算梯度
            # 获取最后一层隐藏层输出
            output = pretrained_model(input_ids=input_ids, attention_mask=attention_mask, token_type_ids=token_type_ids)
        # 增量模型参与训练
        out = self.fc(output.last_hidden_state[:, 0, :])
        return out


# 对传入数据进行编码
def collate_fn(data):
    sents = [i[0] for i in data]
    labels = [i[1] for i in data]
    # 编码
    # 批量编码句子
    out = tokenizer.batch_encode_plus(
        batch_text_or_text_pairs=sents,  # 输入的文本
        add_special_tokens=True,  # 添加特殊标记
        max_length=80,  # 最大长度
        padding='max_length',  # 填充
        truncation=True,  # 截断
        return_tensors='pt',  # 返回pytorch张量
        return_token_type_ids=True,  # 返回token_type_ids  区分不同句子或段落的类型标识
        return_attention_mask=True,  # 返回attention_mask  标记有效token位置的掩码
        return_special_tokens_mask=True  # 返回special_tokens_mask 标识特殊token(如[CLS]、[SEP])的位置掩码
    )
    return out['input_ids'], out['attention_mask'], out['token_type_ids'], torch.tensor(labels)


# 创建数据集
train_dataset = MyDataset('train')  # 训练集
train_loader = DataLoader(
    dataset=train_dataset,  # 数据集
    batch_size=200,  # 批次大小
    shuffle=True,  # 是否打乱数据
    drop_last=True,  # 丢弃最后一个批次数据
    collate_fn=collate_fn  # 对加载的数据进行编码
)

test_dataset = MyDataset('test')  # 测试集
test_loader = DataLoader(
    dataset=test_dataset,  # 数据集
    batch_size=200,  # 批次大小
    shuffle=True,  # 是否打乱数据
    drop_last=True,  # 丢弃最后一个批次数据
    collate_fn=collate_fn  # 对加载的数据进行编码
)

if __name__ == '__main__':
    model = DownStreamModel().to(device)  # 创建模型
    optimizer = torch.optim.AdamW(model.parameters())  # 优化器
    criterion = torch.nn.CrossEntropyLoss()  # 定义损失函数
    best_val_acc = 0  # 保存最好的准确率
    EPOCH = 3  # 训练轮数
    for epoch in range(EPOCH):  # 训练轮数
        for i, (input_ids, attention_mask, token_type_ids, labels) in enumerate(train_loader):  # 批次数据
            out = model(input_ids=input_ids.to(device), attention_mask=attention_mask.to(device),
                        token_type_ids=token_type_ids.to(device))  # 模型输出
            loss = criterion(out, labels.to(device))  # 计算损失
            optimizer.zero_grad()  # 清空梯度
            loss.backward()  # 反向传播
            optimizer.step()  # 优化器更新参数
            # 每隔5个批次输出训练结果
            if i % 5 == 0:
                out = out.argmax(dim=1)  # 获取预测结果
                acc = (out == labels.to(device)).sum().item() / len(labels)  # 计算准确率
                print("EPOCH:{}--第{}批次--损失:{}--准确率:{}".format(epoch + 1, i + 1, loss.item(), acc))

    # 验证模型
    model.eval()  # 评估模式 Dropout关闭
    with torch.no_grad():  # 评估模式,不需要计算梯度
        for i, (input_ids, attention_mask, token_type_ids, labels) in enumerate(test_loader):
            out = model(input_ids=input_ids.to(device), attention_mask=attention_mask.to(device),
                        token_type_ids=token_type_ids.to(device))
            out = out.argmax(dim=1)
            acc = (out == labels.to(device)).sum().item() / len(labels)
            if acc > best_val_acc:
                best_val_acc = acc
                torch.save(model.state_dict(), "best_model.pth")
                print(f"测试集准确率EPOCH:{epoch}-第{i}批次:模型保存,准确率:{acc}")
        # 保存最后一轮模型
        torch.save(model.state_dict(), "last_model.pth")
        print(f"最后一轮模型保存,:准确率:{acc}")
运行结果:
cuda
EPOCH:1--第1批次--损失:0.6369971632957458--准确率:0.695
EPOCH:1--第6批次--损失:0.6052521467208862--准确率:0.685
EPOCH:1--第11批次--损失:0.5286625623703003--准确率:0.77
EPOCH:1--第16批次--损失:0.4174182415008545--准确率:0.83
EPOCH:1--第21批次--损失:0.41344115138053894--准确率:0.81
EPOCH:1--第26批次--损失:0.3910037875175476--准确率:0.87
EPOCH:1--第31批次--损失:0.3680213987827301--准确率:0.85
EPOCH:1--第36批次--损失:0.3817676901817322--准确率:0.855
EPOCH:2--第1批次--损失:0.3963841199874878--准确率:0.84
EPOCH:2--第6批次--损失:0.3516421914100647--准确率:0.85
EPOCH:2--第11批次--损失:0.330654114484787--准确率:0.845
EPOCH:2--第16批次--损失:0.3345922529697418--准确率:0.865
EPOCH:2--第21批次--损失:0.3087370693683624--准确率:0.885
EPOCH:2--第26批次--损失:0.25769323110580444--准确率:0.92
EPOCH:2--第31批次--损失:0.2792946696281433--准确率:0.885
EPOCH:2--第36批次--损失:0.29899129271507263--准确率:0.905
EPOCH:3--第1批次--损失:0.3139827847480774--准确率:0.855
EPOCH:3--第6批次--损失:0.27809959650039673--准确率:0.895
EPOCH:3--第11批次--损失:0.2725857198238373--准确率:0.885
EPOCH:3--第16批次--损失:0.30161210894584656--准确率:0.885
EPOCH:3--第21批次--损失:0.26055067777633667--准确率:0.925
EPOCH:3--第26批次--损失:0.22951321303844452--准确率:0.895
EPOCH:3--第31批次--损失:0.2995443642139435--准确率:0.87
EPOCH:3--第36批次--损失:0.3246515691280365--准确率:0.87
测试集准确率EPOCH:2-第0批次:模型保存,准确率:0.975
最后一轮模型保存,:准确率:0.955
把训练好的模型参数进行业务功能封装
前面我们把模型参数训练好了,接下来,我们需要封装下一个接口方法,提供给应用调用。
llm目录下,新建weibo_train.py
import torch
from transformers import BertTokenizer, BertModel
import config
# 加载分词器
tokenizer = BertTokenizer.from_pretrained(config.model_path + '/Bert-base-chinese')
# 使用设备(GPU/CPU)
device = torch.device("cuda" if torch.cuda.is_available() else "cpu")
print(device)
# 加载预训练模型
pretrained_model = BertModel.from_pretrained(config.model_path + '/Bert-base-chinese').to(device)
# 定义下游任务(增量模型)
class DownStreamModel(torch.nn.Module):
def __init__(self):
super(DownStreamModel, self).__init__()
# 下游加一个全连接层,实现二分类任务
self.fc = torch.nn.Linear(768, 2)
def forward(self, input_ids, attention_mask, token_type_ids):
with torch.no_grad(): # 冻结Bert模型参数,不需计算梯度
# 获取最后一层隐藏层输出
output = pretrained_model(input_ids=input_ids, attention_mask=attention_mask, token_type_ids=token_type_ids)
# 增量模型参与训练
out = self.fc(output.last_hidden_state[:, 0, :])
return out
# 对传入数据进行编码
def collate_fn(data):
# 编码
# 批量编码句子
out = tokenizer.batch_encode_plus(
batch_text_or_text_pairs=data, # 输入的文本
add_special_tokens=True, # 添加特殊标记
max_length=80, # 最大长度
padding='max_length', # 填充
truncation=True, # 截断
return_tensors='pt', # 返回pytorch张量
return_token_type_ids=True, # 返回token_type_ids 区分不同句子或段落的类型标识
return_attention_mask=True, # 返回attention_mask 标记有效token位置的掩码
return_special_tokens_mask=True # 返回special_tokens_mask 标识特殊token(如[CLS]、[SEP])的位置掩码
)
return out['input_ids'], out['attention_mask'], out['token_type_ids']
model = DownStreamModel().to(device) # 创建模型
model.load_state_dict(torch.load(config.model_path + "/best_model.pth"))
def check_data(data):
# 验证模型
model.eval() # 评估模式 Dropout关闭
with torch.no_grad(): # 评估模式,不需要计算梯度
input_ids, attention_mask, token_type_ids = collate_fn(data)
out = model(input_ids=input_ids.to(device), attention_mask=attention_mask.to(device),
token_type_ids=token_type_ids.to(device))
output = out.argmax(dim=1)
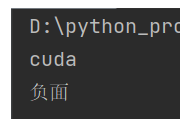
sentiment = output.item()
sentiment_label = "正面" if sentiment == 1 else "负面"
return sentiment_label
if __name__ == '__main__':
result = check_data(["我非常难过"])
print(result)运行结果:
使用BERT大模型微调对微博热词进行情感分析
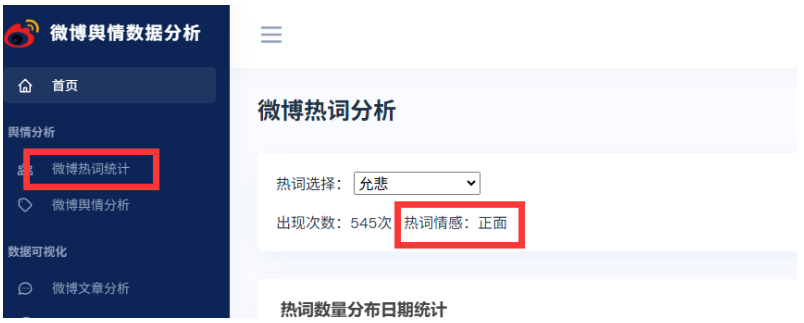
找到视图层业务逻辑代码:
改成:
# 改成使用大模型微调进行舆情分析
sentiments = check_data([defaultHotWord])
重启测试,明显比之前大模型微调前的准确率提高很多。

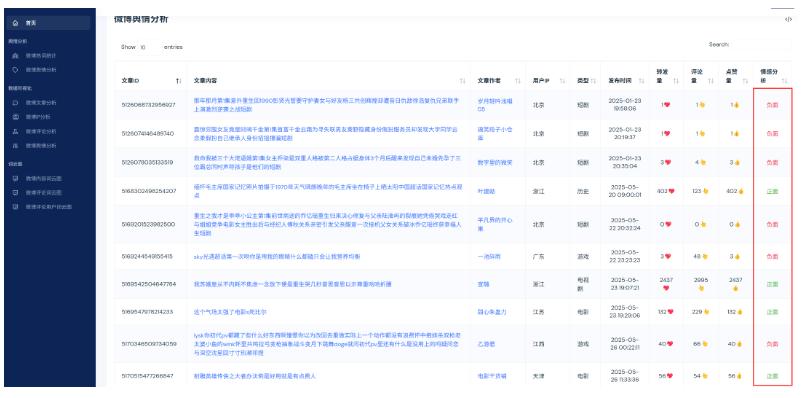
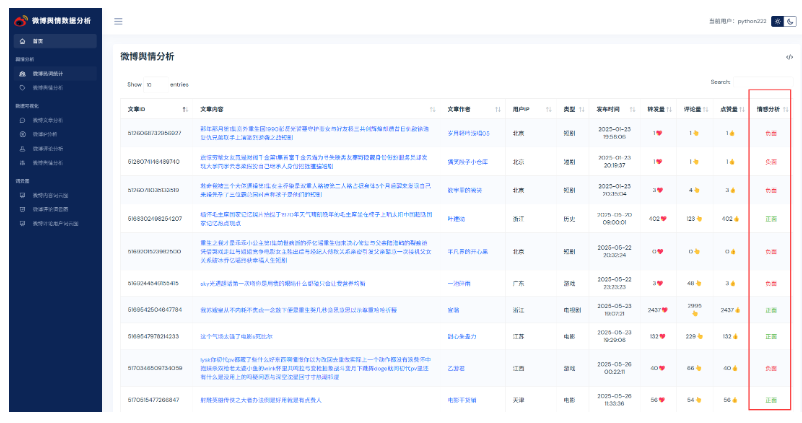
使用BERT大模型对微博文章内容进行情感分析
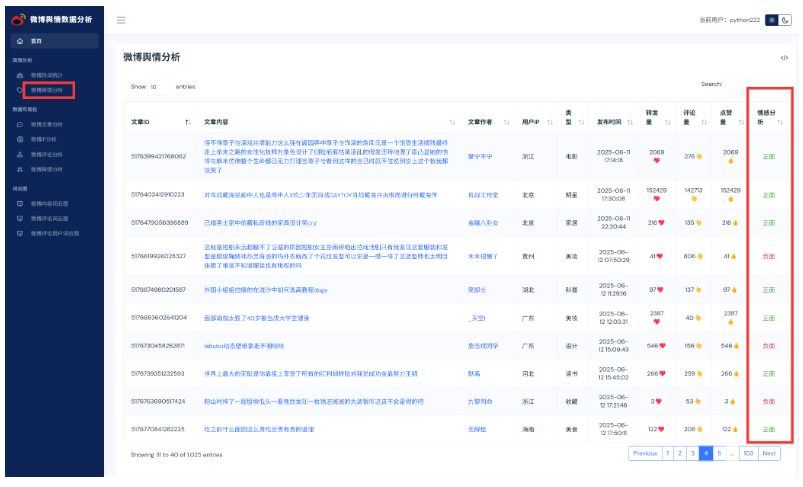
找到微博舆情分析后端视图业务逻辑代码:
改成:
# 改成使用大模型微调进行舆情分析
sentiments = check_data([article[1]])
重启运行,分析结果明显比大模型微调之前准确率高很多。
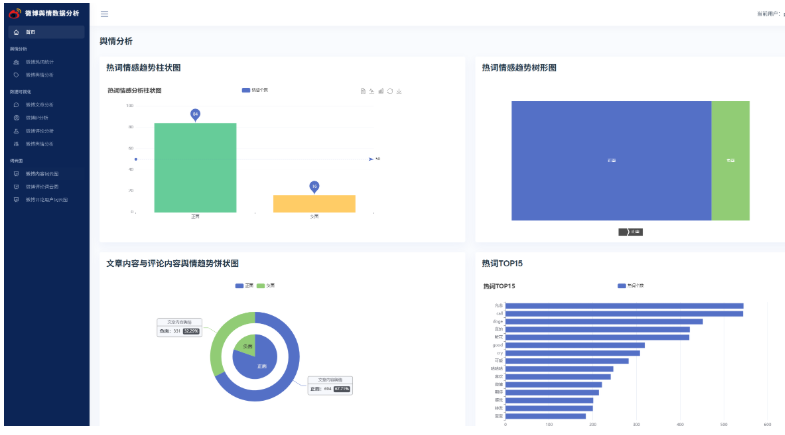
使用BERT大模型对微博舆情分析以及可视化操作
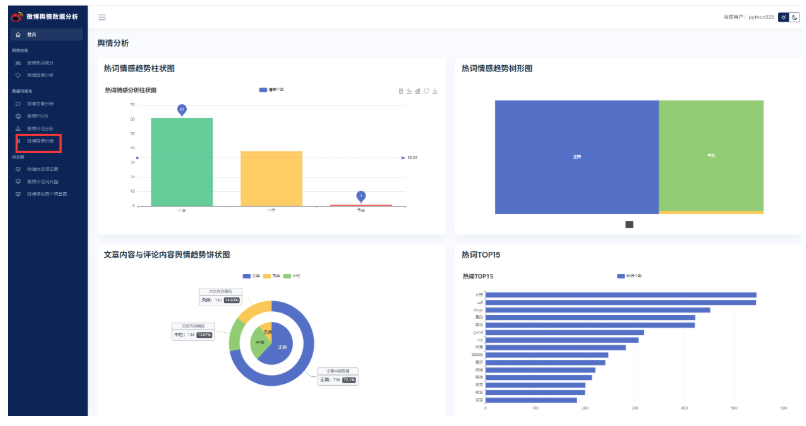
找到数据可视化微博舆情分析后端视图层业务逻辑代码,包括柱状图,树形图,饼状图。代码都需要修改;

修改代码后:
@pb.route('sentimentAnalysis')
def sentimentAnalysis():
    """
    舆情数据分析
    :return:
    """
    xHotBarData = ['正面', '负面']
    yHotBarData = [0, 0]
    # 只读取前100条
    df = pd.read_csv('./fenci/comment_fre.csv', nrows=100)
    for value in df.values:
        # 情感分析
        # stc = SnowNLP(value[0]).sentiments
        # if stc > 0.6:
        #     yHotBarData[0] += 1
        # elif stc < 0.2:
        #     yHotBarData[2] += 1
        # else:
        #     yHotBarData[1] += 1

        # 使用大模型进行情感分析
        # sentiment_label = data_classfication(value[0])
        # 使用大模型微调进行情感分析
        sentiment_label = check_data([value[0]])
        if sentiment_label == '正面':
            yHotBarData[0] += 1
        else:
            yHotBarData[1] += 1

    hotTreeMapData = [{
        'name': xHotBarData[0],
        'value': yHotBarData[0]
    }, {
        'name': xHotBarData[1],
        'value': yHotBarData[1]
    }]

    commentPieData = [{
        'name': '正面',
        'value': 0
    }, {
        'name': '负面',
        'value': 0
    }]
    articlePieData = [{
        'name': '正面',
        'value': 0
    }, {
        'name': '负面',
        'value': 0
    }]
    commentList = commentDao.getAllComment()
    for comment in commentList:
        # 情感分析
        # stc = SnowNLP(comment[1]).sentiments
        # if stc > 0.6:
        #     commentPieData[0]['value'] += 1
        # elif stc < 0.2:
        #     commentPieData[2]['value'] += 1
        # else:
        #     commentPieData[1]['value'] += 1
        # 使用大模型进行情感分析
        # sentiment_label = data_classfication(comment[1])
        # 使用大模型微调进行情感分析
        sentiment_label = check_data([comment[1]])
        if sentiment_label == '正面':
            commentPieData[0]['value'] += 1
        else:
            commentPieData[1]['value'] += 1

    articleList = articleDao.getAllArticle()
    for article in articleList:
        # 情感分析
        # stc = SnowNLP(article[1]).sentiments
        # if stc > 0.6:
        #     articlePieData[0]['value'] += 1
        # elif stc < 0.2:
        #     articlePieData[2]['value'] += 1
        # else:
        #     articlePieData[1]['value'] += 1
        # 使用大模型进行情感分析
        # sentiment_label = data_classfication(article[1])
        # 使用大模型微调进行情感分析
        sentiment_label = check_data([article[1]])
        if sentiment_label == '正面':
            articlePieData[0]['value'] += 1
        else:
            articlePieData[1]['value'] += 1

    df2 = pd.read_csv('./fenci/comment_fre.csv', nrows=15)
    xhotData15 = [x[0] for x in df2.values][::-1]
    yhotData15 = [x[1] for x in df2.values][::-1]
    return render_template('sentimentAnalysis.html',
                           xHotBarData=xHotBarData,
                           yHotBarData=yHotBarData,
                           hotTreeMapData=hotTreeMapData,
                           commentPieData=commentPieData,
                           articlePieData=articlePieData,
                           xhotData15=xhotData15,
                           yhotData15=yhotData15)
重启系统测试,准备率得到了质的提升。
应用系统进行【批量】调用大模型,提高系统响应速度
我们之前单个传入大模型进行情感分析,效率略低,我们一般建议批量的进行情感分析,但是传入的数据量也不能太大。我们之前封装的,可以传入一个列表,但是我们不可以传入一个非常大的列表,否则GPU内存会溢出。
我们如果在业务层进行控制传入的元素量,比较麻烦。所以我们封装一个批量导入的方法。
打开weibo_train.py
def check_data(data):
    # 验证模型
    model.eval()  # 评估模式 Dropout关闭
    with torch.no_grad():  # 评估模式,不需要计算梯度
        input_ids, attention_mask, token_type_ids = collate_fn(data)
        out = model(input_ids=input_ids.to(device), attention_mask=attention_mask.to(device),
                    token_type_ids=token_type_ids.to(device))
        output = out.argmax(dim=1)
        # sentiment = output.item()
        # sentiment_label = "正面" if sentiment == 1 else "负面"
        # print("预测结果:", sentiment_label)
        return output.tolist()

# 批量处理
def check_batch_datas(dataList, batch_num):
    outputList = []
    for i in range(0, len(dataList), batch_num):
        batch_data = dataList[i:i + batch_num]
        outputList.extend(check_data(batch_data))
    return outputList
我们以对微博文章进行大模型情感分析模块为例,修改成批量调用:
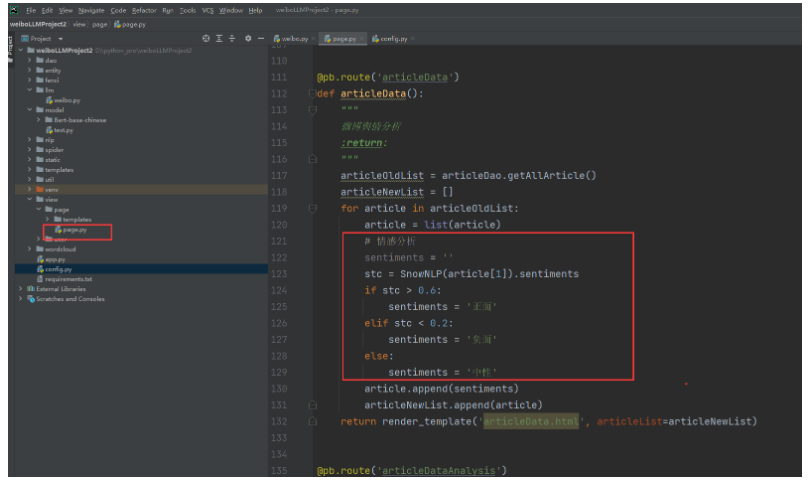
@pb.route('articleData')
def articleData():
    """
    微博舆情分析
    :return:
    """
    articleOldList = articleDao.getAllArticle()
    # 获取所有帖子标题
    articleTitleList = [article[1] for article in articleOldList]
    # 批量使用大模型进行舆情分析
    sentimentsList = check_batch_datas(articleTitleList, batch_num=10)
    # 追加情感分析属性
    articleNewList = []
    for i in range(len(articleOldList)):
        if sentimentsList[i] == 1:
            articleNewList.append(articleOldList[i] + ('正面',))
        else:
            articleNewList.append(articleOldList[i] + ('负面',))

        # for article in articleOldList:
        #     article = list(article)
        # 情感分析
        sentiments = ''
        # stc = SnowNLP(article[1]).sentiments
        # if stc > 0.6:
        #     sentiments = '正面'
        # elif stc < 0.2:
        #     sentiments = '负面'
        # else:
        #     sentiments = '中性'
        # 改成使用大模型进行舆情分析
        # sentiments = data_classfication(article[1])
        # 改成使用大模型微调进行舆情分析
        # sentiments = check_data([article[1]])
        # article.append(sentiments)
        # articleNewList.append(article)
    return render_template('articleData.html', articleList=articleNewList)
运行,效果还是有显著提高的。

有“AI”的1024 = 2048,欢迎大家加入2048 AI社区
更多推荐
 13
13 0
0- 0


 已为社区贡献28条内容

所有评论(0)