小白也能学会的AI Agent架构设计:Open Deep Research三级分层结构实战解析
本文深入解析Open Deep Research项目的多Agent架构设计,采用三级分层嵌套结构:主图负责整体流程编排,监督者子图实现任务分解与委派,研究者子图执行具体研究。通过LangGraph的子图复用和异步并行机制,实现职责分离与高效协作,为构建复杂多Agent系统提供了优秀范例。
本文深入解析Open Deep Research项目的多Agent架构设计,采用三级分层嵌套结构:主图负责整体流程编排,监督者子图实现任务分解与委派,研究者子图执行具体研究。通过LangGraph的子图复用和异步并行机制,实现职责分离与高效协作,为构建复杂多Agent系统提供了优秀范例。
前排提示,文末有大模型AGI-CSDN独家资料包哦!
关注我~第一时间学习如何更好地搭建AI Agent。
重要的不是我们是否会被AI替代,
而是我们要比被替代的人更懂AI。
大家好,本期我们继续研究Open Deep Research这个项目的源代码。上一期我们学习了动态模型配置的实现,本期我们将重点关注多Agent架构的设计与实现。
在多Agent系统中,如何设计Agent之间的协作机制、如何实现任务的分解与委派、如何管理不同Agent的状态,这些都是多Agent架构设计中的核心问题。其实看了Open Deep Research的源代码可以发现,从当前比较主流的Agent定义出发,这个项目主要涉及两个Agent(通过子图实现),一个负责研究活动的监督、组织,一个负责具体实施研究活动。
下面我们来深入理解下Open Deep Research的架构设计思路与实现方式。
Open Deep Research的三级分层嵌套结构概览
从整体上来看,Open Deep Research采用了三级分层嵌套的图结构来实现多Agent协作,每一层都有明确的职责分工。先上一个图给大家感受一下(大图太大有点糊,后面会有分开的清晰版):
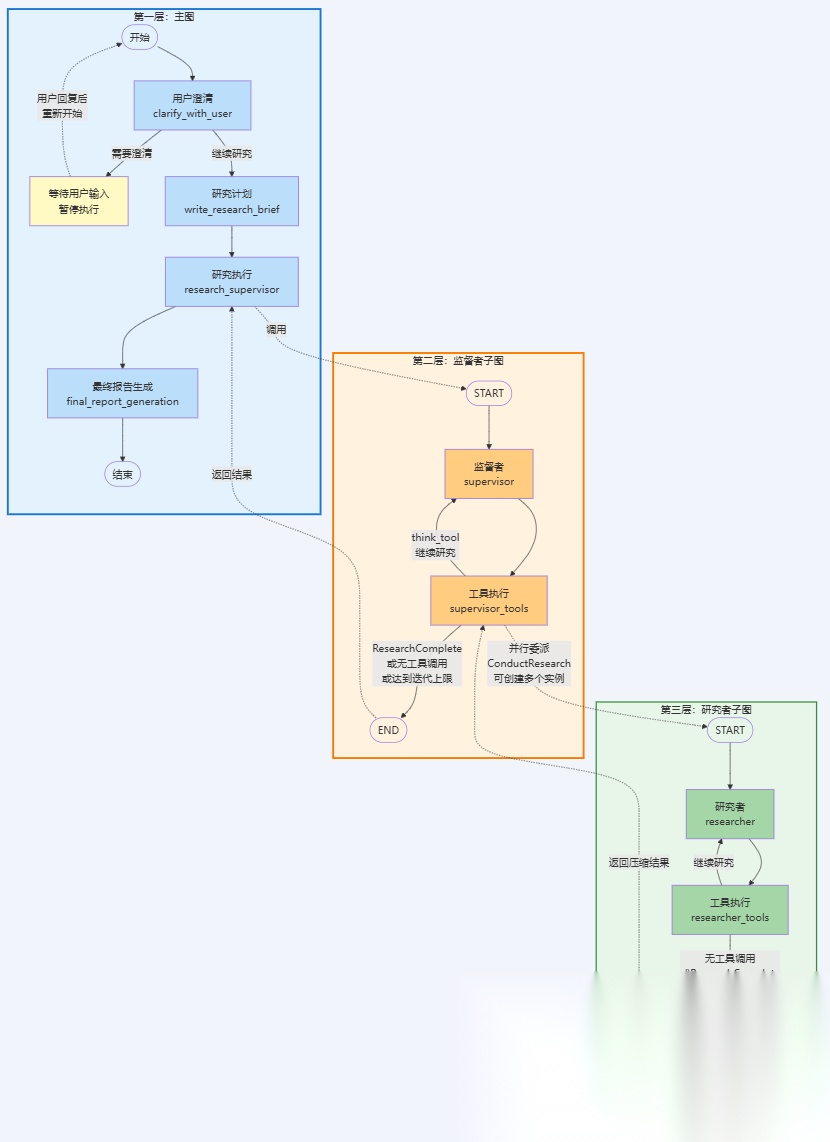
- • 第一层:主图(
deep\_researcher):负责整个研究流程的协调与管理。主图包含四个核心阶段:用户澄清(clarify_with_user)用于确认研究需求、研究计划(write_research_brief)用于将用户输入转换为详细的研究简报、研究执行(research_supervisor)通过调用监督者子图来执行实际研究、最终报告生成(final_report_generation)用于综合所有研究结果生成最终报告。 - • 第二层:监督者子图(
supervisor\_subgraph):作为主图的一个节点,负责研究任务的分解与委派。监督者分析研究简报,通过ConductResearch工具将复杂研究任务分解为多个独立的子任务,并可以并行委派给多个研究者子图实例。监督者还使用ResearchComplete工具判断研究是否完成,使用think_tool进行战略规划,确保研究方向的正确性和完整性。 - • 第三层:研究者子图(
researcher\_subgraph):在监督者子图内部被动态调用,负责执行具体的研究任务。每个研究者子图接收一个特定的研究主题,使用搜索工具(tavily_search、web_search)、MCP工具等进行信息收集,使用think_tool进行战略规划,最后通过compress_research节点压缩研究结果并返回给监督者。
这种分层嵌套的设计实现了职责分离和并行执行:主图负责流程编排,监督者负责任务分解,研究者负责具体执行。多个研究者子图可以并行工作,提高研究效率。
下面我们通过学习源代码来理解这个三级分层嵌套结构的实现方式:
第一层:主图结构分析
Open Deep Research的主图采用线性管道结构,节点按顺序执行,比较简单,结合源代码(deep_researcher.py Lines 701-719)来看下:
deep_researcher_builder = StateGraph( AgentState, input=AgentInputState, config_schema=Configuration)# Add main workflow nodes for the complete research processdeep_researcher_builder.add_node("clarify_with_user", clarify_with_user) # User clarification phasedeep_researcher_builder.add_node("write_research_brief", write_research_brief) # Research planning phasedeep_researcher_builder.add_node("research_supervisor", supervisor_subgraph) # Research execution phasedeep_researcher_builder.add_node("final_report_generation", final_report_generation) # Report generation phase# Define main workflow edges for sequential executiondeep_researcher_builder.add_edge(START, "clarify_with_user") # Entry pointdeep_researcher_builder.add_edge("research_supervisor", "final_report_generation") # Research to reportdeep_researcher_builder.add_edge("final_report_generation", END) # Final exit point# Compile the complete deep researcher workflowdeep_researcher = deep_researcher_builder.compile()
从上述代码可以看出,主图中设置了4个节点,分别是:
- • 节点1:
clarify_with_user- 用来澄清用户真实意图的普通节点; - • 节点2:
write_research_brief- 生成研究计划、简报的普通节点; - • 节点3:
research_supervisor- 监督者子图,负责执行具体的研究工作; - • 节点4:
final_report_generation- 生成最终报告的普通节点。
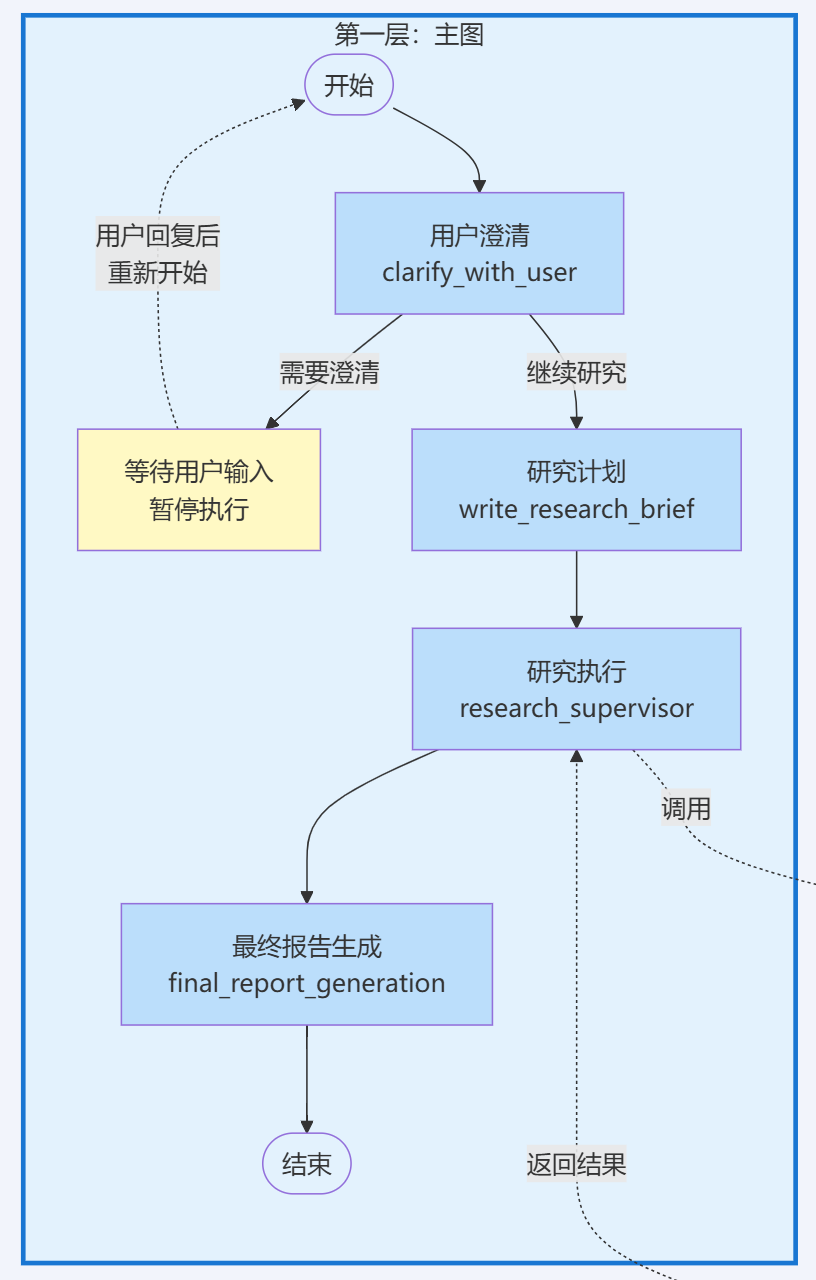
从节点间的连接方式来看,主图内部采用了线性管道的布局模式,即节点按固定顺序,依次执行
- •
START→clarify_with_user - •
clarify_with_user→write_research_brief(通过Command连接) - •
write_research_brief→research_supervisor(通过Command连接) - •
research_supervisor→final_report_generation - •
final_report_generation→END
这里有个小点,主图流程中虽然clarify_with_user和write_research_brief节点在运行顺序上是线性的,但它们没有通过Edge来连接,而是使用了Command的,这是因为这两个节点都需要在跳转时同时更新state,所以用Command来实现是最好的。因为本期重点是在多层架构的设计思路上,state的具体设计与管理、更新机制这个内容得单独做一期,所以这里就先不展开了。
回到主题,主图的这种线性管道布局非常适配按固定顺序执行的业务流程,比如我们这里的研究流程,从总体来说是比较线性的,大致分为“澄清 → 规划 → 研究 → 报告”四个过程。
其中,由于“研究”从行为方式上来说肯定是最复杂的,因此可以把“研究”相关的逻辑单独做成一个子图,让主图来调用这个子图,子图负责具体执行研究活动,向主图输出研究成果即可。
第二层:监督者子图结构分析
监督者子图采用了循环结构,形成迭代式决策循环:
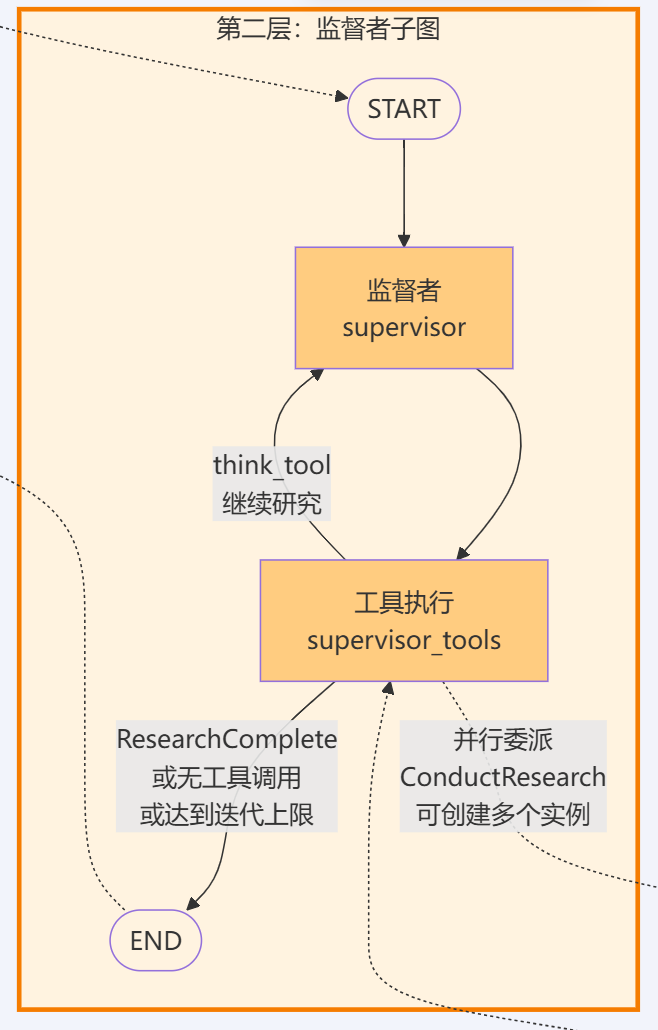
首先结合源代码(deep_researcher.py Lines 351-363)先来看下监督者子图的整体架构:
# Supervisor Subgraph Construction# Creates the supervisor workflow that manages research delegation and coordinationsupervisor_builder = StateGraph(SupervisorState, config_schema=Configuration)# Add supervisor nodes for research managementsupervisor_builder.add_node("supervisor", supervisor) # Main supervisor logicsupervisor_builder.add_node("supervisor_tools", supervisor_tools) # Tool execution handler# Define supervisor workflow edgessupervisor_builder.add_edge(START, "supervisor") # Entry point to supervisor# Compile supervisor subgraph for use in main workflowsupervisor_subgraph = supervisor_builder.compile()
从上述代码可以看出,监督者子图中设置了2个节点,分别是:
- • 节点1:
supervisor- 监督者决策节点(负责分析研究简报,决定委派哪些任务) - • 节点2:
supervisor_tools- 工具执行节点(负责执行监督者调用的工具,包括调用研究者子图)
从节点连接方式来看,子图的入口START直接连接了supervisor,而后续又通过Command在两个节点间形成循环。下面我们结合节点函数的源代码来分析。
supervisor节点:决策阶段
注意,因为本期不分析项目的state相关的数据流情况,故省略非相关代码。
async def supervisor(state: SupervisorState, config: RunnableConfig) -> Command[Literal["supervisor_tools"]]: ...... # Available tools: research delegation, completion signaling, and strategic thinking lead_researcher_tools = [ConductResearch, ResearchComplete, think_tool] # Configure model with tools, retry logic, and model settings research_model = ( configurable_model .bind_tools(lead_researcher_tools) ......
首先,Open Deep Research为supervisor中的模型绑定了ConductResearch, ResearchComplete, think_tool三个工具。
# Step 2: Generate supervisor response based on current context supervisor_messages = state.get("supervisor_messages", []) response = await research_model.ainvoke(supervisor_messages)
然后,supervisor从state中获取到前序的write_research_brief节点生supervisor_messages,传递给模型。由于模型绑定了Tools,所以会决定调用哪些工具,生成包含 tool_calls 的 AIMessage。
这里有一个非常关键的点,由于bind\_tools()只是告诉模型有哪些工具可以使用,让模型可以在响应中生成工具调用请求,所以这里await research\_model.ainvoke(supervisor\_messages)不会实际执行工具,而只会生成tool\_calls。
# Step 3: Update state and proceed to tool execution return Command( goto="supervisor_tools", update={ "supervisor_messages": [response], "research_iterations": state.get("research_iterations", 0) + 1 } )
最后,通过Command跳转并将response(其中包括携带了tool_calls 的 AIMessage)更新给supervisor_tools,然后再具体执行工具的使用。
supervisor_tools节点:执行阶段
首先,supervisor_tools节点会检查退出条件:
# Step 1: Extract current state and check exit conditions configurable = Configuration.from_runnable_config(config) supervisor_messages = state.get("supervisor_messages", []) research_iterations = state.get("research_iterations", 0) most_recent_message = supervisor_messages[-1] # Define exit criteria for research phase exceeded_allowed_iterations = research_iterations > configurable.max_researcher_iterations no_tool_calls = not most_recent_message.tool_calls research_complete_tool_call = any( tool_call["name"] == "ResearchComplete" for tool_call in most_recent_message.tool_calls ) # Exit if any termination condition is met if exceeded_allowed_iterations or no_tool_calls or research_complete_tool_call: return Command( goto=END, update={ "notes": get_notes_from_tool_calls(supervisor_messages), "research_brief": state.get("research_brief", "") } )
代码设定了三种退出条件,即超过迭代次数、无工具调用或调用ResearchComplete,只要满足其一,节点就会返回END结束循环。否则,节点会继续处理think_tool和ConductResearch两种类型的工具调用。
# Step 3: Return command with all tool results update_payload["supervisor_messages"] = all_tool_messages return Command( goto="supervisor", update=update_payload )
工具执行结束的,执行结果将被封装为ToolMessage并返回给 supervisor节点,supervisor节点会分析研究结果,决定是否需要进一步研究,如果是的,则又会生成工具调用响应转发给supervisor_tools节点,从而实现迭代式的研究循环,直到满足退出条件。
ConductResearch工具:调用研究者子图
在supervisor_tools节点中还包含了一层嵌套,即supervisor_tools节点在执行ConductResearch工具时,会并行调用多个研究者子图实例。关键代码(deep_researcher.py Lines 222-233)如下:
# Execute research tasks in parallel research_tasks = [ researcher_subgraph.ainvoke({ "researcher_messages": [ HumanMessage(content=tool_call["args"]["research_topic"]) ], "research_topic": tool_call["args"]["research_topic"] }, config) for tool_call in allowed_conduct_research_calls ] tool_results = await asyncio.gather(*research_tasks)
这里的原理稍微复杂一点,因为本期主要是理结构,就先不展开了。简单地来讲,这里使用了列表推导式创建多个异步任务对象。其中researcher_subgraph.ainvoke()返回的是协程对象(coroutine),而不是立即执行的结果。而asyncio.gather(*research_tasks)中的*操作符将列表展开为多个参数,gather函数会同时启动所有这些协程,让它们并行运行,然后await会等待所有任务完成。
第三层:研究者子图结构分析
研究者子图采用带条件分支的循环结构,支持自主探索和条件退出:
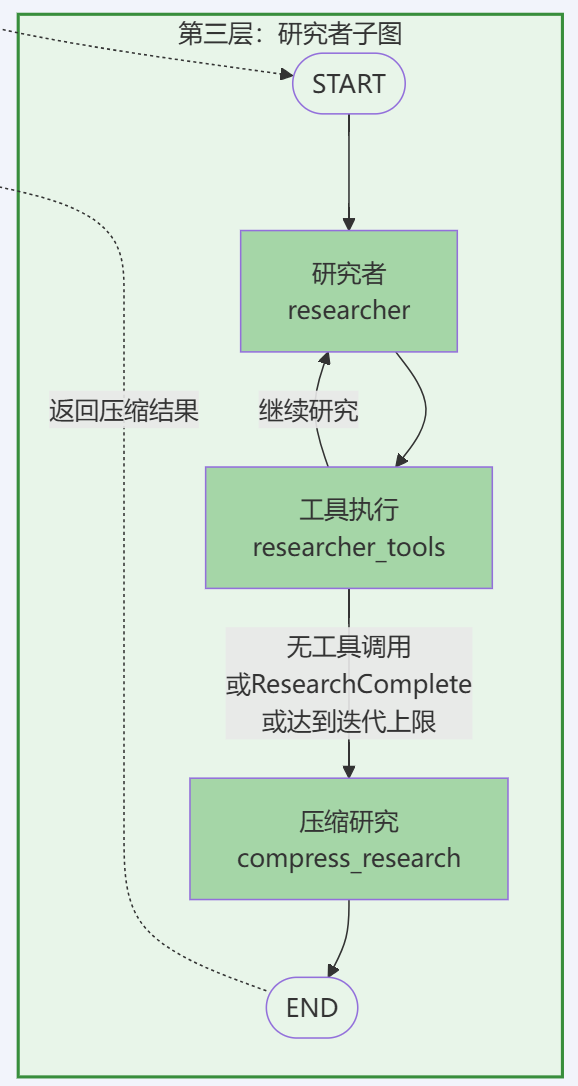
首先结合源代码(deep_researcher.py Lines 587-605)来看下研究者子图的整体架构:
# Researcher Subgraph Construction# Creates individual researcher workflow for conducting focused research on specific topicsresearcher_builder = StateGraph( ResearcherState, output=ResearcherOutputState, config_schema=Configuration)# Add researcher nodes for research execution and compressionresearcher_builder.add_node("researcher", researcher) # Main researcher logicresearcher_builder.add_node("researcher_tools", researcher_tools) # Tool execution handlerresearcher_builder.add_node("compress_research", compress_research) # Research compression# Define researcher workflow edgesresearcher_builder.add_edge(START, "researcher") # Entry point to researcherresearcher_builder.add_edge("compress_research", END) # Exit point after compression# Compile researcher subgraph for parallel execution by supervisorresearcher_subgraph = researcher_builder.compile()
从上述代码可以看出,监督者子图中设置了3个节点,分别是:
- • 节点1:
researcher- 研究者决策节点(决定使用哪些工具进行搜索) - • 节点2:
researcher_tools- 工具执行节点(执行搜索工具调用) - • 节点3:
compress_research- 压缩节点(整理研究结果)
整个监督者子图的工作流比较简单,就不展开每个节点函数的代码分析了。主要是通过Command在researcher和 researcher_tools间构建循环,基本步骤包括:
-
researcher节点分析研究主题,决定调用哪些搜索工具;
-
researcher_tools节点执行这些工具调用(可以并行执行多个搜索);
-
- 执行完工具后,
researcher_tools检查退出条件:
- 执行完工具后,
- • 如果满足退出条件(如超过迭代次数或调用
ResearchComplete),跳转到compress_research; - • 否则,返回到
researcher继续循环。
-
compress_research节点将研究结果压缩整理,并用它来更新对应的state,然后结束研究。
总结
Open Deep Research的多Agent架构采用了三级分层嵌套结构,实现了职责分离和并行执行:
- • 主图层:线性管道结构,负责"澄清→规划→研究→报告"的整体流程编排
- • 监督者子图层:循环结构,负责任务分解与委派,通过
ConductResearch工具并行调用多个研究者子图 - • 研究者子图层:带条件分支的循环结构,负责具体的研究执行和结果压缩
同时,Open Deep Research的设计模式将决策与执行分离到了不同节点。supervisor/researcher节点通过bind_tools()生成tool_calls但不执行,supervisor_tools/researcher_tools节点负责实际执行工具。这种分离机制提供了更好的控制流、错误处理和状态管理能力。
通过LangGraph的子图复用机制和异步并行执行,系统实现了高效的多Agent协作,为构建复杂的多Agent系统提供了很好的参考范例。
好了,以上就是本期的全部内容,如果大家觉得对自己有帮助的,还请多多点赞、收藏、转发、关注!祝大家玩得开心,我们下期再见!

有“AI”的1024 = 2048,欢迎大家加入2048 AI社区
更多推荐


 24
24 0
0- 0


 已为社区贡献240条内容

所有评论(0)