【VisionFive 2 Lite 单板计算机】边缘AI视觉应用部署:物体识别
本文介绍了昉·星光 VisionFive2 Lite 单板计算机结合 OpenCV 与 YOLOv5n 模型实现板端物体识别的项目设计,包括 OpenCV 部署、Qt 平台部署、YOLOv5n 算法模型、代码及效果演示等,给出较高精度的物体识别解决方案,为相关产品在边缘 AI 视觉应用领域的快速开发设计提供了参考。
【VisionFive 2 Lite 单板计算机】边缘AI视觉应用部署:物体识别
本文介绍了昉·星光 VisionFive2 Lite 单板计算机结合 OpenCV 与 YOLOv5n 模型实现板端物体识别的项目设计。
项目介绍
VisionFive 2 Lite 结合 OpenCV 与 YOLO 算法模型实现物体识别。
- 准备工作:硬件连接、系统安装、OpenCV 的板端部署、相关补充等;
- YOLO:部署 Ultralytics 软件包及 YOLOv8n 模型实现快速准确的物体识别;
准备工作
包括硬件连接、OpenCV 部署及测试等。
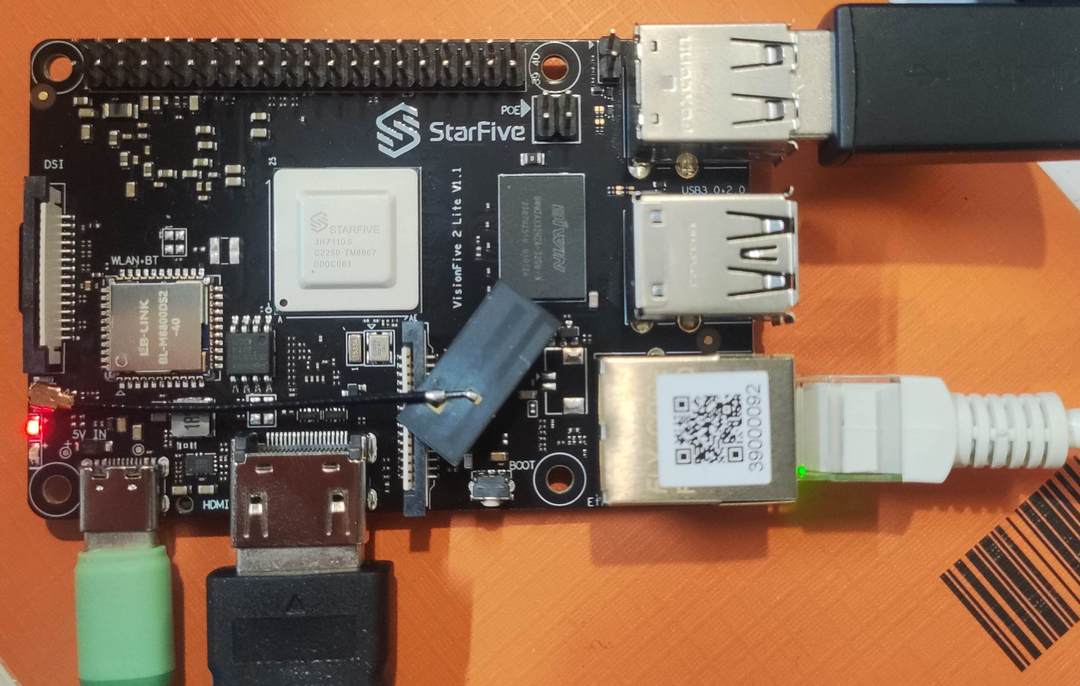
硬件连接
包括供电、联网、显示、鼠标键盘输入等。
系统安装
安装和烧录 VisionFive2 Lite 官方 Ubuntu 操作系统。
详见:VF2 Lite 系统安装 .
软件更新
更新软件包
wget https://github.com/starfive-tech/Debian/releases/download/v0.15.0-engineering-release-wayland/install_full.sh
sudo chmod +x install_full.sh
sudo ./install_full.sh
详见: StarFive-Tech | Debian .
OpenCV
包括 OpenCV 安装及版本检测流程。
-
安装 OpenCV
sudo apt update sudo apt install python3-opencv -
安装缺失的 libopencv 包
sudo apt install -y libopencv-dev
- 验证安装结果
python3 -c "import cv2,sys;print(cv2.__version__,sys.version)"
- 输出 OpenCV 版本号

至此,完成 OpenCV 的板端本地部署。
Qt 平台
完整 Qt 环境部署,以便 SSH 正常弹窗显示结果
sudo apt-get install -y libxcb-xinerama0 libxcb-xinput0 libxcb-cursor0
sudo apt-get install -y libxcb-icccm4 libxcb-image0 libxcb-keysyms1 libxcb-randr0
sudo apt-get install -y libxcb-render-util0 libxcb-shape0 libxcb-sync1 libxcb-xfixes0
sudo apt-get install -y libxcb-xkb1 libxkbcommon-x11-0

# 安装Qt相关的库
sudo apt-get install -y libqt5gui5 libqt5widgets5 libqt5core5a
流程图
工程代码
- 终端执行
touch or_yolo.py新建程序文件,并添加如下代码
#!/usr/bin/env python3
import cv2
import numpy as np
import argparse

# ========== 图片路径 ==========
parser = argparse.ArgumentParser()
parser.add_argument('-i', '--image', default='./img/road.jpg',
                    help='input image path (default: ./img/road.jpg)')
args = parser.parse_args()
IMG_FILE = args.image

# ========== 常量 ==========
INPUT_WIDTH  = 640
INPUT_HEIGHT = 640
SCORE_THRESHOLD   = 0.5
NMS_THRESHOLD     = 0.45
CONFIDENCE_THRESHOLD = 0.45

FONT_FACE  = cv2.FONT_HERSHEY_SIMPLEX
FONT_SCALE = 0.7
THICKNESS  = 1

BLACK  = (0,0,0)
BLUE   = (255,178,50)
YELLOW = (0,255,255)
RED    = (0,0,255)
# ======================================

def draw_label(im, label, left, top):
    """绿色填充标签 + 黑色文字"""
    (tw, th), _ = cv2.getTextSize(label, FONT_FACE, FONT_SCALE, THICKNESS)
    cv2.rectangle(im, (left, top - th - 6), (left + tw + 4, top), BLACK, cv2.FILLED)
    cv2.putText(im, label, (left + 2, top - 2), FONT_FACE, FONT_SCALE, YELLOW, THICKNESS, cv2.LINE_AA)

def pre_process(im, net):
    blob = cv2.dnn.blobFromImage(im, 1/255., (INPUT_WIDTH, INPUT_HEIGHT), (0,0,0), swapRB=True, crop=False)
    net.setInput(blob)
    out_layers = net.getUnconnectedOutLayersNames()
    return net.forward(out_layers)

def post_process(im, outs):
    class_ids, confidences, boxes = [], [], []
    rows = outs[0].shape[1]
    x_factor = im.shape[1] / INPUT_WIDTH
    y_factor = im.shape[0] / INPUT_HEIGHT

    for r in range(rows):
        row = outs[0][0][r]
        conf = row[4]
        if conf < CONFIDENCE_THRESHOLD: continue

        classes_scores = row[5:]
        class_id = int(np.argmax(classes_scores))
        if classes_scores[class_id] < SCORE_THRESHOLD: continue

        cx, cy, w, h = row[0], row[1], row[2], row[3]
        left   = int((cx - w/2) * x_factor)
        top    = int((cy - h/2) * y_factor)
        width  = int(w * x_factor)
        height = int(h * y_factor)

        boxes.append([left, top, width, height])
        confidences.append(float(conf))
        class_ids.append(class_id)

    indices = cv2.dnn.NMSBoxes(boxes, confidences, CONFIDENCE_THRESHOLD, NMS_THRESHOLD)
    for i in indices:
        b = boxes[i]
        left, top, w, h = b[0], b[1], b[2], b[3]
        cv2.rectangle(im, (left, top), (left + w, top + h), BLUE, 2*THICKNESS)
        label = f"{classes[class_ids[i]]}:{confidences[i]:.2f}"
        draw_label(im, label, left, top - 2)
        print(f"{classes[class_ids[i]]}  {confidences[i]:.3f}  "
              f"[{left},{top},{left+w},{top+h}]")          # 终端打印
    return im

# ================= main =================
classes = open("./model/coco.names").read().strip().split('\n')
net = cv2.dnn.readNet("./model/yolov5n.onnx")
net.setPreferableBackend(cv2.dnn.DNN_BACKEND_OPENCV)
net.setPreferableTarget(cv2.dnn.DNN_TARGET_CPU)   # RISC-V 无 GPU/OpenCL

frame = cv2.imread(IMG_FILE)
assert frame is not None, "image path not exist"

outs   = pre_process(frame, net)
result = post_process(frame, outs)

# 效率信息
t, _ = net.getPerfProfile()
label = f"Inference: {t*1000/cv2.getTickFrequency():.2f} ms"
cv2.putText(result, label, (20, 40), FONT_FACE, FONT_SCALE, RED, THICKNESS, cv2.LINE_AA)

cv2.namedWindow("YOLOv5n", cv2.WINDOW_NORMAL)    # 可缩放窗口
cv2.imshow("YOLOv5n", result)
cv2.waitKey(0)
cv2.destroyAllWindows()
保存代码。
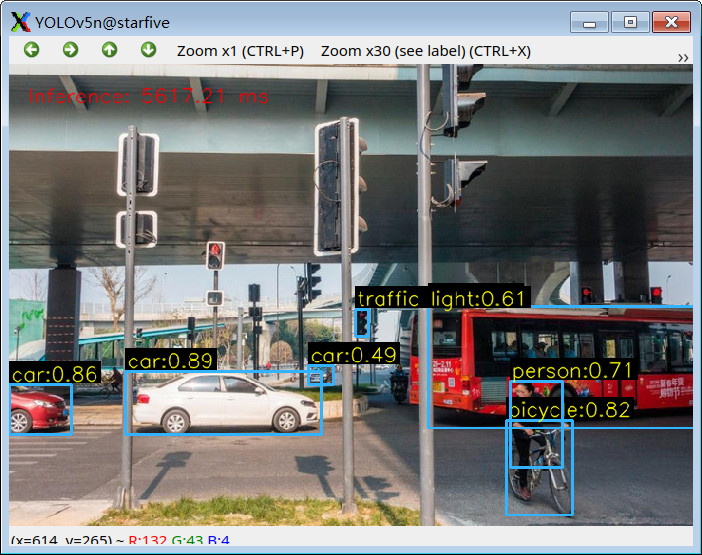
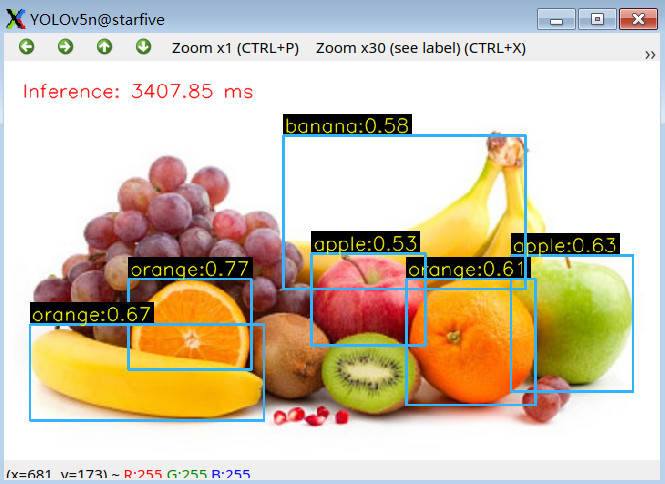
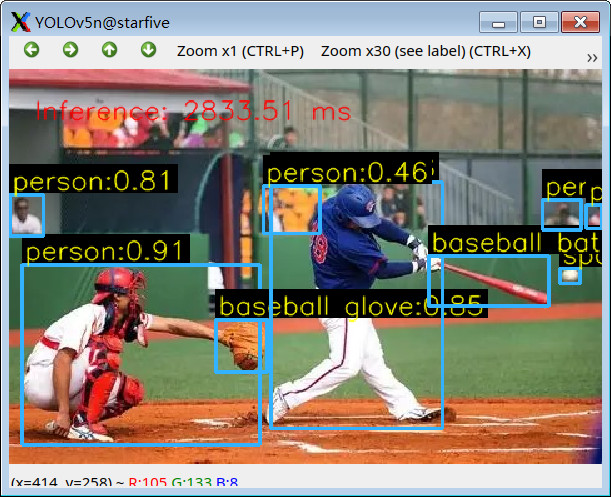
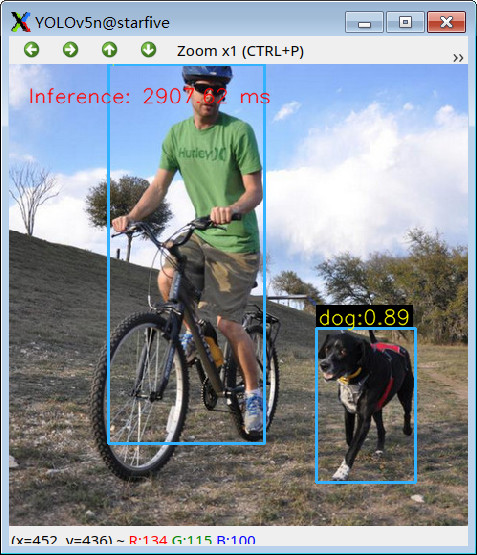
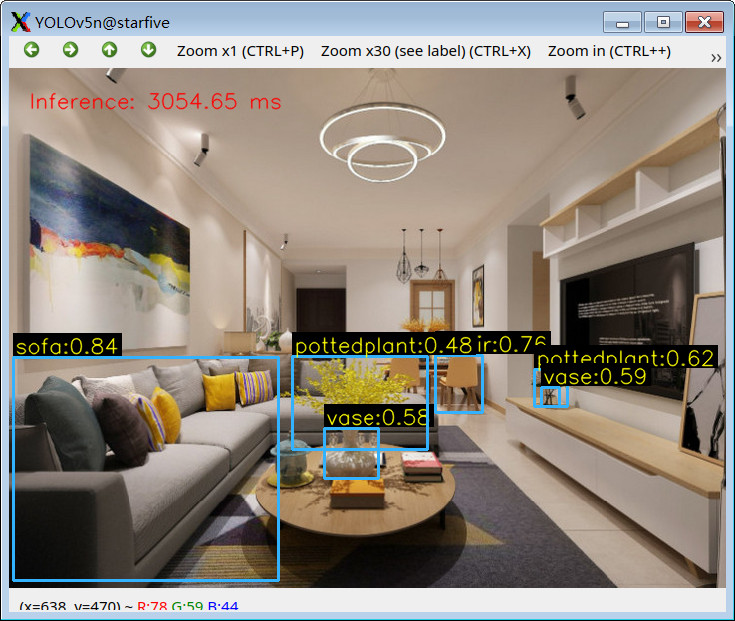
效果演示
-
终端执行
python or_yolo.py -i ./img/desktop.jpg指令运行程序; -
终端打印物体识别结果,包括识别信息、置信度、坐标等;
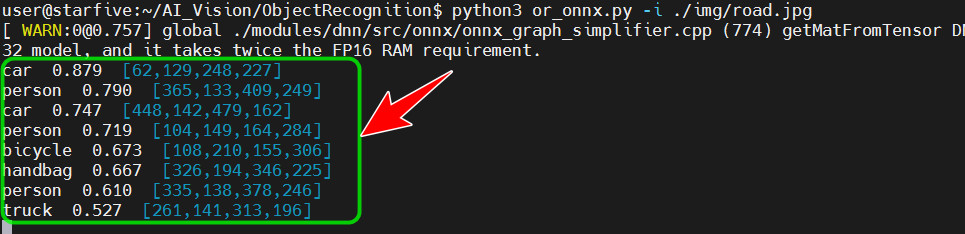
- 弹窗显示识别结果
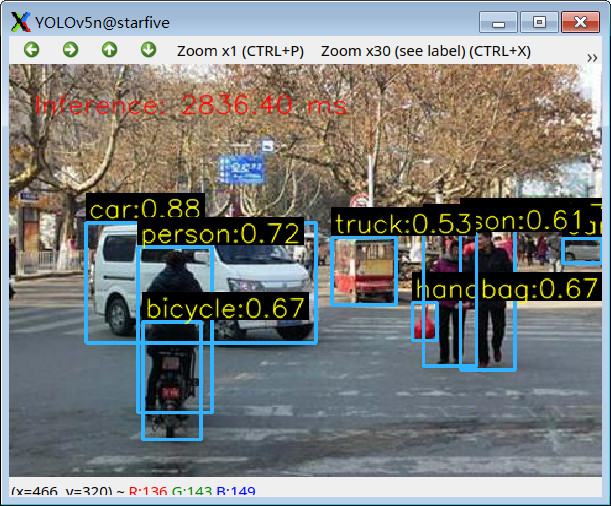
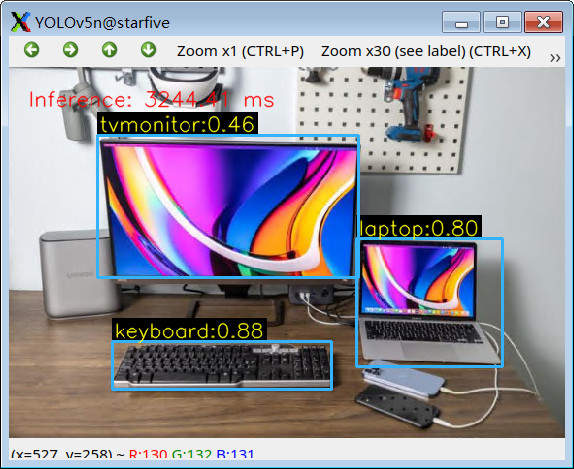
更多效果演示
总结
本文介绍了昉·星光 VisionFive2 Lite 单板计算机结合 OpenCV 与 YOLOv5n 模型实现板端物体识别的项目设计,包括 OpenCV 部署、Qt 平台部署、YOLOv5n 算法模型、代码及效果演示等,给出较高精度的物体识别解决方案,为相关产品在边缘 AI 视觉应用领域的快速开发设计提供了参考。

有“AI”的1024 = 2048,欢迎大家加入2048 AI社区
更多推荐
 0
0 0
0- 0


 已为社区贡献22条内容

所有评论(0)