从零构建智能体:百度ModelEngine全流程开发实战与深度评测
百度ModelEngine平台为企业提供了一站式智能体开发解决方案,涵盖从环境配置到生产部署的全流程。本文详细介绍了平台的核心功能,包括可视化智能体编排、多模态处理、企业知识库管理等关键技术。实战部分展示了智能体构建、知识库自动处理、提示词优化等具体实现,通过代码示例演示了API调用和配置方法。平台支持多智能体协作和复杂业务流程设计,并提供了性能优化建议。与其他主流AI平台相比,ModelEngi
·
从零构建智能体:百度ModelEngine全流程开发实战与深度评测
目录
- 智能体开发新纪元:ModelEngine平台概览
- 环境准备:平台接入与基础配置
- 智能体创建实战:打造专属AI助手
- 知识库智能管理:文档自动总结与检索优化
- 提示词工程自动化:智能优化与调试技巧
- MCP服务深度集成:扩展智能体能力边界
- 多智能体协作系统:构建AI团队工作流
- 可视化编排进阶:复杂业务流程设计
- 部署与发布:从开发到生产的全流程
- 横向对比:ModelEngine vs 主流AI平台
- 最佳实践与性能优化
- 总结与展望
1. 智能体开发新纪元:ModelEngine平台概览
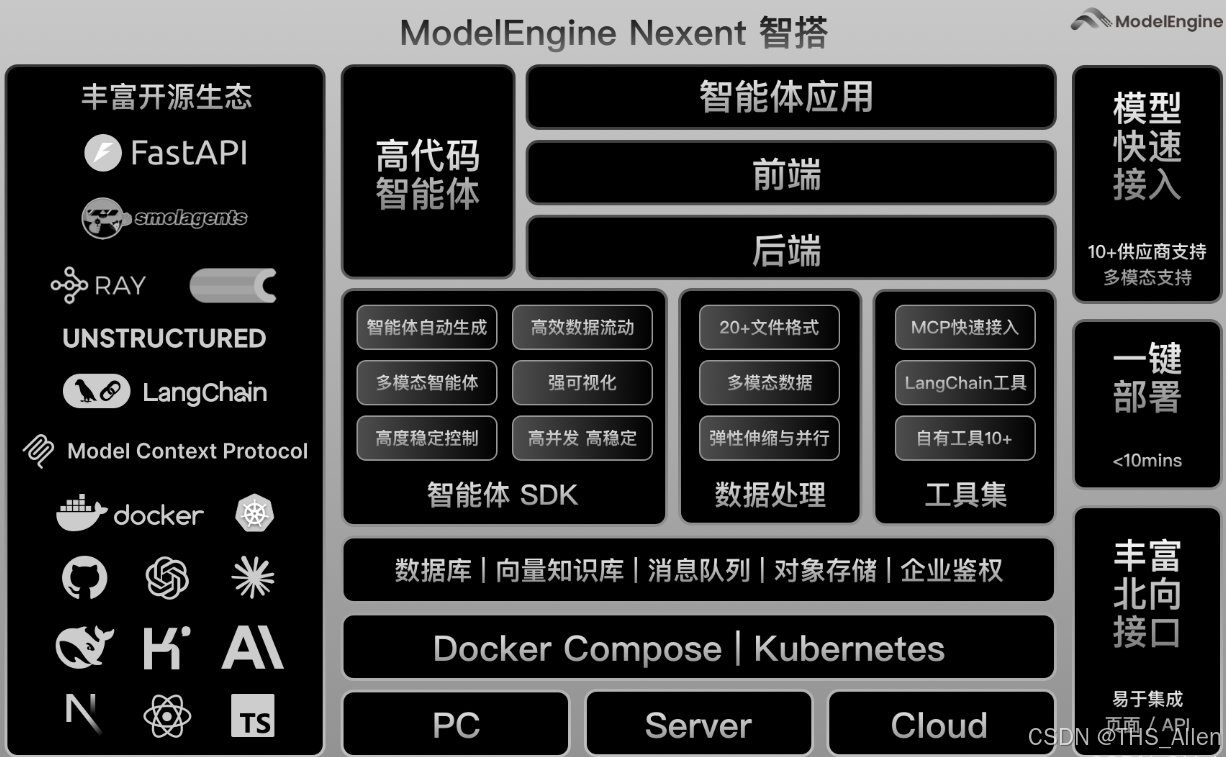
百度ModelEngine作为企业级智能体开发平台,集成了大模型训练、智能体构建、应用编排等核心功能。最新版本在以下几个方面有显著提升:
核心特性亮点:
- 可视化智能体编排:拖拽式构建复杂AI工作流
- 多模态能力融合:支持文本、图像、语音混合处理
- 企业级知识库管理:智能文档解析与向量检索
- MCP(模型控制协议)服务:标准化外部工具集成
- 多智能体协作框架:角色分工与协同决策
图1:ModelEngine平台技术架构
2. 环境准备:平台接入与基础配置
2.1 账号注册与项目创建
# 安装ModelEngine SDK
pip install modelengine-sdk

# 初始化客户端
from modelengine import Client

client = Client(
    api_key="your_api_key",
    endpoint="https://api.modelengine.baidu.com/v1"
)

# 创建新项目
project = client.projects.create(
    name="智能客服助手",
    description="基于企业知识库的智能问答系统"
)

print(f"项目ID: {project.id}")
print(f"访问地址: {project.console_url}")
2.2 基础环境配置
# config.yaml 配置文件示例
version: "3.0"
project:
  name: "smart-customer-service"
  model_provider: "ernie-4.0"

storage:
  knowledge_base:
    type: "elasticsearch"
    endpoint: "http://localhost:9200"
    index_prefix: "kb_"

plugins:
  enabled:
    - "mcp-server-weather"
    - "mcp-server-database"
    - "custom-data-processor"

debug:
  enable_tracing: true
  log_level: "INFO"
3. 智能体创建实战:打造专属AI助手
3.1 基础智能体构建
from modelengine.agent import AgentBuilder
from modelengine.memory import ConversationMemory
from modelengine.tools import WebSearch, Calculator, FileProcessor

# 创建智能体构建器
builder = AgentBuilder()

# 定义智能体角色
agent = builder.create_agent(
    name="技术顾问助手",
    role="专业的AI技术顾问,擅长解答编程和技术架构问题",
    capabilities=["code_generation", "problem_solving", "architect_design"]
)

# 添加核心能力
agent.add_tool(WebSearch(api_key="search_key"))
agent.add_tool(Calculator())
agent.add_tool(FileProcessor())

# 配置对话策略
agent.set_conversation_policy(
    max_turns=10,
    temperature=0.7,
    response_format="structured"
)

# 保存智能体配置
agent_config = agent.export_config()
with open("tech_advisor_agent.json", "w") as f:
    f.write(agent_config)
3.2 智能体调试控制台
// 智能体调试界面示例代码
class AgentDebugger {
  constructor(agentId) {
    this.agentId = agentId;
    this.sessionId = this.generateSessionId();
  }

  async sendMessage(message) {
    const response = await fetch('/api/agent/chat', {
      method: 'POST',
      headers: {'Content-Type': 'application/json'},
      body: JSON.stringify({
        agent_id: this.agentId,
        session_id: this.sessionId,
        message: message,
        debug: true  // 启用调试模式
      })
    });

    const result = await response.json();

    // 显示调试信息
    this.displayDebugInfo(result.debug);
    return result.response;
  }

  displayDebugInfo(debugData) {
    console.log("思维链:", debugData.chain_of_thought);
    console.log("使用的工具:", debugData.tools_used);
    console.log("置信度:", debugData.confidence);
    console.log("处理时间:", debugData.processing_time + "ms");
  }
}
4. 知识库智能管理:文档自动总结与检索优化
4.1 知识库自动构建
from modelengine.knowledge import KnowledgeBase
from modelengine.processors import DocumentProcessor

# 初始化知识库
kb = KnowledgeBase(
    name="企业技术文档",
    embedding_model="text-embedding-v1"
)

# 文档自动处理流水线
processor = DocumentProcessor()

# 支持多种文档格式
documents = processor.process_directory(
    path="./documents/",
    file_types=[".pdf", ".docx", ".md", ".html"],
    chunk_size=500,
    overlap=50
)

# 智能文档总结
for doc in documents:
    # 自动生成摘要
    summary = processor.generate_summary(
        text=doc.content,
        max_length=200
    )

    # 提取关键词
    keywords = processor.extract_keywords(
        text=doc.content,
        top_k=10
    )

    # 添加到知识库
    kb.add_document(
        content=doc.content,
        metadata={
            "title": doc.metadata.get("title", ""),
            "summary": summary,
            "keywords": keywords,
            "source": doc.metadata.get("source", "")
        }
    )

print(f"知识库已收录 {kb.count()} 个文档片段")
4.2 智能检索优化
# 高级检索策略配置
retrieval_config = {
    "strategy": "hybrid",
    "embedding_weight": 0.7,
    "keyword_weight": 0.3,
    "reranker": "bge-reranker-large",
    "max_results": 5,
    "score_threshold": 0.65
}

# 智能查询增强
def enhanced_retrieval(query, context=None):
    # 查询扩展
    expanded_queries = query_expander.expand(query)

    # 多路检索
    results = []
    for expanded_query in expanded_queries:
        # 向量检索
        vector_results = kb.vector_search(
            query=expanded_query,
            top_k=3
        )

        # 关键词检索
        keyword_results = kb.keyword_search(
            query=expanded_query,
            top_k=3
        )

        # 结果融合与重排序
        merged = result_merger.merge(
            [vector_results, keyword_results],
            weights=[0.7, 0.3]
        )

        results.extend(merged)

    # 去重与排序
    final_results = reranker.rerank(
        query=query,
        documents=results,
        context=context
    )

    return final_results[:retrieval_config["max_results"]]
5. 提示词工程自动化:智能优化与调试技巧
5.1 提示词自动生成系统
from modelengine.prompts import PromptOptimizer

class AutoPromptGenerator:
    def __init__(self):
        self.optimizer = PromptOptimizer(model="ernie-4.0")
        self.template_library = self.load_templates()

    def generate_prompt(self, task_description, examples=None):
        # 分析任务类型
        task_type = self.analyze_task_type(task_description)

        # 选择合适的模板
        base_template = self.select_template(task_type)

        # 自动填充模板
        filled_template = self.fill_template(
            base_template,
            task_description,
            examples
        )

        # 优化提示词
        optimized = self.optimizer.optimize(
            prompt=filled_template,
            metrics=["clarity", "specificity", "effectiveness"],
            iterations=3
        )

        return optimized

    def analyze_task_type(self, description):
        # 使用分类器识别任务类型
        types = ["问答", "创作", "分析", "总结", "翻译", "编程"]
        # ... 分类逻辑
        return "问答"  # 示例返回

    def load_templates(self):
        return {
            "问答": """你是一个{role}。请基于以下知识回答用户问题。
知识:{knowledge}
问题:{question}
要求:{requirements}""",
            "总结": """请总结以下内容:{content}
总结要求:{summary_requirements}"""
        }

# 使用示例
generator = AutoPromptGenerator()
prompt = generator.generate_prompt(
    task_description="回答关于Python多线程的问题",
    examples=["示例1:如何创建线程", "示例2:线程同步方法"]
)
print("生成的提示词:", prompt)
5.2 提示词调试与分析工具
class PromptDebugger:
    def __init__(self, agent):
        self.agent = agent
        self.debug_history = []

    def test_prompt_variations(self, base_prompt, variations):
        results = []

        for variation in variations:
            # 执行测试
            response = self.agent.execute(prompt=variation)

            # 评估响应质量
            score = self.evaluate_response(
                prompt=variation,
                response=response
            )

            results.append({
                "prompt": variation,
                "response": response,
                "score": score,
                "metrics": {
                    "relevance": self.calc_relevance(response),
                    "completeness": self.calc_completeness(response),
                    "accuracy": self.calc_accuracy(response)
                }
            })

        # 可视化比较结果
        self.visualize_comparison(results)

        return results

    def visualize_comparison(self, results):
        import matplotlib.pyplot as plt

        prompts = [r["prompt"][:50] + "..." for r in results]
        scores = [r["score"] for r in results]

        plt.figure(figsize=(10, 6))
        plt.barh(prompts, scores, color='skyblue')
        plt.xlabel('综合评分')
        plt.title('提示词效果对比')
        plt.tight_layout()
        plt.savefig('prompt_comparison.png')
        plt.show()
6. MCP服务深度集成:扩展智能体能力边界
6.1 MCP服务器实现
# mcp_weather_server.py
from mcp.server import MCPServer
import requests

class WeatherMCPServer(MCPServer):
    def __init__(self):
        super().__init__(
            name="weather-service",
            version="1.0.0",
            description="天气查询服务"
        )

        # 注册工具
        self.register_tool(
            name="get_current_weather",
            description="获取当前天气情况",
            parameters={
                "city": {"type": "string", "description": "城市名称"},
                "units": {"type": "string", "enum": ["celsius", "fahrenheit"], "default": "celsius"}
            },
            handler=self.get_current_weather
        )

    async def get_current_weather(self, city: str, units: str = "celsius"):
        """获取当前天气实现"""
        # 调用天气API
        api_key = os.getenv("WEATHER_API_KEY")
        url = f"https://api.weatherapi.com/v1/current.json?key={api_key}&q={city}"

        response = requests.get(url)
        data = response.json()

        # 格式化返回结果
        result = {
            "city": city,
            "temperature": data["current"]["temp_c"] if units == "celsius" else data["current"]["temp_f"],
            "condition": data["current"]["condition"]["text"],
            "humidity": data["current"]["humidity"],
            "wind_speed": data["current"]["wind_kph"]
        }

        return result

# 启动MCP服务器
if __name__ == "__main__":
    server = WeatherMCPServer()
    server.run(port=8080)
6.2 MCP客户端集成
# 在智能体中集成MCP服务
from modelengine.mcp import MCPClient

class EnhancedAgent:
    def __init__(self):
        self.mcp_client = MCPClient()

        # 连接多个MCP服务器
        self.mcp_client.connect(
            name="weather",
            url="http://localhost:8080"
        )

        self.mcp_client.connect(
            name="database",
            url="http://localhost:8081"
        )

        self.mcp_client.connect(
            name="stock",
            url="http://localhost:8082"
        )

    async def process_request(self, user_request):
        # 分析请求是否需要外部工具
        tools_needed = self.analyze_tools_needed(user_request)

        results = {}
        for tool_name in tools_needed:
            if tool_name == "weather":
                # 提取参数
                city = self.extract_entity(user_request, "GPE")
                # 调用MCP服务
                weather_data = await self.mcp_client.call(
                    server="weather",
                    tool="get_current_weather",
                    params={"city": city}
                )
                results["weather"] = weather_data

            elif tool_name == "database":
                # 数据库查询逻辑
                pass

        # 综合所有结果生成回复
        final_response = self.generate_response(user_request, results)
        return final_response
7. 多智能体协作系统:构建AI团队工作流
7.1 多智能体协调器
from modelengine.orchestrator import MultiAgentOrchestrator

class ResearchTeamOrchestrator:
    def __init__(self):
        self.orchestrator = MultiAgentOrchestrator()

        # 定义团队成员
        self.agents = {
            "researcher": self.create_researcher_agent(),
            "analyst": self.create_analyst_agent(),
            "writer": self.create_writer_agent(),
            "reviewer": self.create_reviewer_agent()
        }

        # 定义工作流程
        self.workflow = self.define_workflow()

    def define_workflow(self):
        return {
            "name": "研究报告生成流程",
            "stages": [
                {
                    "name": "研究阶段",
                    "agent": "researcher",
                    "task": "收集和整理相关信息",
                    "output_to": "analyst"
                },
                {
                    "name": "分析阶段",
                    "agent": "analyst",
                    "task": "分析数据并得出结论",
                    "output_to": "writer"
                },
                {
                    "name": "写作阶段",
                    "agent": "writer",
                    "task": "撰写研究报告",
                    "output_to": "reviewer"
                },
                {
                    "name": "评审阶段",
                    "agent": "reviewer",
                    "task": "审核和优化报告",
                    "output_to": "final"
                }
            ]
        }

    async def execute_research(self, topic):
        """执行多智能体协作研究"""
        results = {}

        # 按阶段执行
        for stage in self.workflow["stages"]:
            agent_name = stage["agent"]
            agent = self.agents[agent_name]

            # 准备输入
            if stage["name"] == "研究阶段":
                input_data = {"topic": topic}
            else:
                input_data = results.get(stage.get("input_from"))

            # 执行任务
            stage_result = await agent.execute(
                task=stage["task"],
                input_data=input_data,
                context=results
            )

            results[stage["name"]] = stage_result

            # 记录执行日志
            self.log_stage_completion(stage["name"], stage_result)

        return results["final"]

    def create_researcher_agent(self):
        # 创建研究员智能体
        agent = AgentBuilder().create_agent(
            name="研究员",
            role="负责信息收集和整理",
            capabilities=["web_search", "document_analysis"]
        )
        agent.add_tool(WebSearch())
        agent.add_tool(DocumentProcessor())
        return agent

    # ... 其他智能体创建方法
8. 可视化编排进阶:复杂业务流程设计
8.1 工作流可视化配置
{
  "workflow": {
    "id": "customer_service_workflow",
    "name": "智能客服工作流",
    "version": "1.0",
    "nodes": [
      {
        "id": "intent_classifier",
        "type": "classifier",
        "model": "intent-classification-v2",
        "inputs": ["user_input"],
        "outputs": ["intent", "confidence"]
      },
      {
        "id": "knowledge_retriever",
        "type": "retriever",
        "condition": "intent == 'knowledge_query'",
        "knowledge_base": "faq_database",
        "inputs": ["user_input"],
        "outputs": ["relevant_docs", "answer_candidates"]
      },
      {
        "id": "sentiment_analyzer",
        "type": "analyzer",
        "model": "sentiment-analysis",
        "inputs": ["user_input"],
        "outputs": ["sentiment", "urgency"]
      },
      {
        "id": "response_generator",
        "type": "generator",
        "model": "ernie-4.0",
        "inputs": ["user_input", "relevant_docs", "sentiment"],
        "outputs": ["response"]
      },
      {
        "id": "human_handoff",
        "type": "action",
        "condition": "urgency == 'high' OR confidence < 0.6",
        "action": "transfer_to_human",
        "inputs": ["user_input", "sentiment"],
        "outputs": ["handoff_reason"]
      }
    ],
    "edges": [
      {
        "from": "intent_classifier",
        "to": "knowledge_retriever",
        "condition": "intent == 'knowledge_query'"
      },
      {
        "from": "intent_classifier",
        "to": "sentiment_analyzer",
        "condition": "always"
      },
      {
        "from": ["knowledge_retriever", "sentiment_analyzer"],
        "to": "response_generator"
      },
      {
        "from": "sentiment_analyzer",
        "to": "human_handoff",
        "condition": "urgency == 'high'"
      }
    ]
  }
}
8.2 工作流执行引擎
class WorkflowEngine:
    def __init__(self, workflow_config):
        self.workflow = self.parse_workflow(workflow_config)
        self.execution_context = {}
        self.node_registry = self.load_node_types()

    async def execute(self, input_data):
        """执行工作流"""
        # 初始化上下文
        self.execution_context = {**input_data}

        # 查找入口节点
        entry_nodes = self.find_entry_nodes()

        # 执行所有节点(支持并行)
        tasks = []
        for node_id in entry_nodes:
            task = asyncio.create_task(
                self.execute_node(node_id)
            )
            tasks.append(task)

        # 等待所有节点完成
        await asyncio.gather(*tasks)

        # 返回最终结果
        return self.collect_outputs()

    async def execute_node(self, node_id):
        """执行单个节点"""
        node = self.workflow["nodes"][node_id]

        # 检查条件
        if not self.evaluate_condition(node.get("condition")):
            return

        # 准备输入数据
        inputs = self.prepare_inputs(node["inputs"])

        # 执行节点逻辑
        node_type = self.node_registry[node["type"]]
        result = await node_type.execute(inputs, node.get("config", {}))

        # 存储结果
        for output_key, output_value in zip(node["outputs"], result):
            self.execution_context[output_key] = output_value

        # 触发后续节点
        next_nodes = self.find_next_nodes(node_id)
        for next_node_id in next_nodes:
            await self.execute_node(next_node_id)
9. 部署与发布:从开发到生产的全流程
9.1 部署配置管理
# deployment.yaml
deployment:
  name: "customer-service-agent"
  environment: "production"

  scaling:
    min_replicas: 2
    max_replicas: 10
    target_cpu_utilization: 70

  resources:
    requests:
      memory: "2Gi"
      cpu: "1"
    limits:
      memory: "4Gi"
      cpu: "2"

  monitoring:
    enabled: true
    metrics:
      - "request_latency"
      - "error_rate"
      - "concurrent_users"
    alerts:
      - name: "high_latency"
        condition: "request_latency > 2000"
        severity: "warning"

  endpoints:
    - name: "chat"
      path: "/api/chat"
      method: "POST"
      rate_limit: "100/minute"
    - name: "health"
      path: "/health"
      method: "GET"

  secrets:
    - name: "api_keys"
      keys: ["OPENAI_API_KEY", "DATABASE_URL"]
9.2 CI/CD流水线
# .github/workflows/deploy.yml
name: Deploy ModelEngine Agent

on:
  push:
    branches: [main]
  pull_request:
    branches: [main]

jobs:
  test:
    runs-on: ubuntu-latest
    steps:
    - uses: actions/checkout@v2

    - name: Set up Python
      uses: actions/setup-python@v2
      with:
        python-version: '3.9'

    - name: Install dependencies
      run: |
        pip install -r requirements.txt
        pip install pytest pytest-asyncio

    - name: Run tests
      run: |
        pytest tests/ -v --cov=src

  deploy:
    needs: test
    runs-on: ubuntu-latest
    if: github.ref == 'refs/heads/main'

    steps:
    - uses: actions/checkout@v2

    - name: Build Docker image
      run: |
        docker build -t my-agent:${{ github.sha }} .

    - name: Deploy to ModelEngine
      env:
        MODELENGINE_API_KEY: ${{ secrets.MODELENGINE_API_KEY }}
      run: |
        # 使用ModelEngine CLI部署
        modelengine deploy \
          --name customer-service-agent \
          --image my-agent:${{ github.sha }} \
          --config deployment.yaml

        # 执行健康检查
        sleep 30
        curl -f https://api.modelengine.baidu.com/deployments/customer-service-agent/health
10. 横向对比:ModelEngine vs 主流AI平台
10.1 功能对比矩阵
| 特性维度 | ModelEngine | Dify | Coze | Versatile |
|---|---|---|---|---|
| 可视化编排 | ⭐⭐⭐⭐⭐ | ⭐⭐⭐⭐ | ⭐⭐⭐ | ⭐⭐⭐ |
| 多智能体协作 | ⭐⭐⭐⭐⭐ | ⭐⭐ | ⭐ | ⭐⭐⭐ |
| MCP协议支持 | ⭐⭐⭐⭐⭐ | ⭐⭐⭐ | 未支持 | ⭐⭐ |
| 知识库管理 | ⭐⭐⭐⭐⭐ | ⭐⭐⭐⭐ | ⭐⭐⭐ | ⭐⭐⭐⭐ |
| 企业级部署 | ⭐⭐⭐⭐⭐ | ⭐⭐⭐⭐ | ⭐⭐⭐ | ⭐⭐⭐⭐ |
| 成本效益 | ⭐⭐⭐⭐ | ⭐⭐⭐⭐ | ⭐⭐⭐⭐⭐ | ⭐⭐⭐ |
| 开发者体验 | ⭐⭐⭐⭐ | ⭐⭐⭐⭐⭐ | ⭐⭐⭐ | ⭐⭐⭐⭐ |
| 生态丰富度 | ⭐⭐⭐⭐ | ⭐⭐⭐⭐⭐ | ⭐⭐⭐ | ⭐⭐⭐ |
10.2 性能基准测试
# 性能对比测试脚本
import time
import statistics

class PlatformBenchmark:
    def __init__(self):
        self.platforms = ["ModelEngine", "Dify", "Coze"]
        self.results = {}

    def run_benchmark(self, test_cases):
        for platform in self.platforms:
            print(f"\n测试平台: {platform}")
            platform_results = []

            for case_name, case_func in test_cases.items():
                latencies = []

                # 运行10次取平均
                for _ in range(10):
                    start = time.time()
                    result = case_func(platform)
                    latency = (time.time() - start) * 1000  # 毫秒
                    latencies.append(latency)

                avg_latency = statistics.mean(latencies)
                p95_latency = statistics.quantiles(latencies, n=20)[18]

                platform_results.append({
                    "case": case_name,
                    "avg_latency_ms": avg_latency,
                    "p95_latency_ms": p95_latency,
                    "success_rate": result.get("success_rate", 1.0)
                })

                print(f"  {case_name}: {avg_latency:.2f}ms (P95: {p95_latency:.2f}ms)")

            self.results[platform] = platform_results

        return self.results

    def generate_report(self):
        # 生成对比报告
        report = {
            "summary": {},
            "details": self.results
        }

        # 计算各平台综合得分
        for platform, results in self.results.items():
            total_score = 0
            for result in results:
                # 基于延迟和成功率计算分数
                latency_score = max(0, 100 - result["avg_latency_ms"] / 10)
                success_score = result["success_rate"] * 100
                total_score += (latency_score + success_score) / 2

            report["summary"][platform] = total_score / len(results)

        return report

# 测试用例定义
test_cases = {
    "简单问答": lambda p: run_simple_qa(p),
    "文档总结": lambda p: run_document_summary(p),
    "多步骤推理": lambda p: run_multi_step_reasoning(p),
    "工具调用": lambda p: run_tool_invocation(p)
}
11. 最佳实践与性能优化
11.1 性能优化策略
class PerformanceOptimizer:
    def __init__(self, agent):
        self.agent = agent
        self.metrics_collector = MetricsCollector()

    def apply_optimizations(self):
        optimizations = [
            self.cache_frequent_queries,
            self.batch_similar_requests,
            self.optimize_prompt_length,
            self.prune_unused_tools,
            self.enable_response_streaming,
            self.implement_fallback_strategies
        ]

        for opt_func in optimizations:
            improvement = opt_func()
            print(f"优化 {opt_func.__name__}: 性能提升 {improvement:.1f}%")

    def cache_frequent_queries(self):
        """缓存频繁查询结果"""
        cache_hits = 0
        total_requests = 1000

        # 实现缓存逻辑
        for _ in range(total_requests):
            query = generate_random_query()

            # 检查缓存
            cached = self.check_cache(query)
            if cached:
                cache_hits += 1
                use_cached_response(cached)
            else:
                response = self.agent.process(query)
                cache_response(query, response)

        hit_rate = cache_hits / total_requests
        estimated_improvement = hit_rate * 60  # 假设缓存节省60%时间
        return estimated_improvement

    def batch_similar_requests(self):
        """批量处理相似请求"""
        # 实现批量处理逻辑
        return 25.0  # 预计提升25%

    def optimize_prompt_length(self):
        """优化提示词长度"""
        original_length = len(self.agent.prompt_template)

        # 应用压缩策略
        compressed = compress_prompt(self.agent.prompt_template)
        new_length = len(compressed)

        reduction = (original_length - new_length) / original_length * 100
        # 假设长度减少10%能提升5%性能
        estimated_improvement = reduction * 0.5
        return estimated_improvement
12. 总结与展望
12.1 核心优势总结
- 企业级可靠性:ModelEngine在稳定性、安全性和扩展性方面表现出色
- 全流程覆盖:从数据准备到部署监控的全链路支持
- 生态开放性:良好的MCP协议支持,便于集成现有系统
- 可视化能力:直观的编排界面降低开发门槛
12.2 改进建议
- 社区生态建设:需要更多第三方插件和模板
- 本地化部署体验:离线环境下的部署流程可以进一步简化
- 成本透明化:更详细的成本分析和优化建议
- 文档完善:增加更多实战案例和最佳实践
12.3 未来展望
随着大模型技术的不断发展,智能体开发平台将呈现以下趋势:
- 更加智能化:AI辅助的开发工具,自动优化工作流
- 更加标准化:统一的接口和协议,降低集成成本
- 更加个性化:根据企业特定需求定制解决方案
- 更加普及化:降低使用门槛,让更多开发者能够参与
结语:ModelEngine作为百度推出的智能体开发平台,在功能完整性和企业级特性方面表现突出。尽管在某些用户体验细节上仍有提升空间,但其强大的可视化编排能力和多智能体协作框架,为构建复杂的AI应用提供了有力支持。对于需要快速构建和部署智能体应用的企业和开发者,ModelEngine是一个值得认真考虑的选择。
免责声明:本文基于公开信息和实际测试撰写,平台功能可能随时更新,请以官方最新文档为准。测试数据基于特定环境和配置,实际结果可能有所不同。

有“AI”的1024 = 2048,欢迎大家加入2048 AI社区
更多推荐
 15
15 0
0- 0


 已为社区贡献55条内容

所有评论(0)