重走Java Day07:抽象、接口与内部类——从“语法理解”到“架构思维”的觉醒
重走Java Day07:抽象、接口与内部类——从“语法理解”到“架构思维”的觉醒
我曾以为理解了抽象类和接口的语法,就掌握了面向对象的高级特性。直到我在一个真实项目中,因为滥用抽象类导致系统重构,才明白:抽象不是语法糖,而是设计决策。
开篇:那个让我重构整个支付系统的“抽象失误”
一年前,我负责设计一个电商平台的支付模块。需求看起来很简单:支持微信支付、支付宝、银联支付,未来可能扩展其他支付方式。
我自信地设计了第一版:
java
// 第一版:自以为“优雅”的抽象类设计
abstract class Payment {
protected String paymentId;
protected BigDecimal amount;
protected PaymentStatus status;
// 通用方法
public void validate() {
if (amount.compareTo(BigDecimal.ZERO) <= 0) {
throw new IllegalArgumentException("金额必须大于0");
}
}
public void logPayment() {
System.out.println("记录支付日志: " + paymentId);
}
// 抽象方法:每种支付方式不同的实现
public abstract boolean process();
public abstract boolean refund();
public abstract PaymentStatus checkStatus();
}
// 具体实现
class WechatPayment extends Payment {
private String openId;
private String prepayId;
@Override
public boolean process() {
// 微信支付特定逻辑
return callWechatAPI();
}
@Override
public boolean refund() {
// 微信退款逻辑
return callWechatRefundAPI();
}
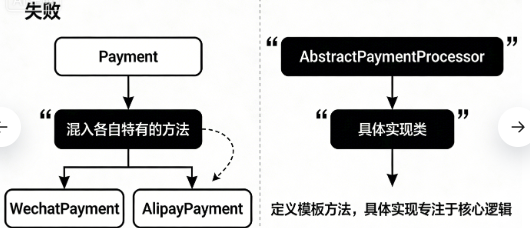
// 问题:微信特有的方法混入了
public String getPaymentQRCode() {
return generateQRCode();
}
}
class AlipayPayment extends Payment {
private String tradeNo;
private String buyerId;
@Override
public boolean process() {
// 支付宝特定逻辑
return callAlipayAPI();
}
// 问题:支付宝特有的回调处理
public void handleAsyncNotify(String notifyData) {
// 处理异步通知
}
}
这个设计在第一次需求变更时就崩溃了:我们需要增加一个“组合支付”(同时使用余额+信用卡)。组合支付不是一个具体的支付方式,而是多种支付方式的组合。
更糟的是,当我尝试引入“支付策略模式”时,发现抽象类限制了灵活性。我不得不重构整个支付模块。
一、抽象类:从“半成品模板”到“设计契约”
1. 抽象类的真正价值:模板方法模式
用户资料提到了模板方法模式,但没深入解释为什么这个模式如此重要。在我重构支付系统时,我重新理解了抽象类:
java
// 重构后:专注于“固定流程”的抽象类
public abstract class AbstractPaymentProcessor {
// 模板方法:定义支付处理的固定流程(final防止子类破坏)
public final PaymentResult process(PaymentRequest request) {
// 1. 验证(所有支付方式都一样)
validateRequest(request);
// 2. 前置处理(可被子类扩展)
beforeProcess(request);
// 3. 核心处理(子类必须实现)
PaymentResult result = doProcess(request);
// 4. 后置处理(可被子类扩展)
afterProcess(request, result);
// 5. 记录(所有支付方式都一样)
recordPayment(request, result);
return result;
}
// 固定实现的方法
private void validateRequest(PaymentRequest request) {
if (request.getAmount() == null || request.getAmount().signum() <= 0) {
throw new ValidationException("支付金额无效");
}
// 更多通用验证...
}
private void recordPayment(PaymentRequest request, PaymentResult result) {
// 记录到数据库
paymentRepository.save(new PaymentRecord(request, result));
}
// 钩子方法:子类可以覆盖(但不是必须)
protected void beforeProcess(PaymentRequest request) {
// 默认空实现
}
protected void afterProcess(PaymentRequest request, PaymentResult result) {
// 默认空实现
}
// 抽象方法:子类必须实现
protected abstract PaymentResult doProcess(PaymentRequest request);
// 另一个模板方法:退款流程
public final RefundResult refund(RefundRequest request) {
validateRefundRequest(request);
RefundResult result = doRefund(request);
recordRefund(request, result);
return result;
}
protected abstract RefundResult doRefund(RefundRequest request);
}
// 具体实现变得非常干净
public class WechatPaymentProcessor extends AbstractPaymentProcessor {
private final WechatPayClient wechatClient;
@Override
protected PaymentResult doProcess(PaymentRequest request) {
// 只关注微信支付特有的逻辑
WechatPaymentRequest wechatRequest = convertToWechatRequest(request);
WechatPaymentResponse response = wechatClient.pay(wechatRequest);
return convertToPaymentResult(response);
}
@Override
protected RefundResult doRefund(RefundRequest request) {
// 微信退款特有逻辑
return wechatClient.refund(request);
}
@Override
protected void beforeProcess(PaymentRequest request) {
// 微信支付特有的前置处理
String openId = getUserOpenId(request.getUserId());
request.addParam("openId", openId);
}
}
关键洞察:抽象类最适合的场景是定义算法的骨架,让子类在不改变算法结构的情况下重新定义算法的某些步骤。
2. 抽象类的构造器之谜
一个常被忽略但重要的点:抽象类可以有构造器,但不能被直接调用:
java
public abstract class BaseEntity {
protected final String id;
protected final Instant createdAt;
protected Instant updatedAt;
// 抽象类的构造器:初始化公共字段
protected BaseEntity() {
this.id = UUID.randomUUID().toString();
this.createdAt = Instant.now();
this.updatedAt = this.createdAt;
}
protected BaseEntity(String id, Instant createdAt) {
this.id = id;
this.createdAt = createdAt;
this.updatedAt = createdAt;
}
// 模板方法:更新实体的固定流程
public final void update() {
validateBeforeUpdate();
doUpdate();
updatedAt = Instant.now();
postUpdate();
}
protected abstract void doUpdate();
protected void validateBeforeUpdate() { /* 默认实现 */ }
protected void postUpdate() { /* 默认实现 */ }
}
// 子类构造器必须调用父类构造器
public class User extends BaseEntity {
private String username;
private String email;
public User(String username, String email) {
super(); // 调用父类无参构造器
this.username = username;
this.email = email;
}
@Override
protected void doUpdate() {
// 用户特定的更新逻辑
validateEmail(email);
}
@Override
protected void validateBeforeUpdate() {
if (username == null || username.trim().isEmpty()) {
throw new ValidationException("用户名不能为空");
}
}
}
3. 抽象类的“不可实例化”陷阱
我曾经犯过一个错误:试图绕过抽象类的实例化限制:
java
// ❌ 错误做法:试图“曲线救国”
abstract class ConfigLoader {
public abstract Config load();
// 提供一个静态工厂方法
public static ConfigLoader createDefault() {
// 返回一个匿名内部类实例
return new ConfigLoader() {
@Override
public Config load() {
return loadFromDefaultPath();
}
};
}
}
// 问题:这破坏了抽象类的设计意图
// 抽象类应该是“需要被继承才有意义”的
// 如果可以创建实例,就应该用普通类+接口
// ✅ 正确做法:明确设计意图
// 情况1:真的需要实例 -> 用普通类
class DefaultConfigLoader {
public Config load() {
return loadFromDefaultPath();
}
}
// 情况2:需要多态 -> 用接口+实现类
interface ConfigLoader {
Config load();
}
class FileConfigLoader implements ConfigLoader {
@Override
public Config load() {
return loadFromFile();
}
}
class DatabaseConfigLoader implements ConfigLoader {
@Override
public Config load() {
return loadFromDatabase();
}
}
二、接口:从“行为契约”到“系统架构”
1. 接口的演进:从“脆弱”到“强大”
用户资料提到了JDK8+的接口新特性,但没解释这些特性如何改变我们的设计:
java
// JDK8之前:接口是“脆弱的”
public interface PaymentService {
// 只能有抽象方法
PaymentResult pay(PaymentRequest request);
RefundResult refund(RefundRequest request);
// 问题:如果要在所有实现中添加新方法,会破坏所有现有实现
// boolean cancel(String paymentId); // 添加这个方法会破坏所有实现类
}
// JDK8之后:接口变得“强大且兼容”
public interface PaymentService {
// 抽象方法
PaymentResult pay(PaymentRequest request);
// 默认方法:提供默认实现,不破坏现有实现
default RefundResult refund(RefundRequest request) {
throw new UnsupportedOperationException("退款功能未实现");
}
// 另一个默认方法
default boolean cancel(String paymentId) {
// 默认实现:记录日志,返回false
log.warn("取消支付功能未实现,paymentId: {}", paymentId);
return false;
}
// 静态方法:工具方法
static PaymentRequestBuilder builder() {
return new PaymentRequestBuilder();
}
// 私有方法(JDK9+):辅助方法,不暴露给实现类
private void validateAmount(BigDecimal amount) {
if (amount == null || amount.signum() <= 0) {
throw new IllegalArgumentException("金额必须大于0");
}
}
}
// 实现类可以只实现需要的方法
class SimplePaymentService implements PaymentService {
@Override
public PaymentResult pay(PaymentRequest request) {
// 只实现支付
return processPayment(request);
}
// refund和cancel使用默认实现
}
class FullPaymentService implements PaymentService {
@Override
public PaymentResult pay(PaymentRequest request) { /* 实现 */ }
@Override
public RefundResult refund(RefundRequest request) {
// 覆盖默认实现
return processRefund(request);
}
@Override
public boolean cancel(String paymentId) {
// 覆盖默认实现
return doCancel(paymentId);
}
}
2. 接口的多重实现与“菱形继承”问题
这是Java面试的经典问题,在实际项目中也会遇到:
java
interface A {
default void doSomething() {
System.out.println("A.doSomething");
}
}
interface B {
default void doSomething() {
System.out.println("B.doSomething");
}
}
// ❌ 编译错误:类C继承了两个接口的doSomething()默认方法
// class C implements A, B { }
// ✅ 解决方案1:明确指定使用哪个
class D implements A, B {
@Override
public void doSomething() {
// 明确调用A的默认方法
A.super.doSomething();
// 或者提供自己的实现
}
}
// ✅ 解决方案2:重新抽象
abstract class AbstractA implements A {
// 把冲突的方法变成抽象,让子类决定
@Override
public abstract void doSomething();
}
class E extends AbstractA implements B {
@Override
public void doSomething() {
// 现在只需要处理B的默认方法
B.super.doSomething();
}
}
在我的支付系统中,我遇到了类似问题:
java
// 定义各种能力接口
interface Payable {
default PaymentResult pay(PaymentRequest request) {
return processPayment(request);
}
PaymentResult processPayment(PaymentRequest request);
}
interface Refundable {
default RefundResult refund(RefundRequest request) {
return processRefund(request);
}
RefundResult processRefund(RefundRequest request);
}
interface Cancelable {
default boolean cancel(String paymentId) {
return doCancel(paymentId);
}
boolean doCancel(String paymentId);
}
// 组合接口:微信支付支持所有功能
interface WechatPaymentService extends Payable, Refundable, Cancelable {
// 微信特有方法
String getPaymentQRCode(PaymentRequest request);
}
// 具体实现
public class WechatPaymentServiceImpl implements WechatPaymentService {
// 必须实现所有抽象方法
@Override
public PaymentResult processPayment(PaymentRequest request) {
// 微信支付实现
}
@Override
public RefundResult processRefund(RefundRequest request) {
// 微信退款实现
}
@Override
public boolean doCancel(String paymentId) {
// 微信取消实现
}
@Override
public String getPaymentQRCode(PaymentRequest request) {
// 微信特有
}
}
3. 接口在Spring框架中的魔法
现代Java开发离不开Spring框架,而接口在Spring中扮演着核心角色:
java
// 业务服务接口
public interface OrderService {
Order createOrder(OrderRequest request);
Order getOrder(String orderId);
Order updateOrder(OrderUpdateRequest request);
void cancelOrder(String orderId);
// 默认方法:业务规则
default void validateOrderRequest(OrderRequest request) {
if (request.getItems() == null || request.getItems().isEmpty()) {
throw new ValidationException("订单项不能为空");
}
if (request.getTotalAmount() == null || request.getTotalAmount().signum() <= 0) {
throw new ValidationException("订单金额无效");
}
}
}
// 实现类:Spring管理的Bean
@Service
@Transactional
@Slf4j
public class OrderServiceImpl implements OrderService {
private final OrderRepository orderRepository;
private final PaymentService paymentService;
private final InventoryService inventoryService;
@Autowired
public OrderServiceImpl(OrderRepository orderRepository,
PaymentService paymentService,
InventoryService inventoryService) {
this.orderRepository = orderRepository;
this.paymentService = paymentService;
this.inventoryService = inventoryService;
}
@Override
public Order createOrder(OrderRequest request) {
// 1. 使用接口默认方法验证
validateOrderRequest(request);
// 2. 检查库存
inventoryService.reserveItems(request.getItems());
// 3. 创建订单
Order order = Order.fromRequest(request);
order = orderRepository.save(order);
// 4. 调用支付
PaymentRequest paymentRequest = buildPaymentRequest(order);
PaymentResult paymentResult = paymentService.pay(paymentRequest);
// 5. 更新订单状态
order.updatePaymentStatus(paymentResult);
return orderRepository.save(order);
}
// 其他方法实现...
}
// 测试时可以使用Mock
@ExtendWith(MockitoExtension.class)
class OrderServiceTest {
@Mock
private OrderRepository orderRepository;
@Mock
private PaymentService paymentService;
@InjectMocks
private OrderServiceImpl orderService;
@Test
void createOrder_ValidRequest_ReturnsOrder() {
// 测试接口实现
OrderRequest request = createValidOrderRequest();
Order result = orderService.createOrder(request);
assertNotNull(result);
verify(paymentService).pay(any());
}
}
三、抽象类 vs 接口:从“选择困难”到“设计直觉”
经过多次重构,我总结出了一套实用的选择指南:
1. 决策流程图
text
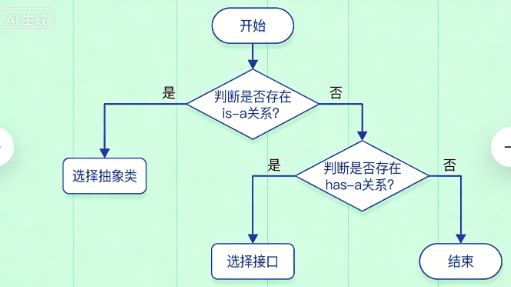
需要建模什么?
├── 是“is-a”关系(狗是一种动物)?
│   ├── 有共享的状态/实现吗?
│   │   ├── 是 → 抽象类
│   │   └── 否 → 接口
│   └── 需要多重继承吗?
│       ├── 是 → 接口
│       └── 否 → 继续判断
└── 是“has-a”能力(狗会游泳)?
    └── 接口
2. 实际案例分析
案例1:日志框架设计
java
// 抽象类:有共享状态和模板方法
abstract class AbstractLogger {
    protected LogLevel level;
    protected Appender appender;

    // 模板方法
    public final void log(LogLevel level, String message) {
        if (isEnabled(level)) {
            String formatted = format(message);
            doLog(formatted);
        }
    }

    protected abstract String format(String message);
    protected abstract void doLog(String formattedMessage);

    protected boolean isEnabled(LogLevel level) {
        return this.level.ordinal() >= level.ordinal();
    }
}

// 接口:定义日志能力
interface Auditable {
    void audit(String action, String userId, Object details);
}

// 类可以同时继承抽象类和实现接口
class FileLogger extends AbstractLogger implements Auditable {
    private final File logFile;

    @Override
    protected String format(String message) {
        return Instant.now() + " [" + level + "] " + message;
    }

    @Override
    protected void doLog(String formattedMessage) {
        writeToFile(logFile, formattedMessage);
    }

    @Override
    public void audit(String action, String userId, Object details) {
        log(LogLevel.INFO, "AUDIT: " + action + " by " + userId);
        saveAuditRecord(action, userId, details);
    }
}
案例2:电商促销系统
java
// 接口:定义促销策略
interface PromotionStrategy {
    BigDecimal apply(BigDecimal originalPrice, OrderContext context);

    // 默认方法:验证策略是否适用
    default boolean isApplicable(OrderContext context) {
        return context.getCustomerType() == CustomerType.REGULAR;
    }

    // 静态方法:工厂方法
    static PromotionStrategy of(String type) {
        switch (type) {
            case "DISCOUNT": return new DiscountStrategy();
            case "COUPON": return new CouponStrategy();
            case "FLASH_SALE": return new FlashSaleStrategy();
            default: throw new IllegalArgumentException("未知促销类型");
        }
    }
}

// 抽象类:共享促销计算逻辑
abstract class AbstractPromotionStrategy implements PromotionStrategy {
    protected final PromotionRule rule;

    protected AbstractPromotionStrategy(PromotionRule rule) {
        this.rule = rule;
    }

    @Override
    public BigDecimal apply(BigDecimal originalPrice, OrderContext context) {
        if (!isApplicable(context)) {
            return originalPrice;  // 不适用,返回原价
        }

        BigDecimal discounted = calculateDiscount(originalPrice, context);
        return discounted.max(BigDecimal.ZERO);  // 确保价格不为负
    }

    protected abstract BigDecimal calculateDiscount(BigDecimal originalPrice, OrderContext context);

    // 公共辅助方法
    protected BigDecimal getDiscountRate(OrderContext context) {
        if (context.isVIP()) {
            return rule.getVipDiscountRate();
        }
        return rule.getRegularDiscountRate();
    }
}

// 具体策略
class DiscountStrategy extends AbstractPromotionStrategy {
    public DiscountStrategy() {
        super(PromotionRule.DEFAULT_DISCOUNT);
    }

    @Override
    protected BigDecimal calculateDiscount(BigDecimal originalPrice, OrderContext context) {
        BigDecimal rate = getDiscountRate(context);
        return originalPrice.multiply(BigDecimal.ONE.subtract(rate));
    }
}
四、代码块:从“语法技巧”到“工程实践”
1. 静态代码块的真实应用
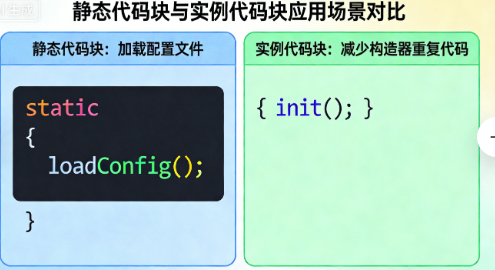
用户资料只展示了基础用法,实际项目中静态代码块有更重要的作用:
java
// 场景1:加载配置文件
public class AppConfig {
    private static final Properties config = new Properties();

    static {
        // 类加载时执行,确保配置提前加载
        try (InputStream is = AppConfig.class.getClassLoader()
                .getResourceAsStream("application.properties")) {
            if (is != null) {
                config.load(is);
            } else {
                // 加载默认配置
                loadDefaultConfig();
            }
        } catch (IOException e) {
            // 静态代码块不能抛出受检异常,必须处理
            throw new RuntimeException("加载配置文件失败", e);
        }
    }

    private static void loadDefaultConfig() {
        config.setProperty("server.port", "8080");
        config.setProperty("database.url", "jdbc:mysql://localhost:3306/app");
        // ...
    }

    public static String getProperty(String key) {
        return config.getProperty(key);
    }
}

// 场景2:注册服务(SPI机制)
public class ServiceRegistry {
    private static final Map<String, ServiceProvider> providers = new HashMap<>();

    static {
        // 自动发现并注册所有ServiceProvider实现
        ServiceLoader<ServiceProvider> loader = ServiceLoader.load(ServiceProvider.class);
        for (ServiceProvider provider : loader) {
            providers.put(provider.getServiceName(), provider);
            log.info("注册服务提供者: {}", provider.getServiceName());
        }

        if (providers.isEmpty()) {
            log.warn("未发现任何服务提供者");
        }
    }

    public static ServiceProvider getProvider(String serviceName) {
        return providers.get(serviceName);
    }
}

// 场景3:初始化复杂静态数据结构
public class ColorPalette {
    // 静态常量映射
    private static final Map<String, Color> NAMED_COLORS;

    static {
        // 复杂的初始化逻辑
        Map<String, Color> map = new HashMap<>();

        // 基础颜色
        map.put("RED", new Color(255, 0, 0));
        map.put("GREEN", new Color(0, 255, 0));
        map.put("BLUE", new Color(0, 0, 255));

        // 从文件加载自定义颜色
        try {
            List<ColorDefinition> definitions = loadColorDefinitions();
            for (ColorDefinition def : definitions) {
                map.put(def.getName(), def.toColor());
            }
        } catch (IOException e) {
            log.warn("加载自定义颜色失败,使用默认颜色", e);
        }

        // 使映射不可变
        NAMED_COLORS = Collections.unmodifiableMap(map);
    }

    public static Color getColor(String name) {
        return NAMED_COLORS.get(name.toUpperCase());
    }
}
2. 实例代码块的妙用:减少构造器重复代码
java
// 反模式:多个构造器有重复代码
public class ConnectionPool {
    private final DataSource dataSource;
    private final int minSize;
    private final int maxSize;
    private final Duration timeout;

    public ConnectionPool(DataSource dataSource) {
        this.dataSource = dataSource;
        this.minSize = 10;  // 重复代码
        this.maxSize = 100; // 重复代码
        this.timeout = Duration.ofSeconds(30);  // 重复代码
        validate();  // 重复代码
    }

    public ConnectionPool(DataSource dataSource, int minSize, int maxSize) {
        this.dataSource = dataSource;
        this.minSize = minSize;
        this.maxSize = maxSize;
        this.timeout = Duration.ofSeconds(30);  // 重复代码
        validate();  // 重复代码
    }

    // 更多构造器...
}

// 正解:使用实例代码块
public class ConnectionPool {
    private final DataSource dataSource;
    private final int minSize;
    private final int maxSize;
    private final Duration timeout;

    // 实例代码块:所有构造器共享的初始化逻辑
    {
        // 公共验证逻辑
        validateDataSource();

        // 设置默认值(可在构造器中覆盖)
        this.timeout = Duration.ofSeconds(30);

        // 初始化资源
        initializePool();
    }

    public ConnectionPool(DataSource dataSource) {
        this.dataSource = Objects.requireNonNull(dataSource, "数据源不能为空");
        this.minSize = 10;
        this.maxSize = 100;
    }

    public ConnectionPool(DataSource dataSource, int minSize, int maxSize) {
        this.dataSource = Objects.requireNonNull(dataSource, "数据源不能为空");
        this.minSize = minSize;
        this.maxSize = maxSize;
    }

    private void validateDataSource() {
        // 验证数据源
    }

    private void initializePool() {
        // 初始化连接池
    }
}
五、内部类:从“嵌套语法”到“设计模式”

1. 成员内部类的真实应用:迭代器模式
java
// 自定义集合类的迭代器实现
public class FixedSizeList<E> implements Iterable<E> {
    private final E[] elements;
    private int size;

    public FixedSizeList(int capacity) {
        this.elements = (E[]) new Object[capacity];
    }

    public void add(E element) {
        if (size >= elements.length) {
            throw new IllegalStateException("列表已满");
        }
        elements[size++] = element;
    }

    // 成员内部类:迭代器
    @Override
    public Iterator<E> iterator() {
        return new FixedSizeListIterator();
    }

    // 私有内部类:可以直接访问外部类的私有字段
    private class FixedSizeListIterator implements Iterator<E> {
        private int cursor = 0;

        @Override
        public boolean hasNext() {
            return cursor < size;  // 访问外部类的size字段
        }

        @Override
        public E next() {
            if (!hasNext()) {
                throw new NoSuchElementException();
            }
            return elements[cursor++];  // 访问外部类的elements数组
        }

        @Override
        public void remove() {
            throw new UnsupportedOperationException("不支持删除操作");
        }
    }

    // 静态内部类:构建器
    public static class Builder<E> {
        private int capacity = 10;

        public Builder<E> capacity(int capacity) {
            if (capacity <= 0) {
                throw new IllegalArgumentException("容量必须大于0");
            }
            this.capacity = capacity;
            return this;
        }

        public FixedSizeList<E> build() {
            return new FixedSizeList<>(capacity);
        }
    }
}

// 使用
FixedSizeList<String> list = new FixedSizeList.Builder<String>()
    .capacity(20)
    .build();

for (String item : list) {  // 使用内部类实现的迭代器
    System.out.println(item);
}
2. 匿名内部类在现代Java中的演变
java
// Java 8之前:匿名内部类常用作事件监听器
button.addActionListener(new ActionListener() {
    @Override
    public void actionPerformed(ActionEvent e) {
        System.out.println("按钮被点击");
        doSomething();
    }

    private void doSomething() {
        // 额外逻辑
    }
});

// Java 8之后:Lambda表达式替代简单的匿名内部类
button.addActionListener(e -> {
    System.out.println("按钮被点击");
    doSomething();  // 不能定义额外方法
});

// 但是,复杂的匿名内部类仍然有用武之地
// 场景:创建一次性实现的策略
public class PaymentProcessor {
    private RetryStrategy retryStrategy;

    public void setRetryStrategy(RetryStrategy strategy) {
        this.retryStrategy = strategy;
    }

    public void processWithRetry(PaymentRequest request) {
        // 使用匿名内部类定义自定义重试策略
        RetryStrategy customStrategy = new RetryStrategy() {
            private int attemptCount = 0;

            @Override
            public boolean shouldRetry(Exception e, int attempt) {
                attemptCount = attempt;

                if (e instanceof TimeoutException) {
                    // 超时重试3次
                    return attempt < 3;
                }

                if (e instanceof NetworkException) {
                    // 网络错误重试5次,但每次延迟增加
                    return attempt < 5;
                }

                // 其他错误不重试
                return false;
            }

            @Override
            public Duration getDelay(int attempt) {
                // 指数退避
                return Duration.ofSeconds((long) Math.pow(2, attempt));
            }

            @Override
            public void onRetry(int attempt, Exception e) {
                log.warn("第{}次重试,错误: {}", attempt, e.getMessage());
            }
        };

        setRetryStrategy(customStrategy);
        process(request);
    }
}
3. 静态内部类的最佳实践:建造者模式
java
// 不可变类的建造者模式
public final class HttpRequest {
    private final String method;
    private final String url;
    private final Map<String, String> headers;
    private final String body;

    // 私有构造器
    private HttpRequest(Builder builder) {
        this.method = builder.method;
        this.url = builder.url;
        this.headers = Collections.unmodifiableMap(new HashMap<>(builder.headers));
        this.body = builder.body;
    }

    // 静态内部类:建造者
    public static class Builder {
        private String method = "GET";
        private String url;
        private Map<String, String> headers = new HashMap<>();
        private String body;

        public Builder url(String url) {
            this.url = Objects.requireNonNull(url, "URL不能为空");
            return this;
        }

        public Builder method(String method) {
            this.method = Objects.requireNonNull(method, "方法不能为空").toUpperCase();
            if (!Arrays.asList("GET", "POST", "PUT", "DELETE").contains(this.method)) {
                throw new IllegalArgumentException("不支持的HTTP方法: " + method);
            }
            return this;
        }

        public Builder header(String name, String value) {
            this.headers.put(
                Objects.requireNonNull(name, "头部名称不能为空"),
                Objects.requireNonNull(value, "头部值不能为空")
            );
            return this;
        }

        public Builder body(String body) {
            this.body = body;
            return this;
        }

        public HttpRequest build() {
            if (url == null || url.trim().isEmpty()) {
                throw new IllegalStateException("URL必须设置");
            }
            return new HttpRequest(this);
        }
    }

    // getter方法...
}

// 使用
HttpRequest request = new HttpRequest.Builder()
    .url("https://api.example.com/users")
    .method("POST")
    .header("Content-Type", "application/json")
    .header("Authorization", "Bearer token123")
    .body("{\"name\":\"张三\"}")
    .build();
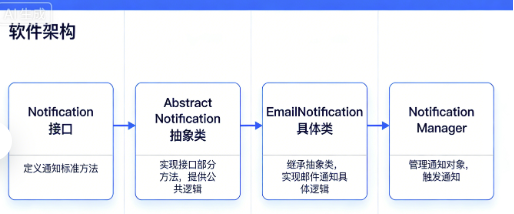
六、综合实战:设计一个可扩展的通知系统
让我用今天的所有知识,设计一个生产级的通知系统:
java
// 1. 接口定义通知行为
public interface Notification {
String getId();
String getTitle();
String getContent();
NotificationType getType();
Instant getCreatedAt();
// 默认方法:验证通知
default boolean isValid() {
return getTitle() != null && !getTitle().trim().isEmpty()
&& getContent() != null && !getContent().trim().isEmpty()
&& getType() != null;
}
// 静态工厂方法
static Notification create(String title, String content, NotificationType type) {
return new SimpleNotification(title, content, type);
}
}
// 2. 抽象类定义通知模板
public abstract class AbstractNotification implements Notification {
protected final String id;
protected final String title;
protected final String content;
protected final NotificationType type;
protected final Instant createdAt;
protected AbstractNotification(String title, String content, NotificationType type) {
this.id = UUID.randomUUID().toString();
this.title = Objects.requireNonNull(title, "标题不能为空");
this.content = Objects.requireNonNull(content, "内容不能为空");
this.type = Objects.requireNonNull(type, "类型不能为空");
this.createdAt = Instant.now();
}
@Override
public String getId() { return id; }
@Override
public String getTitle() { return title; }
@Override
public String getContent() { return content; }
@Override
public NotificationType getType() { return type; }
@Override
public Instant getCreatedAt() { return createdAt; }
// 抽象方法:子类定义具体格式
public abstract String getFormattedContent();
// 模板方法:发送通知的固定流程
public final void send() {
if (!isValid()) {
throw new IllegalStateException("通知无效");
}
preSend();
doSend();
postSend();
}
protected void preSend() {
log.info("准备发送通知: {}", id);
}
protected abstract void doSend();
protected void postSend() {
log.info("通知发送完成: {}", id);
recordDelivery();
}
private void recordDelivery() {
// 记录投递状态
}
}
// 3. 具体通知类
public class EmailNotification extends AbstractNotification {
private final String recipientEmail;
private final String subject;
// 静态内部类:建造者
public static class Builder {
private String title;
private String content;
private String recipientEmail;
private String subject;
public Builder title(String title) {
this.title = title;
return this;
}
public Builder content(String content) {
this.content = content;
return this;
}
public Builder recipientEmail(String email) {
this.recipientEmail = email;
return this;
}
public Builder subject(String subject) {
this.subject = subject;
return this;
}
public EmailNotification build() {
return new EmailNotification(this);
}
}
private EmailNotification(Builder builder) {
super(builder.title, builder.content, NotificationType.EMAIL);
this.recipientEmail = Objects.requireNonNull(builder.recipientEmail, "收件人邮箱不能为空");
this.subject = builder.subject != null ? builder.subject : builder.title;
}
@Override
public String getFormattedContent() {
return String.format("""
主题: %s
收件人: %s
内容: %s
""", subject, recipientEmail, getContent());
}
@Override
protected void doSend() {
// 发送邮件逻辑
EmailSender.send(recipientEmail, subject, getContent());
}
// 实例代码块:注册到通知管理器
{
NotificationManager.register(this);
}
}
// 4. 通知管理器(使用静态代码块初始化)
public class NotificationManager {
private static final Map<NotificationType, List<NotificationHandler>> handlers = new HashMap<>();
// 静态代码块:初始化处理器映射
static {
// 加载所有处理器
ServiceLoader<NotificationHandler> loader = ServiceLoader.load(NotificationHandler.class);
for (NotificationHandler handler : loader) {
handlers.computeIfAbsent(handler.getSupportedType(), k -> new ArrayList<>())
.add(handler);
}
// 注册默认处理器
registerDefaultHandlers();
}
private static void registerDefaultHandlers() {
registerHandler(NotificationType.EMAIL, new EmailNotificationHandler());
registerHandler(NotificationType.SMS, new SmsNotificationHandler());
registerHandler(NotificationType.PUSH, new PushNotificationHandler());
}
public static void registerHandler(NotificationType type, NotificationHandler handler) {
handlers.computeIfAbsent(type, k -> new ArrayList<>()).add(handler);
}
public static void register(Notification notification) {
List<NotificationHandler> typeHandlers = handlers.get(notification.getType());
if (typeHandlers != null) {
for (NotificationHandler handler : typeHandlers) {
handler.handle(notification);
}
}
}
// 成员内部类:处理器接口
public interface NotificationHandler {
NotificationType getSupportedType();
void handle(Notification notification);
}
// 静态内部类:配置
public static class Config {
private int maxRetries = 3;
private Duration timeout = Duration.ofSeconds(30);
public Config maxRetries(int maxRetries) {
this.maxRetries = maxRetries;
return this;
}
public Config timeout(Duration timeout) {
this.timeout = timeout;
return this;
}
public void apply() {
// 应用配置
}
}
}
// 5. 枚举定义通知类型
public enum NotificationType {
EMAIL("邮件"),
SMS("短信"),
PUSH("推送"),
WECHAT("微信"),
DINGTALK("钉钉");
private final String description;
// 枚举构造器
NotificationType(String description) {
this.description = description;
}
public String getDescription() {
return description;
}
// 静态方法:从字符串解析
public static NotificationType fromString(String value) {
for (NotificationType type : values()) {
if (type.name().equalsIgnoreCase(value)) {
return type;
}
}
throw new IllegalArgumentException("未知的通知类型: " + value);
}
}
七、设计原则与最佳实践总结
1. 抽象类使用原则
-
模板方法模式:当有固定算法骨架,只有某些步骤变化时
-
代码复用:多个类有共享的非公共代码时(接口做不到)
-
控制构造:需要控制子类创建过程时
-
避免:如果只有静态方法,使用工具类而非抽象类
2. 接口设计原则
-
定义能力:has-a关系,类能做什么
-
解耦:客户端代码依赖接口,而非具体实现
-
默认方法:用于API演进,添加新方法不破坏现有实现
-
静态方法:接口相关的工具方法
-
多重继承:类需要多种能力时
3. 代码块使用指南
-
静态代码块:复杂的静态初始化、加载资源、注册服务
-
实例代码块:多个构造器的公共初始化逻辑
-
注意:静态代码块不能抛出受检异常,必须处理
4. 内部类选择矩阵
text
需要什么特性?
├── 需要访问外部实例所有成员 → 成员内部类
├── 需要独立,不依赖外部实例 → 静态内部类
├── 只在方法内使用 → 局部内部类
└── 一次性实现,不需要名字 → 匿名内部类
结语:从语法理解到设计直觉
三年前那个让我重构的支付系统,今天看来是我面向对象设计思维的成人礼。它让我明白:
抽象类不是"有抽象方法的类",而是"部分实现的模板"——它封装了不变的部分,开放了变化的部分。
接口不是"只有方法声明的类",而是"能力的契约"——它定义了系统各部分的协作协议。
代码块不是"语法技巧",而是"生命周期管理工具"——它们在对象的诞生和类的加载中扮演关键角色。
内部类不是"嵌套的语法糖",而是"封装和组织的艺术"——它们让紧密相关的逻辑呆在一起。
Day07的内容,是Java面向对象设计从"会用"到"精通"的关键一跃。今天你理解的这些概念,将决定你未来是写"正确的代码",还是设计"优雅的系统"。
记住:技术会过时,语法会变化,但设计思想永存。好的设计,是经得起时间考验的。
明天,当你学习函数式编程和Lambda表达式时,你会看到这些面向对象概念如何与函数式思想融合。但那是明天的故事了。
今天,好好思考你设计的每一个抽象、每一个接口——它们不只是代码,更是你对问题本质的洞察和表达。

有“AI”的1024 = 2048,欢迎大家加入2048 AI社区
更多推荐

 3
3 0
0- 0


 已为社区贡献15条内容

所有评论(0)