GitHub Copilot 调用第三方模型API
·
一、说明
OAI Compatible Provider for Copilot 的作用是:把 Copilot/Copilot Chat 发出的“类似 OpenAI API 的请求”,转发到指定的 OpenAI-Compatible 服务端(例如 ModelScope 推理网关、自建的兼容网关等)。
⚠️ Warning
登录 GitHub Copilot 的账号一定要是非组织方式开通 pro 会员的,不然无法管理模型。
推荐直接用免费的free账号登录即可。
二、插件安装
在 VS Code 扩展市场安装并启用:
- GitHub Copilot
- GitHub Copilot Chat
- OAI Compatible Provider for Copilot(johnny-zhao.oai-compatible-copilot)
安装后:Developer: Reload Window 重载窗口一次。
确保已在 VS Code 中登录 GitHub,并且 Copilot 正常可用(不然你分不清是 Copilot 本身问题还是 provider 转发问题)。
三、配置示例
建议将配置放置在项目内的: .vscode/settings.json
1、单模型示例
{
    "oaicopilot.baseUrl": "https://api.soraharu.com/v1",
    "oaicopilot.delay": 0,
    "oaicopilot.readFileLines": 0,
    "oaicopilot.retry": {
        "enabled": true,
        "max_attempts": 3,
        "interval_ms": 1000,
        "status_codes": []
    },
    "oaicopilot.commitLanguage": "English",
    "oaicopilot.models": [
        {
            "id": "__provider__soraharu",
            "owned_by": "soraharu",
            "baseUrl": "https://api.api.soraharu.com/v1",
            "apiMode": "openai"
        },
        {
            "id": "google/gemini-3-pro-preview",
            "owned_by": "soraharu",
            "baseUrl": "https://api.soraharu.com/v1",
            "context_length": 128000,
            "max_tokens": 4096,
            "vision": true,
            "apiMode": "openai",
            "temperature": 0
        }
    ]
}
2、多模型示例
{
    "oaicopilot.baseUrl": "https://api.soraharu.com/v1",
    "oaicopilot.delay": 0,
    "oaicopilot.readFileLines": 0,
    "oaicopilot.retry": {
        "enabled": true,
        "max_attempts": 3,
        "interval_ms": 1000,
        "status_codes": []
    },
    "oaicopilot.commitLanguage": "English",
    "oaicopilot.models": [
        {
            "id": "__provider__soraharu",
            "owned_by": "soraharu",
            "baseUrl": "https://api.soraharu.com/v1",
            "apiMode": "openai"
        },
        {
            "id": "google/gemini-3-pro-preview",
            "owned_by": "soraharu",
            "baseUrl": "https://api.soraharu.com/v1",
            "context_length": 128000,
            "max_tokens": 4096,
            "vision": true,
            "apiMode": "openai",
            "temperature": 0
        },
        {
            "id": "anthropic/claude-opus-4-5-thinking",
            "owned_by": "soraharu",
            "baseUrl": "https://api.soraharu.com/v1",
            "context_length": 128000,
            "max_tokens": 4096,
            "vision": true,
            "apiMode": "openai",
            "temperature": 0
        },
        {
            "id": "anthropic/claude-sonnet-4-thinking",
            "owned_by": "soraharu",
            "baseUrl": "https://api.soraharu.com/v1",
            "context_length": 128000,
            "max_tokens": 8192,
            "vision": true,
            "apiMode": "openai",
            "temperature": 0
        }
    ]
}
3、配置讲解
配置主要分为两块:
- 顶层通用项(全局 API 地址、重试等)
- oaicopilot.models数组(定义可选的大模型)
顶层通用项
| 字段 | 作用 |
|---|---|
| oaicopilot.baseUrl | 通用 API 基地址,推荐全局只用一处。 |
| oaicopilot.delay | 控制 Copilot 插件调用接口时的延迟,一般设 0(默认即可) |
| oaicopilot.readFileLines | 配合 Copilot 文件分段补全时用,设 0 即可 |
| oaicopilot.retry | Copilot Chat请求失败时的自动重试策略。 |
| oaicopilot.commitLanguage | Copilot建议生成commit的语言,通常填"English"即可 |
模型池 oaicopilot.models
| 字段 | 作用 |
|---|---|
| id | 必须和/v1/models能获得的模型id一致(如"google/gemini-3-pro-preview") |
| owned_by | 一般填"provider名"即可,描述归属或来源 |
| baseUrl | 建议只在顶层写一处,模型对象里不强制(写也可以,冲突时顶层优先) |
| apiMode | 绝大多数 Soraharu/OneAPI都填"openai",如果是anthropic/olllama/自定义才需变 |
| context_length | 最大上下文长度(token数,依照模型能力填) |
| max_tokens | 每次回应的最大输出(token数,官方建议4096/8192之类) |
| vision | 支持多模态(如Gemini/Claude/Sonnet等具备图文能力才设true) |
| temperature | 控制AI输出随机性,越低回答越稳定,代码任务建议设为0 |
4、配置KEY
在 VSCode 页面进行操作:
- Windows/Linux 环境:Ctrl+Shift+P
- Mac 环境:Cmd+Shift+P
输入下面的命令,然后将KEY输入进去:
Set OAl Compatible Multi-Provider Apikey
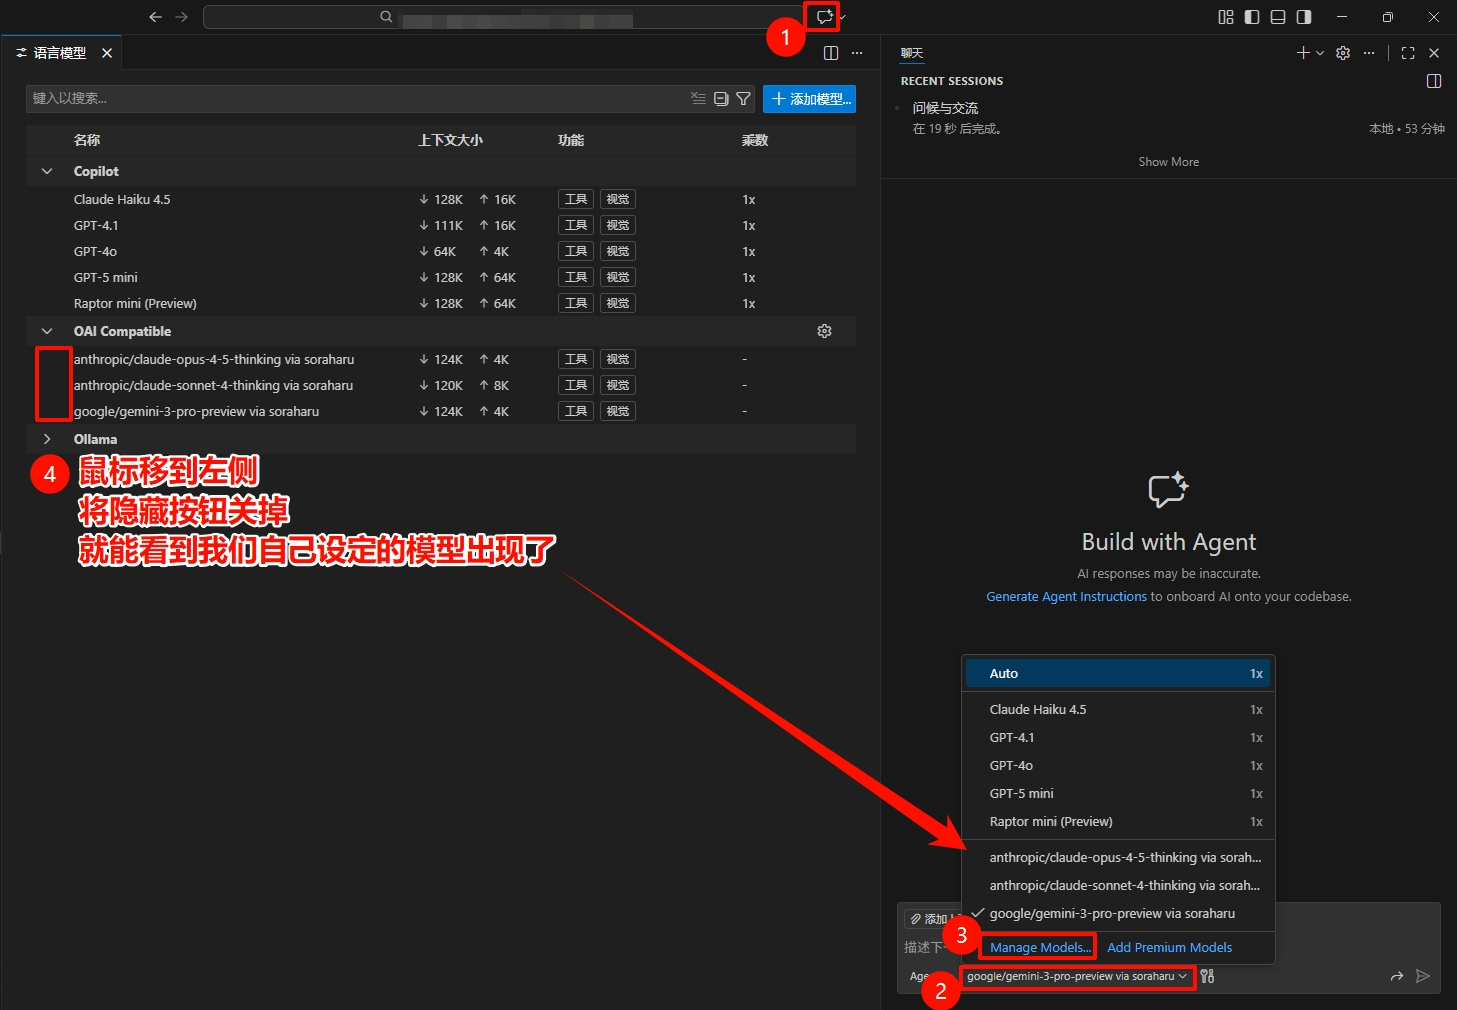
四、模型使用
- 点击进入 Copilot 聊天框
- 点击模型选择框
- 点击模型管理(Manage Modules....)
- 选择 OAI Compatible 将左侧的隐藏眼睛关闭,这样我们自己设定的模型就会出现在选择框了。

有“AI”的1024 = 2048,欢迎大家加入2048 AI社区
更多推荐
 21
21 0
0- 0


 已为社区贡献2条内容

所有评论(0)