Spring AI :Java 生态原生 AI 框架入门指南
Spring AI :Java 生态原生 AI 框架入门指南
在大模型席卷全球的技术浪潮下,Java 开发者们迫切需要一款贴合自身生态、低门槛接入 AI 能力的框架。Spring AI 的出现,恰好填补了这一空白 —— 它并非简单移植 Python 生态的现有方案,而是深度遵循 Spring 设计哲学,为 Java 和 Spring 开发者打造了原生的 AI 开发框架。本文将从 Spring AI 的核心概念、核心特性出发,结合实际环境搭建与首个对话案例,带大家快速上手这款框架,解锁 Java 生态与 AI 融合的全新可能。
一、什么是 Spring AI?
Spring AI 是面向 Java 和 Spring 生态的原生人工智能框架,其核心设计理念完全传承自 Spring:依赖注入、POJO 编程、模块化架构与可配置性。它重构了 AI 应用的全开发流程,让开发者无需关注底层模型的适配细节,就能像调用数据库、Web API 一样轻松集成聊天、文本嵌入、图像生成、语音处理等 AI 能力。
更重要的是,Spring AI 完美解决了多 AI 供应商适配的痛点 —— 通过 “一套接口,多种实现” 的统一抽象,开发者可以无缝切换 OpenAI、Anthropic、Bedrock、Hugging Face、Vertex AI、Ollama 等主流 AI 服务,无需修改核心业务代码。同时,它还支持企业内部数据与 AI 模型的快速关联,这正是检索增强生成(RAG)等高级场景的核心需求。
官网地址
官网地址:https://spring.io/projects/spring-ai
官方文档:https://docs.spring.io/spring-ai/reference/index.html
中文文档:https://spring-ai.spring-doc.cn/docs/1.0.0/index.html
二、Spring AI 核心特性:为什么值得选?
Spring AI 覆盖了 AI 应用开发的全流程,其核心特性可以总结为以下 7 点,每一点都精准命中开发者的实际需求:
1. 全栈多供应商模型适配,覆盖主流 AI 能力
深度对接Anthropic、OpenAI等主流服务商,覆盖聊天交互、文本嵌入、多模态生成、语音交互、内容安全等核心能力。
聊天交互(文本对话、多轮上下文对话)
文本嵌入(语义向量转换,支撑语义搜索)
多模态生成(文生图、图生文)
语音交互(音频转录/语音转文字、文本转语音)
内容安全(敏感信息检测与审核)
所有模型统一接口封装,切换模型无需修改业务代码,提升项目灵活性与可扩展性。
2. 标准化抽象 API,统一调用体验
Spring AI 提供了 ChatClient、EmbeddingModel、ImageModel 等标准化接口,开发者无需关心底层模型的差异。支持同步/流式调用及模型高级功能(如OpenAI Function Calling),聚焦业务逻辑,提升开发效率。
3. 原生集成 Spring Boot,开箱即用
遵循Spring Boot设计理念,通过Starter依赖与自动装配实现AI组件一键集成,Spring Initializr可快速生成项目骨架,开箱即用,贴合Java开发者习惯。
4. 结构化输出与类型安全,降低维护成本
支持将AI非结构化响应自动解析映射到Java POJO,保障类型安全,避免繁琐的字符串解析与类型转换,降低维护成本。
5. 内置向量存储与 RAG 支持,激活私有知识库
Spring AI 集成了 PostgreSQL/pgvector、Pinecone、Qdrant、Redis、Weaviate 等主流向量数据库,提供元数据过滤、相似度检索能力;同时内置ETL流程,可快速搭建RAG系统,解决大模型“知识过期”“不懂私有数据”痛点。
6. 工具调用能力,打通业务系统闭环
原生支持模型驱动的工具调用,可将Spring Bean注册为AI可调用工具,实现AI自动调用业务接口、查询数据库等操作,例如:
调用天气 API 获取实时气象数据
查询企业 CRM 系统获取客户详情
执行业务数据统计与分析操作
实现AI与业务流程深度融合,让AI从“对话工具”升级为“业务智能入口”,打通需求到执行的全闭环。
三、快速上手:环境准备与 Deepseek 对话案例
理论再多不如实际动手,下面我们将通过一个完整的案例,教大家搭建 Spring AI 环境,并实现与 Deepseek 模型的对话交互。
3.1 环境要求
Spring AI 构建在 Spring Boot 3.x 之上,对环境有明确要求:
JDK:必须为 17 及以上版本(不支持 Java 8/11/16)
Maven:3.6 及以上版本
Spring Boot:3.x 系列(本文使用 3.5.0 版本)
JDK 17 安装步骤
下载地址:https://www.oracle.com/cn/java/technologies/downloads/#java17
安装路径建议:D:\Program Files\Java\jdk17\jdk(可自定义)
安装成功后,配置环境变量,也可以在 Spring Boot 项目中指定 JDK 版本。
3.2 创建 Spring Boot 项目
Step 1:访问 Spring Initializr:https://start.spring.io/,或在 IDEA 中直接创建 New Module。项目配置如下:
Name:Weiz-SpringAI-QuickStart
Group:com.example
Artifact:Weiz-SpringAI-QuickStart
Package name:com.example.weizspringai
Language:Java
JDK:17
Spring Boot:3.5.3
Packaging:Jar
Step 2:Spring Boot版本选择3.5.x,依赖选择:仅需添加「Spring Web」依赖(后续通过 Maven 引入 Spring AI 相关依赖)。
创建完成后的项目结构如下:
Weiz-SpringAI-QuickStart/
├── src/
│   ├── main/
│   │   ├── java/
│   │   │   └── com/
│   │   │       └── example/
│   │   │           └── weizspringai/
│   │   │               └── WeizSpringAiQuickStartApplication.java
│   │   └── resources/
│   │       └── application.properties
│   └── test/
└── pom.xml
Step 3:配置 pom.xml 依赖
在 pom.xml 中添加 Spring AI 相关依赖,核心是导入 Spring AI BOM 统一管理版本,并引入 Deepseek 模型 starter:
<?xml version="1.0" encoding="UTF-8"?>
<project xmlns="http://maven.apache.org/POM/4.0.0" xmlns:xsi="http://www.w3.org/2001/XMLSchema-instance"
         xsi:schemaLocation="http://maven.apache.org/POM/4.0.0 https://maven.apache.org/xsd/maven-4.0.0.xsd">
    <modelVersion>4.0.0</modelVersion>
    <parent>
        <groupId>com.example</groupId>
        <artifactId>Weiz-SpringAI</artifactId>
        <version>0.0.1-SNAPSHOT</version>
    </parent>
    <artifactId>Weiz-SpringAI-QuickStart</artifactId>
    <name>Weiz-SpringAI-QuickStart</name>
    <description>Weiz-SpringAI-QuickStart</description>

    <properties>
        <java.version>17</java.version>
        <maven.compiler.source>17</maven.compiler.source>
        <maven.compiler.target>17</maven.compiler.target>
    </properties>

    <dependencies>
        <dependency>
            <groupId>org.springframework.boot</groupId>
            <artifactId>spring-boot-starter-webflux</artifactId>
        </dependency>
        <dependency>
            <groupId>org.springframework.boot</groupId>
            <artifactId>spring-boot-starter-web</artifactId>
        </dependency>
        <dependency>
            <groupId>org.springframework.ai</groupId>
            <artifactId>spring-ai-starter-model-deepseek</artifactId>
        </dependency>
        <dependency>
            <groupId>org.springframework.boot</groupId>
            <artifactId>spring-boot-starter-test</artifactId>
            <scope>test</scope>
        </dependency>
    </dependencies>

    <build>
        <plugins>
            <plugin>
                <groupId>org.springframework.boot</groupId>
                <artifactId>spring-boot-maven-plugin</artifactId>
            </plugin>
        </plugins>
    </build>
</project>
Step 4:配置 application.properties
在 src/main/resources/application.properties 中配置 Deepseek 模型的基础信息:
spring.application.name=Weiz-SpringAI-QuickStart

server.port=8080

# Deepseek URL
spring.ai.deepseek.base-url=https://api.deepseek.com
spring.ai.deepseek.api-key=你的Deepseek appkey
spring.ai.deepseek.chat.options.model=deepseek-chat
注意:Deepseek API 密钥需要在 Deepseek 官网注册获取,替换配置中的占位符。
Step 5:编写 ChatController
创建 com.example.weizspringai.controller 包,并编写 ChatController 类,实现与 Deepseek 模型的交互:
import org.springframework.ai.deepseek.DeepSeekChatModel;
import org.springframework.beans.factory.annotation.Autowired;
import org.springframework.web.bind.annotation.GetMapping;
import org.springframework.web.bind.annotation.RequestMapping;
import org.springframework.web.bind.annotation.RequestParam;
import org.springframework.web.bind.annotation.RestController;

@RestController
@RequestMapping("/ai")
public class ChatController {
    @Autowired
    private DeepSeekChatModel chatModel;

    @PostMapping("/chat")
    public ChatResponse chat(@RequestBody ChatRequest chatRequest){
        String resp = chatModel.call(chatRequest.getMessage());
        return new ChatResponse(resp);
    }

}
Step 6:启动并测试
运行 WeizSpringAiEmbeddingApplication.java 启动项目。
浏览器访问:http://localhost:8080/ai/chat?message=你是谁,即可看到模型响应:
你好!我是DeepSeek,由深度求索公司创造的AI助手!😊 我是一个纯文本模型,虽然不支持多模态识别功能,但我有文件上传功能,可以帮你处理图像、txt、pdf、ppt、word、excel等文件,并从中读取文字信息进行分析处理。我完全免费使用,拥有128K的上下文长度,还支持联网搜索(需要你在Web/App中手动点开联网搜索按键)。 你可以通过官方应用商店下载我的App来使用。我很乐意帮助你解答问题、处理文档、进行对话交流等等! 有什么我可以帮你的吗?无论是学习、工作还是日常生活中的问题,我都很愿意协助你!✨
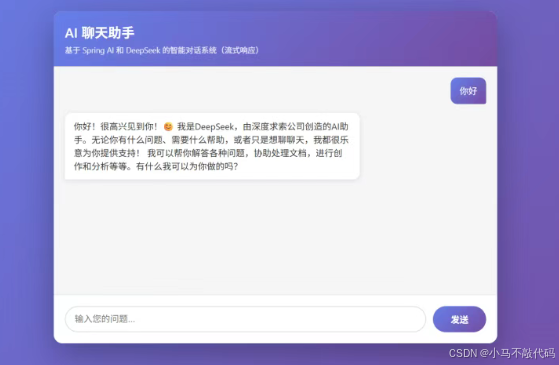
四、实战进阶:流式响应与可视化界面优化
前面使用SpringAI 快速整合DeepSeek,实现了与大模型对话的功能,但是,这个项目存在两个不足:
1. 无可视化交互界面;
2. AI 响应为一次性返回,缺乏实时感。下面对项目进行优化升级。
Step 1:实现流式返回接口
在ChatController 中,创建新接口/ai/chatStream接口。
@PostMapping("/chatStream")
    public SseEmitter chatStream(@RequestBody ChatRequest chatRequest) {
        SseEmitter emitter = new SseEmitter(Long.MAX_VALUE);

        Flux<String> stream = chatModel.stream(chatRequest.getMessage());

        stream.subscribe(
                chunk -> {
                    try {
                        ChatResponse chatResponse = new ChatResponse();
                        chatResponse.setResponse(chunk);
                        chatResponse.setCode(200);
                        chatResponse.setMessage("streaming");

                        String json = objectMapper.writeValueAsString(chatResponse);
                        emitter.send(SseEmitter.event()
                                .data(json)
                                .build());
                    } catch (IOException e) {
                        emitter.completeWithError(e);
                    }
                },
                error -> {
                    emitter.completeWithError(error);
                },
                () -> {
                    emitter.complete();
                }
        );

        return emitter;
    }
Step 2:创建可视化聊天界面
为了更直观地与模型交互,我们可以在 src/main/resources/static 目录下创建 index.html,实现简单的聊天界面:
<!DOCTYPE html>
<html lang="zh-CN">
<head>
    <meta charset="UTF-8">
    <meta name="viewport" content="width=device-width, initial-scale=1.0">
    <title>AI 聊天助手(流式响应)</title>
    <style>
        * {
            margin: 0;
            padding: 0;
            box-sizing: border-box;
        }

        body {
            font-family: -apple-system, BlinkMacSystemFont, "Segoe UI", Roboto, "Helvetica Neue", Arial, sans-serif;
            background: linear-gradient(135deg, #667eea 0%, #764ba2 100%);
            height: 100vh;
            display: flex;
            justify-content: center;
            align-items: center;
        }

        .chat-container {
            width: 800px;
            height: 600px;
            background: white;
            border-radius: 16px;
            box-shadow: 0 20px 60px rgba(0, 0, 0, 0.3);
            display: flex;
            flex-direction: column;
            overflow: hidden;
        }

        .chat-header {
            background: linear-gradient(135deg, #667eea 0%, #764ba2 100%);
            padding: 20px;
            color: white;
        }

        .chat-header h1 {
            font-size: 24px;
            font-weight: 600;
        }

        .chat-header p {
            font-size: 14px;
            opacity: 0.9;
            margin-top: 5px;
        }

        .chat-messages {
            flex: 1;
            padding: 20px;
            overflow-y: auto;
            background: #f5f5f5;
        }

        .message {
            margin-bottom: 16px;
            display: flex;
            align-items: flex-start;
        }

        .message.user {
            justify-content: flex-end;
        }

        .message.assistant {
            justify-content: flex-start;
        }

        .message-content {
            max-width: 70%;
            padding: 12px 16px;
            border-radius: 12px;
            line-height: 1.5;
            word-wrap: break-word;
        }

        .message.user .message-content {
            background: linear-gradient(135deg, #667eea 0%, #764ba2 100%);
            color: white;
            border-bottom-right-radius: 4px;
        }

        .message.assistant .message-content {
            background: white;
            color: #333;
            border-bottom-left-radius: 4px;
            box-shadow: 0 2px 8px rgba(0, 0, 0, 0.1);
        }

        .chat-input-container {
            padding: 20px;
            background: white;
            border-top: 1px solid #e0e0e0;
        }

        .chat-input-form {
            display: flex;
            gap: 12px;
        }

        #messageInput {
            flex: 1;
            padding: 12px 16px;
            border: 2px solid #e0e0e0;
            border-radius: 24px;
            font-size: 16px;
            outline: none;
            transition: border-color 0.3s;
        }

        #messageInput:focus {
            border-color: #667eea;
        }

        #sendButton {
            padding: 12px 32px;
            background: linear-gradient(135deg, #667eea 0%, #764ba2 100%);
            color: white;
            border: none;
            border-radius: 24px;
            font-size: 16px;
            font-weight: 600;
            cursor: pointer;
            transition: transform 0.2s, box-shadow 0.2s;
        }

        #sendButton:hover {
            transform: translateY(-2px);
            box-shadow: 0 4px 12px rgba(102, 126, 234, 0.4);
        }

        #sendButton:active {
            transform: translateY(0);
        }

        #sendButton:disabled {
            background: #ccc;
            cursor: not-allowed;
            transform: none;
        }

        .typing {
            display: inline-block;
            padding: 8px 12px;
        }

        .typing::after {
            content: '...';
            animation: typing 1.5s steps(4, end) infinite;
        }

        @keyframes typing {
            0%, 100% { content: ''; }
            25% { content: '.'; }
            50% { content: '..'; }
            75% { content: '...'; }
        }

        .welcome-message {
            text-align: center;
            color: #666;
            padding: 40px 20px;
        }

        .welcome-message h2 {
            font-size: 20px;
            margin-bottom: 10px;
            color: #333;
        }

        .welcome-message p {
            font-size: 14px;
        }
    </style>
</head>
<body>
    <div class="chat-container">
        <div class="chat-header">
            <h1>AI 聊天助手</h1>
            <p>基于 Spring AI 和 DeepSeek 的智能对话系统(流式响应)</p>
        </div>

        <div class="chat-messages" id="chatMessages">
            <div class="welcome-message">
                <h2>欢迎使用 AI 聊天助手!</h2>
                <p>请在下方输入您的问题,我会尽力为您解答。</p>
            </div>
        </div>

        <div class="chat-input-container">
            <form class="chat-input-form" id="chatForm">
                <input type="text" id="messageInput" placeholder="输入您的问题..." autocomplete="off" required>
                <button type="submit" id="sendButton">发送</button>
            </form>
        </div>
    </div>

    <script>
        const chatMessages = document.getElementById('chatMessages');
        const chatForm = document.getElementById('chatForm');
        const messageInput = document.getElementById('messageInput');
        const sendButton = document.getElementById('sendButton');
        const welcomeMessage = document.querySelector('.welcome-message');

        // 移除欢迎消息
        function removeWelcomeMessage() {
            if (welcomeMessage) {
                welcomeMessage.remove();
            }
        }

        // 添加消息到聊天界面
        function addMessage(content, isUser = false) {
            removeWelcomeMessage();

            const messageDiv = document.createElement('div');
            messageDiv.className = `message ${isUser ? 'user' : 'assistant'}`;

            const messageContent = document.createElement('div');
            messageContent.className = 'message-content';
            messageContent.textContent = content;

            messageDiv.appendChild(messageContent);
            chatMessages.appendChild(messageDiv);

            // 滚动到底部
            chatMessages.scrollTop = chatMessages.scrollHeight;
        }

        // 添加加载消息
        function addLoadingMessage() {
            removeWelcomeMessage();

            const messageDiv = document.createElement('div');
            messageDiv.className = 'message assistant';
            messageDiv.id = 'loadingMessage';

            const messageContent = document.createElement('div');
            messageContent.className = 'message-content typing';
            messageContent.textContent = 'AI 正在思考';

            messageDiv.appendChild(messageContent);
            chatMessages.appendChild(messageDiv);

            chatMessages.scrollTop = chatMessages.scrollHeight;
        }

        // 移除加载消息
        function removeLoadingMessage() {
            const loadingMessage = document.getElementById('loadingMessage');
            if (loadingMessage) {
                loadingMessage.remove();
            }
        }

        // 发送消息(流式响应)
        async function sendMessage(message) {
            addMessage(message, true);

            addLoadingMessage();
            sendButton.disabled = true;
            messageInput.disabled = true;

            try {
                const response = await fetch('/ai/chatStream', {
                    method: 'POST',
                    headers: {
                        'Content-Type': 'application/json',
                    },
                    body: JSON.stringify({ message: message })
                });

                if (!response.ok) {
                    throw new Error('网络请求失败');
                }

                removeLoadingMessage();

                // 创建一个新的消息容器用于显示流式响应
                const messageDiv = document.createElement('div');
                messageDiv.className = 'message assistant';
                messageDiv.id = 'currentStreamMessage';

                const messageContent = document.createElement('div');
                messageContent.className = 'message-content';
                messageContent.textContent = '';

                messageDiv.appendChild(messageContent);
                chatMessages.appendChild(messageDiv);
                chatMessages.scrollTop = chatMessages.scrollHeight;

                // 处理流式响应
                const reader = response.body.getReader();
                const decoder = new TextDecoder();
                let fullText = '';

                while (true) {
                    const { done, value } = await reader.read();

                    if (done) break;

                    // 解码并解析数据
                    const chunk = decoder.decode(value, { stream: true });

                    // 尝试解析 JSON 行
                    const lines = chunk.split('\n').filter(line => line.trim());

                    for (const line of lines) {
                        try {
                            // 移除可能的数据前缀(如 "data:")
                            const cleanLine = line.replace(/^data:\s*/, '').trim();
                            if (!cleanLine) continue;

                            const jsonStr = cleanLine.replace(/,$/, '').trim();
                            const data = JSON.parse(jsonStr);

                            if (data.response) {
                                fullText += data.response;
                                messageContent.textContent = fullText;
                                chatMessages.scrollTop = chatMessages.scrollHeight;
                            } else if (data.reply) {
                                fullText += data.reply;
                                messageContent.textContent = fullText;
                                chatMessages.scrollTop = chatMessages.scrollHeight;
                            }
                        } catch (e) {
                            console.warn('解析 JSON 失败:', e, line);
                            // 如果解析失败,尝试直接显示文本
                            if (chunk.trim()) {
                                fullText += chunk;
                                messageContent.textContent = fullText;
                                chatMessages.scrollTop = chatMessages.scrollHeight;
                            }
                        }
                    }
                }

                // 移除当前消息的 ID 标记
                if (messageDiv) {
                    messageDiv.removeAttribute('id');
                }

            } catch (error) {
                removeLoadingMessage();
                addMessage('抱歉,发生了错误:' + error.message, false);
            } finally {
                sendButton.disabled = false;
                messageInput.disabled = false;
                messageInput.focus();
            }
        }

        // 表单提交
        chatForm.addEventListener('submit', async (e) => {
            e.preventDefault();

            const message = messageInput.value.trim();
            if (!message) return;

            messageInput.value = '';
            await sendMessage(message);
        });

        // 页面加载时聚焦输入框
        messageInput.focus();
    </script>
</body>
</html>
Step 3:启动并测试
重启项目后,访问 http://localhost:8080,即可通过可视化界面与 AI 聊天,例如输入 “你好”,模型会流式返回。
总结
本文我们从 Spring AI 的核心概念出发,详细介绍了它的 7 大核心特性,并通过一个完整的 Deepseek 对话案例,带大家完成了环境搭建、依赖配置、代码编写与测试的全流程。Spring AI 的核心优势在于 “原生集成 Spring 生态” 与 “统一抽象接口”,让 Java 开发者无需跨生态就能快速接入 AI 能力,极大降低了 AI 应用的开发门槛。

有“AI”的1024 = 2048,欢迎大家加入2048 AI社区
更多推荐

 0
0 0
0- 0


 已为社区贡献35条内容

所有评论(0)