Flutter for OpenHarmony 实战:粘性头部分组列表(通讯录A-Z)
override// 滚动控制器// 分组定位键// 分组后的联系人// 首字母列表String?// 当前选中的首字母用于快速定位到指定分组,存储按首字母分组的联系人。onTap;@override// 头像Container(width: 50,colors: [color,],),BoxShadow(),],),),),),// 信息Expanded(Text(),),Text(),),],
前言
Flutter是Google开发的开源UI工具包,支持用一套代码构建iOS、Android、Web、Windows、macOS和Linux六大平台应用,实现"一次编写,多处运行"。
OpenHarmony是由开放原子开源基金会运营的分布式操作系统,为全场景智能设备提供统一底座,具有多设备支持、模块化设计、分布式能力和开源开放等特性。
Flutter for OpenHarmony技术方案使开发者能够:
- 复用Flutter现有代码(Skia渲染引擎、热重载、丰富组件库)
- 快速构建符合OpenHarmony规范的UI
- 降低多端开发成本
- 利用Dart生态插件资源加速生态建设
本文详细解析了一个完整的 Flutter 通讯录应用的开发过程。这个应用展示了如何实现一个具有字母索引、分组显示、粘性头部和快速定位功能的现代化联系人列表界面,实现了一个功能完整的通讯录功能,包含首字母分组、字母索引导航、粘性头部固定、联系人详情展示等核心特性。使用 CustomScrollView 和 Sliver 实现高性能滚动,交互流畅自然。
先看效果
Flutter web 预览效果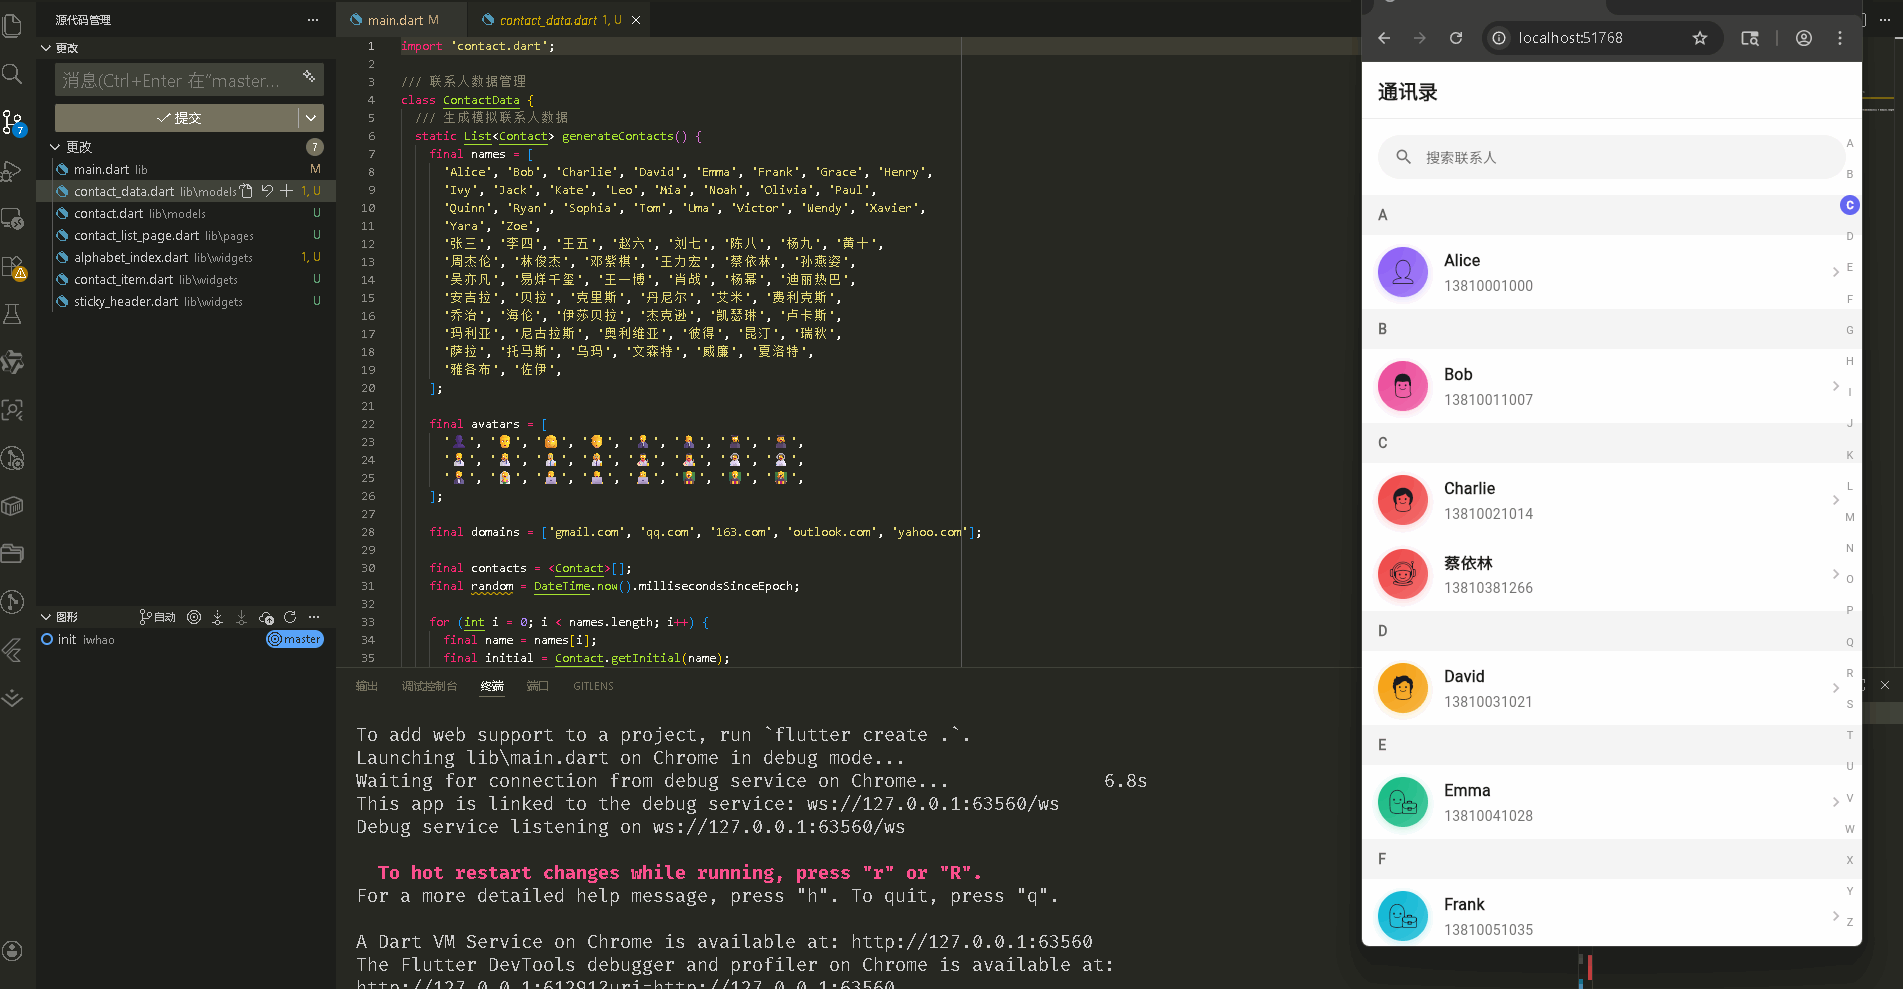
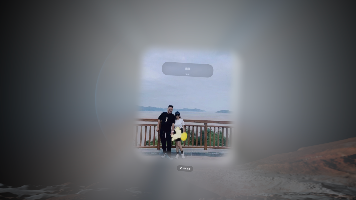
在鸿蒙真机 上模拟器上成功运行后的效果

📋 目录
项目结构说明
应用入口
联系人列表页面 (ContactListPage)
Contact 数据模型
ContactData 数据管理
ContactItem 组件
AlphabetIndex 组件
StickyHeader 组件
📁 项目结构说明
文件目录结构
lib/
├── main.dart                           # 应用入口文件
├── models/                             # 数据模型目录
│   ├── contact.dart                   # 联系人数据模型
│   └── contact_data.dart              # 联系人数据管理
├── pages/                              # 页面目录
│   └── contact_list_page.dart         # 联系人列表页面
└── widgets/                            # 组件目录
    ├── contact_item.dart              # 联系人列表项组件
    ├── alphabet_index.dart            # 字母索引组件
    └── sticky_header.dart             # 粘性头部组件
文件说明
入口文件
lib/main.dart
- 应用入口点,包含
main()函数 - 定义
MyApp类,配置应用主题 - 设置应用标题为"通讯录"
页面文件
lib/pages/contact_list_page.dart
ContactListPage类:联系人列表页面主类- 管理联系人数据分组
- 使用
CustomScrollView和Sliver实现高性能列表 - 实现字母索引导航和滚动定位
- 包含联系人详情对话框
组件文件
lib/widgets/contact_item.dart
ContactItem组件:联系人列表项组件- 显示联系人头像、姓名和电话
- 根据首字母生成渐变颜色
lib/widgets/alphabet_index.dart
AlphabetIndex组件:右侧字母索引组件- 支持点击和拖拽选择字母
- 高亮当前选中的字母
lib/widgets/sticky_header.dart
StickyHeader组件:粘性头部组件- 显示分组标题(首字母)
数据模型
lib/models/contact.dart
Contact类:联系人数据模型- 包含联系人信息(姓名、头像、电话、邮箱、首字母)
- 提供首字母生成方法
lib/models/contact_data.dart
ContactData类:联系人数据管理- 生成模拟联系人数据
- 按首字母分组
- 排序处理
组件依赖关系
main.dart
  └── pages/contact_list_page.dart      (导入联系人列表页面)
      ├── models/contact.dart           (导入联系人模型)
      ├── models/contact_data.dart      (导入数据管理)
      ├── widgets/contact_item.dart     (导入联系人项组件)
      ├── widgets/sticky_header.dart    (导入粘性头部组件)
      └── widgets/alphabet_index.dart   (导入字母索引组件)
数据流向
- 数据生成:
ContactData.generateContacts()生成联系人数据 - 数据分组:
ContactData.groupByInitial()按首字母分组 - 数据加载:
ContactListPage加载并分组数据 - 列表渲染:使用
CustomScrollView和Sliver构建列表 - 字母导航:用户点击或拖拽字母索引,滚动到对应分组
- 详情展示:用户点击联系人,显示详情对话框
应用入口
1. main() 函数
import 'package:flutter/material.dart';
import 'pages/contact_list_page.dart';

void main() {
  runApp(const MyApp());
}
应用入口,导入联系人列表页面。
2. MyApp 类 - 主题配置
class MyApp extends StatelessWidget {
const MyApp({super.key});
Widget build(BuildContext context) {
return MaterialApp(
title: '通讯录',
debugShowCheckedModeBanner: false,
theme: ThemeData(
colorScheme: ColorScheme.fromSeed(
seedColor: Colors.blue,
brightness: Brightness.light,
),
useMaterial3: true,
),
home: const ContactListPage(),
);
}
}
配置浅色主题,使用蓝色作为种子颜色。
联系人列表页面 (ContactListPage)
1. 类定义和状态管理
class ContactListPage extends StatefulWidget {
const ContactListPage({super.key});
State<ContactListPage> createState() => _ContactListPageState();
}
class _ContactListPageState extends State<ContactListPage> {
final ScrollController _scrollController = ScrollController(); // 滚动控制器
final Map<String, GlobalKey> _sectionKeys = {}; // 分组定位键
Map<String, List<Contact>> _groupedContacts = {}; // 分组后的联系人
List<String> _initials = []; // 首字母列表
String? _currentInitial; // 当前选中的首字母
_sectionKeys 用于快速定位到指定分组,_groupedContacts 存储按首字母分组的联系人。
2. 数据加载
void _loadContacts() {
final contacts = ContactData.generateContacts(); // 生成联系人
_groupedContacts = ContactData.groupByInitial(contacts); // 按首字母分组
_initials = ContactData.getInitials(_groupedContacts); // 获取首字母列表
// 为每个分组创建 GlobalKey
for (final initial in _initials) {
_sectionKeys[initial] = GlobalKey();
}
setState(() {});
}
void initState() {
super.initState();
_loadContacts(); // 初始化时加载数据
}
void dispose() {
_scrollController.dispose();
super.dispose();
}
_loadContacts() 生成、分组联系人数据,并为每个分组创建 GlobalKey 用于定位。
3. 滚动定位
void _scrollToSection(String initial) {
  final key = _sectionKeys[initial];
  if (key?.currentContext != null) {
    Scrollable.ensureVisible(
      key!.currentContext!,
      duration: const Duration(milliseconds: 300),  // 300ms 滚动动画
      curve: Curves.easeInOut,
    );
  }
}

void _onLetterSelected(String letter) {
  _currentInitial = letter;  // 更新当前选中字母
  _scrollToSection(letter);  // 滚动到对应分组
}
_scrollToSection() 使用 Scrollable.ensureVisible() 滚动到指定分组,_onLetterSelected() 处理字母选择。
4. 页面布局结构
Widget build(BuildContext context) {
return Scaffold(
backgroundColor: Colors.white,
appBar: AppBar(
elevation: 0,
backgroundColor: Colors.white,
title: const Text(
'通讯录',
style: TextStyle(
color: Color(0xFF1A1A1A),
fontWeight: FontWeight.bold,
fontSize: 20,
),
),
centerTitle: false,
bottom: PreferredSize(
preferredSize: const Size.fromHeight(1),
child: Container(
height: 1,
color: Colors.grey[200], // 底部边框
),
),
),
body: Stack(
children: [
// 主列表
CustomScrollView(
controller: _scrollController,
slivers: _buildSliverList(), // 构建 Sliver 列表
),
// 右侧字母索引
Positioned(
right: 0,
top: 0,
bottom: 0,
child: AlphabetIndex(
initials: _initials,
onLetterSelected: _onLetterSelected,
currentInitial: _currentInitial,
),
),
],
),
);
}
页面使用 Stack 布局,主列表使用 CustomScrollView,右侧使用 Positioned 固定字母索引。
5. 列表构建
List<Widget> _buildSliverList() {
  final slivers = <Widget>[];

  // 添加搜索栏占位
  slivers.add(
    SliverToBoxAdapter(
      child: Container(
        padding: const EdgeInsets.all(16),
        child: Container(
          height: 44,
          decoration: BoxDecoration(
            color: Colors.grey[100],
            borderRadius: BorderRadius.circular(22),
          ),
          child: Row(
            children: [
              const SizedBox(width: 16),
              Icon(Icons.search, color: Colors.grey[600], size: 20),
              const SizedBox(width: 12),
              Text(
                '搜索联系人',
                style: TextStyle(
                  color: Colors.grey[600],
                  fontSize: 14,
                ),
              ),
            ],
          ),
        ),
      ),
    ),
  );

  // 添加分组列表
  for (final initial in _initials) {
    final contacts = _groupedContacts[initial] ?? [];
    if (contacts.isEmpty) continue;

    // 粘性头部
    slivers.add(
      SliverPersistentHeader(
        pinned: true,  // 固定头部
        delegate: _StickyHeaderDelegate(
          child: StickyHeader(title: initial),
        ),
      ),
    );

    // 联系人列表
    slivers.add(
      SliverList(
        delegate: SliverChildBuilderDelegate(
          (context, index) {
            final contact = contacts[index];
            return Container(
              key: index == 0 ? _sectionKeys[initial] : null,  // 第一个项设置 key
              child: ContactItem(
                contact: contact,
                onTap: () => _onContactTap(contact),
              ),
            );
          },
          childCount: contacts.length,
        ),
      ),
    );
  }

  return slivers;
}

void _onContactTap(Contact contact) {
  showDialog(
    context: context,
    builder: (context) => _ContactDetailDialog(contact: contact),
  );
}
列表使用 SliverToBoxAdapter 添加搜索栏,使用 SliverPersistentHeader 添加粘性头部,使用 SliverList 添加联系人列表。每个分组的第一个项设置 GlobalKey 用于定位。
6. 联系人详情对话框
class _ContactDetailDialog extends StatelessWidget {
final Contact contact;
const _ContactDetailDialog({required this.contact});
Widget build(BuildContext context) {
return Dialog(
shape: RoundedRectangleBorder(
borderRadius: BorderRadius.circular(20),
),
child: Container(
padding: const EdgeInsets.all(24),
constraints: const BoxConstraints(maxWidth: 320),
child: Column(
mainAxisSize: MainAxisSize.min,
children: [
// 头像
Container(
width: 80,
height: 80,
decoration: BoxDecoration(
gradient: LinearGradient(
begin: Alignment.topLeft,
end: Alignment.bottomRight,
colors: [
const Color(0xFF6366F1),
const Color(0xFF8B5CF6),
],
),
shape: BoxShape.circle,
),
child: Center(
child: Text(
contact.avatar,
style: const TextStyle(fontSize: 40),
),
),
),
const SizedBox(height: 20),
// 姓名
Text(
contact.name,
style: const TextStyle(
fontSize: 22,
fontWeight: FontWeight.bold,
),
),
const SizedBox(height: 16),
// 电话
_DetailRow(
icon: Icons.phone,
text: contact.phone,
),
const SizedBox(height: 12),
// 邮箱
_DetailRow(
icon: Icons.email,
text: contact.email,
),
const SizedBox(height: 20),
// 关闭按钮
SizedBox(
width: double.infinity,
child: ElevatedButton(
onPressed: () => Navigator.of(context).pop(),
style: ElevatedButton.styleFrom(
backgroundColor: const Color(0xFF6366F1),
foregroundColor: Colors.white,
padding: const EdgeInsets.symmetric(vertical: 12),
shape: RoundedRectangleBorder(
borderRadius: BorderRadius.circular(12),
),
),
child: const Text('关闭'),
),
),
],
),
),
);
}
}
class _DetailRow extends StatelessWidget {
final IconData icon;
final String text;
const _DetailRow({
required this.icon,
required this.text,
});
Widget build(BuildContext context) {
return Row(
children: [
Icon(icon, size: 20, color: Colors.grey[600]),
const SizedBox(width: 12),
Expanded(
child: Text(
text,
style: TextStyle(
fontSize: 16,
color: Colors.grey[800],
),
),
),
],
);
}
}
详情对话框显示联系人头像、姓名、电话和邮箱,使用 Dialog 和自定义布局。
7. 粘性头部代理
class _StickyHeaderDelegate extends SliverPersistentHeaderDelegate {
final Widget child;
_StickyHeaderDelegate({required this.child});
double get minExtent => 40; // 最小高度
double get maxExtent => 40; // 最大高度(相同则固定高度)
Widget build(BuildContext context, double shrinkOffset, bool overlapsContent) {
return child;
}
bool shouldRebuild(_StickyHeaderDelegate oldDelegate) {
return child != oldDelegate.child;
}
}
SliverPersistentHeaderDelegate 控制粘性头部行为。pinned: true 使头部固定在顶部。
Contact 数据模型
1. Contact 类
class Contact {
  final String name;      // 姓名
  final String avatar;    // 头像(emoji)
  final String phone;     // 电话
  final String email;     // 邮箱
  final String initial;   // 首字母

  const Contact({
    required this.name,
    required this.avatar,
    required this.phone,
    required this.email,
    required this.initial,
  });
}
联系人数据模型,包含基本信息和首字母。
2. 首字母生成
/// 从姓名生成首字母
static String getInitial(String name) {
  if (name.isEmpty) return '#';
  final firstChar = name[0].toUpperCase();
  if (firstChar.compareTo('A') >= 0 && firstChar.compareTo('Z') <= 0) {
    return firstChar;  // 英文字母直接返回
  }
  // 处理中文拼音首字母
  final pinyin = _getPinyinFirstChar(firstChar);
  return pinyin.isNotEmpty ? pinyin : '#';
}

/// 获取中文字符的拼音首字母
static String _getPinyinFirstChar(String char) {
  // 简化版:根据Unicode范围判断
  final code = char.codeUnitAt(0);
  if (code >= 0x4E00 && code <= 0x9FFF) {
    // 中文字符范围,这里使用简化映射
    // 实际项目中可以使用 pinyin 包
    final pinyinMap = {
      '阿': 'A', '白': 'B', '蔡': 'C', '丁': 'D', '二': 'E',
      '方': 'F', '高': 'G', '何': 'H', '金': 'J', '康': 'K',
      '李': 'L', '马': 'M', '牛': 'N', '欧': 'O', '彭': 'P',
      '钱': 'Q', '任': 'R', '孙': 'S', '唐': 'T', '吴': 'W',
      '谢': 'X', '杨': 'Y', '张': 'Z',
    };
    return pinyinMap[char] ?? 'Z';
  }
  return '';
}
getInitial() 生成首字母,支持英文和中文(简化版拼音映射)。实际项目可使用 pinyin 包。
ContactData 数据管理
1. 数据生成
class ContactData {
/// 生成模拟联系人数据
static List<Contact> generateContacts() {
final names = [
'Alice', 'Bob', 'Charlie', 'David', 'Emma', 'Frank', 'Grace', 'Henry',
'Ivy', 'Jack', 'Kate', 'Leo', 'Mia', 'Noah', 'Olivia', 'Paul',
'Quinn', 'Ryan', 'Sophia', 'Tom', 'Uma', 'Victor', 'Wendy', 'Xavier',
'Yara', 'Zoe',
'张三', '李四', '王五', '赵六', '刘七', '陈八', '杨九', '黄十',
'周杰伦', '林俊杰', '邓紫棋', '王力宏', '蔡依林', '孙燕姿',
// ... 更多姓名
];
final avatars = [
'👤', '👨', '👩', '🧑', '👨💼', '👩💼', '👨🎓', '👩🎓',
// ... 更多头像
];
final domains = ['gmail.com', 'qq.com', '163.com', 'outlook.com', 'yahoo.com'];
final contacts = <Contact>[];
final random = DateTime.now().millisecondsSinceEpoch;
for (int i = 0; i < names.length; i++) {
final name = names[i];
final initial = Contact.getInitial(name); // 生成首字母
final phone = '138${1000 + (i % 9000)}${1000 + ((i * 7) % 9000)}';
final email = '${name.toLowerCase().replaceAll(' ', '')}${i % domains.length}@${domains[i % domains.length]}';
final avatar = avatars[i % avatars.length];
contacts.add(Contact(
name: name,
avatar: avatar,
phone: phone,
email: email,
initial: initial,
));
}
// 按首字母和姓名排序
contacts.sort((a, b) {
final initialCompare = a.initial.compareTo(b.initial);
if (initialCompare != 0) return initialCompare;
return a.name.compareTo(b.name); // 首字母相同则按姓名排序
});
return contacts;
}
generateContacts() 生成模拟联系人数据,按首字母和姓名排序。
2. 分组和排序
/// 将联系人按首字母分组
static Map<String, List<Contact>> groupByInitial(List<Contact> contacts) {
  final grouped = <String, List<Contact>>{};
  for (final contact in contacts) {
    final initial = contact.initial;
    grouped.putIfAbsent(initial, () => []).add(contact);  // 按首字母分组
  }
  return grouped;
}

/// 获取所有首字母并排序
static List<String> getInitials(Map<String, List<Contact>> grouped) {
  final initials = grouped.keys.toList();
  initials.sort();  // 排序首字母
  return initials;
}
groupByInitial() 按首字母分组,getInitials() 获取并排序首字母列表。
ContactItem 组件
1. 类定义和布局
class ContactItem extends StatelessWidget {
final Contact contact;
final VoidCallback? onTap;
const ContactItem({
super.key,
required this.contact,
this.onTap,
});
Widget build(BuildContext context) {
final color = _getColorFromInitial(contact.initial);
return RepaintBoundary(
child: Material(
color: Colors.transparent,
child: InkWell(
onTap: onTap,
child: Container(
padding: const EdgeInsets.symmetric(horizontal: 16, vertical: 12),
child: Row(
children: [
// 头像
Container(
width: 50,
height: 50,
decoration: BoxDecoration(
gradient: LinearGradient(
begin: Alignment.topLeft,
end: Alignment.bottomRight,
colors: [
color,
color.withOpacity(0.7),
],
),
shape: BoxShape.circle,
boxShadow: [
BoxShadow(
color: color.withOpacity(0.3),
blurRadius: 8,
offset: const Offset(0, 2),
),
],
),
child: Center(
child: Text(
contact.avatar,
style: const TextStyle(fontSize: 24),
),
),
),
const SizedBox(width: 16),
// 信息
Expanded(
child: Column(
crossAxisAlignment: CrossAxisAlignment.start,
children: [
Text(
contact.name,
style: const TextStyle(
fontSize: 16,
fontWeight: FontWeight.w600,
color: Color(0xFF1A1A1A),
),
),
const SizedBox(height: 4),
Text(
contact.phone,
style: TextStyle(
fontSize: 14,
color: Colors.grey[600],
),
),
],
),
),
// 箭头图标
Icon(
Icons.chevron_right,
color: Colors.grey[400],
size: 20,
),
],
),
),
),
),
);
}
联系人项使用 RepaintBoundary 优化性能,显示头像、姓名和电话。头像使用根据首字母生成的渐变颜色。
2. 颜色生成
/// 根据首字母生成颜色(使用静态缓存)
static final List<Color> _colors = [
  const Color(0xFF6366F1), // Indigo
  const Color(0xFF8B5CF6), // Purple
  const Color(0xFFEC4899), // Pink
  const Color(0xFFEF4444), // Red
  const Color(0xFFF59E0B), // Amber
  const Color(0xFF10B981), // Emerald
  const Color(0xFF06B6D4), // Cyan
  const Color(0xFF3B82F6), // Blue
];

Color _getColorFromInitial(String initial) {
  if (initial.isEmpty) return _colors[0];
  final index = initial.codeUnitAt(0) % _colors.length;  // 根据字符码取模
  return _colors[index];
}
_getColorFromInitial() 根据首字母字符码取模,从颜色列表中选取颜色,确保相同首字母使用相同颜色。
AlphabetIndex 组件
1. 类定义和状态
class AlphabetIndex extends StatefulWidget {
final List<String> initials; // 首字母列表
final ValueChanged<String>? onLetterSelected; // 字母选择回调
final String? currentInitial; // 当前选中的首字母
const AlphabetIndex({
super.key,
required this.initials,
this.onLetterSelected,
this.currentInitial,
});
State<AlphabetIndex> createState() => _AlphabetIndexState();
}
class _AlphabetIndexState extends State<AlphabetIndex> {
String? _selectedLetter; // 选中的字母
bool _isDragging = false; // 是否正在拖拽
void initState() {
super.initState();
_selectedLetter = widget.currentInitial;
}
void didUpdateWidget(AlphabetIndex oldWidget) {
super.didUpdateWidget(oldWidget);
if (widget.currentInitial != oldWidget.currentInitial) {
_selectedLetter = widget.currentInitial; // 同步外部状态
}
}
字母索引组件管理选中字母和拖拽状态,支持外部传入当前选中字母。
2. 手势处理
void _onVerticalDragStart(DragStartDetails details) {
  setState(() {
    _isDragging = true;
  });
  _updateSelectedLetter(details.localPosition);  // 根据位置更新选中字母
}

void _onVerticalDragUpdate(DragUpdateDetails details) {
  _updateSelectedLetter(details.localPosition);
}

void _onVerticalDragEnd(DragEndDetails details) {
  setState(() {
    _isDragging = false;
    _selectedLetter = null;  // 拖拽结束后清除选中
  });
}

void _updateSelectedLetter(Offset localPosition) {
  final box = context.findRenderObject() as RenderBox?;
  if (box == null) return;

  final height = box.size.height;
  final itemHeight = height / widget.initials.length;  // 每个字母的高度
  final index = (localPosition.dy / itemHeight).floor().clamp(0, widget.initials.length - 1);
  final letter = widget.initials[index];

  if (_selectedLetter != letter) {
    setState(() {
      _selectedLetter = letter;
    });
    widget.onLetterSelected?.call(letter);  // 触发回调
  }
}
手势处理:_onVerticalDragStart 开始拖拽,_onVerticalDragUpdate 更新选中字母,_onVerticalDragEnd 结束拖拽。_updateSelectedLetter 根据触摸位置计算选中的字母。
3. 字母选择
void _onLetterTap(String letter) {
setState(() {
_selectedLetter = letter;
});
widget.onLetterSelected?.call(letter);
}
Widget build(BuildContext context) {
if (widget.initials.isEmpty) return const SizedBox.shrink();
return GestureDetector(
onVerticalDragStart: _onVerticalDragStart,
onVerticalDragUpdate: _onVerticalDragUpdate,
onVerticalDragEnd: _onVerticalDragEnd,
child: Container(
width: 24,
padding: const EdgeInsets.symmetric(vertical: 8),
child: Column(
mainAxisAlignment: MainAxisAlignment.spaceAround,
children: widget.initials.map((letter) {
final isSelected = _selectedLetter == letter;
return GestureDetector(
onTap: () => _onLetterTap(letter),
child: AnimatedContainer(
duration: const Duration(milliseconds: 150),
width: 20,
height: 20,
decoration: BoxDecoration(
color: isSelected
? const Color(0xFF6366F1) // 选中时显示背景色
: Colors.transparent,
shape: BoxShape.circle,
),
child: Center(
child: Text(
letter,
style: TextStyle(
fontSize: 11,
fontWeight: isSelected ? FontWeight.bold : FontWeight.normal,
color: isSelected
? Colors.white
: const Color(0xFF999999),
),
),
),
),
);
}).toList(),
),
),
);
}
字母选择支持点击和拖拽。使用 AnimatedContainer 实现选中状态的动画效果,选中时显示背景色和白色文字。
StickyHeader 组件
1. 粘性头部实现
class StickyHeader extends StatelessWidget {
final String title;
final Color? backgroundColor;
final Color? textColor;
const StickyHeader({
super.key,
required this.title,
this.backgroundColor,
this.textColor,
});
Widget build(BuildContext context) {
return Container(
height: 40,
padding: const EdgeInsets.symmetric(horizontal: 16),
decoration: BoxDecoration(
color: backgroundColor ?? const Color(0xFFF5F5F5), // 默认灰色背景
border: Border(
bottom: BorderSide(
color: Colors.grey[200]!,
width: 0.5,
),
),
),
child: Align(
alignment: Alignment.centerLeft,
child: Text(
title,
style: TextStyle(
fontSize: 14,
fontWeight: FontWeight.w600,
color: textColor ?? const Color(0xFF666666),
letterSpacing: 0.5,
),
),
),
);
}
}
粘性头部组件显示分组标题(首字母),使用灰色背景和底部边框,支持自定义颜色。
使用示例
在页面中使用通讯录
class MyPage extends StatefulWidget {
State<MyPage> createState() => _MyPageState();
}
class _MyPageState extends State<MyPage> {
final ScrollController _scrollController = ScrollController();
final Map<String, GlobalKey> _sectionKeys = {};
Map<String, List<Contact>> _groupedContacts = {};
List<String> _initials = [];
void initState() {
super.initState();
final contacts = ContactData.generateContacts();
_groupedContacts = ContactData.groupByInitial(contacts);
_initials = ContactData.getInitials(_groupedContacts);
for (final initial in _initials) {
_sectionKeys[initial] = GlobalKey();
}
}
void _scrollToSection(String initial) {
final key = _sectionKeys[initial];
if (key?.currentContext != null) {
Scrollable.ensureVisible(
key!.currentContext!,
duration: const Duration(milliseconds: 300),
curve: Curves.easeInOut,
);
}
}
Widget build(BuildContext context) {
return Scaffold(
appBar: AppBar(title: Text('通讯录')),
body: Stack(
children: [
CustomScrollView(
controller: _scrollController,
slivers: [
// 搜索栏
SliverToBoxAdapter(
child: Container(
padding: const EdgeInsets.all(16),
child: TextField(
decoration: InputDecoration(
hintText: '搜索联系人',
prefixIcon: Icon(Icons.search),
),
),
),
),
// 分组列表
for (final initial in _initials)
...[
SliverPersistentHeader(
pinned: true,
delegate: _StickyHeaderDelegate(
child: StickyHeader(title: initial),
),
),
SliverList(
delegate: SliverChildBuilderDelegate(
(context, index) {
final contact = _groupedContacts[initial]![index];
return Container(
key: index == 0 ? _sectionKeys[initial] : null,
child: ContactItem(contact: contact),
);
},
childCount: _groupedContacts[initial]!.length,
),
),
],
],
),
// 字母索引
Positioned(
right: 0,
top: 0,
bottom: 0,
child: AlphabetIndex(
initials: _initials,
onLetterSelected: _scrollToSection,
),
),
],
),
);
}
}
使用步骤:
- 生成并分组联系人数据
- 为每个分组创建
GlobalKey - 使用
CustomScrollView和Sliver构建列表 - 使用
SliverPersistentHeader添加粘性头部 - 使用
Positioned固定字母索引 - 实现滚动定位功能
欢迎加入开源鸿蒙跨平台社区: https://openharmonycrossplatform.csdn.net

有“AI”的1024 = 2048,欢迎大家加入2048 AI社区
更多推荐

 7
7 0
0- 0


 已为社区贡献1条内容

所有评论(0)