【多模态】CILP架构(图像编码器Modified Resnet+ViT&文字编码器+图文相似度计算+损失函数)
多模态大模型(Multimodal Large Model)是一种能够处理和理解多种模态数据的人工智能模型。模态指的是数据的表现形式,例如文字、图像、音频、视频等。多模态大模型通过结合不同模态数据的特性,利用深度学习技术和大规模的训练数据,构建一个统一的框架来实现跨模态的感知、理解和生成能力。例如,一个多模态大模型可以同时处理文本描述和对应的图片,完成图像生成、描述生成、跨模态检索等任务。这种模型
文章目录
一、多模态简介
多模态大模型(Multimodal Large Model)是一种能够处理和理解多种模态数据的人工智能模型。模态指的是数据的表现形式,例如文字、图像、音频、视频等。多模态大模型通过结合不同模态数据的特性,利用深度学习技术和大规模的训练数据,构建一个统一的框架来实现跨模态的感知、理解和生成能力。例如,一个多模态大模型可以同时处理文本描述和对应的图片,完成图像生成、描述生成、跨模态检索等任务。这种模型的核心是利用不同模态之间的互补性,通过信息的融合和关联增强模型的表现能力,克服单一模态信息不足的问题。
学习多模态大模型的意义在于其广泛的应用潜力和巨大的社会价值。首先,多模态大模型可以在真实世界中广泛应用于多场景任务,如自动驾驶中的视觉和语言指令结合、医疗影像分析中的图像和文本报告结合、智能客服中的语音与文字结合等。这种模型能更好地模拟人类在复杂情境中处理多种信息的能力,从而大幅提升人工智能系统的实用性和智能水平。其次,多模态大模型的研究促进了人工智能跨学科的融合,推动了计算机视觉、自然语言处理、语音识别等领域的协同发展。此外,多模态学习也对人机交互的自然性和效率有重要提升作用,帮助构建更直观、更人性化的交互系统。总之,学习和发展多模态大模型是实现通用人工智能的重要一步,能够推动技术的前沿进展,为各行各业带来深远的影响。
Q&A:多模态为什么有价值?从工程角度来说,为什么多模态模型难度高?
多模态模型能够处理更丰富的信息表达、现实又大量跨模态任务需求,且多模态很有可能是同往AGI的道路,这是多模态模型最有价值的点之一。然而,多模态数据的最大挑战在于 它们不在一个空间中,每种模态的结构和分布差异巨大,难以直接结合:
- 图像数据:4维 (N, C, H, W)。N:批量大小(batch size)。C:通道数(通常为 3,RGB)。H 和 W:图像高度和宽度。特性:数据通常是局部相关(如相邻像素相关),需要卷积操作提取局部特征。
- 时间序列数据:结构:3维 (N, T, F)。N:批量大小。T:时间步长。F:特征维度(如传感器数据的特征数)。特性:时间相关性强,依赖递归网络(如 RNN)或 Transformer 提取时间序列特征。
- 文本数据:结构:2维 (N, L) 或 3维 (N, L, D)N:批量大小。L:句子长度(不同样本可能长度不同)。特性:离散数据,依赖序列建模(如 Transformer)理解上下文。
- 视频数据:结构:5维 (N, T, C, H, W)。N:批量大小。T:时间帧数。C:通道数。H 和 W:帧的高度和宽度。特性:视频数据包含时间和空间信息,既需要卷积提取空间特征,又需要时序建模处理时间相关性。
- 音频数据:结构:3维 (N, T, F)。N:批量大小。T:时间步长。F:频谱特征(如 Mel 频谱的频率维度)。特性:通常是时间相关数据,需要结合卷积和序列建模。
Q&A:都是多模态大模型、SORA/Veo2和LLava/Flamingo有什么不同?
多模态模型是能够处理多种模态(如文本、图像、视频等)数据的人工智能模型,但在细分领域中,我们通常把多模态模型分为两大类:多模态理解模型和多模态生成模型。
-
多模态理解模型:这类模型的输入是多模态数据(如图像和文本),但输出不一定是多模态的,通常是一个预测结果或单一模态的数据(如分类标签或文字)。例子:
CLIP:输入图像和文本,用于在共享语义空间中匹配图像和文本,输出相似度或分类结果。
LLaVA:输入图像和问题文本,输出自然语言回答。
Flamingo:能够将视觉和文本信息结合,用于多模态对话或问答。
ActionCLIP:视频理解模型,输入视频和文本描述,输出动作分类结果。 -
多模态生成模型:这类模型不仅可以理解多模态信息,其输出也可以是多模态的(如图像生成、视频生成或音频生成)。例子:
DALL·E:输入文本描述,生成对应的图像。
Stable Diffusion:输入文本描述,生成高质量图像。
SORA:输入视频和文本,生成符合语义的视频片段。
VideoGPT:输入语义信息,生成动态的视频内容。
GATO:支持输入和输出都是多模态的任务,例如从图像输入到动作输出。
| 特点 | 多模态理解模型 | 多模态生成模型 |
|---|---|---|
| 输入 | 通常是多模态数据,例如图像、文本、视频等形式的数据,提供给模型进行理解任务。 | 可以是多模态数据,也可以是单一模态数据,作为生成过程的条件输入,例如文本或图像。 |
| 输出 | 输出单一模态的预测结果,例如分类标签、相似度分数、或自然语言形式的回答等。 | 输出为生成的多模态数据,包括图像、视频、文本等内容,具有更广泛的表现形式。 |
| 架构核心 | 1. 模态编码器(Encoders):每种模态独立的编码器处理输入数据,例如 CNN 或 ViT(图像),Transformer 或预训练语言模型(文本)。编码器将不同模态的数据转化为高维特征向量。 2. 模态对齐模块(Alignment Module):通过对比学习或跨模态注意力机制,将不同模态的特征对齐到共享的语义空间。例如,CLIP 利用对比学习对齐图像和文本的语义表示。 3. 输出头(Prediction Head):根据具体任务输出结果,例如分类标签、相似度分数或文本回答等内容。 - 例子: - CLIP:图像编码器 + 文本编码器 + 对比学习目标。 - Flamingo:视觉编码器结合文本编码器,通过注意力机制实现模态对齐。 |
1. 模态编码器(Encoders):和多模态理解模型类似,生成模型也有独立的模态编码器,例如文本编码器提取语义嵌入,作为生成条件输入。 2. 生成解码器(Generative Decoder):生成模型增加了解码器,将编码的特征转化为目标模态。 - 图像生成:解码器通过扩散模型(如 Stable Diffusion)或 GAN 生成图像。 - 视频生成:通过时间序列扩展(如 VideoGPT)生成动态视频内容。 - 文本生成:使用标准 Transformer 解码器生成文本描述。 3. 跨模态交互模块(Cross-Modal Interaction Module):生成过程中,可能需要模态之间反复交互,例如跨模态注意力机制。例如,DALL·E 使用文本特征指导生成图像,确保生成结果符合输入语义。 - 例子: - DALL·E:文本编码器结合扩散解码器生成图像。 - Stable Diffusion:文本编码器结合图像生成解码器生成精细图像。 - VideoGPT:多模态编码器与视频解码器结合生成动态视频。 |
二、CILP架构技术路线图
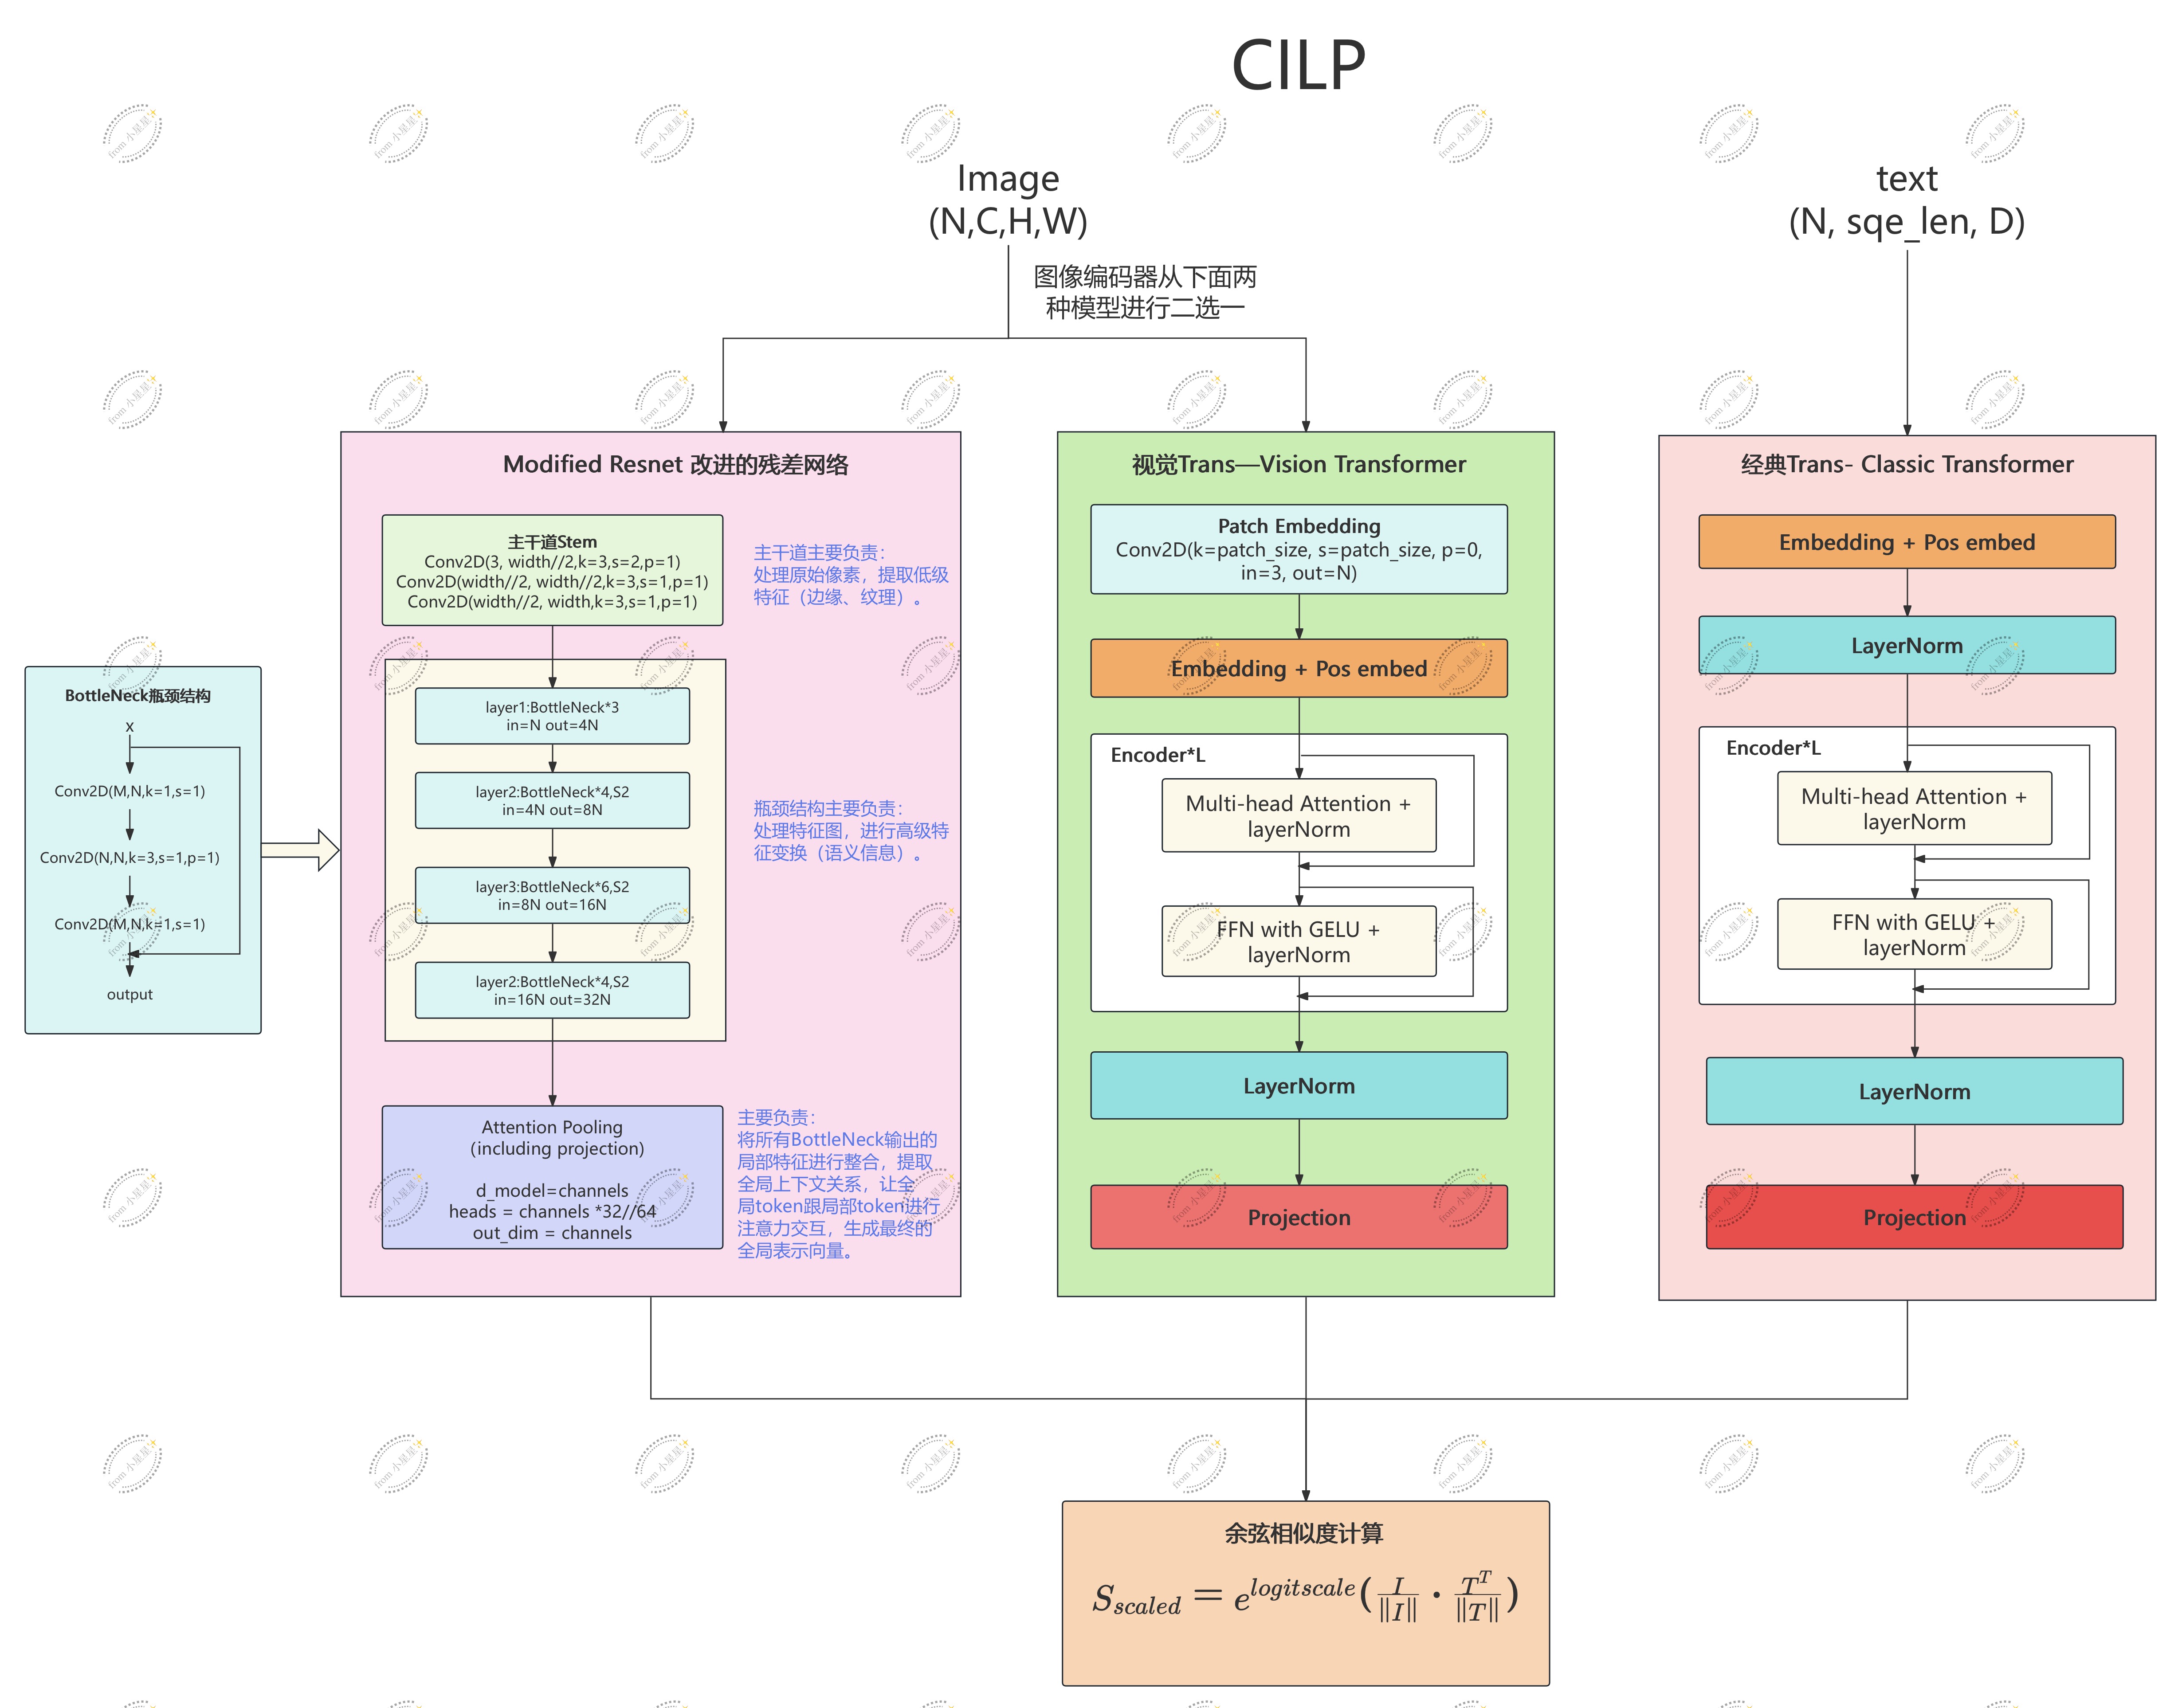
三、图像编码器
3.1 改进的残差网络Modified ResNet
主要由三个重要组成部分构成:主干道、瓶颈结构和Attention Pooling。
- 主干道的作用是:处理原始像素,提取低级特征(边缘、纹理等);
- 瓶颈结构的作用是:处理特征图,进行高级特征变化,提取语义信息;
- Attention Pooling的作用是:将BottleNeck提取的局部特征进行整合,提取全局上下文关系,将全局token跟局部token进行注意力交互,生成了最终的全局表示向量。
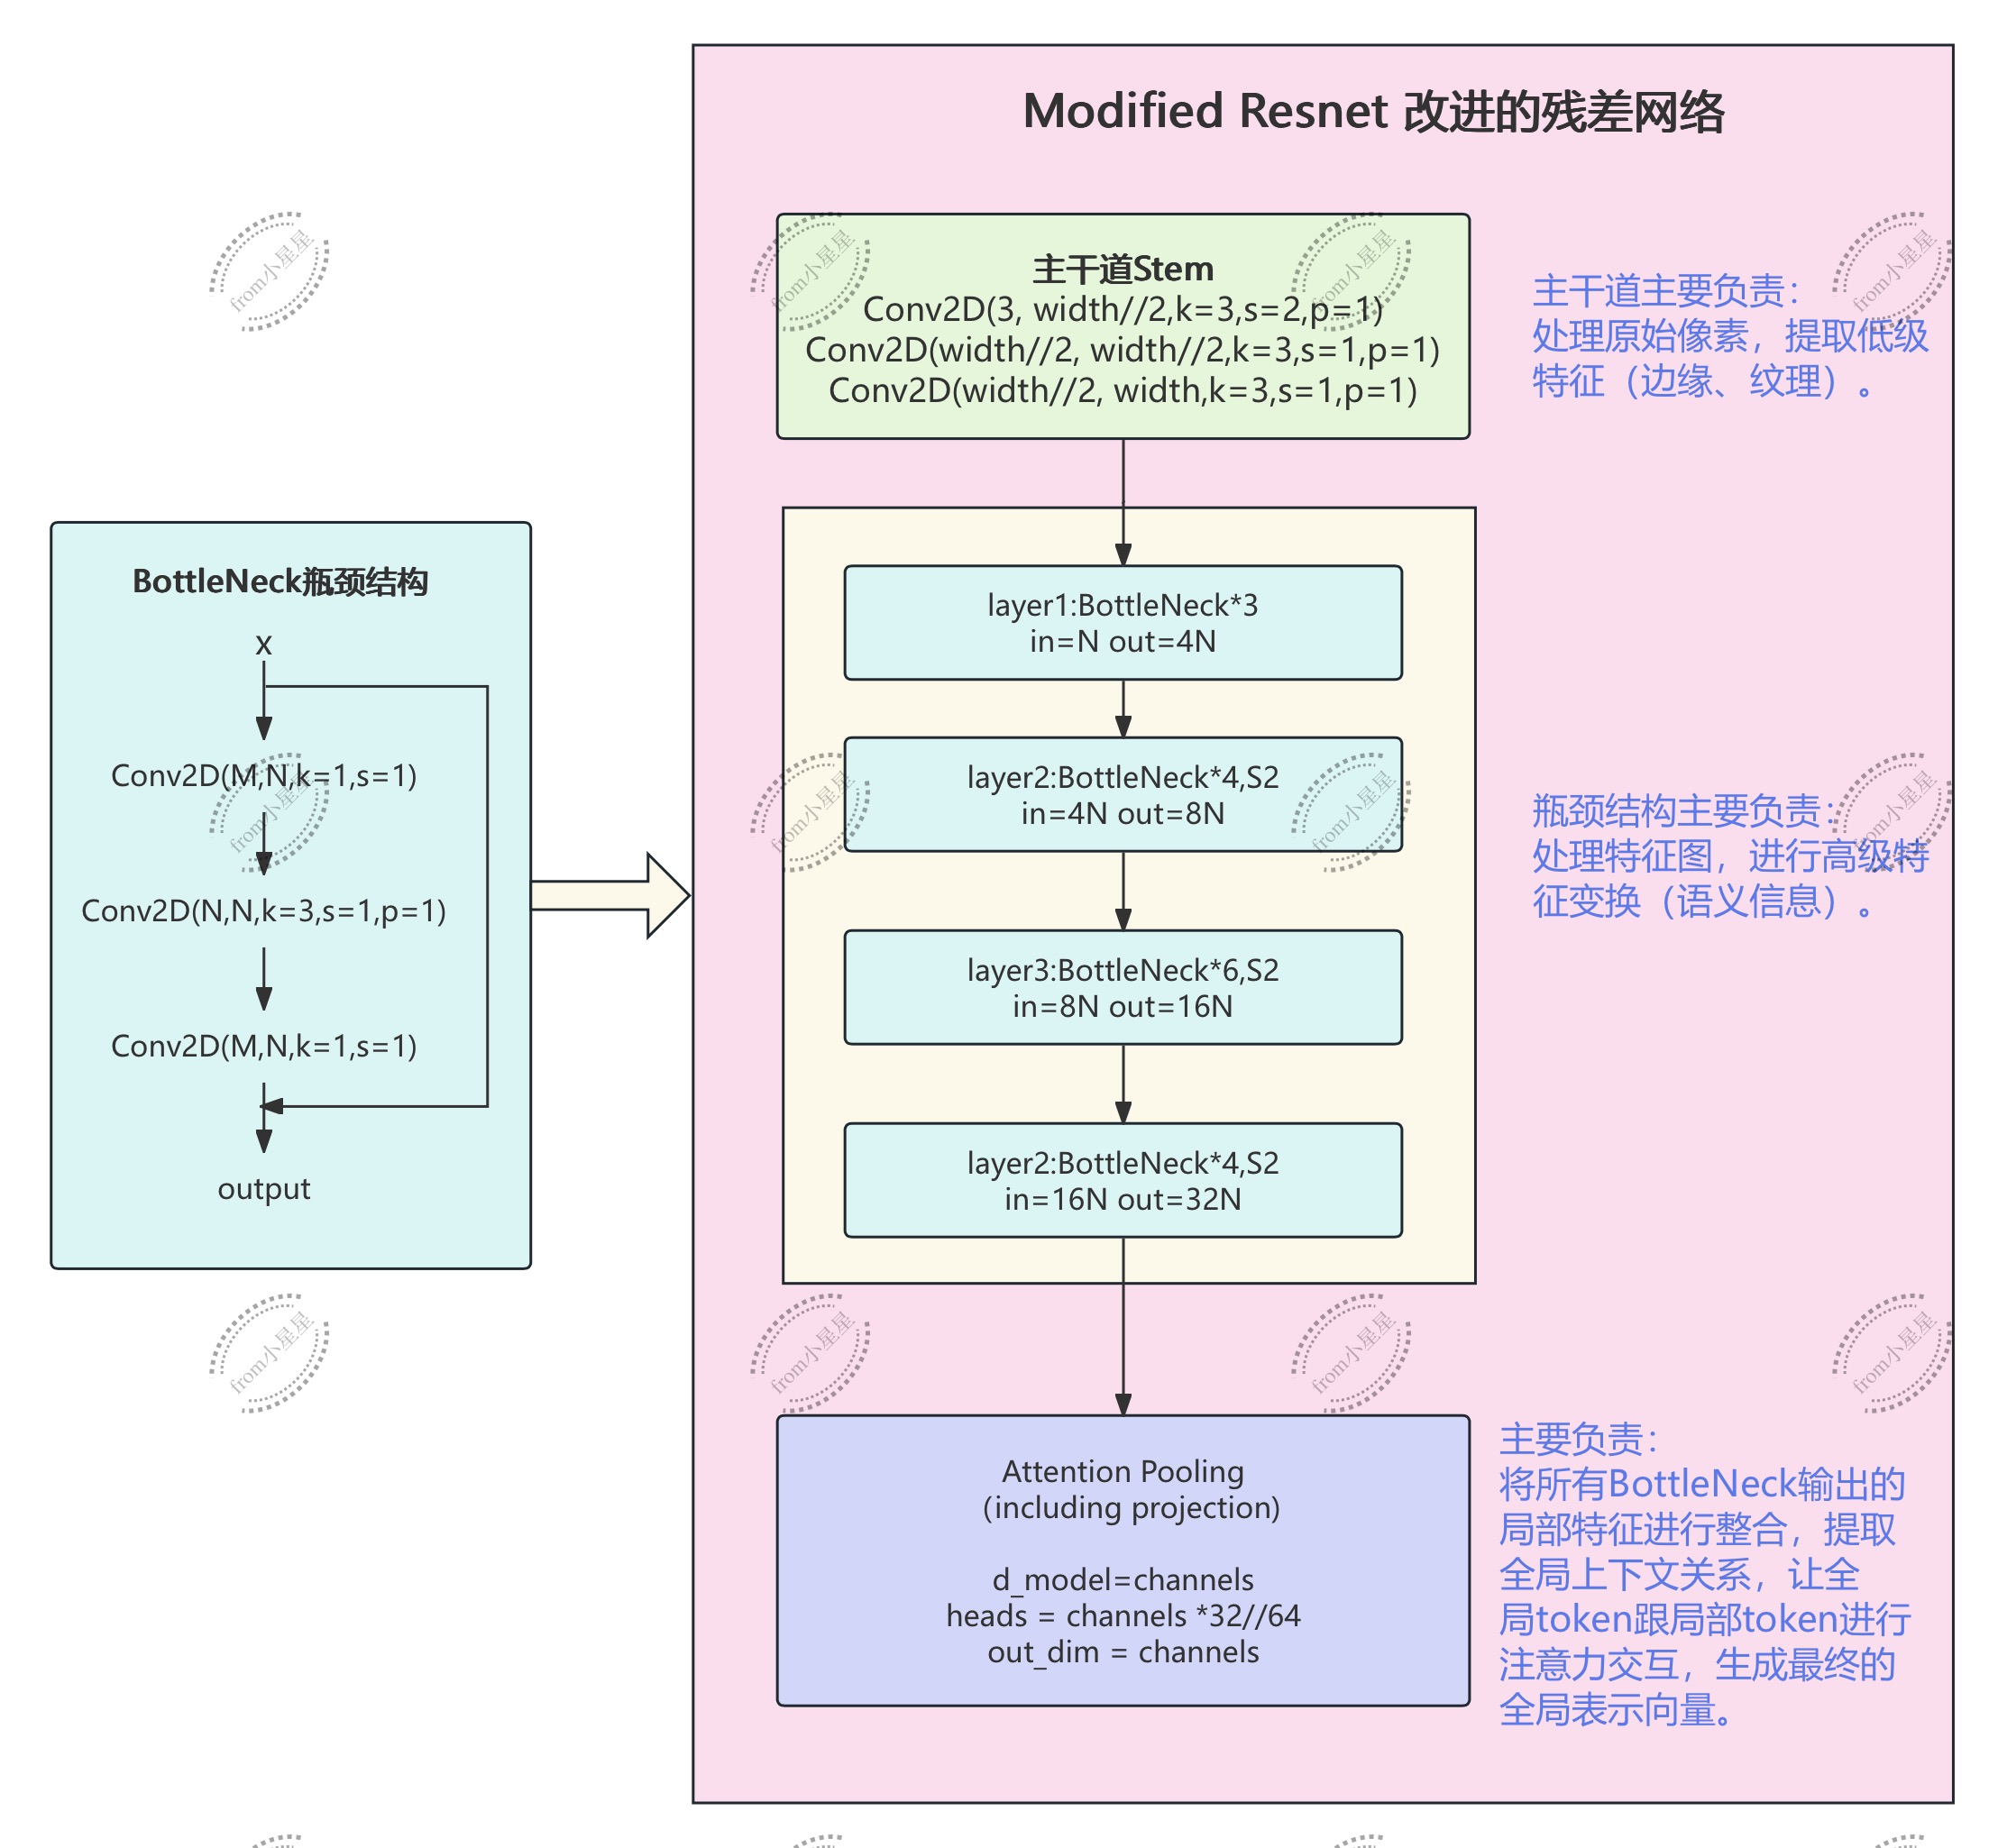
3.1.1 重要组成部分瓶颈结构BottleNeck

class BottleNeck(nn.Module):

    def __init__(self, inplanes, planes, stride=1, expansion=4, downsample=None):
        super(BottleNeck, self).__init__()

        self.conv1 = nn.Conv2d(in_channels=inplanes,
                               out_channels=planes,
                               kernel_size=1,
                               stride=1)
        self.bn1 = nn.BatchNorm2d(planes) #批归一化
        self.relu1 = nn.ReLU(inplace=True)


        self.conv2 = nn.Conv2d(in_channels=planes,
                               out_channels=planes,
                               kernel_size=3,
                               stride=stride,
                               padding=1)
        self.bn2 = nn.BatchNorm2d(planes)
        self.relu2 = nn.ReLU(inplace=True)


        self.conv3 = nn.Conv2d(in_channels=planes,
                               out_channels= expansion * planes,
                               kernel_size=1,
                               stride=1)
        self.bn3 = nn.BatchNorm2d(expansion * planes)


        self.relu3 = nn.ReLU(inplace=True)

        self.downsample = downsample
        self.stride = stride


    def forward(self, x:torch.Tensor):
        '''
        :param x: (batch_size, channels, H, W)
        :return: (batch_size, planes * expansion)
        '''

        identity = x

        # 主路径
        out = self.conv1(x)
        out = self.bn1(out)
        out = self.relu1(out)

        out = self.conv2(out)
        out = self.bn2(out)
        out = self.relu2(out)

        out = self.conv3(out)
        out = self.bn3(out)  # 注意:这里没有ReLU!


        if self.downsample is not None:
            identity = self.downsample(x)

        out = out + identity
        out = self.relu3(out)

        return out
3.1.2 重要组成部分AttentionPool注意力池化
Attention Pooling 是 CLIP 的 Modified ResNet 架构中用来替代传统全局平均池化(Global Average Pooling, GAP)的方法、同时对整个CLIP来说也是重要的向量压缩层。在经过了 stem 和多个 Residual Layers(layer1-layer4)的特征提取后,网络会输出一个形状为 (batch_size, channels, height, width) 的特征图,Attention Pooling 会将这个特征图整合为一个全局特征向量,表示整幅图像的特征、从而方便后续的投影。因此Attention Pooling 的主要任务是将二维的特征图 (batch_size, channels, height, width) 转换为一个全局特征向量 (batch_size, embed_dim)。和传统的全局平均池化相比,注意力池化可以对特征图上的每个位置(像素点)的重要性进行加权、这样生成的全局特征向量能够更好地捕获空间上的信息以及全局上下文关系。
class AttentionPool2D(nn.Module):
    def __init__(self, spacial_dim, embed_dim, num_heads, output_dim):
        super(AttentionPool2D, self).__init__()
        '''
        spacial_dim:输入特征图的空间维度(即特征图宽高的大小,假设特征图是正方形
        embed_dim: 输入特征的嵌入维度(通道数channels)
        num_heads: 多头注意力的头数
        output_dim: 输出特征的目标维度,如果没有指定,则默认为embed_dim
        '''

        # 位置嵌入(Positional_Embedding),初始化为随机值,大小为(spacial_dim ^ 2 + 1, embed_dim)
        self.postional_embedding = nn.Parameter(torch.randn(spacial_dim**2+1, -1, embed_dim)/ embed_dim ** 0.5)
        #针对每个batch添加位置信息
        #额外的"+1"是全局token预留的位置

        self.attention = nn.MultiheadAttention(
            embed_dim=embed_dim,
            num_heads=num_heads,
            batch_first=False,  # 注意:默认是 (seq_len, batch, embed_dim)
            dropout=0.0,
            bias=True
        )

        self.c_project = nn.Linear(embed_dim, output_dim or embed_dim)
        self.num_heads = num_heads


    def foward(self, x):
        '''
        前向传播
        :param x: 输入特征图,shape为(batch_size, channels=embed_dim, height, width)
        :return: 全局特征向量,形状为(batch_size, output_dim)
        '''
        #1、展平特征图并转置
        #(batch_size, channels, height, width)——>(height*width, batch_size, channels)
        x = x.flatten(start_dim=2).permute(2, 0, 1)

        #2、添加全局token(均值池化)
        global_token = x.mean(dim=0, keepdim=True) #(1, batch, channels)
        x = torch.cat([global_token, x], dim=0)

        #3、添加位置编码
        x = x + self.postional_embedding[:, None, :].to(x.dtype)

        #4、执行多头注意力机制
        atten_out, atten_weight = self.attention(
            query=x[:1], #只取第一个token(全局token)作为query
            key=x, #整个序列作为Key
            value=x, #整个序列作为value
            need_weights=False  #不需要返回注意力权重
        )

        #5、输出投影
        #attn_output shape:(1, batch, embed_dim)
        output = self.c_project(atten_out.squeeze(0)) #(batch, embed_dim)

        return output


batch_size = 4  # 假设有 4 个样本
channels = 512  # 从 Bottleneck 输出的特征通道
height = 7      # 特征图的高度
width = 7       # 特征图的宽度
spacial_dim = height  # 假设输入特征图是正方形
embed_dim = channels  # 嵌入维度与输入通道数一致
num_heads = 8  # 多头注意力头数
output_dim = 256  # 输出特征维度


# 生成模拟输入数据(模拟从 Bottleneck 输出的特征图)
input_data = torch.randn(batch_size, channels, height, width)
print(input_data.shape)
#torch.Size([4, 512, 7, 7])

# 创建 AttentionPool2d 实例
attention_pool = AttentionPool2D(spacial_dim, embed_dim, num_heads, output_dim)
output = attention_pool(input_data)

print(output.shape)
#torch.Size([4, 256])
3.1.3 完整的Modified Resnet 实现
import torch
import torch.nn as nn
import torch.nn.functional as F
from typing import List, Optional


class BottleNeck(nn.Module):
    expansion = 4

    def __init__(self, inplanes, planes, stride=1, downsample=None):
        super(BottleNeck, self).__init__()

        self.conv1 = nn.Conv2d(in_channels=inplanes,
                               out_channels=planes,
                               kernel_size=1,
                               stride=1, bias=False)  # 添加bias=False
        self.bn1 = nn.BatchNorm2d(planes)
        self.relu1 = nn.ReLU(inplace=True)

        self.conv2 = nn.Conv2d(in_channels=planes,
                               out_channels=planes,
                               kernel_size=3,
                               stride=stride,
                               padding=1, bias=False)  # 添加bias=False
        self.bn2 = nn.BatchNorm2d(planes)
        self.relu2 = nn.ReLU(inplace=True)

        self.conv3 = nn.Conv2d(in_channels=planes,
                               out_channels=self.expansion * planes,
                               kernel_size=1,
                               stride=1, bias=False)  # 添加bias=False
        self.bn3 = nn.BatchNorm2d(self.expansion * planes)

        self.relu3 = nn.ReLU(inplace=True)

        self.downsample = downsample
        self.stride = stride

    def forward(self, x: torch.Tensor):
        identity = x

        # 主路径
        out = self.conv1(x)
        out = self.bn1(out)
        out = self.relu1(out)

        out = self.conv2(out)
        out = self.bn2(out)
        out = self.relu2(out)

        out = self.conv3(out)
        out = self.bn3(out)  # 注意:这里没有ReLU!

        if self.downsample is not None:
            identity = self.downsample(x)

        out = out + identity
        out = self.relu3(out)

        return out


class AttentionPool2D(nn.Module):
    def __init__(self, spacial_dim, embed_dim, num_heads, output_dim):
        super(AttentionPool2D, self).__init__()
        '''
        spacial_dim: 输入特征图的空间维度(假设是正方形)
        embed_dim: 输入特征的嵌入维度(通道数)
        num_heads: 多头注意力的头数
        output_dim: 输出特征的目标维度
        '''

        # ========== 关键修正:检查spacial_dim参数 ==========
        print(f"AttentionPool2D初始化: spacial_dim={spacial_dim}, embed_dim={embed_dim}")

        # 位置嵌入
        self.positional_embedding = nn.Parameter(
            torch.randn(spacial_dim ** 2 + 1, embed_dim) / embed_dim ** 0.5
        )

        self.attention = nn.MultiheadAttention(
            embed_dim=embed_dim,
            num_heads=num_heads,
            batch_first=False,
            dropout=0.0,
            bias=True
        )

        self.c_project = nn.Linear(embed_dim, output_dim or embed_dim)
        self.num_heads = num_heads

    def forward(self, x):
        '''
        前向传播
        :param x: 输入特征图,shape为(batch_size, channels, height, width)
        :return: 全局特征向量,形状为(batch_size, output_dim)
        '''
        batch_size, channels, height, width = x.shape

        # ========== 关键修正:验证输入尺寸 ==========
        print(f"AttentionPool2D输入: batch={batch_size}, channels={channels}, "
              f"height={height}, width={width}")
        print(f"位置编码形状: {self.positional_embedding.shape}")

        # 验证输入尺寸与spacial_dim匹配
        expected_spacial_dim = int((self.positional_embedding.shape[0] - 1) ** 0.5)
        if height != expected_spacial_dim or width != expected_spacial_dim:
            print(f"警告: 输入尺寸{height}x{width}与期望的{expected_spacial_dim}x{expected_spacial_dim}不匹配!")
            print(f"位置编码期望的token数: {expected_spacial_dim ** 2 + 1}")
            print(f"实际输入的token数: {height * width}")

        # 1、展平特征图并转置
        x = x.flatten(start_dim=2).permute(2, 0, 1)  # (H*W, batch, channels)

        # 2、添加全局token
        global_token = x.mean(dim=0, keepdim=True)  # (1, batch, channels)
        x = torch.cat([global_token, x], dim=0)  # (H*W+1, batch, channels)

        # 3、添加位置编码
        x = x + self.positional_embedding[:, None, :].to(x.dtype)

        # 4、执行多头注意力
        atten_out, _ = self.attention(
            query=x[:1],  # 全局token作为query
            key=x,
            value=x,
            need_weights=False
        )

        # 5、输出投影
        output = self.c_project(atten_out.squeeze(0))  # (batch, output_dim)

        return output


class ModifiedResNet(nn.Module):
    def __init__(self, layers: List[int], output_dim: int, heads: int,
                 input_resolution: int = 224, width: int = 64):
        super(ModifiedResNet, self).__init__()

        self.output_dim = output_dim
        self.input_resolution = input_resolution

        # ========== Stem部分 ==========
        self.conv1 = nn.Conv2d(3, width // 2, kernel_size=3,
                               stride=2, padding=1, bias=False)
        self.bn1 = nn.BatchNorm2d(width // 2)
        self.relu1 = nn.ReLU(inplace=True)

        self.conv2 = nn.Conv2d(width // 2, width // 2, kernel_size=3,
                               stride=1, padding=1, bias=False)
        self.bn2 = nn.BatchNorm2d(width // 2)
        self.relu2 = nn.ReLU(inplace=True)

        self.conv3 = nn.Conv2d(width // 2, width, kernel_size=3,
                               stride=1, padding=1, bias=False)
        self.bn3 = nn.BatchNorm2d(width)
        self.relu3 = nn.ReLU(inplace=True)

        # ========== 残差层 ==========
        self._inplanes = width

        # 关键:注意每个layer的输出分辨率
        self.layer1 = self._make_layer(width, layers[0])  # 输出: 112×112
        self.layer2 = self._make_layer(width * 2, layers[1], stride=2)  # 输出: 56×56
        self.layer3 = self._make_layer(width * 4, layers[2], stride=2)  # 输出: 28×28
        self.layer4 = self._make_layer(width * 8, layers[3], stride=2)  # 输出: 14×14

        # ========== 关键修正:计算正确的spacial_dim ==========
        # 计算最终特征图的大小
        # 224 → conv1(stride=2) → 112
        # 112 → layer1 → 112
        # 112 → layer2(stride=2) → 56
        # 56 → layer3(stride=2) → 28
        # 28 → layer4(stride=2) → 14

        final_spacial_dim = input_resolution // 16  # 224/16 = 14
        embed_dim = width * 32  # width * 8 * 4 = width * 32

        print(f"网络配置:")
        print(f"  输入分辨率: {input_resolution}")
        print(f"  最终特征图大小: {final_spacial_dim}×{final_spacial_dim}")
        print(f"  最终通道数: {embed_dim}")
        print(f"  AttentionPool2D的spacial_dim: {final_spacial_dim}")

        self.attnpool = AttentionPool2D(final_spacial_dim, embed_dim, heads, output_dim)

        # 验证各层配置
        self._verify_architecture()

    def _make_layer(self, planes: int, blocks: int, stride: int = 1):
        downsample = None

        if stride != 1 or self._inplanes != planes * BottleNeck.expansion:
            downsample = nn.Sequential(
                nn.Conv2d(self._inplanes, planes * BottleNeck.expansion,
                          kernel_size=1, stride=stride, bias=False),
                nn.BatchNorm2d(planes * BottleNeck.expansion),
            )

        layers = []
        layers.append(BottleNeck(self._inplanes, planes, stride, downsample))
        self._inplanes = planes * BottleNeck.expansion

        for _ in range(1, blocks):
            layers.append(BottleNeck(self._inplanes, planes, stride=1))

        return nn.Sequential(*layers)

    def _verify_architecture(self):
        """验证网络架构的正确性"""
        print("\n网络架构验证:")
        print("=" * 40)

        # 模拟输入并追踪尺寸变化
        resolution = self.input_resolution
        print(f"初始输入: {resolution}×{resolution}×3")

        # Stem部分
        resolution = resolution // 2  # conv1 stride=2
        print(f"Stem后: {resolution}×{resolution}×{self.conv3.out_channels}")

        # Layer1
        print(f"Layer1后: {resolution}×{resolution}×{self._inplanes}")

        # Layer2-4
        layers = [self.layer2, self.layer3, self.layer4]
        for i, layer in enumerate(layers, 2):
            # 检查第一个block是否有stride=2
            first_block = layer[0]
            if hasattr(first_block, 'stride') and first_block.stride > 1:
                resolution = resolution // 2
            print(f"Layer{i}后: {resolution}×{resolution}×{self._inplanes}")

        print("=" * 40)

    def forward(self, x):
        # 确保输入类型匹配
        x = x.type(self.conv1.weight.dtype)

        print("\n前向传播过程:")
        print(f"输入: {x.shape}")

        # Stem
        x = self.relu1(self.bn1(self.conv1(x)))
        x = self.relu2(self.bn2(self.conv2(x)))
        x = self.relu3(self.bn3(self.conv3(x)))
        print(f"Stem后: {x.shape}")

        # 残差层
        x = self.layer1(x)
        print(f"Layer1后: {x.shape}")

        x = self.layer2(x)
        print(f"Layer2后: {x.shape}")

        x = self.layer3(x)
        print(f"Layer3后: {x.shape}")

        x = self.layer4(x)
        print(f"Layer4后: {x.shape}")

        # 注意力池化
        x = self.attnpool(x)
        print(f"最终输出: {x.shape}")

        return x


# ========== 测试代码 ==========
def test_model():
    """测试模型"""
    print("开始测试ModifiedResNet...")
    print("=" * 60)

    # 创建模型
    model = ModifiedResNet(
        layers=[3, 4, 6, 3],  # ResNet-50配置
        output_dim=512,
        heads=8,
        input_resolution=224,
        width=64
    )

    print("\n" + "=" * 60)
    print("模型创建成功!")
    print(f"总参数量: {sum(p.numel() for p in model.parameters()):,}")

    # 测试输入
    input_data = torch.randn(2, 3, 224, 224)  # batch_size=2
    print(f"\n测试输入: {input_data.shape}")

    # 前向传播
    model.eval()
    with torch.no_grad():
        output = model(input_data)

    print(f"\n测试输出: {output.shape}")
    print("测试成功!")

    return model, output


if __name__ == "__main__":
    # 运行测试
    model, output = test_model()

    # 验证各层参数
    print("\n" + "=" * 60)
    print("各层输出形状验证:")


    # 创建一个简单的验证函数
    def check_layer_shapes():
        test_input = torch.randn(1, 3, 224, 224).type(model.conv1.weight.dtype)

        # Stem
        x = model.conv1(test_input)
        x = model.bn1(x)
        x = model.relu1(x)
        #print(f"1. conv1后: {x.shape}  (应为 1, 32, 112, 112)")

        x = model.conv2(x)
        x = model.bn2(x)
        x = model.relu2(x)
        print(f"2. conv2后: {x.shape}  (应为 1, 32, 112, 112)")

        x = model.conv3(x)
        x = model.bn3(x)
        x = model.relu3(x)
        print(f"3. conv3后: {x.shape}  (应为 1, 64, 112, 112)")

        # Layer1
        x = model.layer1(x)
        #print(f"4. layer1后: {x.shape}  (应为 1, 256, 112, 112)")

        # Layer2
        x = model.layer2(x)
        print(f"5. layer2后: {x.shape}  (应为 1, 512, 56, 56)")

        # Layer3
        x = model.layer3(x)
        print(f"6. layer3后: {x.shape}  (应为 1, 1024, 28, 28)")

        # Layer4
        x = model.layer4(x)
        print(f"7. layer4后: {x.shape}  (应为 1, 2048, 14, 14)")


    check_layer_shapes()
3.2 视觉Trans:Vision Transformer
Vision Transformer (ViT)是一种将Transformer架构应用于计算机视觉任务的深度学习模型,旨在利用 Transformer 的全局建模能力处理图像数据。与传统的卷积神经网络不同,ViT不依赖卷积操作,而是通过将图片分割为固定大小的子块(Patch),并将这些子块视为序列输入,结合自注意力机制对全局特征进行建模。
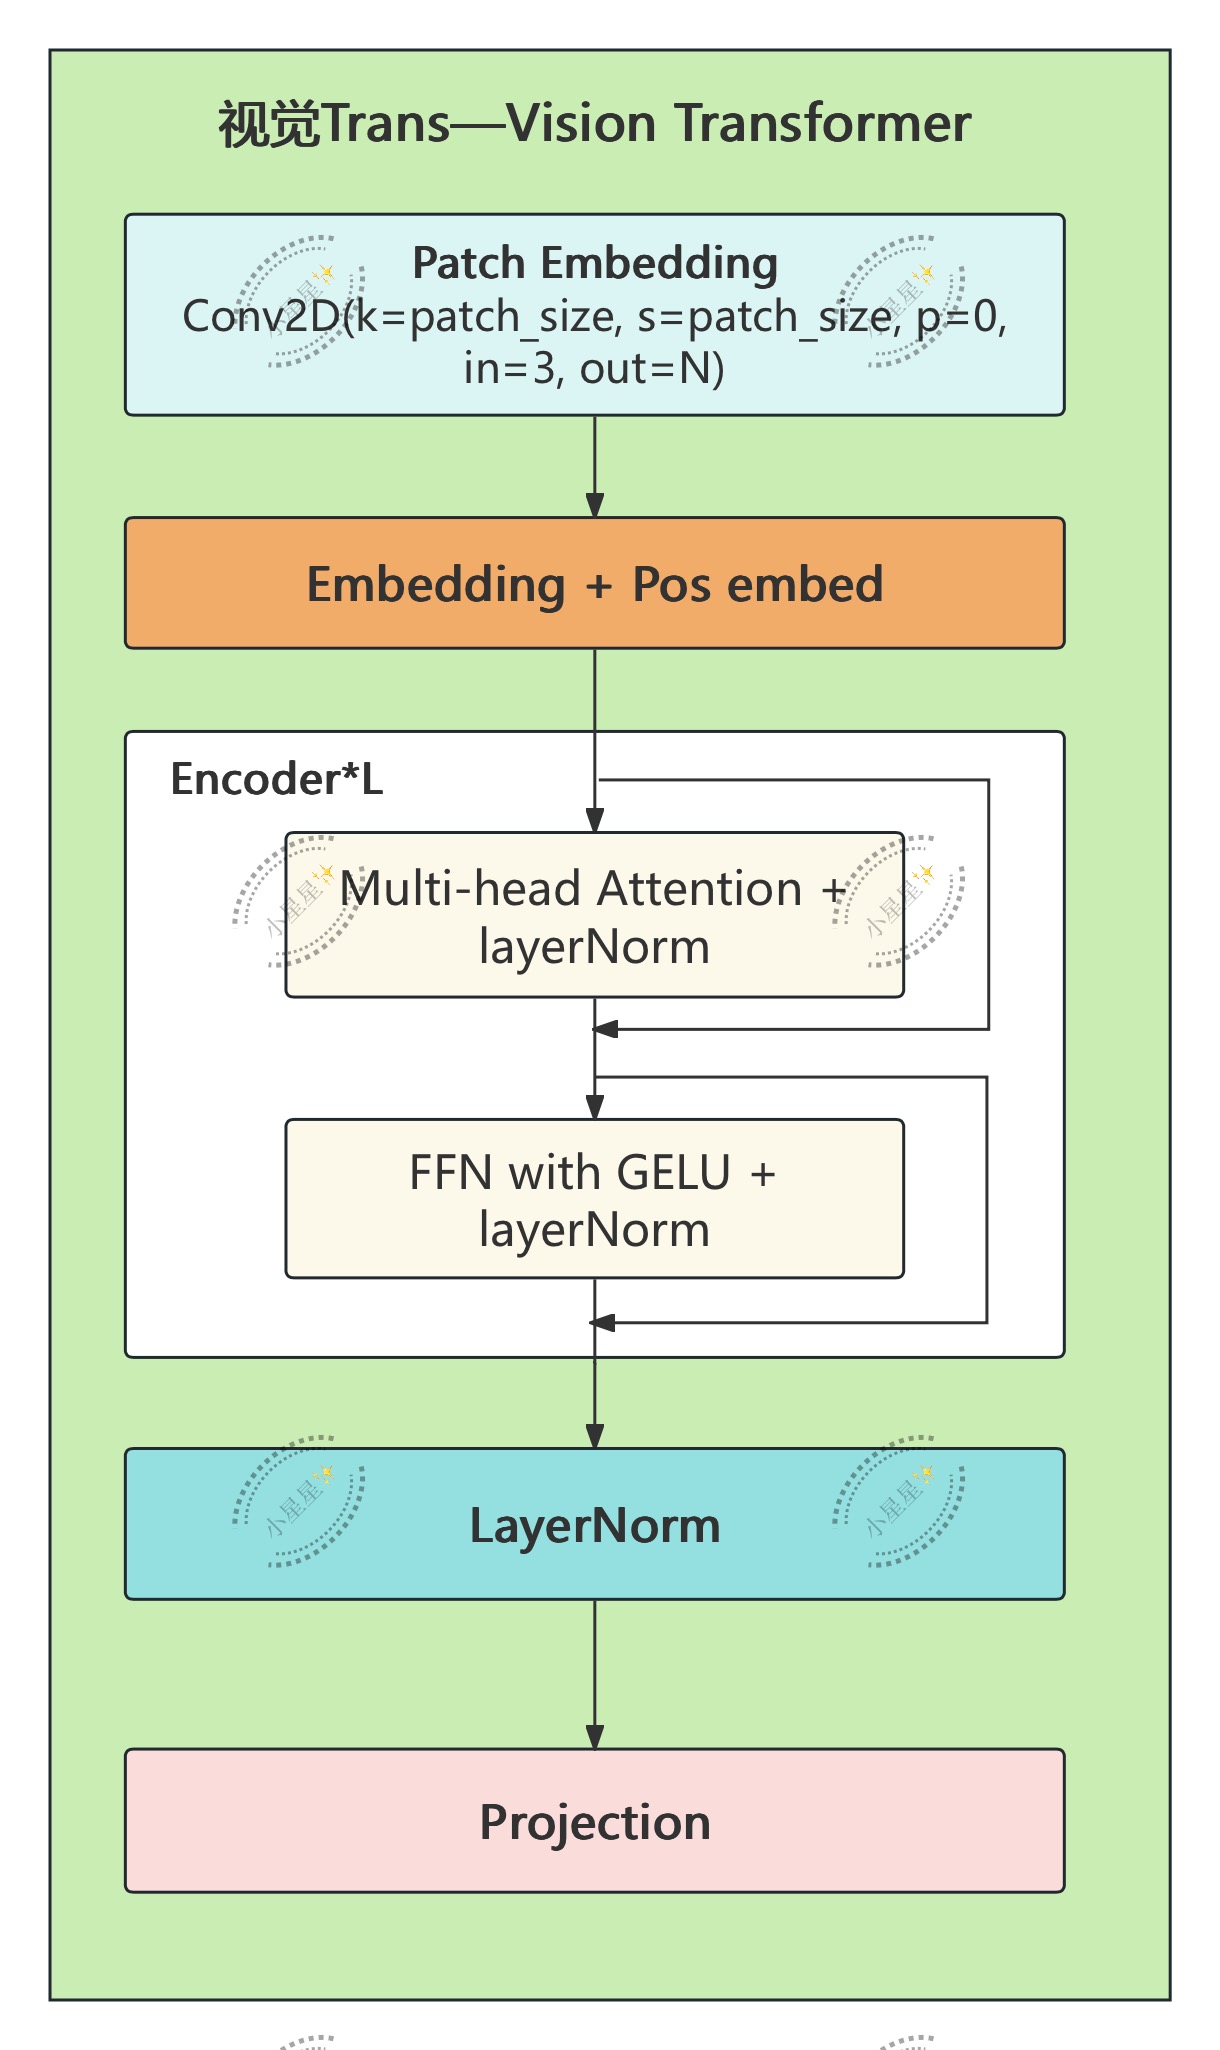
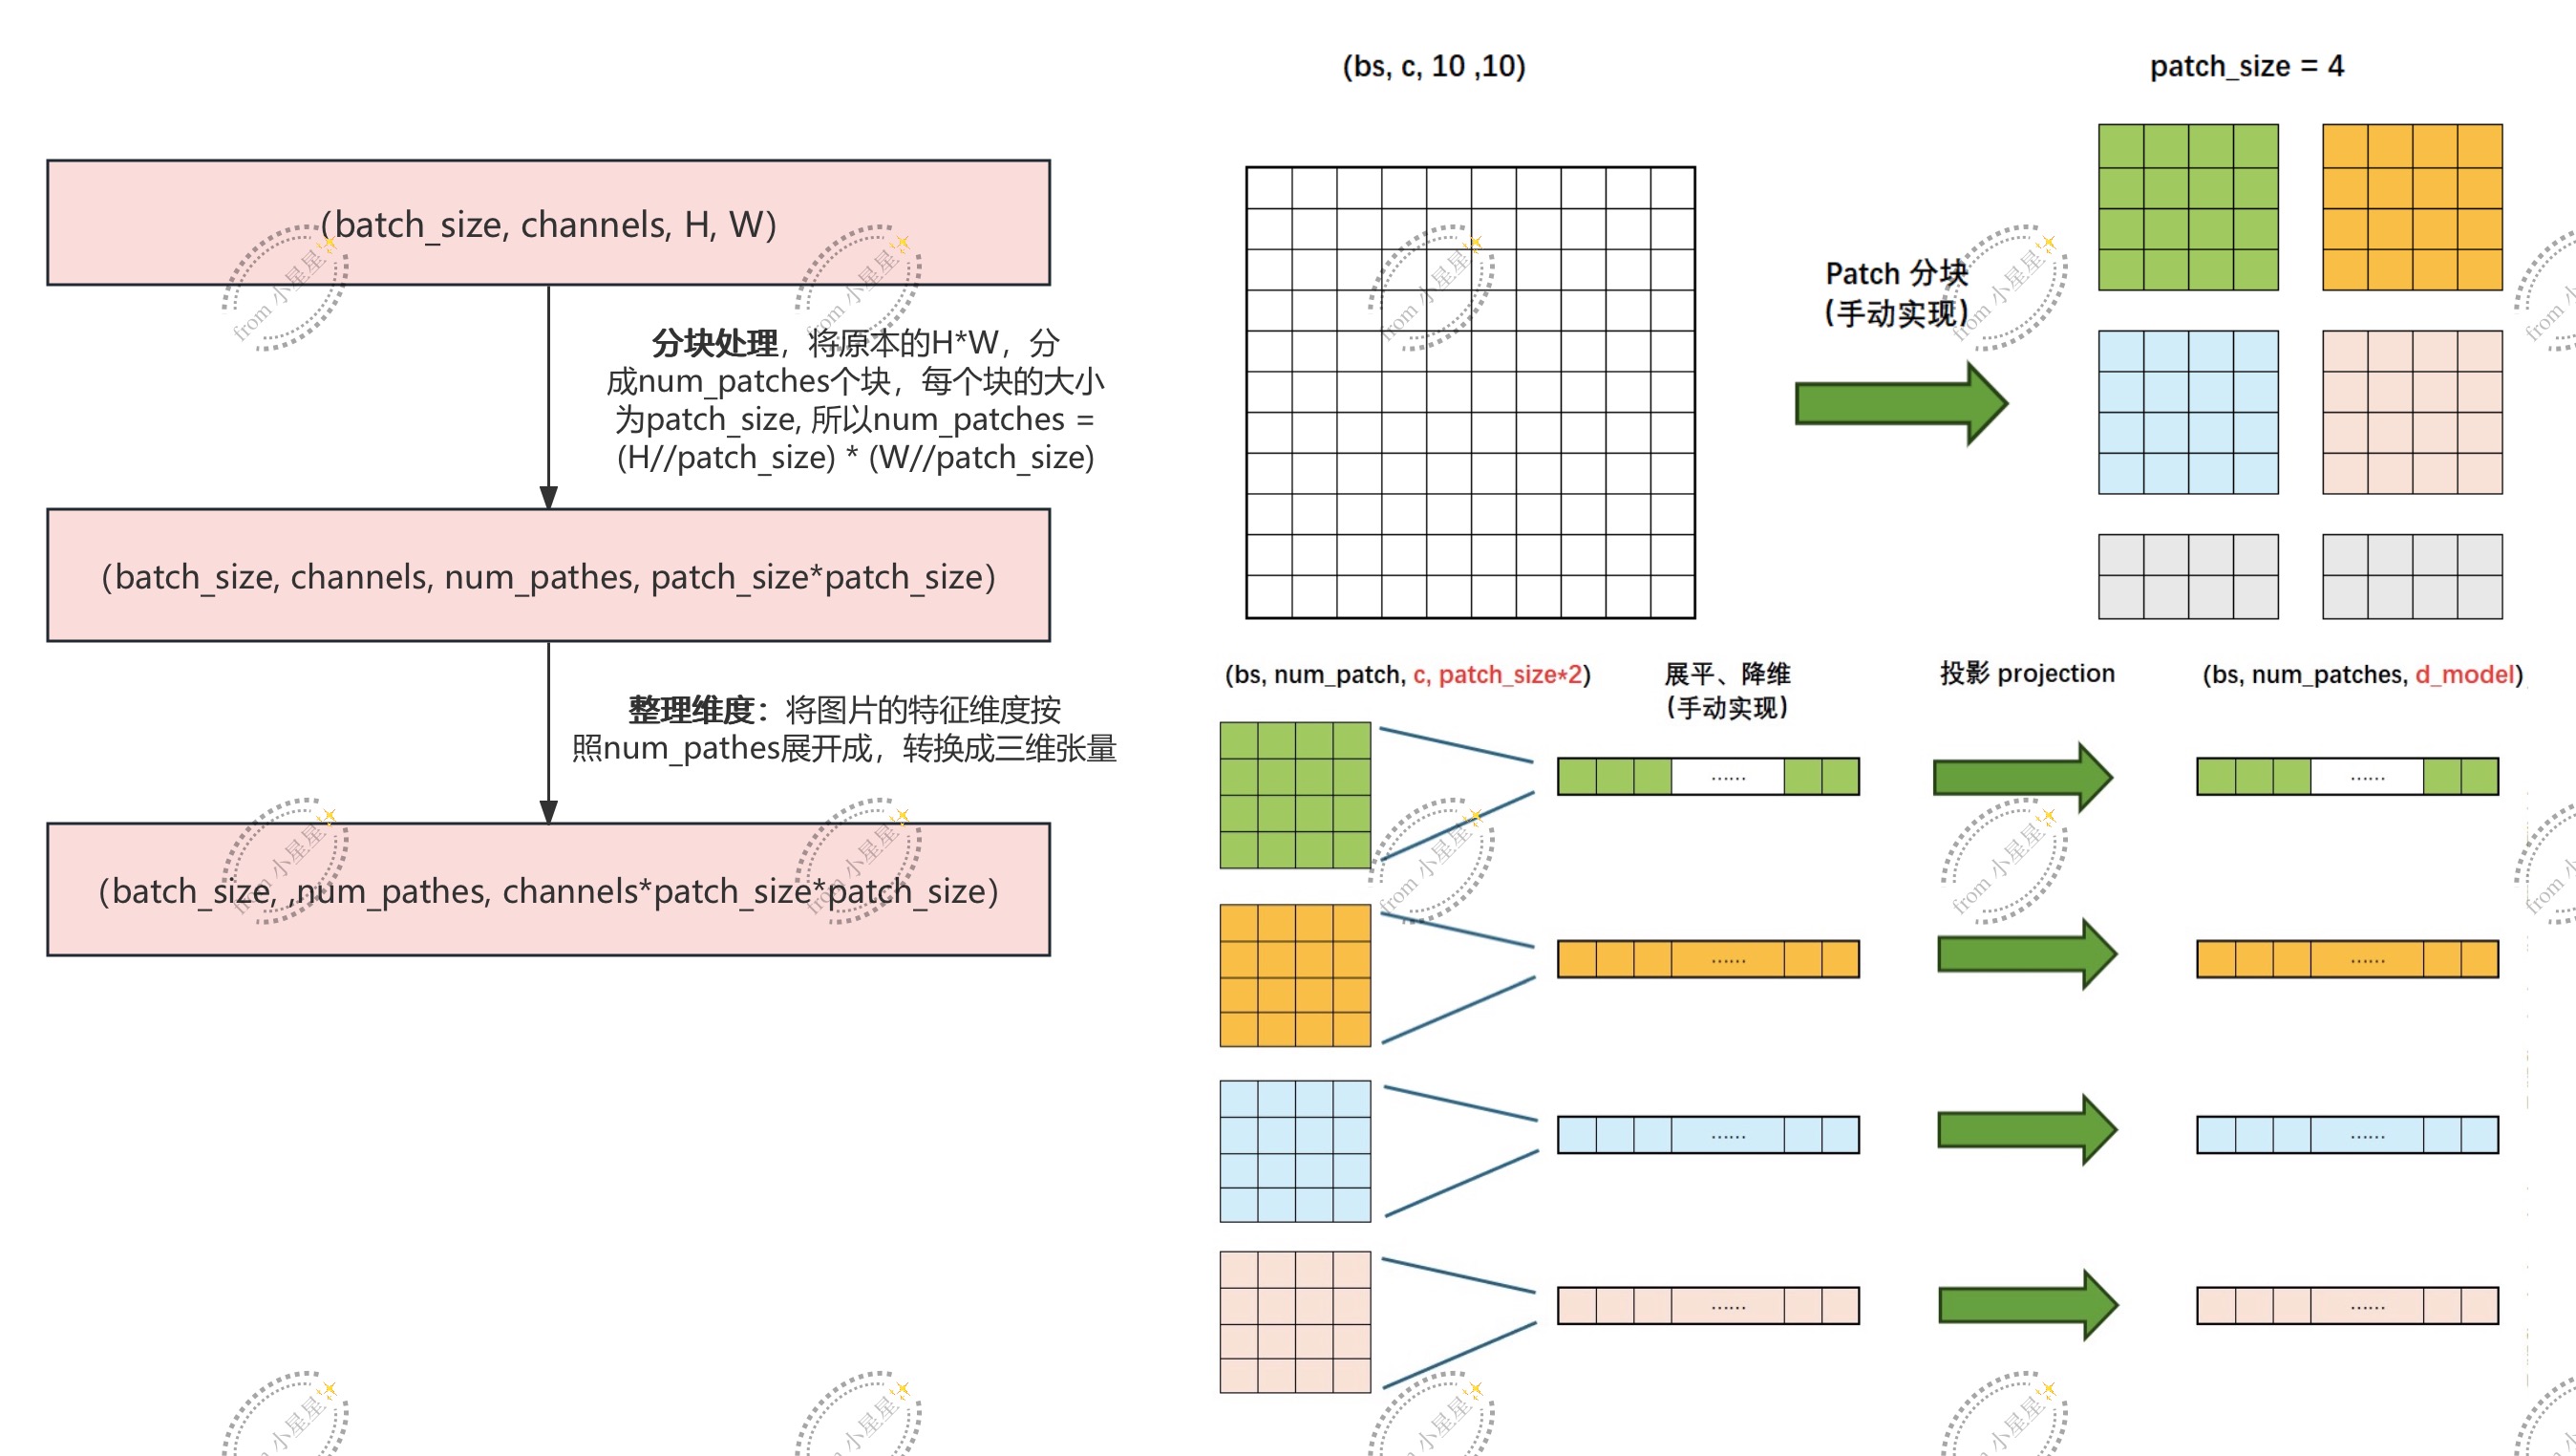
Q&A: ViT如何将图像信息转变为Transformer能够读取的序列?
在ViT中,负责转变信息的结构叫Patch Embedding,传统图像输入是三维张量(HWC),分别表示图像高度、宽度和通道数,而Transformer的输入要求是一维序列。具体来说,ViT会讲输入图像按照固定大小P*P分割成若干个不重叠的子块(Patch),每个Patch被展平为一维向量,形状为P^2 * C,其中C为图像的通道数。随后,使用一个线性投影层(通常是一个全连接层)将每个Patch的一维向量投影到D维空间(D是Transformer的隐藏层维度),生成对应的Embedding。具体如3.2.1所示。
3.2.1 Patch Embedding思想
import torch
import torch.nn as nn


class PacthEmbedding(nn.Module):
    def __init__(self, img_size=224, patch_size=16, in_channels=3, embed_dim=768):
        super(PacthEmbedding, self).__init__()
        '''
        img_size:输入图像的分辨率(默认为224)
        patch_size:每个patch的尺寸(16*16)
        in_channels:输入图像的通道数(默认为3,即RGB图像)
        embed_dim:嵌入维度(Transformer的输入特征维度,默认为768)
        '''
        self.img_size = img_size
        self.patch_size = patch_size
        self.num_patches = (img_size//patch_size) * (img_size//patch_size)
        #计算图像被划分的总patch数量 = (图像宽度上的patch数)* (图像高度上的patch数)
        self.patch_dim = in_channels * patch_size * patch_size
        self.embed_dim = embed_dim

        self.postional_embedding = nn.Parameter(torch.randn(1, self.num_patches, self.embed_dim))


    def forward(self, x):
        B, C, H, W = x.shape
        # 确保输入图像的分辨率与定义的 img_size 一致
        assert H == self.img_size and W == self.img_size, "Input size must match img_size"


        #将输入的图片分patch,使用unfold函数:
        # unfold(2, patch_size, patch_size) 在高度维度上以 patch_size 的窗口滑动并提取小块;
        # unfold(3, patch_size, patch_size) 在宽度维度上以 patch_size 的窗口滑动并提取小块。
        patches = x.unfold(2, self.patch_size, self.patch_size).unfold(3, self.patch_size, self.patch_size)

        #将patches维度转变为(B, num_patches, patch_dim)
        patches = patches.contiguous().view(B, -1, self.patch_dim)

        # 使用线性层将每个 Patch 的特征投影到嵌入维度(embed_dim),
        # 输出的形状为 (B, num_patches, embed_dim)。
        embeddings = self.projection(patches)

        embeddings += self.postional_embedding

        # 返回添加了位置编码的 Patch 嵌入
        return embeddings
3.2.2 CILP中的Patch Embedding
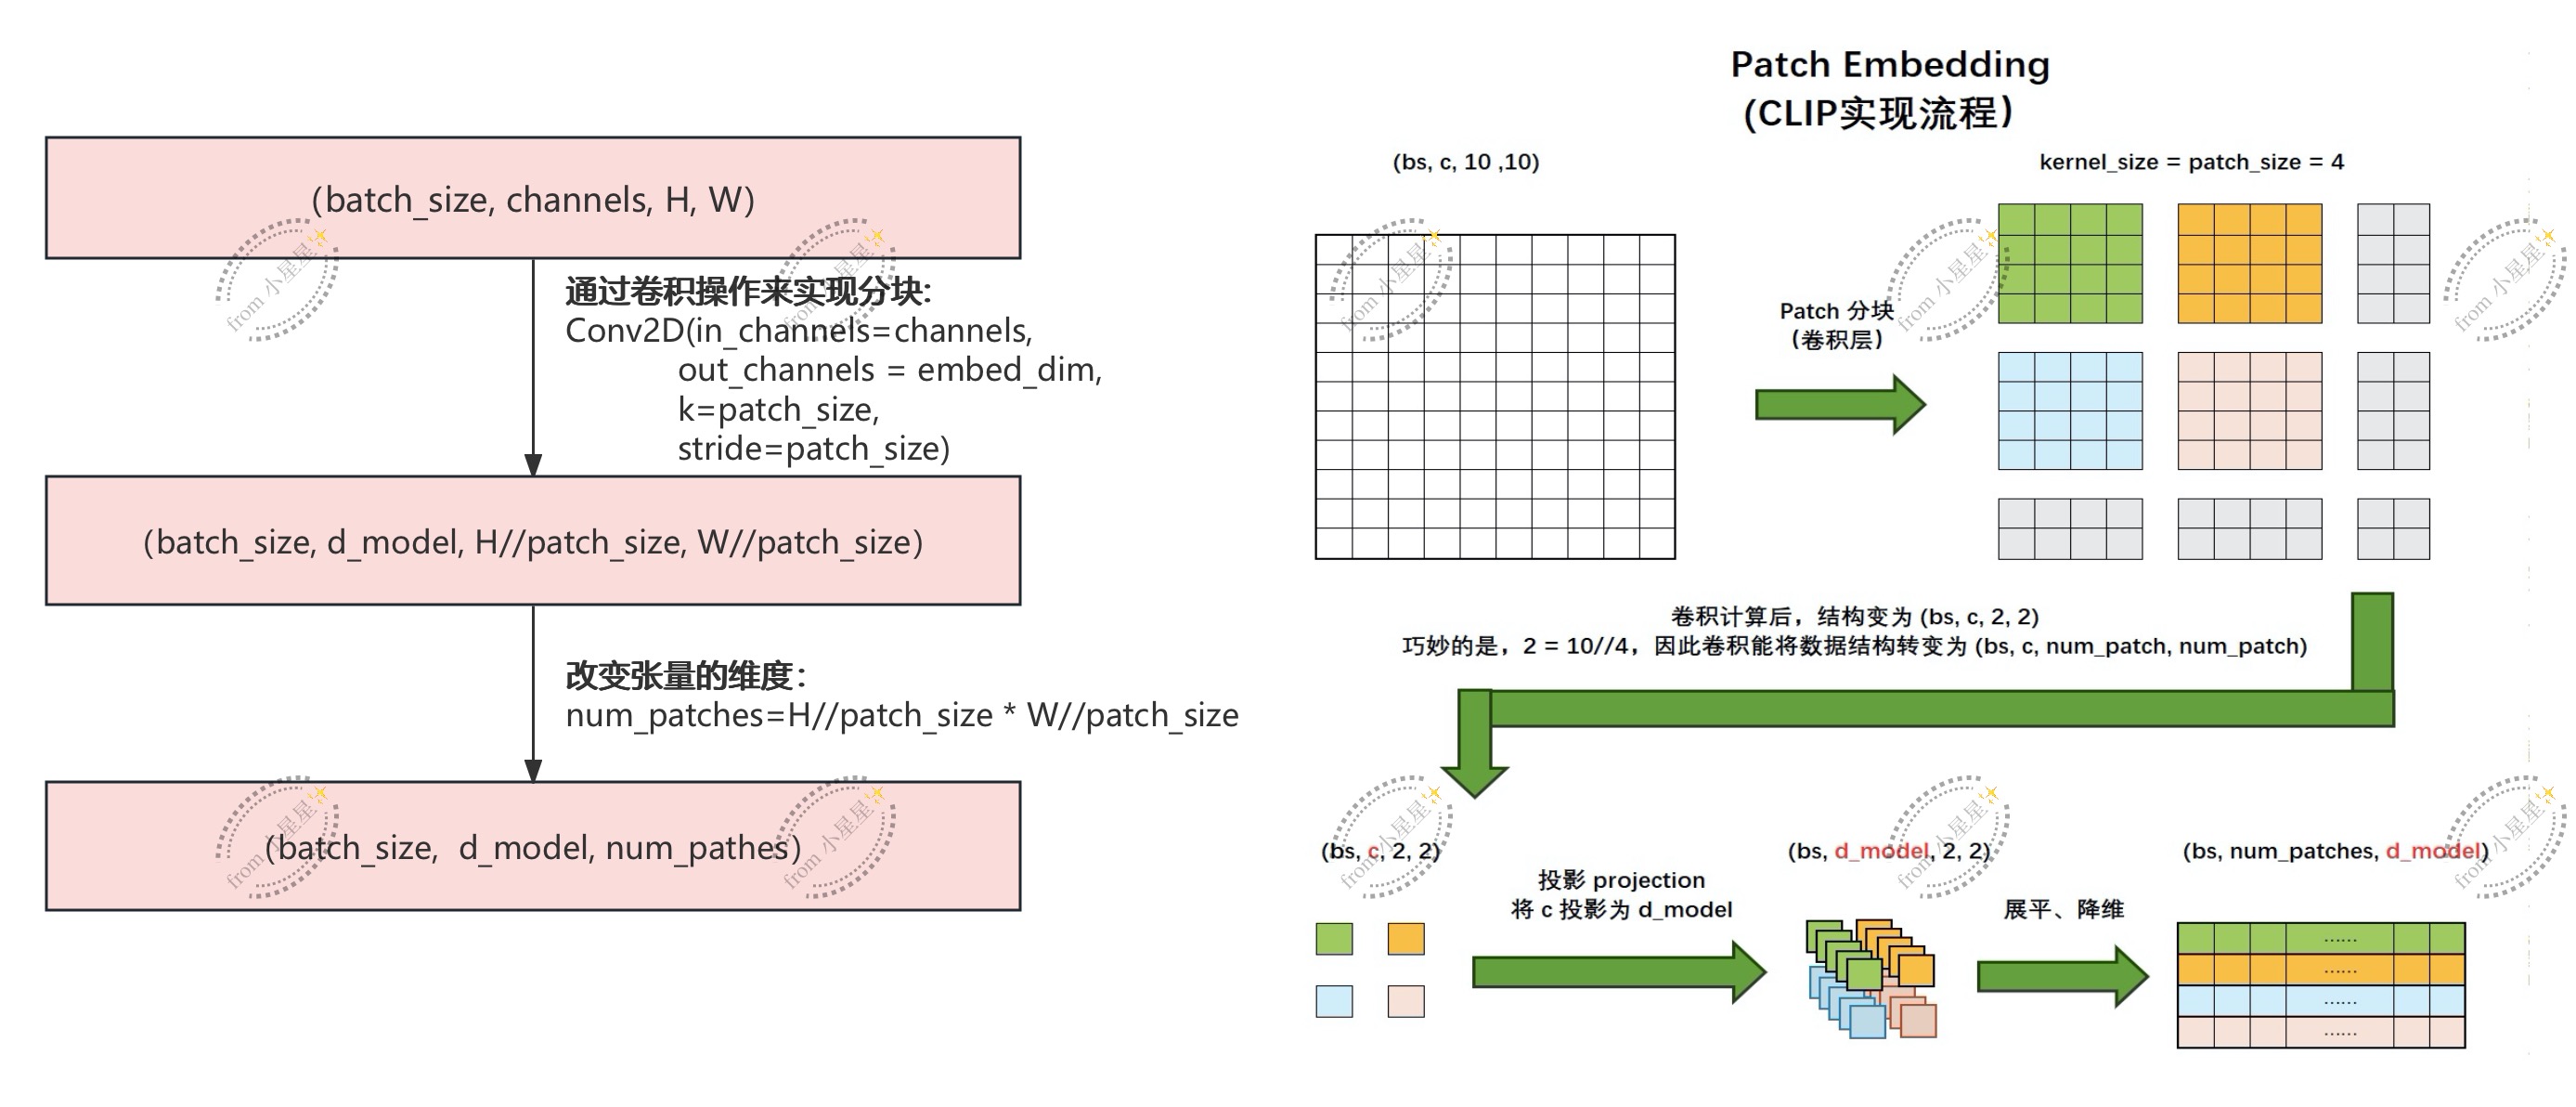
3.2.2.1 代码实现
d_model = 512
patch_size = 16
stride = 16


conv1 = nn.Conv2d(in_channels=3,
                  out_channels=d_model,
                  kernel_size=patch_size,
                  stride=patch_size,
                  bias=False)


input_data = torch.randn(10, 3, 224, 224)
x = conv1(input_data)
print(x.shape)
#torch.Size([10, 512, 14, 14])
x = x.reshape(x.shape[0], x.shape[1], -1)  # 形状 = [batch_size, width, grid ** 2]
x = x.permute(0, 2, 1)
print(x.shape)
#torch.Size([10, 196, 512])
3.2.2.2 优势
3.2.2.2.1 对比Patch Embedding在ViT常规方法和CILP中的方法
| Patch Embedding核心环节 | ViT常规实现方法 | CILP中的实现方法 |
|---|---|---|
| 分块 | 设置好patch_size,使用unfold等方式手动划分 | 使用卷积层进行划分 |
| 投影前展平 | 在划分好的patch上继续unfold、view等方式进行手动展平 | – |
| 投影 | 设置单独的投影线性层接收 in_channels*patch_size * patch_size并输出d_model | 在卷积层中通过将out_channels设置成d_model从而实现投影 |
| 投影后展平 | – | 使用reshape和permute进行展平 |
3.2.2.2.2 使用卷积核进行分块的优势
- 计算效率高:使用卷积操作可以有效利用硬件加速。卷积操作在PyTorch和Tensorflow中得到了高度优化,可以充分利用GPU的并行能力。传统手动展平每个patch的方式需要额外的显式循环操作,效率较低。
- 自然的空间感知:卷积操作天生具有局部感知能力。卷积核在每个Patch内进行加权求和,相当于提取Patch模块中的局部特征,而不是简单的展平数据。
- 内存消耗少:卷积操作直接作用于原始的高维图像,而传统方法展平操作会生成一个高维的中间结果。例如:每个16*16的patch会被展平成长度为16x16x3=768的向量维度,如果图像分辨率较高,Patch较多,会导致内存占用增加。使用卷积操作可以直接输出(batch_size, d_model, grid_height, grid_width),从而避免了显式展平产生的中间结果,从而节省内存。
- 代码简洁且拓展性强:Conv2D的kenerl_size和stride参数天然对应patch的大小和步幅,代码更加直观、简洁,省却了展平和逐个Patch投影的步骤。可拓展性是指:如果需要更复杂的处理,也能直接在卷积层添加更多的非线性操作(如激活函数)或深层网络结构,而不是依赖额外的模块。
- 支持任意大小的图像:相较于传统patch要求图像分辨率是patch大小的整数倍来说,卷积操作能够通过padding自动处理边界。
- 与预训练CNN特征结合的潜力:在实际应用中,可能会用预训练的CNN特征作为Transformer的输入。
- 灵活的Patch特征生成:通过设计卷积核(如不同大小、深度或非线性处理),可以灵活生成更复杂的 Patch 特征。传统方法中,每个像素值直接作为输入,无法动态调整patch内部的特征。
- 提前降维,减少计算量。
Q&A:除了Patch Embedding之外,ViT和普通的Transformer有什么不同?
为了保留图像中Patch的位置信息,ViT会在Patch Embedding中加入二维位置编码(Positional Encoding),以提供给模型相应的顺序信息。跟Transformer不同的是,ViT中的位置编码不是既定数值,而是可以通过反向传播进行梯度更新的可学习的参数。
此外,ViT支持类别嵌入。类别嵌入是一个learnable参数,直接添加到序列的开头,用于提取全图图像特征,类似于在Bert中插入的[CLS],这个token用于收集全局信息。
同时,ViT所需要的数据量比Transformer大很多,ViT被认为是一个图像的架构而不是文本的架构,因此ViT需要的输入是Patch、而普通Transformer需要的输入是Token。
3.2.3 全套VIT代码实现
3.2.3.1 精度提升的LayerNorm(Precision-Promoted LayerNorm)
由于在float16的基础上进行计算可能会引起精度不足的问题,因为方差可能很小,接近 fp16 的最小正值 ~5.96e-8,这就导致误差被放大。因此,我们需要在原来的LayerNorm中转换下计算精度。把原本的float16数据转换成float32的精度进行计算。
class LayerNorm(nn.LayerNorm):
    '''
    LayerNorm的子类,用于处理fp16(半精度浮点数)
    '''
    def forward(self, x: torch.Tensor):
        #保存原属数据类型
        orig_type = x.dtype
        #将输入转换为float32类型,并执行LayerNorm操作
        ret = super().forward(x.type(torch.float32))
        #恢复原始数据类型
        return ret.type(orig_type)
3.2.3.2 QuickGELU激活函数
将原本的GELU激活函数(0.5 * x * (1 + tanh[ √(2/π) * (x + 0.044715 * x³) ]))转换成更加简单且高效的QuickGELU函数(x * sigmoid(1.702 * x))。
class QuickGELU(nn.Module):
    '''
    实现QuickGELU激活函数,比标准的GELU更简单效率更高
    '''
    def forward(self, x:torch.Tensor):
        # QuickGELU 激活函数公式:x * sigmoid(1.702 * x)
        return x * torch.sigmoid(1.702 * x)
Q&A:为什么一定要继承自nn.Moudle类?
一个不继承 nn.Module 的 forward 函数,就像一个游离在外的“计算器”。它虽然能算,但无法融入 PyTorch 这个“智能工厂”的生产线。而继承 nn.Module 后,这个“计算器”就被包装成了一个标准的“工厂设备”,可以被识别、管理和调度。
3.2.3.3 残差块(ResidualAttentionBlock)
class ResidualAttentionBlock(nn.Module):
    def __init__(self, d_model:int, n_head:int, attn_mask:torch.Tensor=None):
        '''
        :param d_model: 模型的隐藏层维度(即特征向量的维度)
        :param n_head: 多头注意力的头数
        :param attn_mask: 注意力掩码,可选
        '''
        super(ResidualAttentionBlock, self).__init__()

        #多头注意力模块
        self.attn = nn.MultiheadAttention(d_model, n_head)
        #第一个LayerNorm
        self.layer1 = LayerNorm(d_model) #在嵌入向量维度上进行归一化,层归一化,不同于batchnorm的计算方法

        #FFN with quickGLUE
        # 前馈网络(MLP),包括线性层、QuickGELU 激活和另一层线性变换
        self.mlp = nn.Sequential(OrderedDict([
            ("c_fc", nn.Linear(d_model, d_model * 4)),  # 扩展特征维度 4 倍
            ("gelu", QuickGELU()),  # QuickGELU 激活
            ("c_proj", nn.Linear(d_model * 4, d_model))  # 恢复到原始特征维度
        ]))
        #第二个layernorm
        self.layer2 = LayerNorm(d_model)

        self.attn_mask = attn_mask

    def attention(self, x: torch.Tensor):
        """
        计算多头注意力。
        """
        # 如果存在注意力掩码,将其转换为与输入相同的数据类型和设备
        self.attn_mask = self.attn_mask.to(dtype=x.dtype, device=x.device) if self.attn_mask is not None else None
        # 调用多头注意力,返回注意力结果(不需要权重)
        return self.attn(x, x, x, need_weights=False, attn_mask=self.attn_mask)[0]


    def forward(self, x):
        #1、多头注意力:先进行LayerNorm,再计算注意力,并与原始x相加
        x = x + self.attn(self.layer1(x))
        #2、前馈网络:先进行LayerNorm,再计算mlp,并与原始x相加
        x = x + self.mlp(self.layer2(x))

        return x
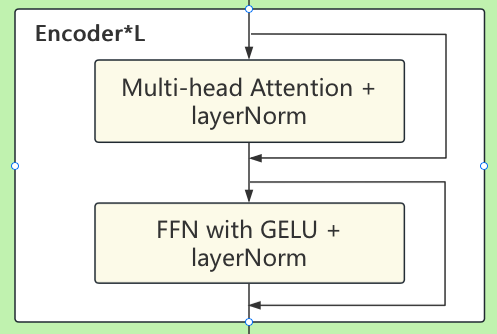
3.2.3.4 残差块的Nx次循环:Transform结构
class Transformer(nn.Module):
    '''
    基于ResidualAttentionBlock的Transformer模块
    '''
    def __init__(self, width:int, layers:int, heads:int, attn_mask:torch.Tensor=None):
        '''
        :param width: 模型的隐藏层维度
        :param layers: Transformer层数
        :param heads: 多头注意力的头数
        :param attn_mask: 注意力掩码,在这里是填充掩码,因为是编码器
        '''
        super().__init__()

        self.width = width
        self.layers = layers
        self.resblocks = nn.Sequential(
            *[ResidualAttentionBlock(width, heads, attn_mask) for _ in range(layers)]
        )


    def forward(self, x:torch.Tensor):
        return self.resblocks
3.2.3.5. ViT模型
class VisionTransformer(nn.Module):
    '''
    实现Vision Transformer,用于处理图像输入
    '''

    def __init__(self, input_resolution:int, patch_size:int, width:int,
                 layers:int, heads:int, output_dim:int):
        '''
        :param input_resolution: 输入图像的分辨率,如224
        :param patch_size: 图像切片尺寸,如16*16
        :param width: Transformer的隐藏层维度
        :param layers: Transformer层数
        :param heads: 多头注意力的头数
        :param output_dim: 输出特征维度
        '''
        super().__init__()
        self.input_resolution = input_resolution
        self.output_dim = output_dim

        #图像切片卷积,将输入图像分割为若干patch,并映射到width维度
        self.conv1 = nn.Conv2d(in_channels=3,
                               out_channels=width,
                               kernel_size=patch_size,
                               stride=patch_size,
                               bias=False)

        #类别嵌入,用于标识全局图像特征
        scale = width ** -0.05
        self.class_embedding = nn.Parameter(scale*torch.randn(width))
        #定义位置编码
        # 位置嵌入,用于编码每个 patch 的位置
        self.positional_embedding = nn.Parameter(scale * torch.randn((input_resolution // patch_size) ** 2 + 1, width))

        #定义输入阶段所需的layernorm
        self.layer = LayerNorm(width)

        #定义transformer编码器
        self.transformer = Transformer(width, layers, heads)

        #定义输出的layernorm和投影层
        self.layer_post = LayerNorm(width)
        self.projection = nn.Parameter(scale * torch.randn(width, output_dim))


    def forward(self, x:torch.Tensor):
        '''
        :param x: 输入图像张量,(batch_size, 3, H, W)
        :return: 输出特征,(batch, output_dim)
        '''
        #图像切片,将输入分割为patch并映射到特征维度
        x = self.conv1(x)  # 形状:[batch, width, grid, grid],其中 grid = input_resolution // patch_size
        # 展平空间维度,并调整维度顺序
        batch_size, width_dim, grid_h, grid_w = x.shape
        num_patches = grid_h * grid_w  # 计算patch总数
        x = x.reshape(batch_size, width_dim, num_patches)  # 形状:[batch, width, num_patches]
        x = x.permute(0, 2, 1)  # 调整为 [batch, num_patches, width]


        #添加类别嵌入
        x = torch.cat(
            [self.class_embedding.to(x.dtype) + torch.zeros(x.shape[0], 1, x.shape[-1], dtype=x.dtype, device=x.device),
             x], dim=1)  # 形状 = [batch_size, num_patches + 1, width]
        # 加上位置嵌入
        x = x + self.positional_embedding.to(x.dtype)
        #输入的LayerNorm
        x = self.layer(x)

        #Transformer编码器
        x = x.permute(1, 0, 2)  # 调整为 [num_patches + 1, batch_size, width]
        x = self.transformer(x)
        x = x.permute(1, 0, 2)  # 调整回 [batch_size, num_patches + 1, width]

        #输出特征仅取出第一个作为全局图像特征
        x = self.layer_post(x[:, 0, :])

        # 如果存在投影层,将其映射到输出维度
        # 如果存在投影层,将其映射到输出维度
        if self.projection is not None:
            x = x @ self.projection

        return x


# 调整参数以减少内存占用
input_resolution = 224  # 分辨率
width = 512  # 隐藏层维度
layers = 6  #  Transformer 层数
heads = 8  # 注意力头数
output_dim = 512  # 输出特征维度
batch_size = 10  # batch大小


# 重新定义 VisionTransformer 模型
vit = VisionTransformer(
    input_resolution=input_resolution,
    patch_size=16,
    width=width,
    layers=layers,
    heads=heads,
    output_dim=output_dim
)


# 假设输入图像数据 (10,3,224,224)
input_data = torch.randn(batch_size, 3, input_resolution, input_resolution)

# 通过模型前向传播
output = vit(input_data)

# 打印输出的形状
print(output.shape)
#torch.Size([10, 512])
四、文本编码器速览
CLIP 中,Transformer 作为文本编码器,其结构与标准的 Transformer 中的编码器结构高度相似,由嵌入层(Embedding Layer)、多层的自注意力模块(Self-Attention)、前馈网络(Feed-Forward Network, FFN)和归一化(LayerNorm)组成。
首先,输入文本通过嵌入层,将每个词映射为固定维度的向量,同时添加可学习的位置编码,以保留序列的位置信息。随后,这些嵌入通过多层 Transformer 模块,每层由多头自注意力(Multi-Head Attention)和 FFN 组成,并在每个子模块后加上残差连接(Residual Connection)和 LayerNorm。Transformer 的作用是逐层捕获文本序列中的上下文关系和全局语义特征。最终,文本的全局语义特征通过特定的标记(例如 [EOS] token)的表示提取,并投影到与图像特征一致的嵌入空间中,用于多模态匹配。这种结构使 CLIP 能够高效地对齐图像和文本的语义信息,实现跨模态理解。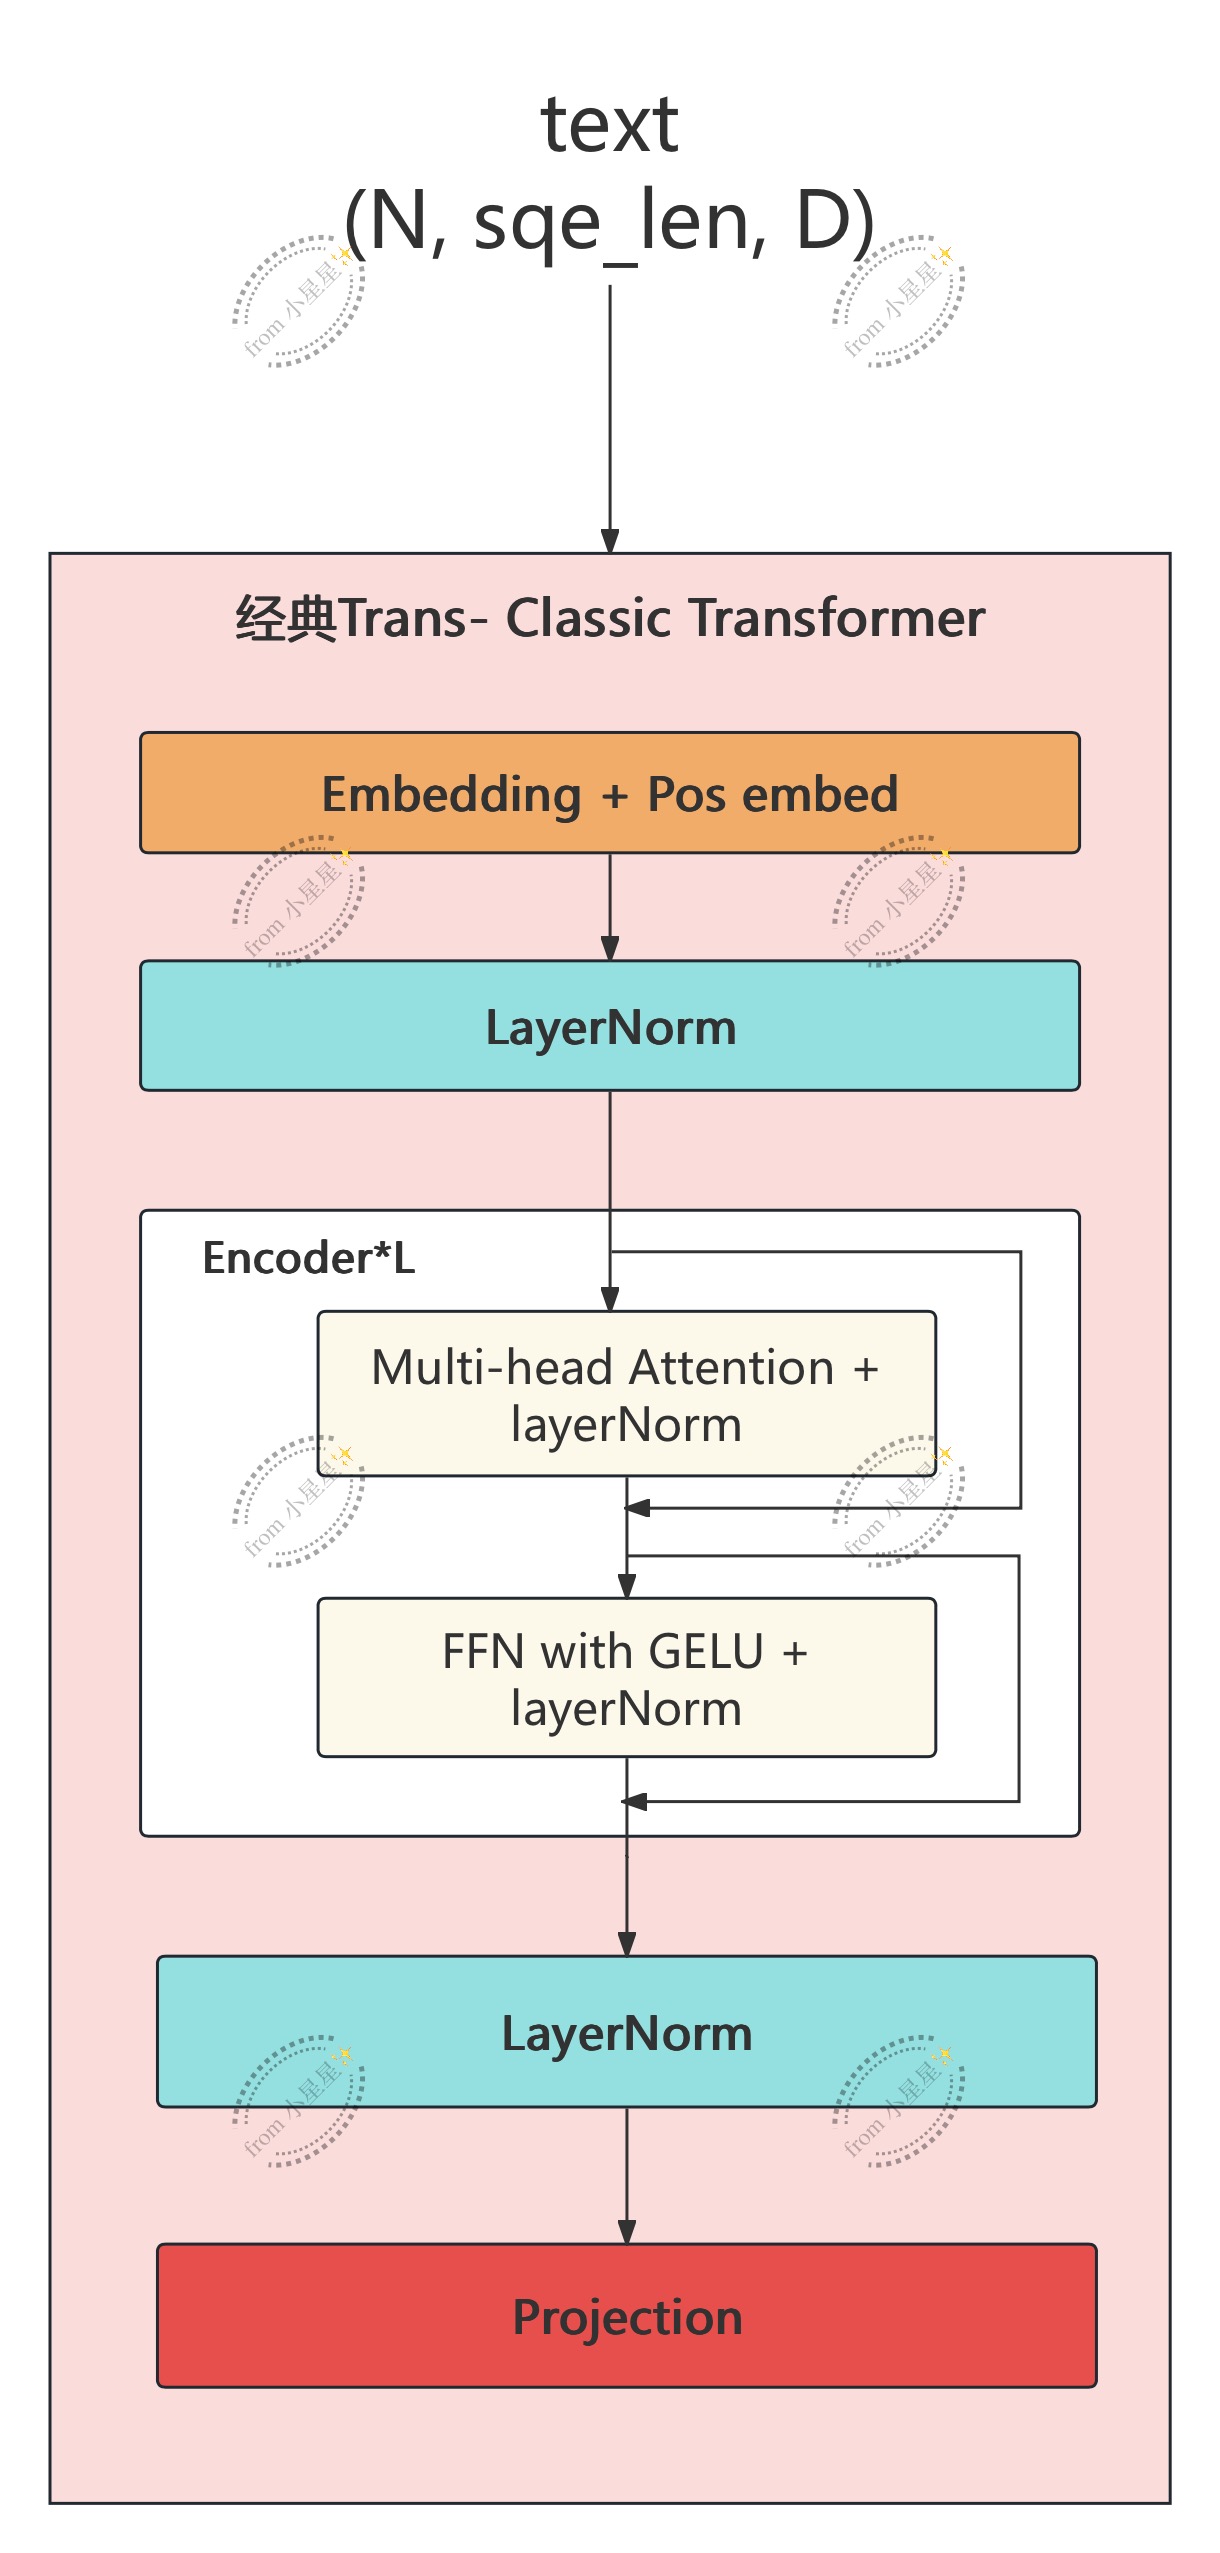
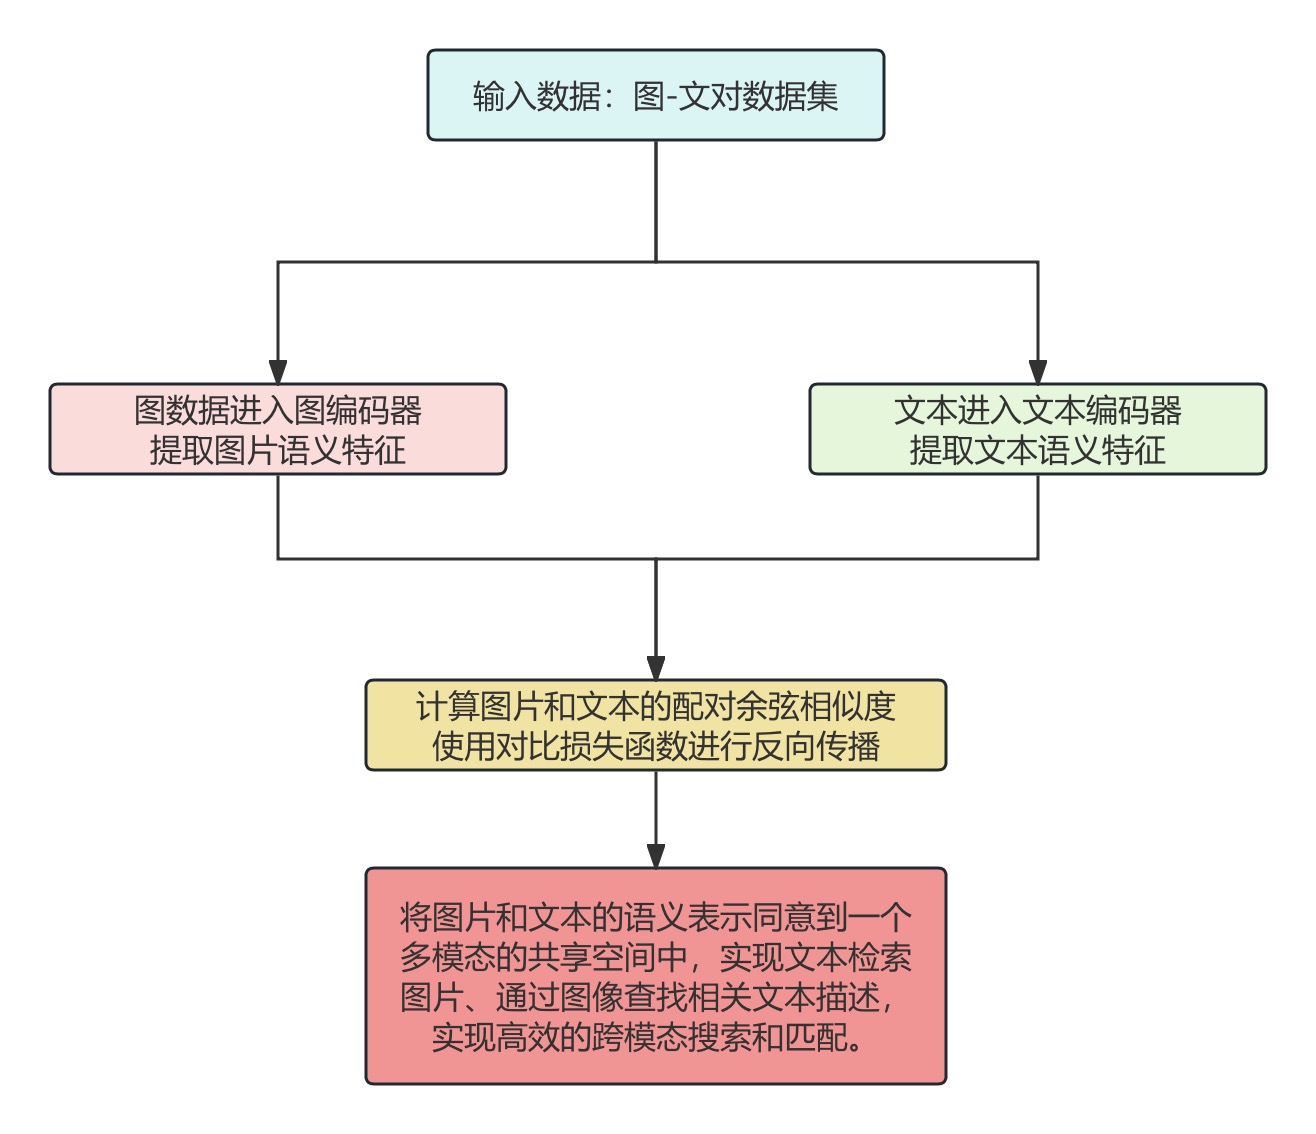
五、CLIP模型的预训练流程
CILP的预训练流程是让架构本身能够理解图像和文本的流程。通过学习图像和文本的匹配关系,成功将这两种模态的信息(图像和文本)映射到同一语义空间,这使得它能够理解并关联图像和文本,从而实现强大的多模态任务能力,比如跨境检索、分类和生成等。
5.1 经典图文对数据集
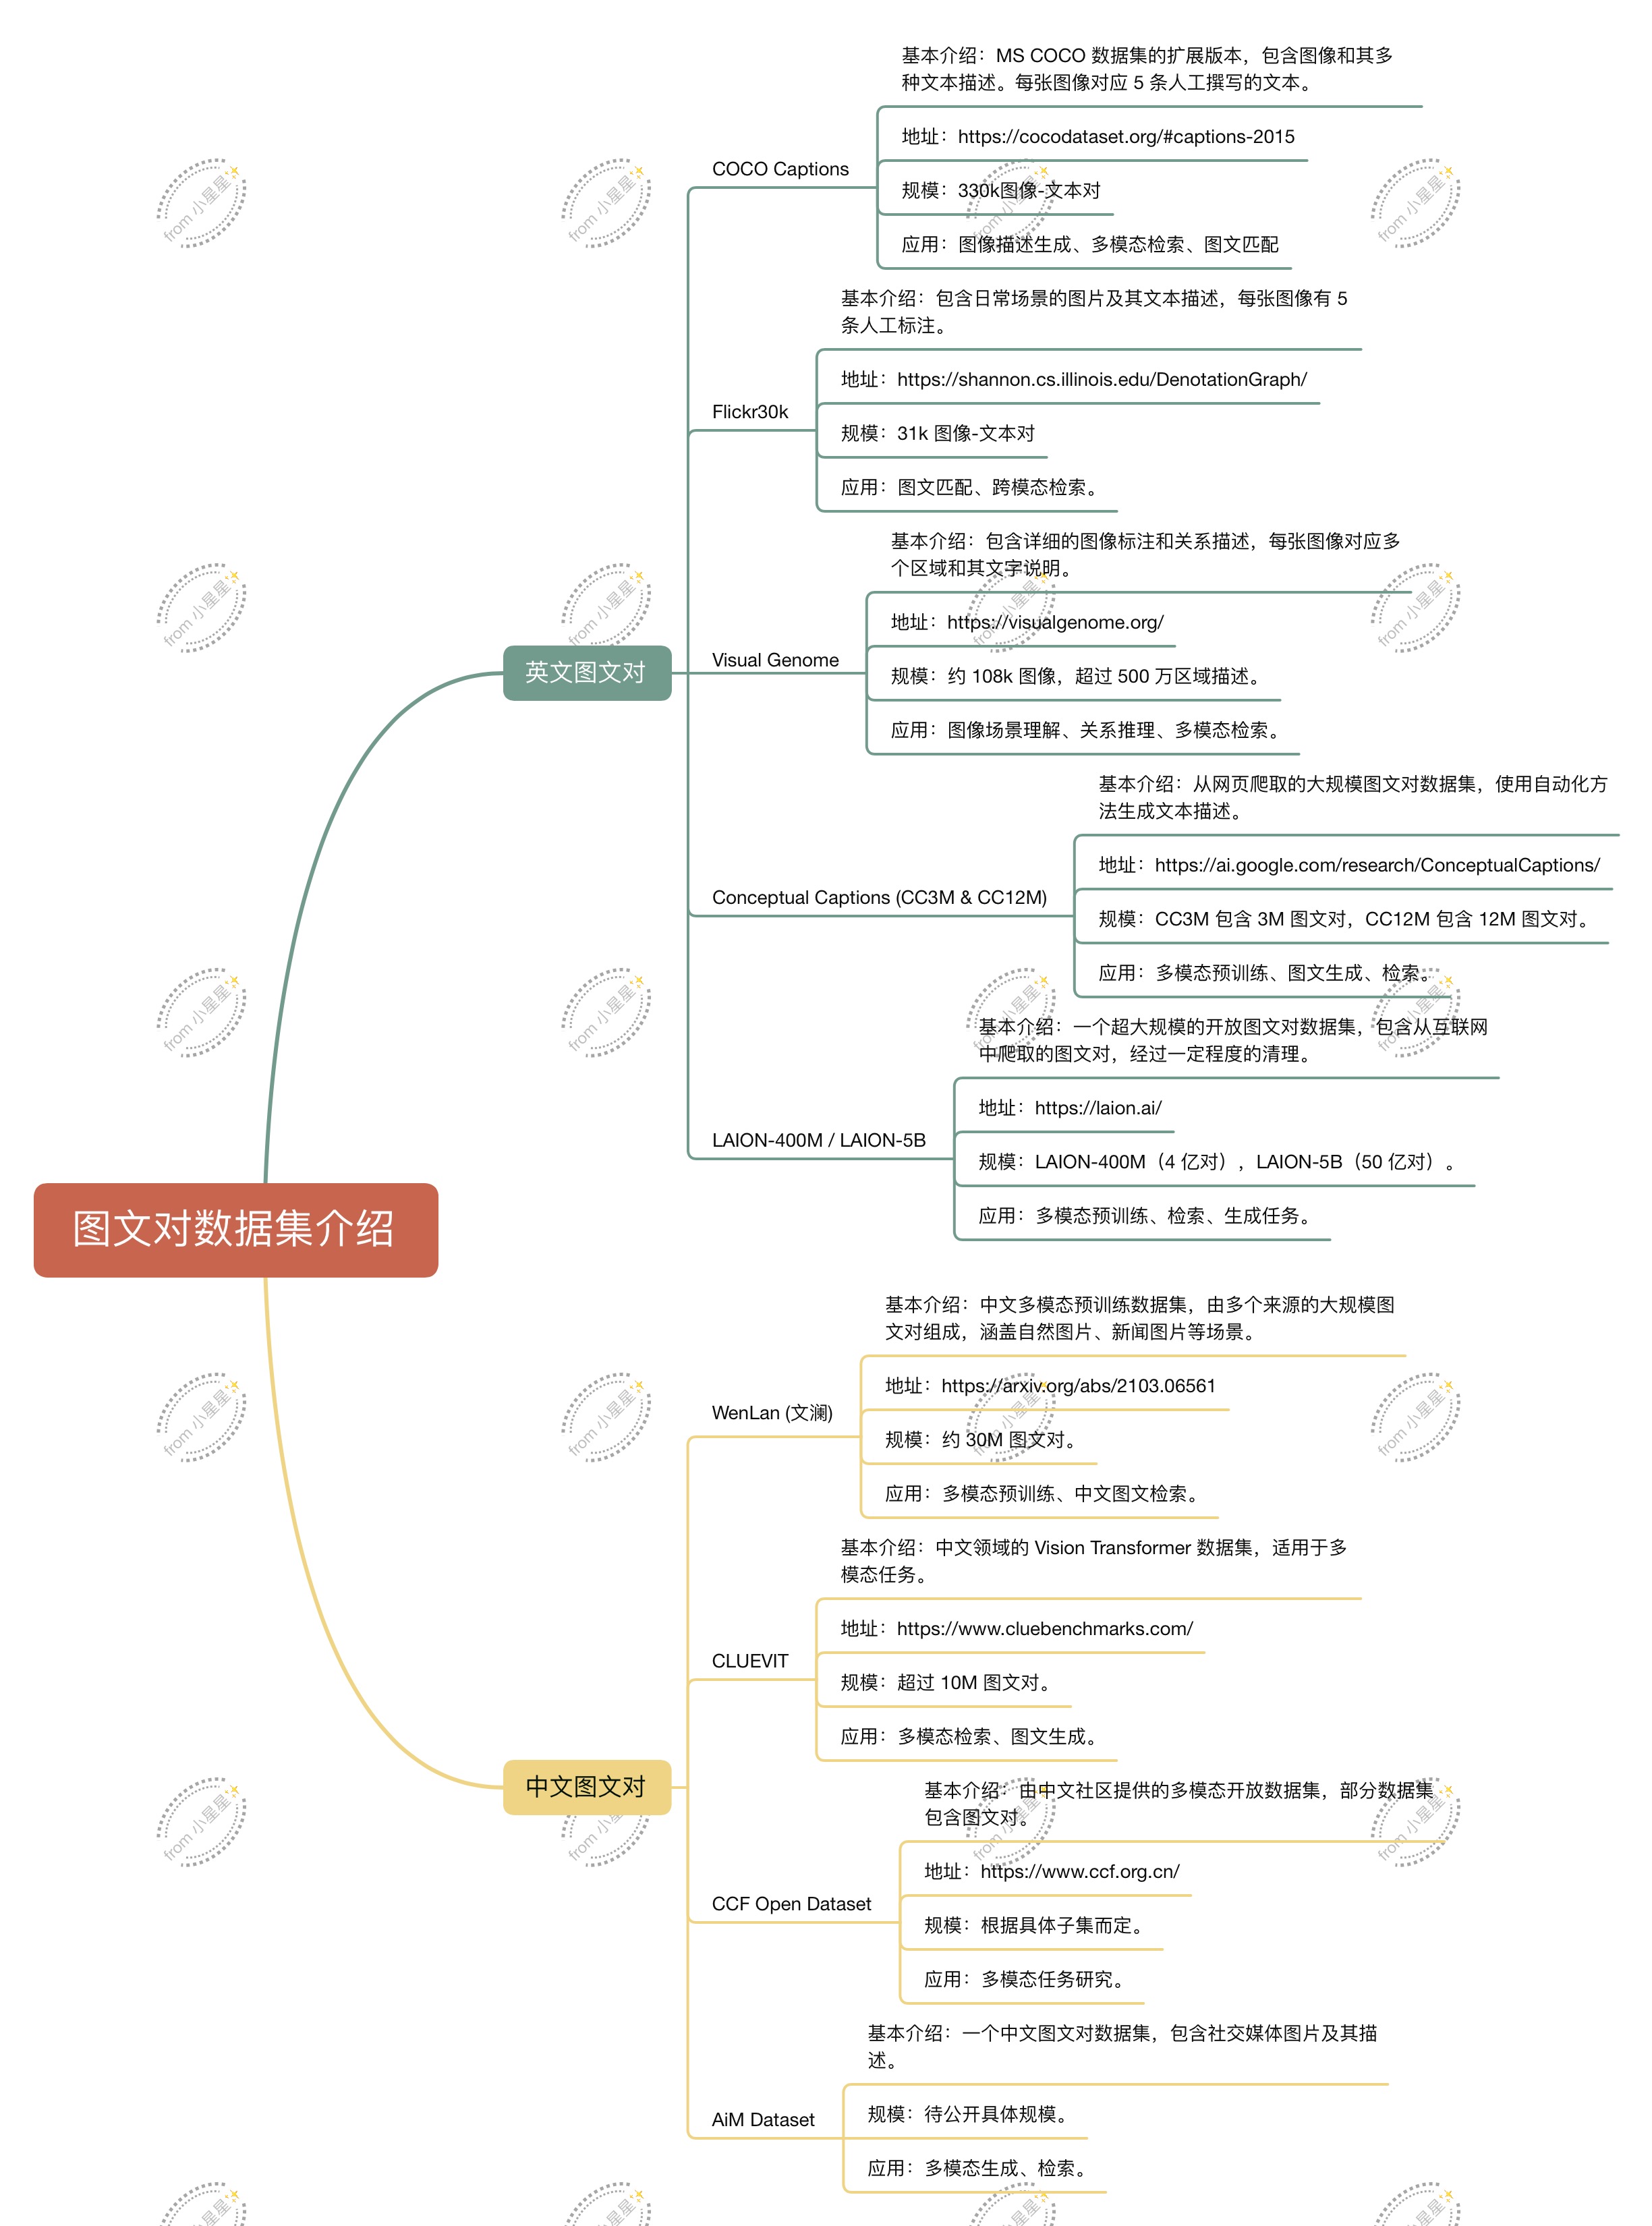
如何选择合适的数据集?
- 任务需求:
图文匹配或检索:COCO Captions、Flickr30k、WenLan。
多模态生成:CC12M、Visual Genome。
多模态预训练:LAION、Conceptual Captions、WenLan。 - 语言和领域:
英文场景:使用 LAION 或 Conceptual Captions。
中文场景:推荐使用 WenLan 或 CLUEVIT。 - 数据规模:
小规模:COCO Captions(约 330k 对)。
大规模:LAION-5B、WenLan(适合预训练大模型)。
5.2 余弦相似度
在CILP(Contrastive Language-Image Pretraining)模型中,图像和文本特征的匹配是核心任务,而余弦相似度是实现这一匹配的关键工具。CILP的目标是通过对比学习,将配对的图像和文本映射到同一语义空间,使其具有相似的特征表示。在CILP中,计算余弦相似度是为了:
- 衡量图像和文本的相似性:使用余弦相似度可以忽略向量大小的影响,只关注它们的方向,即语义一致性。
- 训练中的对比学习:通过余弦相似度,CILP区分语义匹配的图像-文本对和不匹配的对。
计算过程如黄色方框所示。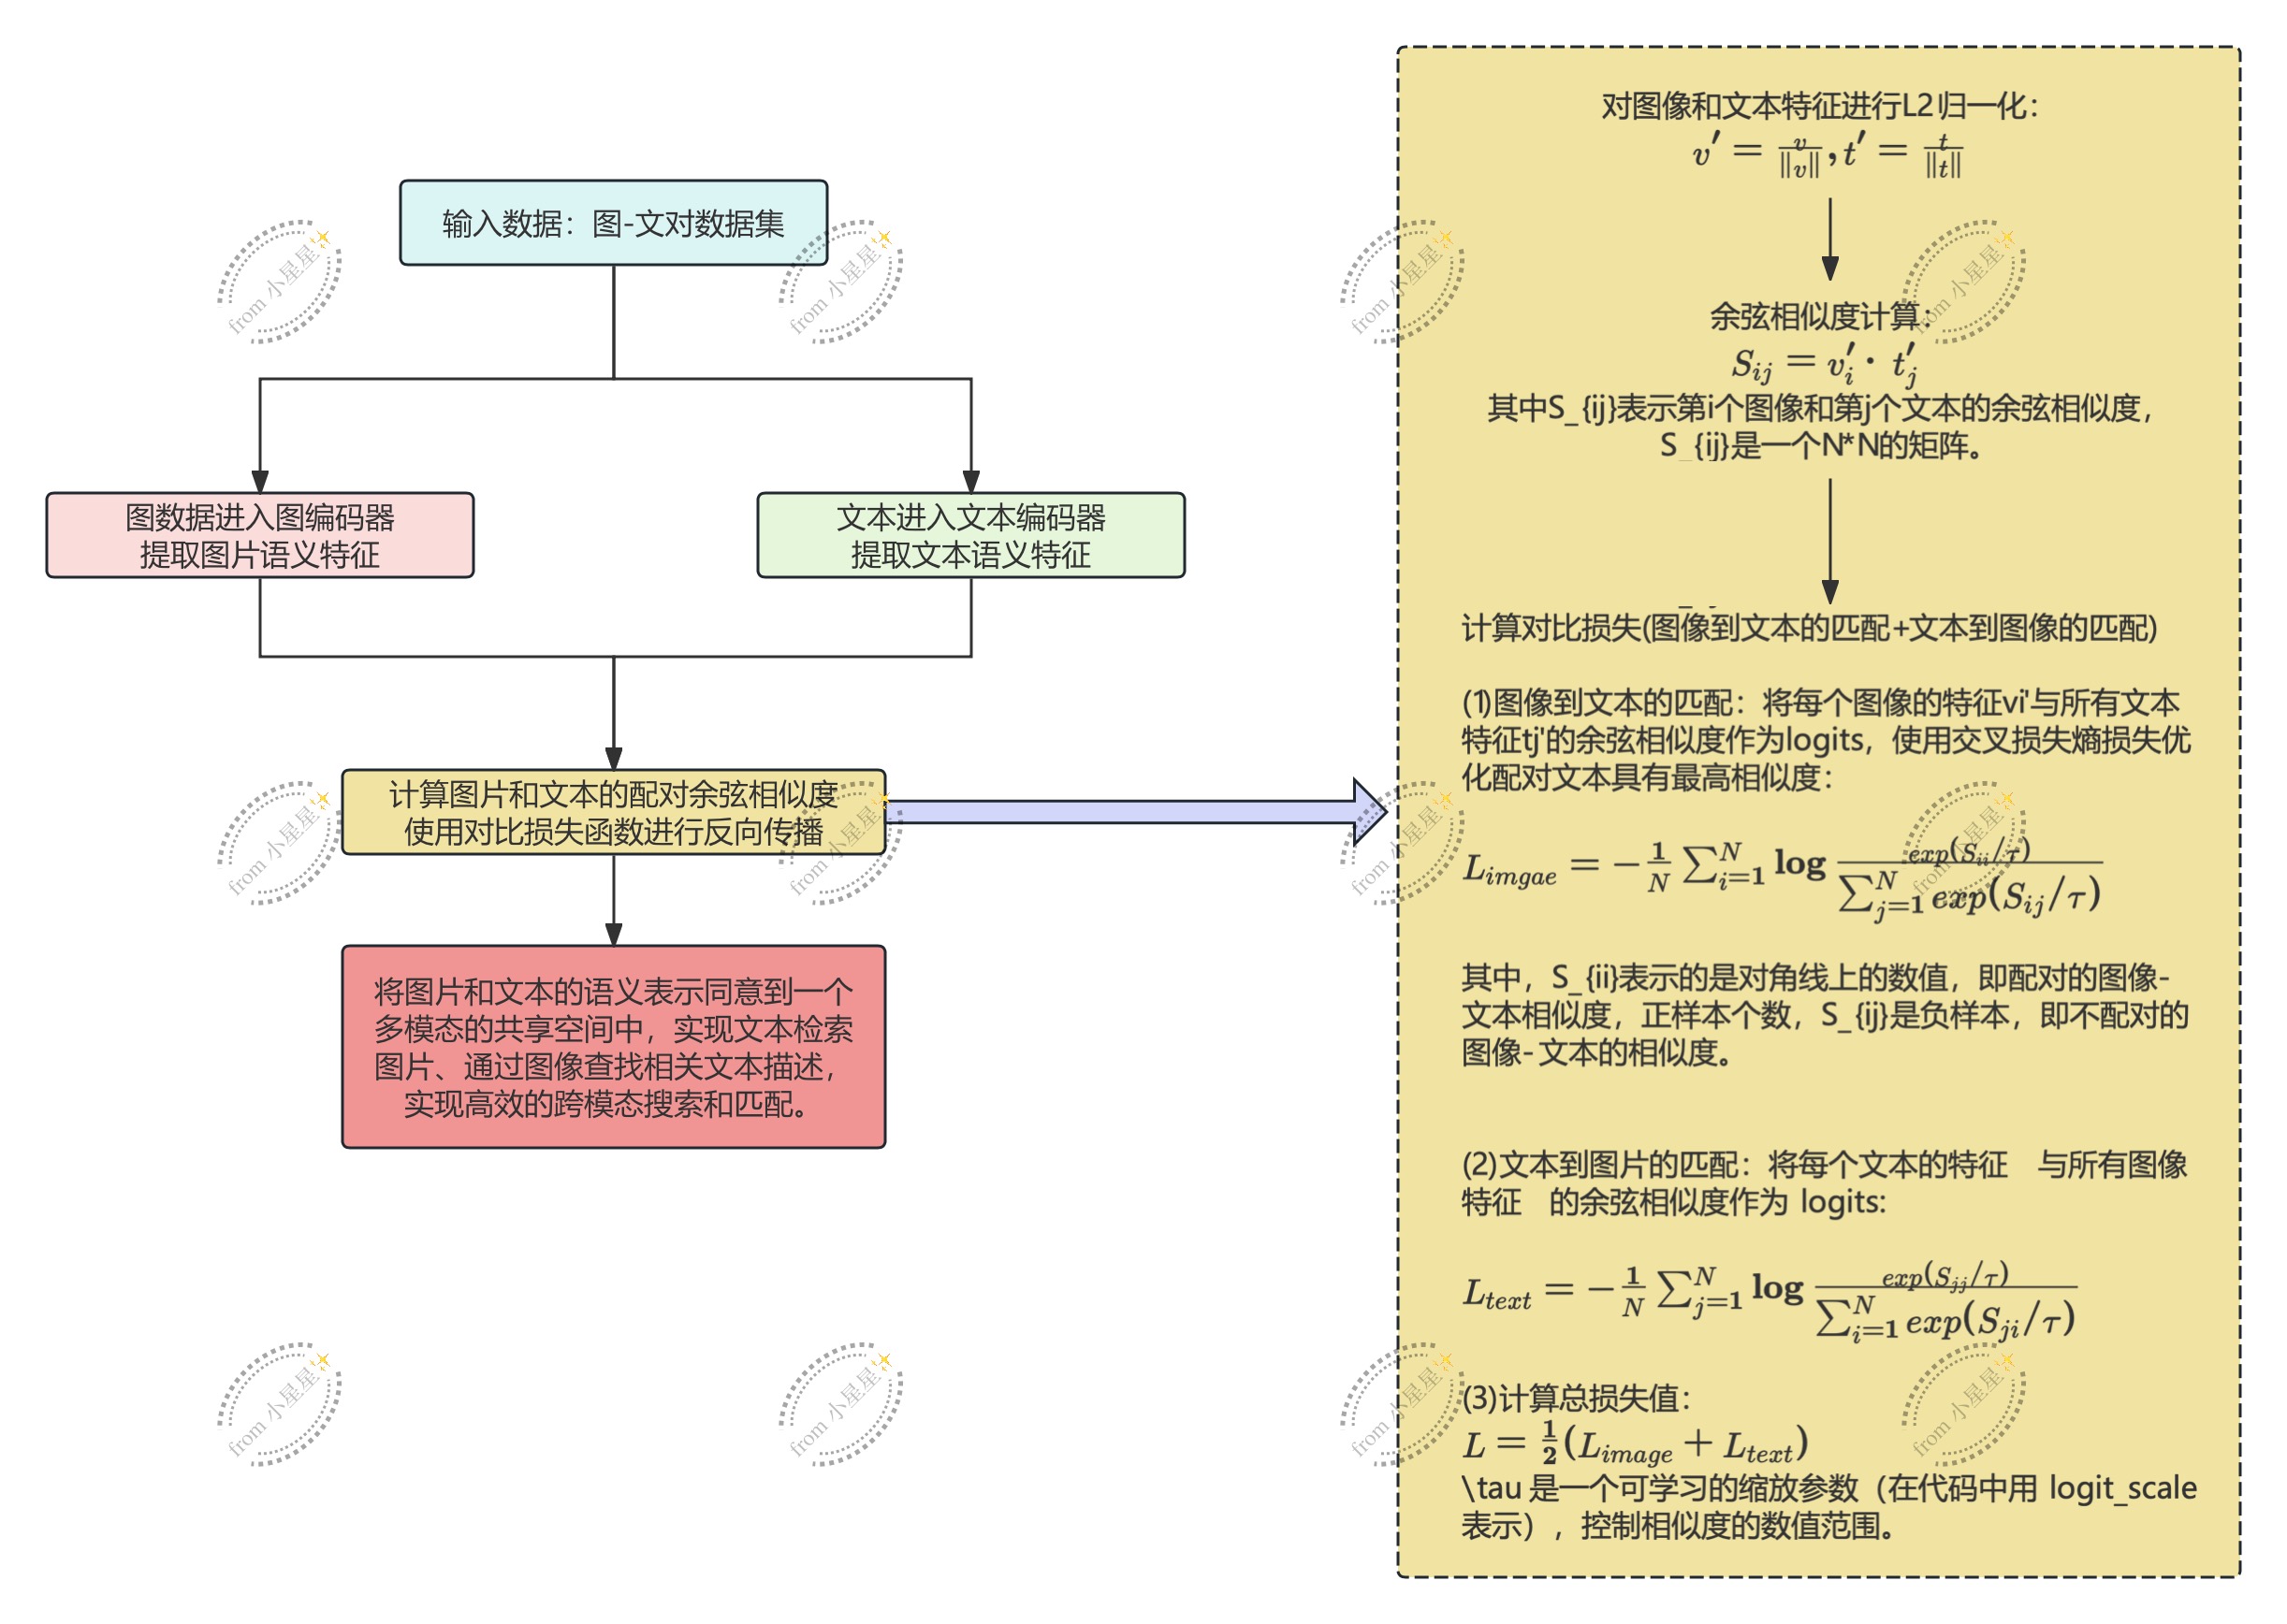
Q&ACILP如何通过对比学习优化特征?
- 拉近正样本:配对的图像和文本通过对比损失被拉近,使他们的余弦相似度更高,体现在L中的分子部分的优化;
- 负样本的分离:非配对的图像和文本被推远,是他们的余弦相似度更低。体现在L中的分母部分的优化。
- 多模态统一表示空间:CILP的最终目标是将图像和文本特征投影到同一个嵌入空间中,使它们的语义相关性可以通过向量的余弦相似度来衡量。
六、CLIP完整模型的实现
class CLIP(nn.Module):
    def __init__(self,
                 embed_dim: int,
                 # vision
                 image_resolution: int,
                 vision_layers: Union[Tuple[int, int, int, int], int],
                 vision_width: int,
                 vision_patch_size: int,
                 # text
                 context_length: int,
                 vocab_size: int,
                 transformer_width: int,
                 transformer_heads: int,
                 transformer_layers: int
                 ):
        super().__init__()

        self.context_length = context_length

        if isinstance(vision_layers, (tuple, list)):
            vision_heads = vision_width * 32 // 64
            self.visual = ModifiedResNet(
                layers=vision_layers,
                output_dim=embed_dim,
                heads=vision_heads,
                input_resolution=image_resolution,
                width=vision_width
            )
        else:
            vision_heads = vision_width // 64
            self.visual = VisionTransformer(
                input_resolution=image_resolution,
                patch_size=vision_patch_size,
                width=vision_width,
                layers=vision_layers,
                heads=vision_heads,
                output_dim=embed_dim
            )

        self.transformer = Transformer(
            width=transformer_width,
            layers=transformer_layers,
            heads=transformer_heads,
            attn_mask=self.build_attention_mask()
        )

        self.vocab_size = vocab_size
        self.token_embedding = nn.Embedding(vocab_size, transformer_width)
        self.positional_embedding = nn.Parameter(torch.empty(self.context_length, transformer_width))
        self.ln_final = LayerNorm(transformer_width)

        self.text_projection = nn.Parameter(torch.empty(transformer_width, embed_dim))
        self.logit_scale = nn.Parameter(torch.ones([]) * np.log(1 / 0.07))

        self.initialize_parameters()

    def initialize_parameters(self):
        nn.init.normal_(self.token_embedding.weight, std=0.02)
        nn.init.normal_(self.positional_embedding, std=0.01)

        if isinstance(self.visual, ModifiedResNet):
            if self.visual.attnpool is not None:
                std = self.visual.attnpool.c_proj.in_features ** -0.5
                nn.init.normal_(self.visual.attnpool.q_proj.weight, std=std)
                nn.init.normal_(self.visual.attnpool.k_proj.weight, std=std)
                nn.init.normal_(self.visual.attnpool.v_proj.weight, std=std)
                nn.init.normal_(self.visual.attnpool.c_proj.weight, std=std)

            for resnet_block in [self.visual.layer1, self.visual.layer2, self.visual.layer3, self.visual.layer4]:
                for name, param in resnet_block.named_parameters():
                    if name.endswith("bn3.weight"):
                        nn.init.zeros_(param)

        proj_std = (self.transformer.width ** -0.5) * ((2 * self.transformer.layers) ** -0.5)
        attn_std = self.transformer.width ** -0.5
        fc_std = (2 * self.transformer.width) ** -0.5
        for block in self.transformer.resblocks:
            nn.init.normal_(block.attn.in_proj_weight, std=attn_std)
            nn.init.normal_(block.attn.out_proj.weight, std=proj_std)
            nn.init.normal_(block.mlp.c_fc.weight, std=fc_std)
            nn.init.normal_(block.mlp.c_proj.weight, std=proj_std)

        if self.text_projection is not None:
            nn.init.normal_(self.text_projection, std=self.transformer.width ** -0.5)

    def build_attention_mask(self):
        # lazily create causal attention mask, with full attention between the vision tokens
        # pytorch uses additive attention mask; fill with -inf
        mask = torch.empty(self.context_length, self.context_length)
        mask.fill_(float("-inf"))
        mask.triu_(1)  # zero out the lower diagonal
        return mask

    @property
    def dtype(self):
        return self.visual.conv1.weight.dtype

    def encode_image(self, image):
        return self.visual(image.type(self.dtype))

    def encode_text(self, text):
        x = self.token_embedding(text).type(self.dtype)  # [batch_size, n_ctx, d_model]

        x = x + self.positional_embedding.type(self.dtype)
        x = x.permute(1, 0, 2)  # NLD -> LND
        x = self.transformer(x)
        x = x.permute(1, 0, 2)  # LND -> NLD
        x = self.ln_final(x).type(self.dtype)

        # x.shape = [batch_size, n_ctx, transformer.width]
        # take features from the eot embedding (eot_token is the highest number in each sequence)
        x = x[torch.arange(x.shape[0]), text.argmax(dim=-1)] @ self.text_projection

        return x

    def forward(self, image, text):
        image_features = self.encode_image(image)
        text_features = self.encode_text(text)

        # normalized features
        image_features = image_features / image_features.norm(dim=1, keepdim=True)
        text_features = text_features / text_features.norm(dim=1, keepdim=True)

        # cosine similarity as logits
        logit_scale = self.logit_scale.exp()
        logits_per_image = logit_scale * image_features @ text_features.t()
        logits_per_text = logits_per_image.t()

        # shape = [global_batch_size, global_batch_size]
        return logits_per_image, logits_per_text


def convert_weights(model: nn.Module):
    """Convert applicable model parameters to fp16"""

    def _convert_weights_to_fp16(l):
        if isinstance(l, (nn.Conv1d, nn.Conv2d, nn.Linear)):
            l.weight.data = l.weight.data.half()
            if l.bias is not None:
                l.bias.data = l.bias.data.half()

        if isinstance(l, nn.MultiheadAttention):
            for attr in [*[f"{s}_proj_weight" for s in ["in", "q", "k", "v"]], "in_proj_bias", "bias_k", "bias_v"]:
                tensor = getattr(l, attr)
                if tensor is not None:
                    tensor.data = tensor.data.half()

        for name in ["text_projection", "proj"]:
            if hasattr(l, name):
                attr = getattr(l, name)
                if attr is not None:
                    attr.data = attr.data.half()

    model.apply(_convert_weights_to_fp16)


def build_model(state_dict: dict):
    vit = "visual.proj" in state_dict

    if vit:
        vision_width = state_dict["visual.conv1.weight"].shape[0]
        vision_layers = len([k for k in state_dict.keys() if k.startswith("visual.") and k.endswith(".attn.in_proj_weight")])
        vision_patch_size = state_dict["visual.conv1.weight"].shape[-1]
        grid_size = round((state_dict["visual.positional_embedding"].shape[0] - 1) ** 0.5)
        image_resolution = vision_patch_size * grid_size
    else:
        counts: list = [len(set(k.split(".")[2] for k in state_dict if k.startswith(f"visual.layer{b}"))) for b in [1, 2, 3, 4]]
        vision_layers = tuple(counts)
        vision_width = state_dict["visual.layer1.0.conv1.weight"].shape[0]
        output_width = round((state_dict["visual.attnpool.positional_embedding"].shape[0] - 1) ** 0.5)
        vision_patch_size = None
        assert output_width ** 2 + 1 == state_dict["visual.attnpool.positional_embedding"].shape[0]
        image_resolution = output_width * 32

    embed_dim = state_dict["text_projection"].shape[1]
    context_length = state_dict["positional_embedding"].shape[0]
    vocab_size = state_dict["token_embedding.weight"].shape[0]
    transformer_width = state_dict["ln_final.weight"].shape[0]
    transformer_heads = transformer_width // 64
    transformer_layers = len(set(k.split(".")[2] for k in state_dict if k.startswith("transformer.resblocks")))

    model = CLIP(
        embed_dim,
        image_resolution, vision_layers, vision_width, vision_patch_size,
        context_length, vocab_size, transformer_width, transformer_heads, transformer_layers
    )

    for key in ["input_resolution", "context_length", "vocab_size"]:
        if key in state_dict:
            del state_dict[key]

    convert_weights(model)
    model.load_state_dict(state_dict)
    return model.eval()
#%%

有“AI”的1024 = 2048,欢迎大家加入2048 AI社区
更多推荐

 18
18 0
0- 0


 已为社区贡献3条内容

所有评论(0)