Git-AI:追踪AI生成代码的革命性工具
Git-AI:追踪AI生成代码的革命性工具
文章目录
- 1、前言
- 2、什么是Git-AI
- 3、核心功能解析
- 4、支持的AI编程工具
- 5、技术原理剖析
- 6、快速上手
- 7、企业级应用场景
- 8、与传统git blame的对比
- 9、未来展望
- 10、实战踩坑指南
- 11、Prompt 存储详解
- 12、总结
🍃作者介绍:25届双非本科网络工程专业,阿里云专家博主,深耕 AI 原理 / 应用开发 / 产品设计。前几年深耕Java技术体系,现专注把 AI 能力落地到实际产品与业务场景。
🦅个人主页:@逐梦苍穹
🐼GitHub主页:https://github.com/XZL-CODE
✈ 您的一键三连,是我创作的最大动力🌹
1、前言
本文摘要:本文全面介绍 Git-AI——一个追踪 AI 生成代码的 Git 扩展工具。文章内容包括:
章节 内容 2-5 基础篇:什么是 Git-AI、核心功能(AI Blame、Prompt存储)、技术原理(Git Note机制) 6 安装篇:一键安装、命令速查 7-9 应用篇:企业场景、与 git blame 对比、未来展望 10 踩坑篇:安装问题、扩展配置、SourceTree 兼容性、Git Hook 原理详解 11 进阶篇:Prompt 存储机制、多人协同配置、查看 AI 工具统计、Git Notes 远程同步 适合读者:使用 AI 编程工具(Claude Code、Cursor、Copilot 等)的开发者,希望追踪和管理 AI 生成代码的团队。
在AI编程助手百花齐放的今天,Claude Code、Cursor、GitHub Copilot、Gemini CLI 等工具已经成为开发者的标配。但随之而来的一个核心问题是:我们如何知道代码库中哪些代码是AI生成的?
这不仅仅是一个技术问题,更是关乎代码审计、团队协作、质量追踪的重要议题。
今天要介绍的 Git-AI,正是为解决这一痛点而生的革命性工具。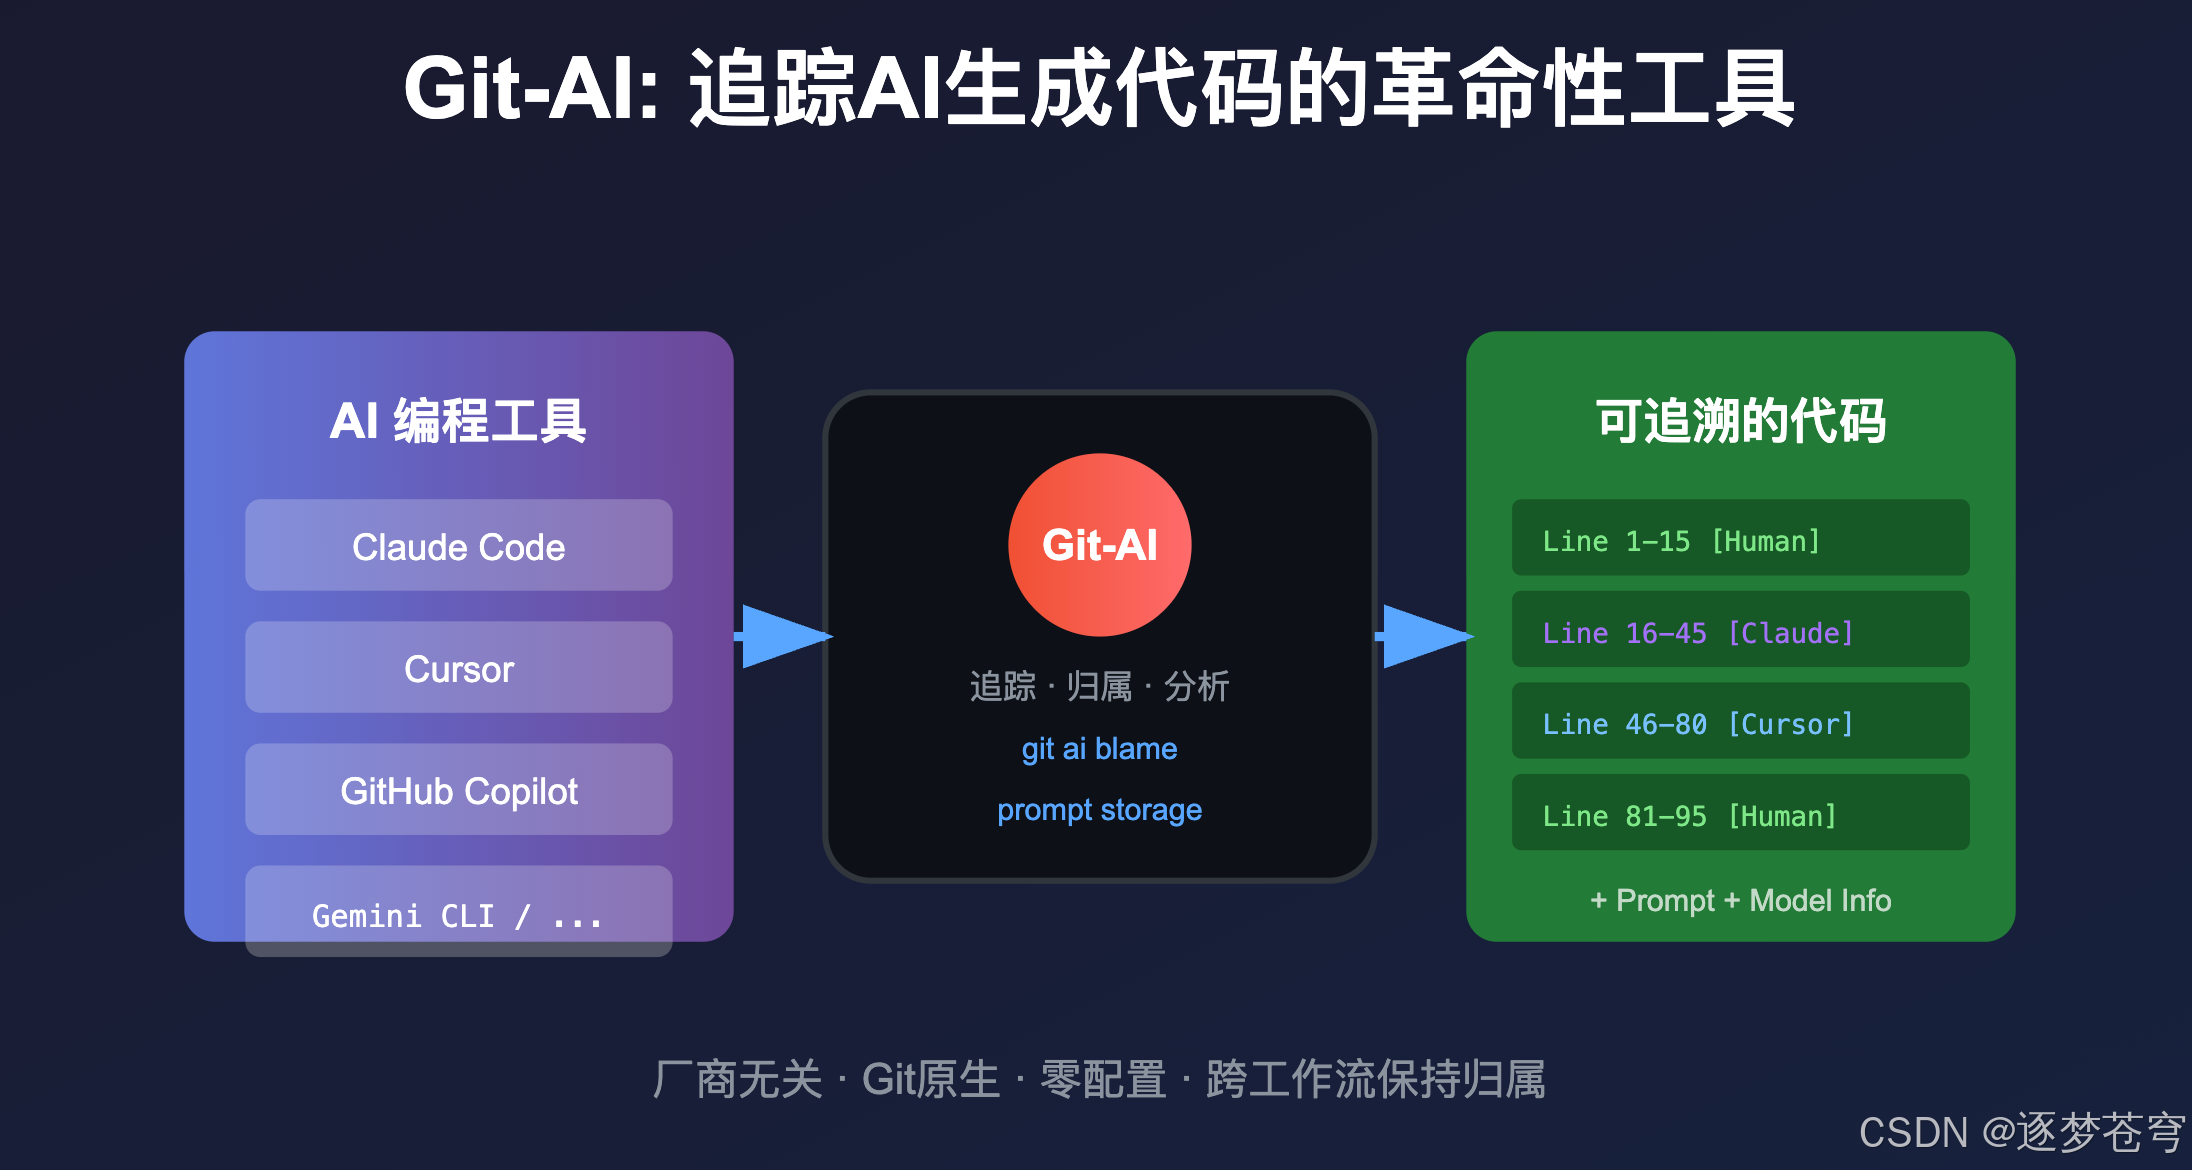
2、什么是Git-AI
2.1 项目概述
Git-AI 是一个Git扩展工具,专门用于追踪代码仓库中AI生成的代码。它的核心理念是:
在多Agent时代,团队需要一种厂商无关的方式来追踪AI对代码库的影响。
| 项目信息 | 详情 |
|---|---|
| GitHub地址 | https://github.com/git-ai-project/git-ai |
| 官网 | https://usegitai.com |
| 主要语言 | Rust (性能核心) + TypeScript/Shell |
| Stars | 672+ |
| 支持平台 | Mac、Linux、Windows |
2.2 为什么需要Git-AI
在没有Git-AI之前,我们面临的困境: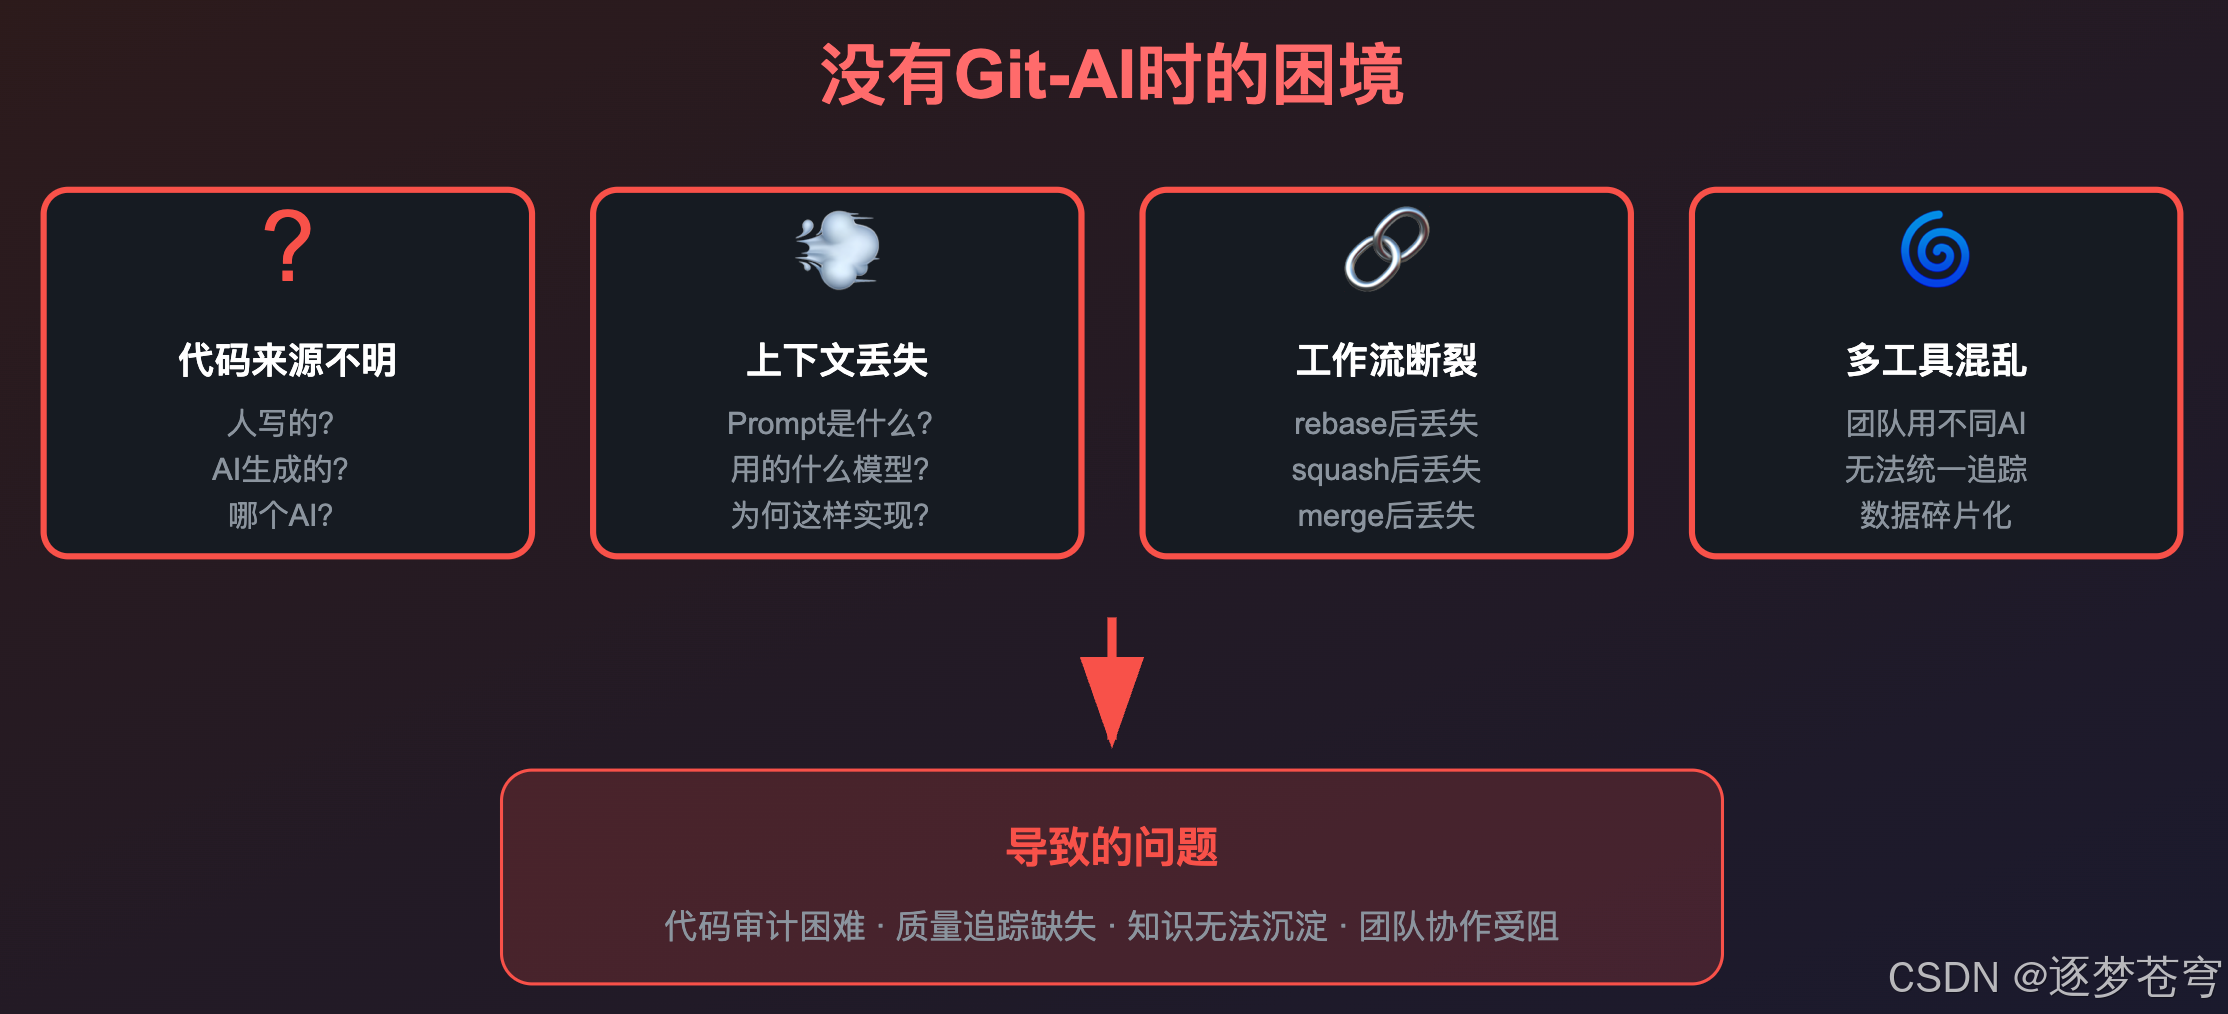
- 无法区分代码来源:哪些是人写的?哪些是AI生成的?
- 丢失上下文:生成代码的prompt是什么?用的哪个模型?
- 工作流断裂:rebase、merge、squash后,AI归属信息丢失
- 多工具混乱:团队成员用不同AI工具,无法统一追踪
3、核心功能解析
3.1 AI Blame - 代码归属追溯
类似于 git blame,Git-AI 提供了 git-ai blame 命令,可以清晰展示每一行代码的来源:
git-ai blame src/main.rs
输出示例:
Line 1-15   [Human]           Initial setup
Line 16-45  [Claude Code]     API endpoint implementation
Line 46-80  [Cursor/GPT-4]    Error handling logic
Line 81-95  [Human]           Configuration tweaks
3.2 Prompt存储与关联
Git-AI不仅追踪代码,还保存生成该代码的prompt: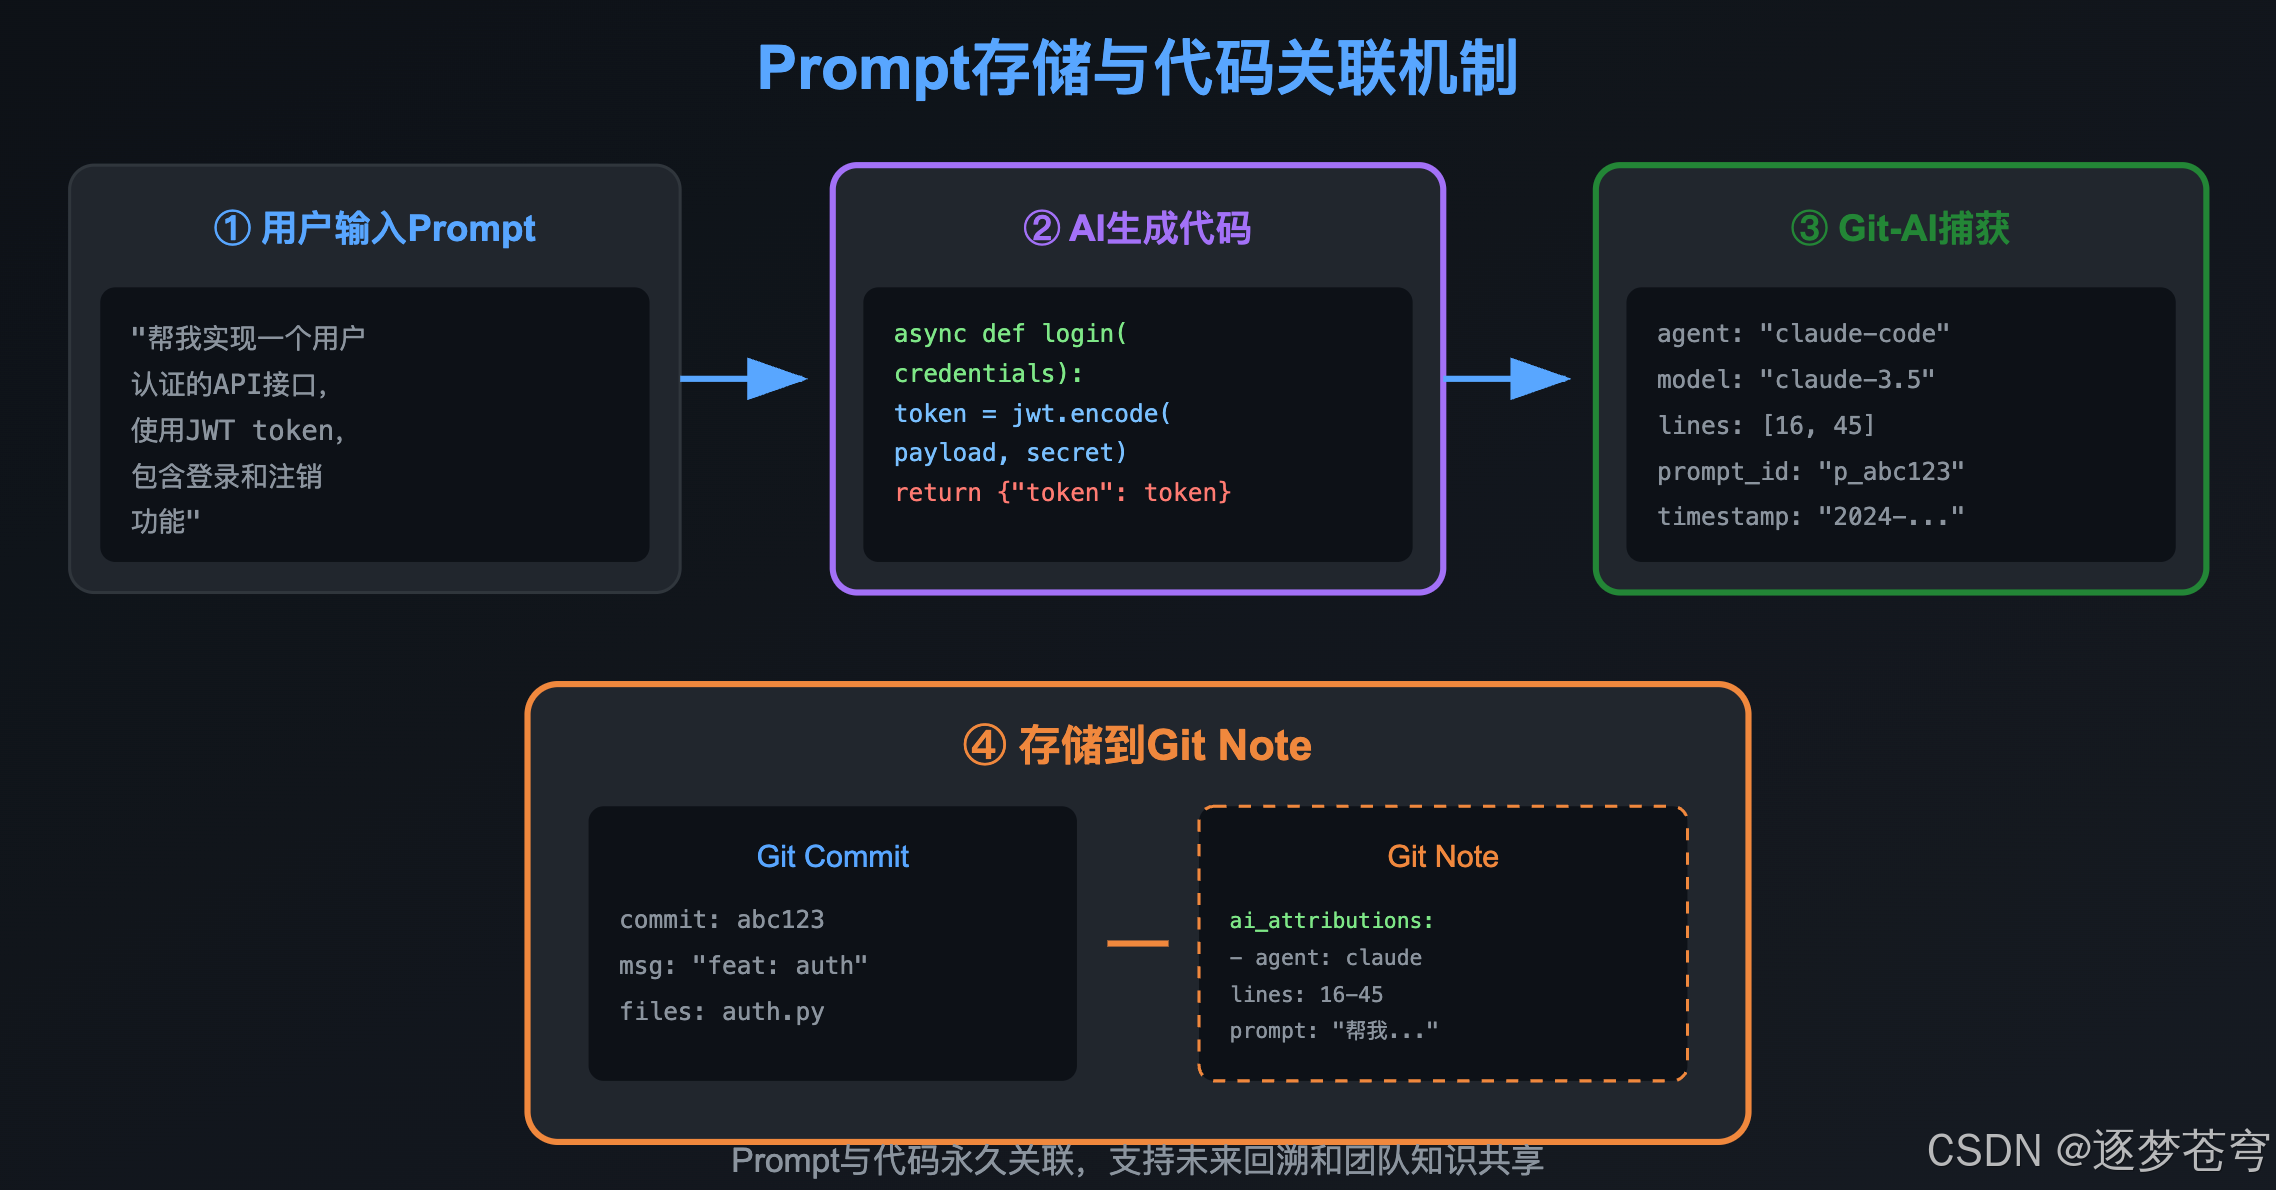
这意味着:
- 未来可以回溯"为什么这段代码是这样写的"
- 团队可以复用高质量的prompt
- Code Review时有更多上下文
3.3 跨工作流保持归属
Git-AI的一大亮点是归属信息能够穿越各种Git操作:
| Git操作 | 传统方式 | Git-AI |
|---|---|---|
| merge | 归属丢失 | ✅ 保持 |
| rebase | 归属丢失 | ✅ 保持 |
| squash | 归属丢失 | ✅ 保持 |
| cherry-pick | 归属丢失 | ✅ 保持 |
4、支持的AI编程工具
Git-AI采用厂商无关的设计,目前支持主流的AI编程工具: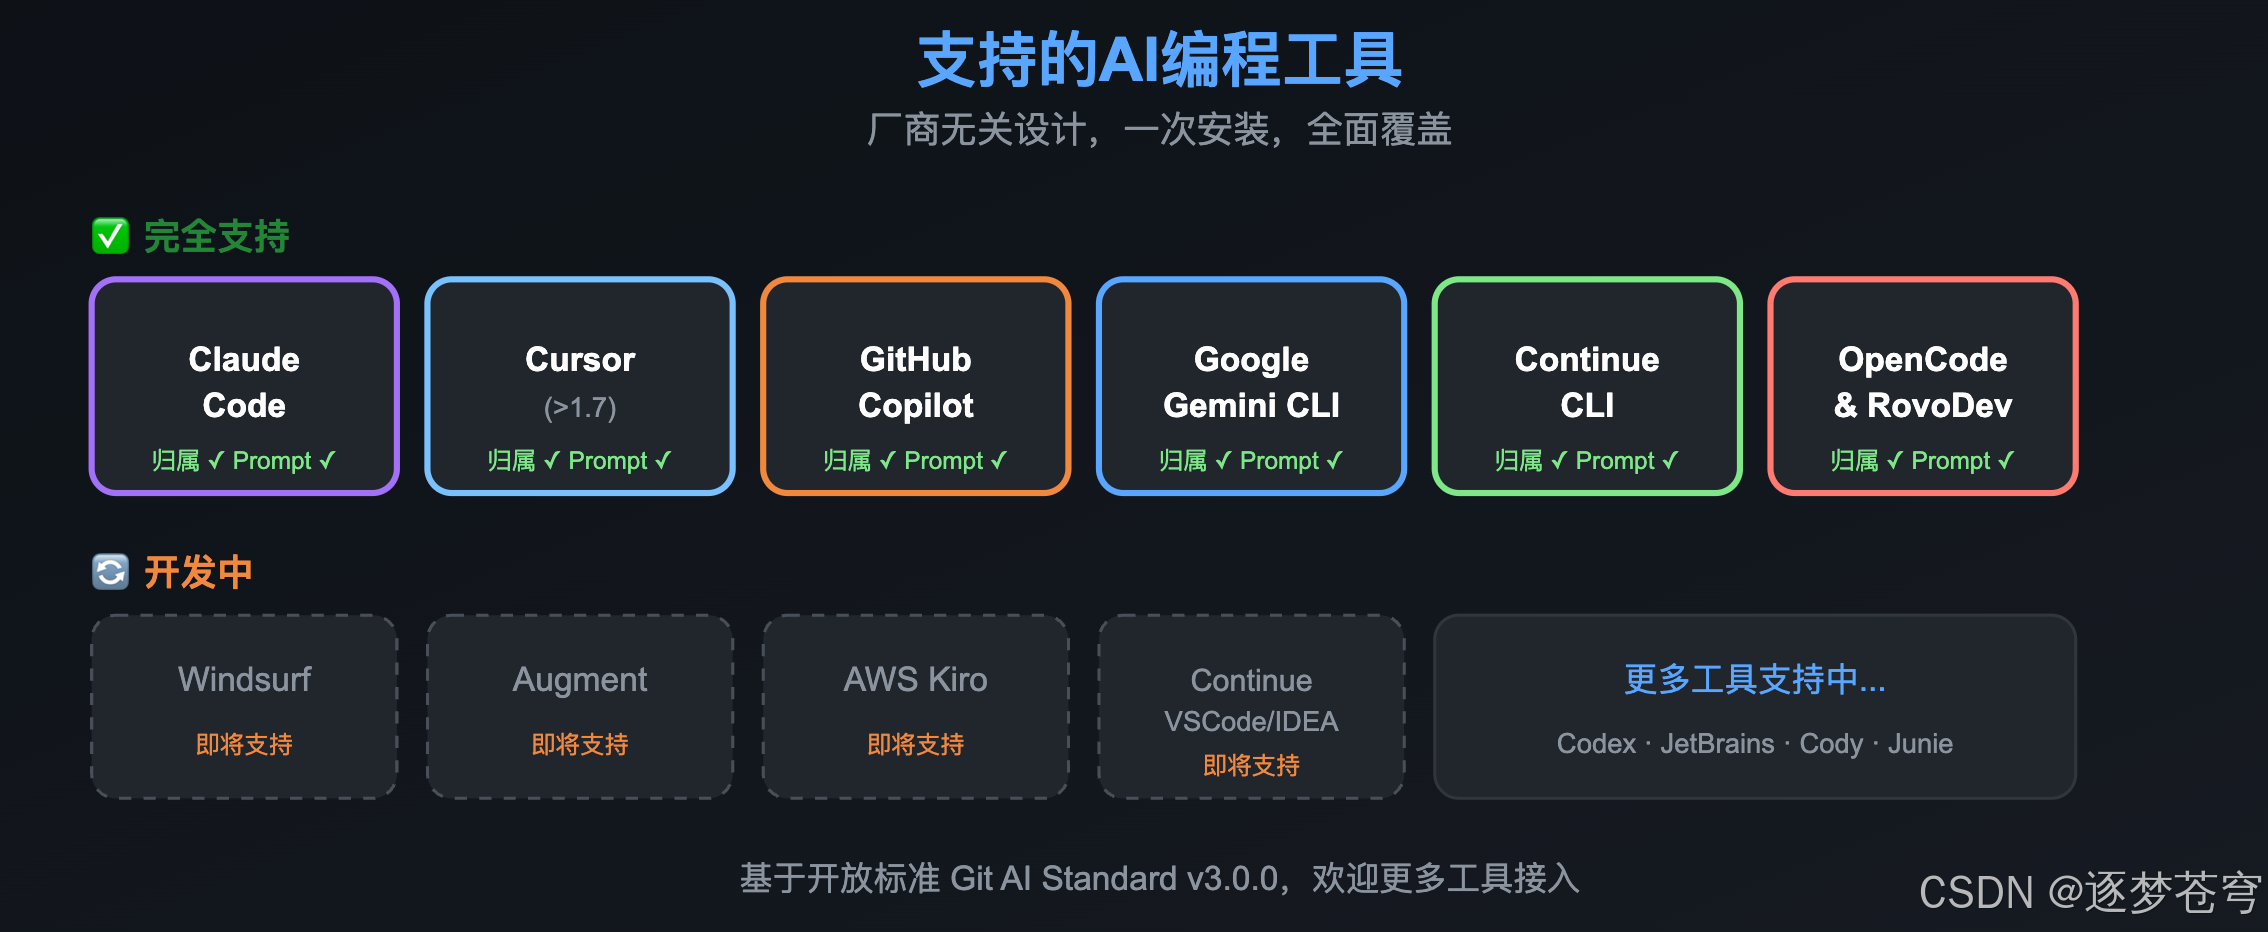
| AI工具 | 代码归属 | Prompt保存 |
|---|---|---|
| Cursor (>1.7) | ✅ | ✅ |
| Claude Code | ✅ | ✅ |
| GitHub Copilot (VSCode) | ✅ | ✅ |
| Google Gemini CLI | ✅ | ✅ |
| Continue CLI | ✅ | ✅ |
| OpenCode | ✅ | ✅ |
| Atlassian RovoDev | ✅ | ✅ |
| Windsurf | 🔄 开发中 | 🔄 |
| Augment Code | 🔄 开发中 | 🔄 |
5、技术原理剖析
5.1 工作流程
Git-AI的工作原理可以分为三个阶段: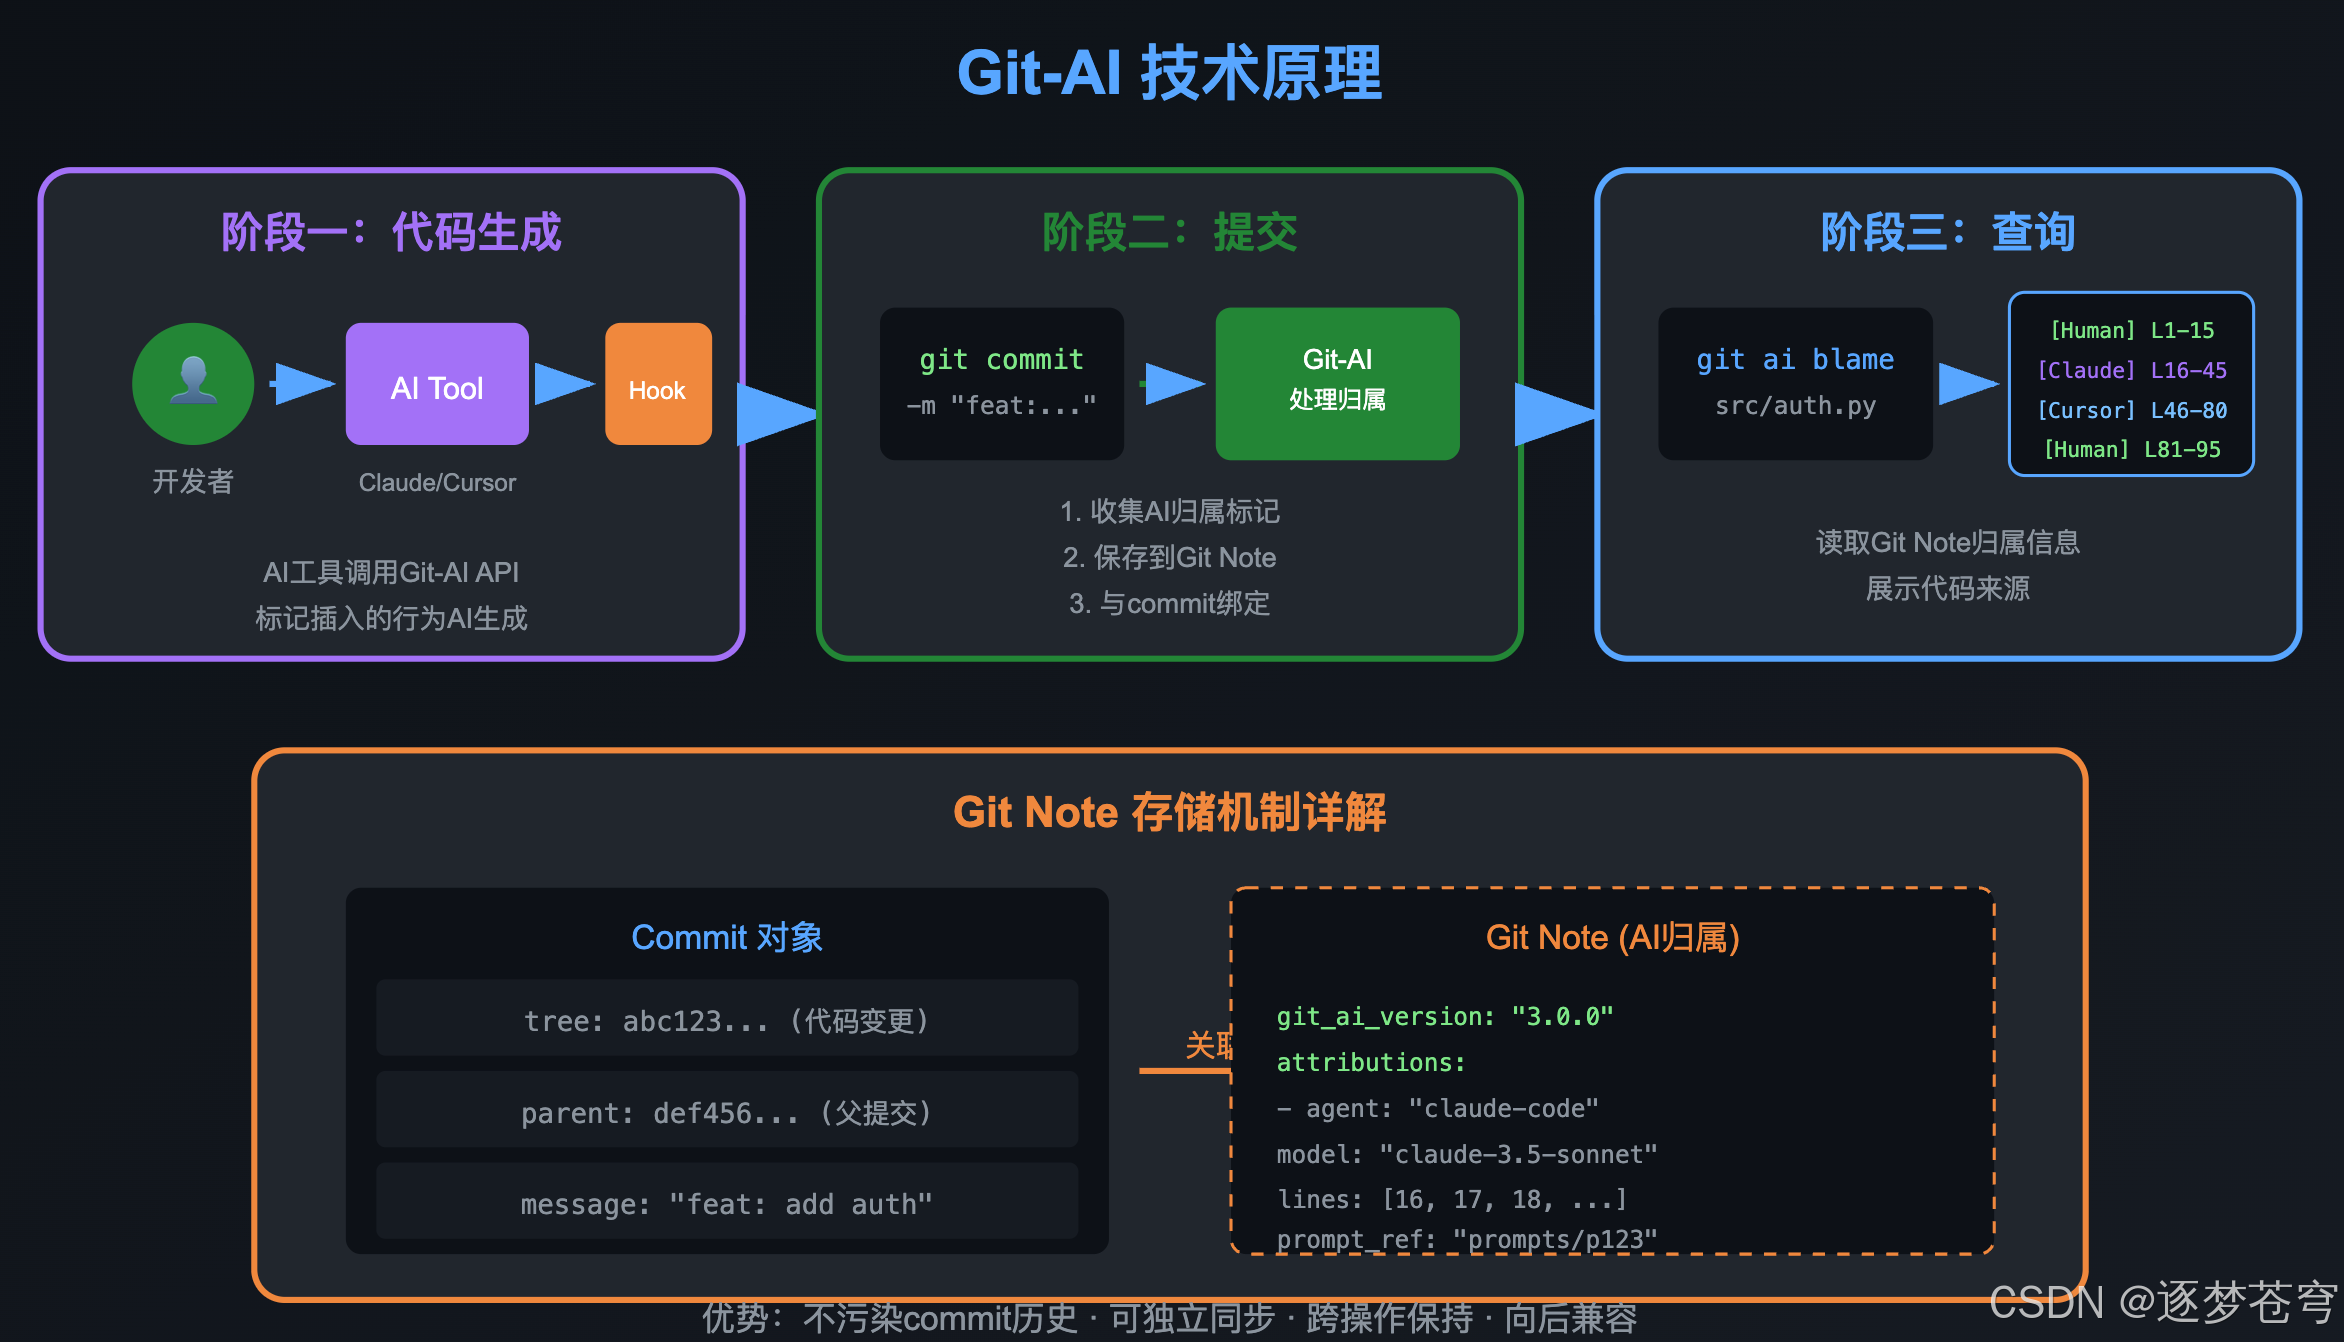
5.1.1 代码生成阶段
当你使用Claude Code、Cursor等工具生成代码时,这些工具会调用Git-AI的API,标记插入的行为AI生成。
5.1.2 提交阶段
在 git commit 时,Git-AI会:
- 收集所有AI归属标记
- 将归属信息保存到 Git Note 中
- Git Note与commit绑定,但不影响commit本身
5.1.3 查询阶段
通过 git-ai blame 等命令,读取Git Note中的归属信息,展示给用户。
5.2 Git Note机制
Git-AI选择使用Git原生的Note机制存储归属信息,这是一个精妙的设计: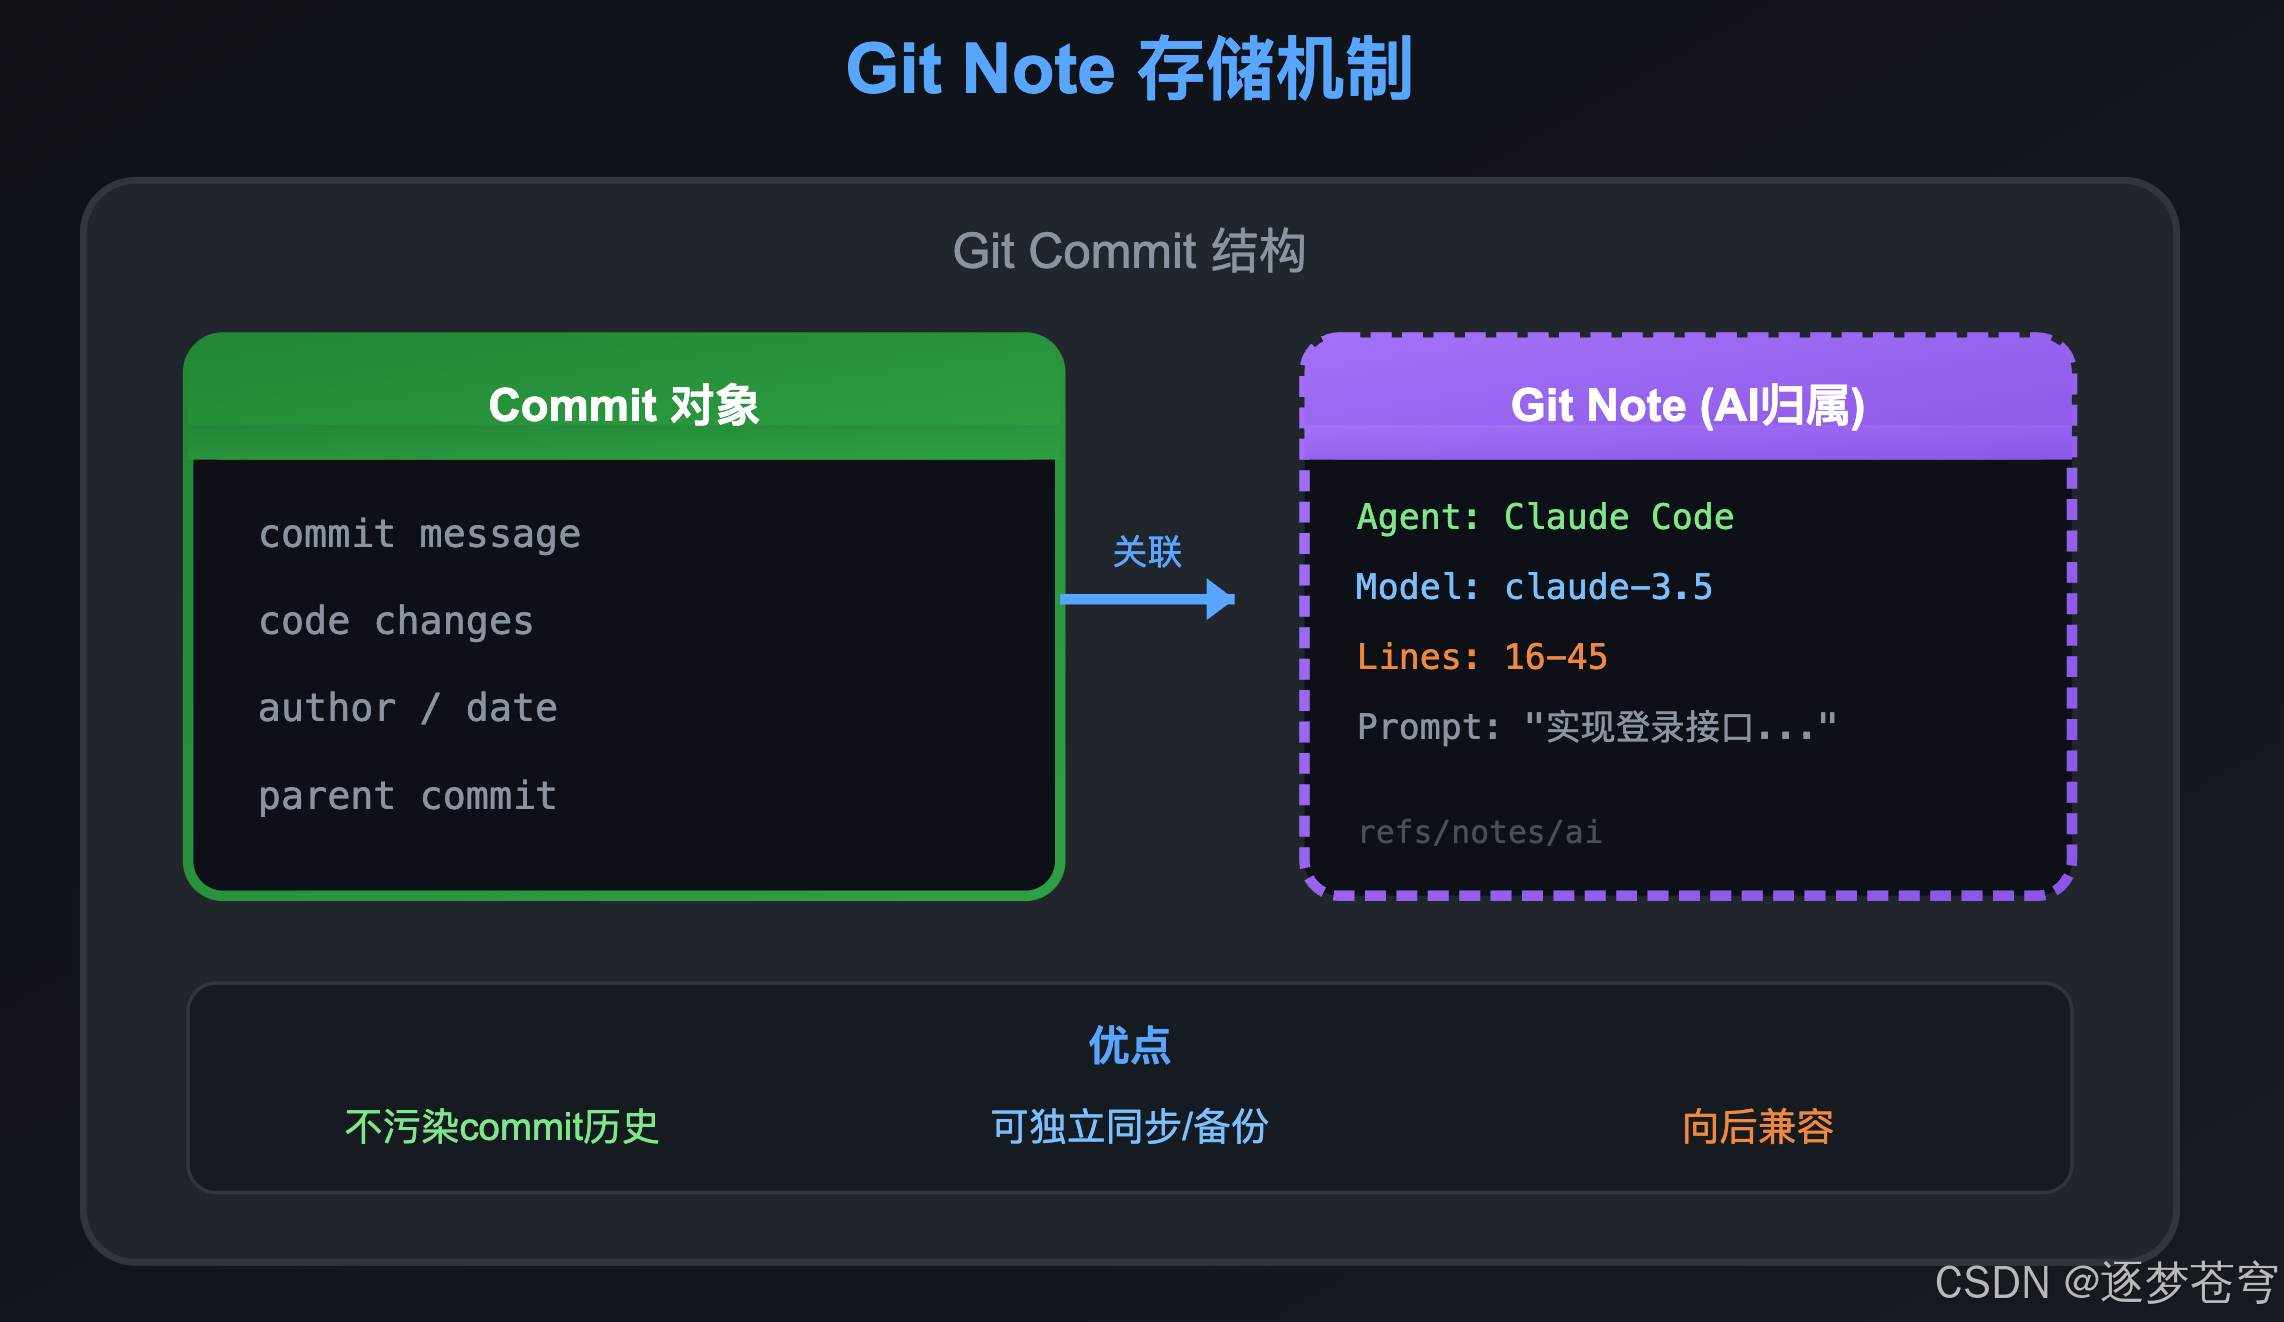
优点:
- 不污染commit历史
- 可以独立同步/备份
- 向后兼容,不影响现有工作流
5.3 标准规范
Git-AI制定了开放标准 Git AI Standard v3.0.0,定义了归属信息的格式,便于:
- 第三方工具集成
- 跨平台数据交换
- 生态系统扩展
6、快速上手
6.1 安装
Mac / Linux / Windows (WSL):
curl -sSL https://usegitai.com/install.sh | bash
Windows (非WSL):
powershell -NoProfile -ExecutionPolicy Bypass -Command "irm http://usegitai.com/install.ps1 | iex"
安装完成后会看到类似输出:
Successfully installed git-ai into /Users/xxx/.git-ai/bin
✓ Claude Code: Hooks updated
✓ Cursor: Hooks updated
✓ VS Code: Hooks already up to date
✓ Gemini: Hooks updated
重要:安装完成后,需要重启终端或执行以下命令使 PATH 生效:
source ~/.zshrc   # 如果使用 zsh
source ~/.bashrc  # 如果使用 bash
VSCode/Cursor 扩展:如果看到提示无法自动安装扩展,需要手动安装:
- Cursor:在扩展商店搜索
git-ai-vscode- VSCode:访问 https://marketplace.visualstudio.com/items?itemName=git-ai.git-ai-vscode
6.2 使用前提
Git-AI 需要在有提交历史的仓库中才能正常工作:
# ❌ 新仓库直接使用会报错
git init
git-ai stats  # 报错:unknown revision

# ✅ 正确流程:先有提交,再查看统计
git init
git add .
git commit -m "initial commit"
git-ai stats  # 正常工作
6.3 零配置使用
安装完成后,无需任何配置,Git-AI 会自动与支持的 AI 工具集成。
# 正常使用你的AI编程工具
# 例如使用Claude Code生成代码

# 正常提交
git add .
git commit -m "feat: add user authentication"

# 查看AI归属
git-ai blame src/auth.py
6.4 常用命令
命令格式说明:
git ai和git-ai两种写法都可以执行命令,但推荐统一使用git-ai(带连字符)。
# 查看文件的AI归属
git-ai blame <file>

# 查看仓库AI代码统计(需要有提交历史)
git-ai stats

# 查看特定 commit 的统计
git-ai stats <commit-hash>

# 查看 diff 的 AI 归属注解
git-ai diff <commit-hash>

# 查看某个 prompt 的详情
git-ai show-prompt <prompt-id>

# 查看归属日志(Git Note 内容)
git-ai show <commit-hash>

# 查看未提交的 AI 编辑状态
git-ai status

# 安装/更新 Agent hooks
git-ai install-hooks

# 查看帮助
git-ai --help
7、企业级应用场景
7.1 代码审计与合规
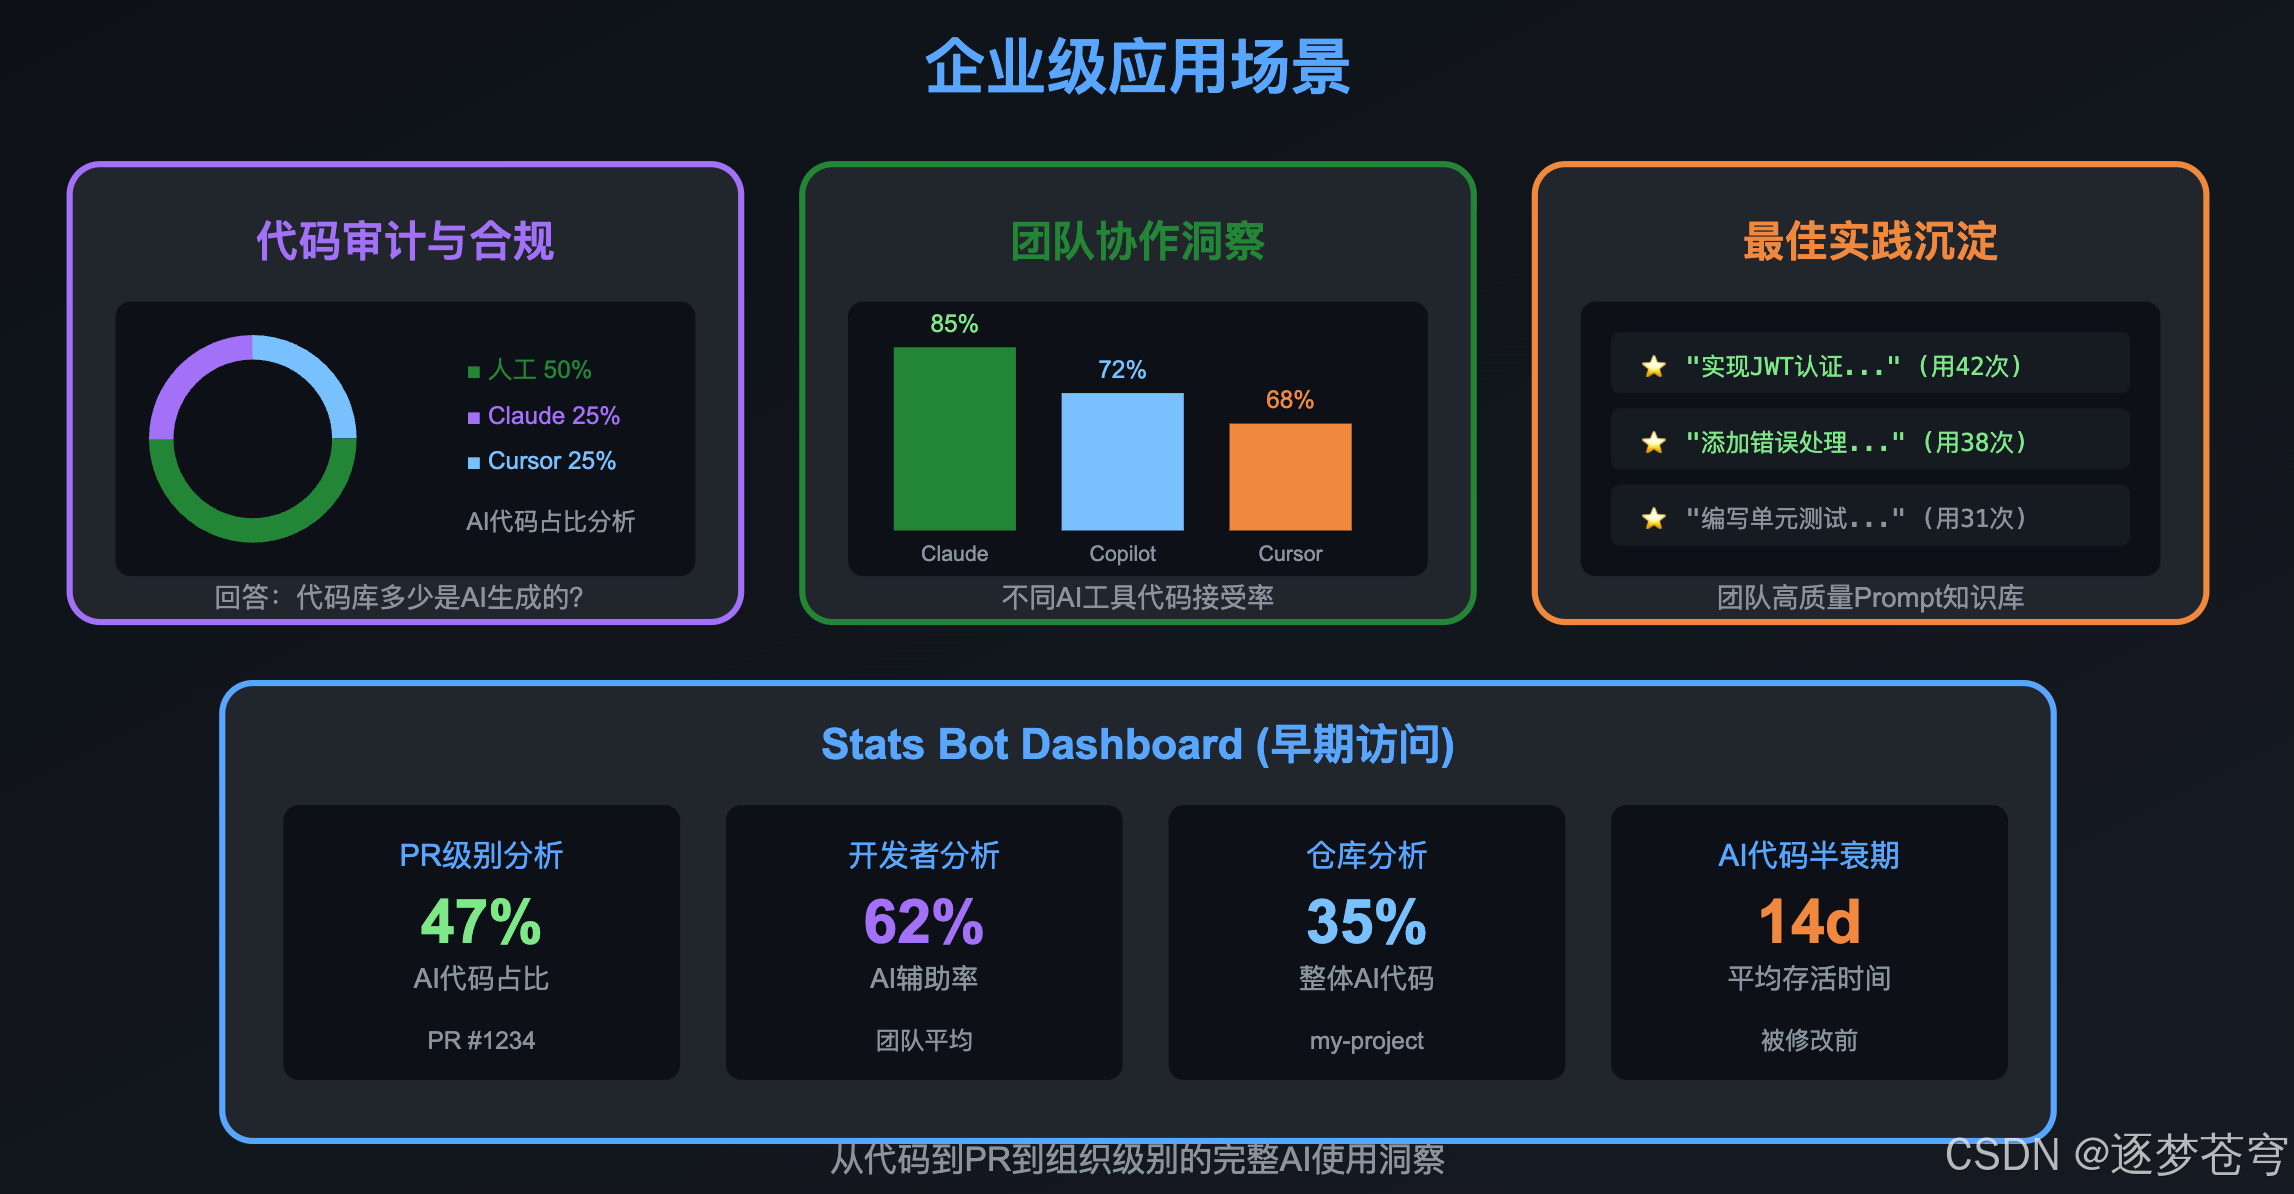
对于企业来说,Git-AI可以回答关键问题:
- 代码库中有多少比例是AI生成的?
- 哪些模块AI参与度最高?
- AI代码的质量如何?(通过bug率关联分析)
7.2 团队协作洞察
通过Stats Bot(早期访问阶段),可以获得:
- PR级别的AI代码占比
- 不同Agent+Model组合的代码接受率
- AI代码的"半衰期"(被修改/删除的速度)
7.3 最佳实践沉淀
高质量的prompt会被保留,团队可以:
- 建立prompt知识库
- 新人快速学习有效的AI协作方式
- 持续优化AI使用策略
8、与传统git blame的对比
| 维度 | git blame | git-ai blame |
|---|---|---|
| 追踪对象 | 人 | 人 + AI Agent + 模型 |
| 信息粒度 | 谁在什么时候改的 | 谁/什么AI用什么prompt生成的 |
| 上下文 | commit message | commit message + prompt |
| 跨操作保持 | 部分丢失 | 完整保持 |
| 统计分析 | 基础 | 丰富的AI洞察 |
9、未来展望
9.1 更多Agent支持
Git-AI团队正在积极与更多AI工具厂商合作:
- Windsurf
- Augment Code
- OpenAI Codex
- JetBrains IDE系列
9.2 深度分析能力
未来可能的功能:
- AI代码质量评分
- 跨仓库AI使用模式分析
- 自动识别高风险AI代码
9.3 开放生态
基于Git AI Standard,第三方可以:
- 构建自己的分析工具
- 集成到CI/CD流程
- 开发IDE插件
10、实战踩坑指南
在实际使用 Git-AI 的过程中,我遇到了不少问题,这里整理出来供大家参考。
10.1 安装后命令不生效
现象:安装完成后执行 git-ai 提示 command not found。
原因:安装脚本修改了 ~/.zshrc,但当前终端会话没有加载新配置。
解决:
# 方法1:重新加载配置
source ~/.zshrc

# 方法2:重启终端
10.2 Cursor/VSCode 扩展需要手动安装
现象:安装日志显示警告:
⚠ Cursor: Unable to automatically install extension
原因:git-ai 无法自动在 GUI 编辑器中安装扩展。
解决:
- 打开 Cursor/VSCode
- 按
Cmd+Shift+X打开扩展面板 - 搜索
git-ai或git-ai-vscode - 点击安装
- 重启编辑器(很重要!)
10.3 安装扩展后 AI 代码仍然不被追踪
现象:用 Cursor AI 改了代码,提交后 git-ai stats 显示 100% 人工。
原因:
- 扩展安装后没有重启 Cursor
- 之前的提交不会被追溯标记
解决:
# 1. 完全退出 Cursor (Cmd+Q),重新打开

# 2. 用 AI 做一些修改

# 3. 提交前检查 git-ai 是否捕捉到
git-ai status
# 应该能看到类似:
# you  ███████░░░░░░░░░░░░░░░░░░░░░░░░░░░░░░░░░ ai
#      18%                                  82%

# 4. 确认有捕捉到后再提交
git add . && git commit -m "test"
10.4 SourceTree 等 GUI 工具提交后丢失 AI 追踪
现象:用 SourceTree 提交后,git-ai stats 显示 0% AI。
原因:Git-AI 依赖 Git Hooks 机制,某些 GUI 工具可能:
- 跳过 hooks
- 使用不同的 git 环境
- 有禁用 hooks 的设置
解决:
- 检查 SourceTree 设置,确保 hooks 未被禁用
- 推荐使用命令行或 Cursor/VSCode 内置 Git 面板提交
| 提交方式 | 兼容性 |
|---|---|
命令行 git commit |
✅ 完全兼容 |
| Cursor/VSCode Git 面板 | ✅ 完全兼容 |
| SourceTree | ⚠️ 需确认 hooks 设置 |
| GitHub Desktop | ⚠️ 需测试 |
10.5 git ai --help 不工作
现象:
git ai --help
# 输出:No manual entry for git-ai
原因:git ai --help 会被 git 解释为查看 man page,而不是执行 git-ai --help。
解决:使用连字符写法:
git-ai --help # ✅ 正确
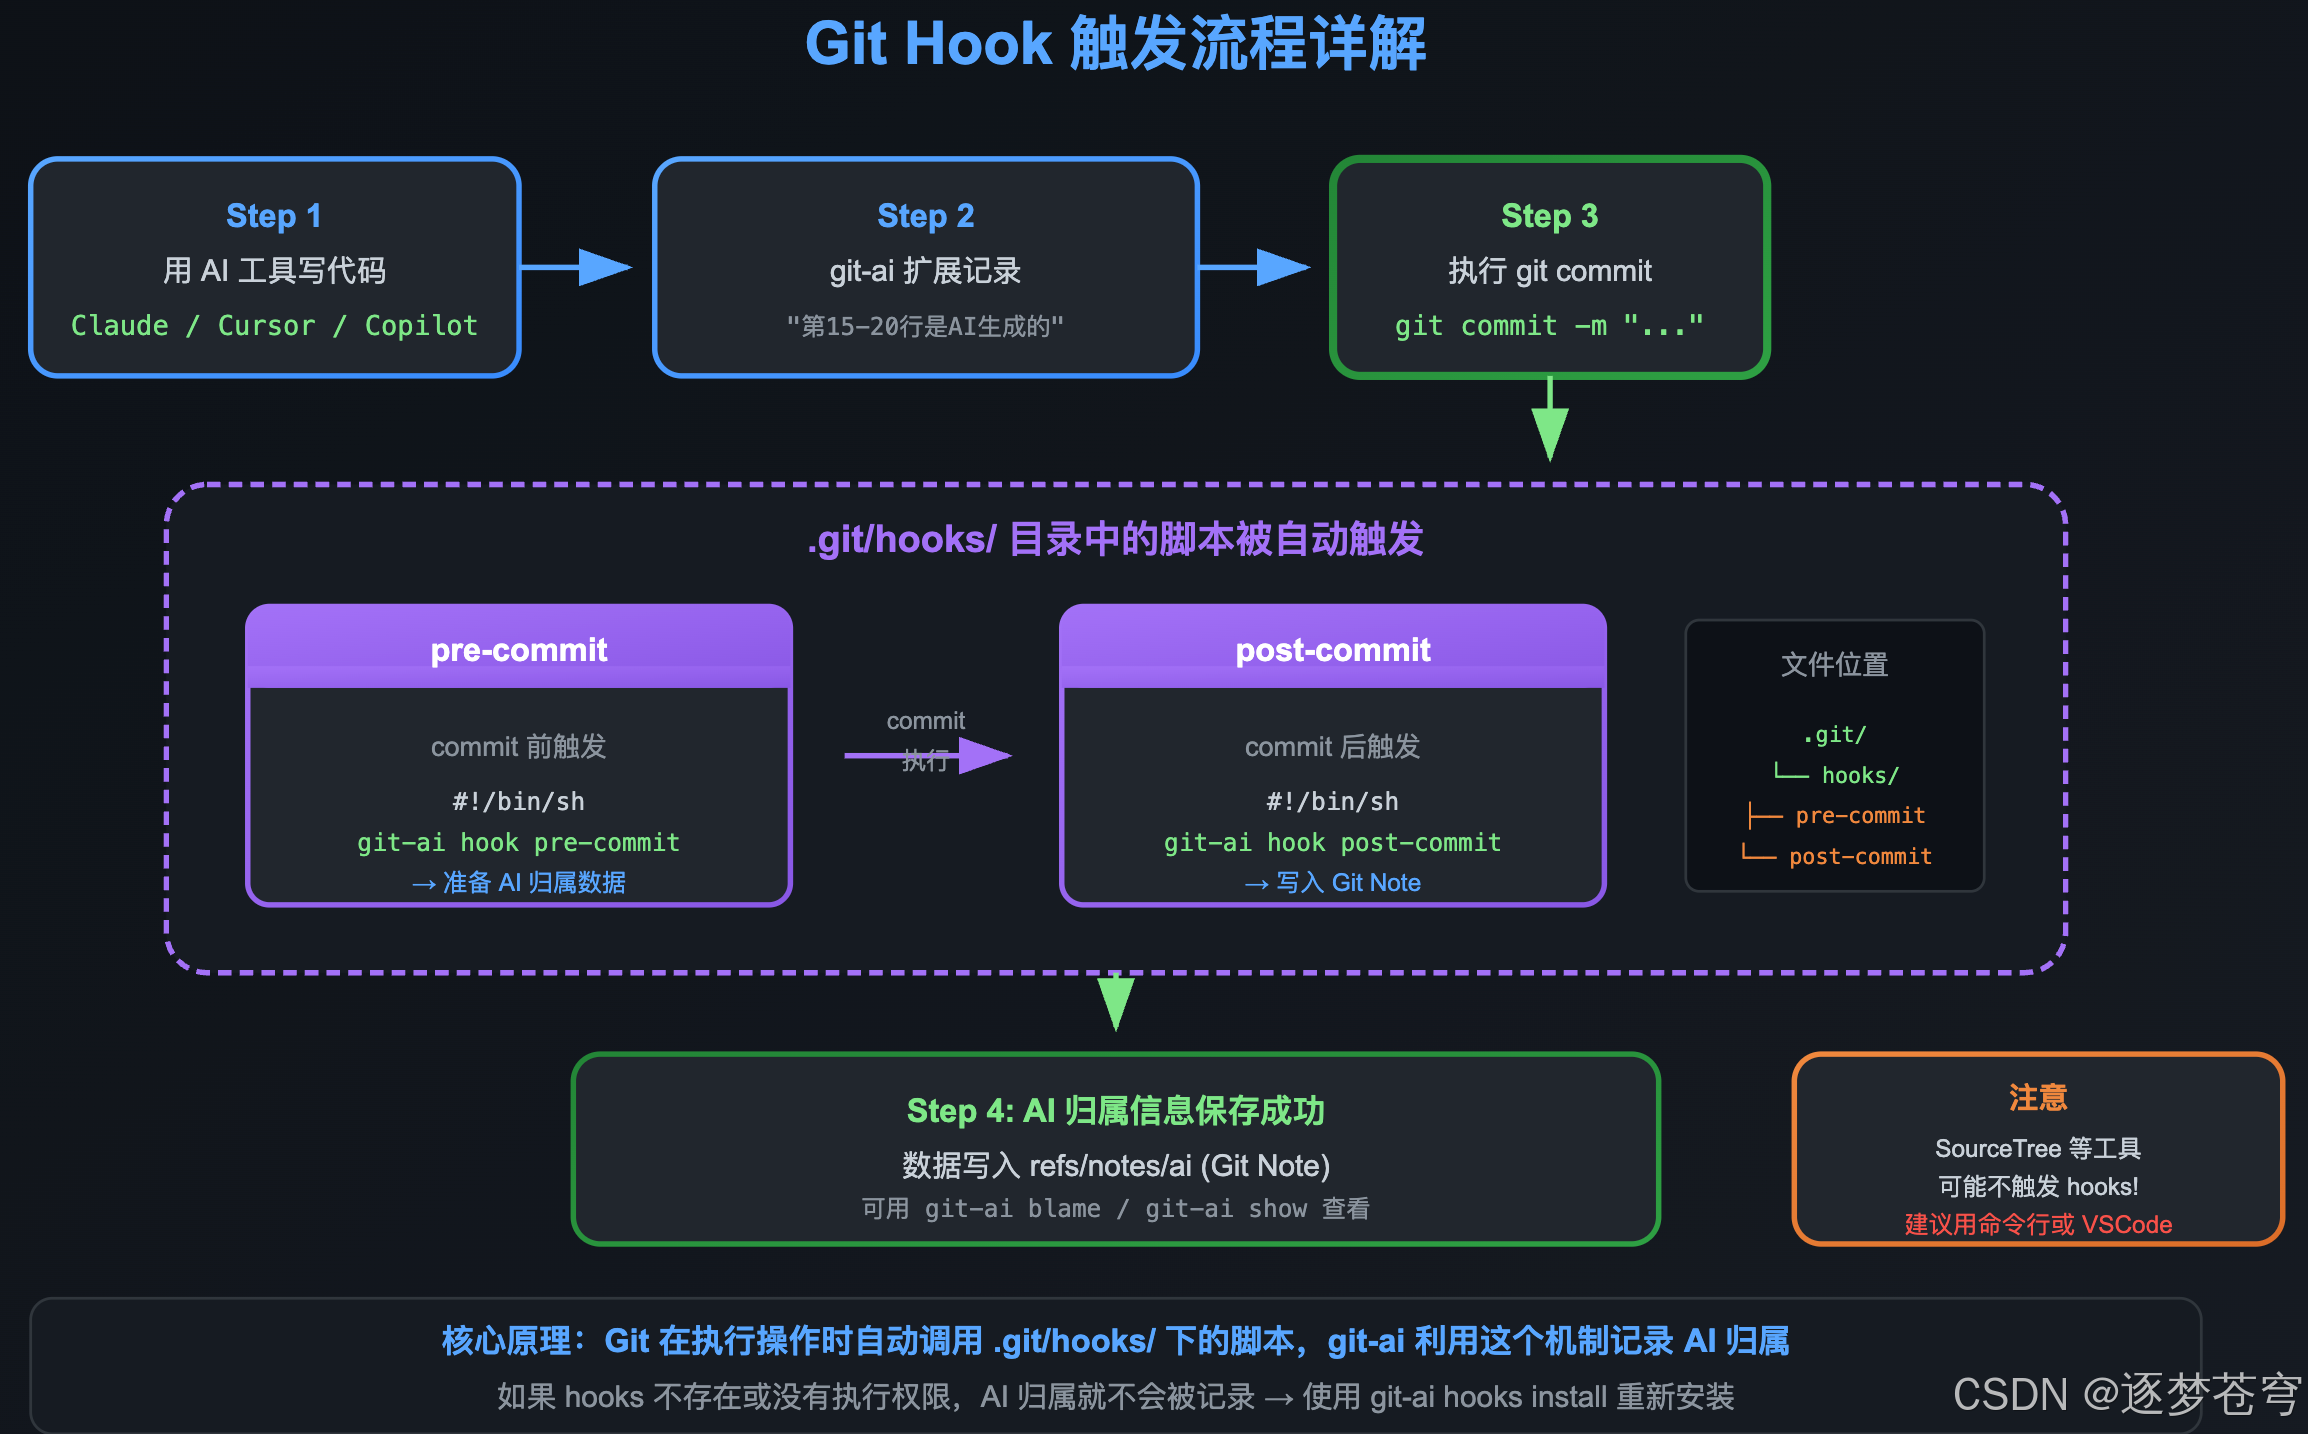
10.6 Git Hook 原理详解
10.6.1 什么是 Git Hooks?
Git Hooks(钩子) 是 Git 内置的一套事件触发机制。简单来说:
当你执行某个 Git 操作时,Git 会检查
.git/hooks/目录下有没有对应名字的脚本,如果有,就自动执行它。
这就像游戏里的"触发器"——走到某个位置就会触发剧情。Git 操作就是"位置",Hook 脚本就是"剧情"。
10.6.2 常见的 Git Hooks 类型
| Hook 名称 | 触发时机 | 用途示例 |
|---|---|---|
pre-commit |
执行 git commit 之前 |
代码格式检查、lint、阻止提交 |
prepare-commit-msg |
生成默认提交信息后 | 自动添加分支名或 issue 编号 |
commit-msg |
用户编辑提交信息后 | 校验提交信息格式 |
post-commit |
执行 git commit 之后 |
发送通知、记录统计信息 |
pre-push |
执行 git push 之前 |
运行测试、阻止推送 |
post-merge |
执行 git merge 之后 |
自动安装依赖 |
post-checkout |
执行 git checkout 之后 |
清理临时文件 |
10.6.3 Git-AI 使用了哪些 Hooks?
Git-AI 主要依赖 两个 Hook: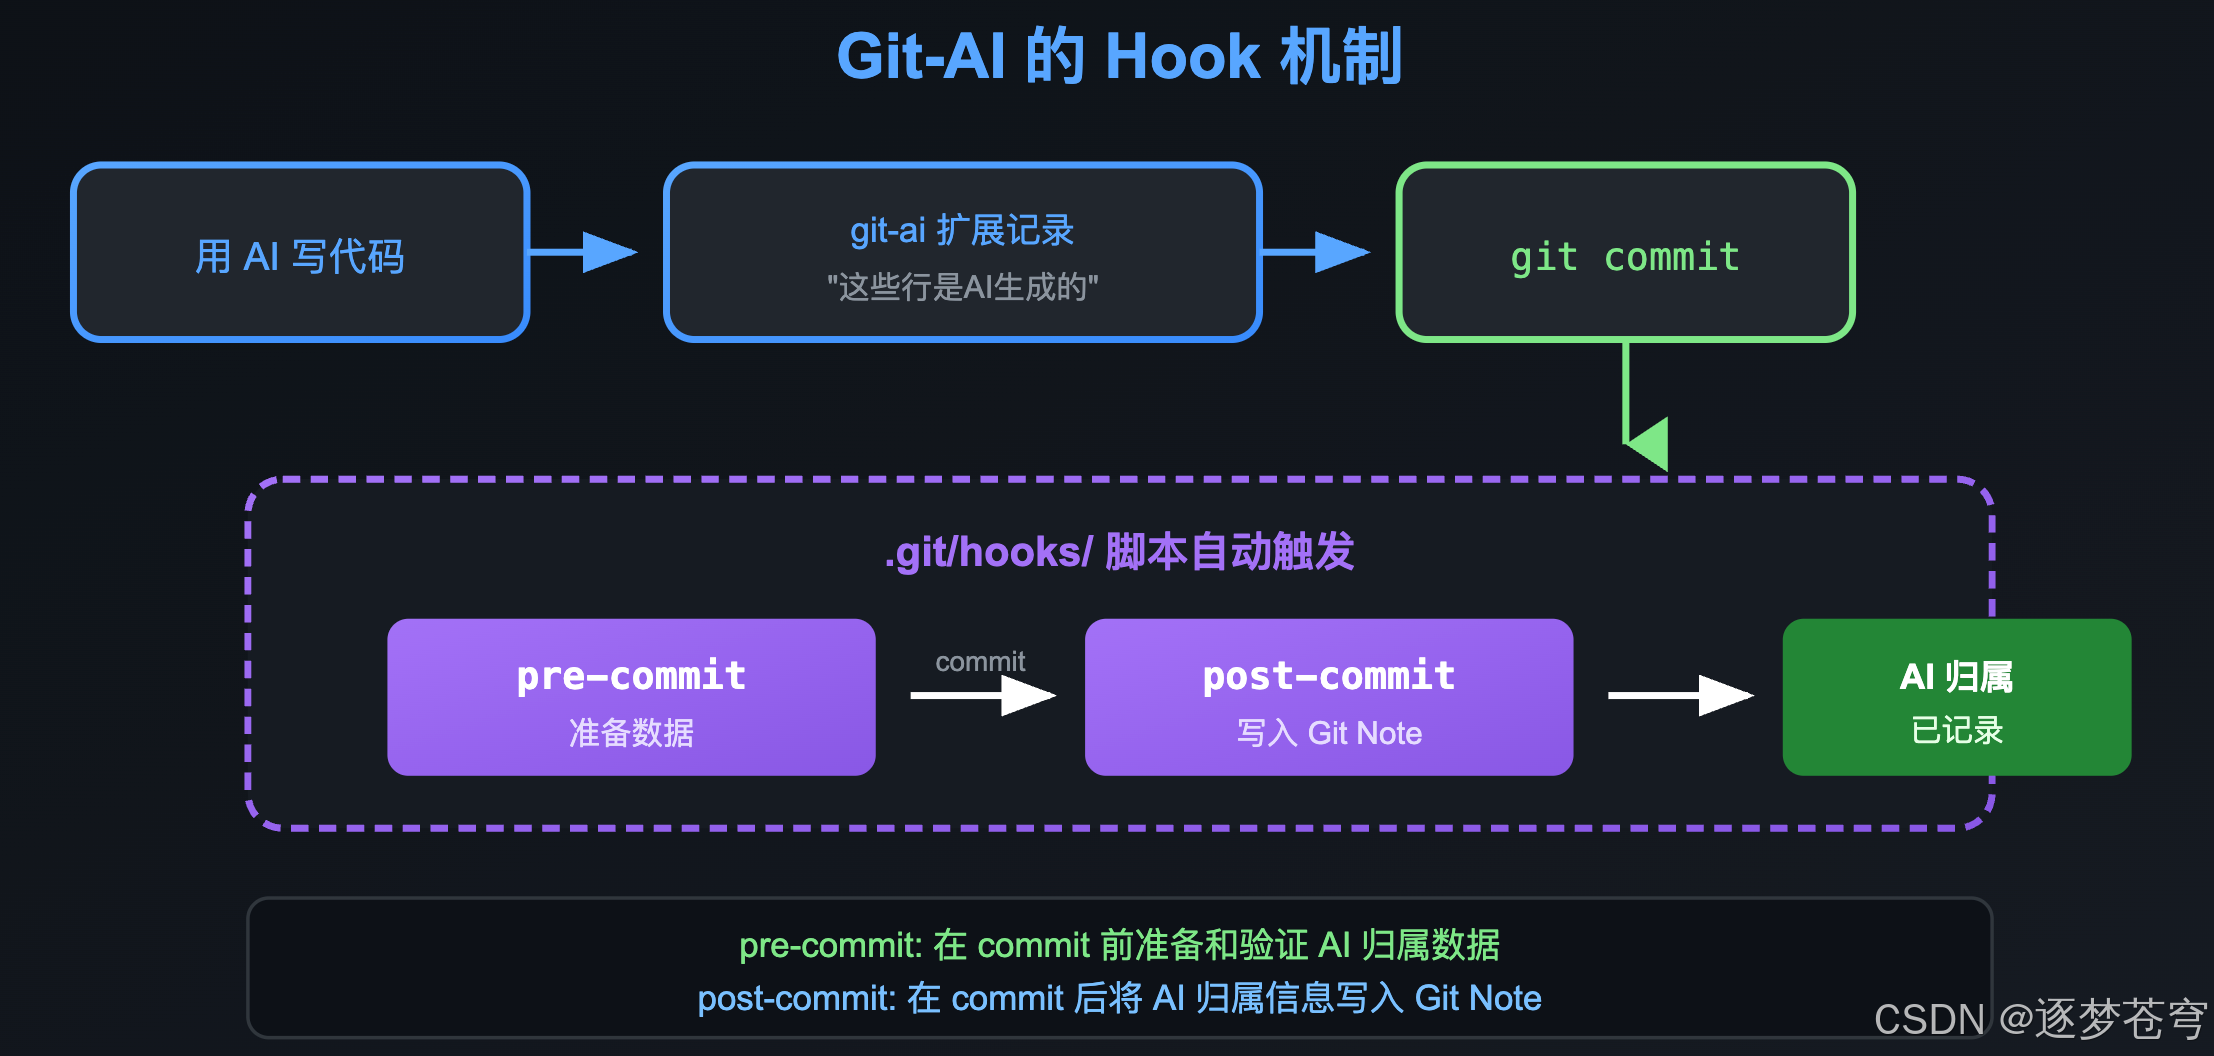
- pre-commit:在 commit 前准备和验证 AI 归属数据
- post-commit:在 commit 后将 AI 归属信息写入 Git Note
10.6.4 查看 Hook 脚本内容
安装 git-ai 后,你可以查看它创建的 hook 脚本:
# 查看 post-commit hook
cat .git/hooks/post-commit
典型输出:
#!/bin/sh
# git-ai post-commit hook
exec git-ai hook post-commit "$@"
这个脚本非常简洁——它只是调用 git-ai hook post-commit 命令,真正的逻辑在 git-ai 程序内部处理。
10.6.5 为什么 SourceTree 等工具可能不触发 Hook?
这是最容易踩的坑。原因如下:
| 场景 | Hook 是否触发 | 原因 |
|---|---|---|
命令行 git commit |
✅ 触发 | 标准 Git 行为 |
| VSCode/Cursor Git 面板 | ✅ 触发 | 内部调用 Git 命令 |
| SourceTree | ⚠️ 可能不触发 | 某些版本会跳过 hooks |
| GitHub Desktop | ⚠️ 可能不触发 | 同上 |
| IDE 内置 Git | ✅ 一般触发 | 取决于具体实现 |
SourceTree 不触发的典型原因:
- SourceTree 使用的是内嵌的 Git,而不是系统安装的 Git
- 某些版本为了"加速"会跳过 hooks
- SourceTree 可能使用
--no-verify参数跳过 hooks
解决方案:
# 方案1:使用命令行提交
git add . && git commit -m "your message"

# 方案2:使用 VSCode/Cursor 的 Git 面板提交
# (这些编辑器会正确触发 hooks)

# 方案3:配置 SourceTree 使用系统 Git
# SourceTree → 偏好设置 → Git → 使用系统 Git
10.6.6 手动检查 Hooks 是否正常
# 1. 检查 hooks 目录
ls -la .git/hooks/

# 2. 确认 hook 脚本存在且可执行
ls -la .git/hooks/post-commit
# 输出应该包含 -rwxr-xr-x(x 表示可执行)

# 3. 如果没有执行权限,添加权限
chmod +x .git/hooks/post-commit

# 4. 手动测试 hook
.git/hooks/post-commit
# 应该看到 git-ai 的输出(如果 hook 工作正常)
10.6.7 Hook 触发流程图
10.6.8 常见问题排查
问题1:提交后没有 AI 归属信息
# 检查 hook 是否存在
ls .git/hooks/post-commit

# 如果不存在,重新初始化 git-ai
git-ai hooks install
问题2:hook 存在但不执行
# 检查执行权限
ls -la .git/hooks/post-commit

# 添加执行权限
chmod +x .git/hooks/post-commit
问题3:hook 执行但报错
# 手动执行查看错误信息
.git/hooks/post-commit

# 检查 git-ai 是否在 PATH 中
which git-ai
问题4:使用了 --no-verify 跳过 hooks
# 这个命令会跳过所有 hooks!
git commit --no-verify -m "message"  # ❌ AI 归属不会被记录

# 正确做法:不要使用 --no-verify
git commit -m "message"              # ✅ hooks 正常触发
11、Prompt 存储详解
11.1 两个存储位置
Git-AI 的数据存储在两个地方:
| 存储位置 | 路径 | 内容 | 用途 |
|---|---|---|---|
| Git Note | 随 commit 存储 | 元数据(工具、模型、行号) | 代码归属追踪 |
| 全局数据库 | ~/.git-ai/internal/db |
完整对话(prompt + 回复) | Prompt 分析 |
11.2 Git Commit 与 Git Note 的关系
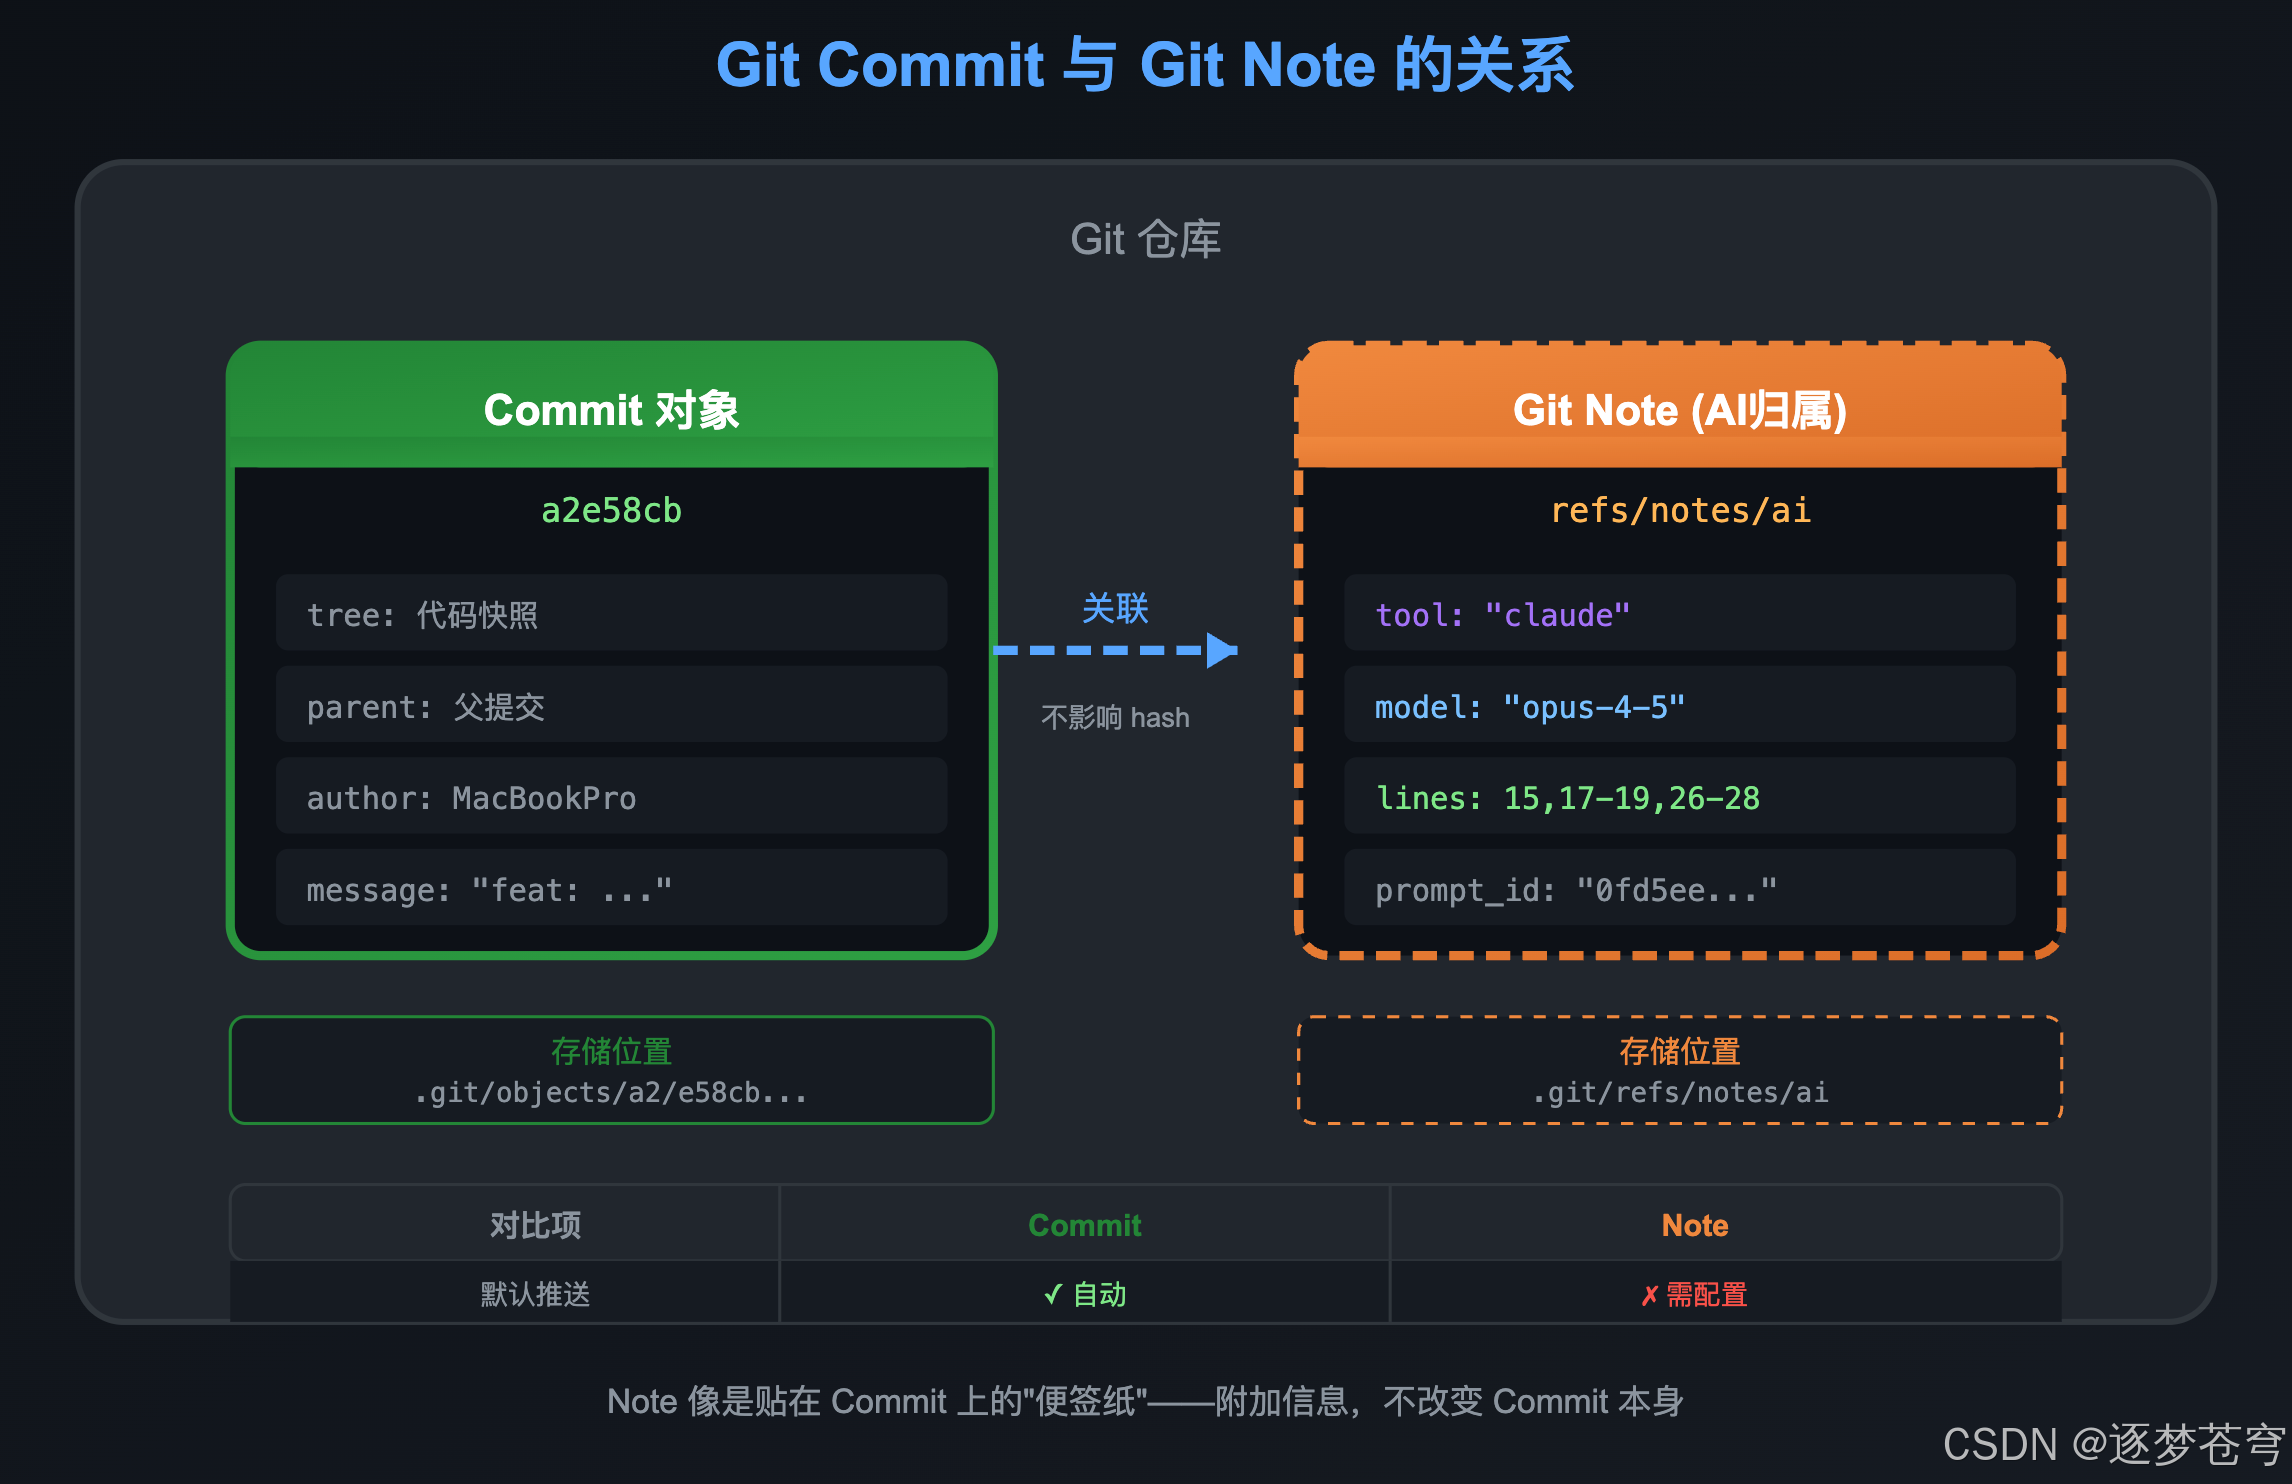
核心区别:
| 对比 | Git Commit | Git Note |
|---|---|---|
| 存什么 | 代码变更、作者、时间、消息 | 额外的附加信息(AI归属) |
| 是否影响 commit hash | ✅ 会影响 | ❌ 不影响 |
| 是否必须 | ✅ 必须 | ❌ 可选 |
| 默认是否 push | ✅ 是 | ❌ 否(需单独配置) |
| GUI 工具支持 | ✅ 支持 | ❌ 大多不支持 |
一句话总结:Git Note 是"贴"在 Commit 上的便签纸——不改变 commit 本身,但可以附加额外信息。
11.3 查看 Git Note 中的归属信息
方法1:使用 git-ai 命令
git-ai show <commit-hash>
方法2:使用原生 git 命令
# 列出所有带 AI 归属的 commits
git notes --ref=refs/notes/ai list

# 查看某个 commit 的 note 内容
git notes --ref=refs/notes/ai show <commit-hash>
方法3:在 git log 中直接显示(推荐)
配置一次,永久生效:
git config notes.displayRef refs/notes/ai
然后 git log 就能直接看到 AI 归属信息:
commit a2e58cb (HEAD -> main)
Author: MacBookPro <abc10086xzl@gmail.com>
Date:   Tue Jan 27 15:15:54 2026 +0800

    test after extension 2

Notes (ai):
    ClipMind/ContentView.swift
      cce7dc1177030070 13-14,16,20-22,29,33-34
      0fd5eeb3d01edae0 15,17-19,26-28,35
    ---
    {
      "schema_version": "authorship/3.0.0",
      "prompts": {
        "0fd5eeb3d01edae0": {
          "agent_id": {
            "tool": "claude",
            "model": "claude-opus-4-5-20251101"
          },
          ...
        }
      }
    }
取消显示 Notes:
# 删除配置,git log 不再显示 notes
git config --unset notes.displayRef
临时控制显示/隐藏(不改配置):
# 临时显示 notes(即使没配置)
git log --notes=refs/notes/ai

# 临时隐藏 notes(即使配置了也不显示)
git log --no-notes
11.4 多人协同:Git Notes 的推送与同步
11.4.1 理解 Commit 与 Note 的推送机制
这是最容易混淆的地方,请仔细理解: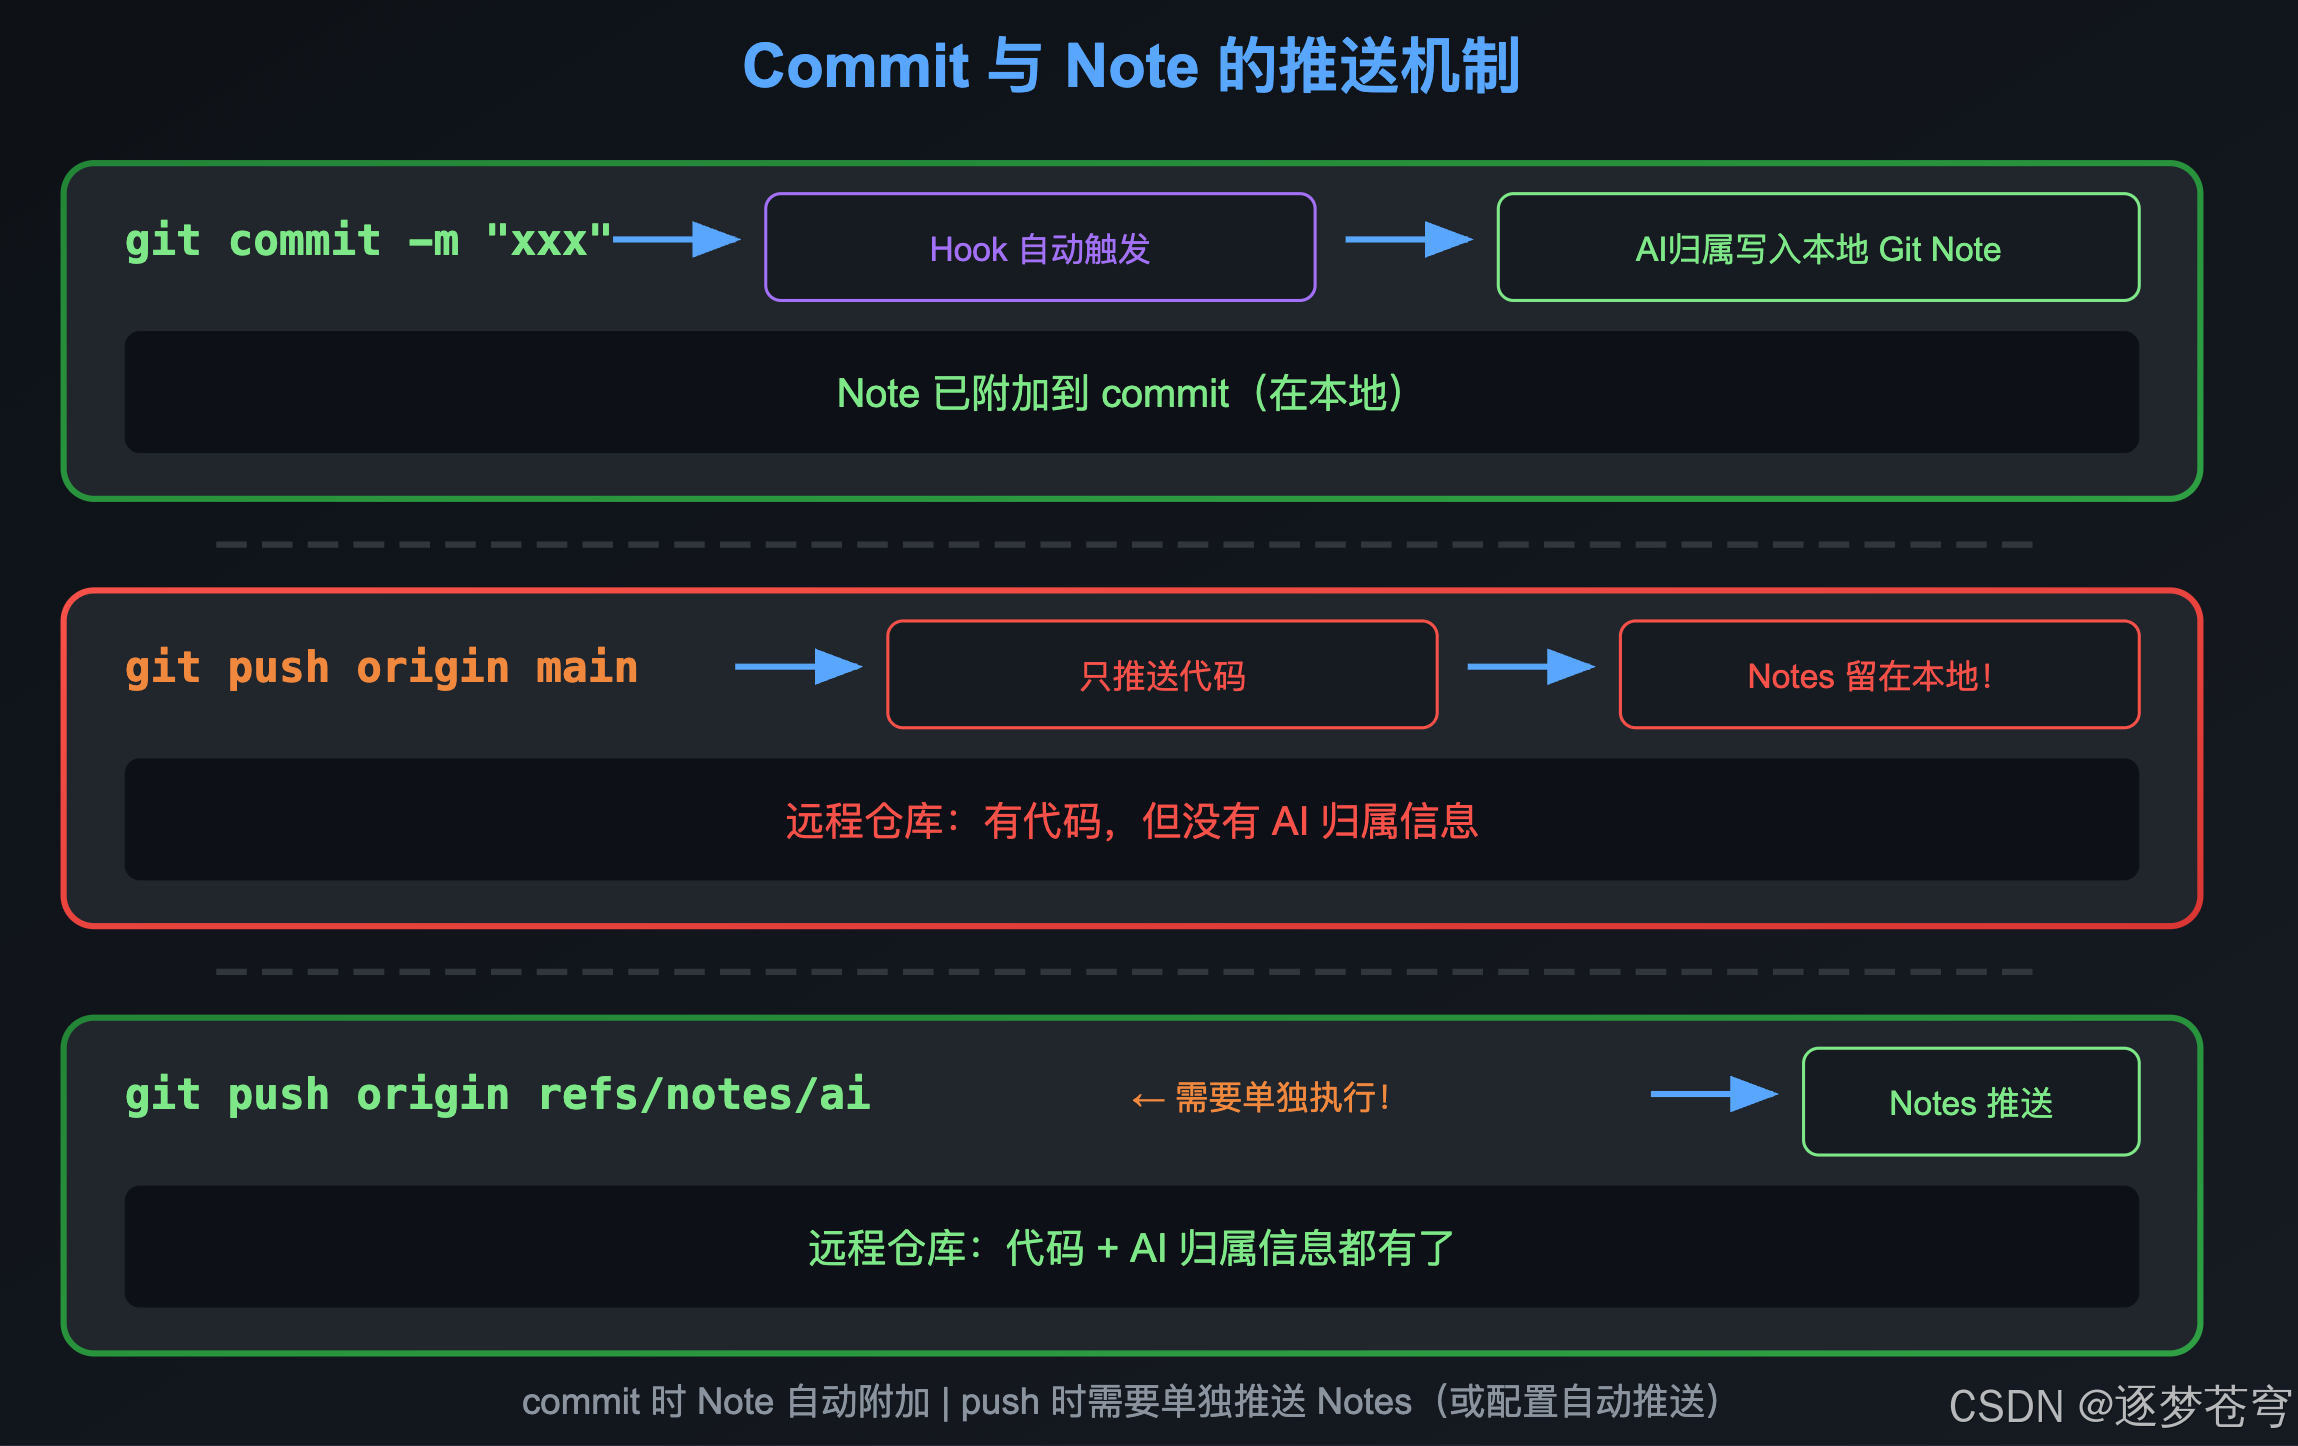
一句话总结:
git commit时 Note 自动附加(不需要额外操作)git push时 Note 不会自动推送(需要配置或手动推送)
11.4.2 Notes 的存储位置详解

查看本地 Notes 存储:
# 查看 refs/notes/ai 指向哪个对象
cat .git/refs/notes/ai
# 输出: f3abc123456789...

# 查看这个对象的内容
git cat-file -p $(cat .git/refs/notes/ai)
11.4.3 手动推送和拉取 Notes
# 推送你的 notes 到远程
git push origin refs/notes/ai

# 从远程拉取 notes
git fetch origin refs/notes/ai:refs/notes/ai
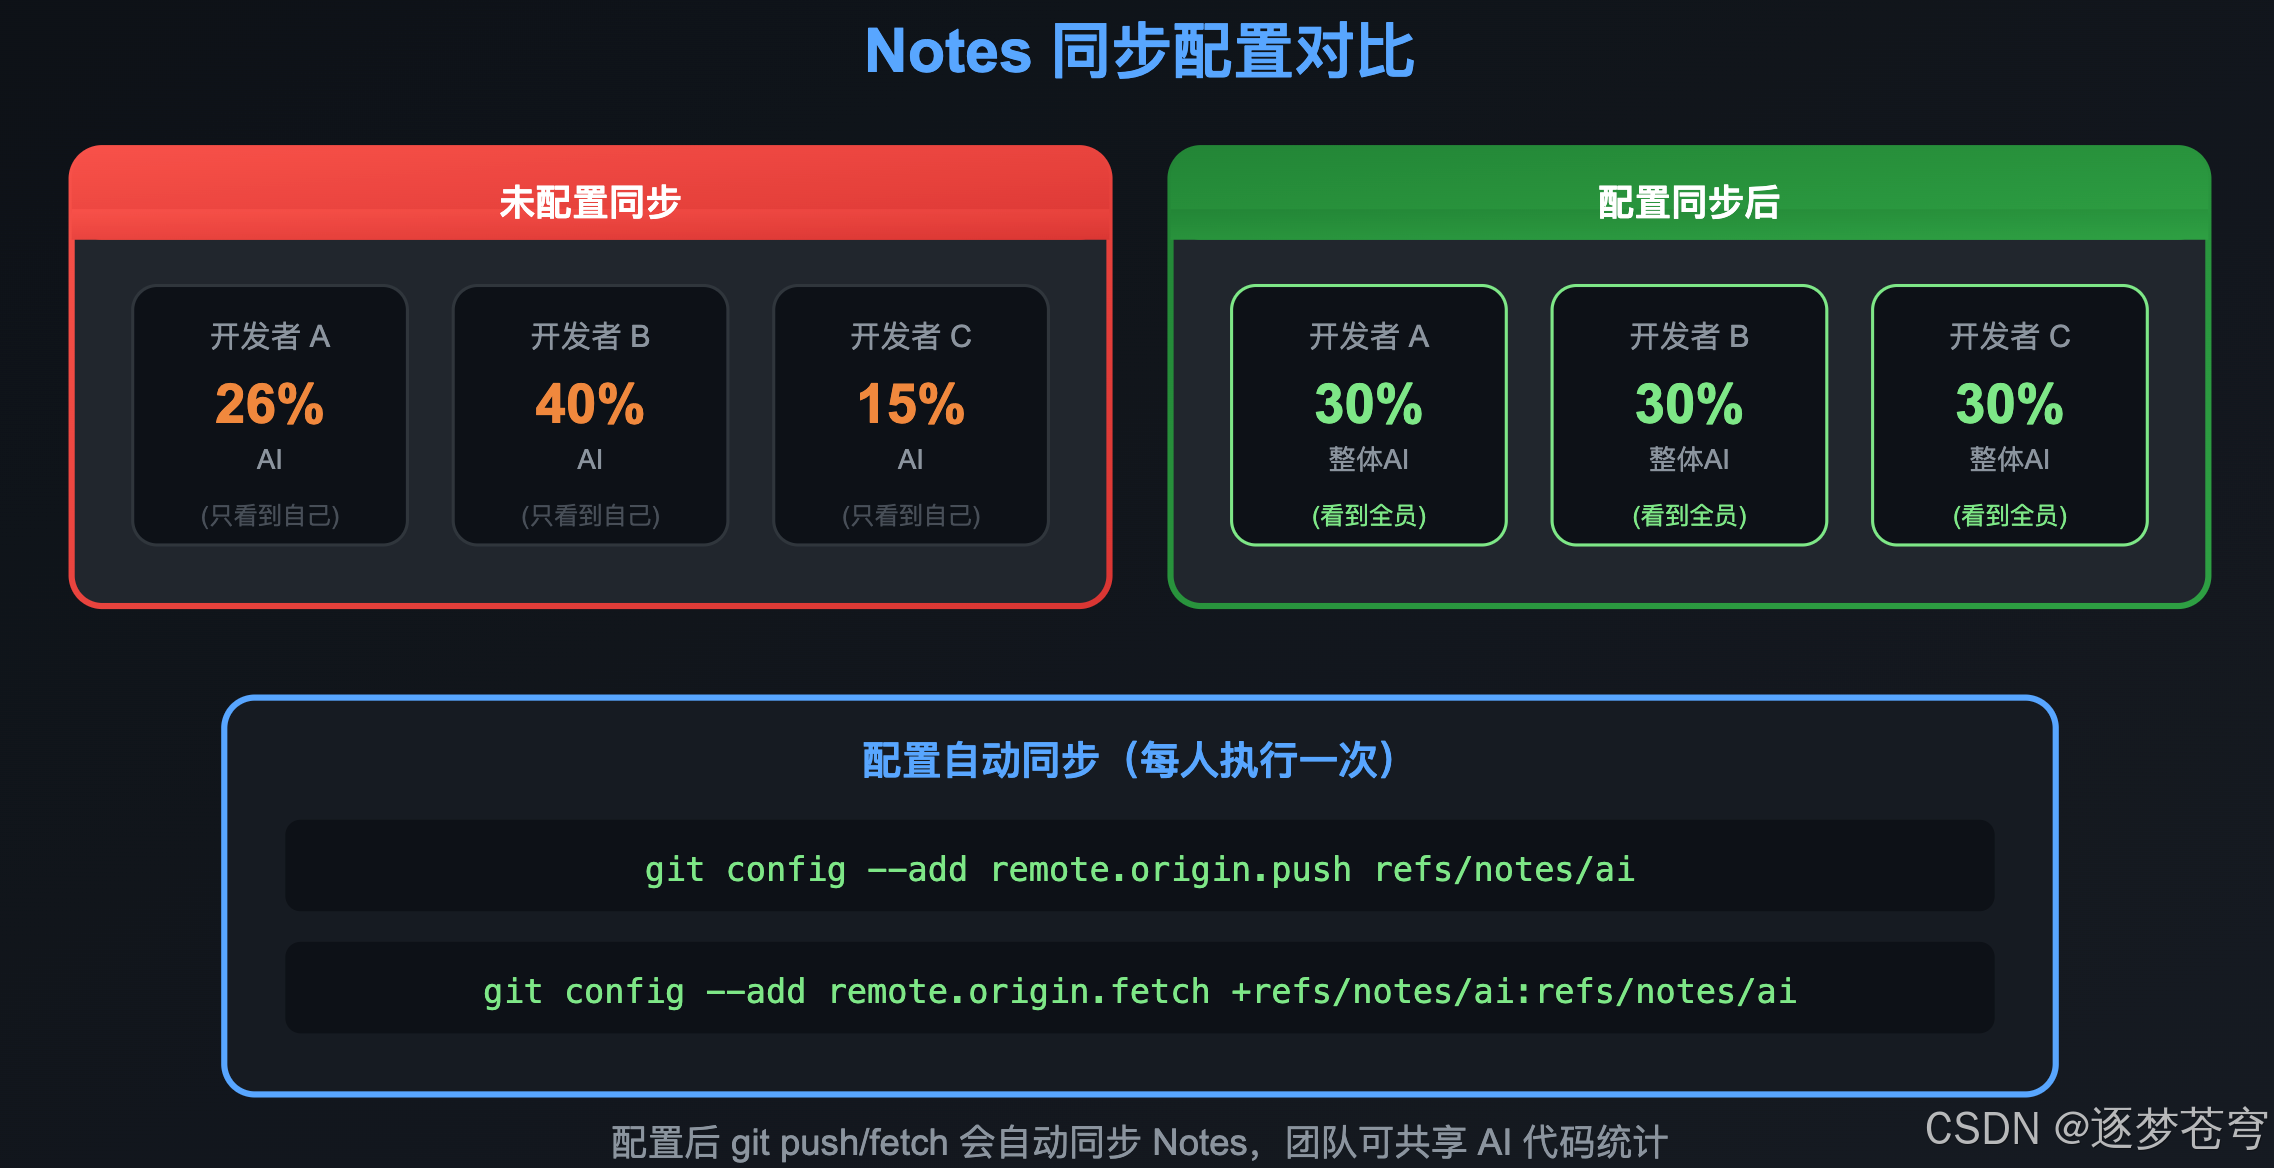
11.4.4 配置自动推送/拉取(推荐)
配置一次,以后每次 push/fetch 自动包含 Notes:
# push 时自动包含 notes
git config --add remote.origin.push refs/notes/ai

# fetch 时自动拉取 notes
git config --add remote.origin.fetch +refs/notes/ai:refs/notes/ai
或者直接编辑 .git/config:
[remote "origin"]
    url = git@github.com:xxx/xxx.git
    fetch = +refs/heads/*:refs/remotes/origin/*
    fetch = +refs/notes/ai:refs/notes/ai     # 添加这行
    push = refs/notes/ai                      # 添加这行
配置后的效果:
git push    # 代码和 notes 一起推送
git fetch   # 代码和 notes 一起拉取
11.4.5 多人协同完整流程
场景:团队3人协作,都使用 AI 辅助编程,想要共享 AI 代码统计。
Step 1:每个成员配置自动同步(每人执行一次)
git config --add remote.origin.push refs/notes/ai
git config --add remote.origin.fetch +refs/notes/ai:refs/notes/ai
Step 2:日常开发流程
# 开发者 A
git add .
git commit -m "feat: 新功能"   # Hook 自动附加 AI 归属
git push                        # 代码 + Notes 一起推送

# 开发者 B
git pull                        # 代码 + Notes 一起拉取
git-ai stats                    # 能看到 A 的 AI 代码贡献
Step 3:新成员加入项目
git clone <repo-url>
cd <project>

# 配置自动同步
git config --add remote.origin.push refs/notes/ai
git config --add remote.origin.fetch +refs/notes/ai:refs/notes/ai

# 首次拉取历史 notes
git fetch origin refs/notes/ai:refs/notes/ai

# 查看整个项目的 AI 统计
git-ai stats
11.4.6 不配置同步会怎样?
| 场景 | git-ai stats 显示 |
|---|---|
| 未配置同步 | 只有你自己的 AI 代码统计 |
| 配置了同步 | 整个团队的 AI 代码统计 |
11.5 各工具对 Git Notes 的支持
| 工具 | 能否查看 Git Notes |
|---|---|
命令行 git log (配置后) |
✅ 能 |
git-ai show |
✅ 能 |
| SourceTree | ❌ 不支持 |
| GitHub 网页 | ❌ 默认不显示 |
| GitLens (VSCode) | ⚠️ 有限支持 |
Git Notes 是"隐藏"的元数据,专门给工具(如 git-ai)使用,大多数 GUI 工具看不到。这也是为什么 git-ai 提供了专门的命令来读取和展示这些信息。
11.6 查看使用了哪些 AI 工具
git-ai stats 只显示整体的 AI 代码比例,如果想知道具体使用了哪些 AI 工具(Claude、Cursor、Copilot 等),有以下方法:
方法1:查看某个文件的 AI 归属详情
git-ai blame <文件名>
输出会显示每一行是哪个 AI 生成的,包括工具和模型信息。
方法2:查看某个 commit 的 AI 信息
# 查看指定 commit
git-ai show <commit-hash>

# 查看最新 commit
git-ai show HEAD
方法3:通过 prompts 数据库查询
# 先生成/更新 prompts 数据库
git-ai prompts

# 列出所有 prompts(会显示 agent_id 包含工具和模型)
git-ai prompts list

# 用 SQL 统计使用了哪些 AI 工具和模型
git-ai prompts exec "SELECT DISTINCT json_extract(agent_id, '$.tool') as tool, json_extract(agent_id, '$.model') as model FROM prompts"
方法4:直接查看 Git Note 原始内容
# 查看最近 commit 的 note
git notes --ref=refs/notes/ai show HEAD
输出示例:
{
  "schema_version": "authorship/3.0.0",
  "prompts": {
    "0fd5eeb3d01edae0": {
      "agent_id": {
        "tool": "claude",                      ← AI 工具名称
        "model": "claude-opus-4-5-20251101"    ← 具体模型版本
      }
    },
    "cce7dc1177030070": {
      "agent_id": {
        "tool": "cursor",
        "model": "gpt-4"
      }
    }
  }
}
常见 AI 工具标识
| tool 字段 | 对应工具 |
|---|---|
claude |
Claude Code CLI |
cursor |
Cursor 编辑器 |
copilot |
GitHub Copilot |
continue |
Continue 插件 |
gemini |
Gemini CLI |
11.7 查看完整的 Prompt 对话
Git Note 里只有精简的元数据,完整的 prompt 对话存储在全局数据库:
# 生成/更新 prompts 数据库
git-ai prompts

# 列出所有 prompts
git-ai prompts list

# 用 SQL 查看完整对话
git-ai prompts exec "SELECT messages FROM prompts WHERE id='<prompt-id>'"
完整对话包括:
- 用户输入的 prompt
- AI 的回复
- 工具调用记录(Read、Edit 等)
11.8 全局数据库文件说明
~/.git-ai/
├── bin/              # git-ai 可执行文件
├── config.json       # 配置文件
└── internal/
    ├── db            # SQLite 数据库(无后缀,但就是 .db)
    ├── db-shm        # SQLite 共享内存文件
    └── db-wal        # SQLite 预写日志
用图形化工具查看数据库:
# 安装 DB Browser for SQLite
brew install --cask db-browser-for-sqlite

# 或者复制一份带后缀的
cp ~/.git-ai/internal/db ~/Desktop/git-ai-prompts.db
11.9 项目目录下的 prompts.db
运行 git-ai prompts 会在项目目录生成 prompts.db,这是临时分析文件,建议加入 .gitignore:
echo "prompts.db" >> .gitignore
12、总结
Git-AI填补了AI编程时代的一个重要空白:追踪和管理AI生成的代码。
它的核心价值在于:
- 透明性:清晰知道代码的来源
- 可追溯:保留生成代码的上下文(prompt、模型等)
- 工程化:与Git深度集成,支持真实工作流
- 标准化:厂商无关的开放标准
对于正在大规模采用AI编程工具的团队来说,Git-AI不是一个"nice to have",而是即将成为"must have"的基础设施。
🔗 相关链接:
- GitHub:https://github.com/git-ai-project/git-ai
- 官方文档:https://usegitai.com/docs
- 标准规范:https://github.com/git-ai-project/git-ai/blob/main/specs/git_ai_standard_v3.0.0.md

有“AI”的1024 = 2048,欢迎大家加入2048 AI社区
更多推荐
 21
21 0
0- 0


 已为社区贡献49条内容

所有评论(0)