3天从零搭建个人主页,Astro+Cloudflare Pages零成本部署全流程
摘要:使用Astro快速搭建个人主页 本文详细介绍了如何利用Astro静态站点生成器和Cloudflare Pages免费托管服务快速搭建个人技术主页。Astro凭借零默认JavaScript、多框架支持、内置内容集合和SEO优化等优势,结合Cloudflare Pages的全球CDN加速、自动部署和免费托管功能,为开发者提供了高性能、低成本的技术解决方案。文章从项目初始化、配置到个性化主页设计,
前言:记录技术成长的最佳方式
作为一名开发者,我一直希望有一个属于自己的空间,用来记录技术心得、分享项目经验、展示学习成果。写过不少技术文章,但总是散落在各个平台;做过一些有趣的项目,却没有一个统一的地方展示。
直到我发现了 Astro —— 这个现代化的静态站点生成器,让我在不到一天的时间里,就搭建出了一个专业、美观、功能齐全的个人主页。它不仅完美支持博客系统,还能展示项目、生成简历,更重要的是部署维护极其简单。今天,我就把这份完整实践指南分享给大家。
为什么选择 Astro + Cloudflare Pages?
在正式开始之前,我们先来看看这套技术组合的优势:
Astro 的核心优势:
- 零默认 JavaScript,极致的性能表现
- 支持 React、Vue、Svelte 等主流框架
- 内置内容集合(Content Collections),类型安全
- MDX 支持,让 Markdown 也能使用组件
- SEO 优化友好,自动生成 sitemap
Cloudflare Pages 的强大功能:
- 完全免费托管静态网站(无限制带宽)
- 全球 CDN 加速,290+ 个节点
- 自动 HTTPS 证书
- 支持 GitHub/GitLab 集成,自动部署
- 边缘函数支持,可扩展性强
- 零配置冷启动,部署秒级完成
这套组合拳,让你既能享受现代化开发的便利,又能零成本部署到全世界,而且性能更优。
第一步:项目初始化
首先,我们需要创建一个新的 Astro 项目:
# 使用 npm 创建项目
npm create astro@latest

# 或使用 pnpm
pnpm create astro

# 或使用 yarn
yarn create astro
在交互式安装过程中:
- 选择 “Include sample files” 推荐 “Blog” 模板
- 选择 “Install dependencies” 自动安装依赖
- 选择 “How do you plan to deploy?” 选 “Cloudflare Pages” 或 “Other”
进入项目目录:
cd your-project-name
第二步:配置项目信息
打开 astro.config.mjs 文件,配置站点信息:
import { defineConfig } from 'astro/config';

export default defineConfig({
  site: 'https://your-domain.com',  // 替换为你的域名或 Cloudflare Pages 默认域名
  base: '/',  // Cloudflare Pages 通常设置为根路径
  integrations: [
    // 后续添加需要的集成
  ],
});
重要提示:
- Cloudflare Pages 默认域名格式:
your-project.pages.dev - 如果使用自定义域名,需要先在 Cloudflare 添加域名并配置 DNS
base配置通常设置为'/',除非有特殊路径需求
第三步:个性化你的主页
1. 修改首页内容
编辑 src/pages/index.astro:
---
import Layout from '../layouts/Layout.astro';
---

<Layout title="我的个人主页">
  <main>
    <h1>你好,我是张三!</h1>
    <p>全栈开发工程师 | 开源爱好者 | 技术博主</p>

    <section class="projects">
      <h2>我的项目</h2>
      <ul>
        <li>
          <h3>项目一:XXX</h3>
          <p>项目描述...</p>
          <a href="项目链接">查看详情</a>
        </li>
        <!-- 更多项目 -->
      </ul>
    </section>

    <section class="skills">
      <h2>技术栈</h2>
      <p>JavaScript, TypeScript, React, Vue, Node.js...</p>
    </section>
  </main>
</Layout>

<style>
  main {
    max-width: 800px;
    margin: 0 auto;
    padding: 2rem;
  }
  h1 {
    font-size: 3rem;
    margin-bottom: 1rem;
  }
  section {
    margin: 3rem 0;
  }
</style>
2. 添加博客功能
在 src/content/blog 目录下创建 .md 或 .mdx 文件:
---
title: "我的第一篇博客"
description: "这是博客摘要"
pubDate: 2025-01-25
tags: ["Astro", "前端开发"]
---

# 正文内容

这里是博客的正文内容,支持完整的 Markdown 语法。
3. 创建博客列表页
src/pages/blog/index.astro:
---
import { getCollection } from 'astro:content';
import Layout from '../../layouts/Layout.astro';

const allPosts = await getCollection('blog');
const sortedPosts = allPosts.sort((a, b) =>
  b.data.pubDate.valueOf() - a.data.pubDate.valueOf()
);
---

<Layout title="博客列表">
  <main>
    <h1>我的博客</h1>
    <ul>
      {sortedPosts.map(post => (
        <li>
          <a href={`/blog/${post.slug}/`}>
            <h2>{post.data.title}</h2>
            <p>{post.data.description}</p>
            <time>{post.data.pubDate.toDateString()}</time>
          </a>
        </li>
      ))}
    </ul>
  </main>
</Layout>

4. 创建博客详情页
src/pages/blog/[slug].astro:
---
import { getCollection } from 'astro:content';
import Layout from '../../layouts/Layout.astro';

export async function getStaticPaths() {
  const posts = await getCollection('blog');
  return posts.map(post => ({
    params: { slug: post.slug },
    props: { post },
  }));
}

const { post } = Astro.props;
const { Content } = await post.render();
---

<Layout title={post.data.title}>
  <main>
    <h1>{post.data.title}</h1>
    <p>{post.data.description}</p>
    <time>{post.data.pubDate.toDateString()}</time>
    <hr />
    <Content />
  </main>
</Layout>

第四步:美化你的主页
使用 Tailwind CSS
安装 Tailwind CSS:
npx astro add tailwind
在组件中使用 Tailwind 类名:
<div class="container mx-auto px-4">
  <h1 class="text-4xl font-bold text-center my-8">
    欢迎来到我的主页
  </h1>
  <div class="grid grid-cols-1 md:grid-cols-2 gap-6">
    <!-- 项目卡片 -->
  </div>
</div>
添加暗色模式
创建 src/layouts/Layout.astro:
---
interface Props {
  title: string;
}

const { title } = Astro.props;
---

<!doctype html>
<html lang="zh-CN">
  <head>
    <meta charset="UTF-8" />
    <meta name="viewport" content="width=device-width" />
    <title>{title}</title>
  </head>
  <body>
    <slot />
  </body>
</html>

<style is:global>
  :root {
    --bg-color: #ffffff;
    --text-color: #1a1a1a;
  }

  html.dark {
    --bg-color: #1a1a1a;
    --text-color: #ffffff;
  }

  body {
    background-color: var(--bg-color);
    color: var(--text-color);
    transition: background-color 0.3s, color 0.3s;
  }
</style>
添加切换按钮:
<script>
  function toggleDark() {
    document.documentElement.classList.toggle('dark');
  }
</script>

<button onClick="toggleDark">
  切换主题
</button>
第五步:部署到 Cloudflare Pages
1. 创建 GitHub 仓库
在 GitHub 上创建一个新仓库:
- 仓库名:
your-project-name(例如:personal-homepage) - 设置为 Public
- 可选:初始化 README
2. 配置构建脚本
在 package.json 中添加(如果还没有的话):
{
  "scripts": {
    "dev": "astro dev",
    "start": "astro dev",
    "build": "astro build",
    "preview": "astro preview"
  }
}
如果你使用了 Pagefind 搜索功能,构建脚本应该是:
{
  "scripts": {
    "dev": "astro dev",
    "build": "astro build && pagefind --site dist --output-path dist/pagefind",
    "preview": "astro preview"
  }
}
3. 创建 wrangler.toml 配置文件
在项目根目录创建 wrangler.toml:
# Cloudflare Pages 配置文件
# 文档: https://developers.cloudflare.com/pages/platform/build-configuration/

name = "your-project-name"
compatibility_date = "2024-01-01"

# Pages 项目配置
[site]
bucket = "./dist"

# 构建配置
[build]
command = "npm run build"
cwd = ""

[build.upload]
format = "service-worker"

# 环境变量配置
[env.production]
# 允许搜索引擎索引(正式环境)
PUBLIC_ALLOW_INDEX = "1"

[env.preview]
# 预览环境不允许索引
PUBLIC_ALLOW_INDEX = "0"
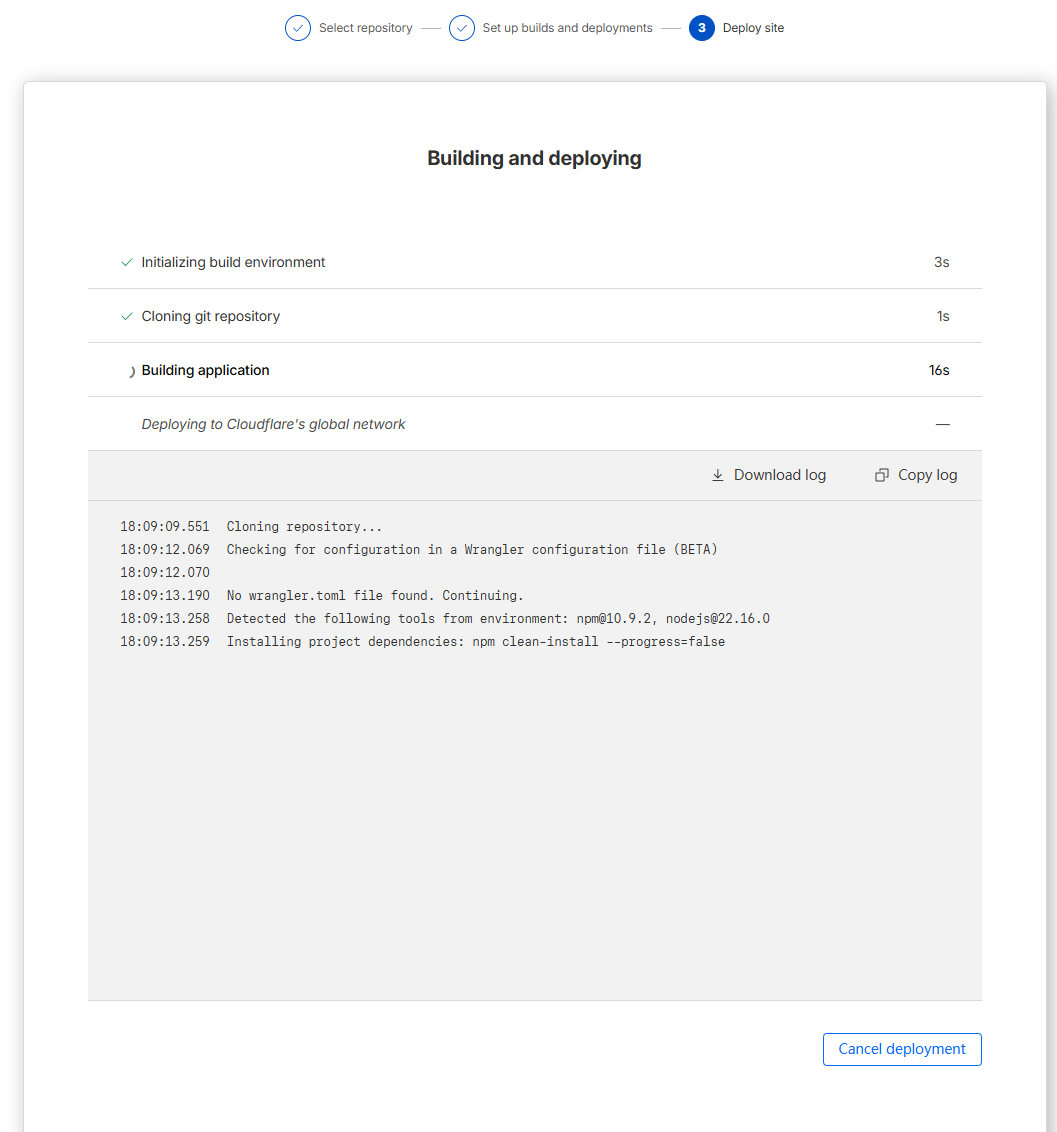
4. 连接 Cloudflare Pages
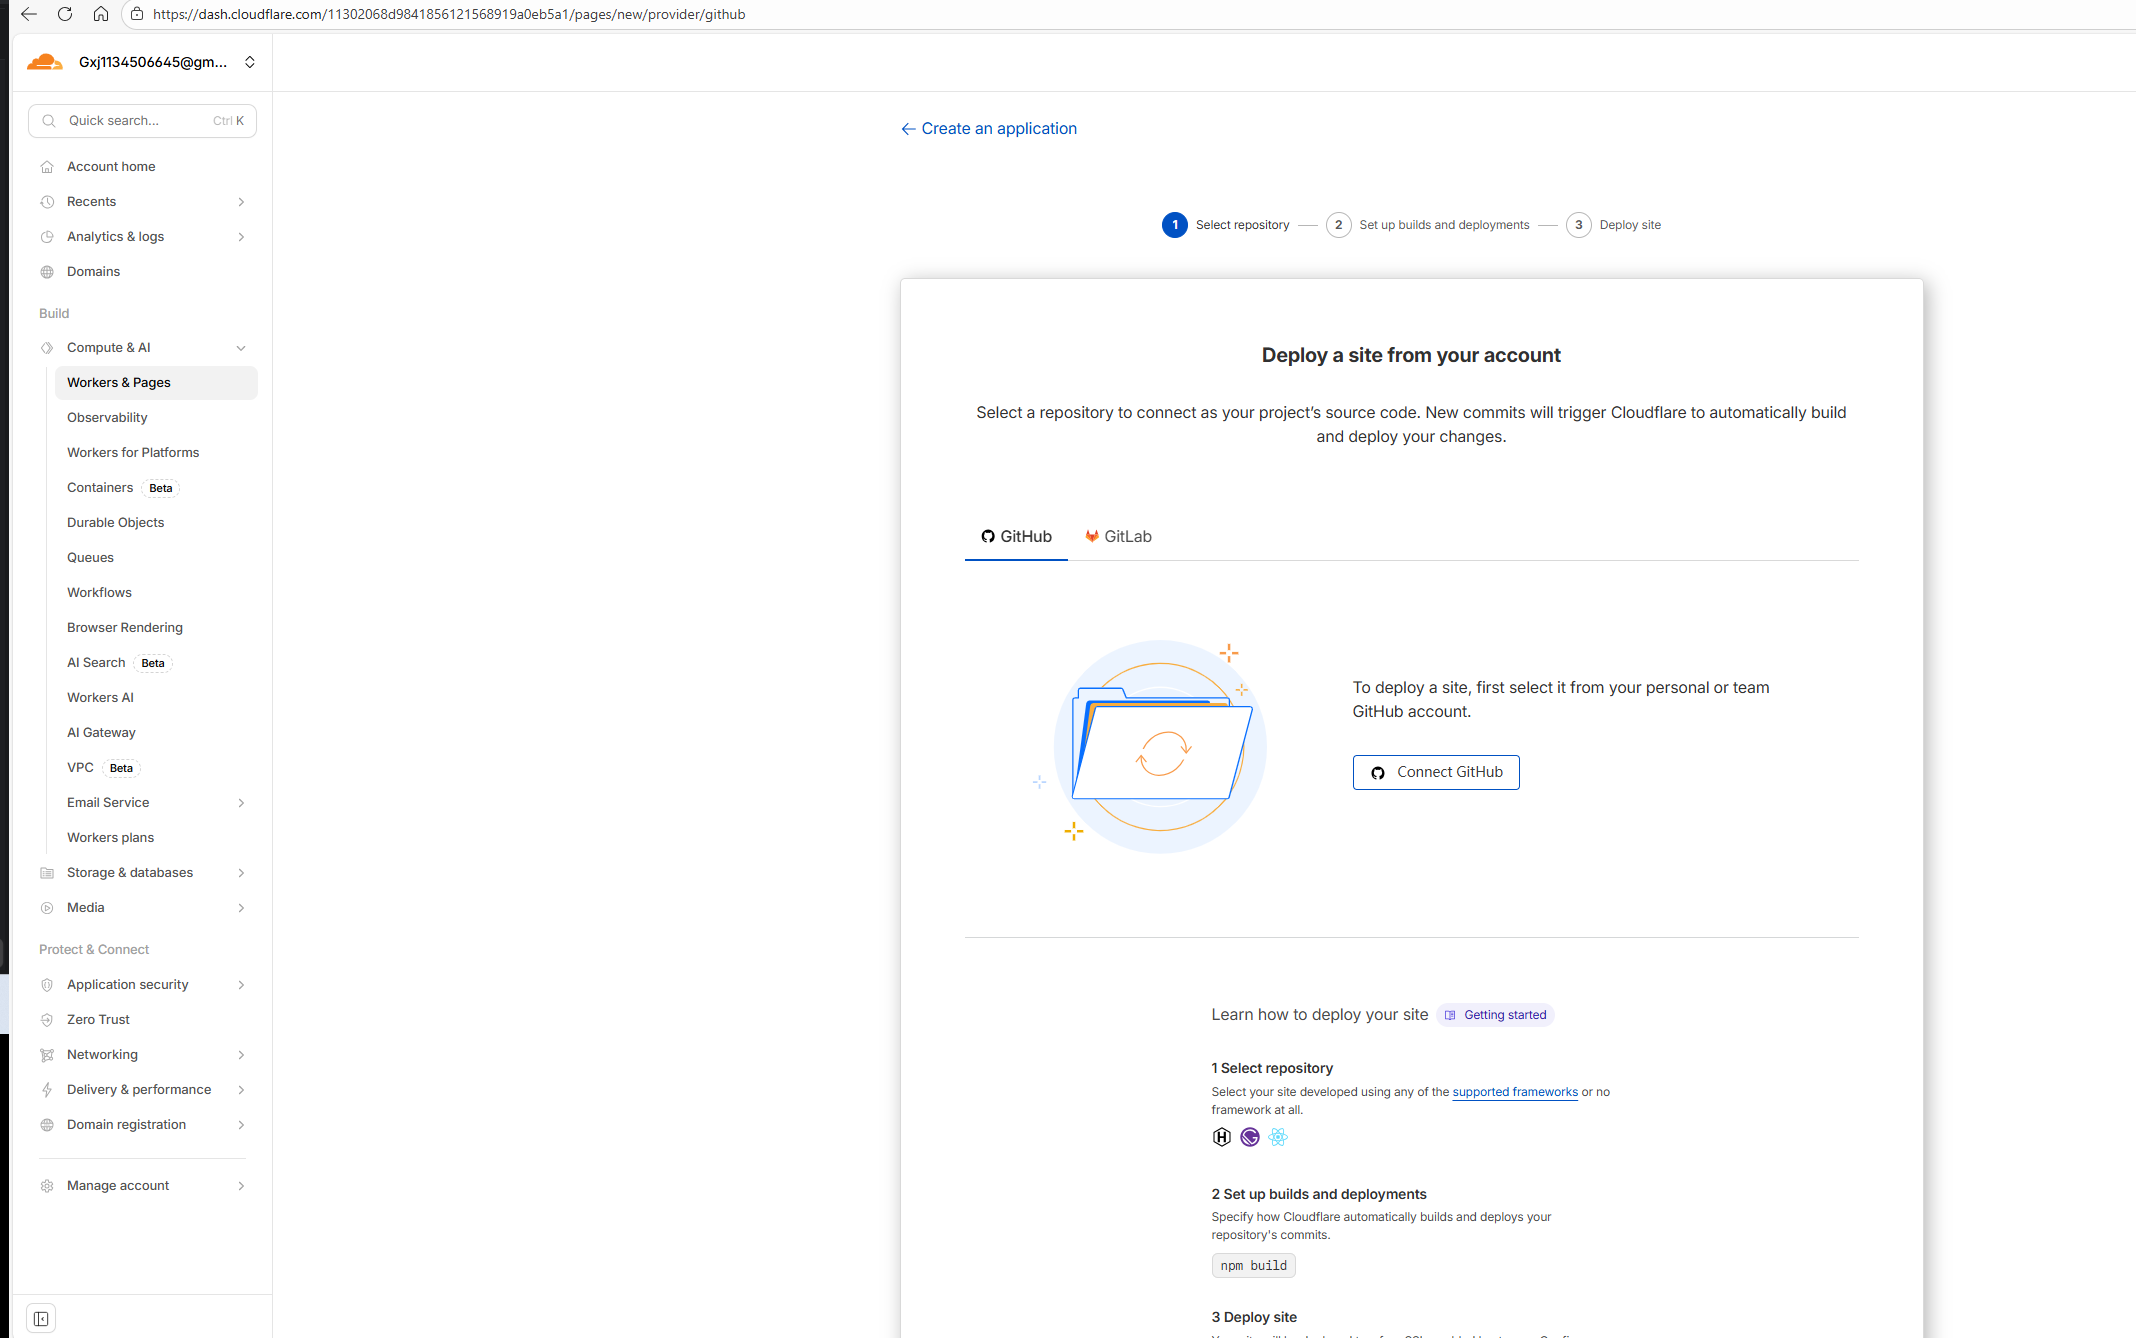
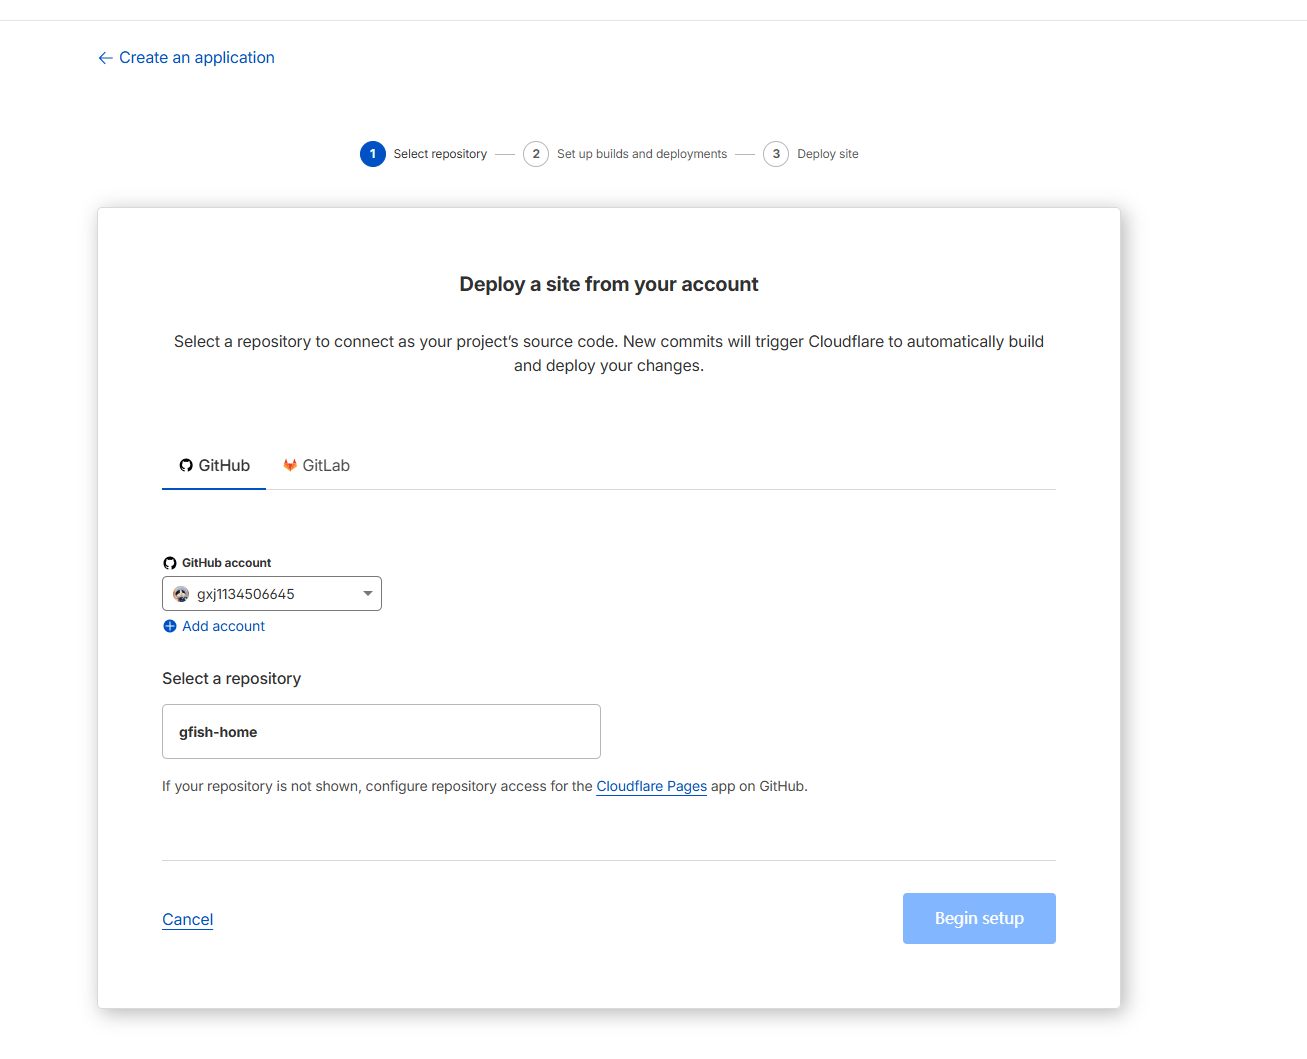
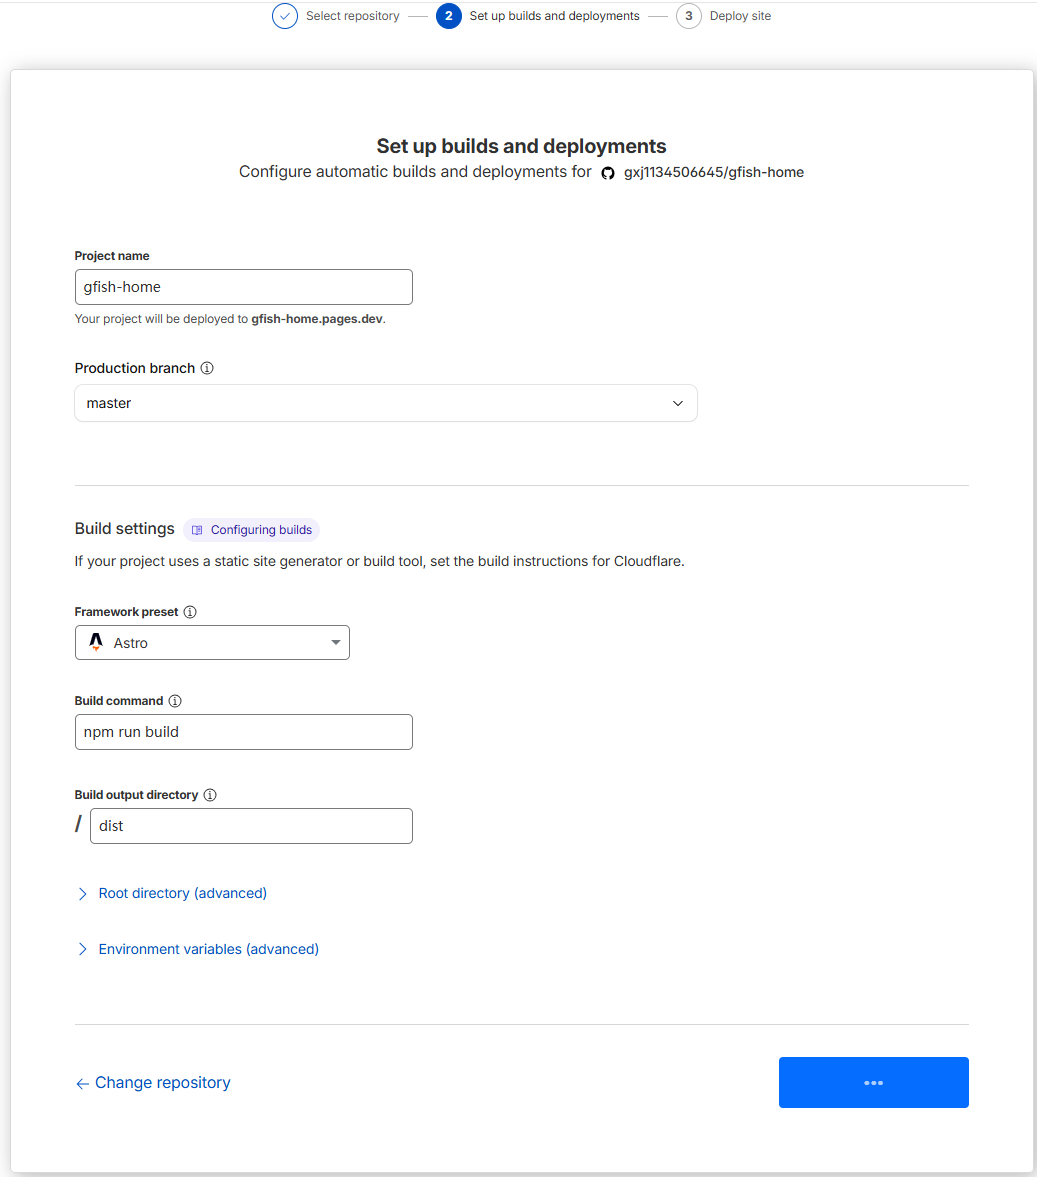
方式一:通过 Cloudflare Dashboard(推荐首次使用)
- 登录 Cloudflare Dashboard: https://dash.cloudflare.com
- 进入 “Workers & Pages” → “Create application” → “Pages” → “Connect to Git”
- 选择你的 GitHub 仓库并授权
- 配置构建设置:
- 构建命令:
npm run build - 构建输出目录:
dist - Node.js 版本: 选择最新 LTS 版本(如 20)
- 构建命令:
- 点击 “Save and Deploy”

方式二:通过 Wrangler CLI(适合熟练用户)
# 安装 Wrangler CLI
npm install -g wrangler

# 登录 Cloudflare
wrangler login

# 部署到 Cloudflare Pages
wrangler pages deploy dist --project-name=your-project-name
5. 配置自定义域名(可选)
如果你有自己的域名,可以在 Cloudflare Dashboard 中配置:
- 进入你的 Pages 项目
- 点击 “Custom domains” → “Set up a custom domain”
- 输入你的域名(如
blog.yourdomain.com) - 按照提示配置 DNS 记录
- 等待 SSL 证书自动生成
几分钟内,你的个人主页就会上线:
- Cloudflare 默认域名:
https://your-project.pages.dev - 自定义域名:
https://your-custom-domain.com
6. 自动部署设置
Cloudflare Pages 会自动检测你的 Git 推送:
- 每次 push 到 main 分支会触发生产环境部署
- 每次创建 Pull Request 会生成预览链接
- 部署历史可以在 Dashboard 中查看
第六步:添加高级功能
1. 全文搜索
使用 Pagefind 添加搜索功能:
npm install -D pagefind
在 package.json 中添加构建后脚本:
{
  "scripts": {
    "build": "astro build && pagefind dist"
  }
}
在页面中添加搜索框:
<script is:inline src="/pagefind/pagefind.js"></script>

<input id="search" type="search" placeholder="搜索..." />

<script>
  const searchBox = document.getElementById('search');
  searchBox.addEventListener('input', (e) => {
    pagefind.search(e.target.value);
  });
</script>
2. 阅读进度条
src/components/ProgressBar.astro:
<div id="progress-bar"></div>

<style>
  #progress-bar {
    position: fixed;
    top: 0;
    left: 0;
    width: 0%;
    height: 4px;
    background: linear-gradient(90deg, #667eea 0%, #764ba2 100%);
    transition: width 0.1s;
    z-index: 1000;
  }
</style>

<script>
  window.addEventListener('scroll', () => {
    const winScroll = document.body.scrollTop || document.documentElement.scrollTop;
    const height = document.documentElement.scrollHeight - document.documentElement.clientHeight;
    const scrolled = (winScroll / height) * 100;
    document.getElementById('progress-bar').style.width = scrolled + '%';
  });
</script>
3. RSS 订阅
安装 RSS 插件:
npx astro add rss
创建 RSS feed src/pages/rss.xml.js:
import rss from '@astrojs/rss';
import { getCollection } from 'astro:content';

export async function GET(context) {
  const posts = await getCollection('blog');
  return rss({
    title: '我的博客',
    description: '我的技术博客 RSS Feed',
    site: context.site,
    items: posts.map(post => ({
      title: post.data.title,
      pubDate: post.data.pubDate,
      description: post.data.description,
      link: `/blog/${post.slug}/`,
    })),
  });
}
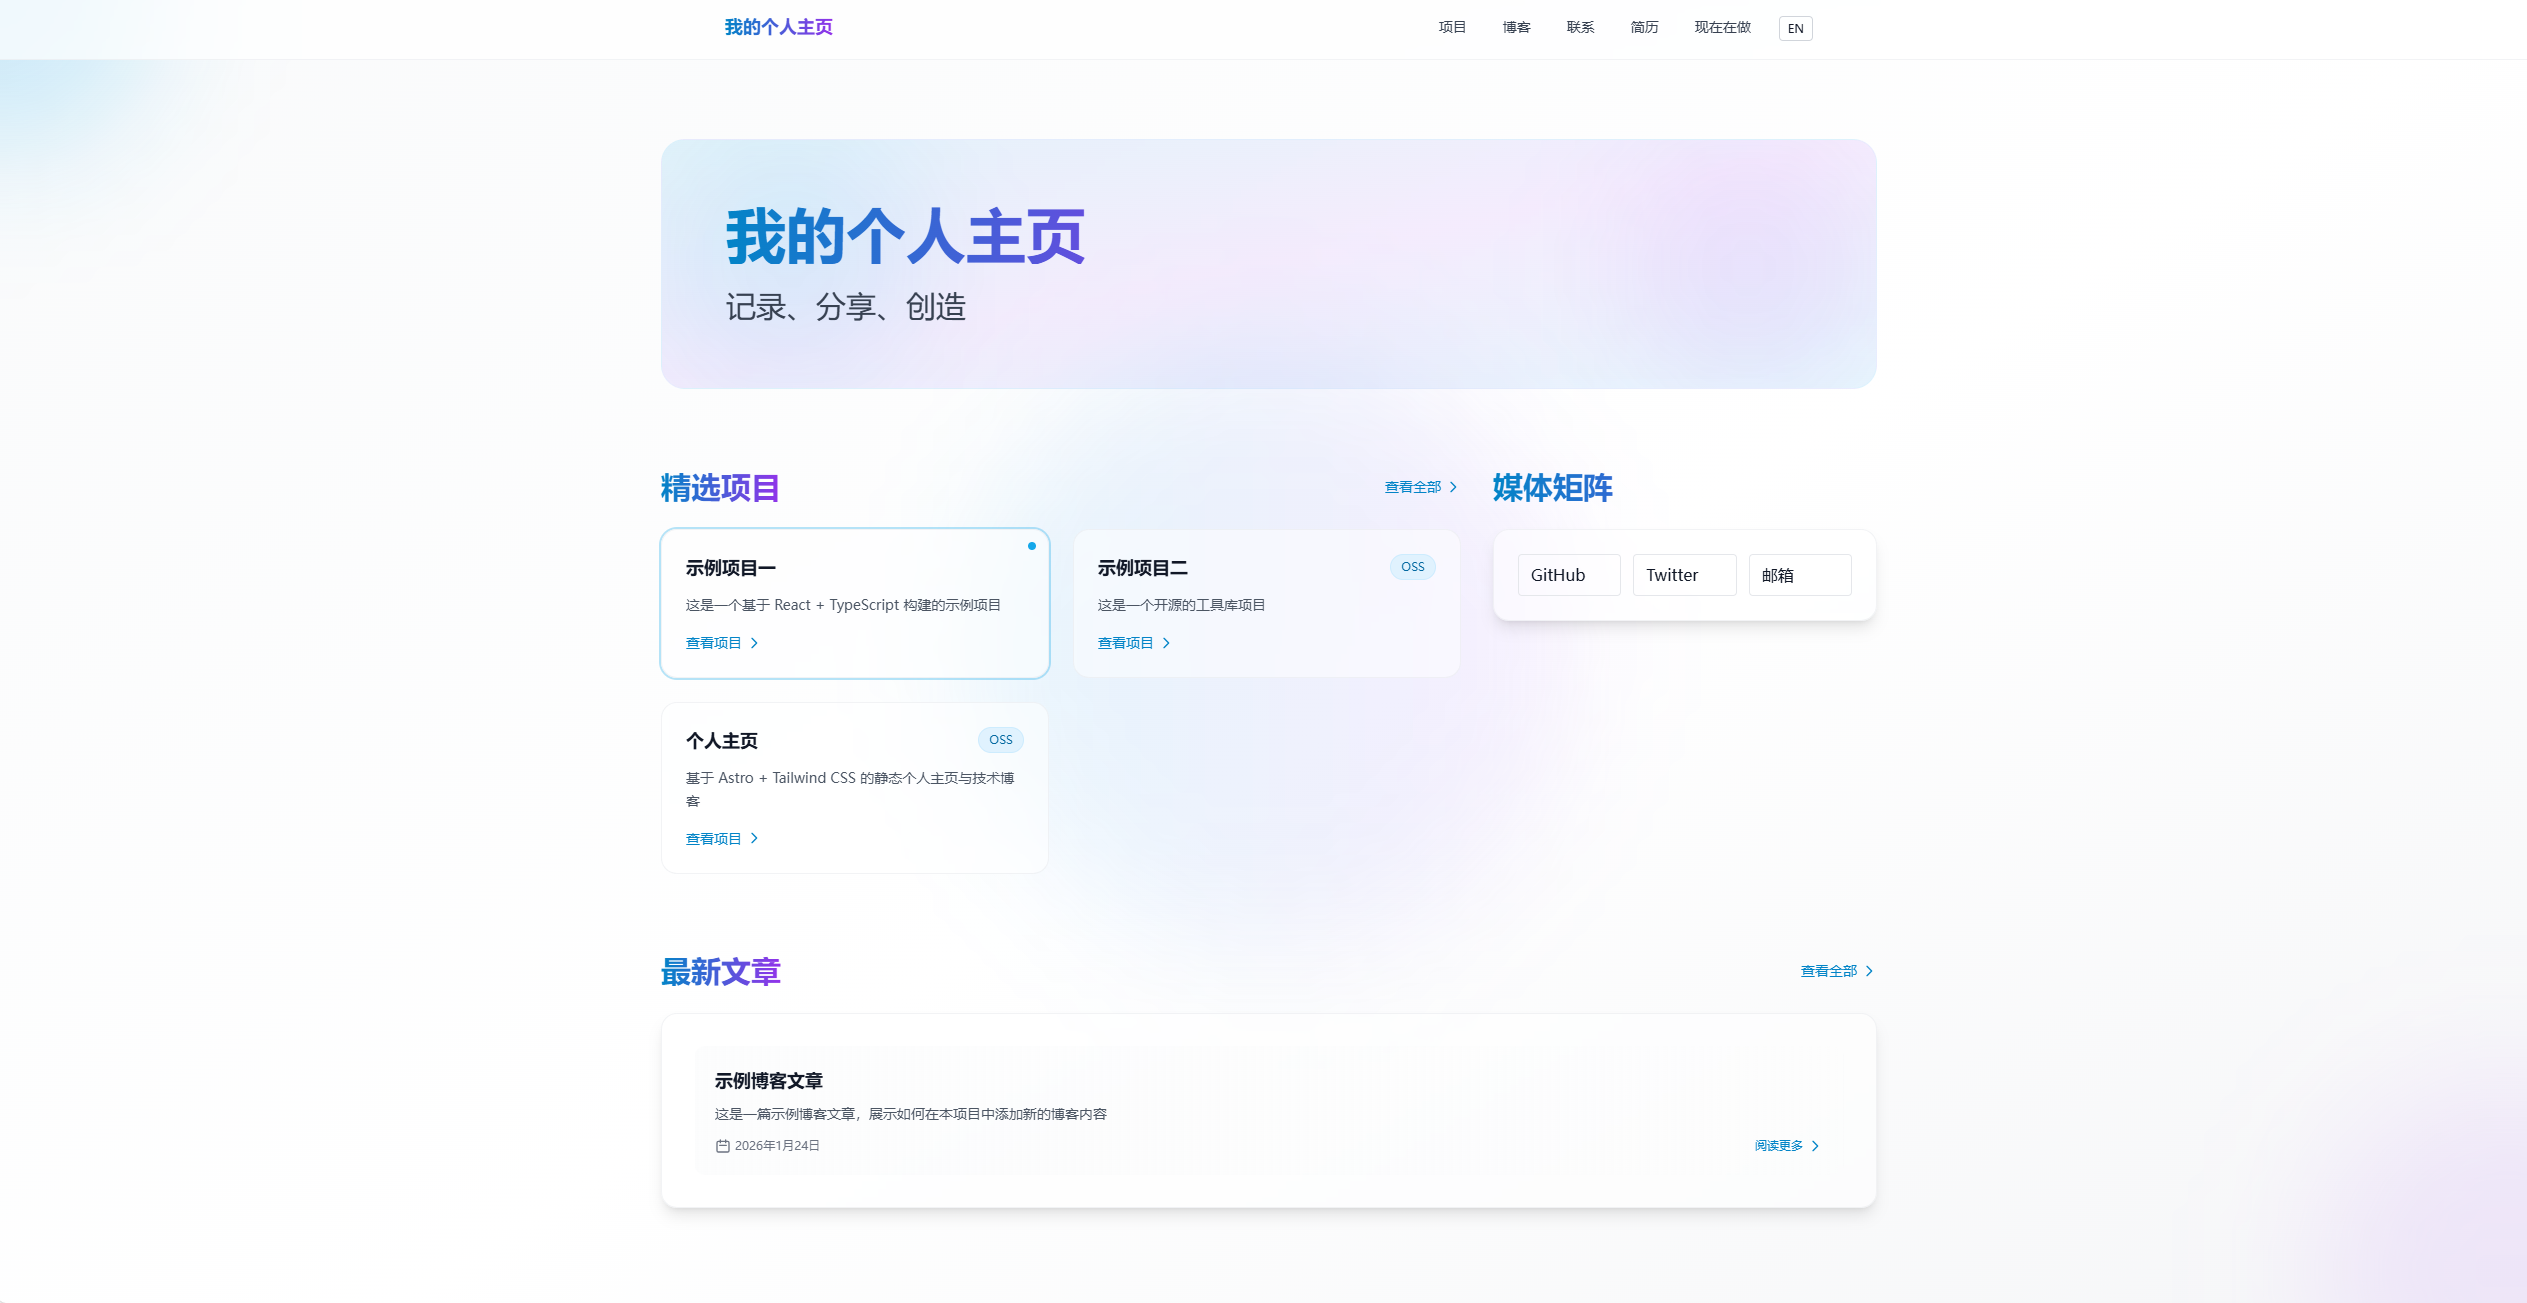
我的个人主页实践分享
基于以上技术栈,我打造了自己的个人主页项目 gfish-home-public。这个项目不仅包含基础的主页展示,还集成了以下特性:
核心功能:
- 双语支持(中英文)
- 全文搜索(Pagefind)
- 博客系统(MDX + 内容集合)
- 项目展示卡片
- 阅读进度条
- 暗色模式
- 面包屑导航
- 回到顶部按钮
- RSS 订阅
- SEO 优化(JSON-LD、Open Graph)
技术亮点:
- Astro 4.5.0 + Vite
- Tailwind CSS + 自定义主题
- TypeScript 类型安全
- Zod 内容验证
- 响应式设计
- 无障碍支持(WCAG 2.1 AA)
- Cloudflare Pages 全球 CDN 部署
- Wrangler 自动化构建
项目地址:
https://github.com/gxj1134506645/gfish-home-public
如果这个项目对你有帮助,欢迎给个 Star ⭐️
在线预览:
https://gfish.pages.dev(示例地址,请替换为实际地址)

总结与展望
通过这篇完整的实践指南,你已经掌握了:
- Astro 项目的基础搭建
- Cloudflare Pages 的免费部署
- 个人主页的个性化定制
- 高级功能的集成方法
一个专业的个人主页,是你在互联网世界中的"数字家园"。它能帮助:
- 记录和分享你的技术成长轨迹
- 展示项目成果和技术实力
- 建立个人技术品牌
- 连接志同道合的开发者
Cloudflare Pages vs 其他方案:
相比 GitHub Pages、Vercel 等方案,Cloudflare Pages 的优势在于:
- 真正的全球 CDN(290+ 节点)
- 无限制的免费带宽
- 更快的部署速度
- 边缘函数支持
下一步建议:
- 添加评论系统(Giscus、Utterances)
- 集成分析工具(Cloudflare Web Analytics、Umami)
- 支持多语言国际化
- 定期更新博客内容
- 优化 SEO 和性能
- 尝试 Cloudflare Pages Functions 添加动态功能
参考资源
Astro 官方文档:
https://docs.astro.build
Cloudflare Pages 官方文档:
https://developers.cloudflare.com/pages
Wrangler CLI 文档:
https://developers.cloudflare.com/workers/wrangler
Tailwind CSS 官方文档:
https://tailwindcss.com/docs
Pagefind 搜索库:
https://pagefind.app
我的 GitHub 仓库:
https://github.com/gxj1134506645/gfish-home-public
欢迎关注公众号 FishTech Notes,一块交流使用心得!

有“AI”的1024 = 2048,欢迎大家加入2048 AI社区
更多推荐

 7
7 0
0- 0


 已为社区贡献22条内容

所有评论(0)