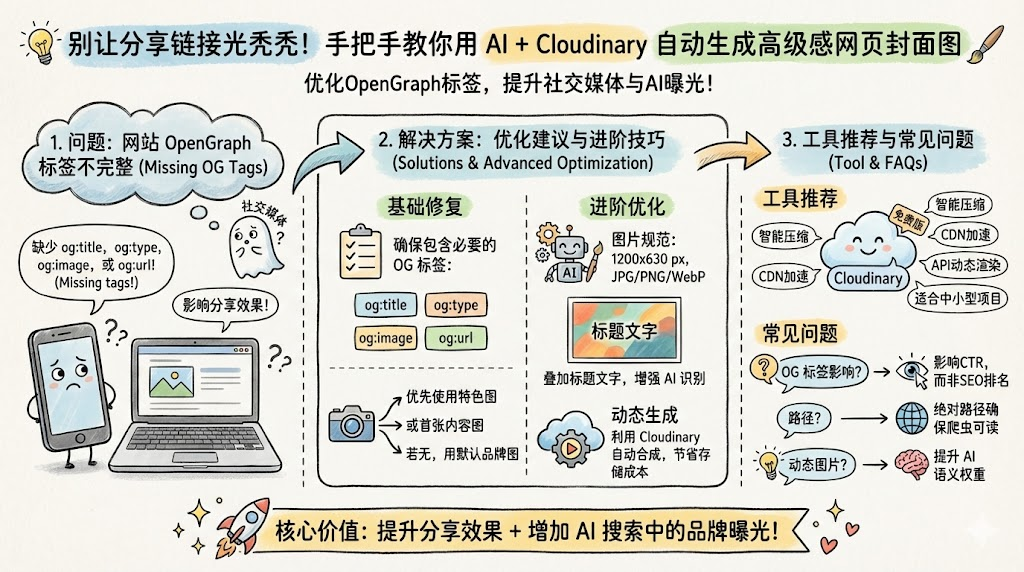
彻底解决 Ahrefs 报警:利用 Cloudinary + Gemini 动态生成 Open Graph 预览图的自动化实践
文章摘要:本文针对网站OpenGraph标签缺失问题,提出两种解决方案:1)使用Python自动生成带品牌元素的OG图片;2)利用Cloudinary动态渲染图片。重点介绍了Cloudinary的使用方法,包括注册、上传底图和开发接口实现动态渲染。文章还分析了图片尺寸、格式等技术规范对SEO和AI优化的影响,并解答了常见问题。对于中小型网站,Cloudinary免费版(25Credits)足够应对
文章摘要:本文针对网站OpenGraph标签缺失问题,提出两种解决方案:
1)使用Python自动生成带品牌元素的OG图片;
2)利用Cloudinary动态渲染图片。
重点介绍了Cloudinary的使用方法,包括注册、上传底图和开发接口实现动态渲染。文章还分析了图片尺寸、格式等技术规范对SEO和AI优化的影响,并解答了常见问题。对于中小型网站,Cloudinary免费版(25Credits)足够应对日常需求,能显著提升社交媒体分享效果。最后提供了不同页面类型的图片策略建议,帮助实现品牌一致性。
目录
Cloudinary 核心配额是多少?每月 25 个信用额度 (Credits)
起因
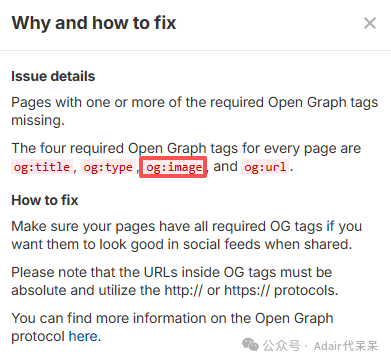
我在ahrefs审查网站问题的时候,发现近期加的 Open Graph tags incomplete 不完整。查看为什么以及如何修复。
Why and how to fix
Issue details
Pages with one or more of the required Open Graph tags missing.
The four required Open Graph tags for every page are og:title, og:type, og:image, and og:url.
How to fix
Make sure your pages have all required OG tags if you want them to look good in social feeds when shared.
Please note that the URLs inside OG tags must be absolute and utilize the http:// or https:// protocols.
You can find more information on the Open Graph protocol here.
大概意思简化社交媒体营销需要这4个必要参数:og:title, og:type, og:image, and og:url。
跨境电商独立站的S/G/AEO之3大Description如何用AI生成附提示词
主要缺少的是图片,相信大家网站都有这样的痛点。
-
早期文章,没有封面图片。
-
分类页面并没有图片。

针对社交媒体分享图片这个问题有几种常见的解决方案:
-
Level 1: 获取文章/产品页的 Featured Image。
-
Level 2: 如果没有配图,抓取内容里的第一张图。
-
Level 3 (Fallback): 设置一张统一的 Default Brand Image(带 Logo 的品牌宣传图),确保任何时候都不会出现空白。
那么有没有进阶方案呢?
| 维度 | 技术要求 | AEO 策略建议 |
| 尺寸 | 建议 1200 x 630 像素 | 确保纵横比在移动端和 PC 端 AI 界面中都不被裁剪。 |
| 格式 | JPG / PNG / WebP | 保持高清晰度,同时文件大小控制在 300KB 以内。 |
| 内容 | 包含文字叠加 | 在图片中加入 H1 标题或核心关键词,AI 视觉模型有时会识别图片文字。 |
| ALT 属性 | 图片描述标签 | 配合 <meta name="twitter:image:alt" content="..."> 强化语义理解。 |
方案一: 利用 Canvas 模板自动化生成带有 "标题+描述" 的预览图。当 AI 在对话中引用你的链接时,这张图就是你的 品牌水印,能极大提升品牌在 AI 搜索中的“实体感”。
Python 示例代码:
"""
OG Image Generator - Python实现
使用 Pillow 库生成 Open Graph 图片
"""

from PIL import Image, ImageDraw, ImageFont, ImageFilter
import requests
from io import BytesIO
import math
import random
import os

class OGImageGenerator:
    """OG图片生成器"""

    def __init__(self):
        self.width = 1200
        self.height = 630

        # 10种预设背景风格
        self.background_styles = {
            'code': {
                'name': 'Code风',
                'gradient': ['#0f0f23', '#1a1a3e', '#16213e'],
                'pattern': 'grid',
                'accent': '#00ff88'
            },
            'lab': {
                'name': 'Lab风',
                'gradient': ['#f0f4f8', '#d9e2ec', '#bcccdc'],
                'pattern': 'hexagon',
                'accent': '#2563eb'
            },
            'nature': {
                'name': 'Nature风',
                'gradient': ['#1e3a20', '#2d5016', '#4a7c59'],
                'pattern': 'organic',
                'accent': '#8fbc8f'
            },
            'tech': {
                'name': 'Tech风',
                'gradient': ['#000428', '#004e92', '#1a237e'],
                'pattern': 'circuit',
                'accent': '#00d4ff'
            },
            'minimal': {
                'name': 'Minimal风',
                'gradient': ['#ffffff', '#f8f9fa', '#e9ecef'],
                'pattern': 'dots',
                'accent': '#212529'
            },
            'cyberpunk': {
                'name': 'Cyberpunk风',
                'gradient': ['#0a0e27', '#1a1a2e', '#16213e'],
                'pattern': 'neon',
                'accent': '#ff006e'
            },
            'ocean': {
                'name': 'Ocean风',
                'gradient': ['#003049', '#0077b6', '#00b4d8'],
                'pattern': 'wave',
                'accent': '#90e0ef'
            },
            'sunset': {
                'name': 'Sunset风',
                'gradient': ['#ff6b35', '#f7931e', '#fdc500'],
                'pattern': 'rays',
                'accent': '#fff5e1'
            },
            'forest': {
                'name': 'Forest风',
                'gradient': ['#2d4a2b', '#3d6a3d', '#5a8a5a'],
                'pattern': 'leaves',
                'accent': '#a8d5a3'
            },
            'space': {
                'name': 'Space风',
                'gradient': ['#0b0c10', '#1f2833', '#2e3d49'],
                'pattern': 'stars',
                'accent': '#66fcf1'
            }
        }

    def hex_to_rgb(self, hex_color):
        """将十六进制颜色转换为RGB元组"""
        hex_color = hex_color.lstrip('#')
        return tuple(int(hex_color[i:i+2], 16) for i in (0, 2, 4))

    def create_gradient(self, colors):
        """创建渐变背景"""
        img = Image.new('RGB', (self.width, self.height))
        draw = ImageDraw.Draw(img)

        # 将十六进制颜色转换为RGB
        rgb_colors = [self.hex_to_rgb(c) for c in colors]

        # 创建对角线渐变
        for y in range(self.height):
            # 计算当前位置的渐变比例
            ratio = y / self.height

            # 在多个颜色之间插值
            if len(rgb_colors) == 2:
                r = int(rgb_colors[0][0] + (rgb_colors[1][0] - rgb_colors[0][0]) * ratio)
                g = int(rgb_colors[0][1] + (rgb_colors[1][1] - rgb_colors[0][1]) * ratio)
                b = int(rgb_colors[0][2] + (rgb_colors[1][2] - rgb_colors[0][2]) * ratio)
            else:
                # 三色渐变
                segment = len(rgb_colors) - 1
                idx = min(int(ratio * segment), segment - 1)
                local_ratio = (ratio * segment) - idx

                r = int(rgb_colors[idx][0] + (rgb_colors[idx+1][0] - rgb_colors[idx][0]) * local_ratio)
                g = int(rgb_colors[idx][1] + (rgb_colors[idx+1][1] - rgb_colors[idx][1]) * local_ratio)
                b = int(rgb_colors[idx][2] + (rgb_colors[idx+1][2] - rgb_colors[idx][2]) * local_ratio)

            draw.rectangle([(0, y), (self.width, y+1)], fill=(r, g, b))

        return img

    def draw_grid_pattern(self, draw, accent_color):
        """绘制网格图案"""
        grid_size = 40
        for x in range(0, self.width, grid_size):
            draw.line([(x, 0), (x, self.height)], fill=accent_color + '26', width=1)
        for y in range(0, self.height, grid_size):
            draw.line([(0, y), (self.width, y)], fill=accent_color + '26', width=1)

    def draw_hexagon(self, draw, x, y, size, color):
        """绘制六边形"""
        points = []
        for i in range(6):
            angle = math.pi / 3 * i
            px = x + size * math.cos(angle)
            py = y + size * math.sin(angle)
            points.append((px, py))
        draw.polygon(points, outline=color)

    def draw_hexagon_pattern(self, draw, accent_color):
        """绘制六边形图案"""
        hex_size = 30
        for y in range(0, self.height + hex_size * 2, int(hex_size * 1.5)):
            for x in range(0, self.width + hex_size * 2, hex_size * 2):
                offset_x = hex_size if (y // int(hex_size * 1.5)) % 2 else 0
                self.draw_hexagon(draw, x + offset_x, y, hex_size, accent_color + '26')

    def draw_dots_pattern(self, draw, accent_color):
        """绘制点阵图案"""
        dot_size = 2
        dot_spacing = 30
        rgb_color = self.hex_to_rgb(accent_color)
        for y in range(0, self.height, dot_spacing):
            for x in range(0, self.width, dot_spacing):
                draw.ellipse([(x-dot_size, y-dot_size), (x+dot_size, y+dot_size)],
                           fill=rgb_color + (40,))

    def draw_circuit_pattern(self, draw, accent_color):
        """绘制电路图案"""
        random.seed(42)  # 固定随机种子保证一致性
        rgb_color = self.hex_to_rgb(accent_color)
        for _ in range(50):
            x = random.randint(0, self.width)
            y = random.randint(0, self.height)
            length = random.randint(50, 150)
            draw.line([(x, y), (x + length, y)], fill=rgb_color + (51,), width=2)
            draw.ellipse([(x-3, y-3), (x+3, y+3)], fill=rgb_color + (51,))

    def draw_stars_pattern(self, draw, accent_color):
        """绘制星星图案"""
        random.seed(42)
        rgb_color = self.hex_to_rgb(accent_color)
        for _ in range(100):
            x = random.randint(0, self.width)
            y = random.randint(0, self.height)
            size = random.randint(1, 3)
            draw.ellipse([(x-size, y-size), (x+size, y+size)], fill=rgb_color + (100,))

    def draw_pattern(self, img, pattern_type, accent_color):
        """根据类型绘制图案"""
        # 创建透明层用于绘制图案
        pattern_layer = Image.new('RGBA', (self.width, self.height), (0, 0, 0, 0))
        draw = ImageDraw.Draw(pattern_layer)

        if pattern_type == 'grid':
            self.draw_grid_pattern(draw, accent_color)
        elif pattern_type == 'hexagon':
            self.draw_hexagon_pattern(draw, accent_color)
        elif pattern_type == 'dots':
            self.draw_dots_pattern(draw, accent_color)
        elif pattern_type == 'circuit':
            self.draw_circuit_pattern(draw, accent_color)
        elif pattern_type == 'stars':
            self.draw_stars_pattern(draw, accent_color)

        # 将图案叠加到背景上
        img = img.convert('RGBA')
        img = Image.alpha_composite(img, pattern_layer)
        return img.convert('RGB')

    def load_font(self, size):
        """加载字体,优先使用系统字体"""
        font_paths = [
            '/System/Library/Fonts/Supplemental/Arial Bold.ttf',  # macOS
            '/usr/share/fonts/truetype/dejavu/DejaVuSans-Bold.ttf',  # Linux
            'C:\\Windows\\Fonts\\arialbd.ttf',  # Windows
            '/usr/share/fonts/truetype/liberation/LiberationSans-Bold.ttf',  # Linux备选
        ]

        for font_path in font_paths:
            if os.path.exists(font_path):
                return ImageFont.truetype(font_path, size)

        # 如果都找不到,使用默认字体
        return ImageFont.load_default()

    def wrap_text(self, text, font, max_width):
        """自动换行文本"""
        words = text.split(' ')
        lines = []
        current_line = ''

        draw = ImageDraw.Draw(Image.new('RGB', (1, 1)))

        for word in words:
            test_line = current_line + word + ' '
            bbox = draw.textbbox((0, 0), test_line, font=font)
            width = bbox[2] - bbox[0]

            if width <= max_width:
                current_line = test_line
            else:
                if current_line:
                    lines.append(current_line.strip())
                current_line = word + ' '

        if current_line:
            lines.append(current_line.strip())

        return lines

    def download_image(self, url):
        """从URL下载图片"""
        try:
            response = requests.get(url, timeout=10)
            response.raise_for_status()
            return Image.open(BytesIO(response.content))
        except Exception as e:
            print(f"下载图片失败: {e}")
            return None

    def generate(self, sku, page_title, page_desc=None, style='code', product_image_url=None):
        """
        生成OG图片

        参数:
            sku: 产品SKU编号
            page_title: 页面标题
            style: 背景风格 (code/lab/nature/tech等)
            product_image_url: 产品图片URL (可选)
            page_desc: 页面描述文字 (可选)

        返回:
            PIL Image对象
        """
        if style not in self.background_styles:
            raise ValueError(f"不支持的风格: {style}")

        style_config = self.background_styles[style]

        # 1. 创建渐变背景
        img = self.create_gradient(style_config['gradient'])

        # 2. 添加图案
        img = self.draw_pattern(img, style_config['pattern'], style_config['accent'])

        # 3. 创建绘图对象
        draw = ImageDraw.Draw(img)

        # 4. 绘制左侧内容
        left_padding = 60
        top_padding = 80

        # SKU标签背景
        accent_rgb = self.hex_to_rgb(style_config['accent'])
        sku_bg = Image.new('RGBA', (120, 40), accent_rgb + (51,))
        img.paste(sku_bg, (left_padding, top_padding), sku_bg)

        # SKU文字
        font_sku = self.load_font(24)
        draw.text((left_padding + 15, top_padding + 8), sku,
                 fill=accent_rgb, font=font_sku)

        # 页面标题
        title_color = '#212529' if style == 'minimal' else '#ffffff'
        title_rgb = self.hex_to_rgb(title_color)
        font_title = self.load_font(48)

        max_title_width = 550
        title_lines = self.wrap_text(page_title, font_title, max_title_width)

        y_position = top_padding + 100
        for line in title_lines[:3]:  # 最多3行
            draw.text((left_padding, y_position), line,
                     fill=title_rgb, font=font_title)
            y_position += 60

        # 页面描述(如果提供)
        if page_desc:
            font_desc = self.load_font(22)
            desc_color = title_rgb if style == 'minimal' else (200, 200, 200)

            max_desc_width = 550
            desc_lines = self.wrap_text(page_desc, font_desc, max_desc_width)

            # 在标题下方留出间距
            desc_y = y_position + 20
            for line in desc_lines[:2]:  # 最多2行描述
                draw.text((left_padding, desc_y), line,
                         fill=desc_color, font=font_desc)
                desc_y += 35

        # 类型标签
        font_label = self.load_font(20)
        label_text = f"{style_config['name']} • DFRobot Official Wiki Documentation"
        draw.text((left_padding, self.height - 60), label_text,
                 fill=accent_rgb, font=font_label)

        # 5. 绘制产品图片(右侧)
        if product_image_url:
            product_img = self.download_image(product_image_url)
            if product_img:
                img_size = 400
                img_x = self.width - img_size - 80
                img_y = (self.height - img_size) // 2

                # 产品图片背景
                product_bg = Image.new('RGBA', (img_size + 40, img_size + 40),
                                      (255, 255, 255, 26))
                img.paste(product_bg, (img_x - 20, img_y - 20), product_bg)

                # 调整产品图片大小
                product_img.thumbnail((img_size, img_size), Image.Resampling.LANCZOS)

                # 居中放置
                offset_x = img_x + (img_size - product_img.width) // 2
                offset_y = img_y + (img_size - product_img.height) // 2

                # 处理透明背景
                if product_img.mode == 'RGBA':
                    img.paste(product_img, (offset_x, offset_y), product_img)
                else:
                    img.paste(product_img, (offset_x, offset_y))

        return img

    def save(self, img, output_path, quality=95):
        """保存图片"""
        img.save(output_path, 'JPEG', quality=quality, optimize=True)
        print(f"图片已保存到: {output_path}")


# 使用示例
if __name__ == "__main__":
    generator = OGImageGenerator()

    # 示例1: 生成Code风格的OG图片(带描述)
    og_image = generator.generate(
        sku="SEN0161",
        page_title="****",
        page_desc="****",
        style="code",
        product_image_url="https://example.com/product.jpg"  # 替换为实际URL
    )

    output_filename = "og-image-sku-***-code.jpg"
    generator.save(og_image, output_filename)

    # 示例2: 批量生成多种风格
    styles_to_generate = ['code', 'lab', 'tech', 'minimal']

    for style in styles_to_generate:
        og_image = generator.generate(
            sku="***",
            page_title="****",
            page_desc="****",
            style=style
        )
        output_filename = f"og-image-sku-***-{style}.jpg"
        generator.save(og_image, output_filename)

print("\n所有OG图片生成完成!")方案二: 避免物理存储:动态图片渲染 (On-the-fly),使用 Cloudinary、Imgix 或开源的 Vercel OG (Satori)。
Golang 示例代码
// 社交媒体分享图片
package controller

import (
	"fmt"
	"net/url"
	"strings"

	"github.com/gin-gonic/gin"
)

/*
 http://127.0.0.1:30006/api/seo/og/og_image?featured_img=v1769065862/og_oh_01.png&page_title=***

 http://127.0.0.1:30006/api/seo/og/og_image?featured_img=v1769065862/og_oh_01.png&page_title=***&page_desc=****
*/

// GenerateOGImage 生成符合 AEO 规范的动态 OG 图片链接
func GenerateOGImage(c *gin.Context) {
	// 获取查询参数(新增 page_desc 参数)
	featuredImg := c.Query("featured_img")
	pageTitle := c.Query("page_title")
	pageDesc := c.Query("page_desc") // 新增:描述文字参数

	// 转义标题和描述(处理特殊字符)
	escapedTitle := escapeCloudinaryText(pageTitle)
	escapedDesc := escapeCloudinaryText(pageDesc)

	// 拼装完整 URL(支持双文字叠加)
	ogURL := BuildCloudinaryURL(
		"你的专属云名称",
		escapedTitle,
		escapedDesc, // 传入描述
		featuredImg,
	)

	// 302 重定向 + 缓存设置
	c.Header("Cache-Control", "public, max-age=86400")
	c.Redirect(302, ogURL)
}

// escapeCloudinaryText 专门处理 Cloudinary 文本转义(抽成通用函数)
func escapeCloudinaryText(text string) string {
	if text == "" {
		return ""
	}
	// 1. 基础 URL 转义
	escaped := url.QueryEscape(text)
	// 2. 替换 Cloudinary 不兼容的字符
	finalText := strings.ReplaceAll(escaped, "+", "%20")  // 空格替换为 %20
	finalText = strings.ReplaceAll(finalText, ",", "%2C") // 逗号转义
	finalText = strings.ReplaceAll(finalText, "|", "%7C") // 竖线转义(防止分割符冲突)
	return finalText
}

// BuildCloudinaryURL 修复语法错误,支持标题+描述双文字叠加
func BuildCloudinaryURL(cloudName, title, desc, baseImage string) string {
	// 1. 基础图片配置(尺寸、背景色)- 第一个独立转换段
	baseConfig := "w_1200,h_630,c_fill,b_rgb:262626"

	// 2. 标题配置(独立的文字叠加段,子参数用,分隔)
	titleConfig := fmt.Sprintf(
		"l_text:Arial_65_bold:%s,co_rgb:ffffff,g_center,y_-80,w_1000,c_fit",
		title,
	)

	// 3. 描述配置(独立的文字叠加段,仅非空时添加)
	descConfig := ""
	if desc != "" {
		descConfig = fmt.Sprintf(
			"/l_text:Arial_40:%s,co_rgb:dddddd,g_center,y_50,w_900,c_fit",
			desc,
		)
	}

	// 4. 拼接最终 URL(严格按 / 分隔独立转换段)
	return fmt.Sprintf(
		"https://res.cloudinary.com/%s/image/upload/%s/%s%s/%s",
		cloudName,
		baseConfig,  // 第一段:基础尺寸/背景
		titleConfig, // 第二段:标题叠加
		descConfig,  // 第三段:描述叠加(可选)
		baseImage,
	)
}
如果使用方案一,要考虑到颗粒度问题,要将og:image放到网站架构的那一层呢?是否考虑到存储成本和维护效率?
| 页面类型 | 颗粒度建议 | 策略描述 |
| 首页 (Home) | 唯一精修图 | 必须包含品牌 Logo、核心 Slogan(如:The best XXX)。 |
| 顶级分类页 (Category) | 分类定制图 | 比如“LattePanda 系列”和“配件系列”各一张图。突出该类别的视觉特征,增强 AI 对该目录的语义识别。 |
| 详情页 (Blog/Product) | 首图引用 (Auto) | 自动抓取文章的第一张插图或产品主图。 |
| 论坛/列表页 (Forum) | 模板化生成 | 论坛内容杂乱,建议使用带品牌边框的统一背景,中间动态叠加该贴标题文字(Canvas 自动化 or cloudinary 动态生成)。 |
Cloudinary 动态生成
Cloudinary 是什么?
Cloudinary 是一个端到端的云端媒体管理平台(SaaS)。它不仅仅是一个存储图片和视频的“网盘”,更是一个强大的在线图像/视频处理引擎。
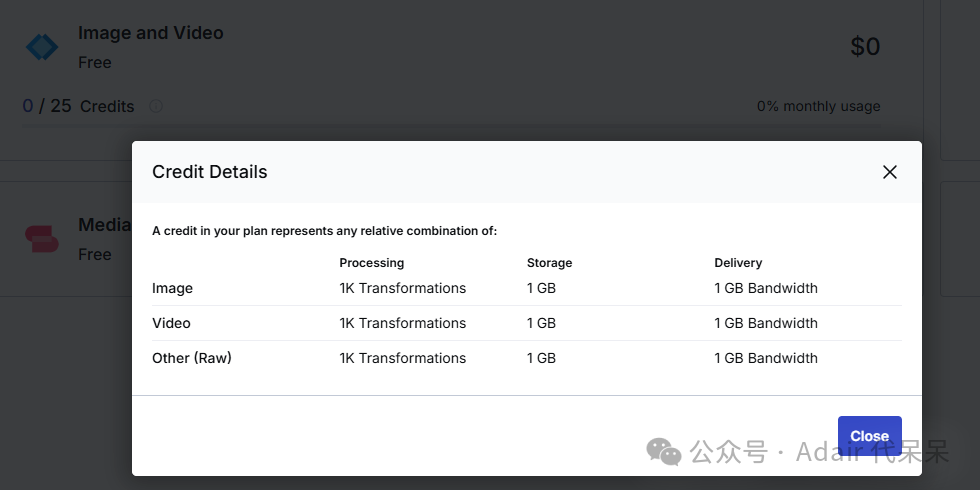
Cloudinary 核心配额是多少?每月 25 个信用额度 (Credits)
这 25 个点数是在以下三个维度中共享的,你可以根据需求自由分配:
| 1 个信用额度 (Credit) 等于 | 说明 |
| 1,000 次转换 (Transformations) | 每生成一个新规格的图片或视频算一次。 |
| 1 GB 托管存储 (Managed Storage) | 你上传的所有原始文件和派生文件的总和。 |
| 1 GB 净流量 (Net Bandwidth) | 经过 Cloudinary CDN 分发出去的总数据量。 |
简单理解: 如果你这个月用了 10GB 存储,你就消耗了 10 个 Credits,剩下的 15 个 Credits 可以用来支持 15GB 的流量,或者 15,000 次转换。
Cloudinary 包含的核心功能有哪些?
即使是免费版,Cloudinary 也开放了其技术核心:
-
智能压缩与格式转换: 支持
f_auto(自动选择 WebP/AVIF 格式)和q_auto(智能质量压缩)。 -
全球 CDN 加速: 集成了 Akamai、Fastly 和 CloudFront 等顶级 CDN 服务。
-
全套 SDK 支持: 提供 Go, Python, Node.js, PHP, Java 等主流语言的集成包。
-
媒体库管理: 提供 UI 界面进行文件上传、搜索和文件夹管理。
-
基础视频处理: 支持视频转码、自适应码流生成等。
Cloudinary 主要限制与不足是什么?
-
不支持自定义域名: 必须使用
res.cloudinary.com/your-cloud-name/这种格式的 URL。 -
并发处理限制: 对于极高频的实时转换请求,可能会有短暂的排队或速率限制。
-
视频时长/大小限制: 免费版对上传的单个大型视频文件有大小上限(通常为 100MB 左右)。
-
技术支持: 仅提供基础的工单支持,响应时间比付费用户慢。
-
无备份与历史记录: 不提供文件的版本控制或误删后的自动找回服务。
Cloudinary 如何使用?
1. 注册 Cloudinary 并获取关键信息
-
访问 Cloudinary 官网 注册免费账号,登录后进入 Dashboard(仪表盘)。
-
记录 3 个核心信息(后续代码要用):
-
Cloud name:你的专属云名称(如demo) -
API Key:API 密钥(一串数字 + 字母) -
API Secret:API 秘钥(需点击「Reveal」显示)
-
2. 上传底图到 Cloudinary
-
可以通过接口文档上传 也可以通过Postman上传。
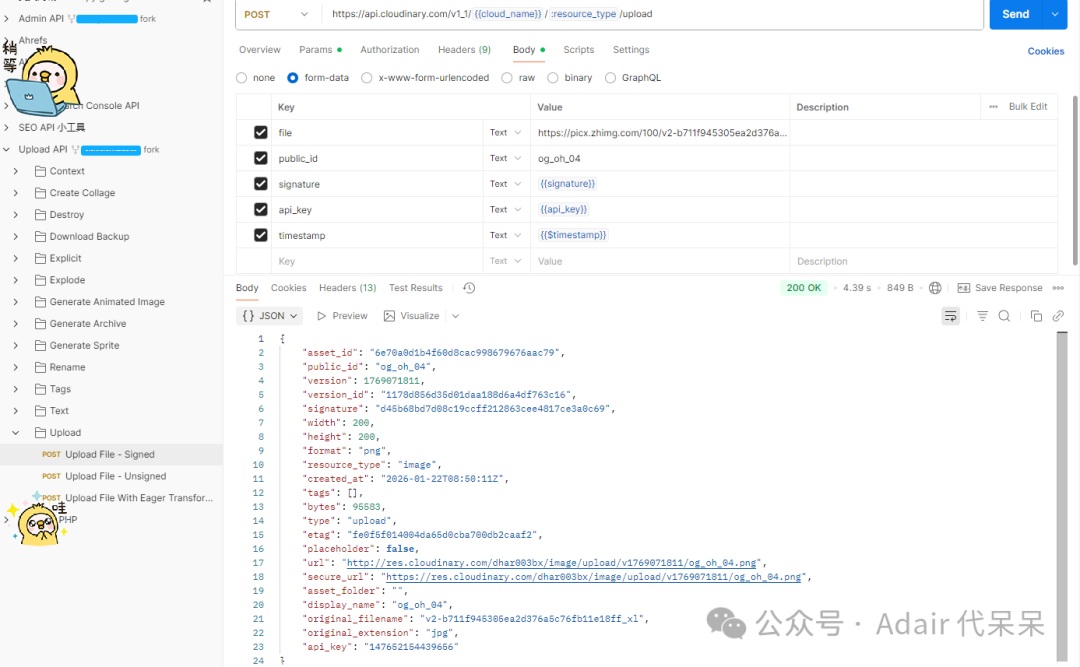
3. 接下来就是开发接口,动态渲染URL 开心的玩耍了。
https://res.cloudinary.com/dhar003bx/image/upload/w_1200,h_630,c_fill,b_rgb:262626/l_text:Arial_65_bold:Cloudinary%20test%202026,co_rgb:ffffff,g_center,y_-80,w_1000,c_fit/v1769065862/og_oh_01.png

那么上面这张图片的背景图是使用 Gemini nano banana 生成的背景图。
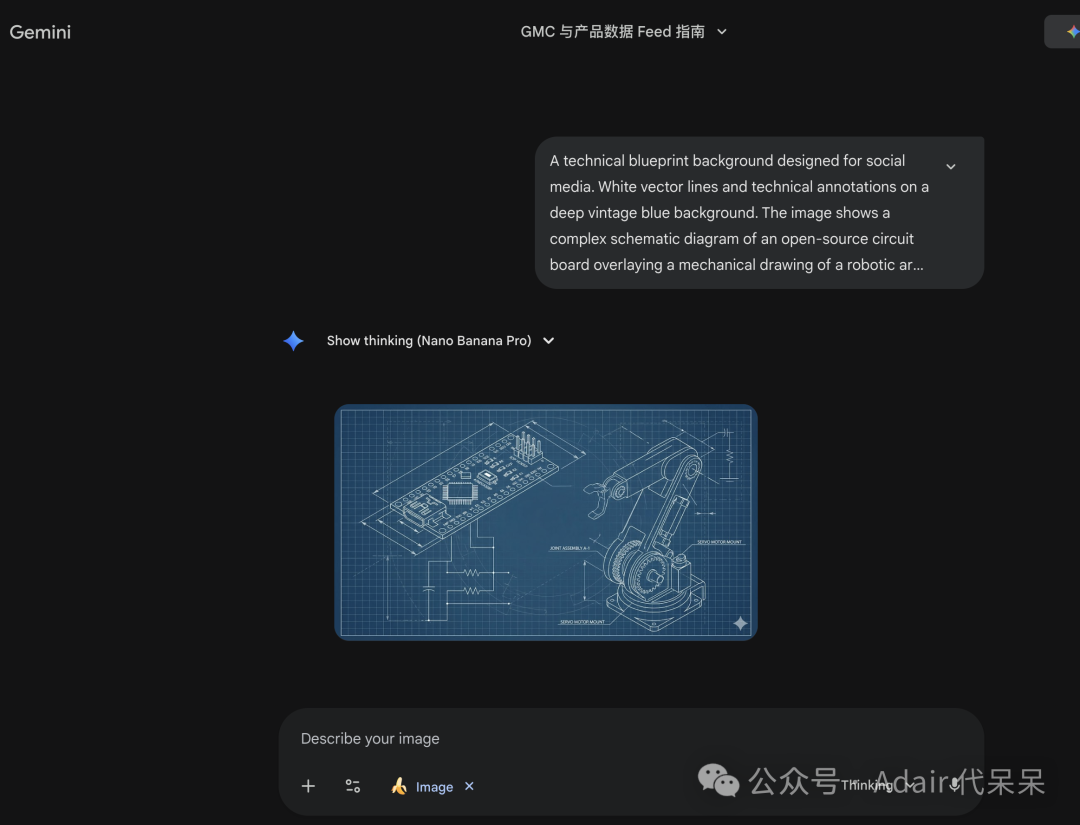
简单来说,通过Gemini nano banana 生成的背景图作为Cloudinary的底图,然后动态添加文字,最后作为社交媒体的图片。
总结:Cloudinary 它适合谁?
-
小型项目/个人博客: 流量较小,但需要高质量的图像缩放和压缩。
-
开发环境/Demo: 验证产品逻辑,通过 API 自动化处理媒体文件。
-
低频高需求场景: 网站页面不多,但每张图片都需要针对不同设备进行几十种尺寸的适配。
FAQ
Q1: 为什么 Ahrefs 提示 OG 标签不完整会影响 SEO?
A: 虽然 OG 标签不直接决定 Google 排名,但它直接影响 CTR(点击率)。社交媒体和 AI 搜索平台(如 Perplexity)通过这些标签抓取摘要,完整的 og:image 能显著提升链接在社交流中的曝光度度和点击率。
Q2: Cloudinary 的免费额度(25 Credits)够用吗?
A: 对于中小型网站非常充裕。一个 Credit 等于 1000 次转换。只要你开启了 f_auto,q_auto(自动格式和质量),单张图片的大小会非常小,主要的消耗在于“首次生成(Transformation)”和“带宽”。配合 CDN 缓存,重度用户建议只在动态层级(如详情页)使用。
Q3: 为什么图片必须使用绝对路径(Absolute URL)?
A: 社交平台(Facebook, Twitter 等)的爬虫在解析网页时,不会像浏览器那样自动处理相对路径。如果不带 https://,爬虫将无法定位到图片资源。
Q4: 动态生成的图片对 AEO(AI 引擎优化)有什么具体好处?
A: AI 视觉模型(如 GPT-4o 或 Gemini)具备 OCR 能力。动态图中包含的 H1 标题文字能被 AI 二次识别,强化了图片与页面内容的相关性语义,有助于在 AI 搜索引用中获得更高的“实体权重”。
Q5: 1200 x 630 像素是唯一的标准吗?
A: 这是目前的“黄金标准”,能确保在 Facebook, LinkedIn 和 Twitter 上都有完美的显示效果。如果不按此比例,图片在移动端预览时可能会被截掉关键文字。
Q6: 如果 Cloudinary 宕机或请求受限,网站会崩溃吗?
A: 不会。OG 标签位于 <head> 中,仅在被爬虫抓取时触发请求,不影响用户前端渲染。建议设置一个本地的 Fallback Image 作为备份地址。
Q7: 如何解决 Cloudinary 不支持自定义域名的问题?
A: 免费版确实有此限制。如果非常介意品牌一致性,可以考虑使用 Cloudflare Workers 做一个简单的 Reverse Proxy(反向代理),将自己的子域名(如 img.yourdomain.com)映射到 Cloudinary 的 URL 上。
关于作者
我是一名自我探索的技术型S/A/GEO,近9年外贸独立站开发&运维经验。
全平台账号小红书、bilibili 和csdn 同号,微信公众号:Adair 代呆呆,知乎:Adair。
欢迎有同样兴趣的朋友关注我。后续会陆续更新我的AEO探索之旅。
希望我的记录能够给你带来启发。欢迎大家多多和我留言交流~
欢迎 ❤️ 点赞 | 🔔 关注 | ⭐️ 收藏 | 💬 评论
你的每一个反馈,对我都很重要,是我持续输出的动力~

有“AI”的1024 = 2048,欢迎大家加入2048 AI社区
更多推荐


 13
13 0
0- 0


 已为社区贡献15条内容

所有评论(0)