MCP学习笔记
MCP学习笔记
最近由于组织架构变动,负责AI相关工具建设,学习一下MCP相关的知识,本文所有mcp server的使用方式均使用的 claude code!!!
参考文档:
- https://gofastmcp.com/getting-started/welcome
- https://code.claude.com/docs/en/mcp#what-you-can-do-with-mcp
1、MCP介绍
1.1、什么是MCP
MCP(Model Context Protocol,模型上下文协议)是 Anthropic 开发的一个开放标准协议,用于让 AI 助手能够安全地连接各种外部数据源和工具。
- 为 AI 应用提供统一的方式来访问数据和工具
- 类似于 USB-C 接口 - 一个标准协议连接多种服务
- 让 AI模型 能够访问文件系统、数据库、API 等外部资源
1.2、MCP组成部分
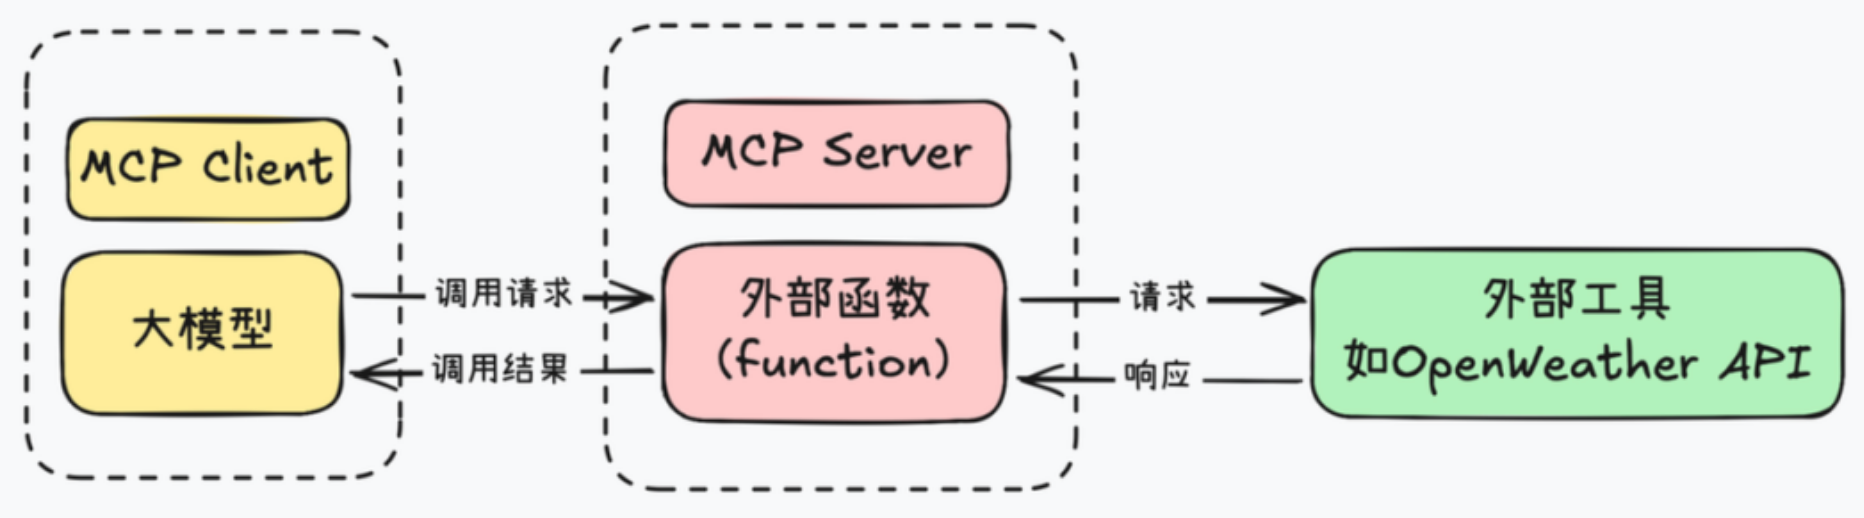
MCP Server(服务器)
提供特定功能的服务
- 文件系统访问
- 数据库查询
- Web 搜索
- 第三方 API 集
MCP Client(客户端)
使用这些服务的应用
- Claude Code CLI
- Claude Desktop
- 其他集成了 MCP 的应用
2、uv
新一代高性能 Python 包管理工具,官网文档:https://docs.astral.sh/uv/
2.1、旧python包管理工具
1、pip
pip 是 Python 官方推荐的包管理器,主要用于安装和卸载 Python 包,支持从 PyPI、Git 仓库、本地目录等多种来源安装
优点
- 广泛使用,社区支持良好
- 简单易用,适合初学者
缺点
- 不支持依赖锁定
- 缺乏虚拟环境和项目管理功能
2、pip-tools
pip-tools 是由 Jazzband 社区维护的工具集,旨在增强 pip 的功能
pip-compile:从requirements.in生成锁定的requirements.txtpip-sync:根据requirements.txt安装或卸载依赖
优点
- 确保项目依赖的一致性
- 与 pip 兼容,易于集成
缺点
- 依赖解析速度较慢
- 功能相对单一,仅处理依赖锁定
3、pipx
pipx 是由 PyPA 维护的工具,专注于在隔离的环境中安装和运行 Python 命令行应用
- 在隔离的虚拟环境中安装 CLI 工具
- 运行一次性命令
优点
- 避免全局污染,隔离性好
- 便于管理和运行 CLI 工具
4、poetry
Poetry 是由 Python 社区开发的项目管理工具,旨在简化依赖管理和打包发布流程
- 使用
pyproject.toml管理项目依赖 - 自动创建和管理虚拟环境
- 构建和发布 Python 包
优点
- 一体化管理项目生命周期
- 使用
pyproject.toml,符合 PEP 518 标准
缺点
- 依赖解析速度较慢
- 对 Python 版本管理支持有限
5、pyenv
pyenv 是由社区开发的工具,用于安装和管理多个 Python 版本
- 安装和切换多个 Python 版本
- 支持全局和本地(每个项目)版本设置
优点
- 支持多个 Python 版本的切换
- 适用于开发和测试不同版本的兼容性
缺点
- 安装新版本需编译,耗时较长
- 不支持 Windows 系统
6、virtualenv
virtualenv 是由社区开发的工具,用于创建隔离的 Python 虚拟环境
- 创建隔离的虚拟环境
- 支持不同项目使用不同的依赖
优点
- 轻量级,创建环境速度快
缺点
- 不包含依赖管理功能
- 需要与 pip 或 pip-tools 结合使用
2.2、什么是uv
由 Astral 公司用 Rust 开发的高性能Python 包管理工具,旨在提供比传统 pip 更快的包安装和依赖管理体验,并整合了多个传统 Python 工具的核心功能,实现了 “一个工具搞定包管理、环境管理、版本管理、打包发布” 的一站式体验
- 比 pip 快 10-100 倍
- 锁文件保证依赖一致性
- 单一工具替代 pip、pip-tools、pipx、poetry、pyenv、virtualenv
- 完全兼容 pip 和 PyPI
- 包管理 + 项目管理 + Python 版本管理
2.3、安装uv
1、安装
macOS/Linux
# 1、官方安装脚本
curl -LsSf https://astral.sh/uv/install.sh | sh
# 2、Homebrew
brew install uv
# 3、pip
pip install uv
windows
# 1、官方安装脚本
powershell -c "irm https://astral.sh/uv/install.ps1 | iex"
# 2、pip
pip install uv
2、验证
uv -V
uv --version
2.3、使用uv
1、Python 版本管理
安装 Python
# 列出所有可用的 Python 版本(简介版)
uv python list

# 安装指定版本 Python
uv python install 3.14
# 安装多个版本
uv python install 3.11 3.12 3.13

# 卸载 Python 版本
uv python uninstall 3.11

# 列出本地已安装的所有 Python 版本
uv python list --only-installed
设置全局 Python 版本
# 1、使用环境变量(推荐)
vim ~/.zshrc
export UV_PYTHON="3.14"
source ~/.zshrc

# 2、使用全局配置文件
mkdir -p ~/.config/uv
cat > ~/.config/uv/uv.toml << 'EOF'
[python]
# 默认 Python 版本
default = "3.12"
# Python 查找偏好
preference = "managed"  # 优先使用 uv 管理的 Python
EOF
2、项目管理
创建项目
# 创建应用项目
uv init my-app

# 在现有目录初始化
uv init
my-app/
├── .gitignore
├── .python-version		# Python 版本锁定
├── main.py
├── pyproject.toml		# 项目配置
├── README.md
└── uv.lock						# 记录所有依赖的精确版本 类似package-lock.json
依赖管理
# 添加生产依赖
uv add requests

# 添加指定版本依赖
uv add "django==5.0"

# 添加开发依赖
uv add pytest --dev

# 移除依赖
uv remove django

# 安装项目所有依赖
uv sync

# 生成/更新锁文件
uv lock
运行项目
如果 project.scripts 发生变动要首先执行 uv sync
.
├── README.md
├── pyproject.toml
├── src
│   └── weather_mcp
│       └── weather
│           ├── __init__.py
│           ├── model.py
│           └── weather.py
└── uv.lock
# src/weather_mcp/weather/weather.py
def today_weather():
    return "It's rainy tomorrow!"

def tomorrow_weather():
    return "It's sunny tomorrow!"
# src/weather/__init__.py
from .weather import today_weather
from .weather import tomorrow_weather
[project]
name = "xumeng03-mcp"
version = "0.1.0"
description = "Add your description here"
readme = "README.md"
requires-python = ">=3.14"

dependencies = [
    "pydantic>=2.12.5",
    "requests>=2.32.5",
]

[project.scripts]
today_weather = "weather_mcp.weather:today_weather"
tomorrow_weather = "weather_mcp.weather:tomorrow_weather"

[dependency-groups]
dev = [
    "pytest>=9.0.2",
]

[build-system]
requires = ["setuptools>=61.0"]
build-backend = "setuptools.build_meta"

[tool.uv]
index-url = "https://pypi.tuna.tsinghua.edu.cn/simple"
extra-index-url = ["https://mirrors.aliyun.com/pypi/simple/"]
tomorrow_weather
uv run tomorrow_weather
3、工具管理
全局安装和管理 Python 的工具
- 安装在独立的隔离环境中
- 全局可用(任何地方都能运行)
# 安装工具
uv tool install ruff
# 安装指定版本工具
uv tool install "black==24.10.0"

# 查看已安装的工具
uv tool list

# 升级单个工具
uv tool upgrade ruff
# 升级单个工具到指定版本
uv tool install --upgrade "ruff==0.8.5"
# 升级所有工具
uv tool upgrade --all

# 卸载单个工具
uv tool uninstall ruff
# 卸载多个工具
uv tool uninstall black ruff mypy
4、其他
# 清理缓存
uv cache clean
# 构建项目
uv build
3、Pydantic
3.1、Pydantic是什么
Pydantic 是 Python 中最流行的数据验证和设置管理库,使用 Python 类型注解进行运行时数据验证
- 运行时数据验证
- 自动类型转换
- 清晰的错误消息
- JSON 序列化/反序列化
- 高性能
from pydantic import BaseModel


class WeatherA:
    def __init__(self, lon, lat):
        self.lon = lon
        self.lat = lat

class WeatherB(BaseModel):
    lon: float
    lat: float
from weather_mcp.weather.model import WeatherA, WeatherB

# 类型错误但没有被捕获
def test_weather_a():
    weather = WeatherA(lon="116.4", lat="AAAAA")
    print(weather)

# 抛出验证错误
def test_weather_b():
    weather = WeatherB(lon="116.4", lat="AAAAA")
    print(weather)
3.2、基础用法
1、定义模型(属性)
from pydantic import BaseModel


class Weather(BaseModel):
    id: int
    main: str
    description: str
    icon: str
from weather_mcp.weather.model import Weather


def test_weather1() -> None:
    weather = Weather(id=802, main="Clouds", description="scattered clouds", icon="03n")
    print(weather)
    weather = Weather(id="802", main="Clouds", description="scattered clouds", icon="03n")
    print(weather)
    weather = Weather(id="undefined", main="Clouds", description="scattered clouds", icon="03n")
    print(weather)
2、定义模型(方法)
class Weather(BaseModel):
    id: int = Field(
        default= 1,
        description="id of the weather"
    )
    main: str = Field(
        description="只能包含字母数字和下划线"
    )
    description: str
    icon: str

    def hello(self) -> str:
        return f"Weather: {self.main} - {self.description}"

    @classmethod
    def default_id(cls) -> int:
        return cls.model_fields['id'].default
def test_weather2() -> None:
    weather = Weather(id=802, main="Clouds", description="scattered clouds", icon="03n")
    print(weather)
    print(weather.hello())
    print(Weather.default_id())
3、从字典和 JSON 创建
from weather_mcp.weather.model import Weather


def test_weather3() -> None:
    data = {"id": 802, "main": "Clouds", "description": "scattered clouds", "icon": "03n"}
    weather = Weather(**data)
    print(weather)
    weather = Weather.model_validate(data)
    print(weather)
    data = '{"id": 802, "main": "Clouds", "description": "scattered clouds", "icon": "03n"}'
    weather = Weather.model_validate_json(data)
    print(weather)
4、字段约束
# 各个类型的字段约束示例
from pydantic import BaseModel, Field
from typing import Optional

class User(BaseModel):
    # 字符串约束
    username: str = Field(
        min_length=3,
        max_length=20,
        pattern=r'^[a-zA-Z0-9_]+$',
        description="用户名,只能包含字母数字和下划线"
    )

    # 数值约束
    age: int = Field(
        ge=0,      # greater than or equal
        le=150,    # less than or equal
        description="年龄,0-150岁"
    )

    # 浮点数约束
    score: float = Field(
        gt=0.0,    # greater than
        lt=100.0,  # less than
        description="分数,0-100分"
    )

    # 列表约束
    tags: list[str] = Field(
        min_length=1,
        max_length=5,
        description="标签,1-5个"
    )

    # 默认值和示例
    email: str = Field(
        default="user@example.com",
        examples=["alice@example.com", "bob@example.com"]
    )
实际例子
from pydantic import BaseModel, Field


class Weather(BaseModel):
    id: int = Field(
        ge=-100,
        le=100,
        description="id of the weather"
    )
    main: str = Field(
        min_length=2,
        max_length=20,
        pattern=r'^[a-zA-Z0-9_]+$',
        description="只能包含字母数字和下划线"
    )
    description: str
    icon: str
def test_weather4() -> None:
    data = {"id": 100, "main": "Clouds", "description": "scattered clouds", "icon": "03n"}
    weather = Weather(**data)
    print(weather)
5、验证器
内置验证器
from pydantic import (
    BaseModel,
    EmailStr,      # 邮箱验证
    HttpUrl,       # URL 验证
    IPvAnyAddress, # IP 地址验证
    Json,          # JSON 字符串
    constr,        # 约束字符串
    conint,        # 约束整数
    confloat,      # 约束浮点数
)
from typing import List

# 需要安装: uv add "pydantic[email]"

class UserProfile(BaseModel):
    # 邮箱验证
    email: EmailStr

    # URL 验证
    website: HttpUrl

    # IP 地址
    ip_address: IPvAnyAddress

    # 约束字符串(旧式写法,仍然支持)
    username: constr(min_length=3, max_length=20, pattern=r'^[a-zA-Z0-9_]+$')

    # 约束整数
    age: conint(ge=0, le=150)

    # 约束浮点数
    rating: confloat(ge=0.0, le=5.0)

    # JSON 字符串
    metadata: Json[dict]
自定义验证器
class Weather(BaseModel):
    id: int = Field(
        ge=-100,
        le=100,
        description="id of the weather"
    )
    main: str = Field(
        min_length=2,
        max_length=20,
        pattern=r'^[a-zA-Z0-9_]+$',
        description="只能包含字母数字和下划线"
    )
    description: str
    icon: str

    @field_validator('icon')
    # cls 是类本身,v 是被验证的值
    def validate_icon(cls, v: str) -> str:
        if not v.startswith(('0', '1', '2', '3', '4', '5', '6', '7', '8', '9')):
            raise ValueError('icon must start with a digit')
        return v

    # 对多个字段验证的时候 会对每个字段分别调用该方法
    @field_validator('description', 'icon')
    def validate_non_empty(cls, v: str) -> str:
        if not v:
            raise ValueError('must not be empty')
        return v
6、嵌套模型
from pydantic import BaseModel, Field, field_validator


class Coord(BaseModel):
    lon: float = Field(
        description="Longitude in decimal degrees",
    )
    lat: float = Field(
        description="Latitude in decimal degrees",
    )


class Weather(BaseModel):
    id: int = Field(
        description="id of the weather"
    )
    main: str = Field(
        description="只能包含字母数字和下划线"
    )
    description: str
    icon: str


class Main(BaseModel):
    temp: float
    feels_like: float
    temp_min: float
    temp_max: float
    pressure: int
    humidity: int
    sea_level: int
    grnd_level: int


class Wind(BaseModel):
    speed: float
    deg: int
    gust: float


class Clouds(BaseModel):
    all: int


class sys(BaseModel):
    country: str
    sunrise: int
    sunset: int


class OpenWeatherMap(BaseModel):
    coord: Coord
    weather: list[Weather]
    base: str
    main: Main
    visibility: int
    wind: Wind
    clouds: Clouds
    dt: int
    sys: sys
    timezone: int
    id: int
    name: str
    cod: int
from weather_mcp.weather.model import Weather, OpenWeatherMap


def test_weather5() -> None:
    data = {
    "coord": {
        "lon": 121.5057,
        "lat": 31.316
    },
    "weather": [
        {
            "id": 802,
            "main": "Clouds",
            "description": "scattered clouds",
            "icon": "03n"
        }
    ],
    "base": "stations",
    "main": {
        "temp": 274.53,
        "feels_like": 269.46,
        "temp_min": 274.53,
        "temp_max": 274.53,
        "pressure": 1034,
        "humidity": 51,
        "sea_level": 1034,
        "grnd_level": 1034
    },
    "visibility": 10000,
    "wind": {
        "speed": 5.98,
        "deg": 352,
        "gust": 7.72
    },
    "clouds": {
        "all": 42
    },
    "dt": 1768998391,
    "sys": {
        "country": "CN",
        "sunrise": 1768949512,
        "sunset": 1768987082
    },
    "timezone": 28800,
    "id": 1787375,
    "name": "Yangpu",
    "cod": 200
}
    openweathermap = OpenWeatherMap(**data)
    print(openweathermap)
7、模型配置
from pydantic import BaseModel, Field, field_validator, ConfigDict


class Coord(BaseModel):
    lon: float = Field(
        description="Longitude in decimal degrees",
    )
    lat: float = Field(
        description="Latitude in decimal degrees",
    )


class Weather(BaseModel):
    id: int = Field(
        description="id of the weather"
    )
    main: str = Field(
        description="只能包含字母数字和下划线"
    )
    description: str
    icon: str


class Main(BaseModel):
    temp: float
    feels_like: float
    temp_min: float
    temp_max: float
    pressure: int
    humidity: int
    sea_level: int
    grnd_level: int


class Wind(BaseModel):
    speed: float
    deg: int
    gust: float


class Clouds(BaseModel):
    all: int


class sys(BaseModel):
    country: str
    sunrise: int
    sunset: int


class OpenWeatherMap(BaseModel):
    model_config = ConfigDict(
        # 字段验证
        validate_assignment=True,  # 赋值时也验证
        str_strip_whitespace=True,  # 自动去除字符串空白
        str_to_lower=False,  # 不自动转小写

        # JSON 配置
        populate_by_name=True,  # 允许使用字段别名

        # 额外字段处理
        extra='forbid',  # 'forbid', 'allow', 'ignore'

        # 性能优化
        use_enum_values=True,  # 使用枚举值而非枚举对象

        # 序列化配置
        json_schema_extra={
            "examples": [
                {
                    "id": 1,
                    "name": "Alice",
                    "email": "alice@example.com"
                }
            ]
        }
    )
    coord: Coord
    weather: list[Weather]
    base: str
    main: Main
    visibility: int
    wind: Wind
    clouds: Clouds
    dt: int
    sys: sys
    timezone: int
    id: int
    name: str
    cod: int
8、环境变量
MYAPP_APP_NAME=My_Awesome_App
MYAPP_DEBUG=true
MYAPP_DATABASE_URL=postgresql://localhost/mydb
MYAPP_API_KEY=secret-key-123
MYAPP_ALLOWED_HOSTS=["localhost","example.com","*.example.org"]
from pydantic_settings import BaseSettings, SettingsConfigDict


class Settings(BaseSettings):
    # 应用配置
    app_name: str = "My Application"
    debug: bool = False

    # 数据库配置
    database_url: str = "sqlite:///./test.db"
    database_pool_size: int = 5

    # API 配置
    api_key: str = "default"
    api_timeout: int = 30

    # 服务器配置
    host: str = "0.0.0.0"
    port: int = 8000

    # 列表配置(逗号分隔)
    allowed_hosts: list[str] = ["localhost"]

    # 配置来源
    model_config = SettingsConfigDict(
        env_file='.env',            # 从 .env 文件读取
        env_file_encoding='utf-8',
        case_sensitive=False,       # 环境变量不区分大小写
        env_prefix='MYAPP_',        # 环境变量前缀
    )
from weather_mcp.setting.setting import Settings


def test_setting() -> None:
    setting = Settings()
    print(setting)
9、序列化和反序列化
from weather_mcp.weather.model import Weather, OpenWeatherMap


def test_weather6() -> None:
    data = {
        "coord": {
            "lon": 121.5057,
            "lat": 31.316
        },
        "weather": [
            {
                "id": 802,
                "main": "Clouds",
                "description": "scattered clouds",
                "icon": "03n"
            }
        ],
        "base": "stations",
        "main": {
            "temp": 274.53,
            "feels_like": 269.46,
            "temp_min": 274.53,
            "temp_max": 274.53,
            "pressure": 1034,
            "humidity": 51,
            "sea_level": 1034,
            "grnd_level": 1034
        },
        "visibility": 10000,
        "wind": {
            "speed": 5.98,
            "deg": 352,
            "gust": 7.72
        },
        "clouds": {
            "all": 42
        },
        "dt": 1768998391,
        "sys": {
            "country": "CN",
            "sunrise": 1768949512,
            "sunset": 1768987082
        },
        "timezone": 28800,
        "id": 1787375,
        "name": "Yangpu",
        "cod": 200
    }
    openweathermap = OpenWeatherMap(**data)
    print(openweathermap.model_dump())
    print(openweathermap.model_dump_json())
    print(OpenWeatherMap.model_validate_json(openweathermap.model_dump_json()))
10、高级特性-泛型
from pydantic import BaseModel
from typing import TypeVar, Generic

T = TypeVar('T')


class Response(BaseModel, Generic[T]):
    code: int
    message: str
    data: T


class User(BaseModel):
    id: int
    name: str


class Product(BaseModel):
    id: int
    name: str
    price: float
from weather_mcp.response.response import Response, User, Product


def test_response1():
    user_response = Response[User](
        code=200,
        message="Success",
        data=User(id=1, name="Alice")
    )
    print(user_response)
    product_response = Response[Product](
        code=200,
        message="Success",
        data=Product(id=101, name="Laptop", price=999.99)
    )
    print(product_response)
11、高级特性-继承
from pydantic import BaseModel
from typing import TypeVar, Generic

T = TypeVar('T')


class Response(BaseModel, Generic[T]):
    code: int
    message: str
    data: T


class User(BaseModel):
    id: int
    name: str


class VipUser(User):
    level: int


class Product(BaseModel):
    id: int
    name: str
    price: float
from weather_mcp.response.response import Response, User, Product, VipUser


def test_response2():
    vip_user_response = Response[VipUser](
        code=200,
        message="Success",
        data=VipUser(id=1, name="Alice", level=5)
    )
    print(vip_user_response)
12、高级特性-计算属性
from pydantic import BaseModel, computed_field
from typing import TypeVar, Generic

T = TypeVar('T')


class Response(BaseModel, Generic[T]):
    code: int
    message: str
    data: T


class User(BaseModel):
    id: int
    name: str


class VipUser(User):
    level: int

    @computed_field
    @property
    def full_name(self) -> str:
        return f"{self.name} (VIP Level {self.level})"


class Product(BaseModel):
    id: int
    name: str
    price: float
from weather_mcp.response.response import Response, User, Product, VipUser


def test_response3():
    vip_user_response = Response[VipUser](
        code=200,
        message="Success",
        data=VipUser(id=1, name="Alice", level=5)
    )
    print(vip_user_response.data.full_name)
4、FastMCP基本使用
FastMCP 是实现 MCP 协议的 Python 框架,可以快速创建 MCP 服务器
4.1、MCP 服务器核心组件
1、Tools (工具)
AI "做"某事,返回执行结果
2、Resources (资源)
AI "读"某物,返回数据内容
3、Prompts (提示)
AI “按模板思考”,返回提示文本
4.2、stdio方式使用
生命周期跟随 Claude Code 会话,Claude Code 自动启动,但仅限本地访问,适合本地开发
1、mcp server
项目目录
.
├── README.md
├── pyproject.toml
├── src
│   └── weather_mcp
│       ├── __init__.py
│       ├── model.py
│       ├── server.py
│       └── weather.py
├── start_mcp.sh
└── uv.lock
_init_.py
from .server import mcp


def main() -> None:
    """Weather MCP Server 的命令行入口"""
    # stdio 方式
    mcp.run()
    # http 方式
    # mcp.run(transport="http", host="127.0.0.1", port=9000)
model.py
from pydantic import BaseModel


class Coord(BaseModel):
    lon: float
    lat: float


class Weather(BaseModel):
    id: int
    main: str
    description: str
    icon: str


class Main(BaseModel):
    temp: float
    feels_like: float
    temp_min: float
    temp_max: float
    pressure: int
    humidity: int
    sea_level: int
    grnd_level: int


class Wind(BaseModel):
    speed: float
    deg: int
    gust: float


class Clouds(BaseModel):
    all: int


class sys(BaseModel):
    country: str
    sunrise: int
    sunset: int


class OpenWeatherMap(BaseModel):
    coord: Coord
    weather: list[Weather]
    base: str
    main: Main
    visibility: int
    wind: Wind
    clouds: Clouds
    dt: int
    sys: sys
    timezone: int
    id: int
    name: str
    cod: int
server.py
from fastmcp import FastMCP
from .weather import today_weather
mcp = FastMCP("Weather MCP Server")
@mcp.tool()
def local_weather():
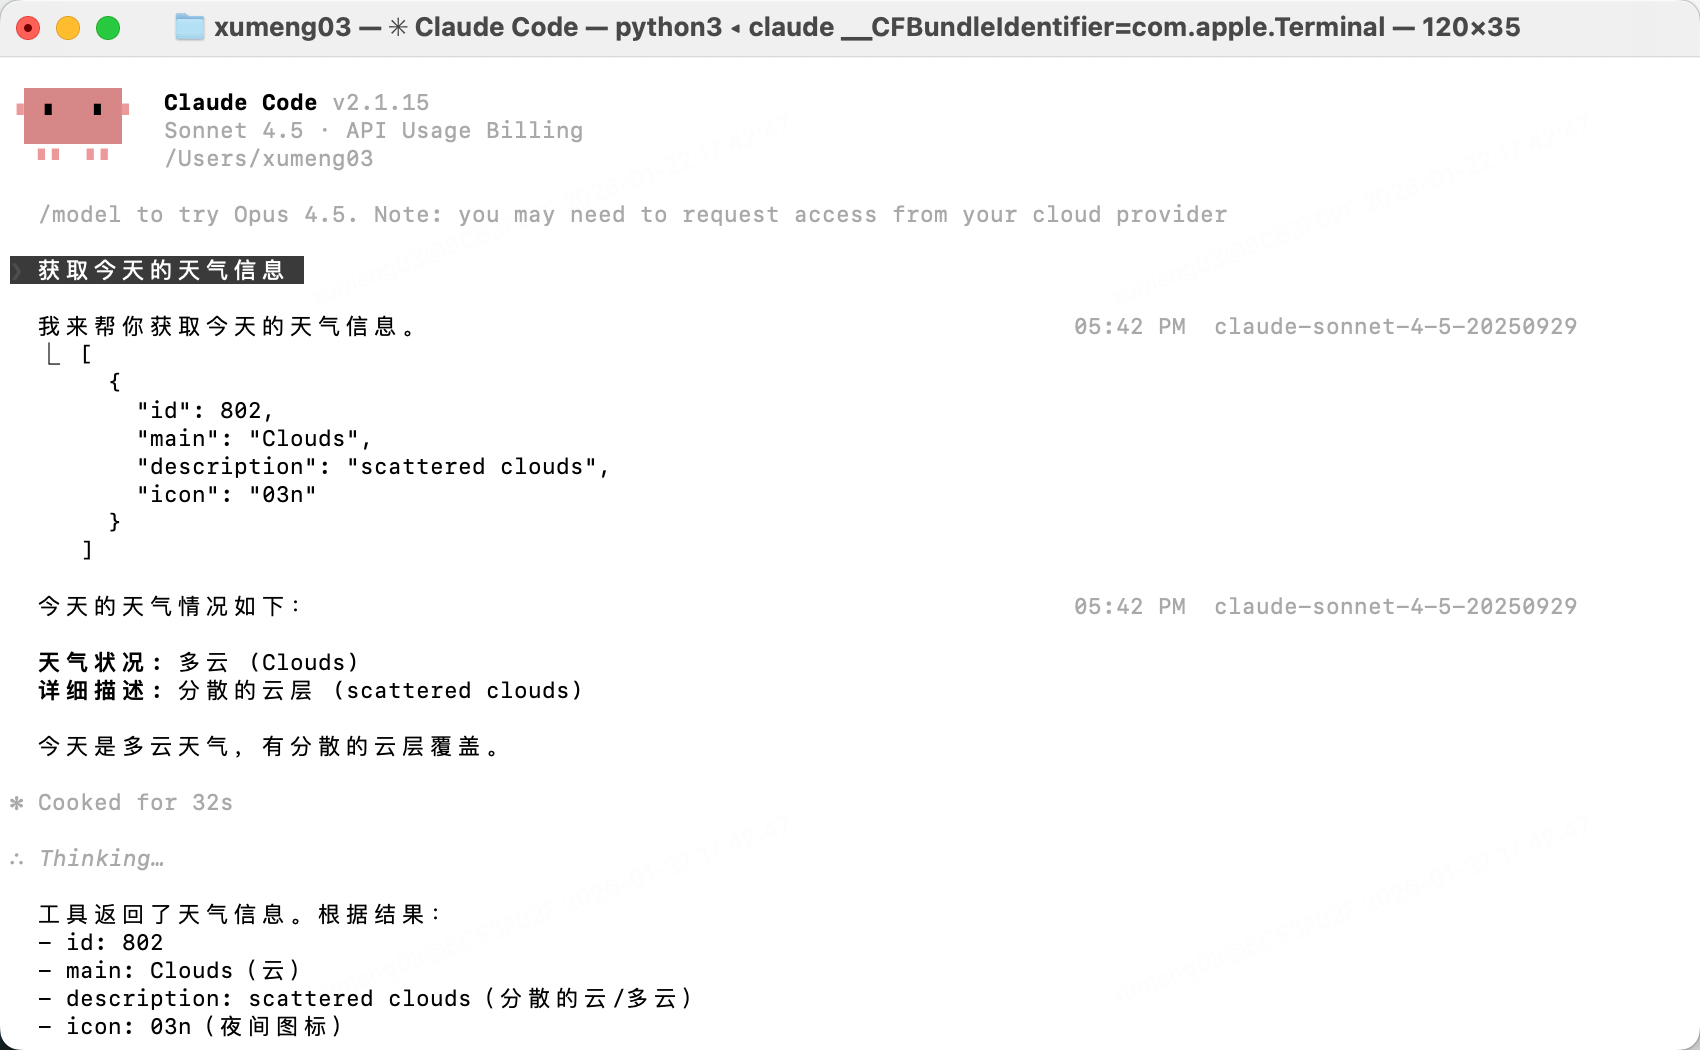
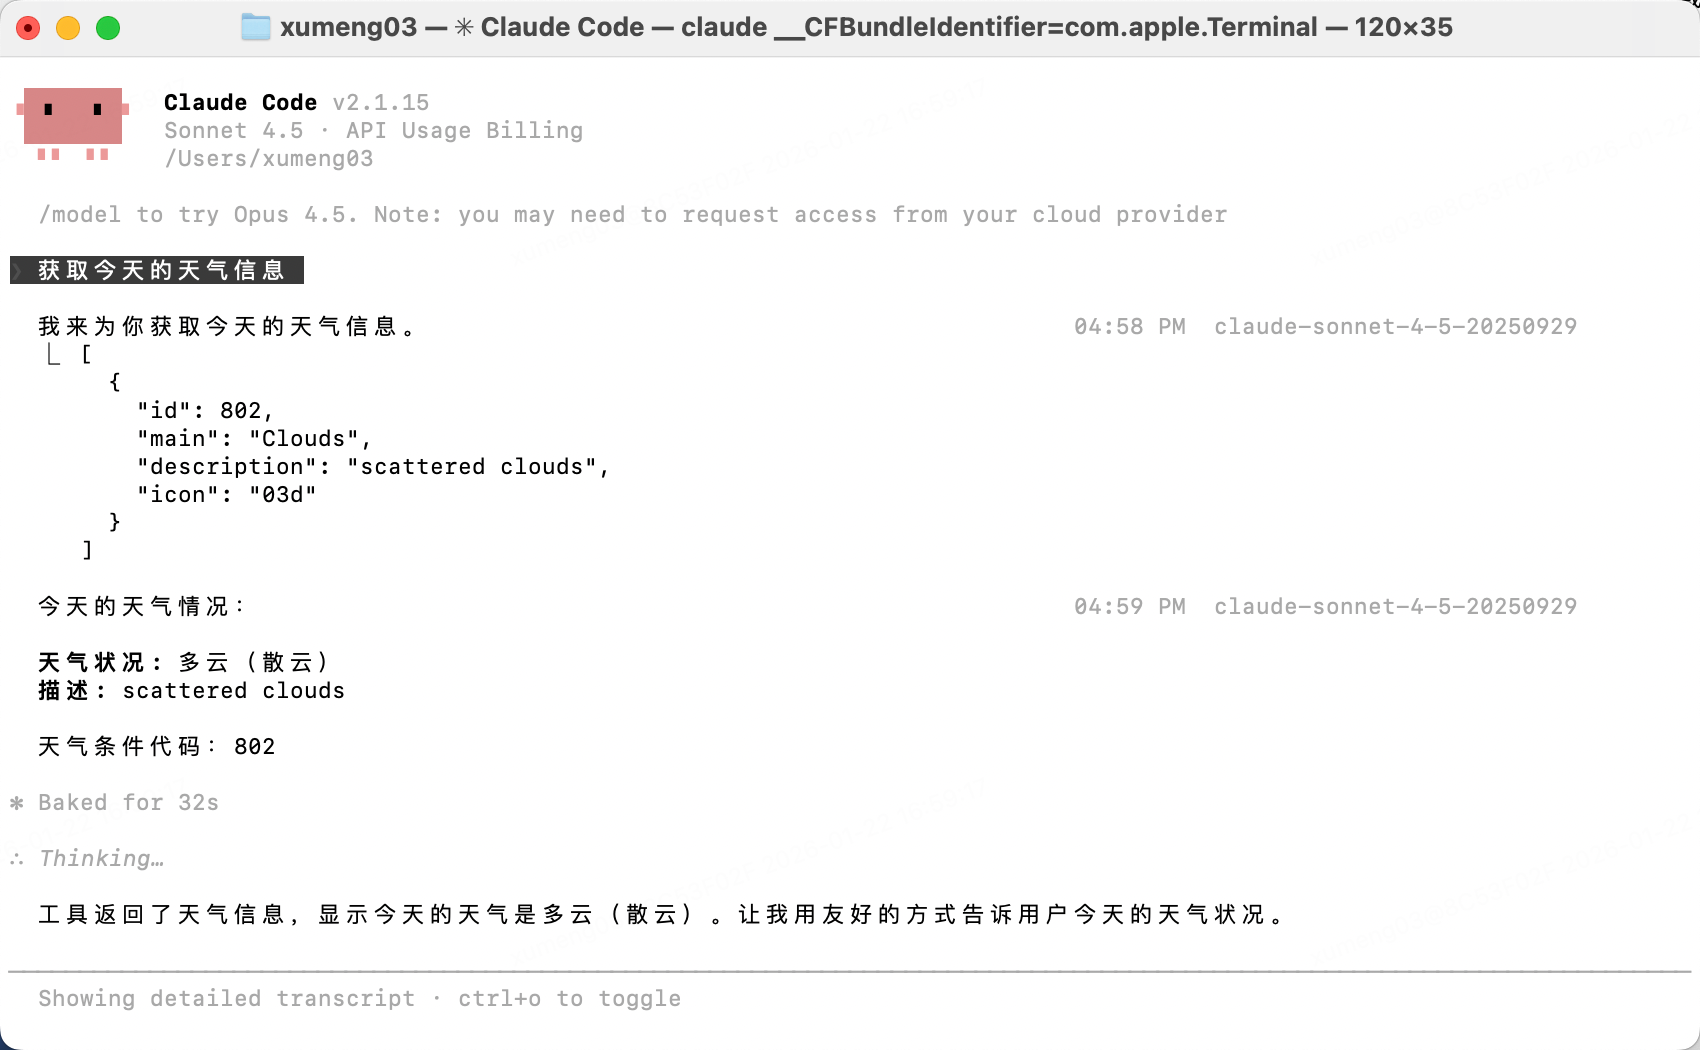
"""获取今天的天气信息"""
openWeatherMap = today_weather()
return openWeatherMap.weather
weather.py
import requests
from .model import OpenWeatherMap

BASE_URL = "http://api.openweathermap.org/data/2.5/weather"


def today_weather():
    res = requests.get(
        BASE_URL,
        params={"lat": 31.316, "lon": 121.505, "appid": "f09932db87c607110e3f2e9c98efba7e"}
    ).json()
    return OpenWeatherMap.model_validate(res)
pyproject.toml
[project]
name = "xumeng03-mcp"
version = "0.1.0"
description = "Add your description here"
readme = "README.md"
requires-python = ">=3.14"

dependencies = [
    "fastmcp>=2.14.3",
    "pydantic>=2.12.5",
    "pydantic-settings>=2.12.0",
    "requests>=2.32.5",
]

[project.scripts]
weather_mcp = "weather_mcp:main"

[dependency-groups]
dev = [
    "pytest>=9.0.2",
]

[tool.pytest.ini_options]
testpaths = ["tests"]

[build-system]
requires = ["setuptools>=61.0"]
build-backend = "setuptools.build_meta"

[tool.uv]
index-url = "https://pypi.tuna.tsinghua.edu.cn/simple"
extra-index-url = ["https://mirrors.aliyun.com/pypi/simple/"]
start_mcp.sh
#!/bin/bash
cd /Users/xumeng03/PycharmProjects/xumeng03_mcp
exec uv run weather_mcp
2、运行mcp server
uv run weather_mcp
3、添加/移除 mcp sever
# 查看可用的 mcp sever
claude mcp list

# 添加 mcp sever(项目级)
# 简写方式:claude mcp add weather_mcp -- /Users/xumeng03/PycharmProjects/xumeng03_mcp/start_mcp.sh
claude mcp add --transport stdio weather_mcp -- /Users/xumeng03/PycharmProjects/xumeng03_mcp/start_mcp.sh
# 添加 mcp sever(全局)
# 简写方式:claude mcp add weather_mcp --scope user -- /Users/xumeng03/PycharmProjects/xumeng03_mcp/start_mcp.sh
claude mcp add weather_mcp --scope user --transport stdio -- /Users/xumeng03/PycharmProjects/xumeng03_mcp/start_mcp.sh

# 移除 mcp sever
claude mcp remove weather
4、使用 mcp sever
4.3、http方式使用
需要手动启动 MCP 服务器,可远程访问,适合团队共享
1、开发mcp server
项目目录
.
├── README.md
├── pyproject.toml
├── src
│   └── weather_mcp
│       ├── __init__.py
│       ├── model.py
│       ├── server.py
│       └── weather.py
└── uv.lock
_init_.py
from .server import mcp


def main() -> None:
    """Weather MCP Server 的命令行入口"""
    # stdio 方式
    # mcp.run()
    # http 方式
    mcp.run(transport="http", host="127.0.0.1", port=9000)
model.py
from pydantic import BaseModel


class Coord(BaseModel):
    lon: float
    lat: float


class Weather(BaseModel):
    id: int
    main: str
    description: str
    icon: str


class Main(BaseModel):
    temp: float
    feels_like: float
    temp_min: float
    temp_max: float
    pressure: int
    humidity: int
    sea_level: int
    grnd_level: int


class Wind(BaseModel):
    speed: float
    deg: int
    gust: float


class Clouds(BaseModel):
    all: int


class sys(BaseModel):
    country: str
    sunrise: int
    sunset: int


class OpenWeatherMap(BaseModel):
    coord: Coord
    weather: list[Weather]
    base: str
    main: Main
    visibility: int
    wind: Wind
    clouds: Clouds
    dt: int
    sys: sys
    timezone: int
    id: int
    name: str
    cod: int
server.py
from fastmcp import FastMCP
from .weather import today_weather

mcp = FastMCP("Weather MCP Server")


@mcp.tool()
def local_weather():
    """获取今天的天气信息"""
    openWeatherMap = today_weather()
    return openWeatherMap.weather
weather.py
import requests
from .model import OpenWeatherMap

BASE_URL = "http://api.openweathermap.org/data/2.5/weather"


def today_weather():
    res = requests.get(
        BASE_URL,
        params={"lat": 31.316, "lon": 121.505, "appid": "f09932db87c607110e3f2e9c98efba7e"}
    ).json()
    return OpenWeatherMap.model_validate(res)
pyproject.toml
[project]
name = "xumeng03-mcp"
version = "0.1.0"
description = "Add your description here"
readme = "README.md"
requires-python = ">=3.14"

dependencies = [
    "fastmcp>=2.14.3",
    "pydantic>=2.12.5",
    "pydantic-settings>=2.12.0",
    "requests>=2.32.5",
]

[project.scripts]
weather_mcp = "weather_mcp:main"

[dependency-groups]
dev = [
    "pytest>=9.0.2",
]

[tool.pytest.ini_options]
testpaths = ["tests"]

[build-system]
requires = ["setuptools>=61.0"]
build-backend = "setuptools.build_meta"

[tool.uv]
index-url = "https://pypi.tuna.tsinghua.edu.cn/simple"
extra-index-url = ["https://mirrors.aliyun.com/pypi/simple/"]
2、运行mcp server
uv run weather_mcp
3、添加/移除 mcp sever
# 查看可用的 mcp sever
claude mcp list

# 添加 mcp sever(项目级)
claude mcp add weather --transport http http://127.0.0.1:9000/mcp
# 添加 mcp sever(全局)
claude mcp add weather --scope user --transport http http://127.0.0.1:9000/mcp

# 移除 mcp sever
claude mcp remove weather
4、使用 mcp sever
4.4、plugin方式使用
待补充

有“AI”的1024 = 2048,欢迎大家加入2048 AI社区
更多推荐


 15
15 0
0- 0


 已为社区贡献2条内容

所有评论(0)