使用uv在Ubuntu上安装Apache Airflow
下载得到uv-installer.sh文件,将该脚本放置到linux机器中执行。还是出现了安装包无法下载的情况,使用Windows终端电脑浏览器下载。上面日志文件中输出的admin账号和密码登录到Web端即可查看了。文件再移植到Linux机器,再次指定依赖文件来执行安装。使用官方推荐的约束文件安装,防止依赖冲突。执行上面依然出错,无法下载特定依赖文件。(约束)功能能极大提高安装成功率。然后重新执行
第一阶段:环境准备
-
确认当前环境:
root@host:~# uname -ioprvs Linux 6.8.0-88-generic #89-Ubuntu SMP PREEMPT_DYNAMIC Sat Oct 11 01:02:46 UTC 2025 x86_64 x86_64 GNU/Linux root@host:~# python3 -V Python 3.12.3 -
Windows客户端网络准备:
在Windows终端电脑上实现网络通畅,然后在Windows终端电脑上启用下图软件,
其主配置文件按如下修改:debug 1 # Log the destination for each request. See also debug 1024. debug 2 # show each connection status #debug 4 # show tagging-related messages #debug 8 # show header parsing debug 128 # debug redirects #debug 256 # debug GIF de-animation #debug 512 # Common Log Format #debug 1024 # Log the destination for requests Privoxy didn't let through, and the reason why. debug 4096 # Startup banner and warnings debug 8192 # Non-fatal errors debug 65536 # Log applying actions listen-address 0.0.0.0:8118 # 此处添加一个父级转发,这样Privoxy才可以通过父级访问 # forward-socks5 / 127.0.0.1:10808 . # 此处添加一个父级转发,这样Privoxy才可以通过父级访问 forward-socks5 / 127.0.0.1:7890 . log-messages 1 -
在Linux机器设置正确的变量:
注意https也要指向http协议头,仅在当前会话生效export http_proxy="http://10.49.1.146:8118" export https_proxy="http://10.49.1.146:8118"
第二阶段:安装 uv
-
安装 uv:
curl -LsSf https://astral.ac.cn/uv/install.sh | sh还是出现无法下载的情况,在Windows终端电脑上使用浏览器直接访问https://astral.ac.cn/uv/install.sh 下载得到uv-installer.sh文件,将该脚本放置到linux机器中执行。
root@host:~# sh uv-installer.sh
downloading uv 0.9.20 x86_64-unknown-linux-gnu
curl: (56) Recv failure: Connection reset by peer
failed to download https://github.com/astral-sh/uv/releases/download/0.9.20/uv-x86_64-unknown-linux-gnu.tar.gz
this may be a standard network error, but it may also indicate
that uv's release process is not working. When in doubt
please feel free to open an issue!
还是出现了安装包无法下载的情况,根据报错信息知道了具体的待下载安装包的全路径,使用Windows终端电脑浏览器下载好uv-x86_64-unknown-linux-gnu.tar.gz,然后放置到Linux机器中,在继续执行uv-install.sh之前,需要修改一下该安装脚本,使其跳过下载操作,修改如下:
……


    # download the archive
    local _url="$ARTIFACT_DOWNLOAD_URL/$_artifact_name"
    local _dir
    _dir="$(ensure mktemp -d)" || return 1
    local _file="$_dir/input$_zip_ext"

    cp /root/uv-x86_64-unknown-linux-gnu.tar.gz $_file
    say "downloading $APP_NAME $APP_VERSION ${_arch}" 1>&2
    say_verbose "  from $_url" 1>&2
    say_verbose "  to $_file" 1>&2

    ensure mkdir -p "$_dir"
    if ! downloader "$_url" "$_file"; then
      say "failed to download $_url"
      say "this may be a standard network error, but it may also indicate"
      say "that $APP_NAME's release process is not working. When in doubt"
      say "please feel free to open an issue!"
      #exit 1
    fi

……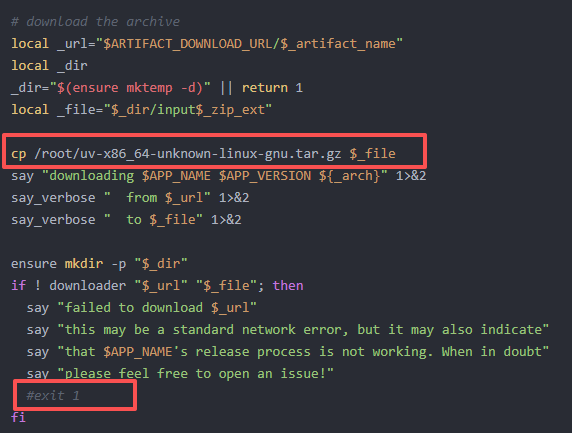
其中最关键的是上图红框部分的改动
然后重新执行脚本即可安装成功root@host:~# sh uv-installer.sh downloading uv 0.9.20 x86_64-unknown-linux-gnu 1 downloader https://github.com/astral-sh/uv/releases/download/0.9.20/uv-x86_64-unknown-linux-gnu.tar.gz /tmp/tmp.2D2xteXWZm/input.tar.gz curl: (56) Recv failure: Connection reset by peer failed to download https://github.com/astral-sh/uv/releases/download/0.9.20/uv-x86_64-unknown-linux-gnu.tar.gz this may be a standard network error, but it may also indicate that uv's release process is not working. When in doubt please feel free to open an issue! no checksums to verify installing to /root/.local/bin uv uvx everything's installed! To add $HOME/.local/bin to your PATH, either restart your shell or run: source $HOME/.local/bin/env (sh, bash, zsh) source $HOME/.local/bin/env.fish (fish) root@host:~# source $HOME/.local/bin/env root@host:~# source $HOME/.local/bin/env.fish -bash: /root/.local/bin/env.fish: line 5: syntax error: unexpected end of file -
验证安装并查看位置:
which uv # 应该输出 /usr/local/bin/uv 或类似路径
第三阶段:创建虚拟环境并安装 Airflow
Airflow 对依赖要求极严,uv 的 constraint(约束)功能能极大提高安装成功率。
-
使用 uv 创建虚拟环境(指定 Python 3.12):
uv venv --python 3.12 -
激活虚拟环境(关键:这会自动处理 PATH 问题):
source .venv/bin/activate -
安装 Apache Airflow:
使用官方推荐的约束文件安装,防止依赖冲突。
AIRFLOW_VERSION=3.0.0

# Extract the version of Python you have installed. If you're currently using a Python version that is not supported by Airflow, you may want to set this manually.
# See above for supported versions.
PYTHON_VERSION="$(python3 -c 'import sys; print(f"{sys.version_info.major}.{sys.version_info.minor}")')"

CONSTRAINT_URL="https://raw.githubusercontent.com/apache/airflow/constraints-${AIRFLOW_VERSION}/constraints-${PYTHON_VERSION}.txt"
# For example this would install 3.0.0 with python 3.9: https://raw.githubusercontent.com/apache/airflow/constraints-3.0.0/constraints-3.9.txt

uv pip install "apache-airflow==${AIRFLOW_VERSION}" --constraint "${CONSTRAINT_URL}"
执行上面依然出错,无法下载特定依赖文件
root@host:~# uv pip install "apache-airflow==${AIRFLOW_VERSION}" --constraint "${CONSTRAINT_URL}"
error: Error while accessing remote requirements file: `https://raw.githubusercontent.com/apache/airflow/constraints-3.0.0/constraints-3.12.txt`
  Caused by: error sending request for url (https://raw.githubusercontent.com/apache/airflow/constraints-3.0.0/constraints-3.12.txt)
  Caused by: client error (Connect)
  Caused by: tunnel error: io error establishing tunnel
  Caused by: Connection reset by peer (os error 104)
所以在Windows上使用浏览器手动下载constraints-3.12.txt文件,再移植到Linux机器,再次指定依赖文件来执行安装
root@host:~# uv pip install "apache-airflow==${AIRFLOW_VERSION}" --constraint constraints-3.12.txt
Resolved 127 packages in 16.53s
      Built dill==0.3.1.1
Prepared 127 packages in 48.49s
Installed 127 packages in 78ms
 + a2wsgi==1.10.8
 + aiologic==0.14.0
 + aiosqlite==0.21.0
 + alembic==1.15.2
 + annotated-types==0.7.0
 + anyio==4.9.0
 + apache-airflow==3.0.0
 + apache-airflow-core==3.0.0
 + apache-airflow-providers-common-compat==1.6.0
 + apache-airflow-providers-common-io==1.5.4
 + apache-airflow-providers-common-sql==1.26.0
 + apache-airflow-providers-smtp==2.0.3
 + apache-airflow-providers-standard==1.0.0
 + apache-airflow-task-sdk==1.0.0
 + argcomplete==3.6.2
 + asgiref==3.8.1
 + attrs==25.3.0
……
……
 + uvicorn==0.34.2
 + uvloop==0.21.0
 + watchfiles==1.0.5
 + websockets==15.0.1
 + werkzeug==2.2.3
 + wirerope==1.0.0
 + wrapt==1.17.2
 + zipp==3.21.0
第四阶段:启动
在激活虚拟环境的状态下启动airflow
-
设置 Airflow 家目录(默认是
~/airflow):export AIRFLOW_HOME=~/airflow -
正式启动:
(root) root@host:~/.venv/bin# nohup airflow standalone >/root/airflow.log 2>&1 &
[1] 2297843
(root) root@host:~/.venv/bin# vi /root/airflow.log
(root) root@host:~/.venv/bin# cat /root/airflow/simple_auth_manager_passwords.json.generated
{"admin": "zWWVsw9fmz66QZXH"}
第五阶段:Web访问
上面日志文件中输出的admin账号和密码登录到Web端即可查看了。

有“AI”的1024 = 2048,欢迎大家加入2048 AI社区
更多推荐

 28
28 0
0- 0


 已为社区贡献2条内容

所有评论(0)