AI Agent(一):定义了解和框架搭建
什么是 AI Agent?
从"对话"到"代理"的进化
想象一下,你有一个非常聪明的朋友,每次你问他问题,他都能给出很好的答案。但有一个问题——他没有记忆,每次对话都是"初次见面"。这就是传统 AI 对话的模式。
AI Agent(人工智能代理) 则不同。它不仅能回答问题,还能:
- 🧠 记住上下文:知道你们之前聊过什么
- 🎯 理解意图:明白你真正想要什么
- 🔧 执行任务:不只是说,还能做
- 📚 持续学习:从交互中积累经验
一个简单的类比
| 特性 | 普通 AI 对话 | AI Agent |
|---|---|---|
| 记忆 | ❌ 每次独立 | ✅ 持续记忆 |
| 上下文 | ❌ 单轮 | ✅ 多轮对话 |
| 执行能力 | ❌ 仅回答 | ✅ 可执行任务 |
| 自主性 | ❌ 被动响应 | ✅ 主动思考 |
Agent 的本质定义
Agent = LLM(大脑)+ Memory(记忆)+ Tools(工具)+ Planning(规划)
用一句话概括:Agent 是一个能够自主感知环境、做出决策、执行行动的智能系统。
为什么需要 Agent?
场景一:传统 AI 和 Agent 的区别
假设你想让 AI 帮你完成一个任务:“帮我查一下今天的天气,如果温度低于 15 度,就提醒我穿外套”。
传统方式的问题:
用户: 今天天气怎么样?
AI: 抱歉,我无法获取实时天气数据...

用户: 我查到了,15度
AI: 好的,15度。

用户: 那我需要穿外套吗?
AI: 这取决于您的耐寒程度...(AI 已经忘记了之前的条件)
每一步都需要人工干预,AI 无法自主完成整个任务链。
场景二:有了 Agent 的体验
用户: 帮我查一下今天的天气,如果温度低于 15 度,就提醒我穿外套

Agent:
[思考] 我需要:1. 获取天气 2. 判断温度 3. 给出建议
[执行] 调用天气 API...
[结果] 今天温度 12°C,低于 15°C
[回复] 🧥 今天只有 12°C,建议您穿上外套出门!
Agent 解决的核心问题
- 任务自动化:将复杂任务分解并自动执行
- 上下文保持:在长对话中保持连贯性
- 工具调用:连接真实世界的能力(API、数据库等)
- 智能决策:根据情况自主选择最佳方案
实际项目可使用场景
- 解决日常问题:可以为项目搭建智能客服 Agent,给用户解答一些日常问题
- 问题自助排查:当遇到一些线上问题时,可以交给 Agent 利用编排好的工具进行自助分析,省去重复性排查过程
- 数据处理:报表等各种数据直接交给 Agent 进行分析
Agent 的核心组件
在深入代码之前,让我们先理解 Agent 的四大核心组件:
┌─────────────────────────────────────────────────────────┐
│                      AI Agent                           │
├─────────────────────────────────────────────────────────┤
│  ┌─────────────┐  ┌─────────────┐  ┌─────────────┐     │
│  │   🧠 LLM    │  │  💾 Memory  │  │  🔧 Tools   │     │
│  │   大语言模型 │  │    记忆系统  │  │   工具集    │     │
│  └─────────────┘  └─────────────┘  └─────────────┘     │
│                          │                              │
│                   ┌──────▼──────┐                       │
│                   │ 📋 Planning │                       │
│                   │   规划引擎   │                       │
│                   └─────────────┘                       │
└─────────────────────────────────────────────────────────┘
1. LLM(大语言模型)—— Agent 的大脑
LLM 是 Agent 的核心智能来源,负责:
- 理解用户输入
- 生成回复内容
- 进行推理和决策
2. Memory(记忆系统)—— Agent 的记忆
记忆分为两种:
- 短期记忆:当前对话的上下文
- 长期记忆:跨会话的知识存储
3. Tools(工具)—— Agent 的手脚
让 Agent 能够与外部世界交互:
- 搜索引擎
- 数据库查询
- API 调用
- 文件操作
4. Planning(规划)—— Agent 的思维
决定如何将复杂任务分解为可执行的步骤。
Agent 使用的 LLM 部署
1. 使用网上的免费大模型,如字节的火山引擎
2. Ollama 本地部署
搭建初始架构 - 具备上下文记忆的对话
第一步:项目初始化
首先,创建项目结构:
mkdir ai-agent
cd ai-agent
go mod init chat-agent
安装依赖:
go get github.com/joho/godotenv
第二步:定义核心数据结构
Agent 的第一步是定义它如何与 LLM 通信。我们需要定义消息的格式:
// Message 代表一条聊天消息
// 这是 Agent 记忆的基本单位
type Message struct {
    Role    string `json:"role"`    // 角色:system/user/assistant
    Content string `json:"content"` // 消息内容
}
三种角色的含义:
| 角色 | 说明 | 作用 |
|---|---|---|
system |
系统消息 | 定义 Agent 的人设和行为规范 |
user |
用户消息 | 用户的输入 |
assistant |
助手消息 | Agent 的回复 |
接下来,定义 API 请求和响应的结构:
// ChatRequest 是发送给 LLM API 的请求结构
type ChatRequest struct {
    Model    string    `json:"model"`    // 使用的模型
    Messages []Message `json:"messages"` // 消息历史(这就是记忆!)
    Stream   bool      `json:"stream"`   // 是否流式输出
}

// ChatResponse 是 LLM API 返回的响应结构
type ChatResponse struct {
    Choices []struct {
        Message Message `json:"message"`
    } `json:"choices"`
    Error struct {
        Message string `json:"message"`
    } `json:"error"`
}
第三步:构建 Agent 核心结构
这是整个 Agent 的核心——ChatAgent 结构体:
// ChatAgent 是我们的 AI Agent 核心
type ChatAgent struct {
    APIKey     string         // API 密钥
    APIURL     string         // API 端点
    Model      string         // 使用的模型
    Messages   []Message      // 💾 这就是 Agent 的记忆!
    HTTPClient *http.Client   // HTTP 客户端
}
🔑 关键洞察: Messages 数组就是 Agent 的"记忆"。每次对话都会追加到这个数组中,这样 Agent 就能记住之前的对话内容。
第四步:创建 Agent 实例
// NewChatAgent 创建一个新的 Agent 实例
func NewChatAgent(apiKey, apiURL, model string) *ChatAgent {
    return &ChatAgent{
        APIKey: apiKey,
        APIURL: apiURL,
        Model:  model,
        // 初始化记忆,包含系统提示词
        Messages: []Message{
            {
                Role:    "system",
                Content: "You are a helpful AI assistant. Be concise and friendly.",
            },
        },
        HTTPClient: &http.Client{
            Timeout: 360 * time.Second,
        },
    }
}
💡 注意: 系统提示词(System Prompt)是 Agent 的"性格设定",它会影响 Agent 的所有回复风格。
第五步:实现消息发送(Agent 的核心循环)
这是 Agent 最核心的方法——发送消息并获取回复:
// SendMessage 发送消息给 AI 并返回响应
func (ca *ChatAgent) SendMessage(userMessage string) (string, error) {
    // 📝 第一步:将用户消息添加到记忆中
    ca.Messages = append(ca.Messages, Message{
        Role:    "user",
        Content: userMessage,
    })

    // 🔧 第二步:构建 API 请求
    request := ChatRequest{
        Model:    ca.Model,
        Messages: ca.Messages,  // 发送完整的对话历史!
        Stream:   false,
    }

    jsonData, err := json.Marshal(request)
    if err != nil {
        return "", fmt.Errorf("failed to marshal request: %w", err)
    }

    // 🌐 第三步:发送 HTTP 请求
    req, err := http.NewRequest("POST", ca.APIURL, strings.NewReader(string(jsonData)))
    if err != nil {
        return "", fmt.Errorf("failed to create request: %w", err)
    }

    req.Header.Set("Content-Type", "application/json")
    req.Header.Set("Authorization", "Bearer "+ca.APIKey)

    // 📨 第四步:获取响应
    resp, err := ca.HTTPClient.Do(req)
    if err != nil {
        return "", fmt.Errorf("failed to send request: %w", err)
    }
    defer resp.Body.Close()

    body, err := io.ReadAll(resp.Body)
    if err != nil {
        return "", fmt.Errorf("failed to read response: %w", err)
    }

    // 🔍 第五步:解析响应
    var chatResp ChatResponse
    if err := json.Unmarshal(body, &chatResp); err != nil {
        return "", fmt.Errorf("failed to parse response: %w", err)
    }

    if len(chatResp.Choices) == 0 {
        return "", fmt.Errorf("no choices in response")
    }

    assistantMessage := chatResp.Choices[0].Message.Content

    // 💾 第六步:将 AI 回复也添加到记忆中
    ca.Messages = append(ca.Messages, Message{
        Role:    "assistant",
        Content: assistantMessage,
    })

    return assistantMessage, nil
}
🎯 核心流程图解:
用户输入 ──→ 添加到记忆 ──→ 发送完整历史给 LLM ──→ 获取回复 ──→ 添加到记忆 ──→ 返回给用户
     │                                                            │
     └────────────────── 下次对话时包含之前的内容 ←─────────────────┘
第六步:实现交互循环
让 Agent 能够持续与用户对话:
// Run 启动交互式聊天会话
func (ca *ChatAgent) Run() {
    scanner := bufio.NewScanner(os.Stdin)

    fmt.Println("🤖 Chat Agent - Type 'exit' to end, 'clear' to reset")
    fmt.Println(strings.Repeat("=", 60))

    for {
        fmt.Print("\nYou: ")
        if !scanner.Scan() {
            break
        }

        input := strings.TrimSpace(scanner.Text())
        if input == "" {
            continue
        }

        // 处理特殊命令
        switch input {
        case "exit", "quit":
            fmt.Println("\n👋 Goodbye!")
            return
        case "clear":
            ca.ClearHistory()
            fmt.Println("✅ Conversation history cleared")
            continue
        }

        // 发送消息给 AI
        fmt.Print("Assistant: ")
        response, err := ca.SendMessage(input)
        if err != nil {
            fmt.Printf("❌ Error: %v\n", err)
            continue
        }

        fmt.Println(response)
    }
}
第七步:主函数入口
func main() {
    // 加载环境变量
    _ = godotenv.Load()

    // 配置参数
    apiKey := "your-api-key"
    apiURL := "https://ark.cn-beijing.volces.com/api/v3/chat/completions"
    model := "your-model"

    // 创建并运行 Agent
    agent := NewChatAgent(apiKey, apiURL, model)
    agent.Run()
}
完整代码一览
将以上所有代码整合,你就得到了一个完整的 AI Agent!
┌────────────────────────────────────────────────────────────┐
│                    main.go 结构                             │
├────────────────────────────────────────────────────────────┤
│  📦 package main                                           │
│  📥 import (...)                                           │
│                                                            │
│  📋 type Message struct { ... }      // 消息结构           │
│  📋 type ChatRequest struct { ... }  // 请求结构           │
│  📋 type ChatResponse struct { ... } // 响应结构           │
│                                                            │
│  🤖 type ChatAgent struct { ... }    // Agent 核心         │
│                                                            │
│  🔧 func NewChatAgent(...) *ChatAgent    // 创建 Agent     │
│  📨 func (ca *ChatAgent) SendMessage(...) // 发送消息      │
│  🧹 func (ca *ChatAgent) ClearHistory()   // 清空记忆      │
│  🔄 func (ca *ChatAgent) Run()            // 运行循环      │
│                                                            │
│  🚀 func main() { ... }              // 程序入口           │
└────────────────────────────────────────────────────────────┘
运行
# 1. 克隆项目
git clone <your-repo>
cd ai-agent

# 2. 安装依赖
go mod download

# 3. 运行
go run main.go
运行截图: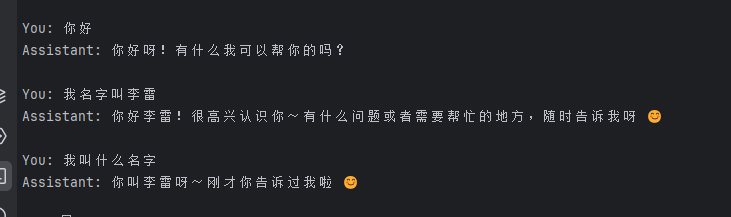
附录:核心代码速查
创建 Agent
agent := NewChatAgent(apiKey, apiURL, model)
发送消息
response, err := agent.SendMessage("你好")
清空记忆
agent.ClearHistory()
运行交互循环
agent.Run()
本文基于实际项目代码编写,所有示例均可直接运行。
作者注:构建 AI Agent 是一个循序渐进的过程。现在是从最简单的对话开始,后面逐步添加记忆、工具、规划能力,最终你会拥有一个真正强大的 AI 助手。关键是理解每个组件的作用,而不是追求一步到位。
Happy Coding! 🚀

有“AI”的1024 = 2048,欢迎大家加入2048 AI社区
更多推荐
 18
18 0
0- 0


 已为社区贡献8条内容

所有评论(0)