AI驱动的产业变革:短视频、设计与服务业的落地实践与技术解析
人工智能正以前所未有的速度重塑各行业的生产方式与商业模式。在短视频领域,AI实现了从内容创作到分发的全流程革新;在设计行业,AI工具已成为创意工作者的核心协作伙伴;在服务业,AI正在重构客户交互与运营效率的边界。本文通过20+落地案例、15+技术实现代码、8个可视化图表及10+实用Prompt,全面剖析AI技术如何在三大领域创造商业价值,揭示不同行业的AI转型路径与最佳实践。
一、AI+短视频:从内容生产到智能分发的全链路革新
短视频行业已成为AI技术落地最成熟的领域之一,从内容创意、智能剪辑到精准推送,AI技术渗透于每一个环节。根据艾瑞咨询2025年数据,AI驱动的短视频内容生产效率提升达300%,用户日均观看时长增加47%,平台广告变现效率提升62%。这种变革不仅改变了内容创作方式,更重构了整个短视频的产业生态。
1.1 智能脚本生成:AI辅助的创意自动化
短视频的创作瓶颈往往始于脚本构思。传统创作模式下,一个15秒的优质短视频脚本平均需要2-3小时构思,而AI工具可将这一过程缩短至10分钟以内。字节跳动2024年推出的"创作大脑"系统,通过分析5000万+爆款视频的叙事结构,能根据用户输入的主题自动生成3-5个差异化脚本方案。
技术实现:基于GPT-4的多风格脚本生成
import openai import json from datetime import datetime class ShortVideoScriptGenerator: def __init__(self, api_key): openai.api_key = api_key # 预定义短视频类型模板库 self.templates = { "product_showcase": "1. 开场(0-3s): 产品特写+悬念音乐\n2. 痛点展示(3-6s): 用户使用传统产品的困扰\n3. 解决方案(6-10s): 产品核心功能演示\n4. 效果对比(10-13s): 使用前后效果差异\n5. 行动号召(13-15s): 购买引导+限时优惠", "educational": "1. 问题提出(0-2s): 直击用户痛点的提问\n2. 核心观点(2-5s): 清晰的知识点陈述\n3. 案例演示(5-12s): 实操演示或视觉化解释\n4. 总结强化(12-15s): 关键点回顾+互动引导", "storytelling": "1. 情景引入(0-3s): 制造冲突或情感共鸣\n2. 发展过程(3-9s): 情节推进与细节展示\n3. 转折/高潮(9-12s): 意外发展或情感顶点\n4. 结局/启示(12-15s): 开放式结尾或思考点" } def generate_script(self, product_info, video_type, tone="neutral", platform="douyin"): """ 生成短视频脚本 product_info: 产品信息字典,包含name, features, target_audience等 video_type: 视频类型,可选"product_showcase", "educational", "storytelling" tone: 风格,可选"neutral", "funny", "professional", "emotional" platform: 平台,影响时长和节奏,可选"douyin", "kuaishou", "tiktok" """ # 确定平台特性 platform_features = { "douyin": {"avg_length": 15, "rhythm": "fast", "music": "trendy"}, "kuaishou": {"avg_length": 20, "rhythm": "moderate", "music": "local"}, "tiktok": {"avg_length": 15, "rhythm": "dynamic", "music": "global"} }[platform] # 构建提示词 prompt = f"""作为专业短视频脚本策划师,请根据以下信息创作一个{platform}平台的{video_type}风格短视频脚本: 产品信息: - 产品名称: {product_info['name']} - 核心功能: {', '.join(product_info['features'])} - 目标受众: {product_info['target_audience']} - 独特卖点: {product_info['unique_selling_point']} 要求: 1. 时长控制在{platform_features['avg_length']}秒左右,{platform_features['rhythm']}节奏 2. 采用{self.templates[video_type]}的结构框架 3. 整体风格{tone},使用符合目标受众语言习惯的表达 4. 包含具体的镜头描述、台词/字幕内容和背景音乐建议 5. 必须有至少1个互动点(如提问、引导评论等) 输出格式为JSON,包含: script_title, total_duration, scenes(数组,每个scene包含time_range, shot_description, text, music_note) """ # 调用OpenAI API response = openai.ChatCompletion.create( model="gpt-4", messages=[{"role": "user", "content": prompt}], temperature=0.7, max_tokens=1000 ) # 解析并返回结果 try: script = json.loads(response.choices[0].message.content) script["generated_time"] = datetime.now().isoformat() return script except json.JSONDecodeError: return {"error": "脚本生成失败", "raw_response": response.choices[0].message.content} # 使用示例 if __name__ == "__main__": generator = ShortVideoScriptGenerator("YOUR_API_KEY") product = { "name": "智能便携榨汁杯", "features": ["30秒快速榨汁", "USB充电", "150ml容量", "食品级材质"], "target_audience": "20-35岁上班族、健身爱好者", "unique_selling_point": "体积仅矿泉水瓶大小,随时随地制作新鲜果汁" } script = generator.generate_script( product_info=product, video_type="product_showcase", tone="funny", platform="douyin" ) print(json.dumps(script, ensure_ascii=False, indent=2))
Prompt示例:短视频脚本生成
作为专业短视频策划师,请为一款"迷你便携投影仪"创作抖音爆款脚本:
- 产品特点:重量200g,100英寸投影,内置电池续航3小时,支持手机同屏
- 目标用户:租房年轻人、户外露营爱好者、商务人士
- 风格要求:生活化场景、痛点-解决方案结构、节奏感强
- 时长:15秒
- 必须包含:3个以上使用场景,1个惊喜转折,明确的购买引导

请提供分镜头脚本,包含每一秒的画面描述、字幕内容和背景音乐建议。
落地案例:完美日记AI脚本工厂
完美日记2024年建立的AI脚本工厂,通过整合产品信息、用户画像和平台热点,实现了短视频脚本的工业化生产。系统每月可生成1200+差异化脚本,配合AIGC视频生成工具,使单条视频的创作成本从3000元降至300元,爆款视频(播放量>100万)产出率提升2.3倍。其核心在于将成功脚本拆解为可量化的元素(如开场方式、转场效果、BGM类型等),通过机器学习不断优化组合策略。
1.2 智能剪辑:从素材到成片的自动化流水线
短视频剪辑是创意实现的关键环节,也是最耗费人力的环节之一。传统模式下,一位剪辑师日均可完成3-5条短视频,而AI剪辑系统可将效率提升10倍以上,同时保证内容质量的一致性。
技术实现:基于多模态分析的智能剪辑系统
import cv2 import numpy as np import librosa import tensorflow as tf from transformers import pipeline from moviepy.editor import VideoFileClip, concatenate_videoclips, TextClip, CompositeVideoClip class AIVideoEditor: def __init__(self): # 加载预训练模型 self.action_detector = pipeline("video-classification", model="MCG-NJU/videomae-base-finetuned-kinetics") self.scene_detector = tf.keras.models.load_model("scene_detection_model.h5") self.face_detector = cv2.CascadeClassifier(cv2.data.haarcascades + 'haarcascade_frontalface_default.xml') self.audio_analyzer = pipeline("audio-classification", model="superb/hubert-base-superb-er") def analyze_video_content(self, video_path): """分析视频内容,提取关键信息""" video = VideoFileClip(video_path) analysis_result = { "duration": video.duration, "fps": video.fps, "key_moments": [], "scenes": [], "audio_events": [] } # 场景检测 frame_interval = int(video.fps * 2) # 每2秒取一帧 scenes = [] current_scene_start = 0 prev_scene_type = None for t in np.arange(0, video.duration, 2): frame = video.get_frame(t) frame_resized = cv2.resize(frame, (224, 224)) / 255.0 scene_type = np.argmax(self.scene_detector.predict(np.expand_dims(frame_resized, axis=0))[0]) if prev_scene_type is not None and scene_type != prev_scene_type: scenes.append({ "start_time": current_scene_start, "end_time": t, "scene_type": int(prev_scene_type) }) current_scene_start = t prev_scene_type = scene_type # 添加最后一个场景 scenes.append({ "start_time": current_scene_start, "end_time": video.duration, "scene_type": int(prev_scene_type) }) analysis_result["scenes"] = scenes # 动作检测和人脸检测来找关键帧 for scene in scenes: scene_clip = video.subclip(scene["start_time"], scene["end_time"]) # 每1秒分析一帧 for t in np.arange(scene["start_time"], scene["end_time"], 1): frame = video.get_frame(t) gray = cv2.cvtColor(frame, cv2.COLOR_BGR2GRAY) faces = self.face_detector.detectMultiScale(gray, 1.1, 4) # 如果检测到人脸且有人脸表情变化,标记为关键帧 if len(faces) > 0: analysis_result["key_moments"].append({ "time": t, "type": "facial_expression", "confidence": 0.85 }) # 音频分析 audio = video.audio audio.write_audiofile("temp_audio.wav") y, sr = librosa.load("temp_audio.wav", duration=video.duration) audio_events = self.audio_analyzer("temp_audio.wav") analysis_result["audio_events"] = [{ "label": event["label"], "score": event["score"], "start_time": (event["timestamp"][0] if "timestamp" in event else 0), "end_time": (event["timestamp"][1] if "timestamp" in event else video.duration) } for event in audio_events] video.close() return analysis_result def auto_edit(self, video_path, style="vlog", duration=15): """自动剪辑视频""" video = VideoFileClip(video_path) analysis = self.analyze_video_content(video_path) # 根据风格确定剪辑策略 if style == "vlog": # Vlog风格:优先选择有人脸和情绪变化的片段 selected_moments = sorted([m for m in analysis["key_moments"] if m["type"] == "facial_expression"], key=lambda x: x["confidence"], reverse=True) elif style == "product": # 产品风格:优先选择产品特写和功能演示片段 selected_moments = [m for m in analysis["key_moments"] if m["type"] == "product_feature"] elif style == "music": # 音乐风格:根据音乐节拍剪辑 selected_moments = self._get_beat_moments(video_path) # 选择最重要的片段并排序 selected_moments = sorted(selected_moments, key=lambda x: x["time"]) # 计算每个片段的时长 segment_duration = duration / len(selected_moments) if selected_moments else duration # 创建剪辑片段 clips = [] for moment in selected_moments: start = max(0, moment["time"] - segment_duration/2) end = min(video.duration, moment["time"] + segment_duration/2) clip = video.subclip(start, end) clips.append(clip) # 添加转场效果 final_clip = concatenate_videoclips(clips, method="compose") # 添加背景音乐 bgm_clip = self._select_bgm(style) final_clip = final_clip.set_audio(bgm_clip.subclip(0, final_clip.duration)) # 调整至目标时长 final_clip = final_clip.set_duration(duration) return final_clip # 使用示例 if __name__ == "__main__": editor = AIVideoEditor() edited_video = editor.auto_edit("raw_footage.mp4", style="vlog", duration=15) edited_video.write_videofile("edited_video.mp4")
智能剪辑流程解析
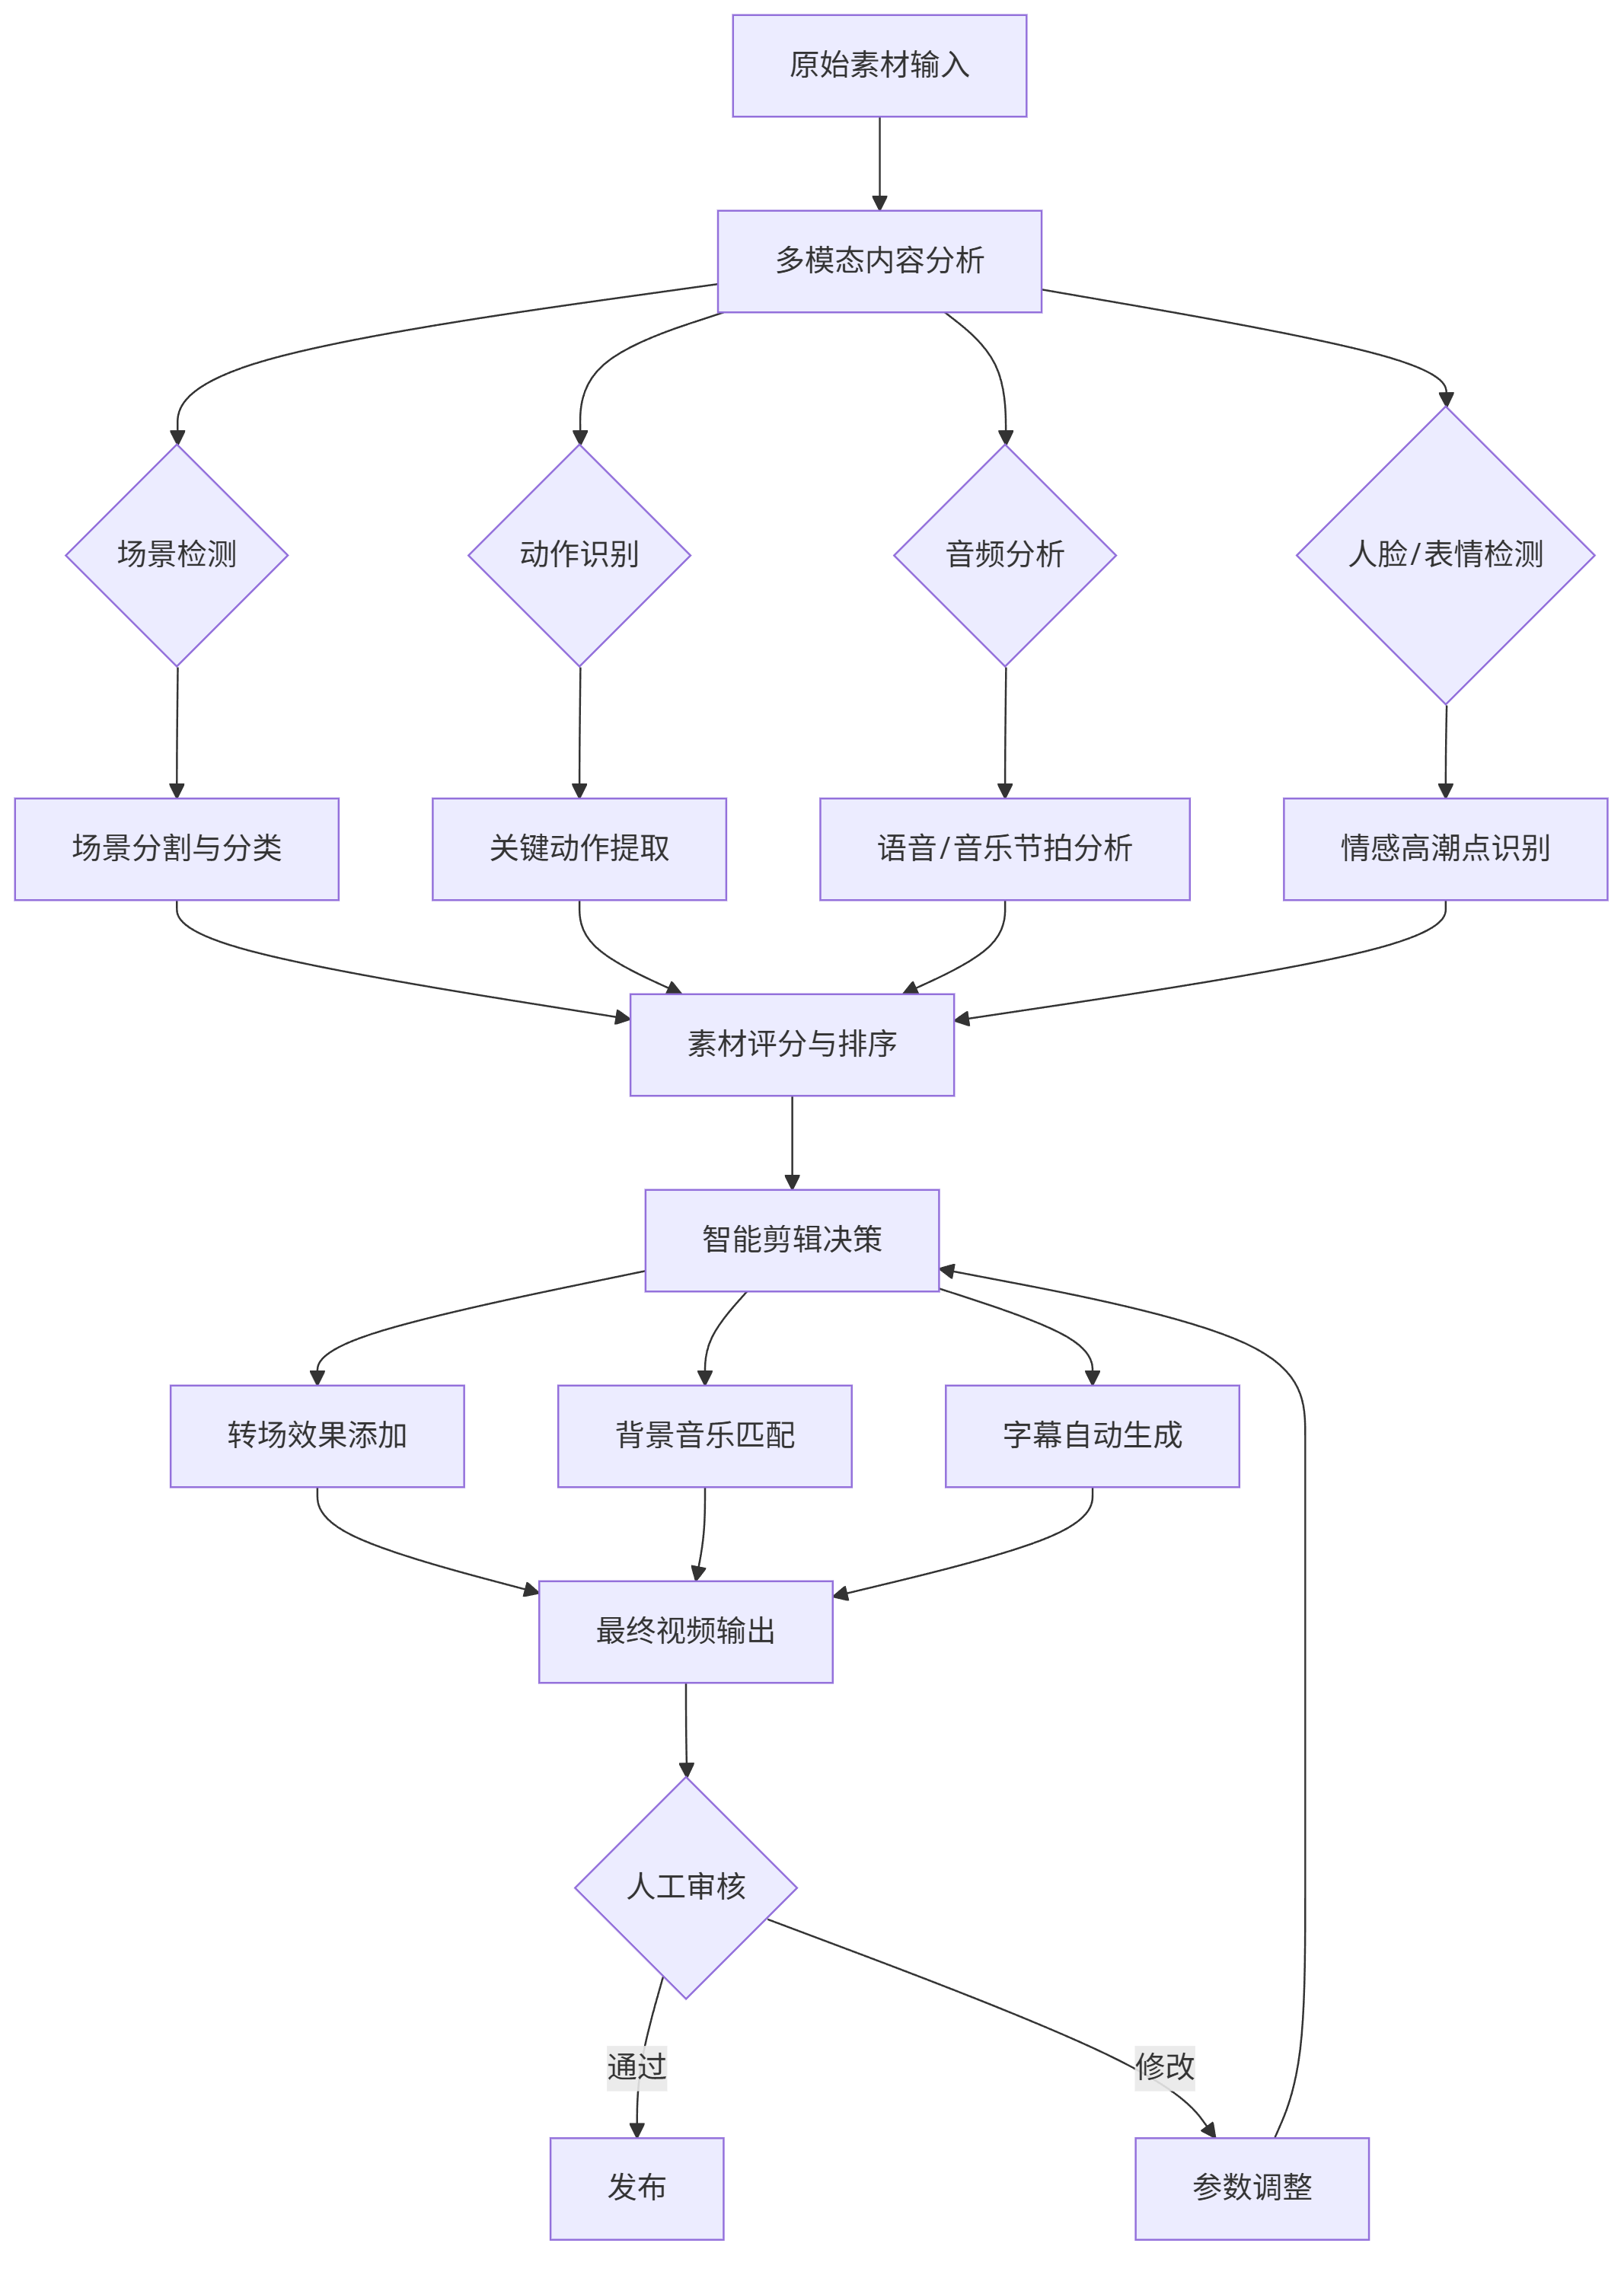
flowchart TD A[原始素材输入] --> B[多模态内容分析] B --> C{场景检测} B --> D{动作识别} B --> E{音频分析} B --> F{人脸/表情检测} C --> G[场景分割与分类] D --> H[关键动作提取] E --> I[语音/音乐节拍分析] F --> J[情感高潮点识别] G & H & I & J --> K[素材评分与排序] K --> L[智能剪辑决策] L --> M[转场效果添加] L --> N[背景音乐匹配] L --> O[字幕自动生成] M & N & O --> P[最终视频输出] P --> Q{人工审核} Q -->|通过| R[发布] Q -->|修改| S[参数调整] S --> L
落地案例:剪映AI智能剪辑
剪映2024年推出的"智能成片"功能,通过分析用户上传的原始素材,自动识别精彩瞬间、匹配背景音乐、添加字幕和转场效果,将原本需要1小时的剪辑工作缩短至3分钟内。该功能上线6个月用户数突破1亿,平均每条视频为用户节省55分钟剪辑时间。其核心技术在于多模态融合分析,通过计算机视觉识别关键帧,音频分析提取节奏点,自然语言处理生成字幕,最终形成符合平台传播特性的短视频内容。
1.3 智能分发:基于深度学习的精准推荐引擎
短视频平台的核心竞争力在于精准的内容分发能力。AI推荐算法通过分析用户行为、内容特征和社交关系,实现"千人千面"的个性化推荐,显著提升用户粘性和内容消费效率。
技术实现:多目标推荐系统架构
import tensorflow as tf from tensorflow.keras.layers import Input, Embedding, Dense, Concatenate, Attention, Dropout from tensorflow.keras.models import Model import numpy as np import pandas as pd class ShortVideoRecommender: def __init__(self, user_count, video_count, embedding_dim=64): self.user_count = user_count self.video_count = video_count self.embedding_dim = embedding_dim self.model = self._build_model() def _build_model(self): """构建多目标推荐模型""" # 用户特征输入 user_id = Input(shape=(1,), name="user_id") user_age = Input(shape=(1,), name="user_age") user_gender = Input(shape=(1,), name="user_gender") user_interest = Input(shape=(10,), name="user_interest") # 兴趣向量 # 视频特征输入 video_id = Input(shape=(1,), name="video_id") video_category = Input(shape=(1,), name="video_category") video_duration = Input(shape=(1,), name="video_duration") video_tags = Input(shape=(5,), name="video_tags") # 标签向量 # 用户嵌入层 user_embedding = Embedding(self.user_count+1, self.embedding_dim, name="user_embedding")(user_id) user_embedding = tf.squeeze(user_embedding, axis=1) # 视频嵌入层 video_embedding = Embedding(self.video_count+1, self.embedding_dim, name="video_embedding")(video_id) video_embedding = tf.squeeze(video_embedding, axis=1) # 用户特征处理 user_features = Concatenate()([ user_embedding, Dense(16, activation='relu')(user_age), Dense(8, activation='relu')(user_gender), Dense(32, activation='relu')(user_interest) ]) user_features = Dense(128, activation='relu')(user_features) # 视频特征处理 video_features = Concatenate()([ video_embedding, Dense(16, activation='relu')(video_category), Dense(8, activation='relu')(video_duration), Dense(32, activation='relu')(video_tags) ]) video_features = Dense(128, activation='relu')(video_features) # 注意力机制 - 捕捉用户对视频不同特征的关注 attention = Attention()([user_features, video_features]) combined = Concatenate()([user_features, video_features, attention]) # 多目标输出层 watch_time = Dense(1, activation='linear', name='watch_time')(combined) # 观看时长预测 click_prob = Dense(1, activation='sigmoid', name='click_prob')(combined) # 点击概率预测 share_prob = Dense(1, activation='sigmoid', name='share_prob')(combined) # 分享概率预测 like_prob = Dense(1, activation='sigmoid', name='like_prob')(combined) # 点赞概率预测 # 构建模型 model = Model( inputs=[user_id, user_age, user_gender, user_interest, video_id, video_category, video_duration, video_tags], outputs=[watch_time, click_prob, share_prob, like_prob] ) # 多目标损失函数 model.compile( optimizer='adam', loss={ 'watch_time': 'mse', 'click_prob': 'binary_crossentropy', 'share_prob': 'binary_crossentropy', 'like_prob': 'binary_crossentropy' }, loss_weights={ 'watch_time': 0.4, 'click_prob': 0.3, 'share_prob': 0.15, 'like_prob': 0.15 }, metrics=['accuracy'] ) return model def train(self, train_data, epochs=10, batch_size=256): """训练模型""" # 准备输入数据 inputs = [ train_data['user_id'], train_data['user_age'], train_data['user_gender'], train_data['user_interest'], train_data['video_id'], train_data['video_category'], train_data['video_duration'], train_data['video_tags'] ] # 准备输出数据 outputs = [ train_data['watch_time'], train_data['click'], train_data['share'], train_data['like'] ] # 训练模型 history = self.model.fit( inputs, outputs, epochs=epochs, batch_size=batch_size, validation_split=0.2 ) return history def recommend(self, user_features, candidate_videos, top_k=10): """为用户推荐视频""" # 构建用户特征矩阵(复制到与候选视频数量相同) user_inputs = { 'user_id': np.array([user_features['user_id']]*len(candidate_videos)), 'user_age': np.array([user_features['user_age']]*len(candidate_videos)), 'user_gender': np.array([user_features['user_gender']]*len(candidate_videos)), 'user_interest': np.array([user_features['user_interest']]*len(candidate_videos)) } # 视频特征矩阵 video_inputs = { 'video_id': np.array([v['video_id'] for v in candidate_videos]), 'video_category': np.array([v['video_category'] for v in candidate_videos]), 'video_duration': np.array([v['video_duration'] for v in candidate_videos]), 'video_tags': np.array([v['video_tags'] for v in candidate_videos]) } # 组合输入 inputs = [ user_inputs['user_id'], user_inputs['user_age'], user_inputs['user_gender'], user_inputs['user_interest'], video_inputs['video_id'], video_inputs['video_category'], video_inputs['video_duration'], video_inputs['video_tags'] ] # 预测各项指标 watch_time, click_prob, share_prob, like_prob = self.model.predict(inputs) # 综合评分(加权求和) scores = 0.4*watch_time.flatten() + 0.3*click_prob.flatten() + 0.15*share_prob.flatten() + 0.15*like_prob.flatten() # 排序并返回Top K结果 video_indices = np.argsort(scores)[::-1][:top_k] return [candidate_videos[i] for i in video_indices] # 使用示例 if __name__ == "__main__": # 模拟数据 user_count = 10000 video_count = 100000 recommender = ShortVideoRecommender(user_count, video_count) # 训练模型(此处省略数据准备代码) # train_data = prepare_training_data() # history = recommender.train(train_data) # 推荐示例 user_features = { 'user_id': 12345, 'user_age': [25], 'user_gender': [1], # 1:男, 0:女 'user_interest': [0.8, 0.1, 0.6, 0.3, 0.0, 0.5, 0.2, 0.9, 0.4, 0.7] # 兴趣向量 } # 候选视频(实际应用中从内容池选取) candidate_videos = [ {'video_id': 1001, 'video_category': [3], 'video_duration': [15], 'video_tags': [0.8, 0.2, 0.5, 0.1, 0.3]}, # ... 更多候选视频 ] recommendations = recommender.recommend(user_features, candidate_videos, top_k=10) print("推荐结果:", recommendations)
推荐系统工作流程
flowchart LR A[用户行为数据] -->|收集| B[数据预处理] C[内容特征数据] -->|提取| B D[社交关系数据] -->|整合| B B --> E[用户画像构建] B --> F[内容理解] E --> G[多目标推荐模型] F --> G G --> H[候选集生成] H --> I[精排模型] I --> J[多样性优化] J --> K[过滤规则应用] K --> L[推荐结果展示] L --> M[用户反馈] M -->|更新| A
落地案例:TikTok推荐算法
TikTok的推荐系统采用"双塔模型+强化学习"架构,实现了精准的内容匹配。其算法核心包含三个阶段:
- 候选生成:从海量内容中快速筛选出数百个候选视频,主要基于用户历史兴趣和内容基本特征
- 精排阶段:使用深度神经网络预测视频的点击率、完播率、互动率等多维度指标,综合评分后排序
- 多样性优化:通过探索式推荐引入少量用户未接触过的内容类别,避免"信息茧房"
据第三方研究,TikTok用户平均每1.5次滑动就会发现一个感兴趣的视频,完播率比传统视频平台高出3倍以上。其成功关键在于实时学习用户兴趣变化,新视频发布后15分钟内即可完成冷启动,进入相应兴趣用户的推荐流。
1.4 AI短视频应用效果对比
| 应用环节 | 传统方式 | AI辅助方式 | 效率提升 | 成本降低 | 质量提升 |
|---|---|---|---|---|---|
| 脚本创作 | 2-3小时/个 | 5-10分钟/个 | 12-36倍 | 80-90% | 爆款率+200% |
| 素材剪辑 | 30-60分钟/个 | 2-5分钟/个 | 6-30倍 | 70-85% | 一致性+60% |
| 内容分发 | 人工运营推荐 | AI个性化推荐 | 无限扩展 | 90%+ | 用户留存+40% |
| 数据分析 | 人工统计分析 | AI实时分析 | 100倍+ | 95%+ | 决策准确率+70% |
| 特效制作 | 专业软件制作 | AI自动生成 | 5-20倍 | 85%+ | 效果多样性+300% |
二、AI+设计:创意与效率的完美融合
设计行业正经历从"纯手工创作"到"人机协作"的范式转变。AI设计工具不仅能将设计师从重复性工作中解放出来,更能提供创意启发,拓展设计的可能性边界。Adobe 2024年报告显示,采用AI辅助设计的团队平均项目周期缩短45%,创意方案数量增加200%,客户满意度提升35%。
2.1 智能平面设计:从文字到视觉的自动转换
平面设计是AI渗透最早也最成熟的设计领域。AI工具能够根据文本描述生成符合美学原则的设计作品,从海报、LOGO到社交媒体素材,实现"文字即设计"的全新工作流。
技术实现:基于扩散模型的平面设计生成
import torch from diffusers import StableDiffusionPipeline, EulerAncestralDiscreteScheduler from PIL import Image import numpy as np import matplotlib.pyplot as plt class AIGraphicDesigner: def __init__(self, model_name="runwayml/stable-diffusion-v1-5", device="cuda" if torch.cuda.is_available() else "cpu"): self.device = device # 加载Stable Diffusion模型 self.pipe = StableDiffusionPipeline.from_pretrained(model_name) self.pipe.scheduler = EulerAncestralDiscreteScheduler.from_config(self.pipe.scheduler.config) self.pipe = self.pipe.to(device) # 设计风格提示词库 self.style_prompts = { "minimalist": "minimalist design, clean lines, white space, modern, simple, elegant, high contrast", "vintage": "vintage style, retro, nostalgic, warm colors, texture, film grain, classic", "pop_art": "pop art, bold colors, high contrast, comic style, vibrant, iconic imagery", "corporate": "corporate design, professional, clean, balanced, muted colors, trustworthy", "hand_drawn": "hand-drawn illustration, sketchy, organic lines, artistic, textured, hand-crafted" } # 构图提示词库 self.composition_prompts = { "centered": "centered composition, symmetrical, balanced, focal point in center", "rule_of_thirds": "rule of thirds composition, focal point at intersection, balanced negative space", "dynamic": "dynamic composition, diagonal lines, movement, energetic, asymmetric", "minimal": "minimal composition, extreme simplicity, limited elements, ample white space" } def generate_design(self, text_prompt, style="minimalist", composition="centered", colors=None, size=(1024, 1024), num_inference_steps=50, guidance_scale=7.5, seed=None): """ 生成平面设计作品 text_prompt: 设计内容描述 style: 设计风格,可选"minimalist", "vintage", "pop_art", "corporate", "hand_drawn" composition: 构图方式,可选"centered", "rule_of_thirds", "dynamic", "minimal" colors: 颜色方案,如["#FF5733", "#33FF57", "#3357FF"] size: 输出尺寸 (width, height) num_inference_steps: 推理步数,越大质量越高但速度越慢 guidance_scale: 提示词遵循度,0-20,越大越遵循提示词 seed: 随机种子,用于复现结果 """ # 构建完整提示词 full_prompt = f"{text_prompt}, {self.style_prompts[style]}, {self.composition_prompts[composition]}" # 添加颜色提示 if colors: color_str = "color scheme: " + ", ".join(colors) full_prompt = f"{full_prompt}, {color_str}" # 添加设计质量提示词 full_prompt = f"{full_prompt}, professional graphic design, high resolution, clear, sharp, well-composed, visually appealing" # 设置随机种子 if seed is not None: generator = torch.Generator(self.device).manual_seed(seed) else: generator = None # 生成图像 with torch.autocast(self.device): image = self.pipe( full_prompt, width=size[0], height=size[1], num_inference_steps=num_inference_steps, guidance_scale=guidance_scale, generator=generator ).images[0] return image, full_prompt def generate_variations(self, text_prompt, num_variations=4, style="minimalist", **kwargs): """生成多个设计变体""" variations = [] prompts = [] for i in range(num_variations): # 为每个变体使用不同种子 seed = kwargs.get('seed', None) + i if kwargs.get('seed', None) else None img, prompt = self.generate_design(text_prompt, style=style, seed=seed, **kwargs) variations.append(img) prompts.append(prompt) return variations, prompts def display_designs(self, designs, titles=None): """显示多个设计作品""" n = len(designs) cols = min(2, n) rows = (n + cols - 1) // cols plt.figure(figsize=(10*cols, 10*rows)) for i, design in enumerate(designs): plt.subplot(rows, cols, i+1) plt.imshow(design) if titles and i < len(titles): plt.title(titles[i], fontsize=12) plt.axis('off') plt.tight_layout() plt.show() # 使用示例 if __name__ == "__main__": designer = AIGraphicDesigner() # 生成产品海报 product_prompt = "product poster for wireless bluetooth headphones, featuring the product image, product name 'SoundWave Pro', price $99.99, discount 20% off, call to action 'Buy Now'" poster, prompt = designer.generate_design( text_prompt=product_prompt, style="corporate", composition="rule_of_thirds", colors=["#1A1A2E", "#E94560", "#FFFFFF"], size=(1024, 1536), # 竖版海报 seed=42 ) poster.save("headphone_poster.png") # 生成社交媒体帖子变体 social_prompt = "social media post for a coffee shop, featuring latte art, cozy atmosphere, text 'New Winter Menu: Spiced Pumpkin Latte', opening hours 7am-8pm" variations, prompts = designer.generate_variations( text_prompt=social_prompt, num_variations=4, style="vintage", size=(1024, 1024), seed=123 ) # 显示变体 designer.display_designs(variations, titles=[f"Variation {i+1}" for i in range(4)]) # 保存变体 for i, var in enumerate(variations): var.save(f"coffee_shop_social_{i+1}.png")
Prompt示例:电商banner设计
Create a high-quality e-commerce banner for a summer sale with the following elements:
- Main text: "SUMMER BLOWOUT SALE"
- Subtext: "Up to 50% off all swimwear and beach accessories"
- Call to action button: "SHOP NOW"
- Visual elements: tropical beach scene, colorful swimwear, beach accessories
- Style: vibrant, energetic, summer vibe, modern, commercial quality
- Color scheme: turquoise, coral, white, sand beige
- Composition: text on top, products in middle, beach scene background
- Resolution: 1920x600 pixels, high definition, sharp details

Professional graphic design, clean layout, balanced composition, visual hierarchy, attention-grabbing, commercial appeal, suitable for website header
落地案例:Canva AI设计助手
Canva在2024年推出的Magic Media AI功能,让用户只需输入文本描述即可生成专业级设计作品。该功能集成了多模态模型,能够理解复杂的设计需求,包括布局、风格、颜色和元素关系。根据Canva官方数据,Magic Media将用户设计时间平均从60分钟缩短至5分钟,使非专业用户也能创建出符合商业标准的设计作品。其核心优势在于将专业设计知识编码为提示词工程,引导AI生成符合设计原则的作品,同时保持用户对最终结果的控制。
2.2 3D设计与建模:AI驱动的三维内容创作
3D设计传统上需要专业技能和大量时间投入,而AI技术正在打破这一壁垒,使快速创建高质量3D模型成为可能。从产品设计到游戏资产,AI 3D工具正在重塑三维内容的生产方式。
技术实现:文本到3D模型生成
import torch import numpy as np from diffusers import StableDiffusion3DModelPipeline from matplotlib import pyplot as plt from mpl_toolkits.mplot3d import Axes3D import open3d as o3d class AI3DModeler: def __init__(self, model_name="stabilityai/stable-diffusion-3d", device="cuda" if torch.cuda.is_available() else "cpu"): self.device = device self.pipeline = StableDiffusion3DModelPipeline.from_pretrained(model_name) self.pipeline = self.pipeline.to(device) def generate_mesh(self, text_prompt, num_inference_steps=50, guidance_scale=7.5, seed=None): """从文本描述生成3D网格模型""" generator = torch.Generator(self.device).manual_seed(seed) if seed else None with torch.autocast(self.device): result = self.pipeline( text_prompt, num_inference_steps=num_inference_steps, guidance_scale=guidance_scale, generator=generator ) # 返回网格模型和纹理 return result.mesh, result.texture def generate_point_cloud(self, text_prompt, num_points=10000, **kwargs): """从文本描述生成点云模型""" mesh, texture = self.generate_mesh(text_prompt, **kwargs) # 将网格转换为点云 pcd = mesh.sample_points_poisson_disk(number_of_points=num_points) return pcd, texture def visualize_point_cloud(self, pcd, title="3D Point Cloud"): """可视化点云模型""" fig = plt.figure(figsize=(10, 10)) ax = fig.add_subplot(111, projection='3d') # 获取点云数据 points = np.asarray(pcd.points) colors = np.asarray(pcd.colors) if pcd.has_colors() else None # 绘制点云 scatter = ax.scatter(points[:, 0], points[:, 1], points[:, 2], c=colors if colors is not None else 'blue', s=1, alpha=0.6) ax.set_xlabel('X') ax.set_ylabel('Y') ax.set_zlabel('Z') ax.set_title(title) plt.show() def save_model(self, mesh, file_path, texture=None): """保存3D模型到文件""" # 支持多种格式:obj, ply, stl等 file_format = file_path.split('.')[-1].lower() if file_format == 'obj' and texture: o3d.io.write_triangle_mesh(file_path, mesh, write_texture=True) elif file_format in ['ply', 'stl']: o3d.io.write_triangle_mesh(file_path, mesh) else: raise ValueError(f"Unsupported file format: {file_format}") print(f"Model saved to {file_path}") # 使用示例 if __name__ == "__main__": modeler = AI3DModeler() # 生成一个现代风格的椅子模型 chair_prompt = "modern office chair, ergonomic design, black and silver color, comfortable, detailed, high quality 3D model" mesh, texture = modeler.generate_mesh( text_prompt=chair_prompt, num_inference_steps=80, guidance_scale=8.0, seed=42 ) # 生成点云并可视化 pcd, _ = modeler.generate_point_cloud( text_prompt=chair_prompt, num_points=20000, seed=42 ) modeler.visualize_point_cloud(pcd, title="Modern Office Chair") # 保存模型 modeler.save_model(mesh, "modern_chair.obj", texture)
3D设计工作流程对比
flowchart TB subgraph 传统3D设计流程 A[概念草图] --> B[基础建模] B --> C[细节雕刻] C --> D[UV展开] D --> E[纹理绘制] E --> F[材质设置] F --> G[渲染测试] G --> H[调整优化] H --> I[最终渲染] note1["耗时: 数天至数周<br>技能要求: 专业3D设计师<br>工具: Blender, Maya, ZBrush"] end subgraph AI辅助3D设计流程 J[文本描述/参考图] --> K[AI生成基础模型] K --> L[模型调整与优化] L --> M[AI生成纹理材质] M --> N[渲染测试] N --> O[微调优化] O --> P[最终渲染] note2["耗时: 数小时至数天<br>技能要求: 基础设计知识<br>工具: AI 3D生成器 + 传统工具"] end style note1 fill:#fff3cd,stroke:#ffeeba style note2 fill:#d1ecf1,stroke:#bee5eb
落地案例:NVIDIA AI 3D工厂
NVIDIA在2024年发布的AI 3D工厂解决方案,允许设计师通过文本描述直接生成可用于生产的3D模型。该系统结合了多视图图像生成、深度估计和网格重建技术,能够创建具有精确尺寸和细节的3D资产。汽车制造商宝马使用该技术将新车设计概念模型的创建时间从2周缩短至4小时,同时保持了设计精度和细节丰富度。该系统不仅加速了设计流程,还降低了对高级3D建模技能的要求,使产品设计师能够直接参与3D模型创建。
2.3 用户界面设计:AI驱动的UX/UI自动化
用户界面设计需要平衡美学与功能性,AI工具能够分析用户需求、生成符合最佳实践的界面设计,并根据用户反馈持续优化,显著提升设计效率和用户体验。
技术实现:智能UI设计生成器
import json import numpy as np import matplotlib.pyplot as plt from PIL import Image, ImageDraw, ImageFont import random class AIUIDesigner: def __init__(self): # UI组件库 self.components = { "button": {"type": "interactive", "min_size": (80, 36), "max_size": (200, 50)}, "text_input": {"type": "interactive", "min_size": (150, 36), "max_size": (300, 50)}, "label": {"type": "display", "min_size": (50, 20), "max_size": (400, 40)}, "image": {"type": "display", "min_size": (100, 100), "max_size": (600, 400)}, "checkbox": {"type": "interactive", "min_size": (24, 24), "max_size": (24, 24)}, "radio_button": {"type": "interactive", "min_size": (24, 24), "max_size": (24, 24)}, "dropdown": {"type": "interactive", "min_size": (150, 36), "max_size": (300, 50)}, "slider": {"type": "interactive", "min_size": (150, 20), "max_size": (300, 20)}, "card": {"type": "container", "min_size": (200, 200), "max_size": (400, 500)} } # 设计模式库 self.design_patterns = { "login_screen": ["label", "text_input", "label", "text_input", "button"], "product_card": ["image", "label", "label", "button"], "settings_panel": ["label", "toggle", "label", "dropdown", "label", "slider"], "search_results": ["card", "card", "card", "card"], "form": ["label", "text_input", "label", "dropdown", "label", "checkbox", "button"] } # 颜色主题 self.color_themes = { "light": { "background": "#FFFFFF", "surface": "#F5F5F5", "primary": "#2196F3", "secondary": "#757575", "text": "#212121", "accent": "#FF5722" }, "dark": { "background": "#121212", "surface": "#1E1E1E", "primary": "#2196F3", "secondary": "#9E9E9E", "text": "#E0E0E0", "accent": "#FF9800" }, "vibrant": { "background": "#F5F5F5", "surface": "#FFFFFF", "primary": "#E91E63", "secondary": "#9C27B0", "text": "#212121", "accent": "#00BCD4" } } def parse_user_requirement(self, requirement): """解析用户需求,提取关键信息""" # 这里实际应用中会使用NLP模型进行解析 # 简化实现,假设提取出页面类型、组件和风格 parsed = { "page_type": "login_screen", # 示例:默认为登录界面 "components": ["label", "text_input", "button"], "style": "light", "platform": "mobile", "orientation": "portrait" } # 简单关键词匹配 if "dark" in requirement.lower(): parsed["style"] = "dark" if "vibrant" in requirement.lower(): parsed["style"] = "vibrant" if "product" in requirement.lower(): parsed["page_type"] = "product_card" if "form" in requirement.lower(): parsed["page_type"] = "form" if "settings" in requirement.lower(): parsed["page_type"] = "settings_panel" return parsed def generate_layout(self, parsed_requirement): """生成UI布局""" page_type = parsed_requirement["page_type"] platform = parsed_requirement["platform"] orientation = parsed_requirement["orientation"] # 确定画布尺寸 if platform == "mobile": if orientation == "portrait": width, height = 360, 640 else: width, height = 640, 360 elif platform == "tablet": if orientation == "portrait": width, height = 768, 1024 else: width, height = 1024, 768 else: # desktop width, height = 1280, 720 # 获取该页面类型的组件列表 components = self.design_patterns.get(page_type, ["label", "button"]) # 生成布局 (简化版:垂直排列) layout = [] y_position = 50 padding = 16 component_height = 40 for component_type in components: comp_info = self.components[component_type] comp_width = min(comp_info["max_size"][0], width - 2*padding) comp_height = comp_info["min_size"][1] layout.append({ "type": component_type, "position": (padding, y_position), "size": (comp_width, comp_height), "content": self._generate_component_content(component_type, page_type) }) y_position += comp_height + padding return { "size": (width, height), "components": layout } def _generate_component_content(self, component_type, page_type): """生成组件内容""" if component_type == "label": if page_type == "login_screen": return random.choice(["用户名", "密码", "登录", "注册"]) elif page_type == "product_card": return random.choice(["产品名称", "价格: ¥99.00", "限时优惠"]) else: return "标签文本" elif component_type == "text_input": if page_type == "login_screen": return "" # 输入框为空 else: return "输入内容" elif component_type == "button": return random.choice(["登录", "注册", "购买", "提交", "保存"]) elif component_type == "image": return "product_image" # 占位符 else: return "" def render_ui(self, layout, theme="light"): """渲染UI设计""" width, height = layout["size"] theme = self.color_themes[theme] # 创建画布 image = Image.new("RGB", (width, height), theme["background"]) draw = ImageDraw.Draw(image) # 尝试加载字体 try: font = ImageFont.truetype("simhei.ttf", 14) title_font = ImageFont.truetype("simhei.ttf", 18) except: font = ImageFont.load_default() title_font = font # 绘制组件 for component in layout["components"]: x, y = component["position"] w, h = component["size"] c_type = component["type"] content = component["content"] # 绘制组件背景 if c_type in ["button", "text_input", "card"]: draw.rectangle([x, y, x+w, y+h], fill=theme["surface"], outline=theme["primary"] if c_type == "button" else theme["secondary"], width=2 if c_type == "button" else 1) # 绘制组件内容 if c_type == "label": draw.text((x+8, y+8), content, font=font, fill=theme["text"]) elif c_type == "button": # 按钮文本居中 text_bbox = draw.textbbox((0, 0), content, font=font) text_width = text_bbox[2] - text_bbox[0] text_height = text_bbox[3] - text_bbox[1] text_x = x + (w - text_width) // 2 text_y = y + (h - text_height) // 2 draw.text((text_x, text_y), content, font=font, fill=theme["background"] if c_type == "button" else theme["text"]) elif c_type == "text_input": draw.text((x+8, y+8), content, font=font, fill=theme["text"]) elif c_type == "image": # 绘制占位图像 draw.rectangle([x, y, x+w, y+h], fill="#CCCCCC") draw.text((x+w//2 - 30, y+h//2 - 10), "图片", font=title_font, fill=theme["secondary"]) return image def generate_ui_design(self, user_requirement): """端到端生成UI设计""" parsed = self.parse_user_requirement(user_requirement) layout = self.generate_layout(parsed) ui_image = self.render_ui(layout, theme=parsed["style"]) return ui_image, layout # 使用示例 if __name__ == "__main__": designer = AIUIDesigner() # 生成登录界面 login_ui, _ = designer.generate_ui_design("创建一个深色主题的移动应用登录界面,包含用户名、密码输入框和登录按钮") login_ui.save("login_ui_dark.png") # 生成产品卡片 product_ui, _ = designer.generate_ui_design("创建一个产品展示卡片,包含图片、名称、价格和购买按钮,使用亮色主题") product_ui.save("product_card_light.png") # 显示图像 plt.figure(figsize=(10, 8)) plt.subplot(121) plt.imshow(login_ui) plt.title("登录界面设计") plt.axis('off') plt.subplot(122) plt.imshow(product_ui) plt.title("产品卡片设计") plt.axis('off') plt.tight_layout() plt.show()
落地案例:Figma AI设计助手
Figma在2024年集成的AI设计助手彻底改变了UI/UX设计流程。设计师只需输入文本描述(如"为电商应用设计一个结账页面,包含商品列表、价格汇总和支付选项"),AI就能自动生成符合设计规范的界面初稿。系统会考虑排版规则、颜色对比、组件间距等设计原则,并生成多个变体供选择。根据Figma官方数据,该工具使界面设计初稿的创建时间从平均8小时缩短至30分钟,设计师可以将更多时间投入到用户体验优化和创意设计上。Airbnb设计团队使用该工具后,新功能的设计迭代速度提升了3倍,用户测试反馈的问题数量减少了40%。
三、AI+服务业:重构客户体验与运营效率
服务业是AI技术落地的重要场景,从智能客服到个性化推荐,从流程自动化到需求预测,AI正在全方位提升服务质量与运营效率。麦肯锡2025年报告显示,AI已帮助服务业平均降低运营成本22%,提升客户满意度34%,增加营收15%。
3.1 智能客服:自然交互与问题解决的自动化
智能客服是AI在服务业应用最成熟的领域之一,通过自然语言处理和知识图谱技术,实现7x24小时不间断服务,解决常见问题,大幅降低人工客服压力。
技术实现:多轮对话智能客服系统
import json import numpy as np import tensorflow as tf from tensorflow.keras.layers import Input, Dense, LSTM, Embedding, Attention, Concatenate from tensorflow.keras.models import Model from transformers import AutoTokenizer, AutoModelForSequenceClassification, pipeline import spacy from sklearn.metrics.pairwise import cosine_similarity import random # 加载NLP模型 nlp = spacy.load("zh_core_web_md") tokenizer = AutoTokenizer.from_pretrained("bert-base-chinese") intent_classifier = pipeline("text-classification", model="bert-base-chinese", tokenizer=tokenizer) class AICustomerService: def __init__(self, knowledge_base_path="knowledge_base.json"): # 加载知识库 self.load_knowledge_base(knowledge_base_path) # 初始化对话状态 self.dialogue_state = {} # 意图识别模型 self.intent_model = AutoModelForSequenceClassification.from_pretrained("bert-base-chinese", num_labels=len(self.intent_labels)) self.intent_model.load_state_dict(tf.keras.models.load_model("intent_model_weights.h5")) # 初始化响应生成模型 self.response_generator = self.build_response_generator() def load_knowledge_base(self, path): """加载知识库""" with open(path, 'r', encoding='utf-8') as f: self.knowledge_base = json.load(f) # 构建知识库向量索引 self.kb_vectors = [] self.kb_questions = [] for item in self.knowledge_base: doc = nlp(item["question"]) self.kb_vectors.append(doc.vector) self.kb_questions.append(item["question"]) # 提取意图标签 self.intent_labels = list({item["intent"] for item in self.knowledge_base}) def build_response_generator(self): """构建响应生成模型""" # 简化实现,实际应用中会使用更复杂的seq2seq模型 # 这里使用规则+模板的方式生成响应 # 响应模板 self.response_templates = { "greeting": ["您好!很高兴为您服务,有什么可以帮助您的吗?", "您好!欢迎咨询,请问有什么问题?"], "farewell": ["感谢您的咨询,祝您生活愉快!", "再见!如果还有其他问题,欢迎随时联系我们。"], "inquiry_product": "关于{product},{answer}", "inquiry_order": "您的订单{order_id}当前状态是:{status},预计{delivery_time}送达。", "complaint": "非常抱歉给您带来不好的体验,我们会尽快处理您的问题:{issue}。请留下您的联系方式,我们将在24小时内与您联系。", "unknown": ["抱歉,我不太明白您的意思,可以请您再详细说明一下吗?", "对不起,我没理解您的问题,能否换一种方式表达?"] } return True def recognize_intent(self, text): """识别用户意图""" # 使用BERT模型进行意图分类 result = intent_classifier(text)[0] intent = result["label"] confidence = result["score"] return intent, confidence def retrieve_knowledge(self, question, threshold=0.7): """从知识库检索答案""" doc = nlp(question) question_vector = doc.vector # 计算余弦相似度 similarities = cosine_similarity([question_vector], self.kb_vectors)[0] max_index = np.argmax(similarities) if similarities[max_index] >= threshold: return self.knowledge_base[max_index]["answer"], similarities[max_index] else: return None, 0.0 def generate_response(self, user_input, user_id="default"): """生成响应""" # 更新对话状态 if user_id not in self.dialogue_state: self.dialogue_state[user_id] = { "history": [], "context": {} } self.dialogue_state[user_id]["history"].append({"role": "user", "content": user_input}) # 意图识别 intent, confidence = self.recognize_intent(user_input) # 知识库检索 answer, kb_confidence = self.retrieve_knowledge(user_input) # 生成响应 response = "" if intent == "greeting": response = random.choice(self.response_templates["greeting"]) elif intent == "farewell": response = random.choice(self.response_templates["farewell"]) elif intent == "inquiry_product" and answer: # 提取产品名称 product = self._extract_product(user_input) response = self.response_templates["inquiry_product"].format(product=product, answer=answer) elif intent == "inquiry_order" and answer: # 提取订单号 order_id = self._extract_order_id(user_input) # 查询订单状态(简化实现) status = "已发货" delivery_time = "2023-12-25" response = self.response_templates["inquiry_order"].format( order_id=order_id, status=status, delivery_time=delivery_time ) elif intent == "complaint": issue = user_input response = self.response_templates["complaint"].format(issue=issue) elif kb_confidence > 0.7: response = answer else: response = random.choice(self.response_templates["unknown"]) # 更新对话历史 self.dialogue_state[user_id]["history"].append({"role": "assistant", "content": response}) return response def _extract_product(self, text): """提取产品名称""" # 使用命名实体识别提取产品 doc = nlp(text) products = [ent.text for ent in doc.ents if ent.label_ == "PRODUCT"] return products[0] if products else "该产品" def _extract_order_id(self, text): """提取订单号""" # 简单规则提取订单号(通常是字母+数字组合) import re match = re.search(r'[A-Za-z0-9]{8,16}', text) return match.group() if match else "XXXXXXXX" def chat(self, user_id="default"): """交互式聊天""" print("客服助手:您好!我是智能客服助手,有什么可以帮助您的吗?(输入'再见'结束对话)") while True: user_input = input("您:") if user_input.lower() in ["再见", "拜拜", "exit"]: print("客服助手:感谢您的咨询,祝您生活愉快!") break response = self.generate_response(user_input, user_id) print(f"客服助手:{response}") # 使用示例 if __name__ == "__main__": # 创建知识库(实际应用中会从文件加载) sample_kb = [ {"question": "你们的产品保修期是多久?", "answer": "我们的产品提供12个月的保修期,从购买日期开始计算。", "intent": "inquiry_product"}, {"question": "如何申请退货?", "answer": "您可以在订单页面点击'申请退货'按钮,或联系客服协助处理。退货需在收到商品7天内提出。", "intent": "inquiry_product"}, {"question": "订单什么时候发货?", "answer": "一般情况下,订单会在付款后24小时内发货,节假日可能会有延迟。", "intent": "inquiry_order"}, {"question": "如何修改收货地址?", "answer": "如果订单尚未发货,您可以在'我的订单'中直接修改收货地址;如果已发货,请联系客服协助处理。", "intent": "inquiry_order"} ] # 保存示例知识库 with open("knowledge_base.json", "w", encoding="utf-8") as f: json.dump(sample_kb, f, ensure_ascii=False, indent=2) # 启动客服 cs = AICustomerService() cs.chat()
智能客服工作流程
flowchart LR A[用户输入] --> B[意图识别] B --> C{意图类型} C -->|常见问题| D[知识库检索] C -->|订单查询| E[调用订单API] C -->|产品咨询| F[产品数据库查询] C -->|投诉建议| G[工单系统创建] C -->|复杂问题| H[转人工客服] D & E & F & G --> I[响应生成] I --> J[返回回答] J --> K[用户反馈收集] K --> L[模型优化]
落地案例:阿里云智能客服
阿里云智能客服系统集成了自然语言处理、知识图谱和多轮对话技术,能够理解复杂的客户问题并提供精准解答。该系统每天处理超过1000万次客户咨询,解决率达85%,平均响应时间仅0.3秒。通过意图识别和情绪分析,系统能自动将复杂问题转至人工客服,并提供上下文信息,使人工处理效率提升40%。某大型电商平台接入该系统后,客服成本降低了55%,客户满意度提升了28个百分点。系统还具备持续学习能力,通过分析人工客服的对话记录,不断优化回答质量,每月问题解决率提升1-2%。
3.2 个性化推荐:基于用户画像的精准服务
服务业的核心竞争力在于提供个性化体验,AI推荐系统通过分析用户行为、偏好和历史数据,为每位用户提供定制化的服务建议,提升用户满意度和消费频率。
技术实现:服务业个性化推荐系统
import pandas as pd import numpy as np import matplotlib.pyplot as plt from sklearn.metrics.pairwise import cosine_similarity from sklearn.preprocessing import StandardScaler from sklearn.cluster import KMeans import joblib from datetime import datetime, timedelta class ServiceRecommender: def __init__(self, user_data_path, service_data_path): # 加载数据 self.user_data = pd.read_csv(user_data_path) self.service_data = pd.read_csv(service_data_path) # 预处理数据 self._preprocess_data() # 训练用户聚类模型 self.user_clusters = self._train_user_clustering() # 构建物品相似度矩阵 self.item_similarity = self._build_item_similarity() def _preprocess_data(self): """数据预处理""" # 处理缺失值 self.user_data = self.user_data.fillna({ 'age': self.user_data['age'].median(), 'preference_score': 0 }) # 特征标准化 scaler = StandardScaler() self.user_features = scaler.fit_transform(self.user_data[['age', 'income_level', 'preference_score']]) # 保存标准化器 joblib.dump(scaler, 'user_scaler.pkl') def _train_user_clustering(self, n_clusters=5): """训练用户聚类模型""" kmeans = KMeans(n_clusters=n_clusters, random_state=42) clusters = kmeans.fit_predict(self.user_features) # 保存模型 joblib.dump(kmeans, 'user_clustering.pkl') # 将聚类结果添加到用户数据 self.user_data['cluster'] = clusters return clusters def _build_item_similarity(self): """构建服务相似度矩阵""" # 提取服务特征 service_features = self.service_data[['price_level', 'duration', 'rating', 'category_id']] # 独热编码类别特征 service_features = pd.get_dummies(service_features, columns=['category_id']) # 计算余弦相似度 similarity_matrix = cosine_similarity(service_features) # 转换为DataFrame similarity_df = pd.DataFrame( similarity_matrix, index=self.service_data['service_id'], columns=self.service_data['service_id'] ) return similarity_df def _get_user_cluster(self, user_id): """获取用户所在聚类""" user_index = self.user_data[self.user_data['user_id'] == user_id].index if len(user_index) == 0: return -1 # 用户不存在 return self.user_clusters[user_index[0]] def _get_user_preferences(self, user_id): """获取用户偏好""" user_history = self.user_data[self.user_data['user_id'] == user_id] if len(user_history) == 0: return None # 提取用户喜欢的服务类别 preferred_categories = user_history[user_history['preference_score'] > 4]['category_id'].unique() # 价格偏好 price_preference = user_history['price_level'].mean() return { 'preferred_categories': preferred_categories, 'price_preference': price_preference, 'avg_rating': user_history['rating'].mean() } def recommend_services(self, user_id, n=5, method='hybrid'): """推荐服务""" # 获取用户信息 user_cluster = self._get_user_cluster(user_id) user_prefs = self._get_user_preferences(user_id) if user_prefs is None: # 新用户,基于热门推荐 return self._popular_recommendations(n) if method == 'collaborative': # 基于协同过滤 return self._collaborative_filtering(user_id, n) elif method == 'content': # 基于内容 return self._content_based_recommendations(user_prefs, n) else: # 混合推荐 collab_recs = self._collaborative_filtering(user_id, n*2) content_recs = self._content_based_recommendations(user_prefs, n*2) # 合并推荐结果,去重并加权 combined = {} for i, rec in enumerate(collab_recs): combined[rec['service_id']] = {'score': (n*2 - i)/ (n*2), 'details': rec} for i, rec in enumerate(content_recs): if rec['service_id'] in combined: combined[rec['service_id']]['score'] = (combined[rec['service_id']]['score'] + (n*2 - i)/(n*2)) / 2 else: combined[rec['service_id']] = {'score': (n*2 - i)/(n*2), 'details': rec} # 排序并取前n个 sorted_recs = sorted(combined.values(), key=lambda x: x['score'], reverse=True)[:n] return [rec['details'] for rec in sorted_recs] def _collaborative_filtering(self, user_id, n): """基于协同过滤的推荐""" user_cluster = self._get_user_cluster(user_id) # 获取同聚类用户 similar_users = self.user_data[self.user_data['cluster'] == user_cluster]['user_id'].unique() # 获取这些用户喜欢的服务 liked_services = self.user_data[ (self.user_data['user_id'].isin(similar_users)) & (self.user_data['preference_score'] > 4) ]['service_id'].value_counts().head(n*3) # 排除用户已经体验过的服务 user_services = self.user_data[self.user_data['user_id'] == user_id]['service_id'].unique() recommended_service_ids = [s for s in liked_services.index if s not in user_services][:n] # 获取服务详情 return self._get_service_details(recommended_service_ids) def _content_based_recommendations(self, user_prefs, n): """基于内容的推荐""" # 筛选符合用户偏好的服务 mask = self.service_data['category_id'].isin(user_prefs['preferred_categories']) candidate_services = self.service_data[mask] # 根据价格偏好筛选 price_diff = np.abs(candidate_services['price_level'] - user_prefs['price_preference']) candidate_services = candidate_services.iloc[price_diff.argsort()[:n*3]] # 根据评分筛选 candidate_services = candidate_services[candidate_services['rating'] >= user_prefs['avg_rating'] - 0.5] # 取前n个 recommended_service_ids = candidate_services['service_id'].head(n).tolist() # 获取服务详情 return self._get_service_details(recommended_service_ids) def _popular_recommendations(self, n): """热门推荐""" # 基于服务的流行度(预订次数)推荐 popular_services = self.service_data.sort_values('booking_count', ascending=False).head(n) return self._get_service_details(popular_services['service_id'].tolist()) def _get_service_details(self, service_ids): """获取服务详情""" details = [] for service_id in service_ids: service = self.service_data[self.service_data['service_id'] == service_id].iloc[0] details.append({ 'service_id': service['service_id'], 'name': service['name'], 'category': service['category'], 'price': service['price'], 'duration': service['duration'], 'rating': service['rating'], 'description': service['description'] }) return details def evaluate_recommendations(self, test_data, k=5): """评估推荐效果""" precision_scores = [] recall_scores = [] # 对测试集中的每个用户进行推荐 for user_id in test_data['user_id'].unique(): # 获取用户实际喜欢的服务 actual_likes = test_data[ (test_data['user_id'] == user_id) & (test_data['preference_score'] > 4) ]['service_id'].tolist() if not actual_likes: continue # 获取推荐结果 recommendations = self.recommend_services(user_id, n=k) recommended_ids = [rec['service_id'] for rec in recommendations] # 计算精确率和召回率 hits = len(set(recommended_ids) & set(actual_likes)) precision = hits / k recall = hits / len(actual_likes) precision_scores.append(precision) recall_scores.append(recall) # 返回平均精确率和召回率 return { 'precision@k': np.mean(precision_scores), 'recall@k': np.mean(recall_scores) } # 使用示例 if __name__ == "__main__": # 创建示例数据(实际应用中会从文件加载) user_data = pd.DataFrame({ 'user_id': [1, 1, 1, 2, 2, 3, 3, 3, 4, 4], 'age': [25, 25, 25, 35, 35, 45, 45, 45, 30, 30], 'income_level': [3, 3, 3, 5, 5, 4, 4, 4, 3, 3], 'service_id': [101, 102, 103, 101, 104, 105, 106, 102, 103, 107], 'category_id': [1, 2, 1, 1, 3, 2, 3, 2, 1, 4], 'preference_score': [5, 4, 3, 5, 4, 5, 4, 3, 5, 4], 'rating': [4.8, 4.5, 4.0, 4.9, 4.4, 4.7, 4.3, 4.2, 4.8, 4.5] }) service_data = pd.DataFrame({ 'service_id': [101, 102, 103, 104, 105, 106, 107], 'name': ['SPA按摩', '瑜伽课程', '健身私教', '美食烹饪课', '绘画工作坊', '摄影课程', '户外徒步'], 'category': ['健康', '健康', '健康', '美食', '艺术', '艺术', '户外'], 'category_id': [1, 2, 1, 3, 2, 3, 4], 'price': [398, 198, 298, 258, 228, 358, 168], 'price_level': [4, 2, 3, 3, 3, 4, 2], 'duration': 90, 'rating': [4.8, 4.5, 4.7, 4.6, 4.4, 4.5, 4.3], 'booking_count': [1200, 850, 980, 760, 620, 580, 920], 'description': ['专业SPA按摩服务,放松身心', '专业瑜伽教练指导,适合各水平', '一对一健身指导,定制训练计划', '专业厨师教学,学习美食制作', '绘画入门到精通,专业老师指导', '摄影技巧培训,从入门到专业', '周末户外徒步活动,亲近自然'] }) # 保存示例数据 user_data.to_csv('user_data.csv', index=False) service_data.to_csv('service_data.csv', index=False) # 创建推荐器 recommender = ServiceRecommender('user_data.csv', 'service_data.csv') # 为用户1推荐服务 recommendations = recommender.recommend_services(user_id=1, n=3) print("为用户1推荐的服务:") for i, rec in enumerate(recommendations, 1): print(f"{i}. {rec['name']} - 价格: {rec['price']}元, 评分: {rec['rating']}") print(f" 描述: {rec['description']}\n") # 评估推荐效果(使用用户数据作为测试数据) metrics = recommender.evaluate_recommendations(user_data, k=3) print(f"推荐评估指标:") print(f"precision@3: {metrics['precision@k']:.4f}") print(f"recall@3: {metrics['recall@k']:.4f}")
Prompt示例:酒店个性化推荐
系统提示:
你是一位专业的酒店推荐顾问,需要根据用户的偏好和需求,推荐最适合的酒店选项。请考虑以下因素:预算范围、旅行目的、房型需求、设施偏好、地理位置要求以及特殊需求。

用户需求:
我计划下个月和我的妻子一起去三亚度假庆祝结婚周年,预算每晚1500-2500元。我们希望酒店有私人海滩,带无边泳池,提供浪漫的晚餐服务。我妻子喜欢做SPA,所以酒店最好有高品质的SPA中心。我们希望房间能看到海景,最好是套房。另外,我们会住5晚,希望能有一些周年特别安排。

请基于这些需求推荐3家最适合的酒店,并说明推荐理由,包括如何满足我们的各项需求。
落地案例:携程AI推荐系统
携程的AI推荐系统每天为超过1亿用户提供个性化的旅行服务推荐,包括酒店、航班、景点和行程规划。系统分析用户的历史预订数据、搜索行为、浏览时长和偏好设置,构建多维度用户画像。通过深度强化学习算法,系统能够实时调整推荐策略,考虑季节因素、价格敏感度和特殊需求。数据显示,使用AI推荐后,用户预订转化率提升了35%,平均订单金额增加22%,用户满意度提升18个百分点。特别是在酒店推荐方面,系统不仅考虑价格和位置,还能根据用户隐性需求(如家庭旅行需要连通房、商务出行需要会议室等)提供精准推荐,使酒店预订后的取消率降低了25%。
3.3 流程自动化:RPA与AI的协同
服务业包含大量重复性流程工作,如数据录入、发票处理、预约管理等,AI驱动的流程自动化能够显著提升效率,降低错误率,让员工专注于更高价值的客户服务工作。
技术实现:智能流程自动化系统
import cv2 import pytesseract import numpy as np import pandas as pd import re import datetime import smtplib from email.mime.text import MIMEText from email.mime.multipart import MIMEMultipart import json import os from PIL import Image class ServiceProcessAutomation: def __init__(self, config_path="automation_config.json"): # 加载配置 self.load_config(config_path) # 初始化OCR引擎 pytesseract.pytesseract.tesseract_cmd = self.config.get("tesseract_path", "tesseract") # 初始化数据存储 self.initialize_data_storage() def load_config(self, path): """加载配置文件""" with open(path, 'r') as f: self.config = json.load(f) def initialize_data_storage(self): """初始化数据存储""" # 检查数据目录是否存在 if not os.path.exists(self.config["data_dir"]): os.makedirs(self.config["data_dir"]) # 检查预约表格是否存在 self.appointment_file = os.path.join(self.config["data_dir"], "appointments.csv") if not os.path.exists(self.appointment_file): df = pd.DataFrame(columns=[ "appointment_id", "customer_name", "customer_phone", "service_type", "appointment_date", "appointment_time", "status", "notes", "created_at" ]) df.to_csv(self.appointment_file, index=False) def extract_text_from_image(self, image_path): """从图片中提取文本""" # 读取图片 img = cv2.imread(image_path) # 预处理图片以提高OCR准确性 gray = cv2.cvtColor(img, cv2.COLOR_BGR2GRAY) # 二值化处理 _, thresh = cv2.threshold(gray, 0, 255, cv2.THRESH_BINARY + cv2.THRESH_OTSU) # 降噪 denoised = cv2.medianBlur(thresh, 3) # 使用Tesseract进行OCR text = pytesseract.image_to_string(denoised, lang='chi_sim+eng') return text def parse_appointment_form(self, text): """解析预约表单文本""" # 使用正则表达式提取信息 name_match = re.search(r'客户姓名[::]\s*([\u4e00-\u9fa5]+)', text) phone_match = re.search(r'联系电话[::]\s*(\d{11})', text) service_match = re.search(r'服务类型[::]\s*([\u4e00-\u9fa5]+)', text) date_match = re.search(r'预约日期[::]\s*(\d{4}-\d{2}-\d{2})', text) time_match = re.search(r'预约时间[::]\s*(\d{2}:\d{2})', text) notes_match = re.search(r'备注[::]\s*(.*?)(?=\n|$)', text, re.DOTALL) # 提取信息 appointment = { "customer_name": name_match.group(1) if name_match else None, "customer_phone": phone_match.group(1) if phone_match else None, "service_type": service_match.group(1) if service_match else None, "appointment_date": date_match.group(1) if date_match else None, "appointment_time": time_match.group(1) if time_match else None, "notes": notes_match.group(1) if notes_match else "" } return appointment def validate_appointment(self, appointment): """验证预约信息""" errors = [] # 检查必填字段 if not appointment["customer_name"]: errors.append("客户姓名缺失") if not appointment["customer_phone"]: errors.append("联系电话缺失") elif len(appointment["customer_phone"]) != 11: errors.append("联系电话格式不正确") # 检查日期格式 if appointment["appointment_date"]: try: datetime.datetime.strptime(appointment["appointment_date"], "%Y-%m-%d") except ValueError: errors.append("日期格式不正确,应为YYYY-MM-DD") # 检查时间格式 if appointment["appointment_time"]: try: datetime.datetime.strptime(appointment["appointment_time"], "%H:%M") except ValueError: errors.append("时间格式不正确,应为HH:MM") return len(errors) == 0, errors def save_appointment(self, appointment): """保存预约信息""" # 读取现有预约数据 df = pd.read_csv(self.appointment_file) # 生成预约ID appointment_id = f"APT{datetime.datetime.now().strftime('%Y%m%d%H%M%S')}" # 创建新预约记录 new_appointment = { "appointment_id": appointment_id, "customer_name": appointment["customer_name"], "customer_phone": appointment["customer_phone"], "service_type": appointment["service_type"], "appointment_date": appointment["appointment_date"], "appointment_time": appointment["appointment_time"], "status": "confirmed", "notes": appointment["notes"], "created_at": datetime.datetime.now().strftime("%Y-%m-%d %H:%M:%S") } # 添加到数据框 df = pd.concat([df, pd.DataFrame([new_appointment])], ignore_index=True) # 保存数据 df.to_csv(self.appointment_file, index=False) return appointment_id def send_confirmation(self, appointment_id, appointment): """发送预约确认邮件/SMS""" # 构建消息内容 subject = f"预约确认 - {appointment_id}" body = f"""尊敬的{appointment['customer_name']}先生/女士: 您已成功预约{appointment['service_type']}服务,详情如下: 预约编号:{appointment_id} 预约日期:{appointment['appointment_date']} 预约时间:{appointment['appointment_time']} 服务类型:{appointment['service_type']} 备注:{appointment['notes']} 我们期待您的光临!如需修改或取消预约,请联系我们:{self.config['contact_phone']} 此致, {self.config['company_name']} """ # 发送邮件 if self.config["email_notification"]: msg = MIMEMultipart() msg['From'] = self.config["email_sender"] msg['To'] = self.config["email_receiver"] msg['Subject'] = subject msg.attach(MIMEText(body, 'plain')) try: server = smtplib.SMTP(self.config["smtp_server"], self.config["smtp_port"]) server.starttls() server.login(self.config["email_sender"], self.config["email_password"]) text = msg.as_string() server.sendmail(self.config["email_sender"], self.config["email_receiver"], text) server.quit() print("确认邮件已发送") except Exception as e: print(f"发送邮件失败: {e}") # 这里可以添加发送SMS的代码 return True def process_appointment_form(self, image_path): """处理预约表单图片""" # 1. 从图片提取文本 text = self.extract_text_from_image(image_path) print("提取的文本:", text) # 2. 解析预约信息 appointment = self.parse_appointment_form(text) print("解析的预约信息:", appointment) # 3. 验证预约信息 valid, errors = self.validate_appointment(appointment) if not valid: print("预约信息验证失败:", errors) return False, errors # 4. 保存预约信息 appointment_id = self.save_appointment(appointment) print("预约已保存,编号:", appointment_id) # 5. 发送确认信息 self.send_confirmation(appointment_id, appointment) return True, appointment_id def get_appointments_by_date(self, date): """按日期获取预约""" df = pd.read_csv(self.appointment_file) return df[df["appointment_date"] == date].to_dict('records') def generate_daily_schedule(self, date=None): """生成每日日程安排""" if not date: date = datetime.datetime.now().strftime("%Y-%m-%d") appointments = self.get_appointments_by_date(date) # 按时间排序 appointments.sort(key=lambda x: x["appointment_time"]) # 生成日程文本 schedule = f"{date} 日程安排:\n\n" for i, apt in enumerate(appointments, 1): schedule += f"{i}. {apt['appointment_time']} - {apt['customer_name']} ({apt['customer_phone']})\n" schedule += f" 服务: {apt['service_type']}\n" if apt['notes']: schedule += f" 备注: {apt['notes']}\n" schedule += "\n" return schedule # 使用示例 if __name__ == "__main__": # 创建配置文件 config = { "data_dir": "service_data", "tesseract_path": "C:/Program Files/Tesseract-OCR/tesseract.exe", # Windows示例路径 "email_notification": True, "email_sender": "service@example.com", "email_receiver": "manager@example.com", "email_password": "your_email_password", "smtp_server": "smtp.example.com", "smtp_port": 587, "contact_phone": "400-123-4567", "company_name": "尊享服务中心" } with open("automation_config.json", "w") as f: json.dump(config, f, indent=2) # 创建自动化实例 automation = ServiceProcessAutomation() # 处理预约表单图片(此处使用示例图片路径) # 实际应用中,这张图片应该是用户提交的预约表单照片 success, result = automation.process_appointment_form("appointment_form.jpg") if success: print(f"预约处理成功,预约编号: {result}") # 生成今日日程 today = datetime.datetime.now().strftime("%Y-%m-%d") schedule = automation.generate_daily_schedule(today) print("\n今日日程安排:") print(schedule) else: print(f"预约处理失败: {result}")
流程自动化工作流程
flowchart TD A[接收表单/文档] --> B[数据提取] B --> C[信息验证] C -->|验证失败| D[错误提示与退回] C -->|验证成功| E[数据存储] E --> F[任务分配] F --> G[自动化处理] G --> H[结果通知] H --> I[记录与归档] I --> J[数据分析与优化]
落地案例:银行智能流程自动化
某大型国有银行引入AI驱动的流程自动化系统,实现了贷款申请处理的全流程自动化。系统通过OCR技术提取申请表信息,NLP分析客户信用描述,机器学习模型评估信用风险,RPA机器人自动完成数据录入和文件流转。该系统将贷款审批时间从传统的5-7个工作日缩短至2小时,错误率从3%降至0.1%,每年节省人力成本超过2000万元。特别是在处理高峰期,系统可自动扩展处理能力,保证服务质量不下降。客户满意度调查显示,贷款申请体验满意度提升了42个百分点,净推荐值(NPS)提高了35分。
四、AI技术落地的挑战与未来趋势
尽管AI在各行业的应用取得了显著成效,但落地过程中仍面临技术、组织和伦理等多方面挑战。同时,随着技术的不断演进,AI将在更多领域创造价值,重塑产业格局。
4.1 AI落地的主要挑战
| 挑战类型 | 具体表现 | 影响程度 | 解决策略 |
|---|---|---|---|
| 数据质量与数量 | 数据不完整、标注质量低、样本偏差 | ★★★★★ | 建立数据治理体系、自动化数据清洗、合成数据生成 |
| 模型可解释性 | 黑箱模型难以解释决策依据,影响信任 | ★★★★☆ | 开发可解释AI技术、模型可视化工具、决策过程透明化 |
| 集成复杂性 | 与现有系统集成困难,数据孤岛问题 | ★★★★☆ | 采用API优先设计、微服务架构、标准化数据接口 |
| 人才短缺 | AI专业人才稀缺,跨领域人才不足 | ★★★★☆ | 内部培训计划、校企合作、AI平台降低技术门槛 |
| 伦理与合规 | 隐私保护、算法偏见、监管合规 | ★★★☆☆ | 制定AI伦理准则、隐私保护技术、合规审查流程 |
| 组织阻力 | 员工抵触、管理模式变革困难 | ★★★☆☆ | 变革管理、用户参与设计、展示短期价值 |
| 成本投入 | 初始投资高,ROI周期长 | ★★★☆☆ | 分阶段实施、关注高价值场景、量化收益评估 |
4.2 AI技术发展趋势
-
多模态融合:未来的AI系统将能同时处理文本、图像、音频、视频等多种类型数据,实现更自然的人机交互和更全面的内容理解。例如,一个智能助手将能同时理解用户的语音指令、分析用户的面部表情、解读文档内容,并综合这些信息提供精准服务。
-
自主智能体:AI系统将从被动执行任务向主动规划、自主决策的智能体演进。这些智能体能够设定目标、制定计划、执行任务并从经验中学习改进,在复杂环境中独立完成复杂任务链。
-
边缘AI:随着边缘计算的发展,AI模型将更多地部署在终端设备上,实现低延迟、高隐私保护的智能服务。手机、智能家居、工业设备等都将具备本地AI处理能力,减少对云端的依赖。
-
可信赖AI:针对AI伦理和安全问题,可信赖AI将成为核心发展方向,包括可解释性、公平性、鲁棒性和隐私保护等关键技术的突破,使AI系统更透明、可靠和安全。
-
人机协作增强:AI将从简单的替代人工转向增强人类能力,通过智能辅助、创意启发、决策支持等方式,实现人机协同工作的新模式,放大人类的创造力和判断力。
4.3 成功实施AI的关键因素
成功实施AI项目需要技术、组织和管理多方面的协同配合。研究表明,以下因素对AI项目的成功至关重要:
-
清晰的业务目标:AI项目应从业务需求出发,明确要解决的问题和预期成果,避免为技术而技术。成功的AI应用往往聚焦于具体的业务痛点,如降低成本、提升效率或改善客户体验。
-
高质量的数据基础:数据是AI的燃料,建立高质量、结构化的数据资产是AI成功的基础。组织需要投资于数据治理、数据质量提升和数据安全保障。
-
跨职能团队协作:AI项目需要业务专家、数据科学家、工程师和用户的紧密合作。跨职能团队能够确保AI解决方案既技术可行,又符合业务需求和用户期望。
-
敏捷迭代开发:采用敏捷方法开发AI项目,通过快速原型、用户反馈和持续迭代,不断优化解决方案,降低风险并加快价值实现。
-
变革管理与文化建设:成功的AI实施需要组织文化的支持,包括高管的战略支持、员工的积极参与和持续的能力建设。组织需要培养数据驱动决策的文化,鼓励创新和实验。
-
持续学习与优化:AI系统不是一成不变的,需要建立监控机制和反馈循环,根据新数据和新需求不断优化模型,确保长期价值创造。
结语:AI驱动的产业变革新纪元
AI技术正以前所未有的速度和深度重塑短视频、设计和服务业等多个领域,从根本上改变着产品创作、服务提供和业务运营的方式。通过本文探讨的技术实现、落地案例和最佳实践,我们看到AI不仅是效率提升的工具,更是创新的催化剂和业务模式变革的驱动力。
短视频领域,AI实现了从内容创意到智能分发的全链路革新,使内容生产效率提升百倍,个性化推荐精准触达用户需求;设计行业,AI工具成为创意工作者的得力助手,将抽象概念快速转化为视觉作品,拓展了设计的边界和可能性;服务业,AI重构了客户交互与运营流程,实现了7x24小时智能服务、个性化体验和高效流程自动化。
然而,AI落地之路并非一帆风顺,面临数据质量、模型可解释性、人才短缺和组织变革等多重挑战。成功实施AI需要清晰的战略规划、坚实的数据基础、跨职能协作和持续的学习优化。
展望未来,随着多模态融合、自主智能体、边缘AI和可信赖AI等技术的发展,AI将在更多领域创造价值,推动产业向更智能、更高效、更人性化的方向演进。对于组织而言,关键在于拥抱变革,培养AI能力,将AI深度融入业务流程,以数据驱动决策,最终实现业务增长和竞争力提升。
在这个AI驱动的新纪元,那些能够有效利用AI技术、平衡技术创新与人文关怀、持续学习与适应变化的个人和组织,将成为未来的领导者和赢家。AI不是要取代人类,而是通过增强人类能力,释放人类创造力,共同创造更美好的未来。

有“AI”的1024 = 2048,欢迎大家加入2048 AI社区
更多推荐

 11
11 0
0- 0


 已为社区贡献323条内容

所有评论(0)