AIDL Hal 开发笔记4----驱动开发
本文介绍了Linux内核驱动开发的基本流程。首先展示了如何编写一个简单的字符设备驱动hello_driver.c,包括定义file_operations结构体、实现读写函数、注册驱动等步骤。然后说明了如何通过修改Kconfig和Makefile将驱动编译进内核或编译为模块。最后提供了一个Native测试程序hello_drv_test.c,用于验证驱动功能。整个开发过程涵盖了从驱动编写、内核配置到
| 驱动开发 |
一、编写Linux 内核驱动
1.1 编写驱动
Linux 驱动实际就是一个 Linux 内核模块。
首先,我们需要理解什么是内核模块?简单来说,内核模块是一段 “固定格式” 的代码,像一个“插件”一样,linux 内核可以动态的加载并执行这段代码,也可以把这段代码编译进内核,在内核启动的时候来执行这段代码。
下面我们写一个简单的 linux 驱动:在内核的 drivers/char 目录中添加 hello_driver.c
#include <linux/module.h>
#include <linux/fs.h>
#include <linux/errno.h>
#include <linux/miscdevice.h>
#include <linux/kernel.h>
#include <linux/major.h>
#include <linux/mutex.h>
#include <linux/proc_fs.h>
#include <linux/seq_file.h>
#include <linux/stat.h>
#include <linux/init.h>
#include <linux/device.h>
#include <linux/tty.h>
#include <linux/kmod.h>
#include <linux/gfp.h>

/* 1. 确定主设备号                                                                 */
static int major = 0;
static char kernel_buf[1024];
static struct class *hello_class;


#define MIN(a, b) (a < b ? a : b)

/* 3. 实现对应的open/read/write等函数,填入file_operations结构体                   */
static ssize_t hello_drv_read (struct file *file, char __user *buf, size_t size, loff_t *offset)
{
	int err;
	printk("%s %s line %d\n", __FILE__, __FUNCTION__, __LINE__);
	err = copy_to_user(buf, kernel_buf, MIN(1024, size));
	return MIN(1024, size);
}

static ssize_t hello_drv_write (struct file *file, const char __user *buf, size_t size, loff_t *offset)
{
	int err;
	printk("%s %s line %d\n", __FILE__, __FUNCTION__, __LINE__);
	err = copy_from_user(kernel_buf, buf, MIN(1024, size));
	return MIN(1024, size);
}

static int hello_drv_open (struct inode *node, struct file *file)
{
	printk("%s %s line %d\n", __FILE__, __FUNCTION__, __LINE__);
	return 0;
}

static int hello_drv_close (struct inode *node, struct file *file)
{
	printk("%s %s line %d\n", __FILE__, __FUNCTION__, __LINE__);
	return 0;
}

/* 2. 定义自己的file_operations结构体                                              */
static struct file_operations hello_drv = {
	.owner	 = THIS_MODULE,
	.open    = hello_drv_open,
	.read    = hello_drv_read,
	.write   = hello_drv_write,
	.release = hello_drv_close,
};

/* 4. 把file_operations结构体告诉内核:注册驱动程序                                */
/* 5. 谁来注册驱动程序啊?得有一个入口函数:安装驱动程序时,就会去调用这个入口函数 */
static int __init hello_init(void)
{
	int err;

	printk("%s %s line %d\n", __FILE__, __FUNCTION__, __LINE__);
	major = register_chrdev(0, "hello", &hello_drv);  /* /dev/hello */

	//提供设备信息,自动创建设备节点。
	// /dev/hello
	hello_class = class_create(THIS_MODULE, "hello_class");
	err = PTR_ERR(hello_class);
	if (IS_ERR(hello_class)) {
		printk("%s %s line %d\n", __FILE__, __FUNCTION__, __LINE__);
		unregister_chrdev(major, "hello");
		return -1;
	}

	device_create(hello_class, NULL, MKDEV(major, 0), NULL, "hello"); /* /dev/hello */
	//到这里我们就可以通过 /dev/hello 文件来访问我们的驱动程序了。
	return 0;
}

/* 6. 有入口函数就应该有出口函数:卸载驱动程序时,就会去调用这个出口函数           */
static void __exit hello_exit(void)
{
	printk("%s %s line %d\n", __FILE__, __FUNCTION__, __LINE__);
	device_destroy(hello_class, MKDEV(major, 0));
	class_destroy(hello_class);
	unregister_chrdev(major, "hello");
}


/* 7. 其他完善:提供设备信息,自动创建设备节点                                     */

module_init(hello_init);
module_exit(hello_exit);

MODULE_LICENSE("GPL");
1.2 将模块编译进内核
接下来我们修改 /drivers/char/Kconfig 文件,使得我们的 hello_driver 模块,能出现在内核的编译选项中。
在 /drivers/char 中的 Kconfig 文件中添加:
config HELLO_DRIVER_MODULE
	bool "hello driver module support"
	default y
然后在 /drivers/char 下的 Makefile 文件中添加:
obj-$(CONFIG_HELLO_DRIVER_MODULE) += hello_driver.o
当在 make menuconfig 编译菜单中选中了 hello module support, CONFIG_HELLO_MODULE 的值是 y,没有选中值是 m(我们定义的默认值是 y):
- obj-y += hello_driver.o 的意思是将 hello_driver.o 编译进内核
- obj-m += hello_driver.o 的意思是文件 hello_driver.o 作为"模块"进行编译,不会编译到内核,但是会生成一个独立的 “hello_driver.ko” 文件,可以使用
insmod命令将模块加载到内核中
最后配置内核:
kernel/linux-5.4$ make menuconfig
进入 Device Drivers 选项: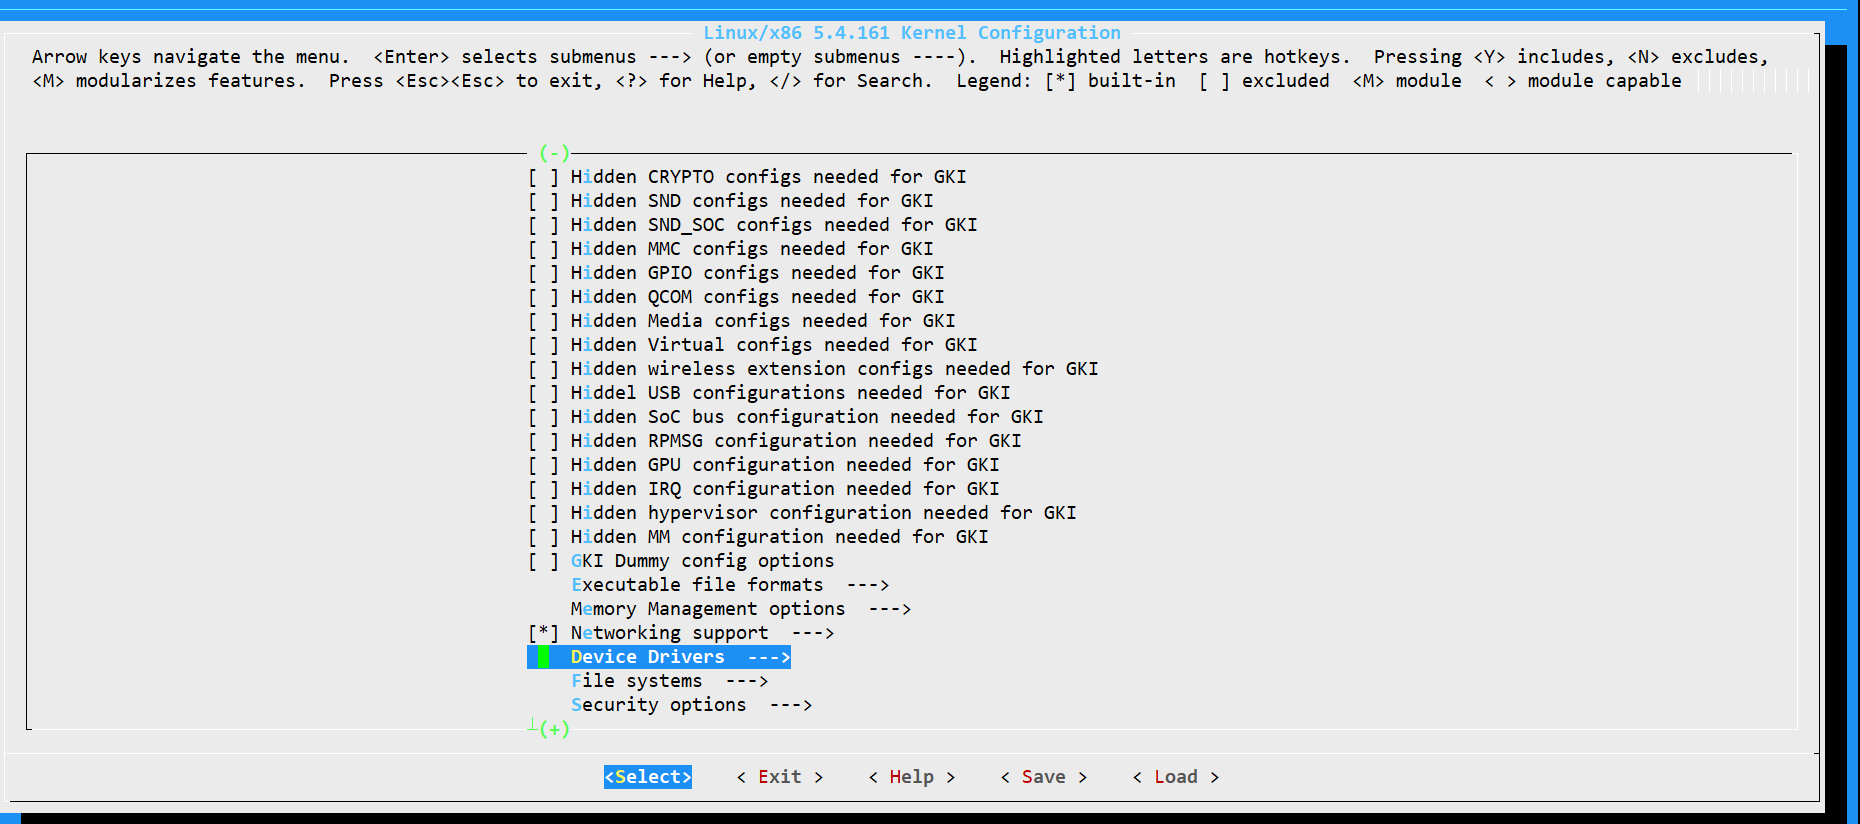
进入 Character devices
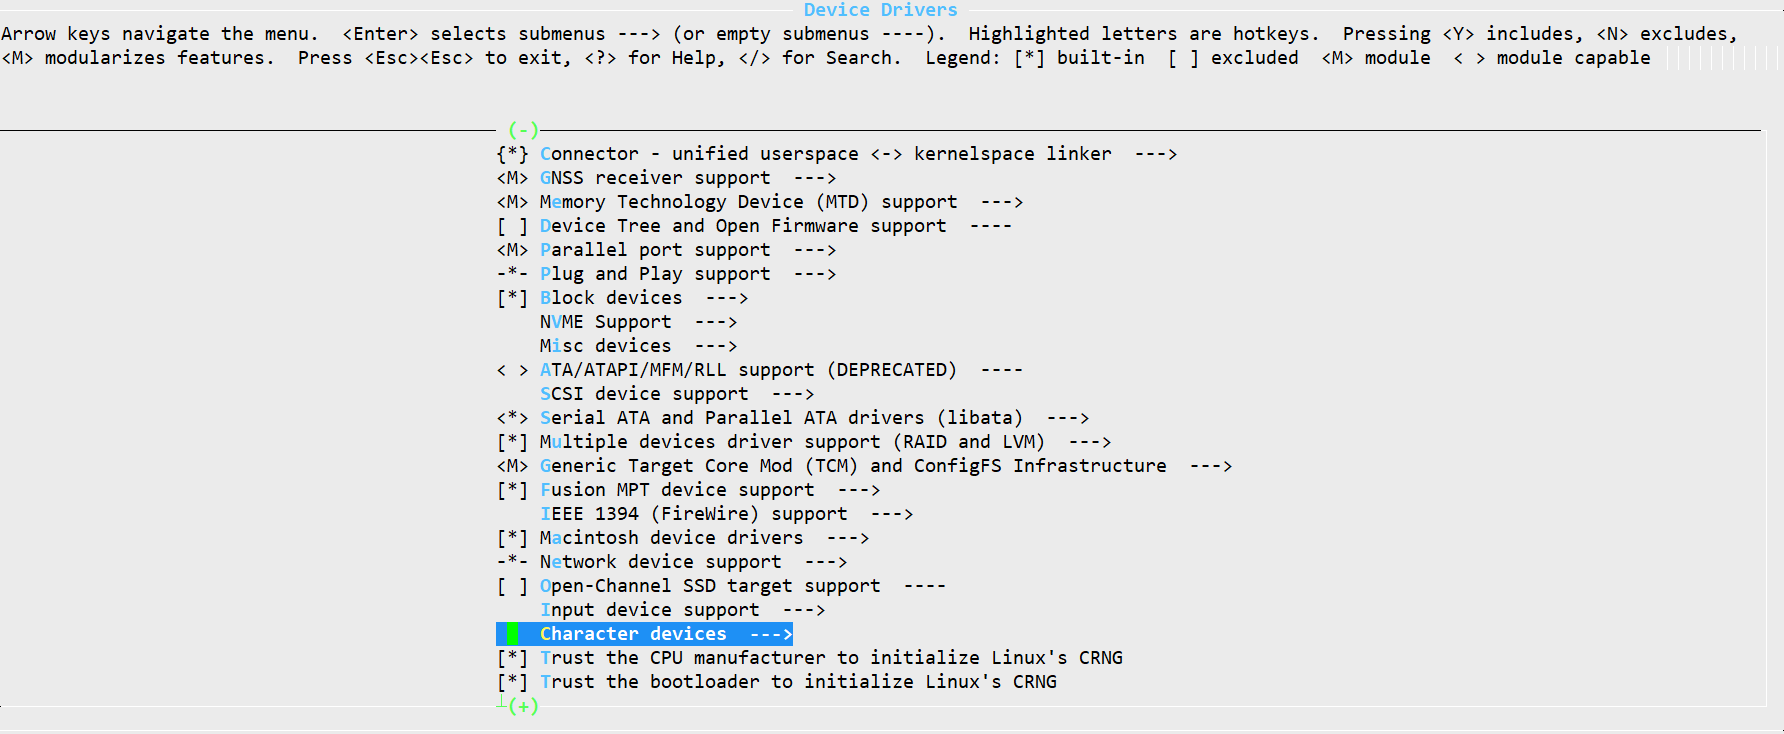
这里就可以看见我们刚才添加的选项,默认是选上的。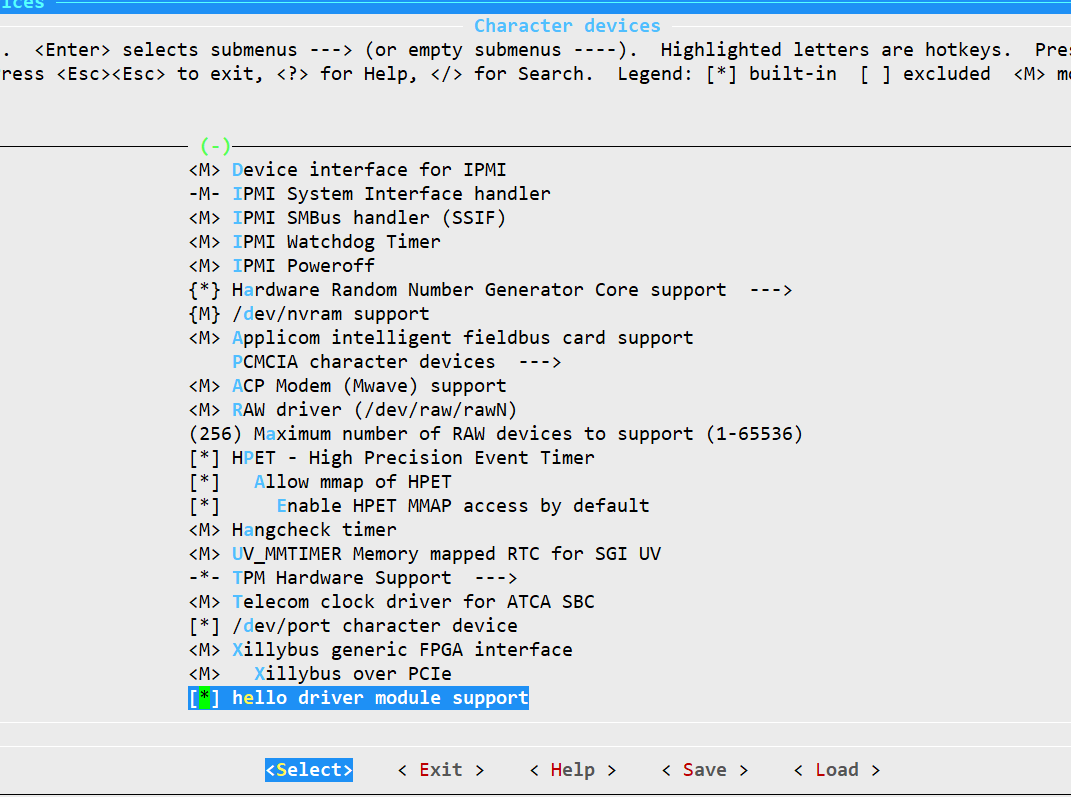
然后执行编译:
source build/envsetup.sh
lunch xxx
make
烧录后抓取 kernel日志
# dmesg 用于显示开机信息
adb shell dmesg | grep hello

二、Native 程序测试驱动程序
在 frameworks/base/native/ 目录下创建如下的目录结构:
hello_drv_test/
├── Android.mk
└── hello_drv_test.c
其中 hello_drv_test.c 的内容如下:
#include <sys/types.h>
#include <sys/stat.h>
#include <fcntl.h>
#include <unistd.h>
#include <stdio.h>
#include <string.h>

/*
 * ./hello_drv_test -w abc
 * ./hello_drv_test -r
 */
int main(int argc, char **argv)
{
	int fd;
	char buf[1024];
	int len;

	/* 1. 判断参数 */
	if (argc < 2)
	{
		printf("Usage: %s -w <string>\n", argv[0]);
		printf("       %s -r\n", argv[0]);
		return -1;
	}

	/* 2. 打开文件 */
	fd = open("/dev/hello", O_RDWR);
	if (fd == -1)
	{
		printf("can not open file /dev/hello\n");
		return -1;
	}

	/* 3. 写文件或读文件 */
	if ((0 == strcmp(argv[1], "-w")) && (argc == 3))
	{
		len = strlen(argv[2]) + 1;
		len = len < 1024 ? len : 1024;
		write(fd, argv[2], len);
	}
	else
	{
		len = read(fd, buf, 1024);
		buf[1023] = '\0';
		printf("APP read : %s\n", buf);
	}

	close(fd);

	return 0;
}
测试程序的内容很简单,就是根据命令行参数读写 /dev/hello 文件。
接着编写 Android.mk 文件:
LOCAL_PATH:= $(call my-dir)
include $(CLEAR_VARS)
LOCAL_MODULE_TAGS := optional
LOCAL_SRC_FILES := \
    hello_drv_test.c
LOCAL_MODULE := hello_drv_test
include $(BUILD_EXECUTABLE)
编译程序并push到机器:
# 编译
cd frameworks/base/native/hello_drv_test
mm


cd -
adb push out/target/product/ceres-b7/system/bin/hello_drv_testsystem/bin/hello_drv_test system/bin


adb shell
# 执行程序
cd system/bin

./hello_drv_test -w "hello"
./hello_drv_test -r
执行程序的结果如下所示:

三、权限配置
要把驱动集成到系统中,还需要添加一些权限相关的配置:
在 system/core/rootdir/ueventd.rc 中添加:
/dev/hello 0666 root root
在 system/sepolicy/device.te 中添加:
type hello_dev_t, dev_type;
在 system/sepolicy/file_contexts 中添加
/dev/hello u:object_r:hello_dev_t:s0

有“AI”的1024 = 2048,欢迎大家加入2048 AI社区
更多推荐


 13
13 0
0- 0


 已为社区贡献13条内容

所有评论(0)