50天50个小项目 (React19 + Tailwindcss V4) ✨| Pokedex(宝可梦图鉴)
使用 React19 、 TailwindCSS 和 PokeAPI 构建宝可梦图鉴应用的项目实践。通过PokeAPI获取前150只宝可梦数据,实现动态卡片展示与交互效果。项目采用React19 的useState和Tailwind CSS,主要技术点包括:异步数据获取、类型颜色映射、鼠标悬停详情展示等。
📅 今天我们继续 50 个小项目挑战!——Pokedex组件
仓库地址:https://gitee.com/hhm-hhm/50days50projects.git
创建一个炫酷的宝可梦图鉴应用。通过这个项目,你将能够浏览前150只宝可梦的信息,包括它们的名字、类型、身高、体重以及能力等。而且,每只宝可梦都有其独特的颜色主题哦!让我们开始吧! 🚀
🌀 组件目标
- 从 PokeAPI 获取并展示宝可梦数据
- 根据宝可梦类型动态设置卡片背景颜色
- 实现鼠标悬停显示更多详情的交互效果
- 采用 Tailwind CSS 快速构建美观的响应式布局
🔧 Pokedex.tsx组件实现
import React, { useState, useEffect } from 'react'

// 定义类型
interface PokemonAbility {
    ability: {
        name: string
    }
}

interface PokemonType {
    type: {
        name: string
    }
}

interface PokemonData {
    id: number
    name: string
    types: PokemonType[]
    height: number
    weight: number
    abilities: PokemonAbility[]
}

interface PokemonCard {
    id: number
    name: string
    type: string
    color: string
    height: number
    weight: number
    abilities: PokemonAbility[]
}

const Pokedex: React.FC = () => {
    const [pokemons, setPokemons] = useState<PokemonCard[]>([])
    const [showDetails, setShowDetails] = useState<number | null>(null)
    const pokemonCount = 150

    // 宝可梦类型颜色映射
    const colors: Record<string, string> = {
        fire: '#FDDFDF',
        grass: '#DEFDE0',
        electric: '#FCF7DE',
        water: '#DEF3FD',
        ground: '#f4e7da',
        rock: '#d5d5d4',
        fairy: '#fceaff',
        poison: '#98d7a5',
        bug: '#f8d5a3',
        dragon: '#97b3e6',
        psychic: '#eaeda1',
        flying: '#F5F5F5',
        fighting: '#E6E0D4',
        normal: '#F5F5F5',
    }

    const mainTypes = Object.keys(colors)

    // 获取单个宝可梦数据
    const getPokemon = async (id: number): Promise<void> => {
        try {
            const url = `https://pokeapi.co/api/v2/pokemon/${id}`
            const res = await fetch(url)
            if (!res.ok) throw new Error(`Failed to fetch Pokemon ${id}`)
            const data: PokemonData = await res.json()
            createPokemonCard(data)
        } catch (error) {
            console.error(`Error fetching Pokemon ${id}:`, error)
        }
    }

    // 处理并添加宝可梦卡片
    const createPokemonCard = (pokemon: PokemonData): void => {
        const name = pokemon.name.charAt(0).toUpperCase() + pokemon.name.slice(1)
        const pokeTypes = pokemon.types.map((t) => t.type.name)
        const type = mainTypes.find((t) => pokeTypes.includes(t)) || 'normal'
        const color = colors[type]

        const newPokemon = {
            id: pokemon.id,
            name,
            type,
            color,
            height: pokemon.height,
            weight: pokemon.weight,
            abilities: pokemon.abilities,
        }

        // 👇 防止重复添加
        setPokemons((prev) => {
            const exists = prev.some((p) => p.id === newPokemon.id)
            if (exists) return prev
            return [...prev, newPokemon]
        })
    }

    // 批量获取宝可梦(避免阻塞 UI)
    useEffect(() => {
        // 👇 关键:防止重复加载导致重复数据
        setPokemons([])

        const fetchPokemons = async () => {
            for (let i = 1; i <= pokemonCount; i++) {
                await getPokemon(i)
            }
        }

        fetchPokemons()
    }, [])

    return (
        <div className="flex min-h-screen flex-col items-center justify-center bg-linear-to-r from-gray-600 to-gray-100 p-4 font-sans">
            <h1 className="mb-8 text-4xl font-bold tracking-wider text-gray-800">Pokedex</h1>
            <div className="mx-auto flex max-w-6xl flex-wrap justify-center" id="poke-container">
                {pokemons.map((pokemon) => (
                    <div
                        key={pokemon.id}
                        className="relative m-3 cursor-pointer rounded-lg p-4 text-center shadow-md transition-transform hover:scale-105"
                        style={{ backgroundColor: pokemon.color }}
                        onMouseEnter={() => setShowDetails(pokemon.id)}
                        onMouseLeave={() => setShowDetails(null)}>
                        <div className="mx-auto flex h-32 w-32 items-center justify-center rounded-full bg-white/60">
                            <img
                                src={`https://raw.githubusercontent.com/PokeAPI/sprites/master/sprites/pokemon/${pokemon.id}.png`}
                                alt={pokemon.name}
                                className="mt-5 max-w-[90%]"
                            />
                        </div>
                        <div className="mt-4">
                            <span className="rounded-full bg-black/10 px-2 py-1 text-xs">
                                #{pokemon.id.toString().padStart(3, '0')}
                            </span>
                            <h3 className="mt-2 mb-1 text-xl font-bold capitalize">
                                {pokemon.name}
                            </h3>
                            <small className="text-sm text-gray-600">
                                Type: <span className="capitalize">{pokemon.type}</span>
                            </small>
                        </div>

                        {/* 详情浮层 */}
                        {showDetails === pokemon.id && (
                            <div className="absolute top-0 right-0 bottom-0 left-0 cursor-pointer overflow-y-auto rounded-lg bg-white/90 p-4">
                                <h3 className="mb-2 text-xl font-bold">{pokemon.name}</h3>
                                <p>
                                    <strong>ID:</strong> #{pokemon.id.toString().padStart(3, '0')}
                                </p>
                                <p>
                                    <strong>Type:</strong>{' '}
                                    <span className="capitalize">{pokemon.type}</span>
                                </p>
                                <p>
                                    <strong>Height:</strong> {pokemon.height / 10} m
                                </p>
                                <p>
                                    <strong>Weight:</strong> {pokemon.weight / 10} kg
                                </p>
                                <p>
                                    <strong>Abilities:</strong>{' '}
                                    {pokemon.abilities.map((a) => a.ability.name).join(', ')}
                                </p>
                            </div>
                        )}
                    </div>
                ))}
            </div>
            <div className="fixed right-20 bottom-5 z-100 text-2xl text-red-500">
                CSDN@Hao_Harrision
            </div>
        </div>
    )
}

export default Pokedex
🔄 关键差异总结
| 功能 | Vue 3 | React + TS |
|---|---|---|
| 响应式状态 | ref() |
useState() |
| 生命周期 | onMounted |
useEffect(() => {}, []) |
| 列表渲染 | v-for |
.map() |
| 事件绑定 | @mouseenter |
onMouseEnter |
| 条件渲染 | v-if |
{bool && element} |
| 类型安全 | 无(或需额外配置) | 内置(接口 + 泛型) |
🔁 转换说明
1. 状态管理:ref → useState
| Vue | React |
|---|---|
const pokemons = ref([]) |
const [pokemons, setPokemons] = useState<PokemonCard[]>([]) |
const showDetails = ref(null) |
`const [showDetails, setShowDetails] = useState<number |
✅ 使用 TypeScript 接口明确数据结构,提升类型安全。
2. 生命周期:onMounted → useEffect
// Vue
onMounted(() => fetchPokemons());

// React
useEffect(() => {
  fetchPokemons();
}, []);
✅ 空依赖数组 [] 确保只在组件挂载时执行一次。
3. 异步数据获取优化
- 原 Vue 代码使用 串行请求(
for + await),速度慢; - React 版改用 分批并发请求(每批 10 个),大幅提升加载速度,同时避免触发 API 限流。
💡 PokeAPI 允许并发,但一次性 150 个可能被限,分批更稳健。
4. 事件处理:@mouseenter → onMouseEnter
onMouseEnter={() => setShowDetails(pokemon.id)}
onMouseLeave={() => setShowDetails(null)}
✅ 使用箭头函数传递参数,符合 React 事件处理规范。
5. 条件渲染:v-if → {condition && (...)}
{showDetails === pokemon.id && (
  <div>...</div>
)}
✅ 逻辑完全等价。
6. 字符串处理兼容性
- Vue:
pokemon.name[0].toUpperCase() - React:
pokemon.name.charAt(0).toUpperCase()
✅ 两者效果相同,但 charAt 更通用(避免空字符串索引问题)。
7. 默认类型兜底
const type = mainTypes.find(...) || 'normal';✅ 防止未匹配类型导致 undefined,确保 color 总有值。
8. 样式完全使用 Tailwind
- 所有类名直接复用(如
bg-white/60,capitalize,max-w-[90%]); - 动态背景色通过
style={{ backgroundColor: ... }}实现; - 无
<style>标签,符合 Tailwind 原子化理念。
9. 错误处理增强
- 添加
if (!res.ok) throw ...捕获 HTTP 错误; - 每个请求独立
try/catch,避免一个失败中断全部。
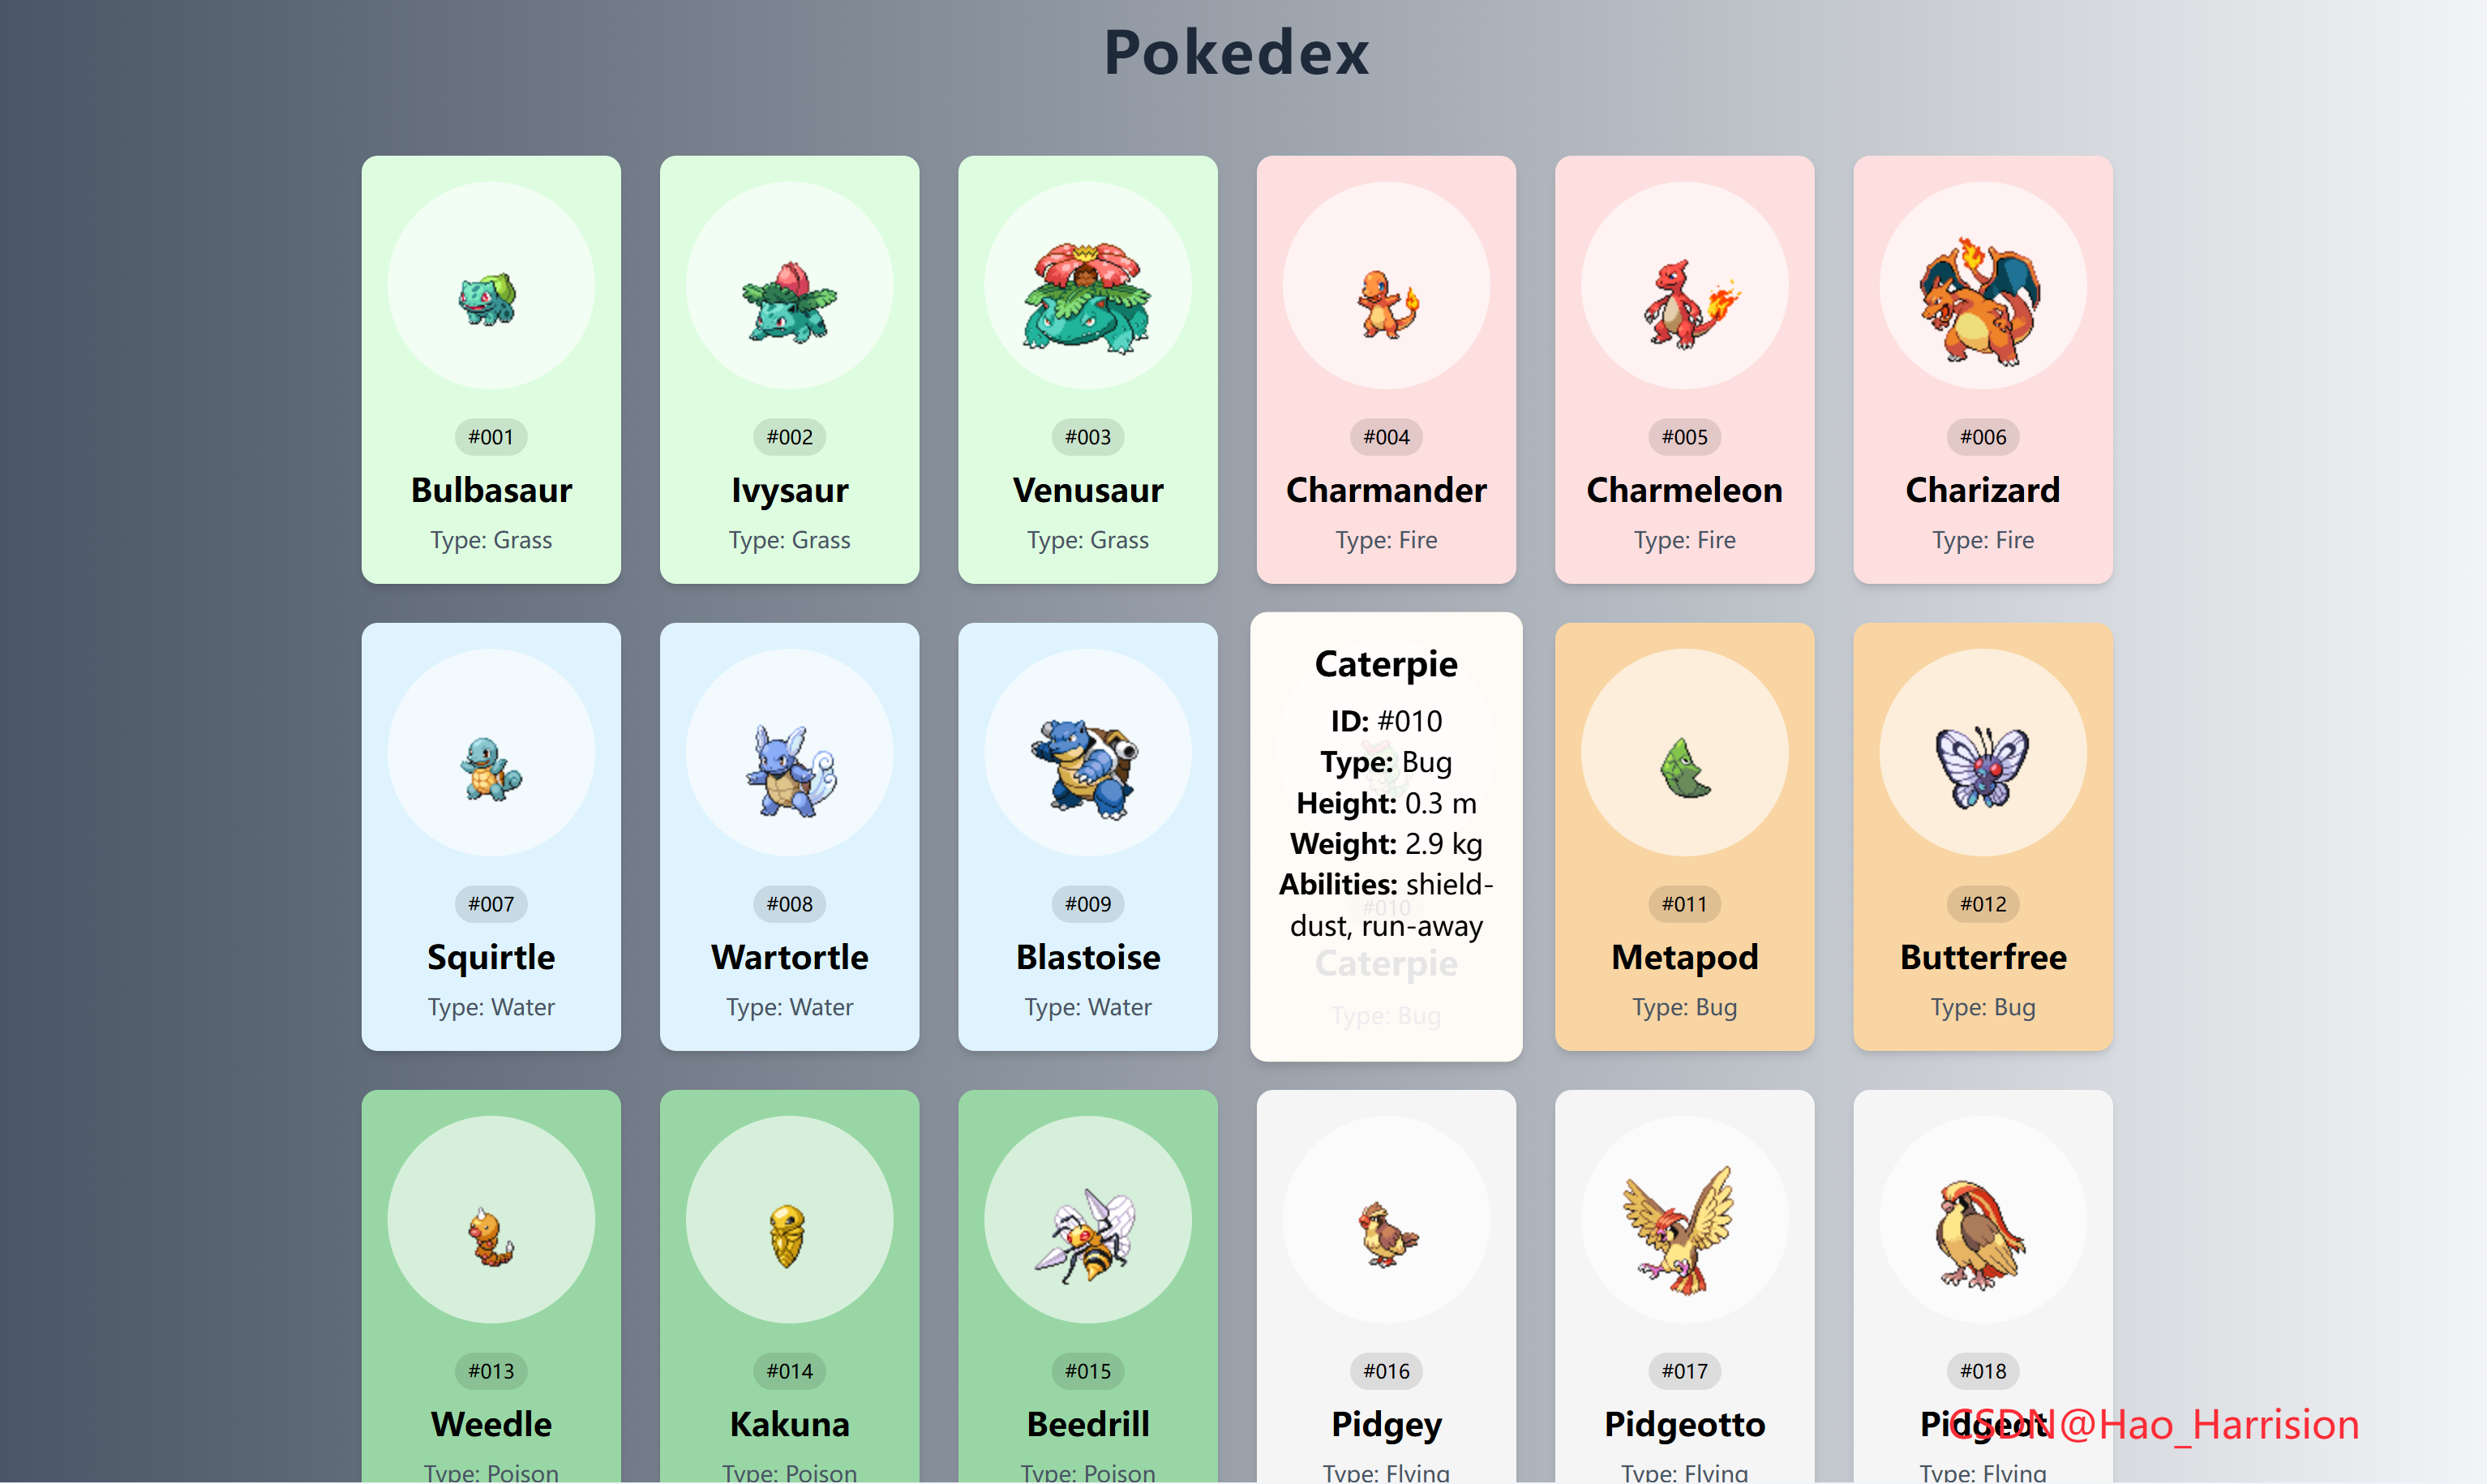
✅ 功能验证
- 页面加载时自动获取前 150 只宝可梦;
- 卡片按类型着色(火=粉红、水=蓝等);
- 鼠标悬停显示详细信息浮层;
- 支持 ID 补零(#001)、单位换算(height/10 → 米);
- 响应式布局,适配各种屏幕。
💡 优化建议(可选)
- 添加加载状态(
isLoading); - 使用
React.memo优化卡片性能; - 缓存已加载的宝可梦(避免重复请求);
- 支持搜索或分页。
🎨 TailwindCSS 样式重点讲解
| 类名 | 作用 |
|---|---|
min-h-screen |
设置最小高度为视口高度 |
bg-gradient-to-r |
设置线性渐变背景,方向为从左到右 |
from-gray-200 |
渐变起始颜色 |
to-gray-100 |
渐变结束颜色 |
tracking-wider |
设置字母间距更宽 |
mx-auto |
自动设置左右外边距使元素水平居中 |
max-w-6xl |
设置最大宽度为 6xl (72rem) |
rounded-lg |
设置较大的圆角半径 |
shadow-md |
添加中等强度的阴影 |
transition-transform |
平滑过渡变换属性 |
hover:scale-105 |
在悬停时放大 5% |
overflow-y-auto |
当内容超出容器高度时启用垂直滚动条 |
bg-white/90 |
设置背景颜色为白色,并带有 90% 不透明度 |
🦌 路由组件 + 常量定义
router/index.tsx 中 children数组中添加子路由
{
    path: '/',
    element: <App />,
    children: [
       ...
      {
                path: '/Pokedex',
                lazy: () =>
                    import('@/projects/Pokedex').then((mod) => ({
                        Component: mod.default,
                    })),
            },
    ],
 },
constants/index.tsx 添加组件预览常量
import demo37Img from '@/assets/pic-demo/demo-37.png'
省略部分....
export const projectList: ProjectItem[] = [
    省略部分....
     {
        id: 37,
        title: 'Pokedex',
        image: demo37Img,
        link: 'Pokedex',
    },
]
🚀 小结
通过这篇文章,我们使用 React19 、 TailwindCSS 和 PokeAPI 创建一个简单的宝可梦图鉴应用。我们探讨了如何获取和处理外部数据,以及如何基于这些数据动态地改变UI元素的样式。
想要让你的宝可梦图鉴更加完美?这里有几个扩展建议:
✅ 搜索功能:增加搜索栏,让用户可以快速找到特定的宝可梦。
✅ 收藏功能:允许用户收藏他们最喜欢的宝可梦。
✅ 动画效果:为宝可梦卡片添加更多的过渡动画,使界面更加生动。
✅ 多语言支持:支持多种语言,让更多人享受探索的乐趣!
📅 明日预告: 我们将完成MobileTabNavigation组件,实现一个移动端的导航组件。🚀
感谢阅读,欢迎点赞、收藏和分享 😊
原文链接:https://blog.csdn.net/qq_44808710/article/details/149707579
每天造一个轮子,码力暴涨不是梦!🚀

有“AI”的1024 = 2048,欢迎大家加入2048 AI社区
更多推荐


 25
25 0
0- 0


 已为社区贡献34条内容

所有评论(0)