在Android中接入OpenAI
线程隔离清晰:网络IO在工作线程,UI操作在主线程完整的调试信息:请求/响应JSON、状态码、密钥验证信息符合OpenAI API标准:请求格式、认证方式、响应解析完全兼容容错性较强:多层错误检查(HTTP状态、JSON结构、业务字段)用户体验考虑:即时界面反馈(进度条、按钮状态)、错误友好提示。
·
在Android中接入OpenAI
一、项目概览与环境准备
本文将为您详细介绍如何在Android移动应用中无缝集成DeepSeek人工智能API,构建功能完善的智能对话系统。我们将采用Java编程语言作为开发基础,借助OkHttp网络库处理API通信,从零开始逐步完成项目搭建、界面设计、功能实现到最终调试的全过程。
成功示例:

1.1 创建Android项目环境
在Android Studio开发环境中启动新项目创建流程:
- 启动Android Studio,选择"新建项目"选项
- 在项目模板中选择"空视图活动"
- 配置项目基础信息
1.2 配置项目依赖库
打开项目级Gradle配置文件,添加必要的第三方库依赖项,确保项目具备网络通信、JSON解析等基础能力:
dependencies {
    implementation 'androidx.appcompat:appcompat:1.6.1'
    implementation 'com.google.android.material:material:1.9.0'
    implementation 'androidx.constraintlayout:constraintlayout:2.1.4'

    // 网络请求库
    implementation 'com.squareup.okhttp3:okhttp:4.11.0'

    // JSON解析库
    implementation 'org.json:json:20230227'

    // 可选:Gson用于更复杂的JSON处理
    implementation 'com.google.code.gson:gson:2.10.1'

    testImplementation 'junit:junit:4.13.2'
    androidTestImplementation 'androidx.test.ext:junit:1.1.5'
    androidTestImplementation 'androidx.test.espresso:espresso-core:3.5.1'
}
1.3 配置应用权限与网络策略
在AndroidManifest.xml配置文件中声明应用所需权限,并设置网络通信策略:
加入这行代码
 <uses-permission android:name="android.permission.INTERNET"
        tools:ignore="ManifestOrder" />
完整代码如下:
<?xml version="1.0" encoding="utf-8"?>
<manifest xmlns:android="http://schemas.android.com/apk/res/android"
    xmlns:tools="http://schemas.android.com/tools">

    <application
        android:allowBackup="true"
        android:dataExtractionRules="@xml/data_extraction_rules"
        android:fullBackupContent="@xml/backup_rules"
        android:icon="@mipmap/ic_launcher"
        android:label="@string/app_name"
        android:roundIcon="@mipmap/ic_launcher_round"
        android:supportsRtl="true"
        android:theme="@style/Theme.MyApplication">
        <activity
            android:name=".MainActivity"
            android:exported="true">
            <intent-filter>
                <action android:name="android.intent.action.MAIN" />

                <category android:name="android.intent.category.LAUNCHER" />
            </intent-filter>
        </activity>
    </application>

    <uses-permission android:name="android.permission.INTERNET"
        tools:ignore="ManifestOrder" />
</manifest>
二、用户界面设计与布局构建
2.1 主界面布局架构
设计简洁直观的聊天界面,包含以下核心组件:
- 顶部应用栏:显示应用标题和状态信息
- 消息展示区:采用可滚动视图展示对话历史
- 输入功能区:集成文本输入框和消息发送按钮
- 状态指示器:显示网络请求加载状态
2.2 交互元素设计要点
- 消息显示区域:采用RecyclerView实现高效的消息列表展示,支持平滑滚动和动态更新
- 输入控制:文本输入框支持多行输入,实时检测输入内容变化
- 操作反馈:发送按钮状态随输入内容动态变化,提供明确的用户操作反馈
- 进度指示:网络请求期间显示加载动画,保持用户界面响应性
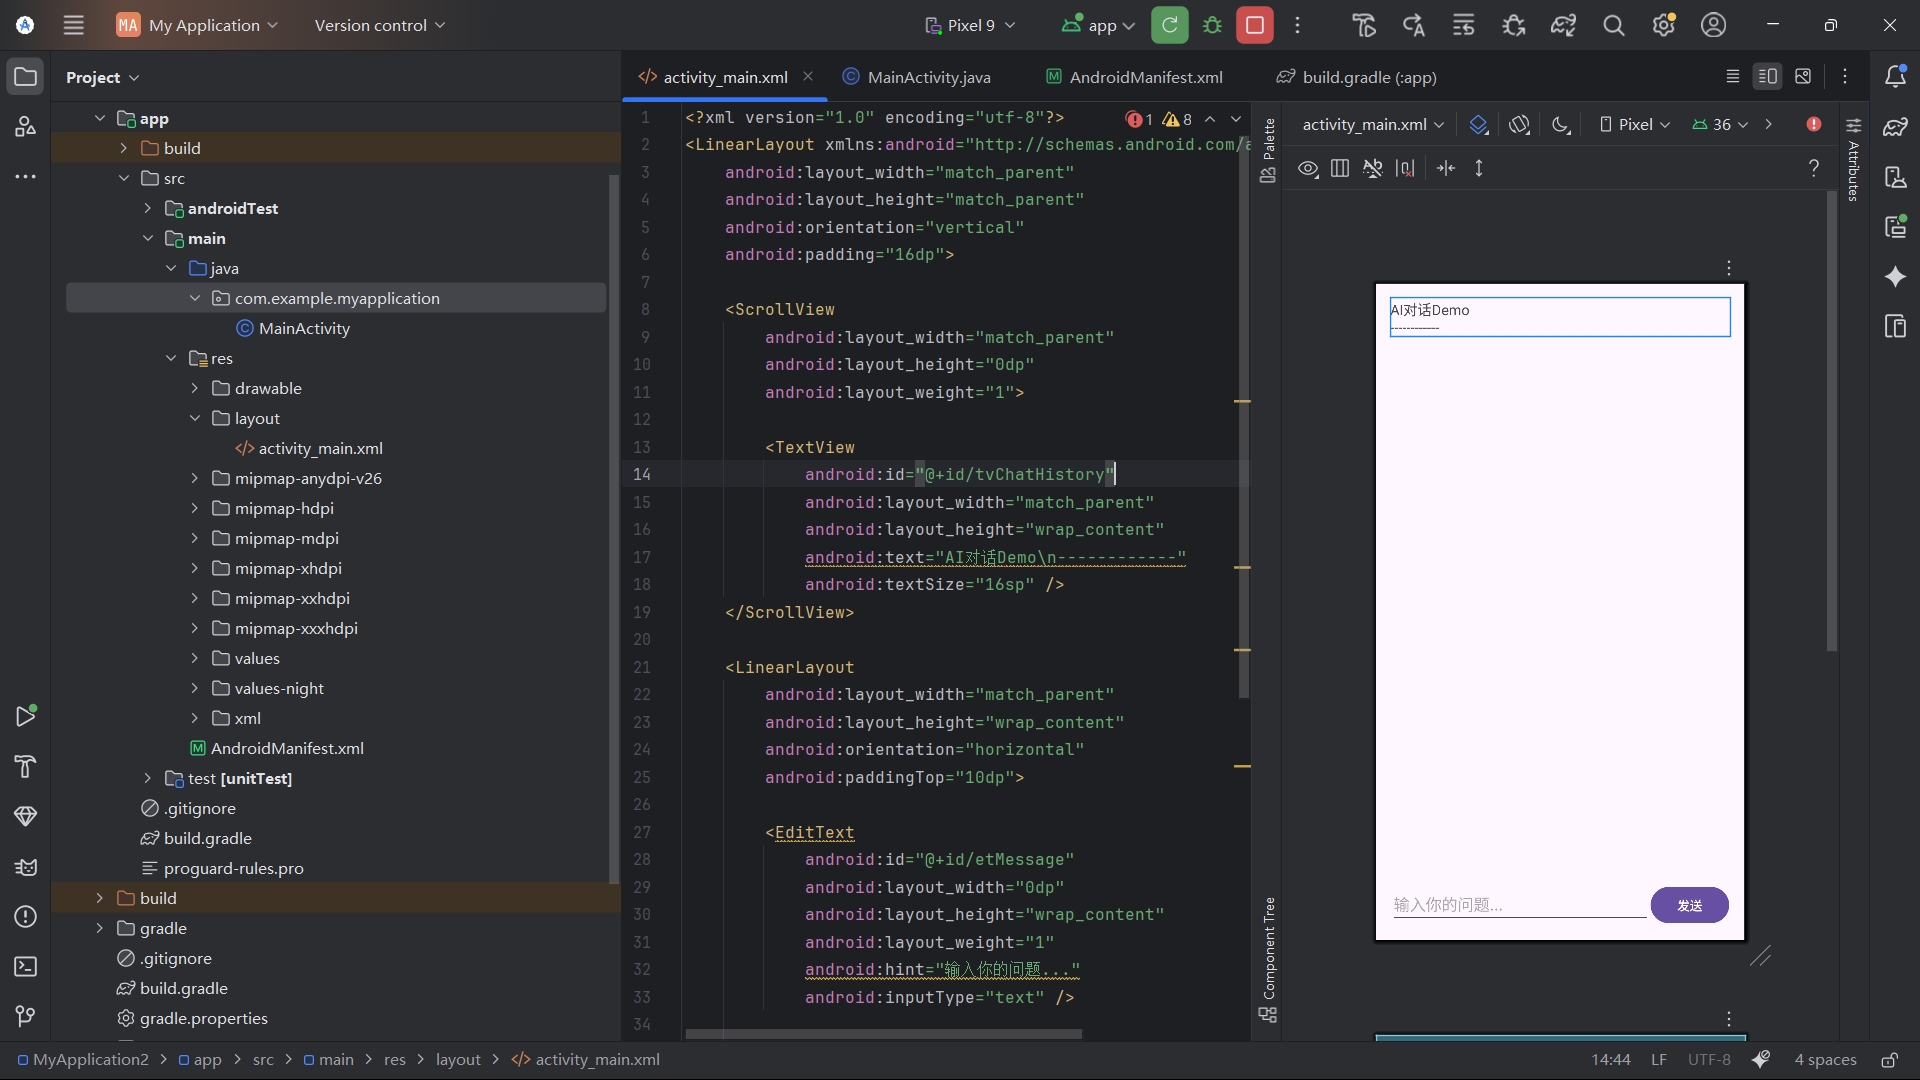
布局代码及效果图如下
<?xml version="1.0" encoding="utf-8"?>
<LinearLayout xmlns:android="http://schemas.android.com/apk/res/android"
    android:layout_width="match_parent"
    android:layout_height="match_parent"
    android:orientation="vertical"
    android:padding="16dp">

    <ScrollView
        android:layout_width="match_parent"
        android:layout_height="0dp"
        android:layout_weight="1">

        <TextView
            android:id="@+id/tvChatHistory"
            android:layout_width="match_parent"
            android:layout_height="wrap_content"
            android:text="AI对话Demo\n------------"
            android:textSize="16sp" />
    </ScrollView>

    <LinearLayout
        android:layout_width="match_parent"
        android:layout_height="wrap_content"
        android:orientation="horizontal"
        android:paddingTop="10dp">

        <EditText
            android:id="@+id/etMessage"
            android:layout_width="0dp"
            android:layout_height="wrap_content"
            android:layout_weight="1"
            android:hint="输入你的问题..."
            android:inputType="text" />

        <Button
            android:id="@+id/btnSend"
            android:layout_width="wrap_content"
            android:layout_height="wrap_content"
            android:text="发送" />
    </LinearLayout>

    <ProgressBar
        android:id="@+id/progressBar"
        android:layout_width="wrap_content"
        android:layout_height="wrap_content"
        android:layout_gravity="center"
        android:visibility="gone" />

</LinearLayout>
三、核心代码实现
3.1请求体构建(第1步)
// 1. 构建请求体
JSONObject requestBody = new JSONObject();
requestBody.put("model", "deepseek-chat");  // 指定模型

JSONArray messages = new JSONArray();

// 系统角色设定(可调整或移除)
JSONObject systemMessage = new JSONObject();
systemMessage.put("role", "system");
systemMessage.put("content", "You are a helpful assistant");
messages.put(systemMessage);

// 用户消息
JSONObject userMsg = new JSONObject();
userMsg.put("role", "user");
userMsg.put("content", userMessage);
messages.put(userMsg);

requestBody.put("messages", messages);      // 消息数组
requestBody.put("max_tokens", 1000);        // 限制响应长度
requestBody.put("temperature", 0.7);        // 控制随机性(0-1)
requestBody.put("stream", false);           // 关闭流式响应
解析要点:
- 消息结构:符合OpenAI标准的
[{"role":"system",...}, {"role":"user",...}]格式 - 关键参数:
max_tokens: 1000- 确保响应不会过长temperature: 0.7- 平衡创意与确定性(值越高回答越多样)stream: false- 等待完整响应而非逐字接收
3.2请求对象创建(第2-3步)
// 2. 打印请求信息(用于调试)
String requestJson = requestBody.toString();
System.out.println("请求JSON: " + requestJson);  // 调试输出

// 3. 创建请求
RequestBody body = RequestBody.create(requestJson, JSON);
Request request = new Request.Builder()
        .url(API_URL)  // "https://api.deepseek.com/v1/chat/completions"
        .addHeader("Authorization", "Bearer " + API_KEY)  // 关键认证头
        .addHeader("Content-Type", "application/json")
        .addHeader("Accept", "application/json")
        .post(body)
        .build();
解析要点:
- 认证方式:标准的Bearer Token认证(
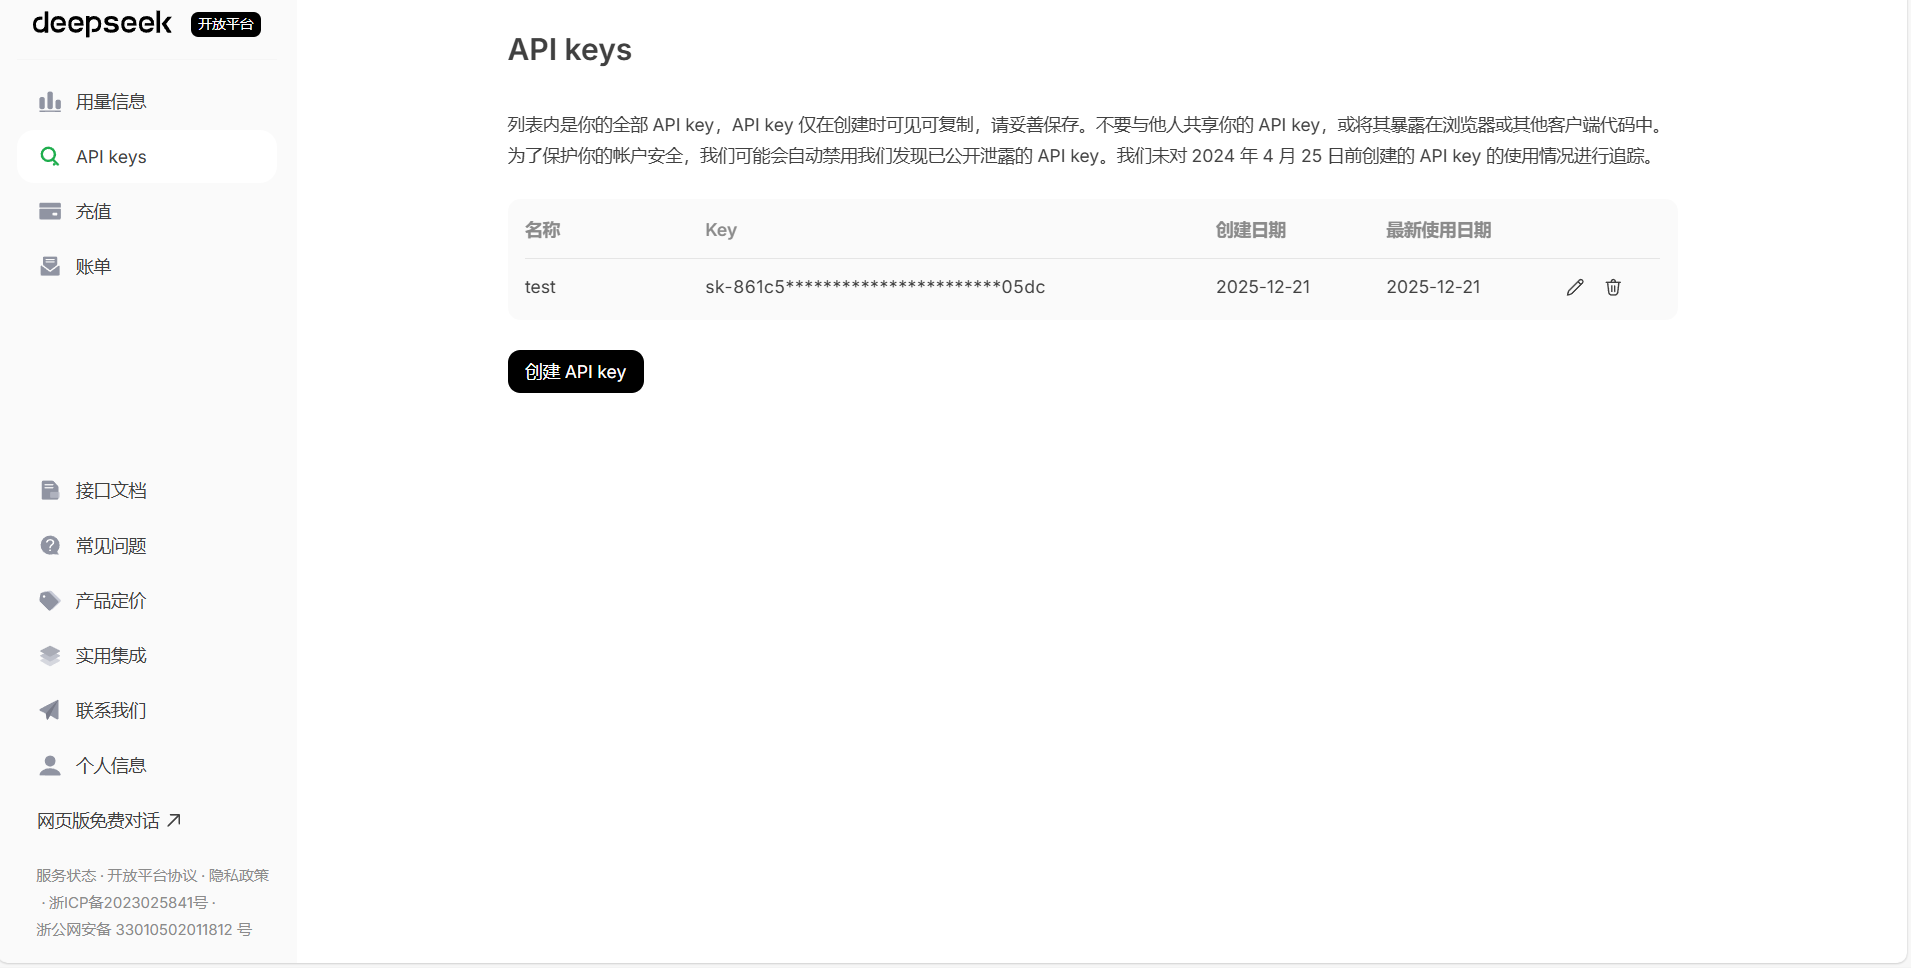
Authorization: Bearer <key>) - APIKEY: 需要在deepseek开发平台注册账号并获取api key替换到代码中的相应位置
- 头信息完整:明确指定请求和响应均为JSON格式
- 调试输出:打印JSON和API密钥长度(前10位),便于排查格式或密钥错误
3.3请求发送与响应处理(第4-5步)
// 4. 发送请求并获取响应
Response response = client.newCall(request).execute();  // 同步执行
int responseCode = response.code();
String responseBody = response.body().string();  // 注意:只能调用一次

System.out.println("响应码: " + responseCode);  // 调试
System.out.println("响应体: " + responseBody);

// 5. 处理响应
if (response.isSuccessful()) {
    JSONObject jsonResponse = new JSONObject(responseBody);

    // 检查是否有choices字段
    if (jsonResponse.has("choices") && !jsonResponse.isNull("choices")) {
        JSONArray choices = jsonResponse.getJSONArray("choices");
        if (choices.length() > 0) {
            JSONObject firstChoice = choices.getJSONObject(0);
            JSONObject messageObj = firstChoice.getJSONObject("message");
            String aiMessage = messageObj.getString("content");  // 提取回复文本

            handler.post(() -> {  // 切回主线程更新UI
                appendMessage("AI: " + aiMessage);
                progressBar.setVisibility(View.GONE);
                btnSend.setEnabled(true);
            });
        }
    }
}
}解析要点:
- 同步请求:
execute()会阻塞当前线程直到响应返回 - 响应结构解析:严格遵循
response → choices[0] → message → content层级 - 线程切换:网络请求在工作线程执行,通过
handler.post()切回主线程更新UI - 重要细节:
response.body().string()只能调用一次,否则会抛异常
3.4错误处理机制
} catch (Exception e) {
    e.printStackTrace();
    final String errorMsg = e.getMessage();
    handler.post(() -> {
        appendMessage("AI: 抱歉,出错了: " + errorMsg);

        // 根据错误类型给出建议
        if (errorMsg != null) {
            if (errorMsg.contains("401") || errorMsg.contains("认证") || errorMsg.contains("Invalid")) {
                appendMessage("提示: API密钥可能无效或过期,请检查密钥");
            } else if (errorMsg.contains("choices")) {
                appendMessage("提示: API返回格式异常,可能是模型名称错误或请求格式问题");
            }
        }

        progressBar.setVisibility(View.GONE);
        btnSend.setEnabled(true);
        Toast.makeText(...).show();
    });
}
解析要点:
- 统一异常捕获:所有异常通过
try-catch统一处理 - 错误分类提示:
- 401/认证错误 → API密钥问题
- choices相关错误 → 请求格式或模型问题
- HTTP错误 → 网络连接问题
- 状态恢复:无论成功失败,都会隐藏进度条并重新启用发送按钮
3.5关键设计总结
- 线程隔离清晰:网络IO在工作线程,UI操作在主线程
- 完整的调试信息:请求/响应JSON、状态码、密钥验证信息
- 符合OpenAI API标准:请求格式、认证方式、响应解析完全兼容
- 容错性较强:多层错误检查(HTTP状态、JSON结构、业务字段)
- 用户体验考虑:即时界面反馈(进度条、按钮状态)、错误友好提示
3.6完整代码
package com.example.myapplication;

import android.os.Bundle;
import android.os.Handler;
import android.os.Looper;
import android.view.View;
import android.widget.Button;
import android.widget.EditText;
import android.widget.ProgressBar;
import android.widget.TextView;
import android.widget.Toast;
import androidx.appcompat.app.AppCompatActivity;

import okhttp3.MediaType;
import okhttp3.OkHttpClient;
import okhttp3.Request;
import okhttp3.RequestBody;
import okhttp3.Response;

import org.json.JSONArray;
import org.json.JSONObject;

import java.util.concurrent.ExecutorService;
import java.util.concurrent.Executors;

public class MainActivity extends AppCompatActivity {

    private TextView tvChatHistory;
    private EditText etMessage;
    private Button btnSend;
    private ProgressBar progressBar;

    private final Handler handler = new Handler(Looper.getMainLooper());
    private final ExecutorService executor = Executors.newSingleThreadExecutor();
    private final OkHttpClient client = new OkHttpClient();

    // 你的DeepSeek API密钥
    private static final String API_KEY = "在此处填入你的api key";
    private static final String API_URL = "https://api.deepseek.com/v1/chat/completions";
    private static final MediaType JSON = MediaType.get("application/json; charset=utf-8");

    @Override
    protected void onCreate(Bundle savedInstanceState) {
        super.onCreate(savedInstanceState);
        setContentView(R.layout.activity_main);

        tvChatHistory = findViewById(R.id.tvChatHistory);
        etMessage = findViewById(R.id.etMessage);
        btnSend = findViewById(R.id.btnSend);
        progressBar = findViewById(R.id.progressBar);

        btnSend.setOnClickListener(new View.OnClickListener() {
            @Override
            public void onClick(View v) {
                String message = etMessage.getText().toString().trim();
                if (!message.isEmpty()) {
                    sendMessage(message);
                    etMessage.setText("");
                } else {
                    Toast.makeText(MainActivity.this, "请输入消息", Toast.LENGTH_SHORT).show();
                }
            }
        });

        etMessage.setOnEditorActionListener((v, actionId, event) -> {
            String message = etMessage.getText().toString().trim();
            if (!message.isEmpty()) {
                sendMessage(message);
                etMessage.setText("");
                return true;
            }
            return false;
        });
    }

    private void sendMessage(String userMessage) {
        appendMessage("你: " + userMessage);
        progressBar.setVisibility(View.VISIBLE);
        btnSend.setEnabled(false);

        executor.execute(() -> {
            try {
                // 1. 构建请求体
                JSONObject requestBody = new JSONObject();
                requestBody.put("model", "deepseek-chat");

                JSONArray messages = new JSONArray();

                // 注意:DeepSeek API有时不需要system消息,可以去掉或简化
                JSONObject systemMessage = new JSONObject();
                systemMessage.put("role", "system");
                systemMessage.put("content", "You are a helpful assistant");
                messages.put(systemMessage);

                JSONObject userMsg = new JSONObject();
                userMsg.put("role", "user");
                userMsg.put("content", userMessage);
                messages.put(userMsg);

                requestBody.put("messages", messages);
                requestBody.put("max_tokens", 1000);
                requestBody.put("temperature", 0.7);
                requestBody.put("stream", false); // 明确设置为非流式

                // 2. 打印请求信息(用于调试)
                String requestJson = requestBody.toString();
                System.out.println("请求JSON: " + requestJson);
                System.out.println("API密钥长度: " + API_KEY.length());
                System.out.println("API密钥前10位: " + (API_KEY.length() > 10 ? API_KEY.substring(0, 10) + "..." : API_KEY));

                // 3. 创建请求
                RequestBody body = RequestBody.create(requestJson, JSON);
                Request request = new Request.Builder()
                        .url(API_URL)
                        .addHeader("Authorization", "Bearer " + API_KEY)
                        .addHeader("Content-Type", "application/json")
                        .addHeader("Accept", "application/json")
                        .post(body)
                        .build();

                // 4. 发送请求并获取响应
                Response response = client.newCall(request).execute();
                int responseCode = response.code();
                String responseBody = response.body().string();

                System.out.println("响应码: " + responseCode);
                System.out.println("响应体: " + responseBody);

                // 5. 处理响应
                if (response.isSuccessful()) {
                    JSONObject jsonResponse = new JSONObject(responseBody);

                    // 检查是否有choices字段
                    if (jsonResponse.has("choices") && !jsonResponse.isNull("choices")) {
                        JSONArray choices = jsonResponse.getJSONArray("choices");
                        if (choices.length() > 0) {
                            JSONObject firstChoice = choices.getJSONObject(0);
                            JSONObject messageObj = firstChoice.getJSONObject("message");
                            String aiMessage = messageObj.getString("content");

                            handler.post(() -> {
                                appendMessage("AI: " + aiMessage);
                                progressBar.setVisibility(View.GONE);
                                btnSend.setEnabled(true);
                            });
                        } else {
                            throw new Exception("choices数组为空");
                        }
                    } else {
                        // 检查是否有错误信息
                        if (jsonResponse.has("error")) {
                            JSONObject error = jsonResponse.getJSONObject("error");
                            String errorMessage = error.getString("message");
                            throw new Exception("API返回错误: " + errorMessage);
                        } else {
                            throw new Exception("响应中没有choices字段");
                        }
                    }
                } else {
                    throw new Exception("HTTP错误: " + responseCode + " - " + responseBody);
                }

            } catch (Exception e) {
                e.printStackTrace();
                final String errorMsg = e.getMessage();
                handler.post(() -> {
                    appendMessage("AI: 抱歉,出错了: " + errorMsg);

                    // 根据错误类型给出建议
                    if (errorMsg != null) {
                        if (errorMsg.contains("401") || errorMsg.contains("认证") || errorMsg.contains("Invalid")) {
                            appendMessage("提示: API密钥可能无效或过期,请检查密钥");
                        } else if (errorMsg.contains("choices")) {
                            appendMessage("提示: API返回格式异常,可能是模型名称错误或请求格式问题");
                        } else if (errorMsg.contains("HTTP")) {
                            appendMessage("提示: 网络请求失败,请检查网络连接");
                        }
                    }

                    progressBar.setVisibility(View.GONE);
                    btnSend.setEnabled(true);
                    Toast.makeText(MainActivity.this, "请求失败: " + (errorMsg != null && errorMsg.length() > 50 ? errorMsg.substring(0, 50) + "..." : errorMsg), Toast.LENGTH_LONG).show();
                });
            }
        });
    }

    private void appendMessage(String message) {
        handler.post(() -> {
            String currentText = tvChatHistory.getText().toString();
            tvChatHistory.setText(currentText + "\n\n" + message);

            // 自动滚动到底部
            tvChatHistory.post(() -> {
                int scrollAmount = tvChatHistory.getLayout().getLineTop(tvChatHistory.getLineCount()) - tvChatHistory.getHeight();
                if (scrollAmount > 0) {
                    tvChatHistory.scrollTo(0, scrollAmount);
                }
            });
        });
    }

    @Override
    protected void onDestroy() {
        super.onDestroy();
        executor.shutdown();
    }
}
四、过程中bug修改
在开发过程中,可能会遇到以下常见问题:
- API 认证失败:如图所示,在未充值或 API 密钥无效时,会出现认证错误。根据实际测试,充值少量金额(如10元)后即可正常使用 API 服务。
- 网络连接问题:确保应用已添加网络权限,并且设备网络连接正常。
- 速率限制:DeepSeek API 可能会有速率限制,如果频繁调用可能被限制。建议合理控制请求频率,或考虑实现请求队列和重试机制。
- JSON 解析错误:确保请求和响应格式符合 API 文档要求,特别是
messages数组的结构。
在本人测试的过程中出现报错:

Insufficient Balance表示余额不足,充值10元余额后再次尝试发送请求成功
作者:邓凯峰
原文链接:在Android中接入OpenAI

有“AI”的1024 = 2048,欢迎大家加入2048 AI社区
更多推荐

 21
21 0
0- 0


 已为社区贡献24条内容

所有评论(0)