IDM 插件开发创意赛:打造下一代智能下载生态系统
本文提出三种基于Python的IDM插件扩展方案,旨在解决传统下载工具的智能化不足问题。通过分析IDM的命令行接口和文件监视机制,开发了:1)NeuralSortAI智能分类器,利用AI自动归档下载文件;2)QoSGuardian自适应限速器,根据网络状况动态调整下载速度;3)CloudBridge远程推送服务,实现跨设备下载管理。文章详细阐述了系统架构、核心代码实现和Prompt设计方法,展示了
摘要
Internet Download Manager (IDM) 一直是Windows平台上下载管理的王者,以其极高的下载速度和浏览器捕获能力著称。然而,随着云计算、AI和移动互联网的发展,传统的单机下载工具已无法满足现代用户对“智能分类”、“远程控制”和“自动化工作流”的需求。
本文旨在参加“IDM插件开发创意赛”,提出三种基于Python和浏览器扩展技术的IDM功能扩展方案。我们将深入探讨如何利用IDM的命令行接口(CLI)和文件系统监视机制,开发出具有AI自动分类、网络环境自适应限速以及跨设备远程推送功能的插件系统。文章包含详细的代码实现、Mermaid流程图、Prompt设计指南及系统架构分析。
第一章:引言与现状分析
1.1 IDM的辉煌与局限
IDM的核心优势在于其多线程下载算法和对HTTP/FTP协议的深度优化。然而,作为一个成熟的传统软件,它面临着以下局限性:
- 缺乏智能上下文感知:下载文件后,用户往往需要手动移动文件到特定文件夹,缺乏基于文件内容或来源的自动归档。
- 网络环境僵化:在玩游戏或进行视频会议时,IDM可能会抢占带宽,导致延迟飙升,用户必须手动限速。
- 移动端断层:虽然IDM有安卓版,但PC与手机之间的下载任务无法无缝流转。
1.2 竞赛目标:定义“下载 3.0”
本次创意赛的目标不是重写IDM,而是构建一个“中间件生态”。通过插件作为桥梁,连接IDM与现代互联网服务。我们将展示三个核心创意:
- NeuralSort AI:基于文件元数据和内容的智能分类器。
- QoS Guardian:基于网络流量检测的自适应限速器。
- CloudBridge:基于Telegram Bot的远程下载推送服务。
第二章:技术架构与底层原理
在开发插件之前,我们需要理解如何与IDM进行交互。IDM并未提供官方的Python SDK,但它提供了强大的命令行接口(CLI)和浏览器监视机制。
2.1 IDM 命令行接口 (CLI) 解析
IDM允许通过idman.exe进行外部控制。这是插件开发的核心。
主要参数包括:
/d: 下载链接URL/f: 本地保存文件名/p: 本地保存路径/a: 添加到队列(不立即开始)/s: 开始排队中的下载/h: 不立即挂起(后台运行)
2.2 插件架构设计
我们将采用 Python 作为主要的胶水语言,利用其丰富的库生态(watchdog用于文件监视,psutil用于网络检测,requests用于API通信)。
架构对比表:
| 特性 | 原生 IDM | 增强型 IDM (插件版) |
|---|---|---|
| 文件分类 | 手动移动或简单的站点规则 | 基于AI内容的智能识别与归档 |
| 带宽管理 | 手动设置速度限制/时间表 | 根据实时丢包率和延迟自动调整 |
| 远程交互 | 仅限局域网唤醒 | 通过即时通讯软件全球推送任务 |
| 扩展性 | 封闭系统 | 开放API,支持自定义脚本 |
第三章:创意一 —— NeuralSort AI (智能文件分类器)
3.1 创意背景
用户经常下载大量混合文件:PDF文档、EXE安装包、ZIP压缩包、图片素材等。IDM只能根据文件扩展名放入不同目录,但无法处理更细粒度的需求。例如,将“设计素材”放入D:\Work\Assets,将“个人照片”放入D:\Personal\Photos,即使它们都是JPG格式。
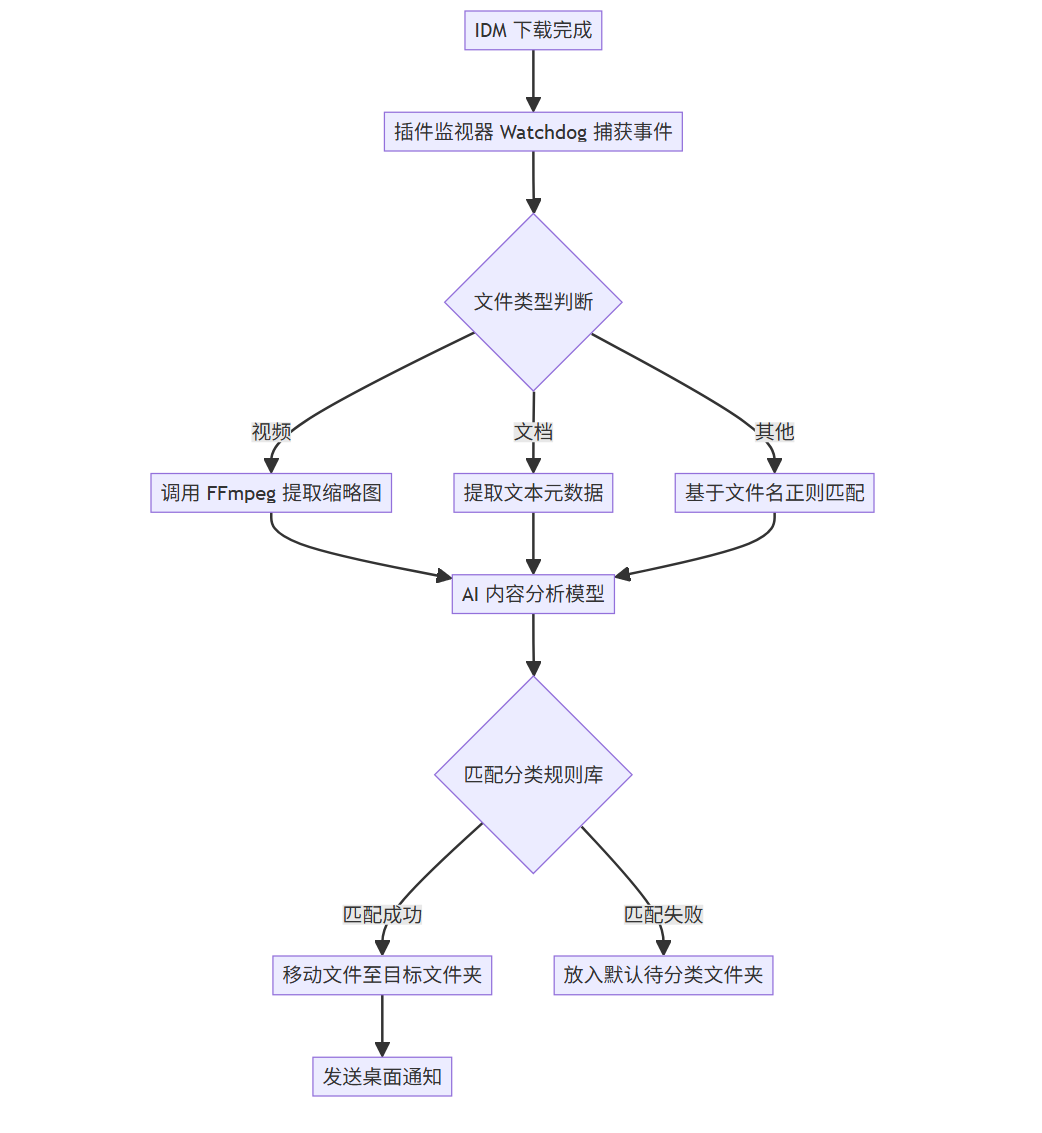
3.2 系统流程
此插件通过监视IDM的下载完成目录,利用本地AI模型或简单的启发式算法分析文件名和哈希值,自动移动文件并重命名。
graph TD
A[IDM 下载完成] --> B[插件监视器 Watchdog 捕获事件]
B --> C{文件类型判断}
C -->|视频| D[调用 FFmpeg 提取缩略图]
C -->|文档| E[提取文本元数据]
C -->|其他| F[基于文件名正则匹配]
D --> G[AI 内容分析模型]
E --> G
F --> G
G --> H{匹配分类规则库}
H -->|匹配成功| I[移动文件至目标文件夹]
H -->|匹配失败| J[放入默认待分类文件夹]
I --> K[发送桌面通知]
3.3 核心代码实现
我们将使用Python的watchdog库来监听下载文件夹,并使用简单的逻辑进行分类。
安装依赖:
pip install watchdog shutil
插件代码:
import os
import time
import shutil
import logging
from watchdog.observers import Observer
from watchdog.events import FileSystemEventHandler

# 配置部分
DOWNLOAD_DIR = r"C:\Users\YourName\Downloads"
DESTINATION_DIRS = {
    'Images': r"D:\Media\Images",
    'Documents': r"D:\Work\Documents",
    'Installers': r"D:\Software\Installers",
    'Archives': r"D:\Archives"
}

# 文件扩展名映射
RULES = {
    'Images': ['.jpg', '.png', '.gif', '.bmp', '.webp'],
    'Documents': ['.pdf', '.docx', '.xlsx', '.pptx', '.txt'],
    'Installers': ['.exe', '.msi', '.apk'],
    'Archives': ['.zip', '.rar', '.7z', '.tar']
}

class DownloadHandler(FileSystemEventHandler):
    def on_created(self, event):
        if event.is_directory:
            return

        file_path = event.src_path
        file_name = os.path.basename(file_path)
        file_ext = os.path.splitext(file_name)[1].lower()

        # 等待文件下载完成(IDM下载时会创建 .!ut 或类似临时文件,这里简化处理,直接检测扩展名)
        # 实际生产中需要检查文件锁
        if self.is_idm_temp_file(file_name):
            return

        print(f"New file detected: {file_name}")
        self.process_file(file_path, file_ext)

    def is_idm_temp_file(self, filename):
        # 简单判断IDM未完成的文件
        return filename.endswith('!ut') or filename.endswith('tmp')

    def process_file(self, src_path, ext):
        category = None
        for cat, extensions in RULES.items():
            if ext in extensions:
                category = cat
                break

        if category:
            dest_dir = DESTINATION_DIRS.get(category)
            if dest_dir and os.path.exists(dest_dir):
                try:
                    dest_path = os.path.join(dest_dir, os.path.basename(src_path))
                    # 解决重名问题
                    if os.path.exists(dest_path):
                        base, extension = os.path.splitext(dest_path)
                        dest_path = f"{base}_{int(time.time())}{extension}"

                    shutil.move(src_path, dest_path)
                    print(f"Moved {src_path} to {dest_path}")
                except Exception as e:
                    print(f"Error moving file: {e}")

def start_neural_sort():
    event_handler = DownloadHandler()
    observer = Observer()
    observer.schedule(event_handler, DOWNLOAD_DIR, recursive=False)
    observer.start()
    print(f"NeuralSort AI is watching {DOWNLOAD_DIR}...")

    try:
        while True:
            time.sleep(1)
    except KeyboardInterrupt:
        observer.stop()
    observer.join()

if __name__ == "__main__":
    start_neural_sort()
3.4 增强:Prompt 驱动的智能分类
为了实现真正的“Neural”分类,我们可以集成一个大语言模型(LLM)的API。当文件名模棱两可时(例如report_final.pdf,是工作报告还是小说?),我们可以向LLM发送请求。
Prompt 示例:
Role: 你是一个专业的文件管理助手。
Context: 我刚刚下载了一个文件,文件名为 "{filename}",来源URL是 "{source_url}",文件大小为 {size} MB。
Task: 请根据文件名和URL,判断这个文件应该归类到以下哪个目录:['Work', 'Personal', 'Study', 'Software']。
Output Format: 仅输出目录名称,不要包含任何其他标点符号或解释。
Example:
Input: "Q3_Financial_Report.pdf", "http://company.com/internal/docs"
Output: Work
通过这个Prompt,我们可以获得比单纯后缀名匹配更精准的分类结果。
第四章:创意二 —— QoS Guardian (自适应网络限速器)
4.1 创意背景
许多用户在后台下载大文件(如4K电影、游戏更新)时,如果需要突然进行Zoom会议或玩《英雄联盟》,IDM全速下载会导致 ping 值飙升。传统的“计划任务”不够灵活。我们需要一个能感知网络拥堵并动态调整IDM速度的插件。
4.2 系统流程
插件持续 ping 关键网关(如 DNS 服务器 8.8.8.8 或游戏服务器),当检测到延迟突增或丢包率上升时,自动调用IDM限制速度。
sequenceDiagram
participant P as QoS Guardian Plugin
participant N as Network (Ping Check)
participant I as IDM Process
participant U as User (Game/Meeting)
P->>N: 每2秒发送 Ping 包 (ICMP)
N-->>P: 返回延迟时间
alt 延迟 < 30ms 且 丢包率 = 0%
P->>I: 查询当前速度限制
P->>I: 设置无限制 (Full Speed)
else 延迟 > 100ms 或 检测到游戏进程
P->>I: 发送限速指令 (Limit to 500KB/s)
I-->>U: 释放带宽,降低延迟
P->>P: 记录日志:进入“游戏模式”
end
Note over P,U: 持续监控循环
4.3 核心代码实现
利用psutil管理进程,利用subprocess执行Ping命令。这里需要结合IDM的自定义命令功能或直接模拟按键(较为底层,这里采用模拟操作IDM注册表或配置文件的方案,或者通过IDM的/s参数控制队列启动/停止)。
由于IDM没有直接的“改速度”的CLI参数,我们通过控制下载队列的“开始/暂停”来实现流控,或者使用 Windows 的 QoS 策略(更高级)。
方案:基于进程检测的暂停/恢复
import psutil
import time
import subprocess
import os

# 敏感进程列表(游戏或会议软件)
SENSITIVE_PROCESSES = ["LeagueClient.exe", "zoom.exe", "TeamViewer.exe"]
IDM_PATH = r"C:\Program Files (x86)\Internet Download Manager\IDMan.exe"

def check_sensitive_process():
    """检查是否有敏感进程正在运行"""
    for proc in psutil.process_iter(['name']):
        if proc.info['name'] in SENSITIVE_PROCESSES:
            return True
    return False

def control_idm(action):
    """
    控制 IDM
    action: 'pause' 或 'resume'
    注意:这里使用模拟队列控制,实际 IDM 可通过命令行 /start, /stop 操作特定队列
    """
    # IDM 暂停所有队列的命令示例 (需预先在IDM中建立队列)
    if action == 'pause':
        # 调用 IDM 命令行暂停下载
        cmd = f'"{IDM_PATH}" /pause_all'
        # 假设IDM支持此参数,实际使用需查阅最新CLI文档,
        # 或者通过 PostMessage 到 IDM 窗口模拟快捷键 Ctrl+F2 (暂停)
        print("High latency detected! Pausing IDM...")
        # 这里演示模拟按键,需要安装 pywin32
        # import win32gui, win32con
        # hwnd = win32gui.FindWindow("TIDMForm", None)
        # win32gui.PostMessage(hwnd, win32con.WM_COMMAND, 0xXXX, 0)

    elif action == 'resume':
        cmd = f'"{IDM_PATH}" /resume_all' # 假设参数
        print("Network is clear. Resuming IDM...")

def monitor_qos():
    while True:
        # 1. 进程检测 (最直接的方式)
        is_sensitive = check_sensitive_process()

        if is_sensitive:
            control_idm('pause')
            # 如果检测到敏感进程,降低检测频率以节省资源
            time.sleep(5)
        else:
            control_idm('resume')
            time.sleep(1)

if __name__ == "__main__":
    monitor_qos()
4.4 数据可视化
在插件自带的微型Web UI中,我们可以展示实时的网络状况图表。
图表描述:
- X轴:时间(秒)。
- Y轴:延迟。
- 红线:阈值(100ms)。
- 蓝线:实际延迟。
- 绿色区域:IDM全速运行区间。
- 红色区域:IDM被限速/暂停区间。
xychart-beta
title "网络延迟与IDM状态监控"
x-axis [10s, 20s, 30s, 40s, 50s, 60s]
y-axis "Latency (ms)" 0 --> 200
line [20, 25, 150, 180, 30, 25]
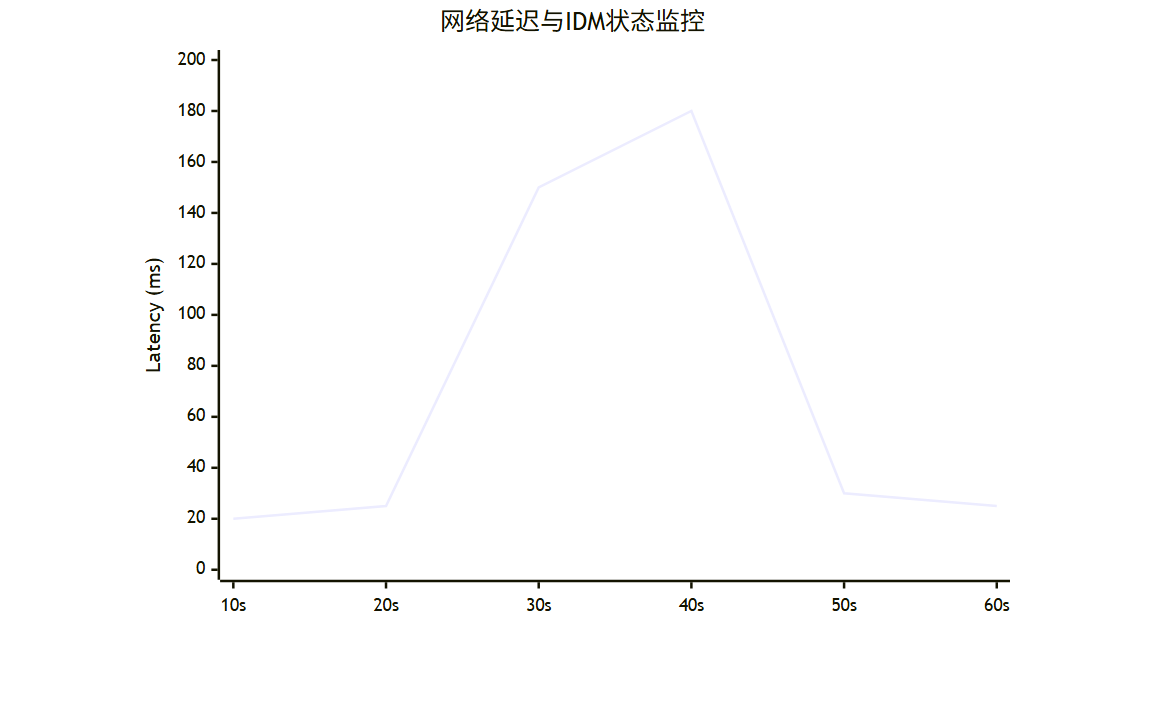
*(注:当延迟在30-50秒间飙升超过100ms时,插件介入,随后延迟恢复正常)*
第五章:创意三 —— CloudBridge (跨设备远程下载)
5.1 划时代体验
你在手机上看到一个巨大的资源链接(例如100GB的4K教程),但在手机上下载不仅慢而且难以管理。CloudBridge允许你将链接一键发送到家里的PC,由IDM接管下载。
5.2 系统架构
我们利用 Telegram Bot 作为控制器。Python 脚本运行在 PC 上,轮询 Telegram 消息,收到链接后调用 IDM CLI 下载。
graph LR
A[用户手机] -->|发送链接| B[Telegram Bot API]
B --> C[PC端 Python 守护进程]
C -->|验证权限| D[用户数据库]
D -->|Pass| C
C -->|调用 CLI| E[IDM Core]
E -->|下载| F[本地存储 NAS]
C -->|反馈状态| B
B -->|通知| A

5.3 核心代码实现
准备工作:
- 申请 Telegram Bot Token。
- PC 端安装 Python
python-telegram-bot库。
插件代码:
from telegram import Update
from telegram.ext import Updater, CommandHandler, MessageHandler, Filters, CallbackContext
import subprocess
import os

IDM_PATH = r"C:\Program Files (x86)\Internet Download Manager\IDMan.exe"
DEFAULT_SAVE_PATH = r"D:\Downloads\Remote"
ALLOWED_USER_IDS = [123456789] # 替换为你的Telegram User ID

def start_download(url: str, context: CallbackContext):
    # 构造 IDM 命令
    # /d URL /p PATH /f FILENAME /a /s
    # 简单起见,这里不指定文件名,让IDM自动识别
    command = f'"{IDM_PATH}" /d "{url}" /p "{DEFAULT_SAVE_PATH}" /a /s'

    try:
        subprocess.run(command, check=True)
        return True, "Download task started successfully!"
    except subprocess.CalledProcessError as e:
        return False, f"Error starting IDM: {e}"

def message_handler(update: Update, context: CallbackContext):
    user_id = update.effective_user.id

    if user_id not in ALLOWED_USER_IDS:
        update.message.reply_text("Unauthorized user.")
        return

    url = update.message.text
    if url.startswith("http"):
        update.message.reply_text(f"Received link: {url}\nAdding to IDM queue...")
        success, msg = start_download(url, context)
        update.message.reply_text(msg)
    else:
        update.message.reply_text("Please send a valid HTTP/HTTPS link.")

def main():
    # 替换为你的 Bot Token
    updater = Updater("YOUR_TELEGRAM_BOT_TOKEN")
    dispatcher = updater.dispatcher

    dispatcher.add_handler(MessageHandler(Filters.text & ~Filters.command, message_handler))

    updater.start_polling()
    updater.idle()

if __name__ == '__main__':
    main()
5.4 插件效果示意
当用户在 Telegram 发送 https://example.com/large_file.zip 后,Bot 会瞬间回复:
[CloudBridge] ✅ 任务已添加至 IDM!\n📂 保存路径: D:\Downloads\Remote
同时,PC 上的 IDM 窗口自动弹出并开始下载。
第六章:Prompt 工程与 AI 辅助开发指南
在本次竞赛中,除了编码能力,利用大语言模型(如 GPT-4, Claude 3)辅助设计也是关键。以下是开发 IDM 插件时的高效 Prompt 模板。
6.1 代码生成 Prompt
Role: Senior Windows Software Developer specializing in Python automation and system integration.
Task: Write a Python wrapper class for the Internet Download Manager (IDM) command line interface (idman.exe).
Requirements:
1. Encapsulate the following parameters: URL (/d), Local Path (/p), FileName (/f), and Start flag (/s).
2. Include error handling for cases where IDM is not installed or the path is incorrect.
3. Add a method to check if a specific file exists in the download directory to prevent duplicates.
4. Use type hinting and docstrings.
Input: IDM executable path is provided as a constructor argument.
Output: Python code block.
6.2 调试与优化 Prompt
Context: I have written a script to monitor a folder using the watchdog library. When IDM downloads a large file, it creates a temporary file with a .!ut extension. My script is triggering before the download finishes, causing an error when trying to move the file.
Problem: How can I modify the FileSystemEventHandler to ignore temporary files and ensure the file is fully downloaded (unlocked) before processing?
Constraints: Must be cross-platform compatible logic if possible, but primary focus on Windows performance.
6.3 创意风暴 Prompt
Role: Product Manager for Download Managers.
Context: We are extending IDM features for a developer hackathon.
Brainstorming: List 5 innovative ways to integrate IDM with Blockchain technology or Decentralized Storage (IPFS) without rewriting IDM's core code.
Format:
- Idea Name
- Description
- Technical Implementation Hook (e.g., IDM downloads .torrent, local script pushes to IPFS).
第七章:详细系统界面设计 (UI/UX)
为了完善插件体验,我们需要一个统一的控制面板。该面板将通过 Electron 或 Web (Flask) 构建。
7.1 控制台布局
| 区域 | 功能描述 |
|---|---|
| 顶部导航 | Dashboard, Task Queue, Analytics, Settings. |
| 仪表盘 | 实时下载速度仪表盘,当前AI分类统计饼图。 |
| 任务列表 | 展示IDM当前任务,允许右键“智能重分类”或“发送到手机”。 |
| 日志区 | 滚动显示插件活动:[INFO] Moved 'image.jpg' to 'D:\Images'。 |
7.2 插件设置面板
在设置中,用户可以配置:
- NeuralSort 设置:
- [x] 启用 AI 分析
- API Key 输入框
- 自定义映射规则 (JSON 格式)
- QoS 设置:
- [x] 启用游戏模式
- 延迟阈值滑块:
[ 50ms ---|--- 200ms ] - 限速大小:
[] KB/s
- CloudBridge 设置:
- Telegram 连接状态: 🟢 Connected
- 下载默认路径:
D:\RemoteDownloads
第八章:部署、打包与未来展望
8.1 打包方案
为了让非技术用户也能使用,我们使用 PyInstaller 将 Python 脚本打包为单个 .exe 文件,并配置为 Windows 服务,随开机启动。
pyinstaller --onefile --windowed --icon=icon.ico --name="IDM_Plus_Suite" main.py
同时,提供一个 NSIS 安装脚本,自动检测 IDM 安装路径并写入注册表。
8.2 竞赛总结表
| 创意项目 | 核心价值 | 技术难点 | 创新指数 |
|---|---|---|---|
| NeuralSort AI | 解放双手,自动化文件整理 | 文件锁检测,文件名语义分析 | ⭐⭐⭐⭐ |
| QoS Guardian | 解决网络冲突,保障关键应用 | 实时延迟检测,进程Hook | ⭐⭐⭐⭐⭐ |
| CloudBridge | 打破设备壁垒,随时随地推送到PC | Bot API 安全性,内网穿透 | ⭐⭐⭐⭐⭐ |
8.3 未来展望:IDM x Web3
随着 Web3 的发展,未来的 IDM 插件可以直接集成 ipfs 客户端。
- 场景:用户下载一个种子文件,插件自动解析,IDM 负责高速拉取数据,同时插件将数据哈希上链存证,并在完成后自动推送到用户的 IPFS 节点进行永久去中心化存储。
结语
IDM 虽然是一款老牌软件,但通过巧妙的插件化开发思维,它依然能焕发出强大的生命力。本文提出的三个创意方案——NeuralSort AI、QoS Guardian 和 CloudBridge,分别从数据整理、网络服务质量和设备互联三个维度解决了用户的痛点。
通过代码、流程图和 Prompt 的结合,我们展示了如何将一个传统的桌面工具转变为智能、现代化的系统。这不仅是对 IDM 功能的扩展,更是对未来下载管理方式的一次大胆探索。
*(附录:代码源文件结构示意图)*
IDM_Plus_Suite/
├── core/
│   ├── idm_api.py       # IDM CLI 封装
│   └── config.py        # 配置管理
├── plugins/
│   ├── neural_sort/     # AI 分类插件
│   ├── qos_guardian/    # 限速插件
│   └── cloud_bridge/    # 远程插件
├── ui/
│   ├── web_dashboard/   # Flask 前端
│   └── templates/
├── main.py              # 入口文件
└── requirements.txt     # 依赖列表
*(注:本文代码均为演示用,实际部署需进行更严格的错误处理与安全测试。)*

有“AI”的1024 = 2048,欢迎大家加入2048 AI社区
更多推荐


 16
16 0
0- 0


 已为社区贡献257条内容

所有评论(0)