大语言模型实战(九)——从零到一:搭建基于 MCP 的 RAG 系统完整教程
RAG 是检索(Retrieval):从知识库中查找相关的信息生成(Generation):使用 LLM 根据检索的信息生成回答✅ 可以处理模型未见过的最新信息✅ 回答基于真实数据,降低幻觉风险✅ 支持添加自定义知识库✅ 更精准和可信的回答MCP 是一个标准化协议,允许应用与 LLM 模型进行安全的交互。定义自定义工具供 LLM 调用实现客户端-服务器架构标准化人类与 AI 的交互流程# 原理:使
从零到一:搭建基于 MCP 的 RAG 系统完整教程
1. 引言
在这个教程中,我将向您展示如何搭建一个完整的 RAG(检索增强生成) 系统,使用 MCP(Model Context Protocol) 协议和 通义千问 LLM 模型。通过这个项目,您将深入理解向量检索、LLM 集成以及 MCP 协议的实际应用。
1.1 什么是 RAG?
RAG 是 Retrieval-Augmented Generation 的缩写,它结合了两个关键能力:
- 检索(Retrieval):从知识库中查找相关的信息
- 生成(Generation):使用 LLM 根据检索的信息生成回答
RAG 相比纯 LLM 的优势:
- ✅ 可以处理模型未见过的最新信息
- ✅ 回答基于真实数据,降低幻觉风险
- ✅ 支持添加自定义知识库
- ✅ 更精准和可信的回答
1.2 什么是 MCP?
MCP 是一个标准化协议,允许应用与 LLM 模型进行安全的交互。通过 MCP,我们可以:
- 定义自定义工具供 LLM 调用
- 实现客户端-服务器架构
- 标准化人类与 AI 的交互流程
1.3 项目架构概览
┌─────────────────┐                    ┌──────────────────┐
│  LLM Client     │  ←→ MCP Protocol ←→ │  MCP Server      │
│ (通义千问 API)   │                    │ (文档索引/检索)   │
└─────────────────┘                    └──────────────────┘
        ↓                                        ↓
    用户查询                          FAISS向量数据库
2. 环境准备
2.1 系统要求
- 操作系统:Linux/Mac/Windows
- Python 版本:Python 3.8+
- 包管理器:Conda(推荐)或 pip
2.2 安装 Conda
如果还未安装 Conda,请从 Anaconda 官网 下载并安装。
2.3 创建虚拟环境
# 创建名为 mcp 的 conda 环境
conda create -n mcp python=3.10

# 激活环境
conda activate mcp
2.4 安装核心依赖
# 安装必要的 Python 包
pip install faiss-cpu mcp openai python-dotenv
依赖说明:
| 包 | 版本 | 用途 |
|---|---|---|
faiss-cpu |
≥1.10.0 | 向量索引和相似度搜索 |
mcp |
≥1.6.0 | MCP 协议支持 |
openai |
≥1.75.0 | OpenAI 兼容 API 客户端 |
python-dotenv |
≥1.1.0 | 环境变量管理 |
3. API 密钥配置
3.1 获取阿里云 API Key
- 访问 阿里云 DashScope 官网
- 登录或注册账户
- 创建 API Key
- 复制您的 API Key
3.2 配置环境变量
创建 .env 文件,配置 API 密钥:
# 文件路径:/home/swpucwf/llm-study/.env

# 通义千问 API 配置
QWEN_API_KEY=your-api-key-here
QWEN_BASE_URL=https://dashscope.aliyuncs.com/compatible-mode/v1

# 阿里百炼嵌入模型配置
DASHSCOPE_API_KEY=your-api-key-here  # 通常与 QWEN_API_KEY 相同
注意:通常 QWEN_API_KEY 和 DASHSCOPE_API_KEY 可以使用同一个 API Key。
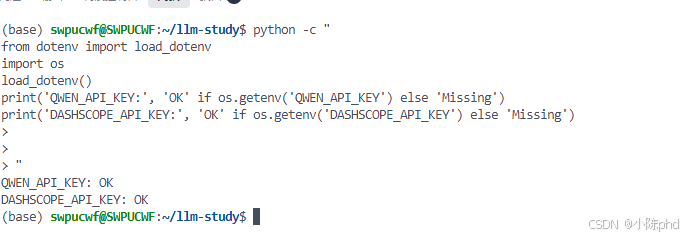
3.3 验证配置
# 测试是否能正确加载环境变量
python -c "
from dotenv import load_dotenv
import os
load_dotenv()
print('QWEN_API_KEY:', 'OK' if os.getenv('QWEN_API_KEY') else 'Missing')
print('DASHSCOPE_API_KEY:', 'OK' if os.getenv('DASHSCOPE_API_KEY') else 'Missing')
"
4. 项目结构
4.1 项目文件树
02-mcp-rag/
├── rag-server/
│   ├── server-ali.py          # 📌 Server 主程序(使用阿里百炼)
│   ├── pyproject.toml
│   └── uv.lock
├── rag-client/
│   ├── client-qwen-ali.py     # 📌 Client 主程序(推荐)
│   ├── client-qwen-ali-optimized.py  # 性能优化版
│   ├── pyproject.toml
│   └── uv.lock
├── start-server.sh            # Server 启动脚本
├── start-client.sh            # Client 启动脚本
├── RUN_GUIDE.md               # 快速启动指南
└── BLOG_MCP_RAG_TUTORIAL.md   # 本文件
4.2 核心文件说明
4.2.1 Server 端:server-ali.py
Server 负责:
- 维护文档的向量索引
- 提供检索工具给 Client
- 使用 FAISS 进行高效的相似度搜索
4.2.2 Client 端:client-qwen-ali.py
Client 负责:
- 与用户交互,获取查询
- 调用 Server 的检索工具
- 与通义千问 LLM 通信
- 生成最终的回答
5. Server 端实现详解
5.1 Server 核心代码
# server-ali.py

from fastmcp import mcp
import numpy as np
import faiss
from openai import OpenAI

class RagServer:
    def __init__(self):
        # 向量存储
        self._index = None
        self._docs = []

        # 初始化嵌入模型客户端
        self.client = OpenAI(
            api_key=os.getenv("DASHSCOPE_API_KEY"),
            base_url="https://dashscope.aliyuncs.com/compatible-mode/v1"
        )

    async def embed_text(self, texts: List[str]) -> np.ndarray:
        """使用阿里百炼模型生成文本嵌入向量"""
        resp = self.client.embeddings.create(
            model="text-embedding-v4",
            input=texts,
            dimensions=1536
        )
        return np.array([d.embedding for d in resp.data], dtype='float32')

    @mcp.tool()
    async def index_docs(self, docs: List[str]) -> str:
        """索引文档到向量库中"""
        self._docs = docs
        embeddings = await self.embed_text(docs)

        # 创建 FAISS 索引
        dimension = embeddings.shape[1]
        self._index = faiss.IndexFlatL2(dimension)
        self._index.add(embeddings)

        return f"✅ 已索引 {len(docs)} 篇文档"

    @mcp.tool()
    async def retrieve_docs(self, query: str, top_k: int = 3) -> str:
        """检索最相关的文档"""
        query_embedding = await self.embed_text([query])
        distances, indices = self._index.search(query_embedding, top_k)

        results = []
        for i, idx in enumerate(indices[0]):
            if idx < len(self._docs):
                results.append(f"[{i}] {self._docs[idx]}")

        return "\n".join(results)

5.2 关键概念详解
5.2.1 文本嵌入(Embedding)
嵌入是将文本转换为数值向量的过程:
文本: "糖尿病的症状"
     ↓ (文本嵌入模型)
向量: [0.23, 0.45, -0.12, ..., 0.89]  (1536 维)
为什么需要嵌入?
- 计算机可以计算向量的相似度
- 相似的文本会有接近的向量
- 可以进行快速的向量搜索
5.2.2 FAISS 索引
FAISS(Facebook AI Similarity Search)是高效的向量搜索库:
# IndexFlatL2:使用欧几里得距离(L2)进行精确搜索
index = faiss.IndexFlatL2(1536)  # 1536 维向量

# 添加向量
index.add(embeddings)

# 搜索相似向量
distances, indices = index.search(query_vector, top_k=3)
FAISS 的优势:
- ✅ 处理百万级向量无压力
- ✅ GPU 加速支持
- ✅ 多种搜索算法(精确、近似等)
6. Client 端实现详解
6.1 Client 核心代码
# client-qwen-ali.py
from mcp import ClientSession
from mcp.client.stdio import stdio_client, StdioServerParameters
from openai import OpenAI
class RagClient:
def __init__(self):
self.session = None
self.client = OpenAI(
api_key=os.getenv("QWEN_API_KEY"),
base_url=os.getenv("QWEN_BASE_URL")
)
async def connect(self, server_script: str):
"""建立 MCP 连接"""
params = StdioServerParameters(
command=sys.executable,
args=[server_script],
)
transport = stdio_client(params)
self.stdio, self.write = await transport.__aenter__()
self.session = await ClientSession(
self.stdio,
self.write
).__aenter__()
await self.session.initialize()
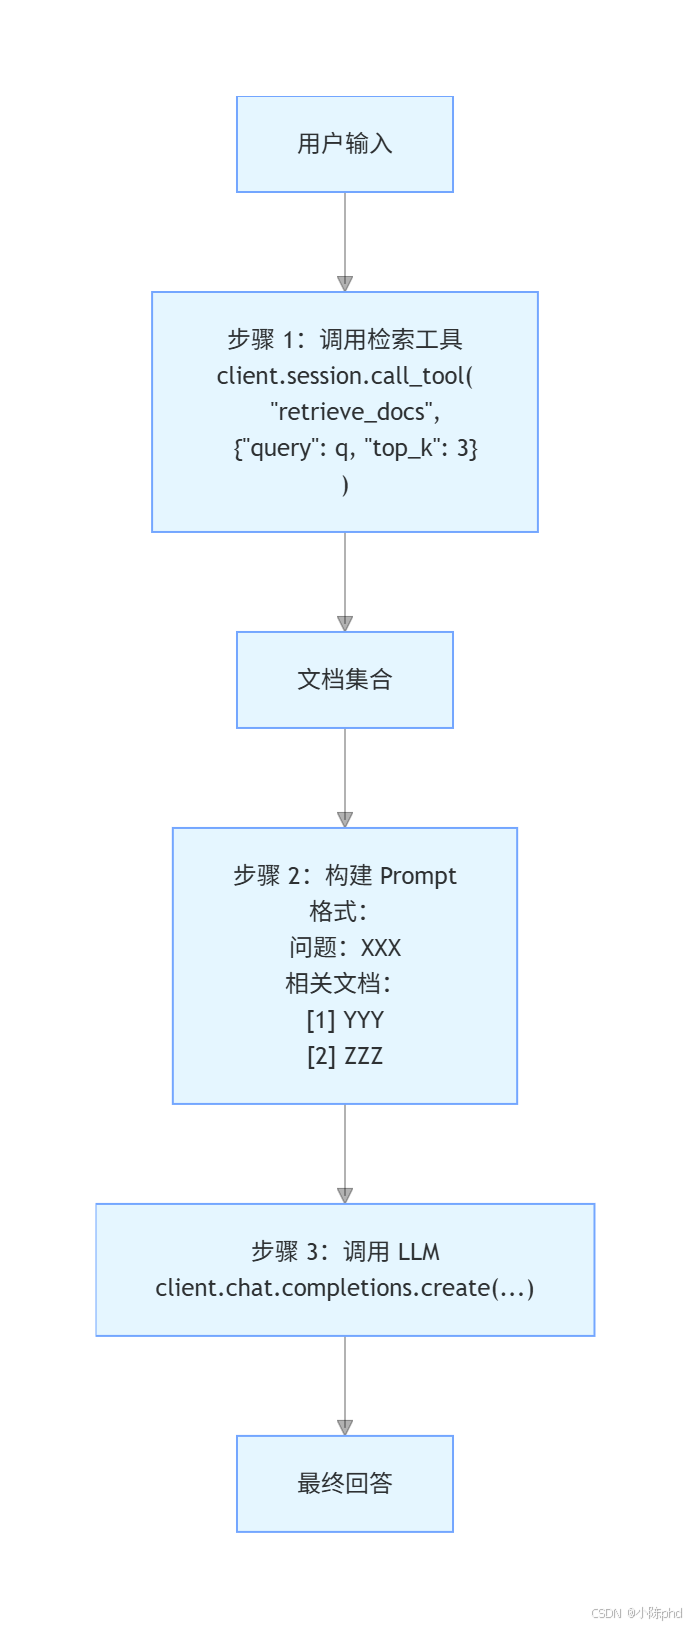
async def query(self, q: str):
"""执行 RAG 查询流程"""
# 步骤 1:检索相关文档
result = await self.session.call_tool(
"retrieve_docs",
{"query": q, "top_k": 3}
)
# 步骤 2:使用 LLM 生成回答
response = self.client.chat.completions.create(
model="qwen-plus",
messages=[
{
"role": "system",
"content": "你是一个专业的医学助手..."
},
{
"role": "user",
"content": f"问题:{q}\n\n相关文档:\n{result}"
}
]
)
return response.choices[0].message.content
6.2 RAG 查询流程
7. 快速启动指南
7.1 启动 Server
在第一个终端中:
# 激活环境
conda activate mcp

# 进入项目目录
cd /home/swpucwf/llm-study/mcp-demo/mcp-in-action-master/02-mcp-rag/rag-server

# 启动 Server
python server-ali.py
预期输出:
load_dotenv
Server 启动后会等待 Client 连接。
7.2 启动 Client
在第二个终端中:
# 激活环境
conda activate mcp

# 进入项目目录
cd /home/swpucwf/llm-study/mcp-demo/mcp-in-action-master/02-mcp-rag/rag-client

# 启动 Client
python client-qwen-ali.py ../rag-server/server-ali.py
预期输出:
============================================================
🚀 启动 RAG 系统(通义千问 + 阿里百炼)
============================================================
📡 正在连接到 RAG Server...
✅ 可用工具: ['index_docs', 'retrieve_docs']
✅ 系统连接成功
📚 正在索引医学文档库...
✅ 已索引 6 篇文档,总文档数:6
============================================================
💬 开始对话(输入 '退出' 结束)
============================================================
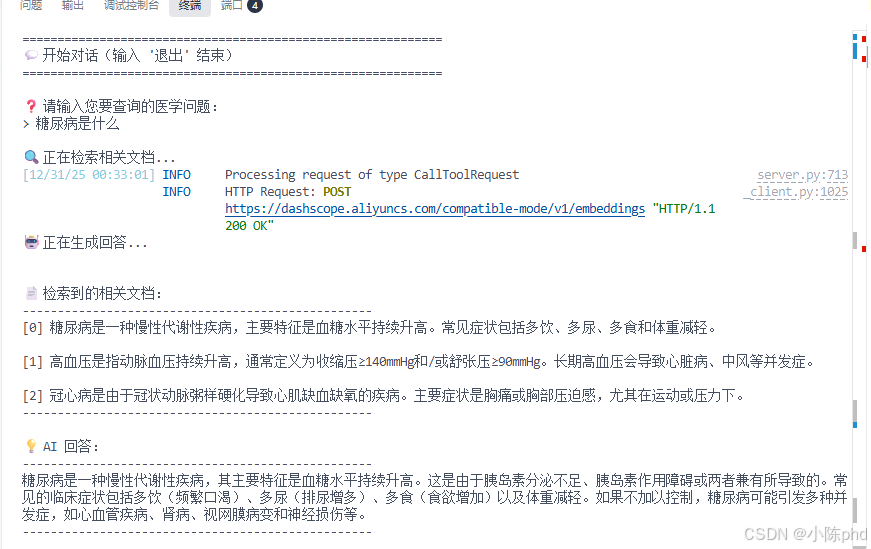
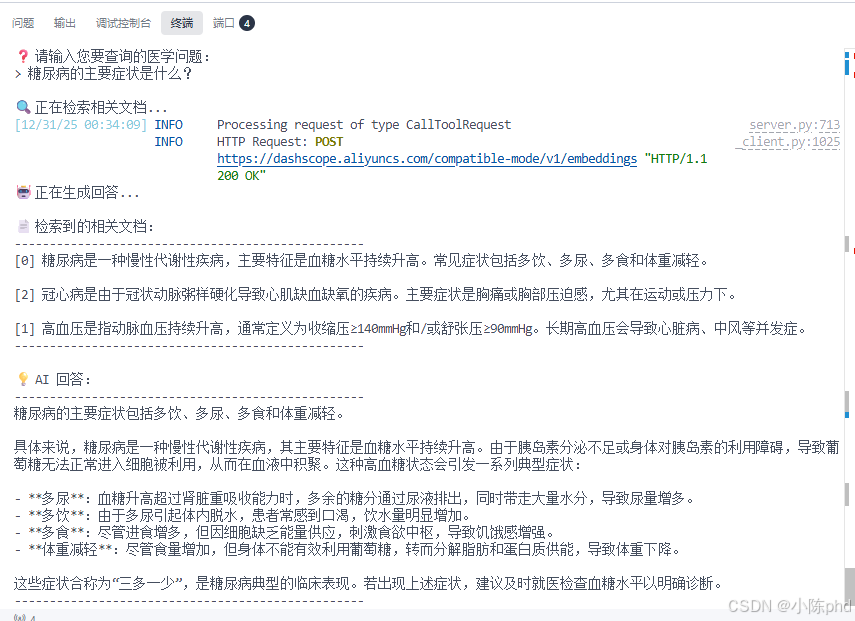
❓ 请输入您要查询的医学问题:
>
7.3 使用启动脚本(可选)
也可以使用提供的启动脚本:
# Server
bash /home/swpucwf/llm-study/mcp-demo/mcp-in-action-master/02-mcp-rag/start-server.sh

# Client
bash /home/swpucwf/llm-study/mcp-demo/mcp-in-action-master/02-mcp-rag/start-client.sh

8. 交互示例
8.1 基本查询
8.2 支持的输入类型
- ✅ 中文输入:
糖尿病的症状 - ✅ 英文输入:
What is diabetes - ✅ 混合输入:
diabetes 症状 - ✅ 退出命令:
退出/exit/quit
9. 深入理解 MCP 协议
9.1 MCP 的客户端-服务器模型
┌─────────────────────────────────────────────────────┐
│  Client(CLI 应用)                                  │
│  ┌──────────────────────────────────────────────┐   │
│  │  使用 ClientSession 与 Server 通信           │   │
│  │  - 列出可用工具                              │   │
│  │  - 调用工具                                  │   │
│  │  - 处理响应                                  │   │
│  └──────────────────────────────────────────────┘   │
└─────────────────────────────────────────────────────┘
                      ↕ (stdio)
┌─────────────────────────────────────────────────────┐
│  Server(MCP 服务进程)                              │
│  ┌──────────────────────────────────────────────┐   │
│  │  使用 @mcp.tool() 装饰器定义工具             │   │
│  │  - index_docs:索引文档                      │   │
│  │  - retrieve_docs:检索文档                   │   │
│  └──────────────────────────────────────────────┘   │
└─────────────────────────────────────────────────────┘
9.2 @mcp.tool() 装饰器详解
@mcp.tool()
async def retrieve_docs(query: str, top_k: int = 3) -> str:
    """检索最相关的文档

    这个装饰器让函数变成一个可被 LLM 调用的工具。

    参数:
        query: 查询文本
        top_k: 返回的文档数

    返回:
        检索到的文档字符串
    """
    # 实现...
装饰器的作用:
- 自动注册工具到 MCP Server
- 解析函数签名生成工具定义
- 处理客户端的工具调用请求
9.3 工具调用流程
Client 端:
  1. 解析用户输入
  2. 调用 session.call_tool("retrieve_docs", {...})
  3. 等待响应

MCP 通信:
  {
    "jsonrpc": "2.0",
    "id": 1,
    "method": "tools/call",
    "params": {
      "name": "retrieve_docs",
      "arguments": {
        "query": "糖尿病",
        "top_k": 3
      }
    }
  }

Server 端:
  1. 接收工具调用请求
  2. 验证参数
  3. 执行 retrieve_docs 函数
  4. 返回结果

MCP 响应:
  {
    "jsonrpc": "2.0",
    "id": 1,
    "result": {
      "content": [{
        "type": "text",
        "text": "[0] 糖尿病是一种慢性代谢性疾病..."
      }]
    }
  }
10. 关键技术点总结
10.1 向量相似度搜索
# 原理:使用向量距离度量相似度
距离越小 → 相似度越高

query_vector = [0.1, 0.2, 0.3, ...]
doc1_vector = [0.1, 0.2, 0.4, ...]  # 距离小 → 相关性高
doc2_vector = [0.8, 0.7, 0.2, ...]  # 距离大 → 相关性低
10.2 异步编程
# 使用 async/await 进行非阻塞 I/O
async def query(self, q: str):
    # 异步调用工具(不阻塞)
    result = await self.session.call_tool(...)
    # 异步调用 API(不阻塞)
    response = await self.client.chat.completions.create(...)
10.3 中文输入处理
# 直接使用 input() 函数处理中文
query = input("> ")  # 支持中文输入

# 关键:避免在线程池中运行 input()
# ✅ 正确:query = input("> ")
# ❌ 错误:query = await loop.run_in_executor(None, input, "> ")
11. 总结
11.1 核心收获
通过这个教程,可以学习:
- RAG 系统架构:理解检索和生成如何协同工作
- MCP 协议:掌握定义和调用工具的方法
- 向量检索:使用 FAISS 进行高效的相似度搜索
- LLM 集成:与通义千问 API 交互
- 异步编程:编写高效的异步 Python 代码
- 中文支持:正确处理中文输入和输出
11.2 下一步建议
- 🎯 尝试用自己的数据构建知识库
- 🔧 实现更复杂的文档处理流程
- 📊 添加日志和监控功能
- 🚀 部署到生产环境
- 🔌 与其他 AI 应用集成
11.3 参考资源
12. 常用命令速查
# 激活环境
conda activate mcp

# 查看环境中的包
pip list

# 启动 Server
cd /home/swpucwf/llm-study/mcp-demo/mcp-in-action-master/02-mcp-rag/rag-server
python server-ali.py

# 启动 Client
cd /home/swpucwf/llm-study/mcp-demo/mcp-in-action-master/02-mcp-rag/rag-client
python client-qwen-ali.py ../rag-server/server-ali.py

# 查看运行日志
# Server 日志在 Server 终端
# Client 日志在 Client 终端

# 停止应用
# Ctrl+C 在相应终端

有“AI”的1024 = 2048,欢迎大家加入2048 AI社区
更多推荐

 18
18 0
0- 0


 已为社区贡献47条内容

所有评论(0)