企业级官网全栈(React·Next.js·Tailwind·Axios·Headless UI·RHF·i18n)实战教程-第一篇:项目初始化与工程规范
本文介绍了企业级官网项目的初始化与工程规范搭建。通过Next.js App Router、TypeScript严格模式、TailwindCSS主题系统和ESLint/Prettier等工具,构建了一个可长期维护的项目基础架构。重点包括:1)严格的TypeScript配置;2)Shadcn风格的CSS变量主题设计;3)统一的工程规范;4)清晰的企业级目录结构。这些基础工作虽然不涉及业务代码,但对项目
第一篇:项目初始化与工程规范
本篇是整个 「企业级官网全栈实战教程」 的起点。
目标只有一个:
搭建一个“一开始就适合长期维护”的 Next.js 工程骨架。
很多项目失败并不是功能难,而是:
-
目录混乱
-
规范缺失
-
后期无法扩展
这一篇,我们一次性把“地基”打牢。
一、技术选型回顾(为什么这样选)
| 技术 | 选择原因 |
|---|---|
| Next.js App Router | 官方未来方向,Server / Client 架构清晰 |
| TypeScript | 企业级必选,减少长期维护成本 |
| Tailwind CSS | 设计系统友好,极适合 Headless UI |
| Shadcn 风格 | 不绑定组件库,风格可控 |
| ESLint / Prettier | 保证多人协作一致性 |
二、Next.js App Router 初始化
1.创建项目
pnpm create next-app@latest enterprise-web
cd enterprise-web

选择 No, customize settings,回车

推荐选项如下(非常重要):
-
TypeScript: ✅ Yes
-
ESLint: ✅ Yes
-
Tailwind CSS: ✅ Yes
-
src/ directory: ✅ Yes
-
App Router: ✅ Yes
-
import alias (@/*): ✅ Yes
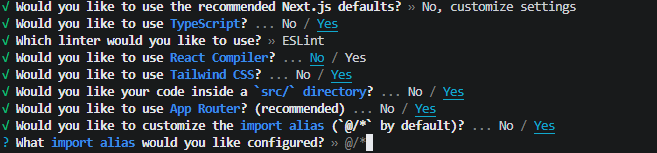
这些选项决定了你后续所有架构的上限。
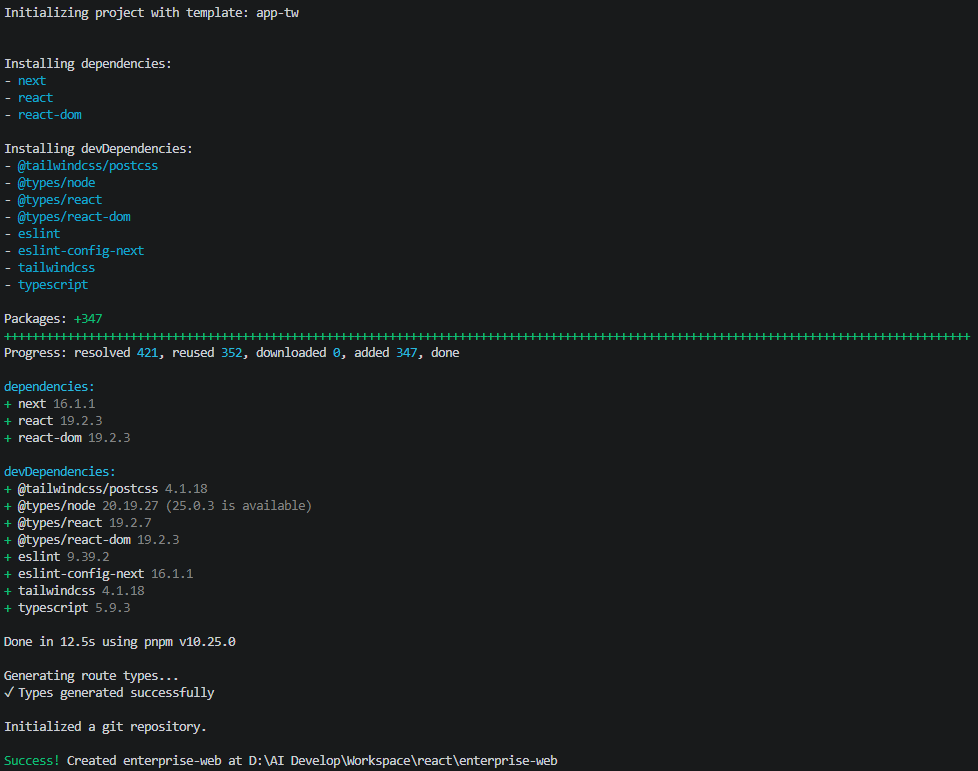
2.初始化后的目录结构
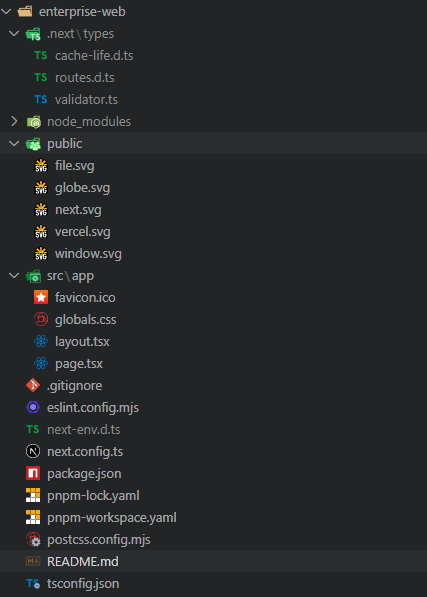
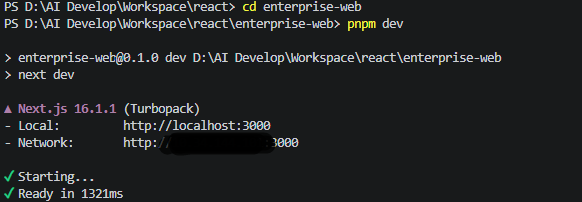
此时项目已经可以启动:
cd enterprise-web
pnpm dev
三、TypeScript 严格模式配置
1.启用严格模式
打开 tsconfig.json:
{
  "compilerOptions": {
    "target": "ES2017",
    "lib": ["dom", "dom.iterable", "esnext"],
    "allowJs": true,
    "skipLibCheck": true,
    "strict": true,
    "noEmit": true,
    "esModuleInterop": true,
    "module": "esnext",
    "moduleResolution": "bundler",
    "resolveJsonModule": true,
    "isolatedModules": true,
    "jsx": "react-jsx",
    "incremental": true,
    "plugins": [
      {
        "name": "next"
      }
    ],
    "paths": {
      "@/*": ["./src/*"]
    }
  },
  "include": [
    "next-env.d.ts",
    "**/*.ts",
    "**/*.tsx",
    ".next/types/**/*.ts",
    ".next/dev/types/**/*.ts",
    "**/*.mts"
  ],
  "exclude": ["node_modules"]
}
在"strict": true,后添加以下配置
{
  "compilerOptions": {
    "strict": true,
    "noImplicitAny": true,
    "strictNullChecks": true,
    "forceConsistentCasingInFileNames": true
  }
}
对tsconfig.json的所有配置项的注释说明
{
  "compilerOptions": {
    // Specifies the target ECMAScript version for compiled output
    // 指定编译输出的目标 ECMAScript 版本
    "target": "ES2017",
    // Specifies the library files to include in the compilation
    // 指定包含在编译中的库文件
    "lib": ["dom", "dom.iterable", "esnext"],
    // Allows JavaScript files to be compiled
    // 允许编译 JavaScript 文件
    "allowJs": true,
    // Skip type checking of declaration files
    // 跳过声明文件的类型检查
    "skipLibCheck": true,
    // Enable all strict type-checking options
    // 启用所有严格类型检查选项
    "strict": true,
    // Raise error on expressions and declarations with an implied any type
    // 对具有隐含 any 类型的表达式和声明引发错误
    "noImplicitAny": true,
    // Enable strict null checks
    // 启用严格的空值检查
    "strictNullChecks": true,
    // Disallow inconsistently-cased references to the same file
    // 禁止对同一文件使用大小写不一致的引用
    "forceConsistentCasingInFileNames": true,
    // Do not emit outputs
    // 不输出编译结果
    "noEmit": true,
    // Enables emit interoperability between CommonJS and ES Modules
    // 启用 CommonJS 和 ES 模块之间的互操作性
    "esModuleInterop": true,
    // Specify module code generation
    // 指定模块代码生成方式
    "module": "esnext",
    // Specify how modules are resolved
    // 指定模块解析方式
    "moduleResolution": "bundler",
    // Include modules imported with .json extension
    // 包含以 .json 扩展名导入的模块
    "resolveJsonModule": true,
    // Unconditionally emit imports for each file
    // 无条件为每个文件输出导入语句
    "isolatedModules": true,
    // Specify JSX code generation
    // 指定 JSX 代码生成方式
    "jsx": "react-jsx",
    // Enable incremental compilation
    // 启用增量编译
    "incremental": true,
    // TypeScript plugins configuration
    // TypeScript 插件配置
    "plugins": [
      {
        // Next.js plugin for enhanced TypeScript support
        // 用于增强 TypeScript 支持的 Next.js 插件
        "name": "next"
      }
    ],
    // Path mapping for import aliases
    // 导入别名的路径映射
    "paths": {
      // Maps imports starting with @/ to ./src/
      // 将以 @/ 开头的导入映射到 ./src/
      "@/*": ["./src/*"]
    }
  },
  // Files and patterns to include in compilation
  // 要包含在编译中的文件和模式
  "include": [
    // Next.js environment type definitions
    // Next.js 环境类型定义
    "next-env.d.ts",
    // All TypeScript files
    // 所有 TypeScript 文件
    "**/*.ts",
    // All TypeScript React files
    // 所有 TypeScript React 文件
    "**/*.tsx",
    // Generated Next.js type definitions
    // 生成的 Next.js 类型定义
    ".next/types/**/*.ts",
    // Generated Next.js dev type definitions
    // 生成的 Next.js 开发类型定义
    ".next/dev/types/**/*.ts",
    // All TypeScript module files
    // 所有 TypeScript 模块文件
    "**/*.mts"
  ],
  // Files and patterns to exclude from compilation
  // 要从编译中排除的文件和模式
  "exclude": [
    // Exclude node_modules directory
    // 排除 node_modules 目录
    "node_modules"
  ]
}
2.为什么一开始就开 strict?
早开痛一时,晚开痛一生
-
能写 Demo,不代表能维护 2 年
-
strict 是对“工程质量”的最低要求
四、Tailwind CSS 与 Shadcn 风格主题设计
1.Tailwind 已默认安装
核心文件:
src/app/globals.css
2.定义企业级主题变量(Shadcn 风格)
@import "tailwindcss";

:root {
  --background: #ffffff;
  --foreground: #171717;
}

@theme inline {
  --color-background: var(--background);
  --color-foreground: var(--foreground);
  --font-sans: var(--font-geist-sans);
  --font-mono: var(--font-geist-mono);
}

@media (prefers-color-scheme: dark) {
  :root {
    --background: #0a0a0a;
    --foreground: #ededed;
  }
}

body {
  background: var(--background);
  color: var(--foreground);
  font-family: Arial, Helvetica, sans-serif;
}
编辑 globals.css:
@import "tailwindcss";

:root {
  --background: 0 0% 100%;
  --foreground: 222.2 47.4% 11.2%;

  --primary: 222.2 47.4% 11.2%;
  --primary-foreground: 210 40% 98%;

  --secondary: 210 40% 96.1%;
  --secondary-foreground: 222.2 47.4% 11.2%;

  --border: 214.3 31.8% 91.4%;
}


@theme inline {
  --color-background: var(--background);
  --color-foreground: var(--foreground);
  --font-sans: var(--font-geist-sans);
  --font-mono: var(--font-geist-mono);
}

@media (prefers-color-scheme: dark) {
  :root {
    --background: #0a0a0a;
    --foreground: #ededed;
  }
}

body {
  background: var(--background);
  color: var(--foreground);
  font-family: Arial, Helvetica, sans-serif;
}
这是 Shadcn UI 的核心思想:
-
不写死颜色
-
全部使用 CSS Variables
3.Tailwind 配置映射变量
创建 tailwind.config.ts:
import type { Config } from 'tailwindcss'

const config: Config = {
  content: ['./src/**/*.{ts,tsx}'],
  theme: {
    extend: {
      colors: {
        background: 'hsl(var(--background))',
        foreground: 'hsl(var(--foreground))',
        primary: {
          DEFAULT: 'hsl(var(--primary))',
          foreground: 'hsl(var(--primary-foreground))',
        },
        secondary: {
          DEFAULT: 'hsl(var(--secondary))',
          foreground: 'hsl(var(--secondary-foreground))',
        },
        border: 'hsl(var(--border))',
      },
    },
  },
  plugins: [],
}

export default config
之后你写的所有组件:
className="bg-background text-foreground"
完全不关心具体颜色值。
五、ESLint + Prettier 工程规范
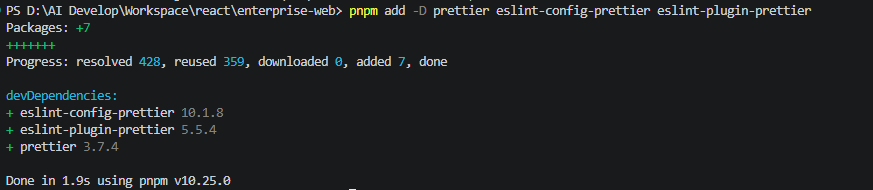
1.安装依赖
pnpm add -D prettier eslint-config-prettier eslint-plugin-prettier
2.配置 Prettier
.prettierrc:
{
  "semi": false,
  "singleQuote": true,
  "trailingComma": "es5",
  "printWidth": 100
}
3.ESLint 结合 Prettier
.eslintrc.json:
{
  "extends": [
    "next/core-web-vitals",
    "plugin:prettier/recommended"
  ]
}
ESLint 管逻辑,Prettier 管格式,职责清晰。
六、企业级目录规范(提前定好)
src/
 ├─ app/
 │   ├─ (public)/       # 官网页面
 │   ├─ (auth)/         # 登录 / 注册
 │   ├─ (user)/         # 用户中心
 │   └─ api/
 │
 ├─ components/
 │   ├─ layout/         # Header / Footer
 │   ├─ ui/             # Headless UI + 基础组件
 │   └─ form/           # RHF + Zod 抽象层
 │
 ├─ lib/
 │   ├─ api/            # axios 封装
 │   ├─ auth/           # 登录态
 │   └─ i18n/           # 国际化
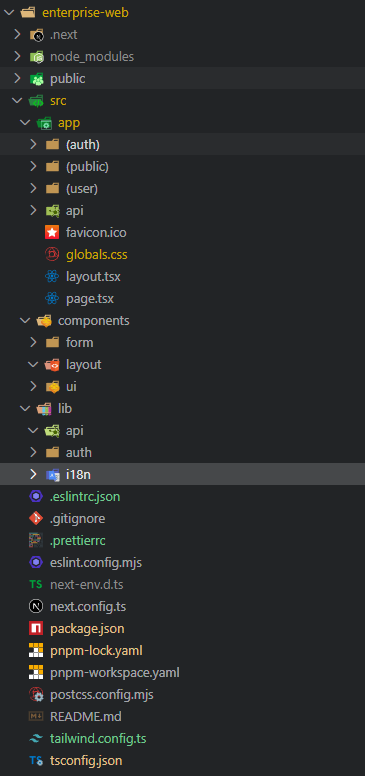
这是本系列教程后续所有代码的“骨架”。
七、本篇小结
到这里,你已经完成了:
-
一个 App Router + TypeScript 严格模式的 Next.js 项目
-
企业级 Tailwind + Shadcn 风格主题系统
-
ESLint / Prettier 工程规范
-
可长期维护的目录结构
这一步看似没有业务代码,却决定了项目能不能活到 1 年后。
下一篇预告
第二篇:企业官网 Layout 架构设计
-
Header(登录前 / 登录后)
-
Headless UI Menu 用户下拉菜单
-
Footer + 语言切换
下一篇开始,正式进入「可视化业务代码」。

有“AI”的1024 = 2048,欢迎大家加入2048 AI社区
更多推荐

 17
17 0
0- 0


 已为社区贡献97条内容

所有评论(0)