Spring AI Alibaba 框架实战指南
Spring AI Alibaba是阿里云基于Spring AI构建的开源AI框架,为Java开发者提供完整的AI应用开发解决方案。该框架具有三大核心特点:简化AI开发复杂度,通过高层抽象ChatClient实现开箱即用;支持多模型无缝切换,统一接口适配通义千问、GPT-4等多种模型;提供丰富的AI能力,涵盖对话聊天、图像生成、语音合成等场景。采用三层架构设计(模型服务层、增强LLM层、智能体框架
面向Java开发者的智能体(Agent)AI开发框架
目录
1. Spring AI Alibaba概述
1.1 什么是Spring AI Alibaba?
Spring AI Alibaba 是阿里云基于 Spring AI 构建的开源AI框架,是阿里云通义系列模型及服务在Java AI应用开发领域的最佳实践。它为Java开发者提供了一套完整的AI应用开发解决方案,让传统Java开发者能够快速上手AI应用开发。
1.2 核心特点
1. 简化AI开发复杂度
传统方式:
// 需要手动处理大量细节
HttpClient client = HttpClient.newHttpClient();
HttpRequest request = HttpRequest.newBuilder()
    .uri(URI.create("https://dashscope.aliyuncs.com/api/v1/services/..."))
    .header("Authorization", "Bearer " + apiKey)
    .POST(HttpRequest.BodyPublishers.ofString(jsonPayload))
    .build();

HttpResponse<String> response = client.send(request, HttpResponse.BodyHandlers.ofString());
// 解析JSON、处理错误、管理会话...
Spring AI Alibaba方式:
// 简洁优雅的API
@Resource
private ChatClient chatClient;

String response = chatClient.prompt()
    .user("你好,请介绍一下Spring AI Alibaba")
    .call()
    .content();
2. 多模型无缝切换
3. 丰富的AI能力支持
| 能力类型 | 支持的模型 | 应用场景 | API接口 |
|---|---|---|---|
| 对话聊天 | 通义千问、GPT-4、Claude等 | 智能客服、问答系统 | ChatClient |
| 图像生成 | 通义万相、DALL-E等 | 文生图、图像编辑 | ImageClient |
| 语音合成 | 通义语音合成 | 文字转语音 | AudioClient |
| 文本向量化 | 通义Embedding | RAG、语义搜索 | EmbeddingClient |
| 多模态 | 通义Vision | 图文理解、OCR | ChatClient |
1.3 版本信息
- 当前版本:1.0 GA(2025年正式发布)
- 依赖要求:
- JDK 17+(基于Spring Boot 3.x)
- Spring Boot 3.2+
- Maven 3.6+ 或 Gradle 7.5+
1.4 与其他框架对比
选择建议:
| 场景 | 推荐框架 | 理由 |
|---|---|---|
| 使用阿里云服务 | Spring AI Alibaba | 深度优化,文档完善 |
| Spring Boot项目 | Spring AI Alibaba | 无缝集成,开箱即用 |
| 需要多模型切换 | LangChain4j | 支持模型最多 |
| 复杂Agent应用 | LangChain4j | Agent功能更强 |
| 企业级应用 | Spring AI Alibaba | 企业特性丰富 |
2. 核心架构与设计理念
2.1 三层架构设计
Spring AI Alibaba采用分层架构,从底层到高层提供渐进式的抽象:
层级说明
1. Augmented LLM(增强LLM层)
- 提供基础抽象:ChatModel、ImageModel、AudioModel等
- 统一的消息格式和工具调用
- 向量存储和检索能力
- MCP(Model Context Protocol)支持
2. Agent Framework(智能体框架层)
- ReactAgent:基于ReAct模式的智能体
- Graph:工作流和多智能体编排
- 状态管理和上下文记忆
3. Application Layer(应用层)
- 具体的AI应用实现
- 业务逻辑集成
2.2 核心设计理念
2.2.1 统一的API抽象
好处:
- ✅ 应用代码与具体模型解耦
- ✅ 可通过配置切换模型
- ✅ 便于测试和开发
2.2.2 声明式编程
// 声明式配置
@Configuration
public class AiConfig {

    @Bean
    public ChatClient chatClient(ChatClient.Builder builder) {
        return builder
            .defaultSystem("你是一个专业的Java技术顾问")
            .defaultOptions(ChatOptions.builder()
                .temperature(0.7)
                .build())
            .build();
    }
}

// 使用时只需注入
@Service
public class AiService {

    @Resource
    private ChatClient chatClient;

    public String chat(String userMessage) {
        return chatClient.prompt()
            .user(userMessage)
            .call()
            .content();
    }
}
2.2.3 响应式编程支持
同步调用:
String response = chatClient.prompt()
    .user("介绍Spring AI Alibaba")
    .call()
    .content();
流式调用:
Flux<String> responseFlux = chatClient.prompt()
    .user("介绍Spring AI Alibaba")
    .stream()
    .content();

// 在Controller中返回SSE
@GetMapping(value = "/stream", produces = MediaType.TEXT_EVENT_STREAM_VALUE)
public Flux<ServerSentEvent<String>> streamChat(@RequestParam String message) {
    return chatClient.prompt()
        .user(message)
        .stream()
        .content()
        .map(chunk -> ServerSentEvent.<String>builder()
            .data(chunk)
            .build());
}
3. 快速开始
3.1 环境准备
3.1.1 系统要求
✓ JDK 17 或更高版本
✓ Maven 3.6+ 或 Gradle 7.5+
✓ IDE:IntelliJ IDEA / Eclipse / VS Code
✓ 阿里云账号(获取API Key)
3.1.2 获取API Key
步骤:
- 访问:https://dashscope.console.aliyun.com/
- 开通百炼服务
- 创建API Key
- 复制保存(仅显示一次)
3.2 创建Spring Boot项目
3.2.1 使用Spring Initializr
# 方式1:使用Spring Initializr网站
# https://start.spring.io/

# 方式2:使用命令行
curl https://start.spring.io/starter.zip \
  -d dependencies=web \
  -d javaVersion=17 \
  -d bootVersion=3.2.0 \
  -d groupId=com.example \
  -d artifactId=ai-demo \
  -o ai-demo.zip

unzip ai-demo.zip
cd ai-demo
3.2.2 添加依赖
Maven(pom.xml):
<?xml version="1.0" encoding="UTF-8"?>
<project xmlns="http://maven.apache.org/POM/4.0.0"
         xmlns:xsi="http://www.w3.org/2001/XMLSchema-instance"
         xsi:schemaLocation="http://maven.apache.org/POM/4.0.0
         https://maven.apache.org/xsd/maven-4.0.0.xsd">
    <modelVersion>4.0.0</modelVersion>

    <parent>
        <groupId>org.springframework.boot</groupId>
        <artifactId>spring-boot-starter-parent</artifactId>
        <version>3.2.0</version>
    </parent>

    <groupId>com.example</groupId>
    <artifactId>ai-demo</artifactId>
    <version>1.0.0</version>

    <properties>
        <java.version>17</java.version>
        <spring-ai-alibaba.version>1.0.0-M2</spring-ai-alibaba.version>
    </properties>

    <dependencies>
        <!-- Spring Boot Web -->
        <dependency>
            <groupId>org.springframework.boot</groupId>
            <artifactId>spring-boot-starter-web</artifactId>
        </dependency>

        <!-- Spring AI Alibaba -->
        <dependency>
            <groupId>com.alibaba.cloud.ai</groupId>
            <artifactId>spring-ai-alibaba-starter</artifactId>
            <version>${spring-ai-alibaba.version}</version>
        </dependency>

        <!-- Lombok(可选) -->
        <dependency>
            <groupId>org.projectlombok</groupId>
            <artifactId>lombok</artifactId>
            <optional>true</optional>
        </dependency>

        <!-- 测试依赖 -->
        <dependency>
            <groupId>org.springframework.boot</groupId>
            <artifactId>spring-boot-starter-test</artifactId>
            <scope>test</scope>
        </dependency>
    </dependencies>

    <build>
        <plugins>
            <plugin>
                <groupId>org.springframework.boot</groupId>
                <artifactId>spring-boot-maven-plugin</artifactId>
            </plugin>
        </plugins>
    </build>
</project>
Gradle(build.gradle):
plugins {
    id 'java'
    id 'org.springframework.boot' version '3.2.0'
    id 'io.spring.dependency-management' version '1.1.0'
}

group = 'com.example'
version = '1.0.0'
sourceCompatibility = '17'

repositories {
    mavenCentral()
}

ext {
    springAiAlibabaVersion = '1.0.0-M2'
}

dependencies {
    implementation 'org.springframework.boot:spring-boot-starter-web'
    implementation "com.alibaba.cloud.ai:spring-ai-alibaba-starter:${springAiAlibabaVersion}"

    compileOnly 'org.projectlombok:lombok'
    annotationProcessor 'org.projectlombok:lombok'

    testImplementation 'org.springframework.boot:spring-boot-starter-test'
}

tasks.named('test') {
    useJUnitPlatform()
}
3.3 配置应用
3.3.1 application.yml配置
spring:
  application:
    name: ai-demo

  ai:
    dashscope:
      # API Key配置(推荐使用环境变量)
      api-key: ${DASHSCOPE_API_KEY}

      # Chat模型配置
      chat:
        enabled: true
        options:
          model: qwen-max              # 模型名称
          temperature: 0.7              # 温度参数(0-1)
          top-p: 0.9                    # 采样参数
          max-tokens: 2000              # 最大Token数

      # Image模型配置
      image:
        enabled: true
        options:
          model: wanx-v1

      # Embedding配置
      embedding:
        enabled: true
        options:
          model: text-embedding-v2

server:
  port: 8080

# 日志配置
logging:
  level:
    com.alibaba.cloud.ai: DEBUG
3.3.2 环境变量配置
# 方式1:在IDE中配置环境变量
# DASHSCOPE_API_KEY=your-api-key-here

# 方式2:使用.env文件(需要spring-dotenv依赖)
# .env文件内容:
DASHSCOPE_API_KEY=sk-xxxxxxxxxxxxx

# 方式3:在启动脚本中设置
export DASHSCOPE_API_KEY=sk-xxxxxxxxxxxxx
java -jar ai-demo.jar
3.4 第一个AI应用
3.4.1 创建Controller
package com.example.aidemo.controller;

import org.springframework.ai.chat.client.ChatClient;
import org.springframework.web.bind.annotation.*;
import reactor.core.publisher.Flux;
import org.springframework.http.MediaType;

@RestController
@RequestMapping("/api/chat")
public class ChatController {

    private final ChatClient chatClient;

    // 构造器注入
    public ChatController(ChatClient.Builder chatClientBuilder) {
        this.chatClient = chatClientBuilder.build();
    }

    /**
     * 简单对话 - 同步
     */
    @GetMapping("/simple")
    public String simpleChat(@RequestParam String message) {
        return chatClient.prompt()
            .user(message)
            .call()
            .content();
    }

    /**
     * 流式对话 - SSE
     */
    @GetMapping(value = "/stream", produces = MediaType.TEXT_EVENT_STREAM_VALUE)
    public Flux<String> streamChat(@RequestParam String message) {
        return chatClient.prompt()
            .user(message)
            .stream()
            .content();
    }

    /**
     * 带系统提示词的对话
     */
    @PostMapping("/chat")
    public String chat(@RequestBody ChatRequest request) {
        return chatClient.prompt()
            .system("你是一个专业的Java技术顾问,擅长Spring框架")
            .user(request.getMessage())
            .call()
            .content();
    }
}

// DTO类
record ChatRequest(String message) {}
3.4.2 启动应用
package com.example.aidemo;

import org.springframework.boot.SpringApplication;
import org.springframework.boot.autoconfigure.SpringBootApplication;

@SpringBootApplication
public class AiDemoApplication {

    public static void main(String[] args) {
        SpringApplication.run(AiDemoApplication.class, args);
    }
}
3.4.3 测试API
# 1. 简单对话
curl "http://localhost:8080/api/chat/simple?message=你好"

# 响应:
你好!很高兴为您服务。请问有什么我可以帮助您的吗?

# 2. 流式对话
curl "http://localhost:8080/api/chat/stream?message=介绍Spring%20AI%20Alibaba"

# 响应(流式):
Spring AI Alibaba 是...
阿里云基于...
主要特性包括...

# 3. POST请求
curl -X POST http://localhost:8080/api/chat/chat \
  -H "Content-Type: application/json" \
  -d '{"message":"如何使用Spring Boot开发微服务?"}'
3.5 项目结构
ai-demo/
├── src/
│   ├── main/
│   │   ├── java/com/example/aidemo/
│   │   │   ├── AiDemoApplication.java      # 启动类
│   │   │   ├── controller/
│   │   │   │   └── ChatController.java     # 控制器
│   │   │   ├── service/
│   │   │   │   └── AiService.java          # 服务层
│   │   │   ├── config/
│   │   │   │   └── AiConfig.java           # 配置类
│   │   │   └── dto/
│   │   │       └── ChatRequest.java        # DTO
│   │   └── resources/
│   │       ├── application.yml              # 配置文件
│   │       └── logback-spring.xml           # 日志配置
│   └── test/
│       └── java/com/example/aidemo/
│           └── AiDemoApplicationTests.java
├── pom.xml                                  # Maven配置
└── README.md
4. 核心组件详解
4.1 ChatClient - 对话客户端
4.1.1 ChatClient架构

4.1.2 基础使用
1. 简单对话
@Service
public class SimpleAiService {

    @Resource
    private ChatClient chatClient;

    /**
     * 最简单的使用方式
     */
    public String chat(String userMessage) {
        return chatClient.prompt()
            .user(userMessage)
            .call()
            .content();
    }
}
2. 带系统提示词
/**
 * 设置系统角色和行为
 */
public String chatWithSystem(String userMessage) {
    return chatClient.prompt()
        .system("""
            你是一个资深的Java架构师,擅长:
            1. Spring生态系统
            2. 微服务架构设计
            3. 性能优化
            请用专业但易懂的方式回答问题。
            """)
        .user(userMessage)
        .call()
        .content();
}
3. 自定义模型参数
/**
 * 动态调整模型参数
 */
public String chatWithOptions(String userMessage, double temperature) {
    return chatClient.prompt()
        .user(userMessage)
        .options(DashScopeChatOptions.builder()
            .temperature(temperature)      // 温度:控制随机性
            .topP(0.9)                    // Top-P采样
            .maxTokens(1000)              // 最大Token数
            .build())
        .call()
        .content();
}
参数说明:
| 参数 | 范围 | 说明 | 推荐值 |
|---|---|---|---|
| temperature | 0.0 - 1.0 | 控制随机性,越高越发散 | 创意任务:0.8-1.0 事实任务:0.1-0.3 |
| top-p | 0.0 - 1.0 | 核采样参数 | 0.9(默认) |
| max-tokens | 1 - 6000 | 限制响应长度 | 根据需求设置 |
4.1.3 获取完整响应
/**
 * 获取包含元数据的完整响应
 */
public void chatWithFullResponse(String userMessage) {
    ChatResponse response = chatClient.prompt()
        .user(userMessage)
        .call()
        .chatResponse();

    // 获取内容
    String content = response.getResult().getOutput().getContent();

    // 获取元数据
    ChatResponseMetadata metadata = response.getMetadata();
    System.out.println("模型: " + metadata.getModel());
    System.out.println("使用Token: " + metadata.getUsage().getTotalTokens());
    System.out.println("完成原因: " + response.getResult().getMetadata().getFinishReason());

    // 输出示例:
    // 模型: qwen-max
    // 使用Token: 156
    // 完成原因: STOP
}
4.1.4 流式响应详解
流式响应是AI应用中非常重要的特性,它能够让用户实时看到生成的内容,而不是等待完整响应后才显示,极大提升了用户体验。
流式响应的优势
Flux响应式编程基础
Spring AI Alibaba基于Spring WebFlux和Project Reactor实现流式响应,核心是Flux类型。
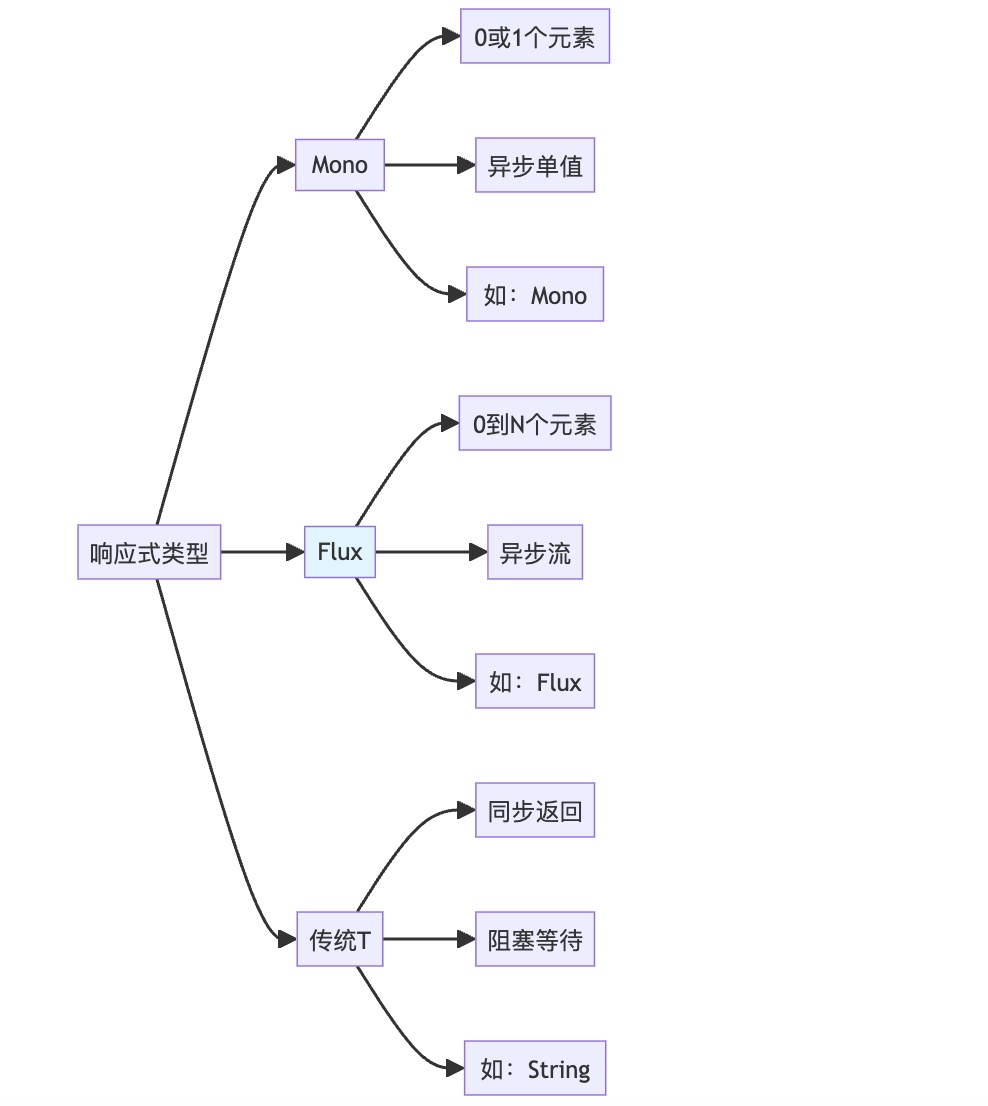
Flux vs Mono vs 传统返回值:
基础示例:
@Service
public class StreamingService {

    @Resource
    private ChatClient chatClient;

    /**
     * 方式1:返回Flux<String> - 纯文本流
     */
    public Flux<String> streamChat(String userMessage) {
        return chatClient.prompt()
            .user(userMessage)
            .stream()
            .content();  // 返回内容流
    }

    /**
     * 方式2:返回Flux<ChatResponse> - 完整响应流
     */
    public Flux<ChatResponse> streamChatResponse(String userMessage) {
        return chatClient.prompt()
            .user(userMessage)
            .stream()
            .chatResponse();  // 返回完整响应流(包含元数据)
    }
}
SSE(Server-Sent Events)实现
SSE是HTML5标准,用于服务器向浏览器推送实时数据。
SSE vs WebSocket:
| 特性 | SSE | WebSocket |
|---|---|---|
| 通信方向 | 单向(服务器→客户端) | 双向 |
| 协议 | HTTP | 独立协议(升级自HTTP) |
| 实现复杂度 | 简单 | 复杂 |
| 自动重连 | ✅ 支持 | ❌ 需手动实现 |
| 事件ID | ✅ 支持 | ❌ 不支持 |
| 适用场景 | AI流式输出、实时通知 | 聊天、游戏 |
完整的SSE实现(推荐方式):
@RestController
@RequestMapping("/api/chat")
@Slf4j
public class StreamChatController {

    @Resource
    private ChatClient chatClient;

    /**
     * 方式1:简单SSE - 只返回文本
     */
    @GetMapping(value = "/stream/simple", produces = MediaType.TEXT_EVENT_STREAM_VALUE)
    public Flux<String> streamSimple(@RequestParam String message) {
        log.info("开始流式响应: {}", message);

        return chatClient.prompt()
            .user(message)
            .stream()
            .content()
            .doOnNext(chunk -> log.debug("生成chunk: {}", chunk))
            .doOnComplete(() -> log.info("流式响应完成"))
            .doOnError(e -> log.error("流式响应错误", e));
    }

    /**
     * 方式2:标准SSE - 使用ServerSentEvent包装
     * 推荐:支持事件ID、事件类型、重连时间等
     */
    @GetMapping(value = "/stream/sse", produces = MediaType.TEXT_EVENT_STREAM_VALUE)
    public Flux<ServerSentEvent<String>> streamSSE(@RequestParam String message) {
        AtomicLong counter = new AtomicLong(0);

        return chatClient.prompt()
            .user(message)
            .stream()
            .content()
            .map(chunk -> ServerSentEvent.<String>builder()
                .id(String.valueOf(counter.incrementAndGet()))  // 事件ID
                .event("message")                                // 事件类型
                .data(chunk)                                     // 数据
                .comment("AI生成内容")                           // 注释
                .build())
            .concatWith(Flux.just(
                ServerSentEvent.<String>builder()
                    .event("done")                               // 完成事件
                    .data("[DONE]")
                    .build()
            ));
    }

    /**
     * 方式3:带元数据的SSE - 返回JSON格式
     */
    @GetMapping(value = "/stream/json", produces = MediaType.TEXT_EVENT_STREAM_VALUE)
    public Flux<ServerSentEvent<StreamResponse>> streamJSON(@RequestParam String message) {
        AtomicLong tokenCount = new AtomicLong(0);
        AtomicLong chunkIndex = new AtomicLong(0);

        return chatClient.prompt()
            .user(message)
            .stream()
            .chatResponse()  // 获取完整响应
            .map(response -> {
                String content = response.getResult().getOutput().getContent();
                long tokens = response.getMetadata().getUsage() != null
                    ? response.getMetadata().getUsage().getTotalTokens()
                    : 0;

                tokenCount.addAndGet(tokens);

                StreamResponse streamResp = StreamResponse.builder()
                    .index(chunkIndex.incrementAndGet())
                    .content(content)
                    .totalTokens(tokenCount.get())
                    .model(response.getMetadata().getModel())
                    .finishReason(response.getResult().getMetadata().getFinishReason())
                    .build();

                return ServerSentEvent.<StreamResponse>builder()
                    .id(String.valueOf(chunkIndex.get()))
                    .event("stream")
                    .data(streamResp)
                    .build();
            });
    }

    /**
     * 方式4:多会话流式 - 支持上下文
     */
    @PostMapping(value = "/stream/conversation", produces = MediaType.TEXT_EVENT_STREAM_VALUE)
    public Flux<ServerSentEvent<String>> streamConversation(
            @RequestBody ConversationRequest request) {

        // 构建消息历史
        List<Message> messages = buildMessages(request);

        return chatClient.prompt()
            .messages(messages)
            .stream()
            .content()
            .map(chunk -> ServerSentEvent.<String>builder()
                .data(chunk)
                .build());
    }

    /**
     * 方式5:流式响应 + 数据库保存
     */
    @GetMapping(value = "/stream/persist", produces = MediaType.TEXT_EVENT_STREAM_VALUE)
    public Flux<ServerSentEvent<String>> streamWithPersist(
            @RequestParam String message,
            @RequestParam String sessionId) {

        StringBuilder fullResponse = new StringBuilder();

        return chatClient.prompt()
            .user(message)
            .stream()
            .content()
            .doOnNext(fullResponse::append)  // 收集完整响应
            .map(chunk -> ServerSentEvent.<String>builder()
                .data(chunk)
                .build())
            .doOnComplete(() -> {
                // 流式完成后保存到数据库
                saveConversation(sessionId, message, fullResponse.toString());
            });
    }

    // 辅助方法
    private List<Message> buildMessages(ConversationRequest request) {
        List<Message> messages = new ArrayList<>();
        // 添加历史消息
        request.getHistory().forEach(msg ->
            messages.add(msg.getRole().equals("user")
                ? new UserMessage(msg.getContent())
                : new AssistantMessage(msg.getContent()))
        );
        // 添加当前消息
        messages.add(new UserMessage(request.getMessage()));
        return messages;
    }

    private void saveConversation(String sessionId, String question, String answer) {
        log.info("保存会话: session={}, Q={}, A={}", sessionId, question, answer);
        // 实际保存逻辑
    }
}

// DTO类
@Data
@Builder
class StreamResponse {
    private Long index;
    private String content;
    private Long totalTokens;
    private String model;
    private String finishReason;
}

@Data
class ConversationRequest {
    private String message;
    private List<HistoryMessage> history;
}

@Data
class HistoryMessage {
    private String role;
    private String content;
}
前端集成示例
1. 原生JavaScript(EventSource):
// 简单文本流
const eventSource = new EventSource('/api/chat/stream/simple?message=介绍Spring AI');

eventSource.onmessage = (event) => {
    document.getElementById('response').innerText += event.data;
};

eventSource.onerror = (error) => {
    console.error('SSE错误:', error);
    eventSource.close();
};

// 关闭连接
// eventSource.close();
2. 标准SSE(支持事件类型):
const eventSource = new EventSource('/api/chat/stream/sse?message=你好');

// 监听message事件
eventSource.addEventListener('message', (event) => {
    const data = event.data;
    document.getElementById('response').innerText += data;
});

// 监听done事件
eventSource.addEventListener('done', (event) => {
    console.log('生成完成');
    eventSource.close();
    document.getElementById('status').innerText = '完成';
});

// 错误处理
eventSource.onerror = (error) => {
    console.error('连接错误:', error);
    eventSource.close();
};
3. 使用Fetch API(更灵活):
async function streamChat(message) {
    const response = await fetch(`/api/chat/stream/simple?message=${encodeURIComponent(message)}`);
    const reader = response.body.getReader();
    const decoder = new TextDecoder();

    while (true) {
        const { done, value } = await reader.read();

        if (done) {
            console.log('流式响应完成');
            break;
        }

        const chunk = decoder.decode(value, { stream: true });
        document.getElementById('response').innerText += chunk;
    }
}

// 使用
streamChat('介绍Spring AI Alibaba');
4. React集成示例:
import { useState, useEffect } from 'react';

function StreamChat() {
    const [message, setMessage] = useState('');
    const [response, setResponse] = useState('');
    const [loading, setLoading] = useState(false);

    const handleStream = () => {
        setLoading(true);
        setResponse('');

        const eventSource = new EventSource(
            `/api/chat/stream/sse?message=${encodeURIComponent(message)}`
        );

        eventSource.addEventListener('message', (event) => {
            setResponse(prev => prev + event.data);
        });

        eventSource.addEventListener('done', () => {
            eventSource.close();
            setLoading(false);
        });

        eventSource.onerror = () => {
            eventSource.close();
            setLoading(false);
        };
    };

    return (
        <div>
            <input
                value={message}
                onChange={e => setMessage(e.target.value)}
                placeholder="输入问题"
            />
            <button onClick={handleStream} disabled={loading}>
                {loading ? '生成中...' : '发送'}
            </button>
            <div className="response">
                {response}
            </div>
        </div>
    );
}
流式响应高级特性
1. 背压处理(Backpressure)
/**
 * 控制流速,避免客户端处理不过来
 */
@GetMapping(value = "/stream/backpressure", produces = MediaType.TEXT_EVENT_STREAM_VALUE)
public Flux<ServerSentEvent<String>> streamWithBackpressure(@RequestParam String message) {
    return chatClient.prompt()
        .user(message)
        .stream()
        .content()
        .delayElements(Duration.ofMillis(50))  // 延迟50ms,控制速度
        .onBackpressureBuffer(100)             // 缓冲100个元素
        .map(chunk -> ServerSentEvent.<String>builder()
            .data(chunk)
            .build());
}
2. 超时处理
/**
 * 设置超时时间
 */
@GetMapping(value = "/stream/timeout", produces = MediaType.TEXT_EVENT_STREAM_VALUE)
public Flux<ServerSentEvent<String>> streamWithTimeout(@RequestParam String message) {
    return chatClient.prompt()
        .user(message)
        .stream()
        .content()
        .timeout(Duration.ofSeconds(30))  // 30秒超时
        .onErrorResume(TimeoutException.class, e ->
            Flux.just("[错误: 请求超时]")
        )
        .map(chunk -> ServerSentEvent.<String>builder()
            .data(chunk)
            .build());
}
3. 错误处理和重试
/**
 * 完善的错误处理
 */
@GetMapping(value = "/stream/resilient", produces = MediaType.TEXT_EVENT_STREAM_VALUE)
public Flux<ServerSentEvent<String>> streamResilient(@RequestParam String message) {
    return chatClient.prompt()
        .user(message)
        .stream()
        .content()
        .retryWhen(Retry.backoff(3, Duration.ofSeconds(1))  // 重试3次
            .filter(throwable -> throwable instanceof IOException))
        .onErrorResume(throwable -> {
            log.error("流式响应错误", throwable);
            return Flux.just("[错误: " + throwable.getMessage() + "]");
        })
        .map(chunk -> ServerSentEvent.<String>builder()
            .data(chunk)
            .build());
}
4. 多路复用(组合多个流)
/**
 * 同时调用多个模型,合并结果
 */
@GetMapping(value = "/stream/multiplex", produces = MediaType.TEXT_EVENT_STREAM_VALUE)
public Flux<ServerSentEvent<MultiModelResponse>> streamMultiModel(@RequestParam String message) {
    // 模型1:快速模型
    Flux<String> stream1 = chatClient.prompt()
        .user(message)
        .options(DashScopeChatOptions.builder().model("qwen-turbo").build())
        .stream()
        .content()
        .map(chunk -> new MultiModelResponse("qwen-turbo", chunk));

    // 模型2:高质量模型
    Flux<String> stream2 = chatClient.prompt()
        .user(message)
        .options(DashScopeChatOptions.builder().model("qwen-max").build())
        .stream()
        .content()
        .map(chunk -> new MultiModelResponse("qwen-max", chunk));

    // 合并两个流
    return Flux.merge(stream1, stream2)
        .map(resp -> ServerSentEvent.<MultiModelResponse>builder()
            .data(resp)
            .build());
}

@Data
@AllArgsConstructor
class MultiModelResponse {
    private String model;
    private String content;
}
实现方式对比总结
| 方式 | 优点 | 缺点 | 适用场景 |
|---|---|---|---|
| Flux<String> | 简单,性能好 | 无元数据,无事件控制 | 纯文本流式输出 |
| Flux<ServerSentEvent<String>> | 标准SSE,支持事件ID | 略复杂 | 生产环境推荐 |
| Flux<ChatResponse> | 包含完整元数据 | 数据量大 | 需要Token统计等场景 |
| WebSocket | 双向通信 | 实现复杂 | 实时交互应用 |
最佳实践推荐:
性能对比:
/**
 * 性能测试对比
 */
@RestController
@RequestMapping("/api/benchmark")
public class StreamBenchmarkController {

    @Resource
    private ChatClient chatClient;

    /**
     * 同步调用(基准)
     */
    @GetMapping("/sync")
    public String syncCall(@RequestParam String message) {
        long start = System.currentTimeMillis();
        String result = chatClient.prompt()
            .user(message)
            .call()
            .content();
        long duration = System.currentTimeMillis() - start;
        log.info("同步调用耗时: {}ms", duration);
        return result;
    }

    /**
     * 流式调用
     */
    @GetMapping(value = "/stream", produces = MediaType.TEXT_EVENT_STREAM_VALUE)
    public Flux<ServerSentEvent<BenchmarkData>> streamCall(@RequestParam String message) {
        long start = System.currentTimeMillis();
        AtomicLong firstChunkTime = new AtomicLong(0);
        AtomicInteger chunkCount = new AtomicInteger(0);

        return chatClient.prompt()
            .user(message)
            .stream()
            .content()
            .doOnNext(chunk -> {
                if (firstChunkTime.get() == 0) {
                    firstChunkTime.set(System.currentTimeMillis() - start);
                    log.info("首个chunk延迟: {}ms", firstChunkTime.get());
                }
                chunkCount.incrementAndGet();
            })
            .doOnComplete(() -> {
                long total = System.currentTimeMillis() - start;
                log.info("流式调用总耗时: {}ms, chunk数: {}", total, chunkCount.get());
            })
            .map(chunk -> ServerSentEvent.<BenchmarkData>builder()
                .data(new BenchmarkData(
                    chunk,
                    firstChunkTime.get(),
                    System.currentTimeMillis() - start
                ))
                .build());
    }
}

@Data
@AllArgsConstructor
class BenchmarkData {
    private String content;
    private Long firstChunkLatency;
    private Long currentLatency;
}
典型性能指标:
同步调用:
- 首字节延迟(TTFB): 2000-5000ms
- 总耗时: 3000-10000ms
- 用户体验: 需等待完成后才看到内容

流式调用:
- 首字节延迟(TTFB): 200-500ms ⚡
- 总耗时: 3000-10000ms(相同)
- 用户体验: 立即开始显示内容 ✨
- 优势: 降低感知延迟80%+
4.1.5 多轮对话
@Service
public class ConversationService {

    @Resource
    private ChatClient chatClient;

    /**
     * 多轮对话实现
     */
    public String multiTurnChat(String userMessage, List<Message> history) {
        // 构建消息列表
        List<Message> messages = new ArrayList<>(history);
        messages.add(new UserMessage(userMessage));

        return chatClient.prompt()
            .messages(messages)
            .call()
            .content();
    }
}

// 使用示例
List<Message> history = new ArrayList<>();
history.add(new UserMessage("我想学习Spring AI"));
history.add(new AssistantMessage("很好!Spring AI是..."));

String response = conversationService.multiTurnChat(
    "那我应该从哪里开始?",
    history
);
4.1.6 ChatClient配置
@Configuration
public class ChatClientConfig {

    /**
     * 自定义ChatClient Bean
     */
    @Bean
    public ChatClient chatClient(ChatClient.Builder builder) {
        return builder
            // 默认系统提示词
            .defaultSystem("""
                你是一个专业的AI助手。
                回答要准确、简洁、专业。
                """)
            // 默认选项
            .defaultOptions(DashScopeChatOptions.builder()
                .model("qwen-max")
                .temperature(0.7)
                .build())
            // 默认函数(后面会讲)
            .defaultFunctions("weatherFunction")
            .build();
    }

    /**
     * 创建专门用途的ChatClient
     */
    @Bean
    @Qualifier("codingAssistant")
    public ChatClient codingAssistantClient(ChatClient.Builder builder) {
        return builder
            .defaultSystem("你是一个Java代码助手,专注于Spring Boot开发")
            .defaultOptions(DashScopeChatOptions.builder()
                .temperature(0.3)  // 代码生成用较低温度
                .build())
            .build();
    }
}
4.2 ImageClient - 图像生成
4.2.1 基础使用
@Service
public class ImageService {

    @Resource
    private ImageClient imageClient;

    /**
     * 文生图
     */
    public String generateImage(String prompt) {
        ImageResponse response = imageClient.call(
            new ImagePrompt(prompt,
                DashScopeImageOptions.builder()
                    .model("wanx-v1")           // 通义万相模型
                    .n(1)                       // 生成1张图片
                    .width(1024)                // 宽度
                    .height(1024)               // 高度
                    .build())
        );

        // 获取图片URL
        return response.getResult().getOutput().getUrl();
    }

    /**
     * 生成多张图片
     */
    public List<String> generateMultipleImages(String prompt, int count) {
        ImageResponse response = imageClient.call(
            new ImagePrompt(prompt,
                DashScopeImageOptions.builder()
                    .model("wanx-v1")
                    .n(count)                   // 生成多张
                    .build())
        );

        return response.getResults().stream()
            .map(result -> result.getOutput().getUrl())
            .collect(Collectors.toList());
    }
}
4.2.2 Controller实现
@RestController
@RequestMapping("/api/image")
public class ImageController {

    @Resource
    private ImageService imageService;

    @PostMapping("/generate")
    public Result<ImageResult> generateImage(@RequestBody ImageRequest request) {
        String imageUrl = imageService.generateImage(request.getPrompt());

        return Result.success(ImageResult.builder()
            .url(imageUrl)
            .prompt(request.getPrompt())
            .build());
    }
}

// DTO
record ImageRequest(String prompt) {}

@Builder
record ImageResult(String url, String prompt) {}
4.3 AudioClient - 语音合成
4.3.1 文字转语音
@Service
public class AudioService {

    @Resource
    private AudioTranscriptionClient transcriptionClient;

    @Resource
    private AudioSpeechClient speechClient;

    /**
     * 文字转语音
     */
    public byte[] textToSpeech(String text) {
        SpeechPrompt prompt = new SpeechPrompt(text,
            DashScopeAudioSpeechOptions.builder()
                .model("sambert-zhichu-v1")     // 语音模型
                .voice("zhixiaoxia")            // 音色
                .build());

        SpeechResponse response = speechClient.call(prompt);
        return response.getResult().getOutput();
    }

    /**
     * 语音转文字
     */
    public String speechToText(byte[] audioData) {
        AudioTranscriptionPrompt prompt = new AudioTranscriptionPrompt(audioData);
        AudioTranscriptionResponse response = transcriptionClient.call(prompt);
        return response.getResult().getOutput();
    }
}
4.4 EmbeddingClient - 向量化
4.4.1 文本向量化
@Service
public class EmbeddingService {

    @Resource
    private EmbeddingClient embeddingClient;

    /**
     * 单个文本向量化
     */
    public List<Double> embed(String text) {
        EmbeddingResponse response = embeddingClient.embedForResponse(
            Collections.singletonList(text)
        );

        return response.getResult().getOutput();
    }

    /**
     * 批量文本向量化
     */
    public List<List<Double>> embedBatch(List<String> texts) {
        EmbeddingResponse response = embeddingClient.embedForResponse(texts);

        return response.getResults().stream()
            .map(result -> result.getOutput())
            .collect(Collectors.toList());
    }

    /**
     * 计算文本相似度
     */
    public double calculateSimilarity(String text1, String text2) {
        List<Double> embedding1 = embed(text1);
        List<Double> embedding2 = embed(text2);

        return cosineSimilarity(embedding1, embedding2);
    }

    /**
     * 余弦相似度计算
     */
    private double cosineSimilarity(List<Double> v1, List<Double> v2) {
        double dotProduct = 0.0;
        double norm1 = 0.0;
        double norm2 = 0.0;

        for (int i = 0; i < v1.size(); i++) {
            dotProduct += v1.get(i) * v2.get(i);
            norm1 += Math.pow(v1.get(i), 2);
            norm2 += Math.pow(v2.get(i), 2);
        }

        return dotProduct / (Math.sqrt(norm1) * Math.sqrt(norm2));
    }
}
5. 高级特性
5.1 RAG(检索增强生成)
5.1.1 RAG架构
5.1.2 数据准备
1. 文档加载和切分
@Service
public class DocumentService {

    /**
     * 加载PDF文档
     */
    public List<Document> loadPdfDocuments(String filePath) {
        // 使用PDF文档加载器
        PdfDocumentReader reader = new PdfDocumentReader(
            new FileSystemResource(filePath)
        );

        return reader.get();
    }

    /**
     * 文档分块
     */
    public List<Document> splitDocuments(List<Document> documents) {
        TokenTextSplitter splitter = new TokenTextSplitter(
            500,    // chunk size
            50,     // overlap
            5,      // min chunk size
            10000   // max chunk size
        );

        return splitter.apply(documents);
    }
}
2. 向量存储
@Configuration
public class VectorStoreConfig {

    /**
     * 配置Elasticsearch向量存储
     */
    @Bean
    public VectorStore vectorStore(
            EmbeddingClient embeddingClient,
            RestClient restClient) {

        return new ElasticsearchVectorStore(
            restClient,
            embeddingClient
        );
    }

    /**
     * 配置Redis向量存储
     */
    @Bean
    public VectorStore redisVectorStore(
            EmbeddingClient embeddingClient,
            RedisVectorStoreConfig config) {

        return new RedisVectorStore(config, embeddingClient);
    }
}
3. 文档导入
@Service
public class DocumentImportService {

    @Resource
    private DocumentService documentService;

    @Resource
    private VectorStore vectorStore;

    /**
     * 导入文档到向量库
     */
    public void importDocuments(String filePath) {
        // 1. 加载文档
        List<Document> documents = documentService.loadPdfDocuments(filePath);

        // 2. 分块
        List<Document> chunks = documentService.splitDocuments(documents);

        // 3. 存入向量库
        vectorStore.add(chunks);

        log.info("导入{}个文档片段到向量库", chunks.size());
    }
}
5.1.3 RAG查询
@Service
public class RagService {

    @Resource
    private ChatClient chatClient;

    @Resource
    private VectorStore vectorStore;

    /**
     * RAG问答
     */
    public String ragQuery(String question) {
        // 1. 向量检索相关文档
        List<Document> relevantDocs = vectorStore.similaritySearch(
            SearchRequest.query(question)
                .withTopK(5)                    // 检索Top 5
                .withSimilarityThreshold(0.7)   // 相似度阈值
        );

        // 2. 构建上下文
        String context = relevantDocs.stream()
            .map(Document::getContent)
            .collect(Collectors.joining("\n\n---\n\n"));

        // 3. 使用QuestionAnswerAdvisor
        return chatClient.prompt()
            .user(question)
            .advisors(new QuestionAnswerAdvisor(vectorStore))
            .call()
            .content();
    }

    /**
     * RAG问答(手动构建Prompt)
     */
    public RagResponse ragQueryManual(String question) {
        // 检索文档
        List<Document> docs = vectorStore.similaritySearch(
            SearchRequest.query(question).withTopK(5)
        );

        // 手动构建Prompt
        String prompt = String.format("""
            # 任务
            基于以下文档内容回答用户问题。

            # 文档内容
            %s

            # 用户问题
            %s

            # 要求
            1. 仅基于提供的文档内容回答
            2. 如果文档中没有相关信息,明确说明
            3. 给出文档引用
            """,
            buildContext(docs),
            question
        );

        String answer = chatClient.prompt()
            .user(prompt)
            .call()
            .content();

        return RagResponse.builder()
            .answer(answer)
            .sources(extractSources(docs))
            .build();
    }

    private String buildContext(List<Document> docs) {
        return docs.stream()
            .map(doc -> String.format("【来源:%s】\n%s",
                doc.getMetadata().get("source"),
                doc.getContent()))
            .collect(Collectors.joining("\n\n---\n\n"));
    }

    private List<DocumentSource> extractSources(List<Document> docs) {
        return docs.stream()
            .map(doc -> DocumentSource.builder()
                .source(doc.getMetadata().get("source"))
                .snippet(doc.getContent().substring(0, Math.min(200, doc.getContent().length())))
                .build())
            .collect(Collectors.toList());
    }
}

@Builder
record RagResponse(String answer, List<DocumentSource> sources) {}

@Builder
record DocumentSource(String source, String snippet) {}
5.1.4 使用QuestionAnswerAdvisor
@Configuration
public class RagConfig {

    @Bean
    public QuestionAnswerAdvisor questionAnswerAdvisor(VectorStore vectorStore) {
        return new QuestionAnswerAdvisor(vectorStore,
            SearchRequest.defaults()
                .withTopK(5)
                .withSimilarityThreshold(0.7)
        );
    }
}

@Service
public class SimpleRagService {

    @Resource
    private ChatClient chatClient;

    @Resource
    private QuestionAnswerAdvisor questionAnswerAdvisor;

    public String query(String question) {
        return chatClient.prompt()
            .user(question)
            .advisors(questionAnswerAdvisor)
            .call()
            .content();
    }
}
5.2 Function Calling(工具调用)
5.2.1 什么是Function Calling?
Function Calling允许大模型主动调用外部函数/API来完成任务。
5.2.2 定义函数
方式1:使用@Bean注册函数
@Configuration
public class FunctionConfig {

    /**
     * 天气查询函数
     */
    @Bean
    @Description("查询指定城市的天气信息")
    public Function<WeatherRequest, WeatherResponse> weatherFunction() {
        return request -> {
            // 模拟调用天气API
            return WeatherResponse.builder()
                .city(request.city())
                .temperature(25)
                .condition("晴天")
                .humidity(60)
                .build();
        };
    }

    /**
     * 订单查询函数
     */
    @Bean
    @Description("根据订单ID查询订单详情")
    public Function<OrderRequest, OrderResponse> orderQueryFunction() {
        return request -> {
            // 实际业务逻辑
            Order order = orderService.getById(request.orderId());
            return OrderResponse.from(order);
        };
    }
}

// 请求和响应DTO
record WeatherRequest(
    @JsonProperty(required = true, description = "城市名称") String city,
    @JsonProperty(required = false, description = "日期,默认今天") String date
) {}

@Builder
record WeatherResponse(String city, int temperature, String condition, int humidity) {}

record OrderRequest(@JsonProperty(required = true, description = "订单ID") String orderId) {}
record OrderResponse(String orderId, String status, BigDecimal amount) {
    static OrderResponse from(Order order) {
        return new OrderResponse(
            order.getId().toString(),
            order.getStatus().name(),
            order.getAmount()
        );
    }
}
5.2.3 使用Function Calling
@Service
public class FunctionCallingService {

    @Resource
    private ChatClient chatClient;

    /**
     * 使用函数调用
     */
    public String chatWithFunctions(String userMessage) {
        return chatClient.prompt()
            .user(userMessage)
            .functions("weatherFunction", "orderQueryFunction")  // 注册可用函数
            .call()
            .content();
    }
}

// 使用示例
String response = service.chatWithFunctions("帮我查一下北京的天气");
// 大模型会自动调用weatherFunction,然后返回:
// "北京当前天气晴天,温度25℃,湿度60%"

String response2 = service.chatWithFunctions("查询订单12345的状态");
// 大模型会自动调用orderQueryFunction
方式2:动态注册函数
public String chatWithDynamicFunction(String userMessage) {
    // 动态创建函数
    FunctionCallback weatherCallback = FunctionCallback.builder()
        .function("getCurrentWeather", (WeatherRequest request) -> {
            // 函数实现
            return getWeatherData(request.city());
        })
        .description("获取当前天气")
        .inputType(WeatherRequest.class)
        .build();

    return chatClient.prompt()
        .user(userMessage)
        .function(weatherCallback)
        .call()
        .content();
}
5.2.4 复杂工具调用示例
/**
 * 数据库查询工具
 */
@Component
public class DatabaseTools {

    @Resource
    private UserRepository userRepository;

    @Resource
    private OrderRepository orderRepository;

    @Bean
    @Description("查询用户信息")
    public Function<UserQueryRequest, UserInfo> userQueryFunction() {
        return request -> {
            User user = userRepository.findById(request.userId())
                .orElseThrow(() -> new BusinessException("用户不存在"));

            return UserInfo.builder()
                .userId(user.getId())
                .username(user.getUsername())
                .email(user.getEmail())
                .registerDate(user.getCreateTime())
                .build();
        };
    }

    @Bean
    @Description("查询用户的订单列表")
    public Function<UserOrderRequest, List<OrderInfo>> userOrdersFunction() {
        return request -> {
            List<Order> orders = orderRepository.findByUserId(request.userId());

            return orders.stream()
                .map(order -> OrderInfo.builder()
                    .orderId(order.getId().toString())
                    .amount(order.getAmount())
                    .status(order.getStatus().name())
                    .createTime(order.getCreateTime())
                    .build())
                .collect(Collectors.toList());
        };
    }
}

// 使用示例
String response = chatClient.prompt()
    .user("查询用户1001的信息和最近的订单")
    .functions("userQueryFunction", "userOrdersFunction")
    .call()
    .content();

// 大模型会:
// 1. 先调用userQueryFunction获取用户信息
// 2. 再调用userOrdersFunction获取订单列表
// 3. 整合结果返回给用户
5.3 Graph - 工作流和多智能体
5.3.1 Graph框架概述
Spring AI Alibaba Graph是一个低级工作流和多智能体编排框架,灵感来自LangGraph。
5.3.2 基础Graph示例
/**
 * 简单工作流示例
 */
@Service
public class SimpleGraphService {

    @Resource
    private ChatClient chatClient;

    public String executeWorkflow(String userInput) {
        // 1. 创建Graph
        Graph<WorkflowState> graph = new Graph<>();

        // 2. 添加节点
        graph.addNode("analyze", this::analyzeNode);
        graph.addNode("process", this::processNode);
        graph.addNode("summarize", this::summarizeNode);

        // 3. 添加边(定义流程)
        graph.addEdge(START, "analyze");
        graph.addEdge("analyze", "process");
        graph.addEdge("process", "summarize");
        graph.addEdge("summarize", END);

        // 4. 编译并执行
        CompiledGraph<WorkflowState> compiled = graph.compile();

        WorkflowState initialState = WorkflowState.builder()
            .userInput(userInput)
            .build();

        WorkflowState finalState = compiled.invoke(initialState);

        return finalState.getResult();
    }

    /**
     * 分析节点
     */
    private WorkflowState analyzeNode(WorkflowState state) {
        String analysis = chatClient.prompt()
            .system("你是分析专家,分析用户需求")
            .user(state.getUserInput())
            .call()
            .content();

        return state.toBuilder()
            .analysis(analysis)
            .build();
    }

    /**
     * 处理节点
     */
    private WorkflowState processNode(WorkflowState state) {
        String processed = chatClient.prompt()
            .system("根据分析结果进行处理")
            .user("分析结果:" + state.getAnalysis())
            .call()
            .content();

        return state.toBuilder()
            .processed(processed)
            .build();
    }

    /**
     * 汇总节点
     */
    private WorkflowState summarizeNode(WorkflowState state) {
        String summary = chatClient.prompt()
            .system("汇总所有信息,生成最终结果")
            .user("处理结果:" + state.getProcessed())
            .call()
            .content();

        return state.toBuilder()
            .result(summary)
            .build();
    }
}

/**
 * 工作流状态
 */
@Data
@Builder(toBuilder = true)
class WorkflowState {
    private String userInput;
    private String analysis;
    private String processed;
    private String result;
}
5.3.3 条件路由
/**
 * 带条件判断的工作流
 */
public String executeConditionalWorkflow(String userInput) {
    Graph<WorkflowState> graph = new Graph<>();

    // 添加节点
    graph.addNode("classify", this::classifyNode);
    graph.addNode("handleQuestion", this::handleQuestionNode);
    graph.addNode("handleCommand", this::handleCommandNode);
    graph.addNode("handleOther", this::handleOtherNode);

    // 添加边
    graph.addEdge(START, "classify");

    // 条件路由
    graph.addConditionalEdge("classify", this::routeByType);

    graph.addEdge("handleQuestion", END);
    graph.addEdge("handleCommand", END);
    graph.addEdge("handleOther", END);

    // 执行
    CompiledGraph<WorkflowState> compiled = graph.compile();
    WorkflowState finalState = compiled.invoke(
        WorkflowState.builder().userInput(userInput).build()
    );

    return finalState.getResult();
}

/**
 * 分类节点
 */
private WorkflowState classifyNode(WorkflowState state) {
    String type = chatClient.prompt()
        .system("""
            分析用户输入的类型:
            - question: 问题
            - command: 命令
            - other: 其他
            只返回类型名称
            """)
        .user(state.getUserInput())
        .call()
        .content()
        .toLowerCase();

    return state.toBuilder()
        .type(type)
        .build();
}

/**
 * 路由函数
 */
private String routeByType(WorkflowState state) {
    return switch (state.getType()) {
        case "question" -> "handleQuestion";
        case "command" -> "handleCommand";
        default -> "handleOther";
    };
}
5.3.4 多智能体协作
/**
 * 多智能体协作示例
 */
@Service
public class MultiAgentService {

    @Resource
    private ChatClient chatClient;

    /**
     * 代码审查多智能体流程
     */
    public CodeReviewResult reviewCode(String code) {
        Graph<CodeReviewState> graph = new Graph<>();

        // 定义多个智能体节点
        graph.addNode("securityReviewer", this::securityReviewNode);
        graph.addNode("performanceReviewer", this::performanceReviewNode);
        graph.addNode("styleReviewer", this::styleReviewNode);
        graph.addNode("coordinator", this::coordinatorNode);

        // 并行执行审查
        graph.addEdge(START, "securityReviewer");
        graph.addEdge(START, "performanceReviewer");
        graph.addEdge(START, "styleReviewer");

        // 汇总到协调者
        graph.addEdge("securityReviewer", "coordinator");
        graph.addEdge("performanceReviewer", "coordinator");
        graph.addEdge("styleReviewer", "coordinator");

        graph.addEdge("coordinator", END);

        // 执行
        CompiledGraph<CodeReviewState> compiled = graph.compile();
        CodeReviewState finalState = compiled.invoke(
            CodeReviewState.builder().code(code).build()
        );

        return finalState.getResult();
    }

    private CodeReviewState securityReviewNode(CodeReviewState state) {
        String review = chatClient.prompt()
            .system("你是安全审查专家,检查代码安全问题")
            .user("审查代码:\n" + state.getCode())
            .call()
            .content();

        return state.toBuilder()
            .securityReview(review)
            .build();
    }

    // 其他审查节点类似...

    private CodeReviewState coordinatorNode(CodeReviewState state) {
        String summary = chatClient.prompt()
            .system("你是协调者,汇总所有审查意见")
            .user(String.format("""
                安全审查:%s
                性能审查:%s
                风格审查:%s
                请汇总生成最终报告
                """,
                state.getSecurityReview(),
                state.getPerformanceReview(),
                state.getStyleReview()))
            .call()
            .content();

        return state.toBuilder()
            .result(CodeReviewResult.builder()
                .summary(summary)
                .securityIssues(extractIssues(state.getSecurityReview()))
                .performanceIssues(extractIssues(state.getPerformanceReview()))
                .styleIssues(extractIssues(state.getStyleReview()))
                .build())
            .build();
    }
}
5.4 MCP(Model Context Protocol)集成
5.4.1 什么是MCP?
MCP是一个标准化协议,让AI模型能够安全地访问外部数据源和工具。
5.4.2 使用Nacos MCP Registry
@Configuration
public class McpConfig {

    /**
     * 配置Nacos MCP注册中心
     */
    @Bean
    public NacosMcpRegistry nacosMcpRegistry(NacosProperties nacosProperties) {
        return new NacosMcpRegistry(
            nacosProperties.getServerAddr(),
            nacosProperties.getNamespace()
        );
    }

    /**
     * MCP服务自动发现
     */
    @Bean
    public McpServiceDiscovery mcpServiceDiscovery(NacosMcpRegistry registry) {
        return new McpServiceDiscovery(registry);
    }
}
# application.yml
spring:
  ai:
    alibaba:
      mcp:
        enabled: true
        registry:
          type: nacos
          address: localhost:8848
          namespace: mcp-services
6. 企业级应用实践
6.1 会话记忆管理
6.1.1 内存存储(开发测试)
@Configuration
public class ChatMemoryConfig {

    /**
     * 内存Chat Memory
     */
    @Bean
    public ChatMemory inMemoryChatMemory() {
        return new InMemoryChatMemory();
    }
}
6.1.2 Redis存储(生产推荐)
@Configuration
public class RedisChatMemoryConfig {

    @Bean
    public ChatMemory redisChatMemory(
            RedisTemplate<String, Object> redisTemplate) {

        return new RedisChatMemory(redisTemplate,
            ChatMemoryConfig.builder()
                .maxMessages(20)                    // 最多保留20条消息
                .timeToLive(Duration.ofHours(24))  // 24小时过期
                .build());
    }
}

@Service
public class ConversationService {

    @Resource
    private ChatClient chatClient;

    @Resource
    private ChatMemory chatMemory;

    public String chat(String sessionId, String userMessage) {
        // 1. 加载历史
        List<Message> history = chatMemory.get(sessionId);

        // 2. 添加新消息
        history.add(new UserMessage(userMessage));

        // 3. 调用模型
        String response = chatClient.prompt()
            .messages(history)
            .call()
            .content();

        // 4. 保存响应
        history.add(new AssistantMessage(response));
        chatMemory.save(sessionId, history);

        return response;
    }
}
6.1.3 数据库存储(持久化)
@Configuration
public class JdbcChatMemoryConfig {

    @Bean
    public ChatMemory jdbcChatMemory(DataSource dataSource) {
        return new JdbcChatMemory(dataSource);
    }
}

// 数据库表结构
CREATE TABLE chat_memory (
    id BIGINT PRIMARY KEY AUTO_INCREMENT,
    session_id VARCHAR(64) NOT NULL,
    role VARCHAR(20) NOT NULL,
    content TEXT NOT NULL,
    metadata JSON,
    create_time DATETIME NOT NULL,
    INDEX idx_session_id (session_id),
    INDEX idx_create_time (create_time)
);
6.2 监控与可观测性
6.2.1 集成Micrometer
@Configuration
public class ObservabilityConfig {

    @Bean
    public ObservationRegistry observationRegistry() {
        return ObservationRegistry.create();
    }

    @Bean
    public ChatClientObservationConvention customConvention() {
        return new ChatClientObservationConvention() {
            @Override
            public KeyValues getLowCardinalityKeyValues(ChatClientObservationContext context) {
                return KeyValues.of(
                    "ai.model", context.getModel(),
                    "ai.provider", "dashscope"
                );
            }
        };
    }
}
# application.yml
management:
  endpoints:
    web:
      exposure:
        include: health,info,metrics,prometheus
  metrics:
    tags:
      application: ${spring.application.name}
    export:
      prometheus:
        enabled: true
6.2.2 自定义指标
@Aspect
@Component
public class AiMetricsAspect {

    private final MeterRegistry meterRegistry;

    public AiMetricsAspect(MeterRegistry meterRegistry) {
        this.meterRegistry = meterRegistry;
    }

    @Around("@annotation(com.example.annotation.AiMetrics)")
    public Object recordMetrics(ProceedingJoinPoint pjp) throws Throwable {
        Timer.Sample sample = Timer.start(meterRegistry);

        String methodName = pjp.getSignature().getName();
        try {
            Object result = pjp.proceed();

            // 记录成功
            sample.stop(Timer.builder("ai.call.duration")
                .tag("method", methodName)
                .tag("status", "success")
                .register(meterRegistry));

            // 记录Token使用(如果可获取)
            if (result instanceof ChatResponse response) {
                meterRegistry.counter("ai.tokens.used",
                    "type", "total"
                ).increment(response.getMetadata().getUsage().getTotalTokens());
            }

            return result;

        } catch (Exception e) {
            sample.stop(Timer.builder("ai.call.duration")
                .tag("method", methodName)
                .tag("status", "error")
                .tag("error.type", e.getClass().getSimpleName())
                .register(meterRegistry));
            throw e;
        }
    }
}
6.3 安全与限流
6.3.1 API Key管理
@Configuration
public class SecurityConfig {

    /**
     * 从环境变量或密钥管理系统获取API Key
     */
    @Bean
    public DashScopeApiKeyProvider apiKeyProvider() {
        return new DashScopeApiKeyProvider() {
            @Override
            public String getApiKey() {
                // 1. 优先从环境变量
                String apiKey = System.getenv("DASHSCOPE_API_KEY");

                // 2. 或从密钥管理服务获取
                if (apiKey == null) {
                    apiKey = secretManager.getSecret("ai/dashscope/api-key");
                }

                return apiKey;
            }
        };
    }
}
6.3.2 限流配置
@Configuration
public class RateLimitConfig {

    /**
     * 基于Redis的限流
     */
    @Bean
    public RateLimiter aiRateLimiter(RedisTemplate<String, Object> redisTemplate) {
        return new RedisRateLimiter(
            10,         // 每秒10个请求
            100,        // 突发上限100
            redisTemplate
        );
    }
}

@Aspect
@Component
public class RateLimitAspect {

    @Resource
    private RateLimiter aiRateLimiter;

    @Before("@annotation(com.example.annotation.RateLimited)")
    public void checkRateLimit() {
        if (!aiRateLimiter.tryAcquire()) {
            throw new RateLimitException("请求过于频繁,请稍后重试");
        }
    }
}
6.4 异常处理与降级
@ControllerAdvice
public class GlobalExceptionHandler {

    @ExceptionHandler(AiException.class)
    public Result<?> handleAiException(AiException e) {
        log.error("AI调用异常", e);

        return Result.error()
            .code("AI_ERROR")
            .message("AI服务暂时不可用,请稍后重试")
            .build();
    }

    @ExceptionHandler(RateLimitException.class)
    public Result<?> handleRateLimit(RateLimitException e) {
        return Result.error()
            .code("RATE_LIMIT")
            .message(e.getMessage())
            .build();
    }
}

@Service
public class ResilientAiService {

    @Resource
    private ChatClient chatClient;

    @Resource
    private CacheManager cacheManager;

    /**
     * 带降级的AI调用
     */
    public String chatWithFallback(String userMessage) {
        try {
            return chatClient.prompt()
                .user(userMessage)
                .call()
                .content();

        } catch (AiException e) {
            log.warn("AI调用失败,使用缓存降级", e);

            // 降级1:返回缓存结果
            String cached = cacheManager.get(userMessage);
            if (cached != null) {
                return cached + "\n(来自缓存)";
            }

            // 降级2:返回默认响应
            return "抱歉,AI服务暂时不可用,请稍后重试。";
        }
    }
}
7. 最佳实践与注意事项
7.1 Prompt优化
7.1.1 System Prompt最佳实践
/**
 * ✅ 好的System Prompt
 */
String goodSystemPrompt = """
    # 角色
    你是一个专业的Java技术顾问,擅长Spring生态系统。

    # 能力
    - 解答Java和Spring相关技术问题
    - 提供代码示例和最佳实践
    - 进行架构设计建议

    # 约束
    - 回答要准确、简洁、专业
    - 提供的代码必须可运行
    - 引用官方文档时给出链接
    - 如果不确定,明确说明

    # 输出格式
    - 使用Markdown格式
    - 代码使用代码块包裹
    - 重要信息使用粗体标注
    """;

/**
 * ❌ 不好的System Prompt
 */
String badSystemPrompt = "你是一个AI助手,帮助用户解决问题。";
7.1.2 温度参数选择
| 任务类型 | 推荐温度 | 说明 |
|---|---|---|
| 代码生成 | 0.1 - 0.3 | 需要精确性,避免创造性 |
| 技术问答 | 0.3 - 0.5 | 平衡准确性和灵活性 |
| 文案创作 | 0.7 - 0.9 | 需要创造性和多样性 |
| 头脑风暴 | 0.9 - 1.0 | 最大化创新性 |
7.2 性能优化
7.2.1 缓存策略
@Service
public class CachedAiService {

    @Resource
    private ChatClient chatClient;

    /**
     * 使用Spring Cache缓存结果
     */
    @Cacheable(value = "ai-responses",
               key = "#userMessage",
               unless = "#result == null")
    public String chatWithCache(String userMessage) {
        return chatClient.prompt()
            .user(userMessage)
            .call()
            .content();
    }

    /**
     * 手动缓存管理
     */
    public String chatWithManualCache(String userMessage) {
        // 1. 检查缓存
        String cached = redis.get("ai:" + hash(userMessage));
        if (cached != null) {
            return cached;
        }

        // 2. 调用AI
        String response = chatClient.prompt()
            .user(userMessage)
            .call()
            .content();

        // 3. 存入缓存
        redis.setex("ai:" + hash(userMessage), 3600, response);

        return response;
    }

    private String hash(String input) {
        return DigestUtils.md5DigestAsHex(input.getBytes());
    }
}
7.2.2 异步处理
@Service
public class AsyncAiService {

    @Resource
    private ChatClient chatClient;

    @Async("aiTaskExecutor")
    public CompletableFuture<String> chatAsync(String userMessage) {
        String response = chatClient.prompt()
            .user(userMessage)
            .call()
            .content();

        return CompletableFuture.completedFuture(response);
    }
}

@Configuration
public class AsyncConfig {

    @Bean("aiTaskExecutor")
    public Executor aiTaskExecutor() {
        ThreadPoolTaskExecutor executor = new ThreadPoolTaskExecutor();
        executor.setCorePoolSize(5);
        executor.setMaxPoolSize(10);
        executor.setQueueCapacity(100);
        executor.setThreadNamePrefix("ai-task-");
        executor.initialize();
        return executor;
    }
}
7.3 成本控制
7.3.1 Token使用优化
/**
 * Token使用优化策略
 */
@Service
public class TokenOptimizedService {

    /**
     * 1. 精简Prompt
     */
    public String chatOptimized(String userMessage) {
        // ❌ 不要包含冗余信息
        String badPrompt = """
            请你仔细阅读以下问题,然后认真思考,给出详细的、
            完整的、准确的回答,确保回答质量高...
            问题:%s
            """.formatted(userMessage);

        // ✅ 精简到重点
        String goodPrompt = userMessage;

        return chatClient.prompt()
            .user(goodPrompt)
            .call()
            .content();
    }

    /**
     * 2. 使用max-tokens限制
     */
    public String chatWithLimit(String userMessage) {
        return chatClient.prompt()
            .user(userMessage)
            .options(DashScopeChatOptions.builder()
                .maxTokens(500)  // 限制响应长度
                .build())
            .call()
            .content();
    }

    /**
     * 3. 选择合适的模型
     */
    public String chatWithRightModel(String userMessage, boolean isComplex) {
        String model = isComplex ? "qwen-max" : "qwen-turbo";

        return chatClient.prompt()
            .user(userMessage)
            .options(DashScopeChatOptions.builder()
                .model(model)
                .build())
            .call()
            .content();
    }
}
7.3.2 成本监控
@Component
public class CostMonitor {

    private final MeterRegistry meterRegistry;
    private final AtomicLong totalTokens = new AtomicLong(0);

    public CostMonitor(MeterRegistry meterRegistry) {
        this.meterRegistry = meterRegistry;

        // 注册指标
        meterRegistry.gauge("ai.cost.total.tokens", totalTokens);
    }

    public void recordUsage(ChatResponse response) {
        long tokens = response.getMetadata().getUsage().getTotalTokens();
        totalTokens.addAndGet(tokens);

        // 计算成本(假设每1000 tokens = 0.01元)
        double cost = tokens / 1000.0 * 0.01;

        meterRegistry.counter("ai.cost.amount",
            "model", response.getMetadata().getModel()
        ).increment(cost);
    }
}
7.4 测试策略
7.4.1 单元测试
@SpringBootTest
class AiServiceTest {

    @MockBean
    private ChatClient chatClient;

    @Resource
    private AiService aiService;

    @Test
    void testChat() {
        // Mock ChatClient
        ChatResponse mockResponse = mock(ChatResponse.class);
        when(chatClient.prompt()).thenReturn(mock(PromptSpec.class));
        // ... 设置mock行为

        // 测试
        String result = aiService.chat("测试消息");

        assertNotNull(result);
        verify(chatClient).prompt();
    }
}
7.4.2 集成测试
@SpringBootTest(webEnvironment = WebEnvironment.RANDOM_PORT)
class ChatControllerIntegrationTest {

    @Resource
    private TestRestTemplate restTemplate;

    @Test
    void testChatEndpoint() {
        ResponseEntity<String> response = restTemplate.getForEntity(
            "/api/chat/simple?message=你好",
            String.class
        );

        assertEquals(HttpStatus.OK, response.getStatusCode());
        assertNotNull(response.getBody());
    }
}
附录
A. 常见问题FAQ
Q1: Spring AI Alibaba vs LangChain4j,如何选择?
A:
- 使用阿里云服务 → Spring AI Alibaba
- Spring Boot项目 → Spring AI Alibaba(无缝集成)
- 需要复杂Agent → LangChain4j(功能更全面)
- 需要多模型切换 → LangChain4j(支持20+模型)
Q2: 如何降低API调用成本?
A:
- 使用缓存减少重复调用
- 选择合适的模型(简单任务用qwen-turbo)
- 限制max-tokens
- 精简Prompt
- 批量处理请求
Q3: 如何处理大模型的幻觉问题?
A:
- 使用RAG提供准确的上下文
- 降低temperature参数
- 明确要求模型基于提供的信息回答
- 使用Function Calling获取实时数据
- 人工审核关键输出
B. 参考资源
官方文档:
- Spring AI Alibaba官网:https://java2ai.com
- Spring Cloud Alibaba文档:https://sca.aliyun.com
- 阿里云百炼平台:https://dashscope.console.aliyun.com
开源项目:
- GitHub仓库:https://github.com/alibaba/spring-ai-alibaba
- 示例项目:https://github.com/springaialibaba/spring-ai-alibaba-examples
社区资源:
- 钉钉社区群
- GitHub Discussions
- CSDN技术博客
Sources:

有“AI”的1024 = 2048,欢迎大家加入2048 AI社区
更多推荐

 21
21 0
0- 0


 已为社区贡献5条内容

所有评论(0)