N8N实战③:每日定时抓取天气并生成穿搭建议自动推送到微信
摘要:本文介绍了一个基于N8N自动化平台打造的微信天气穿搭机器人项目。该机器人每天定时获取天气数据,通过大模型生成穿搭建议和手绘效果图,整合成美观的HTML消息推送到微信。项目涉及天气API调用、数据处理、定时任务等核心功能,包含8个关键节点:定时触发、天气查询、穿搭建议生成、AI绘图、温馨提示生成、数据整合和微信推送。文章详细说明了每个节点的配置方法,并提供了代码示例和效果展示。该项目适合自动化
引言
今天,我们将一起挑战一个既实用又充满趣味的新项目:打造一个能每日定时为你推送天气情况和贴心穿搭建议的微信机器人。这个项目完美契合了“实用”和“有成就感”两个要素。想象一下,每天晚上,你的微信都能准时收到一条消息,告诉你明日的温度、天气,并建议你该穿什么衣服出门,甚至还生成了精美的穿搭手稿图片,是不是很有趣呢!该项目综合了HTTP请求、数据处理、定时任务和消息推送等核心自动化概念,是初学者从入门到精通的完美练手项目。相信从0到1完成这个项目后,你一定能感受到自动化工作流带来的效率提升和成就感。
技术框架
(注:本项目前提是已经完成了云部署/本地部署的工作,如果还没有的话请先完成部署哦!)
云部署教程参考:https://www.n8nzh.com/docs/quick_start/freen8n/
这个教程新手友好,非常快速就能完成部署。
本项目将使用几个常见的网络服务,通过N8N将它们“胶合”在一起。
-
N8N: 作为核心自动化平台,负责整个工作流的调度和执行。
-
天气API: 我们使用一个免费的天气API服务(和风天气)来获取实时天气数据。
-
微信推送: 我选用了Pushplus这类微信消息推送服务。它们通过提供一个唯一的URL,允许我们通过HTTP请求轻松地将消息发送到微信。
-
核心逻辑: N8N获取天气数据 -> 加工处理(如提取关键信息、生成穿搭建议)-> 格式化为美观的html文档 -> 通过微信推送服务发送。
工作流搭建思路
整个工作流可以清晰地划分为六个主要阶段,逻辑清晰,易于理解和调试:
-
触发与数据获取(Trigger & Fetch): 使用N8N的Cron节点设定每日推送的时间(如每晚8点)。触发后,通过HTTP Request节点调用天气API,获取你所在城市的天气数据(JSON格式)。
-
生成穿搭建议:调用大模型节点,结合提示词,让大模型根据天气状况和个性化的穿搭偏好生成详细的穿搭建议
-
生成穿搭图片:这是最有趣的部分!我是用了nanobanana制作精美的服饰手绘图片(这个模型是收费的)。
-
增加温馨提醒:我们使用Function节点,对获取到的天气数据(如最高/最低温度、天气状况)进行进一步分析,根据预设的逻辑规则生成对应的温馨提醒。例如昼夜温差大,提醒做好保暖工作等。其实这部也可以和穿搭建议节点融合,直接让大模型给出温馨提醒。
-
数据处理:把以上信息整合在一起,也就是期望最终推送给你的信息是什么样的,在这个节点就要完全处理好。我选择了html文本的形式整合信息,比较简洁美观,易读性强。
-
消息推送(Push): 最后,使用另一个HTTP Request节点,将生成的格式化消息(html文本)发送到Pushplus的API,最终在你的微信上弹出通知。
详细节点和配置说明
让我们在N8N编辑器中一步步添加和配置节点。
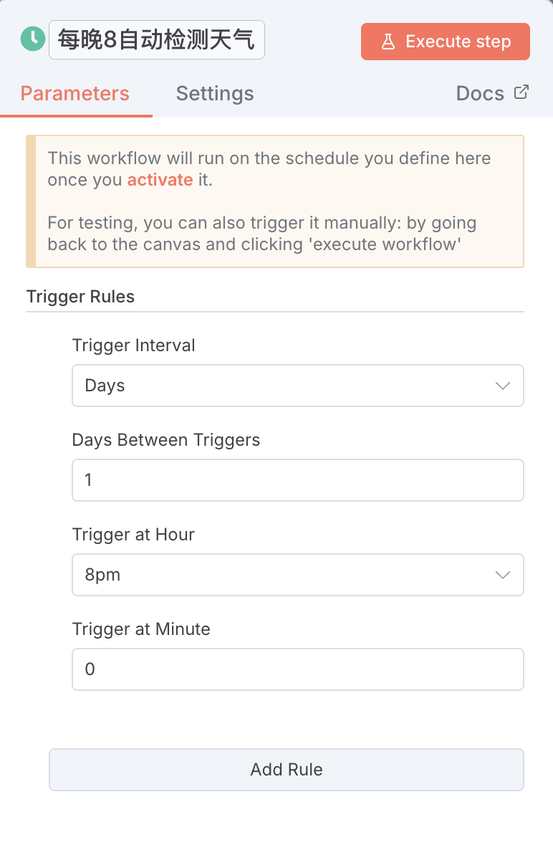
节点1:调度(Scheduler)
-
功能: 定时触发整个工作流。
-
配置
-
-
选择XX节点,配置如图。我设置的是每晚8点触发。
-
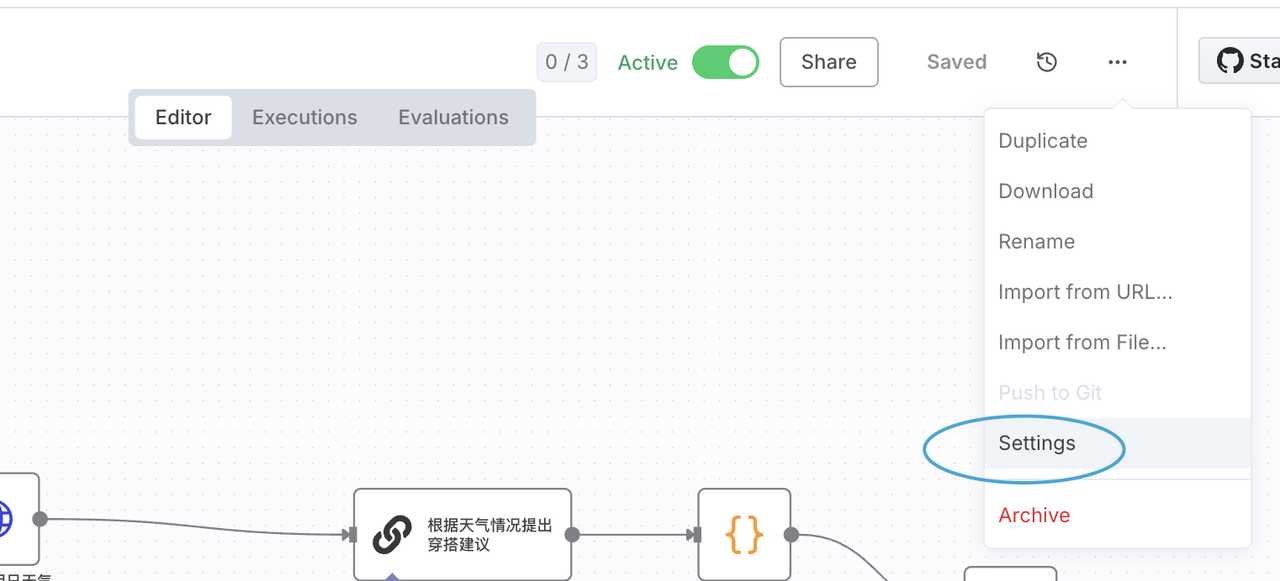
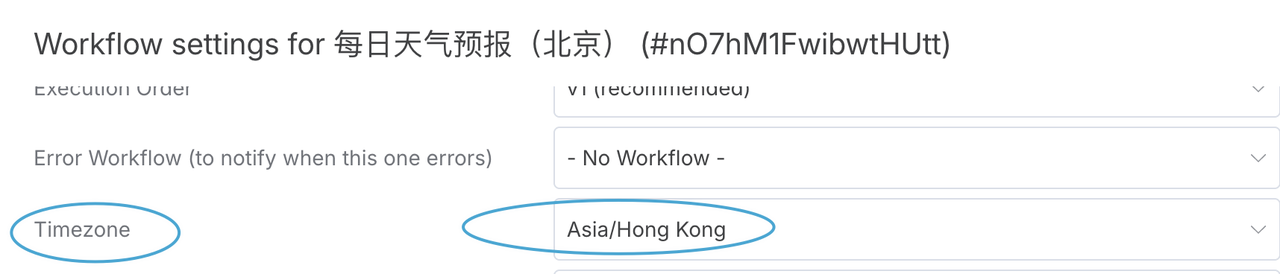
注意:时区调整,我这个云部署的版本默认是美国时区,我手动选择了HONGKONG,保证能在北京时间的晚8点触发该节点,在setting里进行设置(如图)。
-
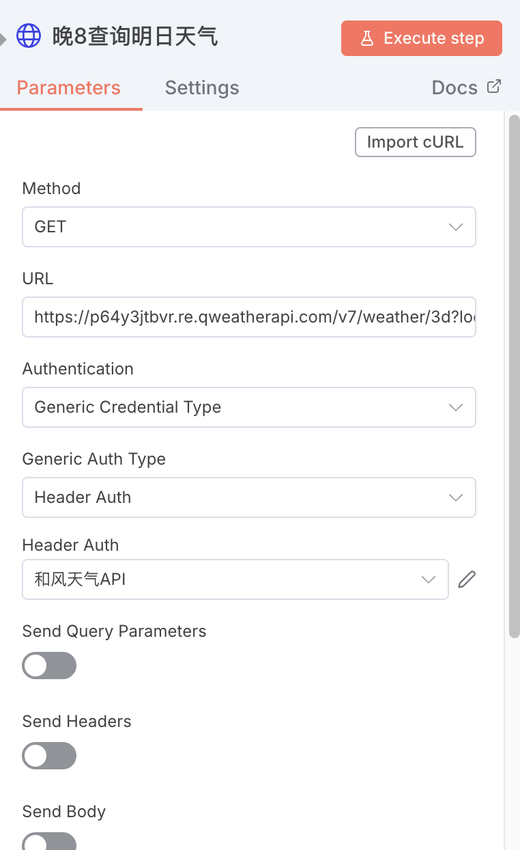
节点2:获取天气(HTTP Request)
-
功能: 调用天气API。
-
配置:
https://your_api_host/v7/weather/3d?location=101010100需要先注册和风天气,进入项目管理创建新的项目,并获取到该项目的
API KEY -
API说明网址:https://dev.qweather.com/docs/api/weather/weather-daily-forecast/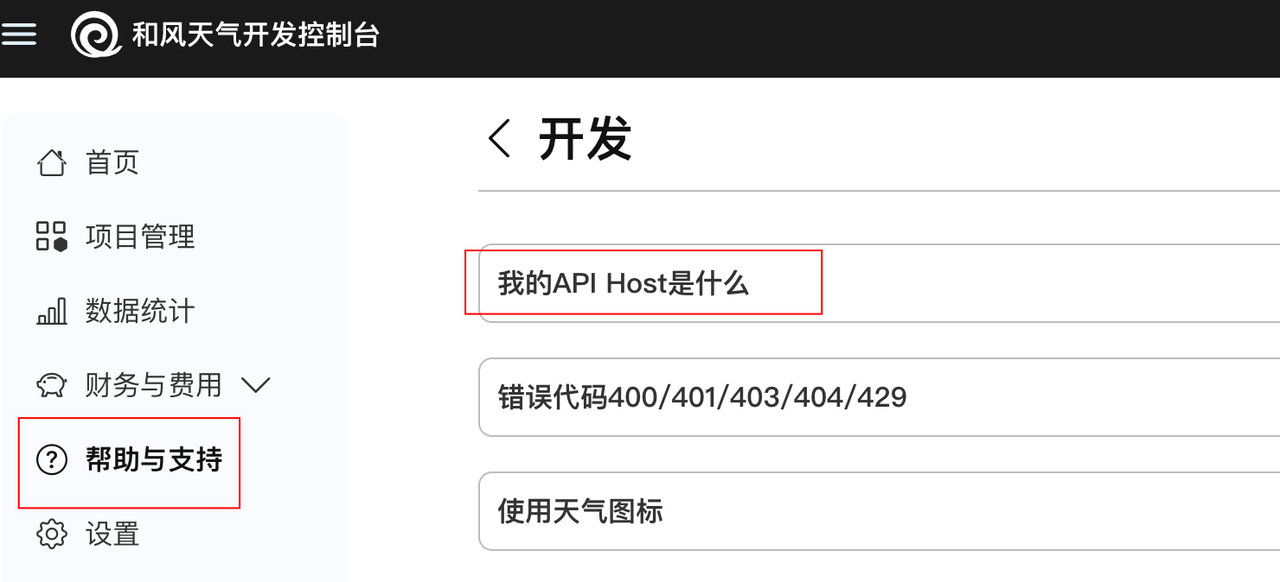
通过下图位置可以获取到自己的your_api_host,并在网址中进行替换
-
-
 Authentication: 选择
 Generic Credentials -
Request Method:
GET -
URL: 填入API地址。和风天气的“3日天气”API示例(location码代表北京,其他城市代码可以通过API文档获取):
-
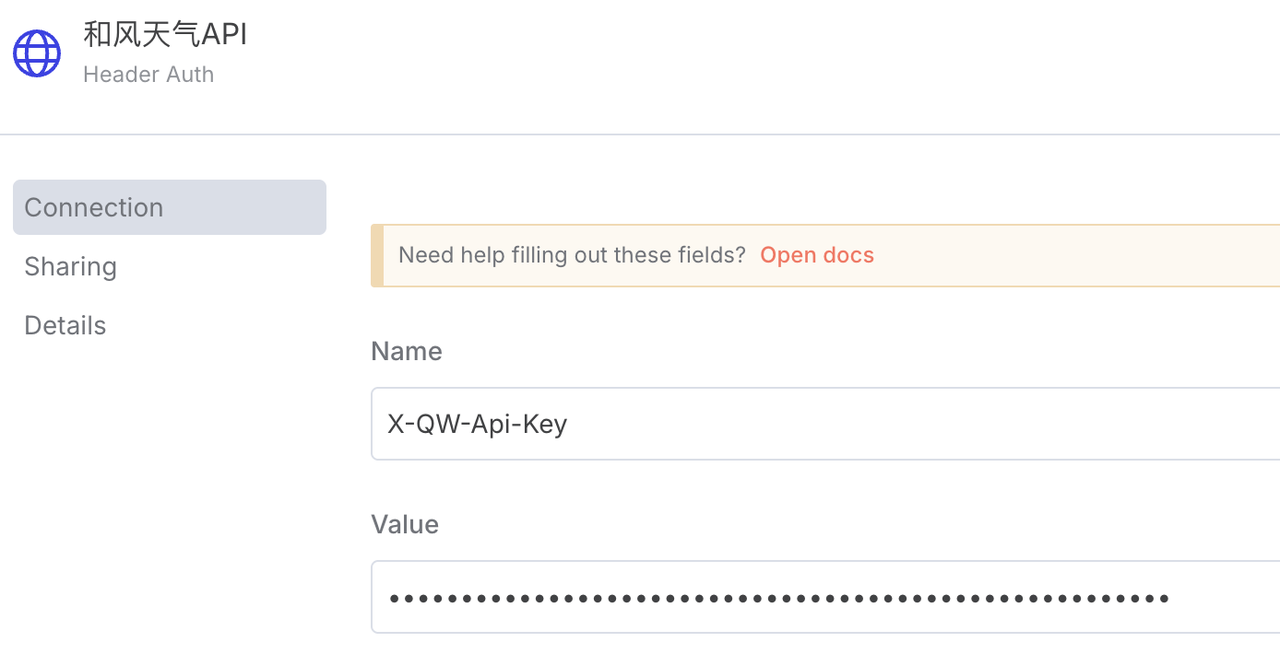
HeaderAuth:需新建
格式为:
X-QW-Api-Key: ABCD1234EFGHvalue填写上一步获取到的api key即可
-
节点3:生成穿搭建议(大模型节点)
-
功能: 处理天气数据,并给出穿搭建议。
-
配置:
-
添加LLM节点
-
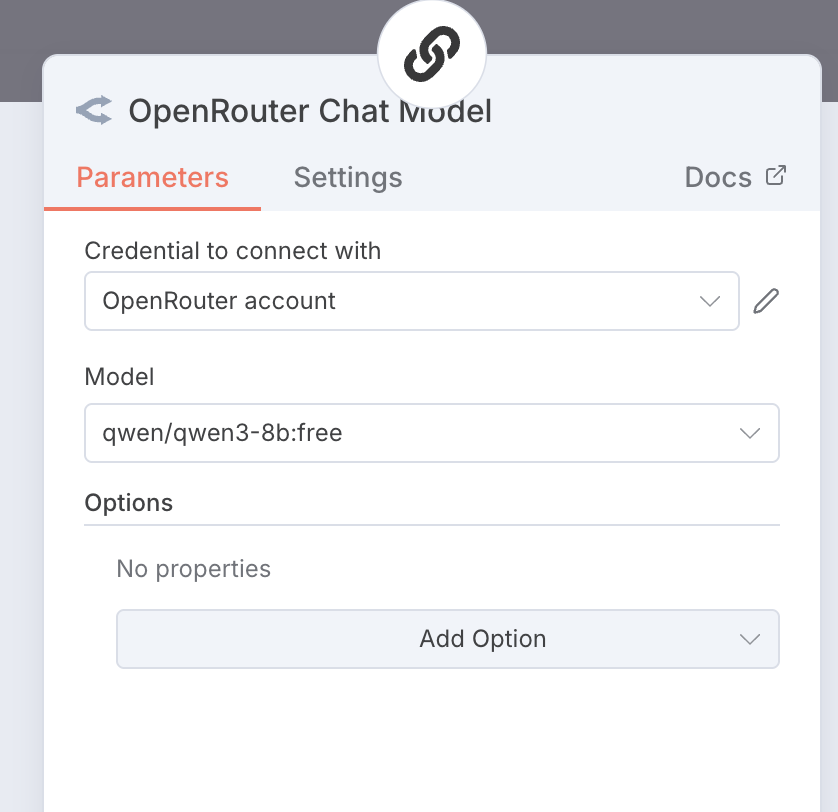
我使用了openrouter里的免费模型,注册openrouter后创建credential,使用默认的apikey即可,
-
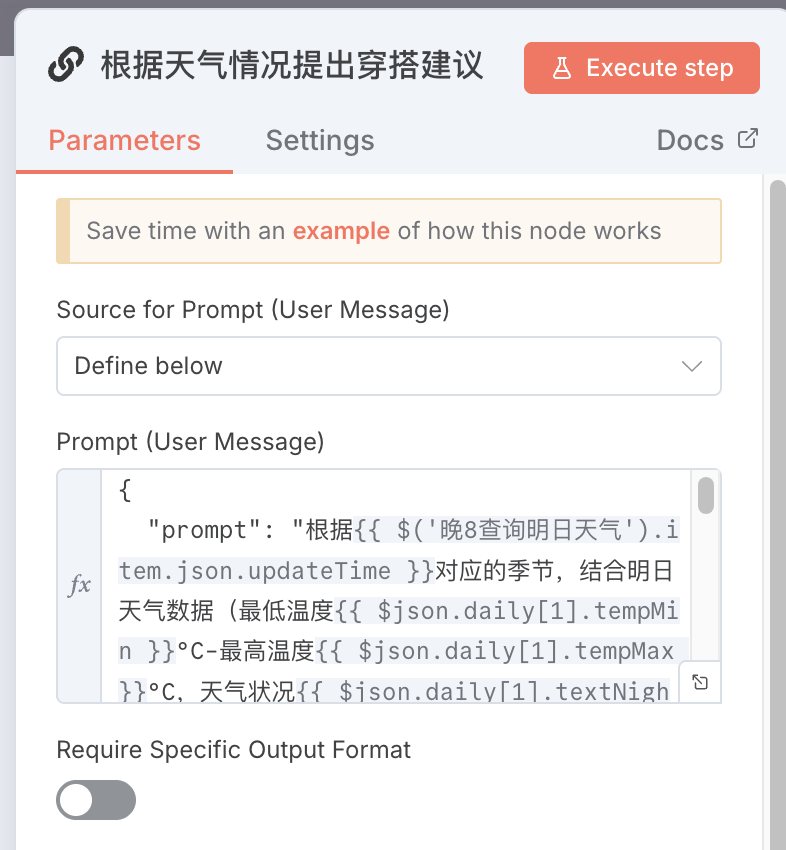
在JavaScript代码框中输入以下逻辑代码(此处prompt我设置了自己的情况,例如办公室通勤,坐地铁需要冬季衣服方便穿脱,你可以自行调整):
-
{ "prompt": "根据{{ $('晚8查询明日天气').item.json.updateTime }}对应的季节,结合明日天气数据(最低温度{{ $json.daily[1].tempMin }}°C-最高温度{{ $json.daily[1].tempMax }}°C,天气状况{{ $json.daily[1].textNight }},风力{{ $json.daily[1].windSpeedDay }}级,湿度{{ $json.daily[1].humidity }}°,降雨概率{{ $json.daily[1].precip }}),为居住在北京的33岁、办公室工作的女性,提供通勤穿搭建议,要求:舒适为主兼顾女性化,鞋子不要高跟鞋。同时考虑冬季地铁内较热,需方便穿脱。\n请用以下固定格式输出,只给简洁明确的单品描述(如外套:短款深灰色羽绒服),禁止添加任何解释文本(选择它的理由),注意,连衣裙这种直接归类到上衣里,下装、配饰都可以为空:\n\n## 🌤️ 明日天气概况\n明日气温{{ $json.daily[1].tempMin }}-{{ $json.daily[1].tempMax }}°C,天气状况{{ $json.daily[1].textNight }},风力{{ $json.daily[1].windSpeedDay }}级,湿度{{ $json.daily[1].humidity }}°,降雨概率{{ $json.daily[1].precip }})\n\n# 🌫️ 今日通勤穿搭清单\n\n- **外套**:\n- **上衣**:\n- **下装**:\n- **鞋子**:\n- **配饰**:\n\n> 提示:", "output_format": "text" }节点4:大模型生图(HTTP Request节点)
-
功能:根据穿搭建议生成手绘真人穿搭图片
-
配置:
// 获取输入数据 const inputData = $input.first().json.text; // 解析穿搭建议文本 const parseDressingAdvice = (text) => { const result = { 外套: '', 上衣: '', 下装: '', 鞋子: '', 配饰: '' }; // 按行分割文本 const lines = text.split('\n').filter(line => line.trim() !== ''); // 提取穿搭清单 lines.forEach(line => { const trimmedLine = line.trim(); if (trimmedLine.includes('外套') && trimmedLine.includes(':')) { result.外套 = trimmedLine.split(':')[1].trim().replace(/(.*?)/g, ''); } else if (trimmedLine.includes('上衣') && trimmedLine.includes(':')) { result.上衣 = trimmedLine.split(':')[1].trim().replace(/(.*?)/g, ''); } else if (trimmedLine.includes('下装') && trimmedLine.includes(':')) { result.下装 = trimmedLine.split(':')[1].trim().replace(/(.*?)/g, ''); } else if (trimmedLine.includes('鞋子') && trimmedLine.includes(':')) { result.鞋子 = trimmedLine.split(':')[1].trim().replace(/(.*?)/g, ''); } else if (trimmedLine.includes('配饰') && trimmedLine.includes(':')) { result.配饰 = trimmedLine.split(':')[1].trim().replace(/(.*?)/g, ''); } }); return result; }; // 从输入文本中提取穿搭信息 const dressingItems = parseDressingAdvice(inputData); // 构建生图提示词(单行格式) const buildImagePrompt = (items) => { return `30岁中国女性, 黑色长发, 自然微笑, 165cm匀称身材, 自然站立姿势, 真人手绘风格, 时尚插画, 柔和线条, 水彩效果, 简洁都市街道背景, 淡雅色调, 突出服装质感和层次感. 外套:${items.外套}, 上衣:${items.上衣}, 下装:${items.下装}, 鞋子:${items.鞋子}, 配饰:${items.配饰}. 真人手绘风格, 时尚杂志插画, 柔和自然色彩, 真实人体比例, 自然服装纹理和褶皱, 自然日光柔和阴影. 避免动漫卡通风格, 避免过度美颜失真, 避免复杂背景, 避免暴露或不适当姿势.`; }; // 生成完整的提示词 const imagePrompt = buildImagePrompt(dressingItems); // 返回结果 return [{ json: { prompt: imagePrompt, timestamp: new Date().toISOString() } }];此处我选择了KIE这个API中转站,好处是里面模型很多可以自己挑选,价格还可以。创建凭证的方法一样,不再赘述。注意格式
Authorization Bearer xxxx(你获取到的api key)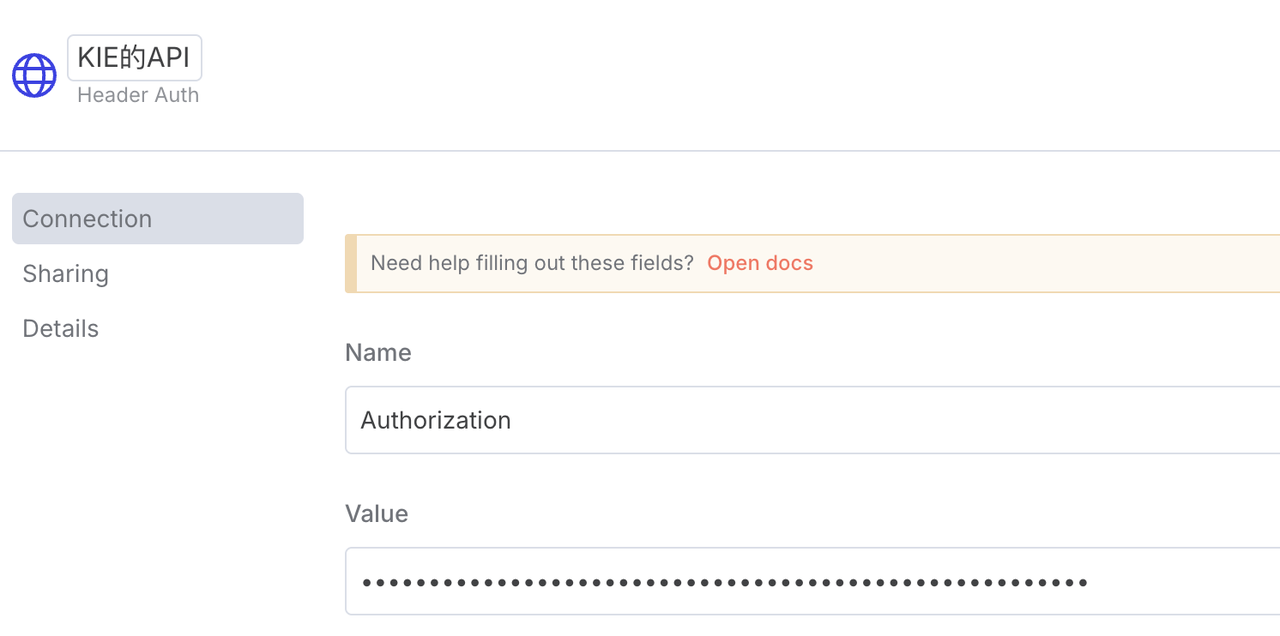
-
-
第一个节点,构造绘图prompt请求: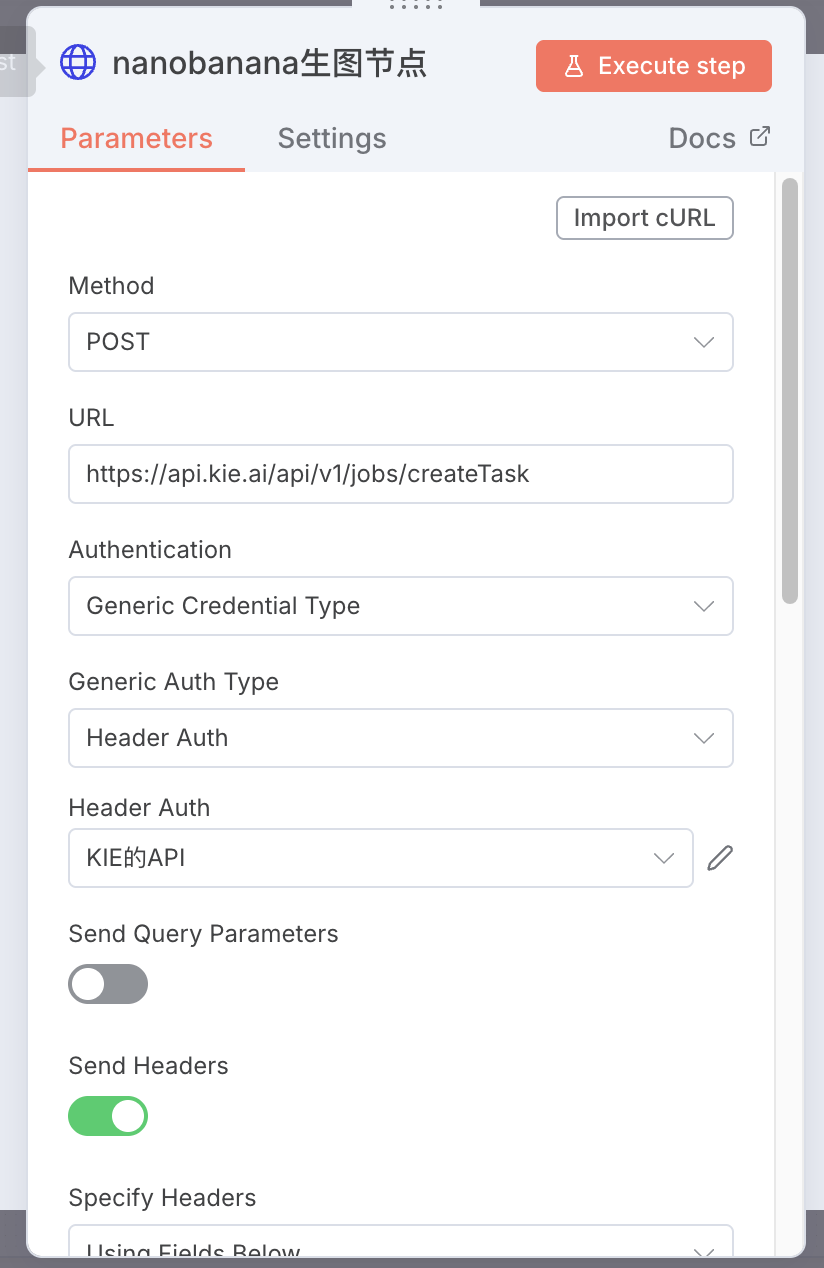
-
第二个节点,通过HTTP request节点调用nano-banana生成图片。
-
-
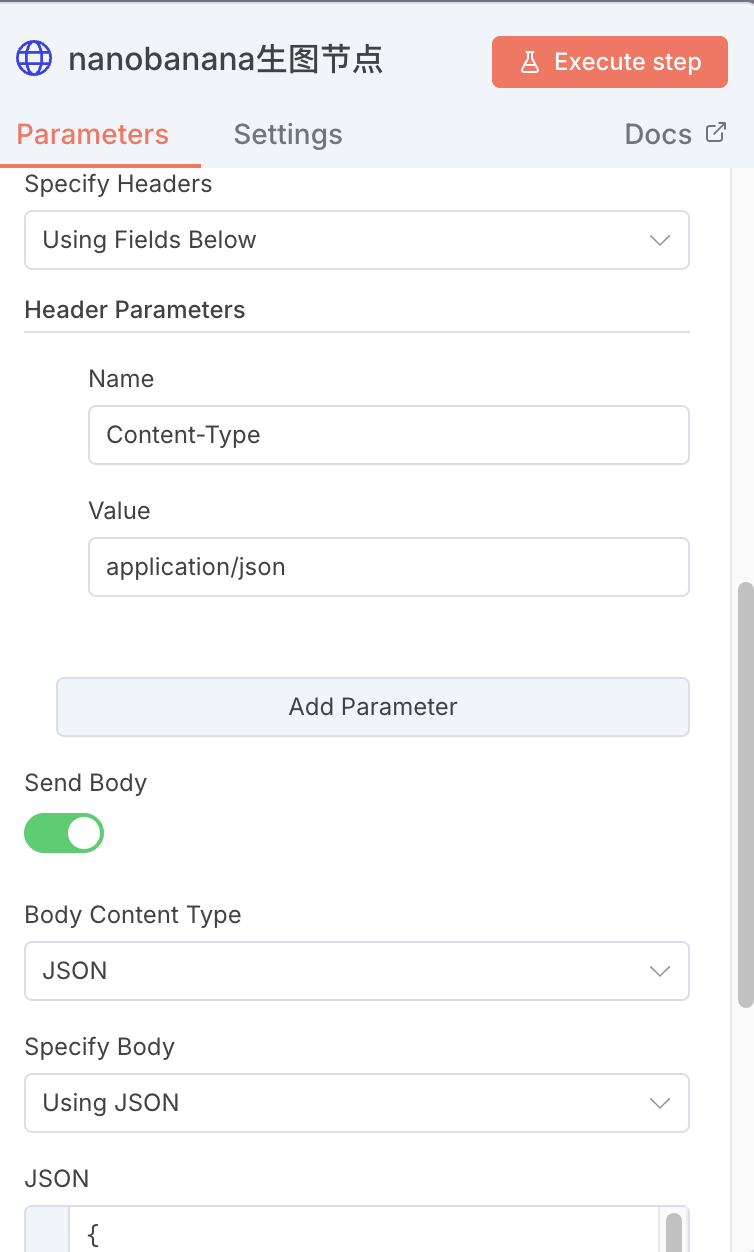
JSON文本框的具体内容如下:
{ "model": "google/nano-banana", "callBackUrl": "", "input": { "prompt": "{{ $json.prompt }}", "output_format": "png", "image_size": "3:4" } }
节点5:获取图片链接
-
提取http节点返回的信息中的图片链接
-
实际完整的链路是:http节点(生图节点)先生成一个任务-再使用另一个http节点获取响应结果(response)-提取结果中的图片链接,由于任务执行需要时间,因此增加了一个等待节点(wait),并增加了一个判断条件,当响应体中图片链接不为空时继续执行,否则返回等待节点。
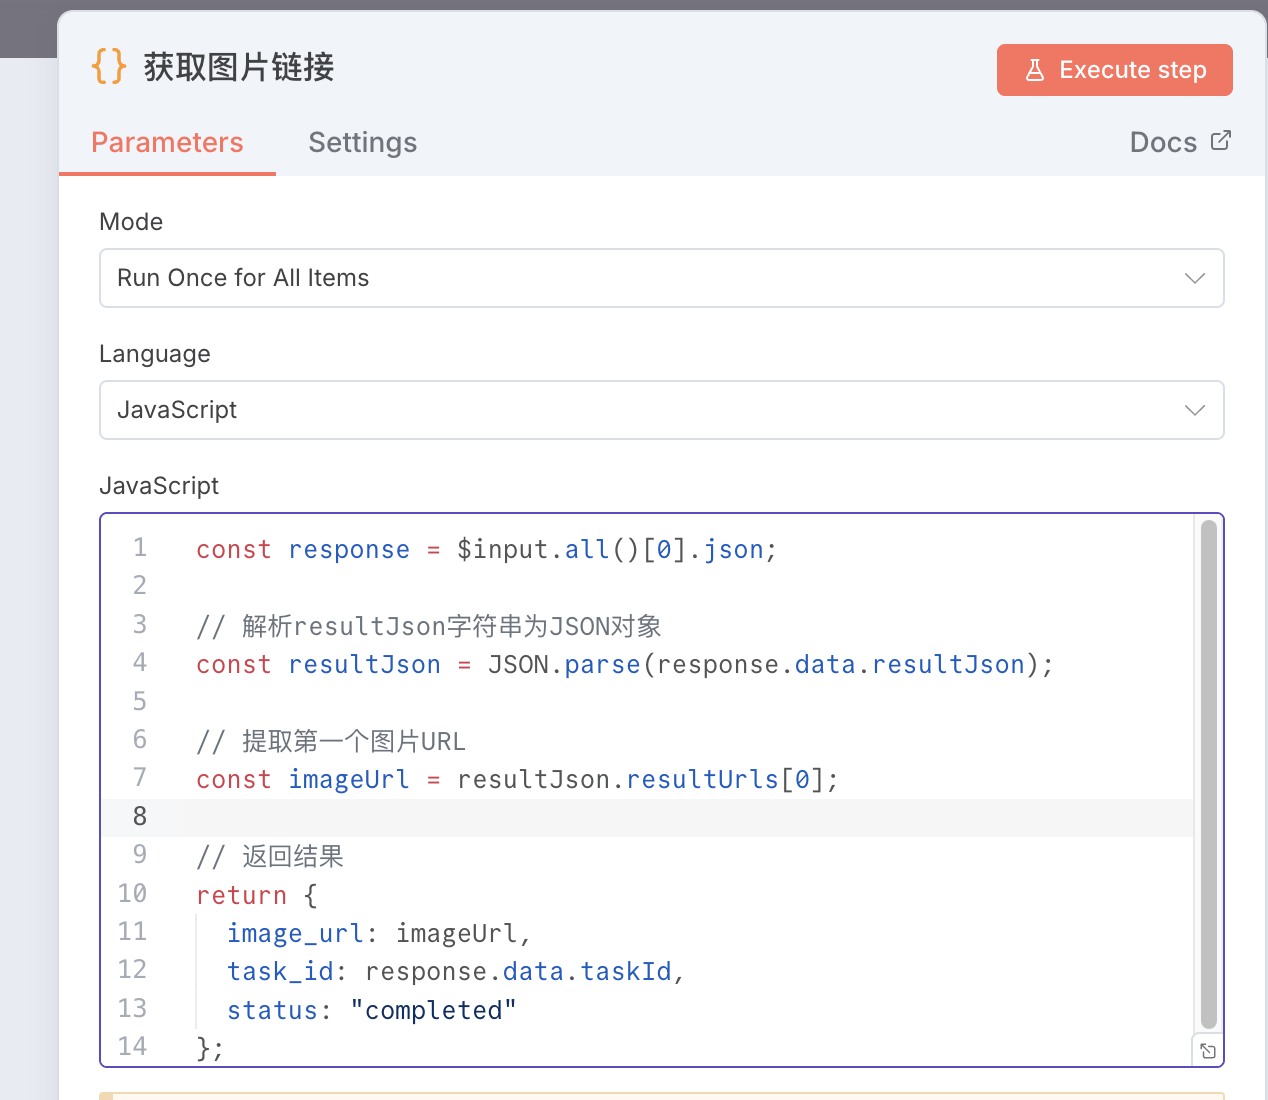
const response = $input.all()[0].json; // 解析resultJson字符串为JSON对象 const resultJson = JSON.parse(response.data.resultJson); // 提取第一个图片URL const imageUrl = resultJson.resultUrls[0]; // 返回结果 return { image_url: imageUrl, task_id: response.data.taskId, status: "completed" };节点6:根据天气生成温馨提醒
// 获取明日天气数据(daily数组中的第二个元素) const tomorrow = $('晚8查询明日天气').first().json.daily[0]; // 初始化提示数组 const tips = []; // 1. 降雨概率提示 if (parseFloat(tomorrow.precip) > 30) { tips.push(`🌧️ 降雨概率${tomorrow.precip}%,建议携带雨伞`); } else if (parseFloat(tomorrow.precip) > 10) { tips.push(`🌦️ 有${tomorrow.precip}%的降雨可能,可备折叠伞`); } // 2. 风力提示 const windLevel = parseInt(tomorrow.windSpeedDay); if (windLevel >= 4) { tips.push(`💨 风力较大(${tomorrow.windScaleDay}级),建议做好防风准备`); } else if (windLevel >= 3) { tips.push(`🍃 有${tomorrow.windScaleDay}级风,注意防风保暖`); } // 3. 温差提示 const tempDiff = parseInt(tomorrow.tempMax) - parseInt(tomorrow.tempMin); if (tempDiff >= 10) { tips.push(`🌡️ 昼夜温差大(${tempDiff}°C),注意增减衣物`); } else if (tempDiff >= 7) { tips.push(`🌓 温差${tempDiff}°C,建议采用分层穿搭`); } // 4. 紫外线提示 const uvIndex = parseInt(tomorrow.uvIndex); if (uvIndex >= 5) { tips.push(`☀️ 紫外线较强(指数${uvIndex}),建议做好防晒`); } else if (uvIndex >= 3) { tips.push(`⛱️ 紫外线指数${uvIndex},外出可戴帽子`); } // 5. 低温提示 if (parseInt(tomorrow.tempMin) <= 0) { tips.push(`❄️ 最低气温${tomorrow.tempMin}°C,注意防寒保暖`); } else if (parseInt(tomorrow.tempMin) <= 5) { tips.push(`🧣 清晨低温${tomorrow.tempMin}°C,建议佩戴围巾`); } // 6. 空气质量提示(根据天气状况推断) if (tomorrow.textDay.includes("霾") || tomorrow.textDay.includes("雾")) { tips.push(`😷 空气质量可能不佳,建议佩戴口罩`); } // 如果没有特殊提示,添加默认温馨提醒 if (tips.length === 0) { tips.push("🌤️ 天气平稳,注意根据体感调整衣物"); } // 返回格式化提示 return { weatherTips: tips.join("\n") };节点7:数据整合(CODE)
// 获取输入数据 const dressingAdvice = $('根据天气情况提出穿搭建议').first().json.text; const weatherTips = $input.first().json.weatherTips; const imageUrl = $('获取图片链接').first().json.image_url; // 新增图片URL变量 // 解析穿搭建议文本 const parseDressingAdvice = (text) => { const result = { weatherSummary: '', dressingItems: {}, dressingTip: '' }; // 按行分割文本 const lines = text.split('\n').filter(line => line.trim() !== ''); // 提取天气概况 for (let i = 0; i < lines.length; i++) { if (lines[i].includes('明日天气概况')) { // 找到天气概况行,取下一行作为实际内容 if (i + 1 < lines.length) { result.weatherSummary = lines[i + 1].trim(); break; } } } // 提取穿搭清单和提示 lines.forEach(line => { const trimmedLine = line.trim(); if (trimmedLine.includes('外套') && trimmedLine.includes(':')) { result.dressingItems.外套 = trimmedLine.split(':')[1].trim(); } else if (trimmedLine.includes('上衣') && trimmedLine.includes(':')) { result.dressingItems.上衣 = trimmedLine.split(':')[1].trim(); } else if (trimmedLine.includes('下装') && trimmedLine.includes(':')) { result.dressingItems.下装 = trimmedLine.split(':')[1].trim(); } else if (trimmedLine.includes('鞋子') && trimmedLine.includes(':')) { result.dressingItems.鞋子 = trimmedLine.split(':')[1].trim(); } else if (trimmedLine.includes('配饰') && trimmedLine.includes(':')) { result.dressingItems.配饰 = trimmedLine.split(':')[1].trim(); } else if (trimmedLine.includes('提示:')) { result.dressingTip = trimmedLine.replace('提示:', '').trim(); } }); return result; }; const dressingData = parseDressingAdvice(dressingAdvice); // 解析天气提示 const parseWeatherTips = (tipsText) => { if (!tipsText) return []; return tipsText.split('\n').filter(tip => tip.trim() !== ''); }; const weatherTipsList = parseWeatherTips(weatherTips); // 生成HTML内容 const htmlContent = ` <!DOCTYPE html> <html lang="zh-CN"> <head> <meta charset="UTF-8"> <meta name="viewport" content="width=device-width, initial-scale=1.0"> <title>明日通勤指南</title> <style> * { margin: 0; padding: 0; box-sizing: border-box; } body { font-family: -apple-system, BlinkMacSystemFont, "Segoe UI", Roboto, "PingFang SC", "Hiragino Sans GB", "Microsoft YaHei", sans-serif; line-height: 1.6; color: #333; background: #f5f5f5; min-height: 100vh; padding: 20px; } .container { max-width: 600px; margin: 0 auto; } .card { background: white; border-radius: 12px; box-shadow: 0 4px 12px rgba(0, 0, 0, 0.1); overflow: hidden; } .header { background: linear-gradient(135deg, #4a69bd 0%, #6a89cc 100%); color: white; padding: 25px 20px; text-align: center; } .header h1 { font-size: 24px; font-weight: 600; margin-bottom: 5px; } .header .date { opacity: 0.9; font-size: 14px; } .content { padding: 25px; } .section { margin-bottom: 25px; } .section:last-child { margin-bottom: 0; } .section-title { display: flex; align-items: center; font-size: 18px; font-weight: 600; margin-bottom: 15px; color: #4a69bd; } .section-title .icon { margin-right: 10px; font-size: 20px; } .weather-summary { background: #f8f9fa; padding: 15px; border-radius: 8px; font-size: 15px; line-height: 1.5; } .dressing-list { margin-bottom: 15px; } .dressing-item { display: flex; margin-bottom: 10px; padding-bottom: 10px; border-bottom: 1px solid #f0f0f0; } .dressing-item:last-child { border-bottom: none; } .dressing-label { font-weight: 600; width: 80px; color: #555; } .dressing-value { color: #333; flex: 1; } /* 新增图片展示区域 */ .outfit-image-container { margin: 20px 0; text-align: center; } .outfit-image { max-width: 100%; border-radius: 8px; box-shadow: 0 4px 12px rgba(0, 0, 0, 0.1); border: 1px solid #eee; } .image-caption { margin-top: 8px; font-size: 14px; color: #666; font-style: italic; } .tip-box { background: #e3f2fd; border-left: 4px solid #2196f3; padding: 12px 15px; border-radius: 6px; font-size: 14px; margin-top: 15px; } .weather-tips { display: flex; flex-direction: column; gap: 10px; } .weather-tip-item { display: flex; align-items: center; padding: 10px 15px; background: #fff8e1; border-radius: 6px; border-left: 4px solid #ffd54f; } .weather-tip-icon { margin-right: 10px; font-size: 18px; } .footer { text-align: center; padding: 15px; color: #888; font-size: 12px; border-top: 1px solid #eee; } @media (max-width: 480px) { body { padding: 10px; } .content { padding: 20px; } .dressing-label { width: 70px; } } </style> </head> <body> <div class="container"> <div class="card"> <div class="header"> <h1>明日通勤指南</h1> <div class="date">${new Date().toLocaleDateString('zh-CN', { year: 'numeric', month: 'long', day: 'numeric', weekday: 'long' })}</div> </div> <div class="content"> <!-- 天气概况 --> <div class="section"> <div class="section-title"> <span class="icon">🌤️</span> 天气概况 </div> <div class="weather-summary"> ${dressingData.weatherSummary || '暂无天气数据'} </div> </div> <!-- 穿搭建议 --> <div class="section"> <div class="section-title"> <span class="icon">👗</span> 穿搭建议 </div> <div class="dressing-list"> ${Object.entries(dressingData.dressingItems).map(([key, value]) => `<div class="dressing-item"> <div class="dressing-label">${key}:</div> <div class="dressing-value">${value}</div> </div>` ).join('')} </div> <!-- 新增图片展示区域 --> ${imageUrl ? ` <div class="outfit-image-container"> <img src="${imageUrl}" alt="穿搭效果图" class="outfit-image"> <div class="image-caption">AI生成的穿搭效果参考图</div> </div> ` : ''} ${dressingData.dressingTip ? ` <div class="tip-box"> 💡 ${dressingData.dressingTip} </div> ` : ''} </div> <!-- 温馨提示 --> ${weatherTipsList.length > 0 ? ` <div class="section"> <div class="section-title"> <span class="icon">💡</span> 温馨提示 </div> <div class="weather-tips"> ${weatherTipsList.map(tip => `<div class="weather-tip-item"> <span class="weather-tip-icon">${tip.substring(0, 2)}</span> <span>${tip.substring(2)}</span> </div>` ).join('')} </div> </div> ` : ''} </div> <div class="footer"> 数据来自和风天气API • 更新于 ${new Date().toLocaleString('zh-CN')} </div> </div> </div> </body> </html> `; // 返回HTML内容 return { htmlContent: htmlContent };节点8:推送到微信(HTTP Request)
-
功能: 将合并后生成的消息内容发送到微信服务号。
-
配置:
Content-Type: application/json
Request Method: GET
URL: http://www.pushplus.plus/send
Headers:
Content-Type:application/json
Body Type: JSON
填写token(你申请的token)、title(🌤️ 北京明日天气&穿搭建议)、content(值为{{ $json.htmlContent }})、template(值为html)
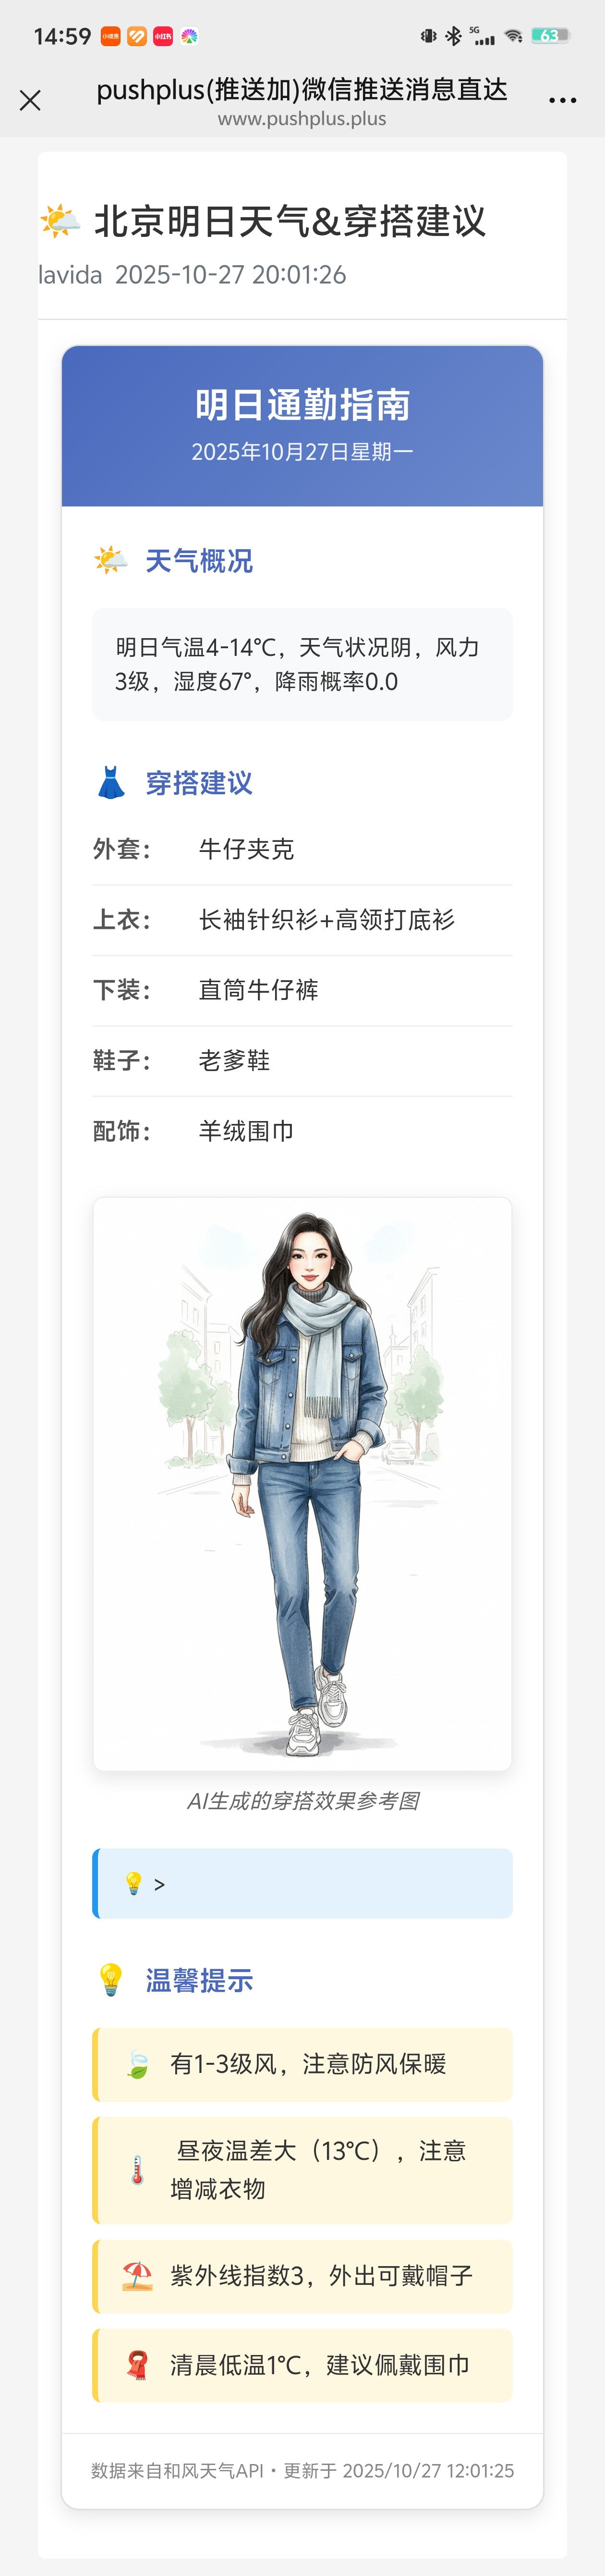
效果示意
当工作流运行时,你的微信将会收到一条类似以下格式的消息:
注意事项
-
API密钥安全: 各种API Key是你的私人凭证。在生产环境中,强烈建议使用N8N的credentials来存储它们,而不是直接写在节点配置里。
-
API调用限制: 免费的天气API通常有每日调用次数限制。我们的工作流每天只调用一次,完全在免费额度内。
-
数据解析: 以上案例中所有的代码都是AI帮我写的,我使用的是元宝(选择deepseek模型),只要描述好你的需求,很轻松即可完成。如果有bug就发报错信息让AI给你修改。
-
时区问题: 确保你的N8N服务器或云服务的时区设置正确,以免Cron触发器在错误的时间执行。
扩展思路
-
增加多城市支持: 扩展到多个城市列表,关注家人朋友所在地的天气。
-
加入生活指数/空气质量指数: 调用天气API的“生活指数”接口,加入紫外线、穿衣、运动、花粉过敏指数等建议。还可增加空气质量指数建议。
希望这个详细的案例能帮助你更好地掌握N8N,并再次体验到创造自动化工具的乐趣^_^
获取教程JSON模板
-
📦 N8N工作流JSON文件
请关注同名公众号并发送私信“天气穿搭”,获取完整的配置文档(自动发送百度网盘链接)。

有“AI”的1024 = 2048,欢迎大家加入2048 AI社区
更多推荐

 43
43 0
0- 0


 已为社区贡献4条内容

所有评论(0)