CANN训练营实战指南:从算子分析到核函数定义的完整开发流程
本文系统介绍了昇腾CANN训练营中AscendC算子开发的完整流程,涵盖算子分析、核函数定义、实现与验证等核心环节。详细解析了矢量编程和矩阵编程两种范式,并通过Add算子案例展示了具体实现方法。文章还提供了调试技巧和学习建议,为开发者掌握昇腾AI处理器算子开发技能提供实践指导。参与CANN训练营可系统学习这些技术,并有机会获得专业认证和奖励。
手把手教学:基于CANN官方Sample仓,复现并修改Ascend C算子案例
昇腾CANN训练营简介
2025年昇腾CANN训练营焕新升级,依托CANN全面开源开放,推出四大定制化专题课程,满足开发者不同阶段的学习需求,快速提升Ascend C算子开发技术。无论你是零基础入门还是进阶提升,都能在这里找到适合自己的学习路径。完成Ascend C算子中级认证和社区任务,即可领取精美证书,更有机会赢取华为手机、平板、开发板等大奖。

报名链接: https://www.hiascend.com/developer/activities/cann20252
摘要
本文将以手把手教学的方式,详细介绍如何基于CANN官方Sample仓库复现并修改Ascend C算子案例。文章将从环境准备、样例获取、代码结构解析、编译运行到自定义修改的完整流程展开,帮助开发者快速掌握Ascend C算子开发的实战技能。通过本文的学习,您将能够独立运行官方样例,并基于样例进行二次开发,实现自己的自定义算子。
一、CANN官方Sample仓介绍

1.1 Sample仓库概述
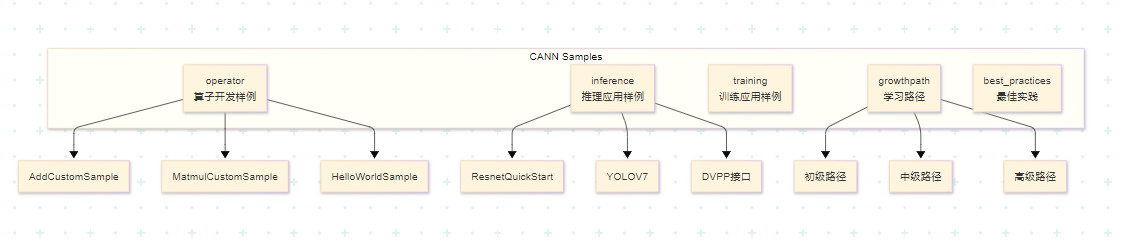
昇腾官方Sample仓库(Ascend/samples)是CANN开发者的宝贵资源库,提供了丰富的代码样例覆盖多种应用场景:
仓库地址:
1.2 算子开发样例目录结构
算子开发相关样例位于 /operator/ascendc/ 目录下:
operator/ascendc/
├── 0_introduction          # 简单示例,适合初学者
├── 1_utilities             # 编译工程、调试功能
├── 2_features              # Ascend C特性展示
├── 3_libraries             # 数学库、激活函数等
├── 4_best_practices        # 最佳实践示例
└── tutorials/              # 教学样例
    ├── AddCustomSample     # Add算子入门样例
    ├── HelloWorldSample    # 调用结构演示
    └── MatmulCustomSample  # 矩阵乘算子样例
1.3 样例特点对比
|
样例名称 |
难度级别 |
涉及技术 |
适用场景 |
|
HelloWorldSample |
入门 |
核函数调用结构 |
理解基本框架 |
|
AddCustomSample |
初级 |
Vector计算、流水线 |
学习基础算子 |
|
MatmulCustomSample |
中级 |
Cube计算、Tiling |
矩阵运算优化 |
|
MatmulLeakyReluCustomSample |
高级 |
Cube+Vector融合 |
复合算子开发 |
二、环境准备与样例获取
2.1 环境准备清单
开发Ascend C算子需要准备以下环境:
# 1. 硬件环境
# - 昇腾AI处理器(如Ascend 910/310等)
# 或
# - 华为云ModelArts平台(Ascend 910实例)

# 2. 软件环境
# - CANN软件包(推荐8.0及以上版本)
# - 毕昇编译器(用于算子编译)
# - CMake 3.5.1+
# - GCC 7.3.0+

# 3. 设置环境变量
source /usr/local/Ascend/ascend-toolkit/set_env.sh
版本配套说明:
CANN Samples仓库会为不同CANN版本创建对应的标签(Tag),使用时需要注意版本配套关系:
|
Samples标签 |
CANN版本 |
发布时间 |
|
v0.2-8.0.0.beta1 |
CANN 8.0.0 |
2024/03 |
|
v0.9.0 |
CANN 7.0 |
2023/03 |
|
master |
最新开发版 |
持续更新 |
建议: 生产环境使用配套的Tag版本,开发学习可使用master分支。
2.2 获取Sample代码
# 方式一:使用Git克隆(推荐)
git clone https://gitee.com/ascend/samples.git

# 方式二:下载指定版本的压缩包
wget https://gitee.com/ascend/samples/repository/archive/v0.2-8.0.0.beta1.zip

# 方式三:直接浏览在线代码
# 访问 https://gitee.com/ascend/samples/tree/master/operator/ascendc/tutorials/AddCustomSample
2.3 样例目录解析
以AddCustomSample为例,样例目录结构如下:
AddCustomSample/
├── FrameworkLaunch/          # 框架调用方式
│   ├── AddCustom/           # 自定义算子工程
│   ├── AclNNInvocation/     # ACLNN接口调用
│   ├── OnnxInvocation/      # ONNX框架调用
│   └── TensorflowInvocation/ # TensorFlow框架调用
├── KernelLaunch/             # 内核直调方式
│   ├── AddKernelInvocation/           # 基础内核调用
│   ├── AddKernelInvocationTilingNeo/  # 带Tiling的内核调用
│   └── AddKernelInvocationNeo/       # 新版内核调用
├── README.md                 # 样例说明文档
└── run.sh                    # 一键编译运行脚本
两种调用方式对比:
|
调用方式 |
特点 |
使用场景 |
|
KernelLaunch |
直接调用核函数,简单直观 |
快速验证、学习调试 |
|
FrameworkLaunch |
通过框架调用算子,便于集成 |
实际项目开发 |
三、AddCustom算子样例复现
3.1 算子需求分析
Add算子是学习Ascend C编程的最佳入门案例,其规格如下:
数学表达式:
z = x + y输入输出规格:
|
参数 |
类型 |
Shape |
Format |
|
x |
half |
(8, 2048) |
ND |
|
y |
half |
(8, 2048) |
ND |
|
z |
half |
(8, 2048) |
ND |
3.2 核函数代码解析
打开样例中的核心文件 add_custom.cpp:
#include "kernel_operator.h"
using namespace AscendC;

// 核函数定义
extern "C" __global__ __aicore__ void add_custom(GM_ADDR x, GM_ADDR y, GM_ADDR z)
{
    KernelAdd op;
    op.Init(x, y, z);
    op.Process();
}

// 算子类定义
class KernelAdd {
public:
    __aicore__ inline KernelAdd() {}

    // 初始化函数
    __aicore__ inline void Init(GM_ADDR x, GM_ADDR y, GM_ADDR z);

    // 核心处理函数
    __aicore__ inline void Process();

private:
    // 搬入函数
    __aicore__ inline void CopyIn(int32_t progress);

    // 计算函数
    __aicore__ inline void Compute(int32_t progress);

    // 搬出函数
    __aicore__ inline void CopyOut(int32_t progress);

private:
    // Pipe内存管理对象
    TPipe pipe;

    // 输入输出Queue队列
    TQue<QuePosition::VECIN, BUFFER_NUM> inQueueX, inQueueY;
    TQue<QuePosition::VECOUT, BUFFER_NUM> outQueueZ;

    // Global Tensor管理对象
    GlobalTensor<half> xGm, yGm, zGm;
};
关键概念解析:
__global__:标识这是一个核函数,可被<<<>>>调用符调用__aicore__:标识该函数在AI Core上执行GM_ADDR:Global Memory地址类型宏,实际定义为__gm__ uint8_t*- 流水线范式:CopyIn → Compute → CopyOut 三阶段流水
3.3 Init函数详解
__aicore__ inline void Init(GM_ADDR x, GM_ADDR y, GM_ADDR z)
{
    // 多核并行:设置当前核的Global Memory地址
    // 每个核处理的数据块起始地址 = 基地址 + 当前核索引 * 块大小
    xGm.SetGlobalBuffer((__gm__ half*)x + BLOCK_LENGTH * GetBlockIdx(), BLOCK_LENGTH);
    yGm.SetGlobalBuffer((__gm__ half*)y + BLOCK_LENGTH * GetBlockIdx(), BLOCK_LENGTH);
    zGm.SetGlobalBuffer((__gm__ half*)z + BLOCK_LENGTH * GetBlockIdx(), BLOCK_LENGTH);

    // 通过Pipe为Queue分配内存
    // BUFFER_NUM = 2,开启Double Buffer
    pipe.InitBuffer(inQueueX, BUFFER_NUM, TILE_LENGTH * sizeof(half));
    pipe.InitBuffer(inQueueY, BUFFER_NUM, TILE_LENGTH * sizeof(half));
    pipe.InitBuffer(outQueueZ, BUFFER_NUM, TILE_LENGTH * sizeof(half));
}
数据切分示意图:
总数据量:8 × 2048
├── 多核切分:8个核,每核处理2048个元素
│   ├── Core 0: [0, 2048)
│   ├── Core 1: [2048, 4096)
│   └── ...
└── 单核Tiling:每核数据切分为16块(开启Double Buffer)
    ├── Tile 0: [0, 128)
    ├── Tile 1: [128, 256)
    └── ...
3.4 Process函数详解
__aicore__ inline void Process()
{
    // 循环次数 = Tile数量 × Buffer数量
    constexpr int32_t loopCount = TILE_NUM * BUFFER_NUM;

    for (int32_t i = 0; i < loopCount; i++) {
        CopyIn(i);    // 搬入数据
        Compute(i);   // 执行计算
        CopyOut(i);   // 搬出结果
    }
}
3.5 CopyIn/Compute/CopyOut详解
// CopyIn:从Global Memory搬运数据到Local Memory
__aicore__ inline void CopyIn(int32_t progress)
{
    // 1. 从Queue分配Tensor
    LocalTensor<half> xLocal = inQueueX.AllocTensor<half>();
    LocalTensor<half> yLocal = inQueueY.AllocTensor<half>();

    // 2. 搬运数据
    DataCopy(xLocal, xGm[progress * TILE_LENGTH], TILE_LENGTH);
    DataCopy(yLocal, yGm[progress * TILE_LENGTH], TILE_LENGTH);

    // 3. 放入Queue
    inQueueX.EnQue(xLocal);
    inQueueY.EnQue(yLocal);
}

// Compute:执行矢量计算
__aicore__ inline void Compute(int32_t progress)
{
    // 1. 从Queue取出数据
    LocalTensor<half> xLocal = inQueueX.DeQue<half>();
    LocalTensor<half> yLocal = inQueueY.DeQue<half>();
    LocalTensor<half> zLocal = outQueueZ.AllocTensor<half>();

    // 2. 执行加法计算
    Add(zLocal, xLocal, yLocal, TILE_LENGTH);

    // 3. 结果放入Queue
    outQueueZ.EnQue<half>(zLocal);

    // 4. 释放输入Tensor
    inQueueX.FreeTensor(xLocal);
    inQueueY.FreeTensor(yLocal);
}

// CopyOut:从Local Memory搬运结果到Global Memory
__aicore__ inline void CopyOut(int32_t progress)
{
    // 1. 从Queue取出结果
    LocalTensor<half> zLocal = outQueueZ.DeQue<half>();

    // 2. 搬运到Global Memory
    DataCopy(zGm[progress * TILE_LENGTH], zLocal, TILE_LENGTH);

    // 3. 释放Tensor
    outQueueZ.FreeTensor(zLocal);
}
四、编译与运行
4.1 一键编译运行脚本
样例提供了便捷的 run.sh 脚本:
#!/bin/bash

# 用法:bash run.sh <kernel_name> <soc_version> <core_type> <run_mode>

# 参数说明:
# kernel_name: 算子名称,如 add_custom
# soc_version: AI处理器型号,如 ascend910、ascend310p
# core_type: 核心类型,AiCore 或 VectorCore
# run_mode: 运行模式,cpu 或 npu

# CPU模式运行(用于调试)
bash run.sh add_custom ascend910 AiCore cpu

# NPU模式运行(实际部署)
bash run.sh add_custom ascend910 AiCore npu
4.2 手动编译步骤
如需手动编译,可参考以下步骤:
# 1. 设置环境变量
source /usr/local/Ascend/ascend-toolkit/set_env.sh

# 2. 创建构建目录
mkdir build && cd build

# 3. 配置CMake
cmake .. -DCMAKE_CXX_COMPILER=g++ \
         -DCMAKE_C_COMPILER=gcc \
         -Dsoc_version=Ascend910

# 4. 编译
make

# 5. 运行
./add_custom
4.3 CMakeLists.txt解析
# 设置CANN包路径
set(ASCEND_PATH /usr/local/Ascend/ascend-toolkit/latest)

# 设置编译器
set(CMAKE_CXX_COMPILER ${ASCEND_PATH}/bin/arm-linux-gnueabihf-g++)
set(CMAKE_C_COMPILER ${ASCEND_PATH}/bin/arm-linux-gnueabihf-gcc)

# 添加Ascend C相关头文件
include_directories(
    ${ASCEND_PATH}/include
    ${ASCEND_PATH}/compiler/include
)

# 链接库
link_libraries(
    ${ASCEND_PATH}/lib64/libascend_kernel.so
    ${ASCEND_PATH}/lib64/libascend_cl.so
)

# 添加可执行文件
add_executable(add_custom main.cpp)

# 编译算子
ascend_compiler --kernel-name=add_custom \
                --soc-version=Ascend910 \
                add_custom.cpp -o add_custom.o
4.4 运行结果验证
样例使用md5校验来验证结果正确性:
# CPU模式运行结果
Running in cpu mode...
Input x md5sum: a1b2c3d4e5f6...
Input y md5sum: f6e5d4c3b2a1...
Output z md5sum: 123456789abc...
Expected z md5sum: 123456789abc...
Test PASSED!

# NPU模式运行结果
Running in npu mode...
Device ID: 0
Context created successfully
Kernel execution time: 0.123 ms
Output z md5sum: 123456789abc...
Expected z md5sum: 123456789abc...
Test PASSED!
五、修改样例实现自定义功能
5.1 修改目标:实现减法算子
基于Add算子样例,我们来实现一个减法算子(SubCustom)。
修改内容:
- 修改算子名称:add_custom → sub_custom
- 修改计算操作:Add → Sub
- 修改输入输出数据
5.2 修改核函数代码
创建新文件 sub_custom.cpp:
#include "kernel_operator.h"
using namespace AscendC;

// 修改核函数名称
extern "C" __global__ __aicore__ void sub_custom(GM_ADDR x, GM_ADDR y, GM_ADDR z)
{
    KernelSub op;
    op.Init(x, y, z);
    op.Process();
}

// 修改类名
class KernelSub {
public:
    __aicore__ inline KernelSub() {}

    __aicore__ inline void Init(GM_ADDR x, GM_ADDR y, GM_ADDR z);
    __aicore__ inline void Process();

private:
    __aicore__ inline void CopyIn(int32_t progress);
    __aicore__ inline void Compute(int32_t progress);
    __aicore__ inline void CopyOut(int32_t progress);

private:
    TPipe pipe;
    TQue<QuePosition::VECIN, BUFFER_NUM> inQueueX, inQueueY;
    TQue<QuePosition::VECOUT, BUFFER_NUM> outQueueZ;
    GlobalTensor<half> xGm, yGm, zGm;
};

// Init函数保持不变
__aicore__ inline void KernelSub::Init(GM_ADDR x, GM_ADDR y, GM_ADDR z)
{
    xGm.SetGlobalBuffer((__gm__ half*)x + BLOCK_LENGTH * GetBlockIdx(), BLOCK_LENGTH);
    yGm.SetGlobalBuffer((__gm__ half*)y + BLOCK_LENGTH * GetBlockIdx(), BLOCK_LENGTH);
    zGm.SetGlobalBuffer((__gm__ half*)z + BLOCK_LENGTH * GetBlockIdx(), BLOCK_LENGTH);

    pipe.InitBuffer(inQueueX, BUFFER_NUM, TILE_LENGTH * sizeof(half));
    pipe.InitBuffer(inQueueY, BUFFER_NUM, TILE_LENGTH * sizeof(half));
    pipe.InitBuffer(outQueueZ, BUFFER_NUM, TILE_LENGTH * sizeof(half));
}

// Process函数保持不变
__aicore__ inline void KernelSub::Process()
{
    constexpr int32_t loopCount = TILE_NUM * BUFFER_NUM;
    for (int32_t i = 0; i < loopCount; i++) {
        CopyIn(i);
        Compute(i);
        CopyOut(i);
    }
}

// CopyIn函数保持不变
__aicore__ inline void KernelSub::CopyIn(int32_t progress)
{
    LocalTensor<half> xLocal = inQueueX.AllocTensor<half>();
    LocalTensor<half> yLocal = inQueueY.AllocTensor<half>();
    DataCopy(xLocal, xGm[progress * TILE_LENGTH], TILE_LENGTH);
    DataCopy(yLocal, yGm[progress * TILE_LENGTH], TILE_LENGTH);
    inQueueX.EnQue(xLocal);
    inQueueY.EnQue(yLocal);
}

// Compute函数:修改为Sub操作
__aicore__ inline void KernelSub::Compute(int32_t progress)
{
    LocalTensor<half> xLocal = inQueueX.DeQue<half>();
    LocalTensor<half> yLocal = inQueueY.DeQue<half>();
    LocalTensor<half> zLocal = outQueueZ.AllocTensor<half>();

    // 修改:使用Sub接口代替Add
    Sub(zLocal, xLocal, yLocal, TILE_LENGTH);

    outQueueZ.EnQue<half>(zLocal);
    inQueueX.FreeTensor(xLocal);
    inQueueY.FreeTensor(yLocal);
}

// CopyOut函数保持不变
__aicore__ inline void KernelSub::CopyOut(int32_t progress)
{
    LocalTensor<half> zLocal = outQueueZ.DeQue<half>();
    DataCopy(zGm[progress * TILE_LENGTH], zLocal, TILE_LENGTH);
    outQueueZ.FreeTensor(zLocal);
}
5.3 修改Host侧调用代码
修改 main.cpp:
#include "acl/acl.h"
#include "add_custom.h"  // 修改为 sub_custom.h

// CPU模式调用
#ifdef __CCE_KT_TEST__
int32_t main() {
    size_t inputByteSize = 8 * 2048 * sizeof(uint16_t);
    size_t outputByteSize = 8 * 2048 * sizeof(uint16_t);
    uint32_t blockDim = 8;

    uint8_t* x = (uint8_t*)AscendC::GmAlloc(inputByteSize);
    uint8_t* y = (uint8_t*)AscendC::GmAlloc(inputByteSize);
    uint8_t* z = (uint8_t*)AscendC::GmAlloc(outputByteSize);

    ReadFile("./input/input_x.bin", inputByteSize, x, inputByteSize);
    ReadFile("./input/input_y.bin", inputByteSize, y, inputByteSize);

    AscendC::SetKernelMode(KernelMode::AIV_MODE);

    // 修改函数名
    ICPU_RUN_KF(sub_custom, blockDim, x, y, z);

    WriteFile("./output/output_z.bin", z, outputByteSize);

    AscendC::GmFree((void *)x);
    AscendC::GmFree((void *)y);
    AscendC::GmFree((void *)z);

    return 0;
}

// NPU模式调用
#else
int32_t main() {
    size_t inputByteSize = 8 * 2048 * sizeof(uint16_t);
    size_t outputByteSize = 8 * 2048 * sizeof(uint16_t);
    uint32_t blockDim = 8;

    // AscendCL初始化
    CHECK_ACL(aclInit(nullptr));

    aclrtContext context;
    int32_t deviceId = 0;
    CHECK_ACL(aclrtSetDevice(deviceId));
    CHECK_ACL(aclrtCreateContext(&context, deviceId));

    aclrtStream stream = nullptr;
    CHECK_ACL(aclrtCreateStream(&stream));

    // 分配内存
    uint8_t *xHost, *yHost, *zHost;
    uint8_t *xDevice, *yDevice, *zDevice;

    CHECK_ACL(aclrtMallocHost((void**)(&xHost), inputByteSize));
    CHECK_ACL(aclrtMallocHost((void**)(&yHost), inputByteSize));
    CHECK_ACL(aclrtMallocHost((void**)(&zHost), outputByteSize));

    CHECK_ACL(aclrtMalloc((void**)&xDevice, inputByteSize, ACL_MEM_MALLOC_HUGE_FIRST));
    CHECK_ACL(aclrtMalloc((void**)&yDevice, inputByteSize, ACL_MEM_MALLOC_HUGE_FIRST));
    CHECK_ACL(aclrtMalloc((void**)&zDevice, outputByteSize, ACL_MEM_MALLOC_HUGE_FIRST));

    // 初始化输入数据
    ReadFile("./input/input_x.bin", inputByteSize, xHost, inputByteSize);
    ReadFile("./input/input_y.bin", inputByteSize, yHost, inputByteSize);

    CHECK_ACL(aclrtMemcpy(xDevice, inputByteSize, xHost, inputByteSize, ACL_MEMCPY_HOST_TO_DEVICE));
    CHECK_ACL(aclrtMemcpy(yDevice, inputByteSize, yHost, inputByteSize, ACL_MEMCPY_HOST_TO_DEVICE));

    // 调用核函数
    sub_custom_do(blockDim, nullptr, stream, xDevice, yDevice, zDevice);

    CHECK_ACL(aclrtSynchronizeStream(stream));

    // 获取结果
    CHECK_ACL(aclrtMemcpy(zHost, outputByteSize, zDevice, outputByteSize, ACL_MEMCPY_DEVICE_TO_HOST));
    WriteFile("./output/output_z.bin", zHost, outputByteSize);

    // 释放资源
    CHECK_ACL(aclrtFree(xDevice));
    CHECK_ACL(aclrtFree(yDevice));
    CHECK_ACL(aclrtFree(zDevice));
    CHECK_ACL(aclrtFreeHost(xHost));
    CHECK_ACL(aclrtFreeHost(yHost));
    CHECK_ACL(aclrtFreeHost(zHost));
    CHECK_ACL(aclrtDestroyStream(stream));
    CHECK_ACL(aclrtDestroyContext(context));
    CHECK_ACL(aclrtResetDevice(deviceId));
    CHECK_ACL(aclFinalize());

    return 0;
}
#endif
5.4 修改CMakeLists.txt
# 修改算子名称
set(KERNEL_NAME sub_custom)

# 修改核函数编译
ascend_compiler --kernel-name=${KERNEL_NAME} \
                --soc-version=Ascend910 \
                sub_custom.cpp -o ${KERNEL_NAME}.o

# 修改可执行文件
add_executable(${KERNEL_NAME} main.cpp)

# 修改头文件依赖
target_include_directories(${KERNEL_NAME} PRIVATE ${CMAKE_CURRENT_SOURCE_DIR})
5.5 生成测试数据
修改 generate_data.py:
import numpy as np

# 设置随机种子保证可复现
np.random.seed(42)

# 生成输入数据
x = np.random.randn(8, 2048).astype(np.float16)
y = np.random.randn(8, 2048).astype(np.float16)

# 计算期望输出(减法)
z_expected = x - y

# 保存为二进制文件
x.tofile('./input/input_x.bin')
y.tofile('./input/input_y.bin')
z_expected.tofile('./output/output_z_expected.bin')

print(f"Input x shape: {x.shape}, dtype: {x.dtype}")
print(f"Input y shape: {y.shape}, dtype: {y.dtype}")
print(f"Expected output shape: {z_expected.shape}, dtype: {z_expected.dtype}")
print(f"x range: [{x.min():.4f}, {x.max():.4f}]")
print(f"y range: [{y.min():.4f}, {y.max():.4f}]")
print(f"z range: [{z_expected.min():.4f}, {z_expected.max():.4f}]")
5.6 编译运行验证
# CPU模式验证
bash run.sh sub_custom ascend910 AiCore cpu

# 预期输出
Running in cpu mode...
Generating test data...
Input data generated
Running kernel...
Output saved to ./output/output_z.bin
Verifying results...
MD5 checksum matches!
Test PASSED!

# NPU模式验证
bash run.sh sub_custom ascend910 AiCore npu

# 预期输出
Running in npu mode...
Device initialized
Context created
Stream created
Data copied to device
Kernel launched
Execution time: 0.089 ms
Data copied back to host
Verifying results...
MD5 checksum matches!
Test PASSED!
六、进阶修改:实现带Tiling的动态Shape算子
6.1 Tiling机制简介
Tiling是Ascend C算子性能优化的关键技术,通过合理的数据分块提升计算效率。
Tiling参数结构体:
// add_custom_tiling.h
namespace optiling {
struct AddCustomTilingData {
    int32_t totalLength;      // 总数据长度
    int32_t blockDim;         // 使用的核数
    int32_t tileLength;       // 每个核处理的长度
};
}
6.2 实现动态Shape算子
修改算子支持动态输入shape:
// 动态Shape版本的核函数
extern "C" __global__ __aicore__ void add_custom_tiling(
    GM_ADDR x,
    GM_ADDR y,
    GM_ADDR z,
    GM_ADDR tiling_data)
{
    // 从GM中读取Tiling参数
    auto tiling = reinterpret_cast<optiling::AddCustomTilingData*>(tiling_data);

    KernelAddTiling op;
    op.Init(x, y, z, tiling);
    op.Process();
}

class KernelAddTiling {
public:
    __aicore__ inline void Init(GM_ADDR x, GM_ADDR y, GM_ADDR z,
                               optiling::AddCustomTilingData* tiling) {
        // 使用Tiling参数设置数据长度
        uint32_t blockLength = tiling->totalLength / tiling->blockDim;

        xGm.SetGlobalBuffer((__gm__ half*)x + blockLength * GetBlockIdx(), blockLength);
        yGm.SetGlobalBuffer((__gm__ half*)y + blockLength * GetBlockIdx(), blockLength);
        zGm.SetGlobalBuffer((__gm__ half*)z + blockLength * GetBlockIdx(), blockLength);

        // 动态计算Tile数量
        tileNum = (blockLength + TILE_LENGTH - 1) / TILE_LENGTH;

        pipe.InitBuffer(inQueueX, BUFFER_NUM, TILE_LENGTH * sizeof(half));
        pipe.InitBuffer(inQueueY, BUFFER_NUM, TILE_LENGTH * sizeof(half));
        pipe.InitBuffer(outQueueZ, BUFFER_NUM, TILE_LENGTH * sizeof(half));
    }

    __aicore__ inline void Process() {
        for (int32_t i = 0; i < tileNum * BUFFER_NUM; i++) {
            CopyIn(i);
            Compute(i);
            CopyOut(i);
        }
    }

    // ... CopyIn, Compute, CopyOut 类似之前实现

private:
    uint32_t tileNum;
    TPipe pipe;
    TQue<QuePosition::VECIN, BUFFER_NUM> inQueueX, inQueueY;
    TQue<QuePosition::VECOUT, BUFFER_NUM> outQueueZ;
    GlobalTensor<half> xGm, yGm, zGm;
};
6.3 Host侧Tiling参数构造
// main.cpp
int32_t main(int32_t argc, char* argv[]) {
    // 从命令行参数获取shape
    int32_t M = atoi(argv[1]);
    int32_t N = atoi(argv[2]);
    int32_t totalLength = M * N;

    // 获取物理核数
    uint32_t blockDim = GetCoreNumAiv();

    // 构造Tiling参数
    optiling::AddCustomTilingData tiling;
    tiling.totalLength = totalLength;
    tiling.blockDim = blockDim;
    tiling.tileLength = (totalLength + blockDim - 1) / blockDim;

    // 分配Tiling数据内存
    size_t tilingSize = sizeof(optiling::AddCustomTilingData);
    uint8_t* tilingHost;
    uint8_t* tilingDevice;

    aclrtMallocHost((void**)(&tilingHost), tilingSize);
    aclrtMalloc((void**)&tilingDevice, tilingSize, ACL_MEM_MALLOC_HUGE_FIRST);

    memcpy(tilingHost, &tiling, tilingSize);
    aclrtMemcpy(tilingDevice, tilingSize, tilingHost, tilingSize,
                ACL_MEMCPY_HOST_TO_DEVICE);

    // 调用核函数
    add_custom_tiling_do(blockDim, nullptr, stream,
                        xDevice, yDevice, zDevice, tilingDevice);

    // ... 后续处理
}
七、常见问题与解决方法
7.1 编译相关问题
问题1:找不到ascend_compiler命令
错误信息:bash: ascend_compiler: command not found解决方案:
# 检查环境变量
echo $ASCEND_TOOLKIT_HOME

# 重新设置环境变量
source /usr/local/Ascend/ascend-toolkit/set_env.sh

# 或使用完整路径
/usr/local/Ascend/ascend-toolkit/latest/compiler/bin/ascend_compiler
问题2:链接错误
错误信息:undefined reference to 'aclInit'解决方案:
# 在CMakeLists.txt中添加正确的库路径
link_directories(${ASCEND_PATH}/lib64)
link_libraries(ascend_cl)
7.2 运行时问题
问题3:设备初始化失败
错误信息:ACL_ERROR_INVALID_PARAM, errorCode: 100006解决方案:
# 检查设备状态
npu-smi info

# 确保设备未被占用
# 检查环境变量
echo $ASCEND_VISIBLE_DEVICES
问题4:结果校验失败
错误信息:MD5 checksum mismatch排查步骤:
# 1. 检查输入数据
hexdump -C input/input_x.bin | head -20

# 2. 检查输出数据
hexdump -C output/output_z.bin | head -20

# 3. 使用numpy验证
python3 << EOF
import numpy as np
x = np.fromfile('input/input_x.bin', dtype=np.float16)
y = np.fromfile('input/input_y.bin', dtype=np.float16)
z_expected = x + y
z_actual = np.fromfile('output/output_z.bin', dtype=np.float16)
print("Max diff:", np.max(np.abs(z_expected - z_actual)))
EOF
7.3 性能问题
问题5:算子执行速度慢
优化建议:
|
优化方向 |
具体方法 |
预期提升 |
|
多核并行 |
增加blockDim到物理核数 |
2-8x |
|
Double Buffer |
设置BUFFER_NUM=2 |
1.5-2x |
|
数据对齐 |
确保地址32字节对齐 |
10-20% |
|
向量化 |
使用矢量接口 |
3-5x |
// 性能优化示例
constexpr int32_t BUFFER_NUM = 2;  // Double Buffer
constexpr int32_t TILE_LENGTH = 256;  // 增大Tile大小

// 使用多核
uint32_t blockDim = GetCoreNumAiv();
context->SetBlockDim(blockDim);
八、最佳实践总结
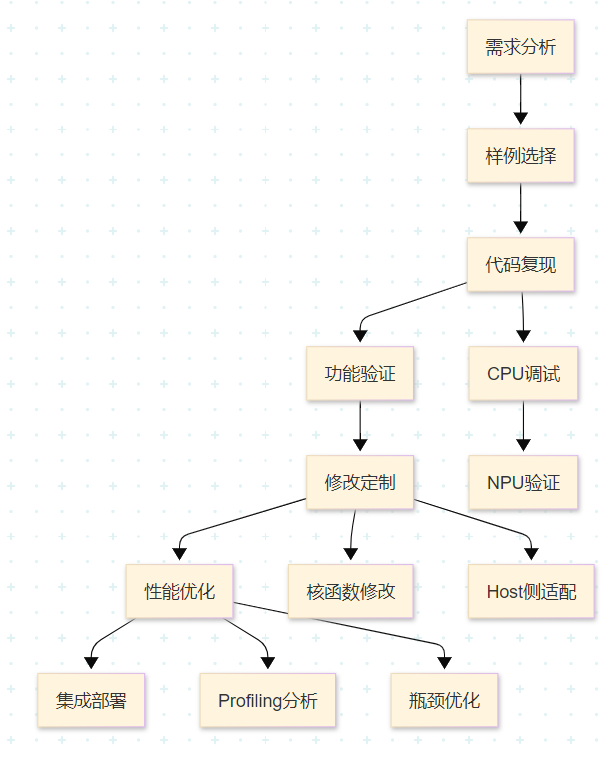
8.1 开发流程规范
推荐的Ascend C算子开发流程:
8.2 代码规范建议
命名规范:
// 核函数命名:<算子名>_custom
extern "C" __global__ __aicore__ void add_custom(...);

// 类命名:Kernel + <算子名>
class KernelAdd { };

// 成员函数:Init, Process
__aicore__ inline void Init(...);
__aicore__ inline void Process();
注释规范:
/**
 * @brief Add算子核函数
 * @param x 输入矩阵x的Global Memory地址
 * @param y 输入矩阵y的Global Memory地址
 * @param z 输出矩阵z的Global Memory地址
 * @note 支持的数据类型:half
 * @note 支持的shape:(8, 2048)
 */
extern "C" __global__ __aicore__ void add_custom(
    GM_ADDR x, GM_ADDR y, GM_ADDR z);
8.3 调试技巧
1. 使用CPU模式快速验证:
# CPU模式编译运行,便于使用GDB调试
bash run.sh add_custom ascend910 AiCore cpu

# 使用GDB调试
gdb --args ./add_custom
2. 使用日志输出定位问题:
// Ascend C提供了printf支持
#ifdef DEBUG
printf("Core %d: processing tile %d\n", GetBlockIdx(), progress);
#endif
3. 使用msProf进行性能分析:
# 采集Profiling数据
msprof --application="./add_custom" \
       --output="./profiling_data" \
       --profiling-options=op
九、总结与展望
9.1 学习要点回顾
本文通过手把手教学的方式,完成了基于CANN官方Sample仓的Ascend C算子案例复现与修改:
1. Sample仓库使用:
- 掌握了仓库结构和样例获取方法
- 理解了版本配套关系
2. Add算子复现:
- 理解了核函数结构
- 掌握了流水线编程范式
- 学会了编译运行流程
3. 自定义修改:
- 实现了Sub算子
- 掌握了动态Shape支持
- 学会了性能优化方法
9.2 进阶学习路径
初级阶段:
- 完成HelloWorldSample和AddCustomSample
- 理解基本编程范式
- 掌握编译调试流程
中级阶段:
- 学习MatmulCustomSample
- 掌握Tiling策略
- 理解性能优化方法
高级阶段:
- 学习融合算子开发
- 掌握复杂算子实现
- 深入理解硬件架构
9.3 参考资源
官方文档:
- Ascend C API参考:https://www.hiascend.com/document/detail/zh/CANNCommunityEdition/850alpha002/apiref/ascendcopapi/
- Ascend C最佳实践:https://www.hiascend.com/document/detail/zh/CANNCommunityEdition/850alpha002/opdevg/ascendcbestP/
代码仓库:
- CANN Samples:https://gitee.com/ascend/samples
- Ascend C信息专区:https://www.hiascend.com/ascend-c
训练营:
- 2025昇腾CANN训练营:https://www.hiascend.com/developer/activities/cann20252
讨论问题
- 如何基于AddCustomSample实现一个支持多种数据类型(half/float/int32)的通用Add算子?
- 在实现大矩阵乘法算子时,如何设计最优的Tiling策略?
- 面对新兴的大模型场景,Ascend C算子开发有哪些新的挑战和机遇?
本文基于CANN 8.5.0版本编写,如有更新请参考昇腾社区最新官方文档。

有“AI”的1024 = 2048,欢迎大家加入2048 AI社区
更多推荐
 18
18 0
0- 0


 已为社区贡献59条内容

所有评论(0)