告别元素定位难题,基于AI视觉识别的UI测试实战项目
本项目创新性地融合了Playwright测试框架与AI智能识别技术,打造了基于自然语言描述的下一代UI自动化测试解决方案。通过集成Midscene AI引擎,实现了以自然语言驱动的高效元素定位和交互操作,大幅提升测试脚本的可读性和开发效率。
项目概述
本项目创新性地融合了Playwright测试框架与AI智能识别技术,打造了基于自然语言描述的下一代UI自动化测试解决方案。通过集成Midscene AI引擎,实现了以自然语言驱动的高效元素定位和交互操作,大幅提升测试脚本的可读性和开发效率。
技术栈特色
-
核心框架 : Midscene + Playwright + allure-playwright
-
AI智能识别 : 集成@midscene/web AI引擎,支持自然语言元素定位
-
测试报告 : Allure测试报告系统,提供详细的测试结果和截图
-
视觉回归 : 内置截图对比功能,支持视觉回归测试
安装环境
必需环境:
Node.js 运行环境
依赖安装:
执行以下命令安装所有必要的开发依赖包:
npm install @midscene/web playwright @playwright/test allure-playwright --save-dev
AI写代码
安装的包包括:
-
@midscene/web: 核心AI测试库
-
playwright: 浏览器自动化框架
-
@playwright/test: Playwright测试运行器
-
allure-playwright: Allure报告集成
项目架构
-
src/ -
├── libs/ # 基础库 -
│ ├── base-test.ts # 测试框架fixtures -
│ └── utils.ts # 工具函数 -
├── pages/ # 页面对象模型 -
│ ├── base-page.ts # 基础页面类,封装AI智能操作 -
│ ├── basic_setting/ # 业务页面 -
│ └── login.ts # 登录页面 -
└── tests/ # 测试用例 -
├── auth.setup.ts # 认证设置 -
├── login.spec.ts # 登录测试 -
└── user-manager/ # 用户管理测试
AI写代码
核心特色:
1、零选择器维护
传统UI自动化需要维护大量的CSS选择器、XPath等定位符,当页面结构变化时测试用例大量失效。本项目通过AI智能识别技术,完全摆脱了对选择器的依赖。
2、共享登录状态
Playwright 在称为 浏览器上下文 的隔离环境中执行测试。这种隔离模型提高了可重复性并防止测试失败级联。测试可以加载现有的认证状态。这消除了每次测试都需要进行认证的需要,并加快了测试执行速度。
创建tests/auth.setup.ts,它将为所有其他测试准备经过身份验证的浏览器状态。
-
const authFile = path.join(process.cwd(), './.auth/auth.json'); -
/** -
* -
* 登录后,将浏览器状态存储到文件中,后续测试用例可以使用该文件来登录 -
*/ -
setup('保存登陆状态', async ({ loginPage }) => { -
loginPage.agent.reportFileName = '保存登陆状态'; -
if(!process.env.USERNAME || !process.env.PASSWORD){ -
thrownewError('请设置环境变量USERNAME和PASSWORD'); -
} -
await loginPage.login(process.env.USERNAME, process.env.PASSWORD); -
await loginPage.context.storageState({ indexedDB: true,path: authFile }); -
});
在playwright.config.ts文件中增加一个setup的项目,并将其声明为其他项目的依赖项,这样setup会始终在其他项之前运行,并把登录状态保存到storageState中。
-
exportdefault defineConfig({ -
/* Configure projects for major browsers */ -
projects: [ -
{ name: 'setup', testMatch: /.*\.setup\.ts/ }, -
{ -
name: 'chromium', -
use: { -
...devices['Desktop Chrome'], -
storageState: './.auth/auth.json', -
}, -
dependencies: ['setup'], -
}, -
], -
});
3、智能测试操作封装
封装基于AI的智能操作,如点击按钮,输入文本,滚动页面,获取元素文本或结构化数据等,包含自动重试机制和Allure测试报告步骤记录,提高测试稳定性和可追溯性,而且便于后续扩展
-
async click(text: string, maxRetries: number = 3): Promise<void>{ -
await allure.step(`点击元素: ${text}`, async () => { -
try{ -
awaitthis.agent.aiTap(`点击:${text}`); -
}catch(e){ -
if (maxRetries > 0) { -
console.error(`click ${text} failed, retrying after 1 second (${maxRetries} retries left):`, e); -
awaitthis.page.waitForTimeout(2000); -
awaitthis.click(text, maxRetries - 1); -
} else { -
console.error(`click ${text} failed after all retries:`, e); -
throw e; -
} -
} -
}); -
}
4、视觉比较
Playwright Test 提供的 toHaveScreenshot() 方法支持视觉回归测试。首次运行时会自动生成基准截图并存储,后续测试会将当前页面截图与基准图进行像素级对比。推荐在布局稳定的页面中使用此功能,可精准检测UI层面的细微变化。
-
for(let user of queryUser){ -
test(user.title, async ({ userManagerPage }) => { -
userManagerPage.agent.reportFileName = user.title; -
const userList = await userManagerPage.queryUser(user); -
await expect(userManagerPage.page).toHaveScreenshot(`${user.title}.png`); -
}); -
}
AI写代码
在playwright.config.ts文件中增加toHaveScreenshot配置,toHaveScreenshot为截图保存地址,maxDiffPixels为允许的像素差异最大值,超出此值测试将失败。
-
exportdefault defineConfig({ -
expect: { -
toHaveScreenshot: { -
pathTemplate: './screenshots/{testFileDir}/{testFileName}/{arg}{ext}', -
maxDiffPixels: 300, -
}, -
}, -
});
AI写代码
5、可视化报告生成
在 playwright.config.ts 中集成 Allure 报告框架,配置如下:
-
exportdefault defineConfig({ -
reporter: [ -
["line"], -
["allure-playwright",{resultsDir: "./allure-results",detail: true,suiteTitle: true,testTitle: true}] -
], -
});
AI写代码
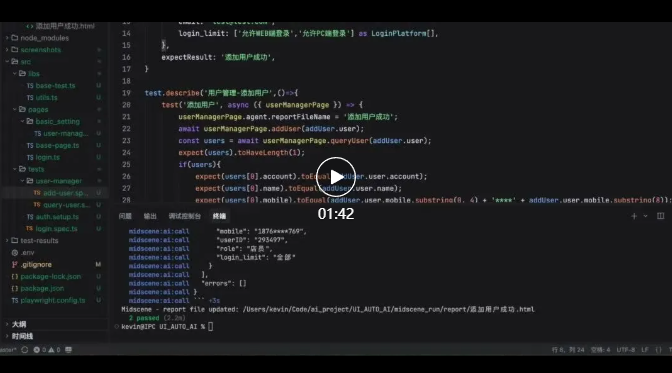
测试执行后,Allure 会自动将详细的操作记录保存至指定目录。通过命令 allure serve allure-results 即可启动本地服务,生成包含完整操作步骤的可视化测试报告。
业务流程实现
以添加用户为例,用户管理模块中的添加用户功能实现了在系统中创建新用户账户的完整流程,包括填写用户信息、验证创建结果。
1、添加用户操作流程
-
async addUser(userParams: UserParams): Promise<void>{ -
awaitthis.goto('/#/User/UserPower'); -
awaitthis.waitForElement('出现添加用户按钮',10000); -
awaitthis.click('添加用户按钮'); -
awaitthis.click('所属角色下拉框'); -
awaitthis.click(userParams.role || '下拉列表第一个角色'); -
awaitthis.input(userParams.account || '','登录帐号输入框'); -
awaitthis.input(userParams.name || '','用户姓名输入框'); -
awaitthis.input(userParams.password || '','登录密码输入框'); -
awaitthis.input(userParams.mobile || '','手机号码输入框'); -
awaitthis.input(userParams.email || '','电子邮箱输入框'); -
awaitthis.input(userParams.third_account || '','第三方账号输入框'); -
for(const limit of platform_limits){ -
if(userParams.login_limit?.includes(limit)){ -
if(awaitthis.isSelected(`登录限制${limit}`)){ -
continue; -
}else{ -
awaitthis.click(`登录限制${limit}`); -
} -
}else{ -
awaitthis.click(`登录限制${limit}`); -
} -
} -
if(!awaitthis.isExisted('确定按钮')){ -
awaitthis.scrollTo('down','untilBottom','右边区域'); -
} -
awaitthis.click('确定按钮'); -
}
2、测试验证流程
-
test.describe('用户管理-添加用户',()=>{ -
test('添加用户', async ({ userManagerPage }) => { -
userManagerPage.agent.reportFileName = '添加用户成功'; -
await userManagerPage.addUser(addUser.user); #调用添加用户流程 -
const users = await userManagerPage.queryUser(addUser.user); #查询添加的用户 -
expect(users).toHaveLength(1); -
if(users){ -
expect(users[0].account).toEqual(addUser.user.account); -
expect(users[0].name).toEqual(addUser.user.name); -
expect(users[0].mobile).toEqual(addUser.user.mobile.substring(0, 4) + '****' + addUser.user.mobile.substring(8)); -
expect(users[0].role).toEqual(addUser.user.role); -
} -
}) -
})
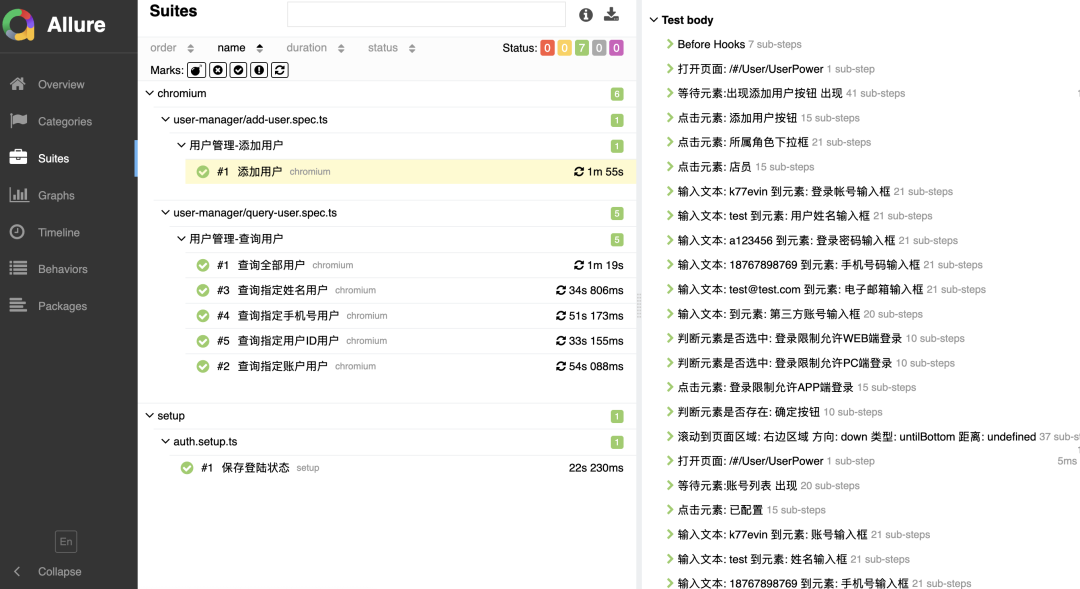
3、页面效果展示
感谢每一个认真阅读我文章的人!!!
作为一位过来人也是希望大家少走一些弯路,如果你不想再体验一次学习时找不到资料,没人解答问题,坚持几天便放弃的感受的话,在这里我给大家分享一些自动化测试的学习资源,希望能给你前进的路上带来帮助。
软件测试面试文档
我们学习必然是为了找到高薪的工作,下面这些面试题是来自阿里、腾讯、字节等一线互联网大厂最新的面试资料,并且有字节大佬给出了权威的解答,刷完这一套面试资料相信大家都能找到满意的工作。
视频文档获取方式:
这份文档和视频资料,对于想从事【软件测试】的朋友来说应该是最全面最完整的备战仓库,这个仓库也陪伴我走过了最艰难的路程,希望也能帮助到你!以上均可以分享,点下方小卡片即可自行领取。

有“AI”的1024 = 2048,欢迎大家加入2048 AI社区
更多推荐
 29
29 0
0- 0


 已为社区贡献3条内容

所有评论(0)