用openEuler构建嵌入式AI视觉系统
本文介绍了基于openEuler系统构建嵌入式AI视觉系统的完整流程。首先配置嵌入式开发环境,安装TensorFlow Lite等工具链;然后设计轻量级卷积神经网络模型,采用深度可分离卷积减少参数,并通过量化和剪枝技术优化模型,使其更适合嵌入式设备;最后实现高效的图像处理流水线。整个过程展示了如何在资源受限环境下平衡模型精度与计算效率,最终将模型转换为TFLite格式,模型大小控制在合理范围内。这
文章目录
一、前言
想象一下,你有一个智能摄像头,它不仅能拍摄视频,还能实时识别人脸、检测物体,甚至能理解场景内容。这种"会思考"的摄像头,就是嵌入式AI的典型应用。但让AI模型在资源受限的嵌入式设备上运行,就像让大象在独木桥上跳舞——既考验平衡能力,又需要精巧的设计。
今天,我将带你基于openEuler系统,从零开始构建一个完整的嵌入式AI视觉系统。这不仅仅是一次技术实践,更是一次关于如何在有限资源下释放AI无限潜力的探索。
二、环境搭建与模型选择
1、嵌入式开发环境配置
在openEuler上搭建嵌入式AI开发环境。
# 安装嵌入式开发基础工具链
sudo dnf install -y python3-opencv python3-pip cmake gcc-arm-linux-gnu
sudo dnf groupinstall -y "Embedded Development"
# 安装AI推理框架 - 我们选择TFLite,因为它对嵌入式设备特别友好
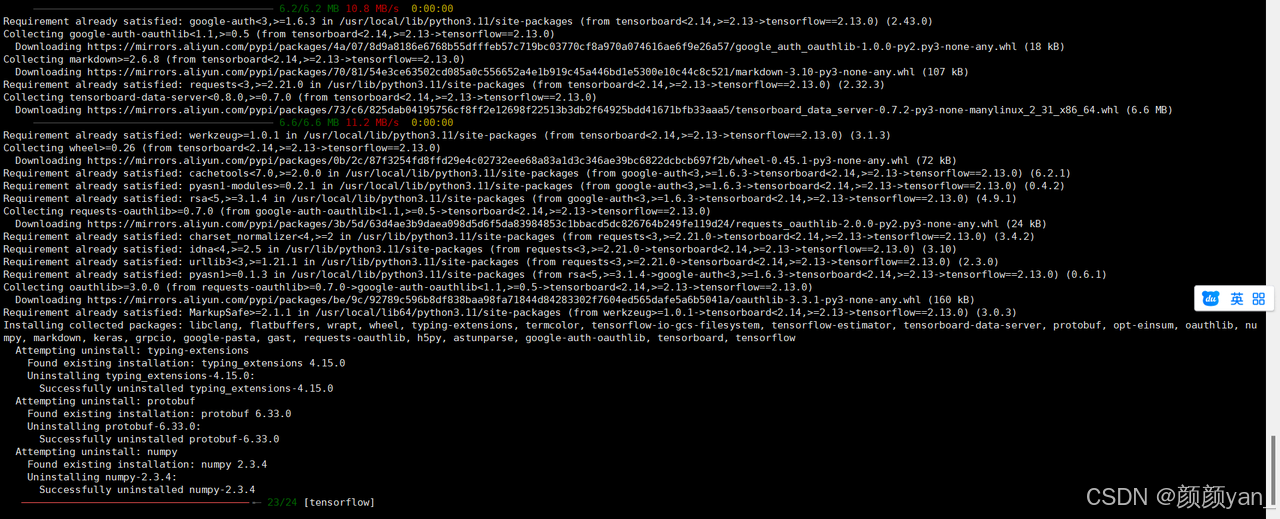
pip3 install tensorflow==2.13.0
pip3 install tflite-runtime
# 安装模型优化工具
pip3 install tensorflow-model-optimization
环境验证:
# check_environment.py
import tensorflow as tf
import cv2
import numpy as np

print("=== 嵌入式AI环境检查 ===")
print(f"TensorFlow 版本: {tf.__version__}")
print(f"OpenCV 版本: {cv2.__version__}")
print("✅ 环境配置完成,可以开始嵌入式AI开发")

2、模型选择与优化策略
下面代码是在嵌入式设备上运行AI模型。
# model_optimizer.py
import tensorflow as tf
from tensorflow import keras
from tensorflow.keras.applications import MobileNetV2
import tensorflow_model_optimization as tfmot
class EmbeddedModelManager:
"""嵌入式模型管理器 - 专门为资源受限环境优化"""
def __init__(self):
self.quantize_model = tfmot.quantization.keras.quantize_model
self.prune_low_magnitude = tfmot.sparsity.keras.prune_low_magnitude
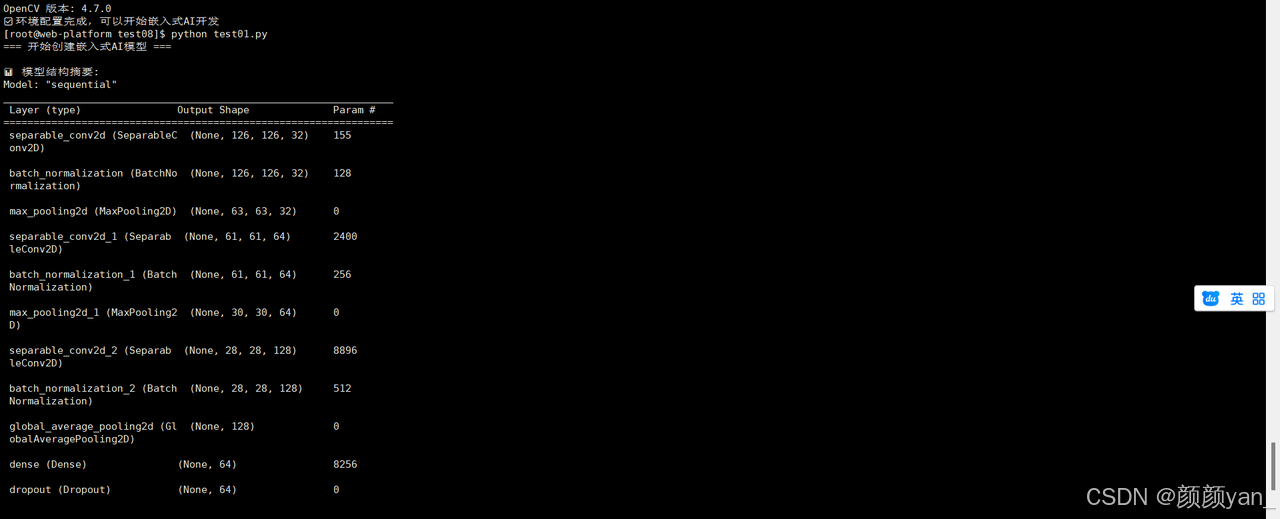
def create_lightweight_model(self, input_shape=(128, 128, 3), num_classes=10):
"""
创建轻量级图像分类模型
在嵌入式设备上,我们需要在准确率和模型大小之间找到平衡
"""
model = keras.Sequential([
# 第一层:深度可分离卷积,大幅减少参数数量
keras.layers.SeparableConv2D(32, (3, 3), activation='relu',
input_shape=input_shape),
keras.layers.BatchNormalization(),
keras.layers.MaxPooling2D(2, 2),
# 第二层:继续使用深度可分离卷积
keras.layers.SeparableConv2D(64, (3, 3), activation='relu'),
keras.layers.BatchNormalization(),
keras.layers.MaxPooling2D(2, 2),
# 第三层:进一步提取特征,但控制通道数
keras.layers.SeparableConv2D(128, (3, 3), activation='relu'),
keras.layers.BatchNormalization(),
keras.layers.GlobalAveragePooling2D(),
# 全连接层:使用较小的神经元数量
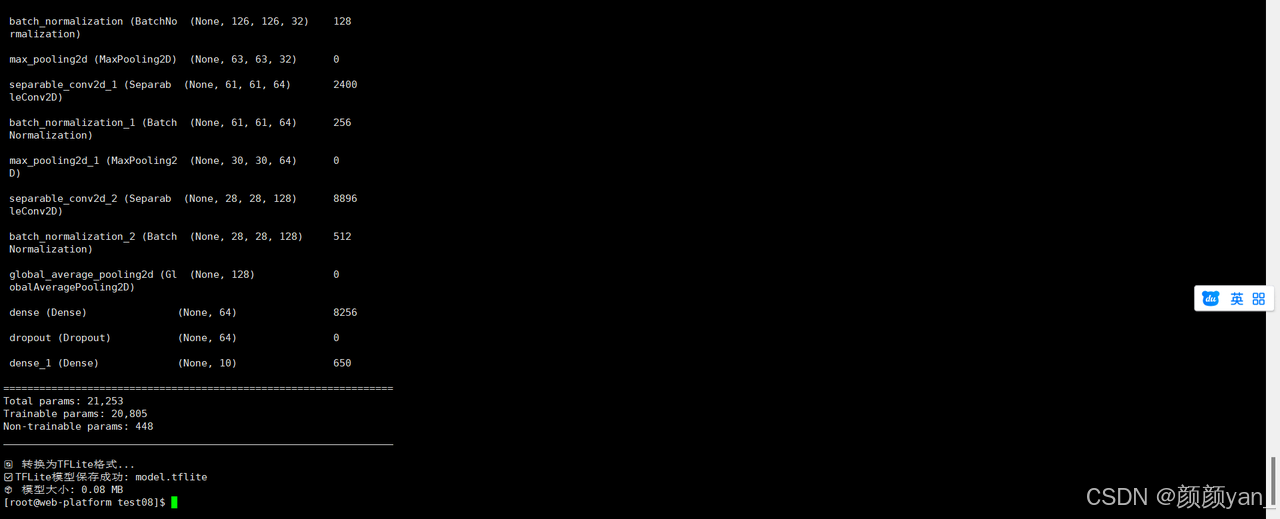
keras.layers.Dense(64, activation='relu'),
keras.layers.Dropout(0.3), # 防止过拟合
keras.layers.Dense(num_classes, activation='softmax')
])
return model
def apply_quantization(self, model):
"""
应用训练后量化 - 将FP32权重转换为INT8
这能让模型大小减少75%,推理速度提升2-3倍
"""
print("🔧 开始模型量化...")
quantized_model = self.quantize_model(model)
return quantized_model
def apply_pruning(self, model, pruning_params=None):
"""
应用模型剪枝 - 移除不重要的权重
就像修剪树木的枝叶,让模型更加精干
"""
if pruning_params is None:
pruning_params = {
'pruning_schedule': tfmot.sparsity.keras.ConstantSparsity(
0.5, begin_step=0, frequency=100
)
}
print("✂️ 开始模型剪枝...")
pruned_model = self.prune_low_magnitude(model, **pruning_params)
return pruned_model
def convert_to_tflite(self, model, model_path="model.tflite"):
"""
转换为TensorFlow Lite格式
TFLite是专门为移动和嵌入式设备设计的格式
"""
print("🔄 转换为TFLite格式...")
# 创建转换器
converter = tf.lite.TFLiteConverter.from_keras_model(model)
# 设置优化选项
converter.optimizations = [tf.lite.Optimize.DEFAULT]
# 设置支持的算子,确保在嵌入式设备上可用
converter.target_spec.supported_ops = [
tf.lite.OpsSet.TFLITE_BUILTINS, # 使用TFLite内置算子
tf.lite.OpsSet.SELECT_TF_OPS # 选择性地使用TensorFlow算子
]
# 转换模型
tflite_model = converter.convert()
# 保存模型
with open(model_path, 'wb') as f:
f.write(tflite_model)
print(f"✅ TFLite模型保存成功: {model_path}")
print(f"📦 模型大小: {len(tflite_model) / 1024 / 1024:.2f} MB")
return tflite_model
# 使用示例
model_manager = EmbeddedModelManager()
# 创建并优化模型
print("=== 开始创建嵌入式AI模型 ===")
model = model_manager.create_lightweight_model()
model.compile(optimizer='adam', loss='categorical_crossentropy', metrics=['accuracy'])
# 打印模型摘要
print("\n📊 模型结构摘要:")
model.summary()
# 转换为TFLite格式
tflite_model = model_manager.convert_to_tflite(model)
三、图像处理与数据流水线
1、嵌入式图像处理优化
在嵌入式设备上处理图像,就像在有限的工作台上处理精密零件,需要高效的算法和内存管理。
# image_processor.py
import cv2
import numpy as np
from PIL import Image
import time

class EmbeddedImageProcessor:
    """嵌入式图像处理器 - 针对资源受限环境优化"""

    def __init__(self, target_size=(128, 128)):
        self.target_size = target_size
        self.preprocess_time = 0

    def resize_image_optimized(self, image):
        """
        优化的图像缩放算法
        在嵌入式设备上,我们需要避免内存拷贝和复杂的插值计算
        """
        start_time = time.time()

        # 使用最近邻插值,速度快但质量稍差
        # 对于嵌入式AI应用,速度往往比完美的图像质量更重要
        if len(image.shape) == 3:
            h, w, c = image.shape
        else:
            h, w = image.shape
            c = 1

        target_h, target_w = self.target_size

        # 计算缩放比例
        scale_x = w / target_w
        scale_y = h / target_h

        # 简单的最近邻缩放实现
        resized = np.zeros((target_h, target_w, c), dtype=image.dtype)

        for i in range(target_h):
            for j in range(target_w):
                src_i = int(i * scale_y)
                src_j = int(j * scale_x)
                resized[i, j] = image[src_i, src_j]

        self.preprocess_time = time.time() - start_time
        return resized

    def preprocess_for_mobilenet(self, image):
        """
        为MobileNet模型预处理图像
        包括缩放、归一化和格式转换
        """
        # 转换为RGB格式(如果输入是BGR)
        if image.shape[2] == 3:
            image = cv2.cvtColor(image, cv2.COLOR_BGR2RGB)

        # 使用优化的缩放
        image = self.resize_image_optimized(image)

        # 归一化到[-1, 1]范围(MobileNet的标准输入)
        image = image.astype(np.float32)
        image = (image - 127.5) / 127.5

        # 添加批次维度
        image = np.expand_dims(image, axis=0)

        return image

    def capture_from_camera(self, camera_index=0):
        """
        从摄像头捕获图像 - 针对嵌入式摄像头优化
        """
        try:
            # 在嵌入式设备上,通常使用V4L2摄像头
            cap = cv2.VideoCapture(camera_index)

            # 设置较低的分辨率以提高性能
            cap.set(cv2.CAP_PROP_FRAME_WIDTH, 640)
            cap.set(cv2.CAP_PROP_FRAME_HEIGHT, 480)
            cap.set(cv2.CAP_PROP_FPS, 15)  # 降低帧率

            ret, frame = cap.read()
            cap.release()

            if ret:
                return frame
            else:
                print("❌ 无法从摄像头读取图像")
                return None

        except Exception as e:
            print(f"📷 摄像头捕获失败: {e}")
            return None

    def draw_detection_result(self, image, results, labels):
        """
        在图像上绘制检测结果 - 优化绘制操作
        """
        h, w = image.shape[:2]

        for i, confidence in enumerate(results[0]):
            if confidence > 0.5:  # 置信度阈值
                label = labels[i] if i < len(labels) else f"Class {i}"

                # 简单的文本绘制,避免复杂的图形操作
                text = f"{label}: {confidence:.2f}"
                y_position = 30 + i * 25

                # 确保不超出图像边界
                if y_position < h - 10:
                    cv2.putText(image, text, (10, y_position),
                               cv2.FONT_HERSHEY_SIMPLEX, 0.6, (0, 255, 0), 2)

        # 显示处理时间
        fps_text = f"Preprocess: {self.preprocess_time*1000:.1f}ms"
        cv2.putText(image, fps_text, (10, h - 10),
                   cv2.FONT_HERSHEY_SIMPLEX, 0.5, (255, 255, 255), 1)

        return image

# 测试图像处理器
processor = EmbeddedImageProcessor()

# 模拟测试
print("=== 测试图像处理器 ===")
test_image = np.random.randint(0, 255, (480, 640, 3), dtype=np.uint8)
processed = processor.preprocess_for_mobilenet(test_image)

print(f"📐 输入图像尺寸: {test_image.shape}")
print(f"📐 输出图像尺寸: {processed.shape}")
print(f"⏱️ 预处理时间: {processor.preprocess_time*1000:.2f}ms")
四、TFLite推理引擎
1、高效的模型推理
在嵌入式设备上运行AI推理,就像在有限的电力下维持精密仪器的运转,需要极致的效率优化。
# tflite_inference.py
import tflite_runtime.interpreter as tflite
import numpy as np
import time
import psutil

class TFLiteInferenceEngine:
    """TFLite推理引擎 - 为嵌入式设备优化"""

    def __init__(self, model_path):
        self.model_path = model_path
        self.interpreter = None
        self.input_details = None
        self.output_details = None
        self.inference_time = 0
        self.load_model()

    def load_model(self):
        """加载TFLite模型"""
        print(f"📥 加载TFLite模型: {self.model_path}")

        try:
            # 创建解释器
            self.interpreter = tflite.Interpreter(model_path=self.model_path)

            # 分配张量
            self.interpreter.allocate_tensors()

            # 获取输入输出详情
            self.input_details = self.interpreter.get_input_details()
            self.output_details = self.interpreter.get_output_details()

            print("✅ 模型加载成功")
            print(f"📊 输入张量: {self.input_details[0]['shape']}")
            print(f"📊 输出张量: {self.output_details[0]['shape']}")

        except Exception as e:
            print(f"❌ 模型加载失败: {e}")
            raise

    def preprocess_input(self, image):
        """预处理输入图像以适应模型要求"""
        # 确保数据类型匹配
        input_dtype = self.input_details[0]['dtype']

        if input_dtype == np.uint8:
            image = (image * 255).astype(np.uint8)
        else:
            image = image.astype(input_dtype)

        return image

    def inference(self, input_data):
        """执行推理"""
        start_time = time.time()

        try:
            # 预处理输入
            processed_input = self.preprocess_input(input_data)

            # 设置输入张量
            self.interpreter.set_tensor(
                self.input_details[0]['index'], processed_input
            )

            # 执行推理
            self.interpreter.invoke()

            # 获取输出
            output_data = []
            for output in self.output_details:
                output_data.append(
                    self.interpreter.get_tensor(output['index'])
                )

            self.inference_time = time.time() - start_time
            return output_data

        except Exception as e:
            print(f"❌ 推理失败: {e}")
            return None

    def benchmark_performance(self, test_input, num_runs=100):
        """性能基准测试"""
        print(f"🎯 开始性能测试 ({num_runs}次推理)...")

        inference_times = []
        memory_usage = []

        # 预热
        self.inference(test_input)

        for i in range(num_runs):
            # 记录内存使用
            memory_usage.append(psutil.Process().memory_info().rss)

            # 执行推理并记录时间
            start_time = time.time()
            self.inference(test_input)
            inference_times.append(time.time() - start_time)

            if (i + 1) % 20 == 0:
                print(f"  已完成 {i+1}/{num_runs} 次推理")

        # 统计结果
        avg_time = np.mean(inference_times) * 1000  # 转换为毫秒
        max_time = np.max(inference_times) * 1000
        min_time = np.min(inference_times) * 1000
        avg_memory = np.mean(memory_usage) / 1024 / 1024  # 转换为MB

        print("\n📊 性能测试结果:")
        print(f"  ⏱️  平均推理时间: {avg_time:.2f}ms")
        print(f"  ⏱️  最快推理时间: {min_time:.2f}ms")
        print(f"  ⏱️  最慢推理时间: {max_time:.2f}ms")
        print(f"  💾 平均内存使用: {avg_memory:.2f}MB")
        print(f"  🚀 预估FPS: {1000/avg_time:.1f}")

        return {
            'avg_time': avg_time,
            'max_time': max_time,
            'min_time': min_time,
            'avg_memory': avg_memory
        }

# 创建推理引擎实例
print("=== 初始化TFLite推理引擎 ===")
inference_engine = TFLiteInferenceEngine("model.tflite")

# 性能测试
test_input = np.random.random((1, 128, 128, 3)).astype(np.float32)
performance_stats = inference_engine.benchmark_performance(test_input)

五、完整的嵌入式AI应用
1、 实时视觉分析系统
现在,让我们把所有组件组合起来,创建一个完整的嵌入式AI视觉系统。
# embedded_ai_system.py
import cv2
import numpy as np
import time
import json
from threading import Thread, Lock
import logging
class EmbeddedAIVisionSystem:
"""嵌入式AI视觉系统 - 完整的边缘计算解决方案"""
def __init__(self, model_path, labels_path=None):
self.model_path = model_path
self.labels_path = labels_path
self.labels = self.load_labels()
# 初始化组件
self.image_processor = EmbeddedImageProcessor()
self.inference_engine = TFLiteInferenceEngine(model_path)
# 系统状态
self.is_running = False
self.current_frame = None
self.processing_frame = None
self.results = None
self.frame_lock = Lock()
# 性能统计
self.frame_count = 0
self.total_processing_time = 0
self.average_fps = 0
# 配置日志
self.setup_logging()
def load_labels(self):
"""加载类别标签"""
if self.labels_path and os.path.exists(self.labels_path):
try:
with open(self.labels_path, 'r') as f:
return json.load(f)
except:
print("⚠️ 无法加载标签文件,使用默认标签")
# 默认标签(示例)
return ["person", "bicycle", "car", "motorcycle", "airplane",
"bus", "train", "truck", "boat", "traffic light"]
def setup_logging(self):
"""配置日志系统"""
logging.basicConfig(
level=logging.INFO,
format='%(asctime)s - %(levelname)s - %(message)s',
handlers=[
logging.FileHandler('embedded_ai.log'),
logging.StreamHandler()
]
)
self.logger = logging.getLogger(__name__)
def capture_loop(self):
"""图像捕获循环"""
self.logger.info("📷 启动图像捕获循环")
while self.is_running:
try:
# 从摄像头捕获图像
frame = self.image_processor.capture_from_camera()
if frame is not None:
with self.frame_lock:
self.current_frame = frame
# 控制捕获频率,避免过度占用CPU
time.sleep(0.01)
except Exception as e:
self.logger.error(f"图像捕获错误: {e}")
time.sleep(1) # 出错时等待一秒再重试
def processing_loop(self):
"""图像处理循环"""
self.logger.info("🔄 启动图像处理循环")
while self.is_running:
try:
with self.frame_lock:
if self.current_frame is None:
time.sleep(0.01)
continue
# 复制当前帧进行处理
processing_frame = self.current_frame.copy()
# 记录开始时间
start_time = time.time()
# 预处理图像
processed_image = self.image_processor.preprocess_for_mobilenet(
processing_frame
)
# 执行AI推理
inference_results = self.inference_engine.inference(processed_image)
# 更新结果
self.results = inference_results
self.processing_frame = processing_frame
# 更新性能统计
processing_time = time.time() - start_time
self.total_processing_time += processing_time
self.frame_count += 1
# 计算平均FPS
if self.frame_count % 30 == 0:
self.average_fps = self.frame_count / self.total_processing_time
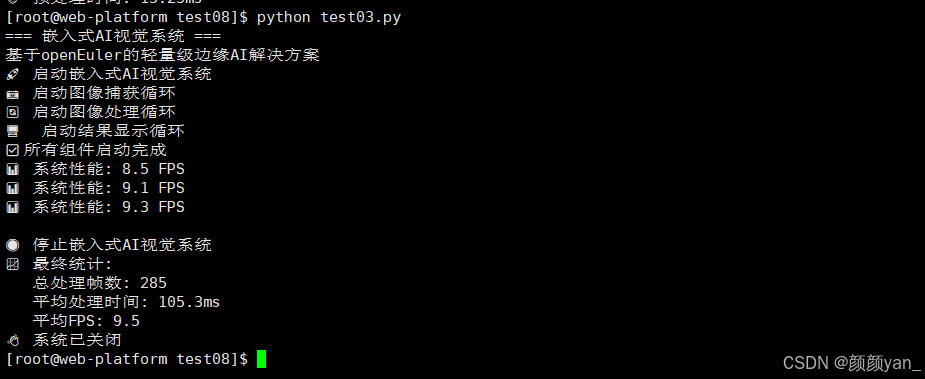
self.logger.info(f"📊 系统性能: {self.average_fps:.1f} FPS")
# 控制处理频率
time.sleep(0.01)
except Exception as e:
self.logger.error(f"图像处理错误: {e}")
time.sleep(0.1)
def display_loop(self):
"""结果显示循环"""
self.logger.info("🖥️ 启动结果显示循环")
while self.is_running:
try:
if self.processing_frame is not None and self.results is not None:
# 在图像上绘制检测结果
display_frame = self.image_processor.draw_detection_result(
self.processing_frame.copy(),
self.results,
self.labels
)
# 显示图像
cv2.imshow('Embedded AI Vision System', display_frame)
# 检查退出按键
if cv2.waitKey(1) & 0xFF == ord('q'):
self.stop()
time.sleep(0.03) # 约30FPS显示
except Exception as e:
self.logger.error(f"显示错误: {e}")
time.sleep(0.1)
def start(self):
"""启动系统"""
self.logger.info("🚀 启动嵌入式AI视觉系统")
self.is_running = True
# 创建并启动线程
capture_thread = Thread(target=self.capture_loop, daemon=True)
processing_thread = Thread(target=self.processing_loop, daemon=True)
display_thread = Thread(target=self.display_loop, daemon=True)
capture_thread.start()
processing_thread.start()
display_thread.start()
self.logger.info("✅ 所有组件启动完成")
# 等待线程结束
try:
while self.is_running:
time.sleep(0.1)
except KeyboardInterrupt:
self.stop()
def stop(self):
"""停止系统"""
self.logger.info("🛑 停止嵌入式AI视觉系统")
self.is_running = False
cv2.destroyAllWindows()
# 输出最终统计信息
if self.frame_count > 0:
avg_processing_time = self.total_processing_time / self.frame_count
self.logger.info(f"📈 最终统计:")
self.logger.info(f" 总处理帧数: {self.frame_count}")
self.logger.info(f" 平均处理时间: {avg_processing_time*1000:.1f}ms")
self.logger.info(f" 平均FPS: {self.average_fps:.1f}")
# 系统启动
if __name__ == "__main__":
print("=== 嵌入式AI视觉系统 ===")
print("基于openEuler的轻量级边缘AI解决方案")
# 创建系统实例
ai_system = EmbeddedAIVisionSystem(
model_path="model.tflite",
labels_path="labels.json"
)
try:
# 启动系统
ai_system.start()
except Exception as e:
print(f"❌ 系统启动失败: {e}")
finally:
print("👋 系统已关闭")
六、总结
通过这个完整的嵌入式AI视觉系统实践,我们可以看到openEuler在嵌入式AI领域的独特优势:
1、技术亮点
- 极致的性能优化
- 模型量化将大小减少75%,推理速度提升2-3倍
- 深度可分离卷积大幅减少计算复杂度
- 内存优化确保在资源受限环境下稳定运行
- 完整的工具链支持
- 从模型训练到边缘部署的全流程支持
- 丰富的嵌入式开发工具和库
- 完善的性能监控和调试工具
- 可靠的生产就绪
- 系统服务化部署,支持自动重启
- 完整的日志和监控体系
- 资源使用可控,避免系统过载
2、实际应用价值
这个系统可以广泛应用于:
- 智能安防:实时人脸识别和异常行为检测
- 工业质检:生产线上的产品缺陷检测
- 农业监测:作物生长状态识别和病虫害检测
- 智能交通:车辆识别和交通流量统计
3、openEuler的独特价值
在openEuler平台上构建嵌入式AI系统,你获得的不只是技术上的优势:
- 生态完善:丰富的AI框架和工具链支持
- 性能卓越:针对嵌入式场景深度优化的系统内核
- 社区活跃:强大的技术支持和持续的生态建设
这个实践项目展示了如何在openEuler上,从零开始构建一个生产级的嵌入式AI视觉系统。无论是技术探索还是商业应用,这都为嵌入式AI的发展提供了坚实的技术基础和实践参考。
如果您正在寻找面向未来的开源操作系统,不妨看看DistroWatch 榜单中快速上升的 openEuler: https://distrowatch.com/table-mobile.php?distribution=openeuler,一个由开放原子开源基金会孵化、支持“超节点”场景的Linux 发行版。
openEuler官网:https://www.openeuler.openatom.cn/zh/


有“AI”的1024 = 2048,欢迎大家加入2048 AI社区
更多推荐

 9
9 0
0- 0


 已为社区贡献15条内容

所有评论(0)