手撕大模型推理框架
当执行之后会出现这样的界面,我们选择左边的NVIDIA Proprietary,如果出现第二张图中的提示,说明你的Ubuntu系统中已经有了N卡驱动,不需要再重复安装。如果已知型号,则无需执行查询命令。在页面中,我们通过下拉菜单选择显卡型号、操作系统版本等信息,系统将推荐匹配的驱动程序,随后再下载对应版本的驱动安装包至本地,我这里是要选择RTX 3090对应的显卡。当我们下载好安装包之后就可以开始
文章目录
零、基础知识
1)tokenizer基础
①token:token 可以理解为最小语义单元,表达的意义可以是 word/char/subword,中文翻译的话可以是词元、令牌、词。对于多模态模型,图像也可以经过一些处理变为 image tokens embedding 向量。
②tokenizer:分词器,作用是将输入文本转换为神经网络可识别的 token-ids(也叫 input ids)。
③input ids:LLM 必须的输入,本质是 tokens 索引,即整数向量。
④Attention Mask:是二进制张量类型,针对 batch 输入中序列长度不一的场景,值为1 表示实际的内容 token,0 表示填充 token。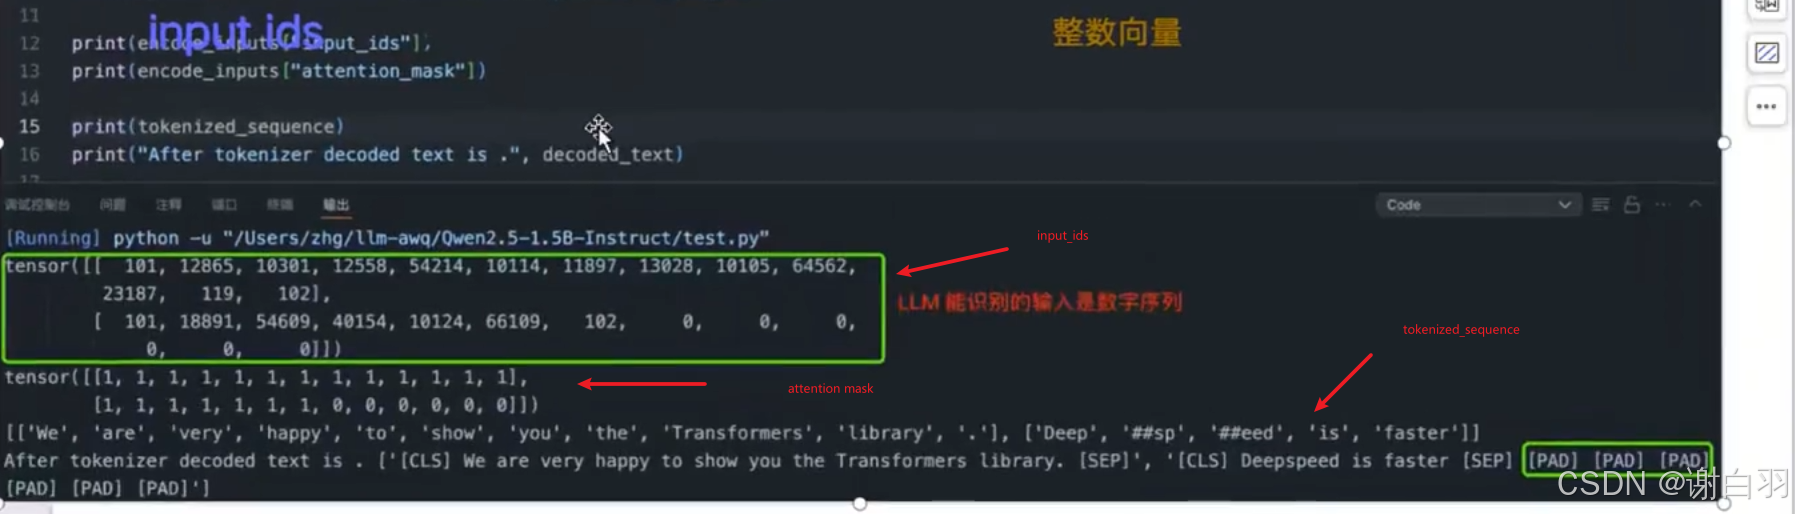
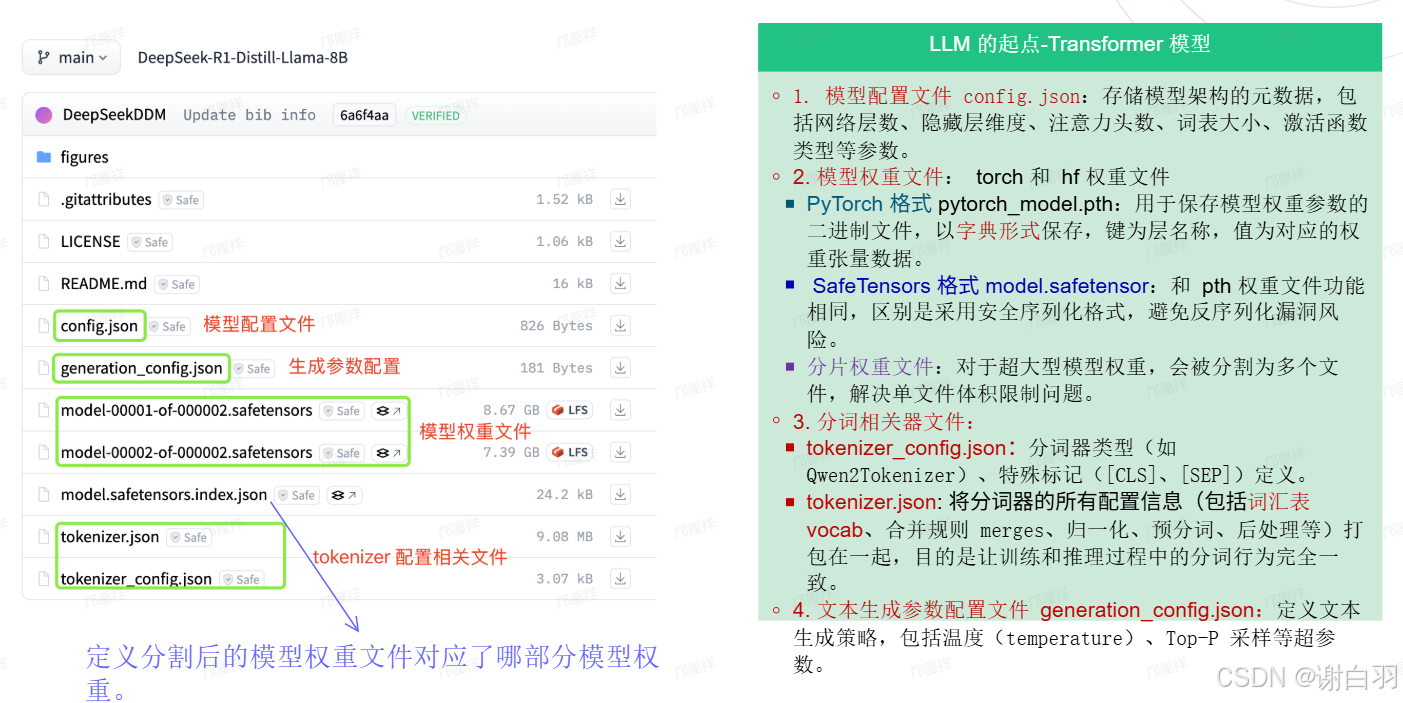
2)模型权重拆解
tokenizer.json包括分词列表: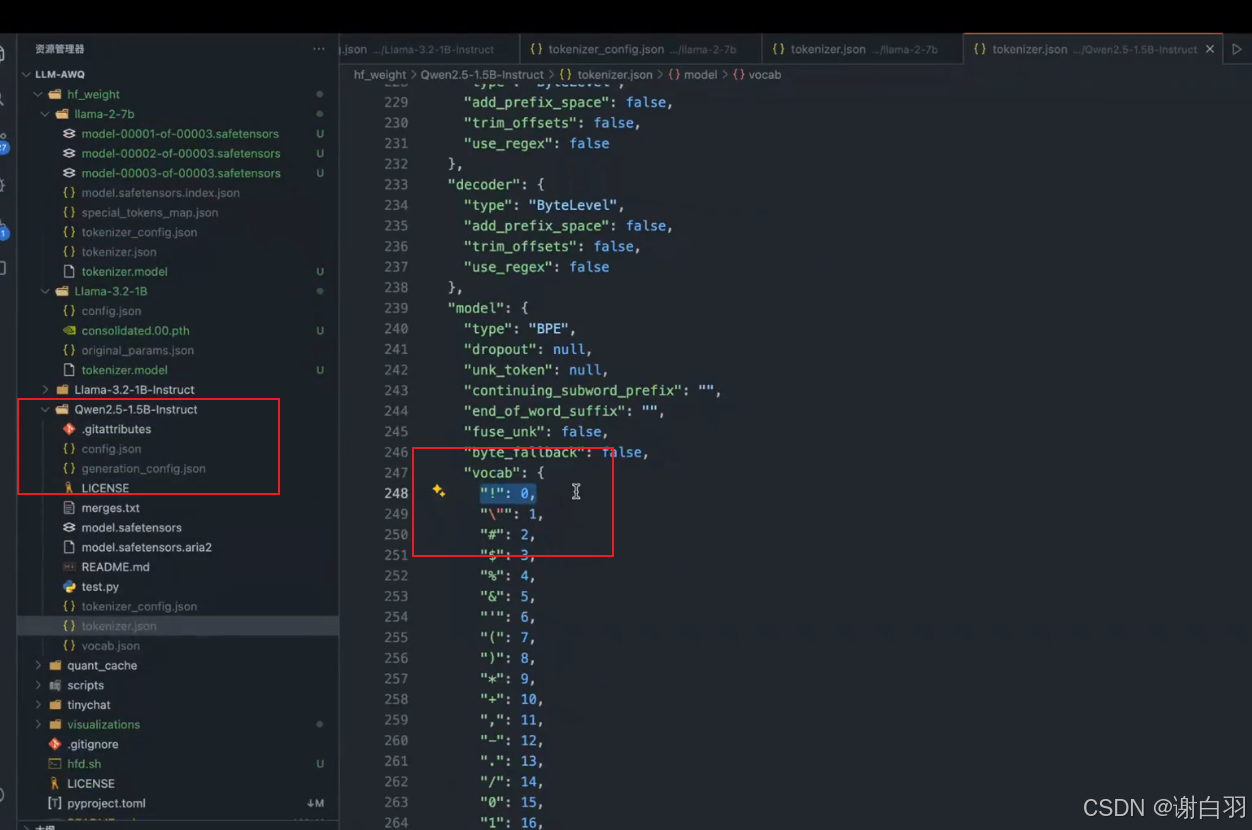
Tokenizer.json 解析及特殊 tokens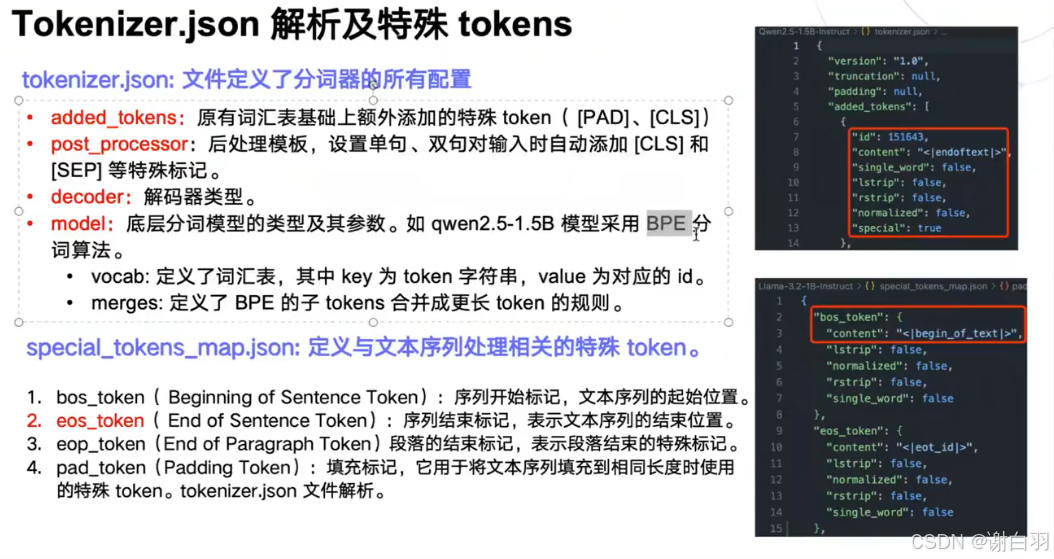
3)transformer模型结构

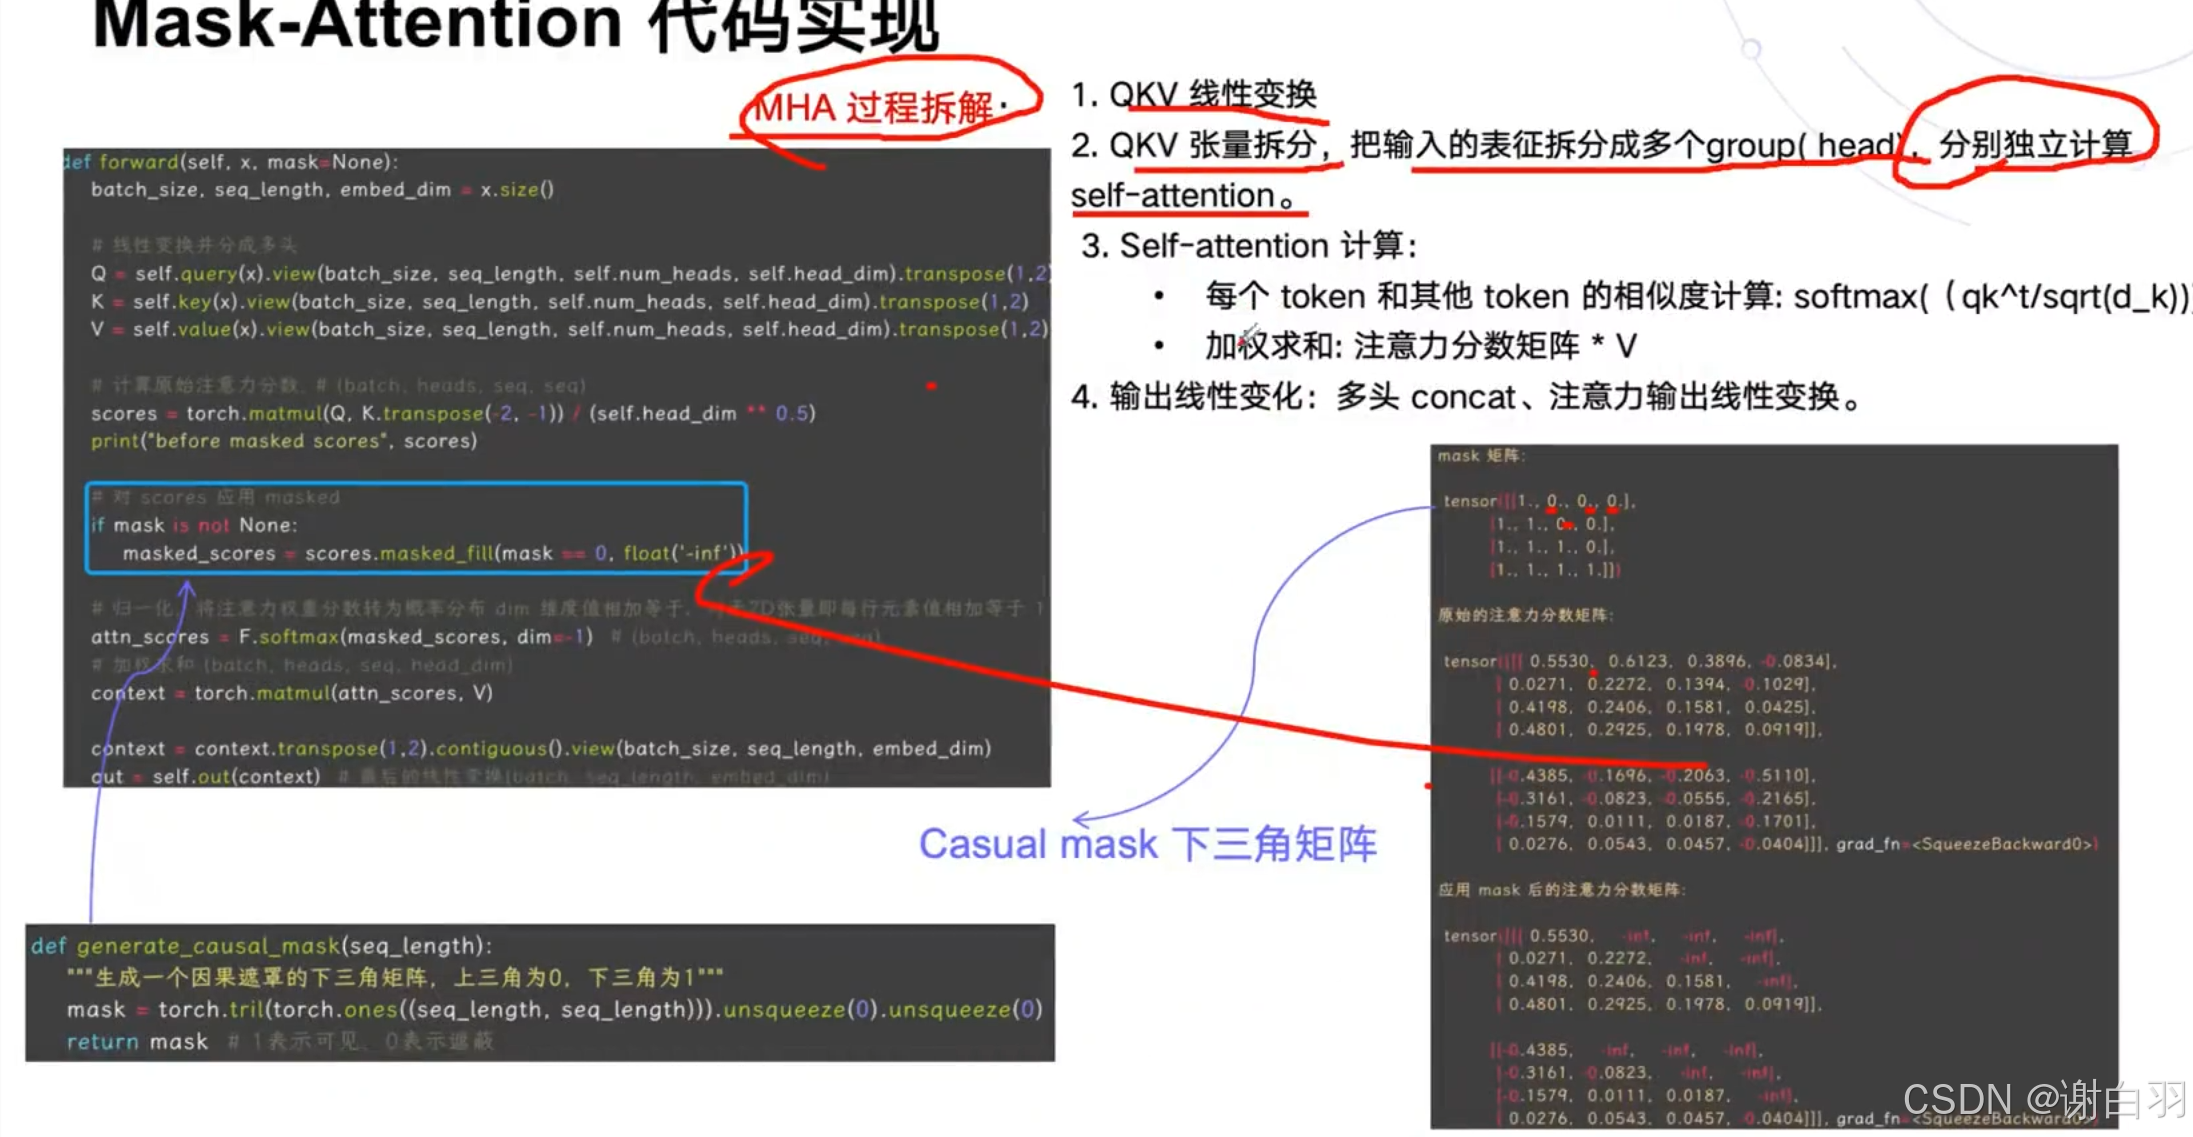
4)self-attention结构
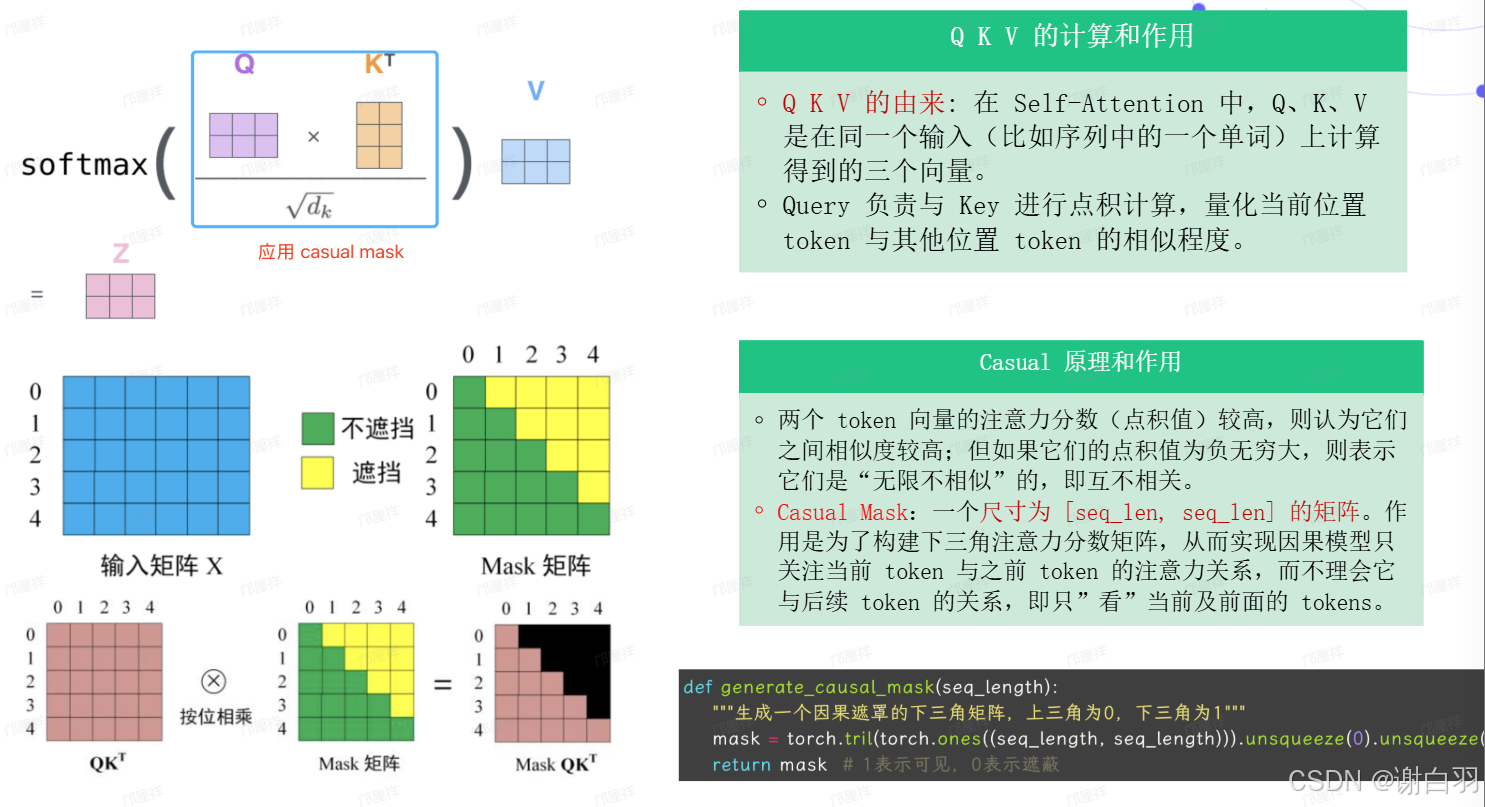
mask-attention(主要是标记后面的qkv不参与计算,电积负无穷大)
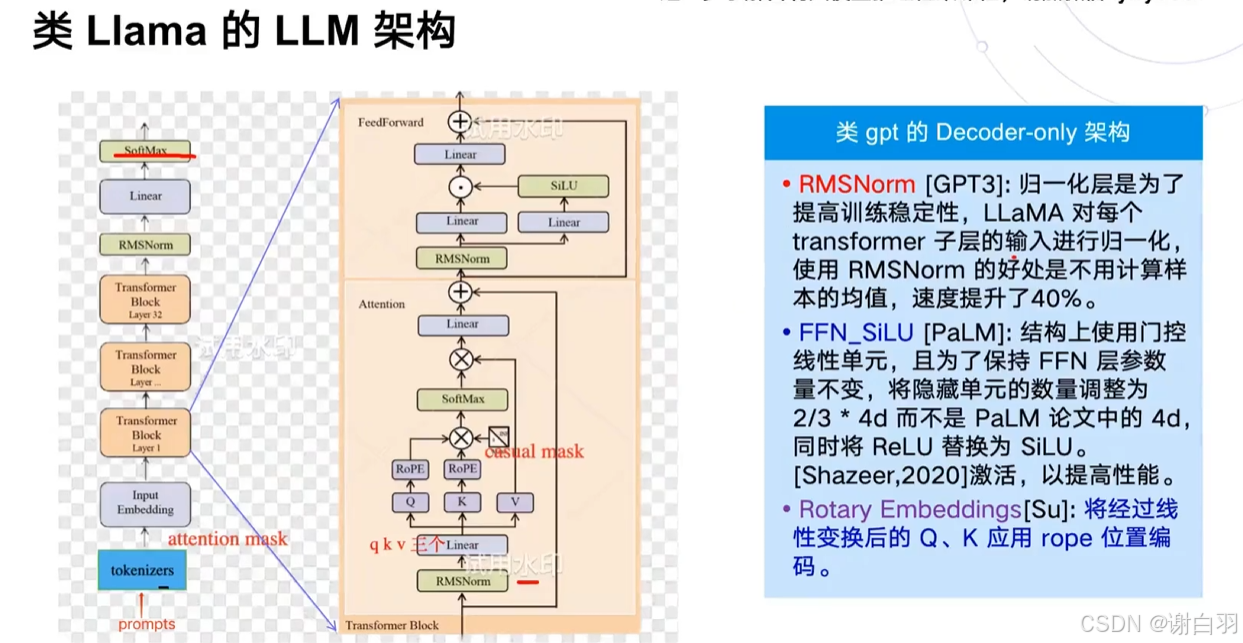
5)类似LLM的模型结构(类GPT的decoder-only自回归模型在deepspeekV2出来之前是主流)
-
llama和transformer结构的区别
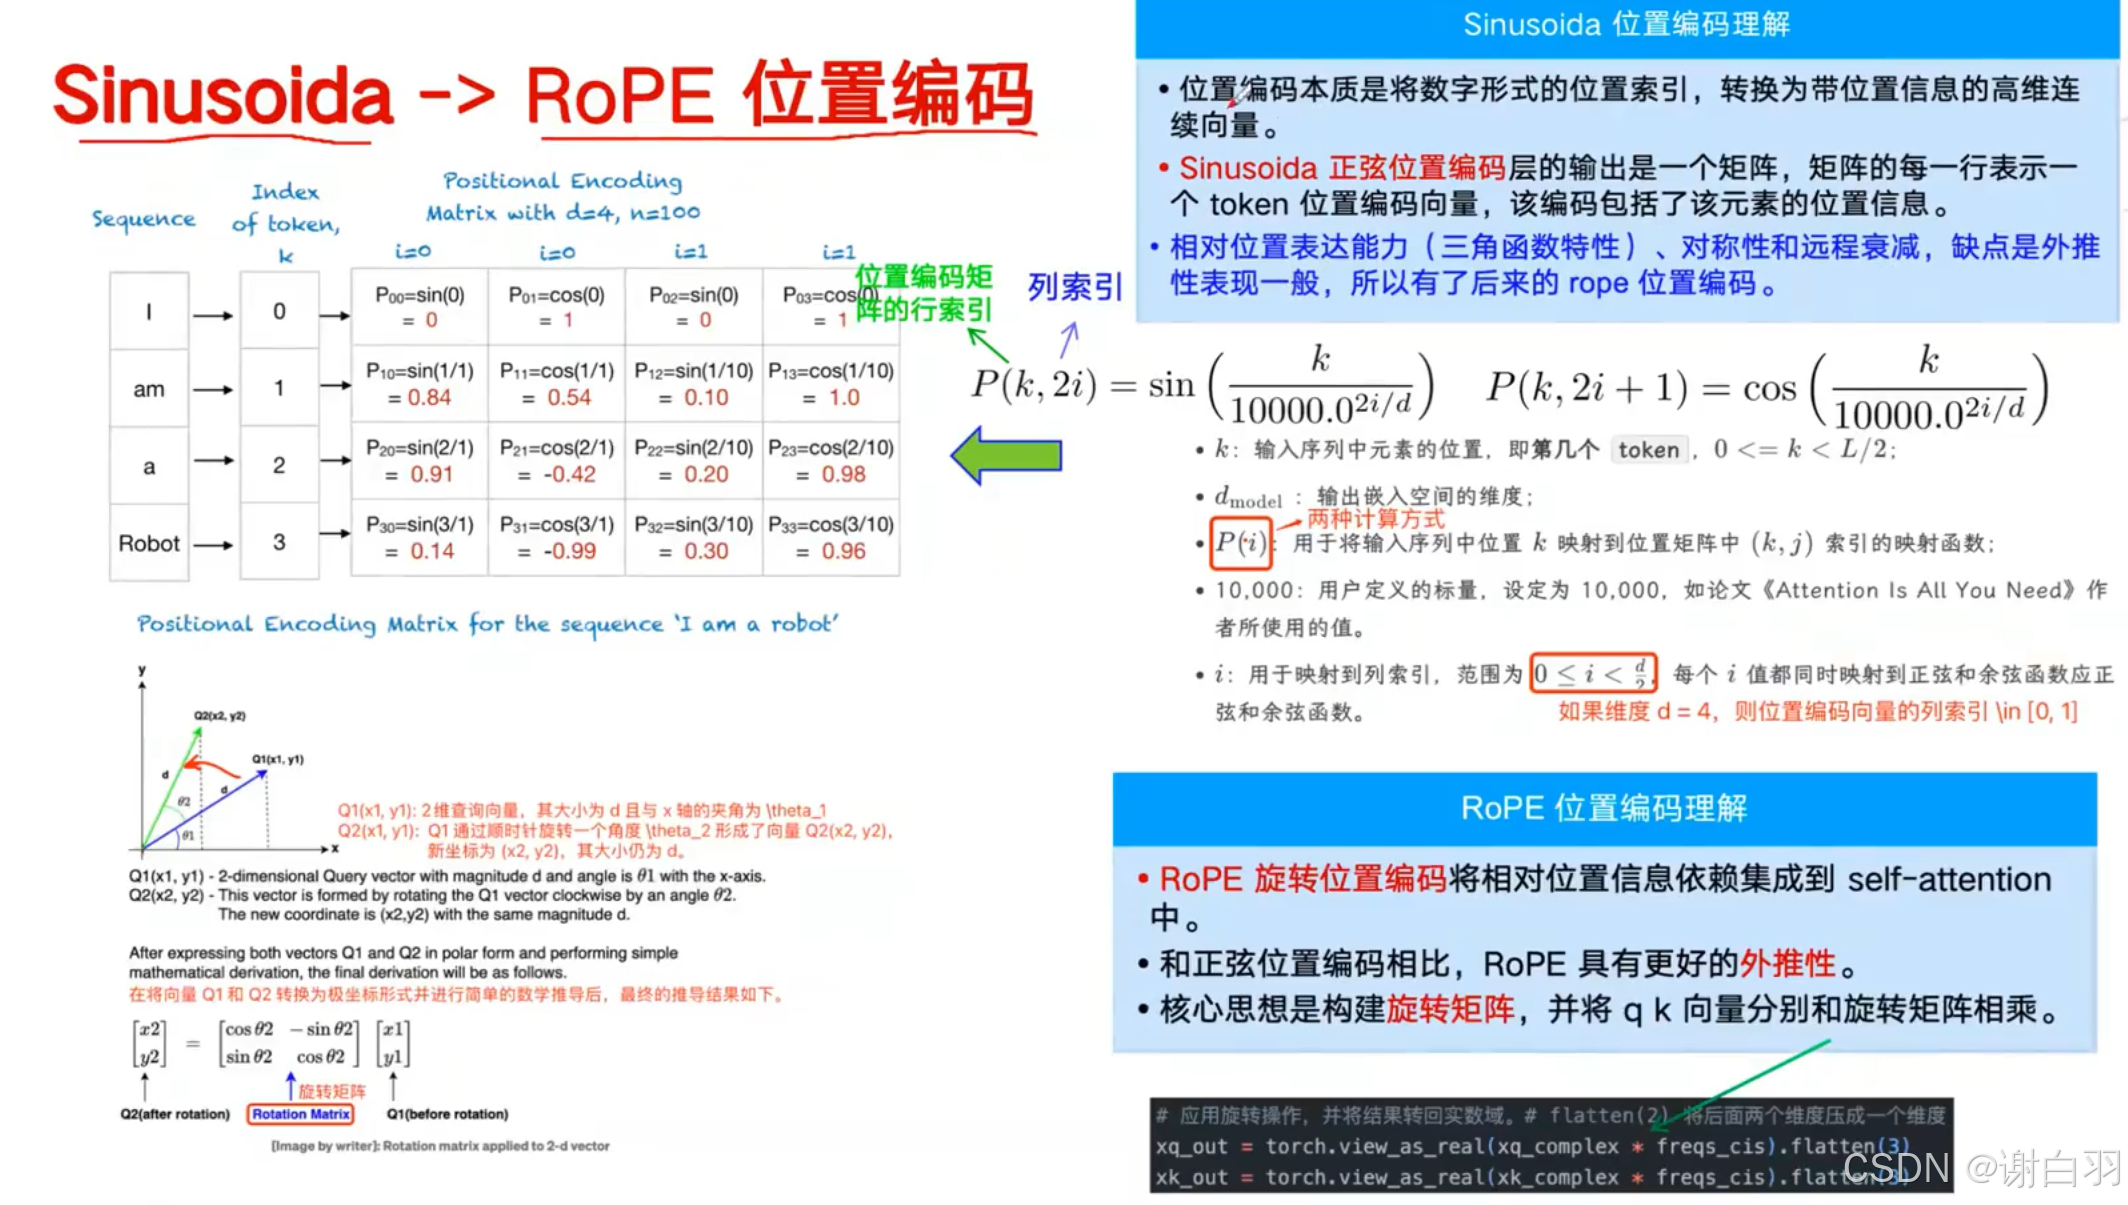
①类llama用的位置编码用的RoPE
②位置编码移动到了attention层里面去做了,在QKV线性变换之后做的
③归一化从layerNorm换成了RMSNorm
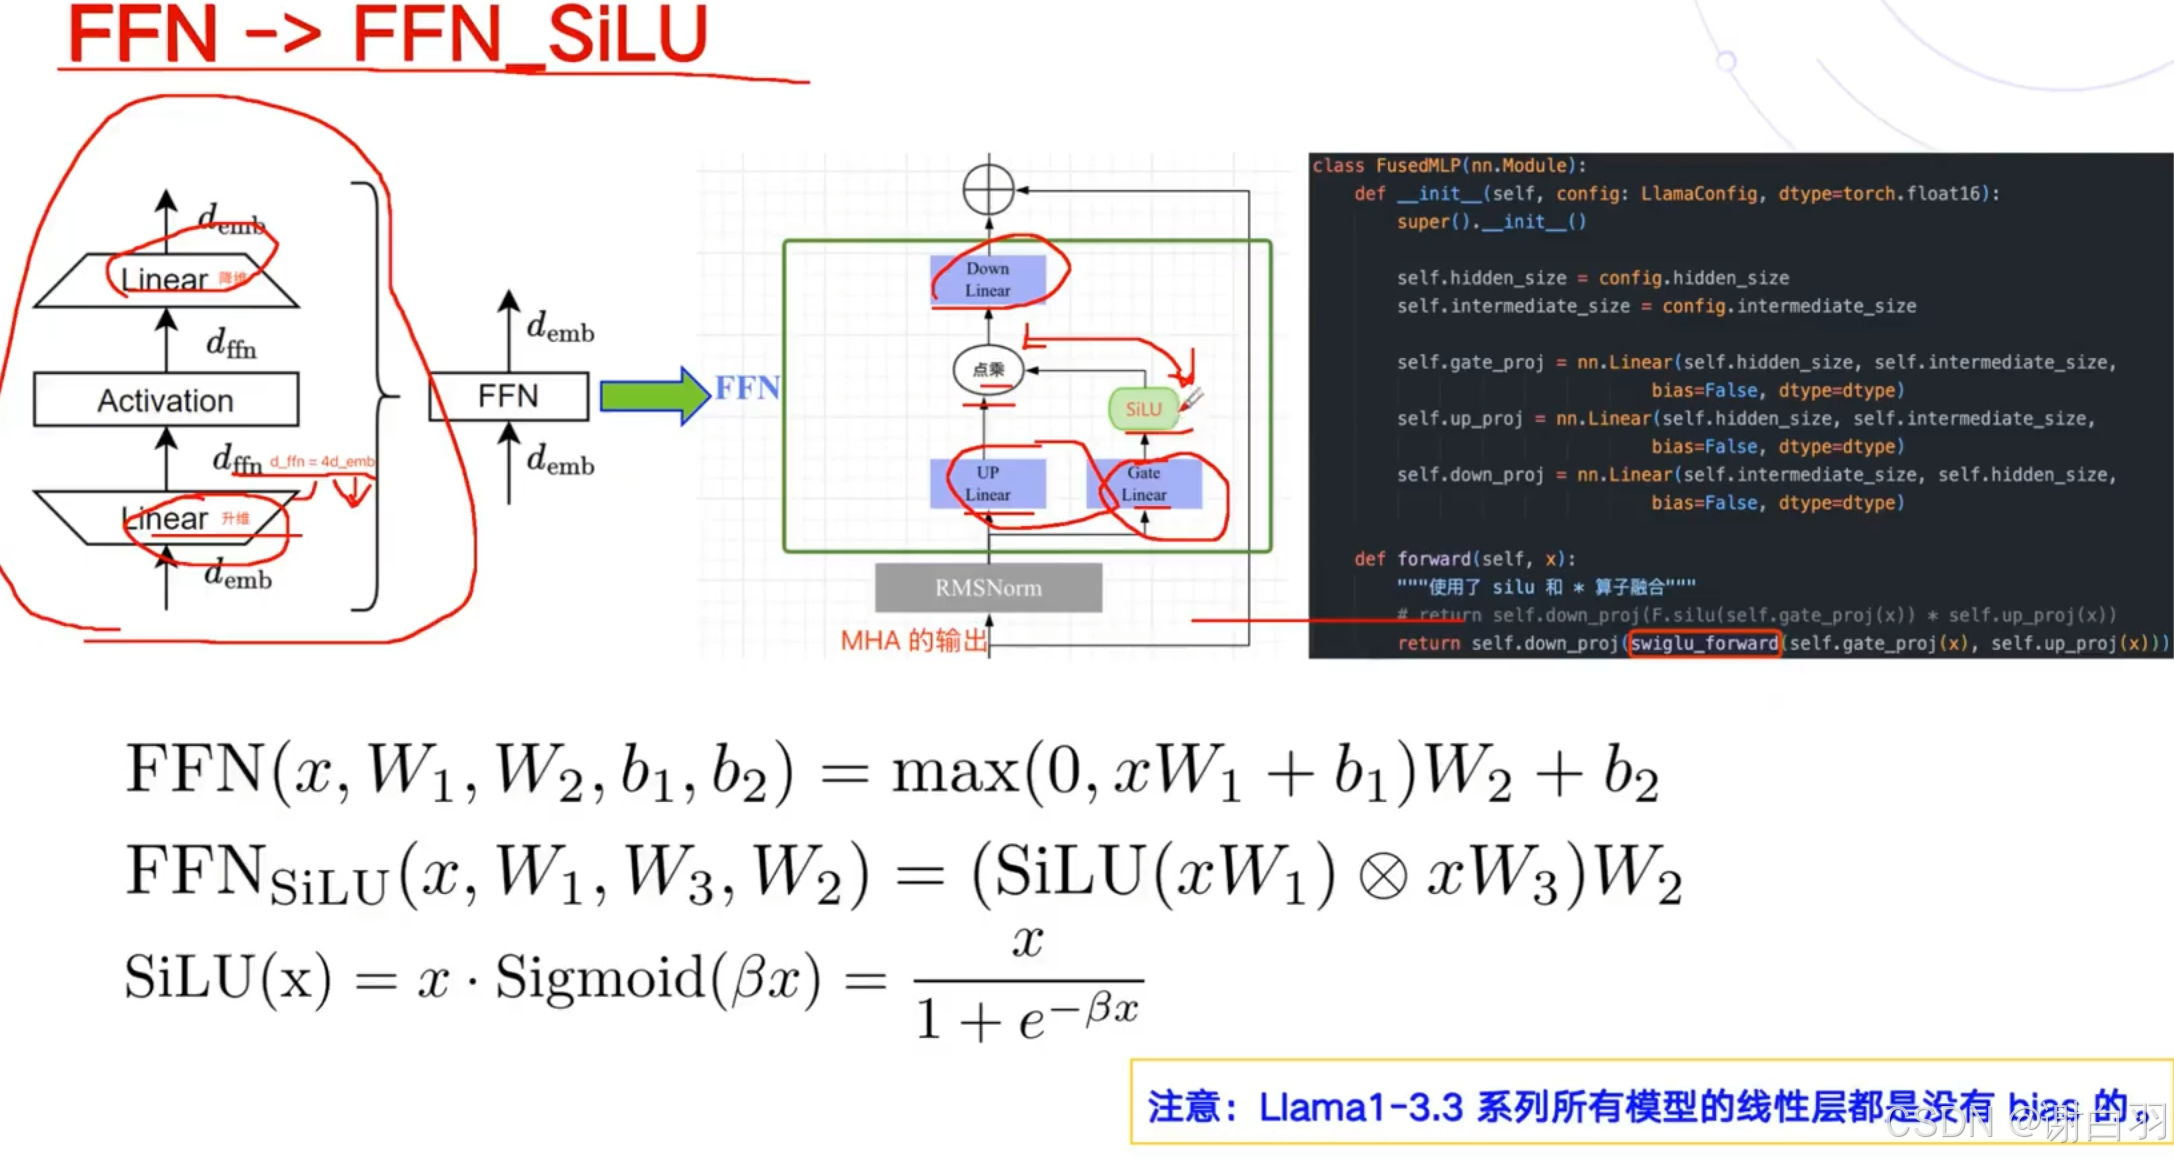
④把FeedForward拆成更细了,拆成三个线性层,激活函数用了SiLU激活更高效点 -
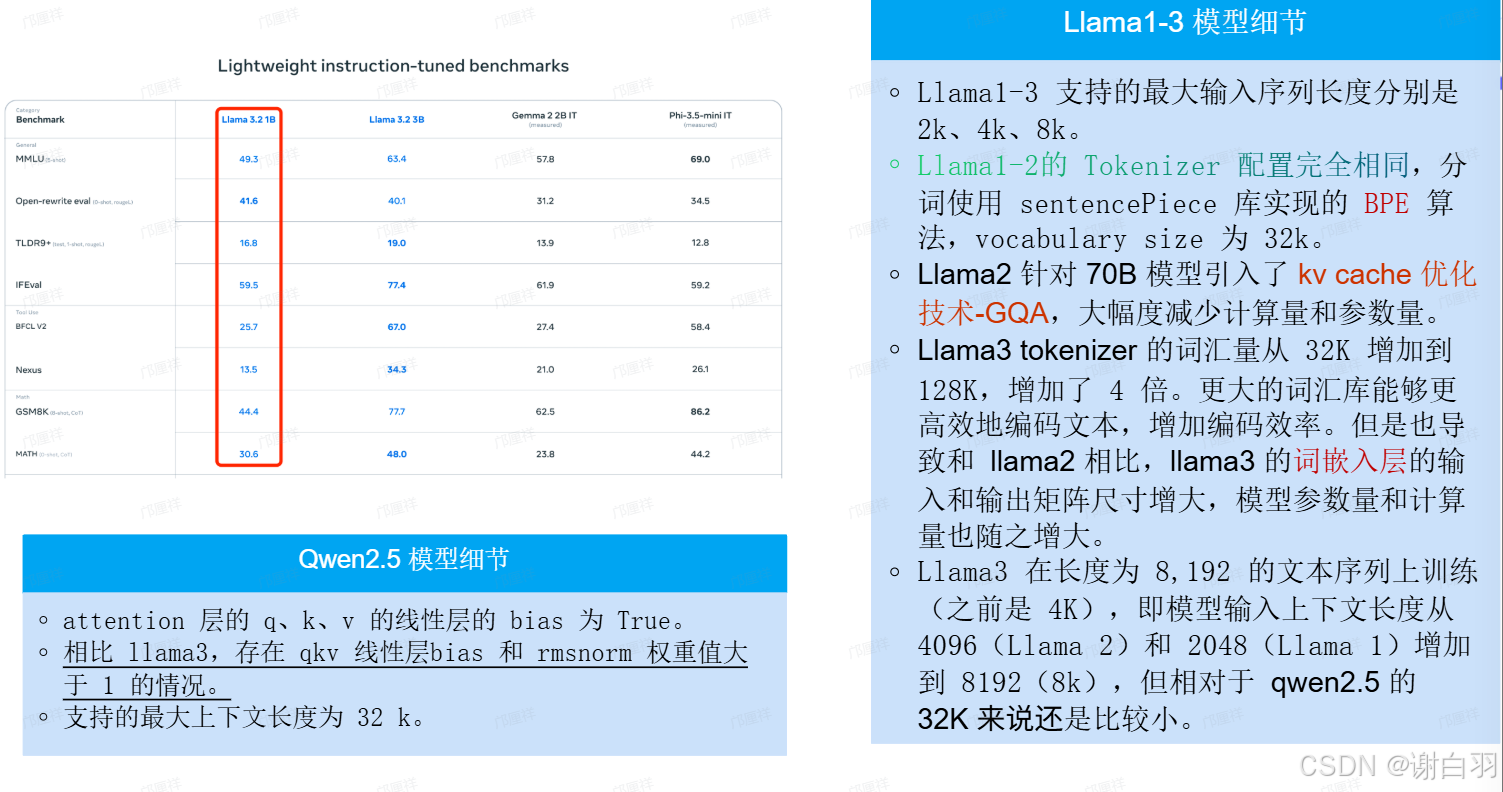
LLAMA 1到3的升级点
6)LLM参数量和计算量的分析
①MHA块的参数量:4h^2+4h
llama没有bias,所以只有4h^2
②MLP参数量:transformer是8h^2+5h
③transformer还有layerNorm,参数量是4h,llama没有layerNorm
④embedding层参数:Vh,V是词汇表,h是hidden size隐藏层大小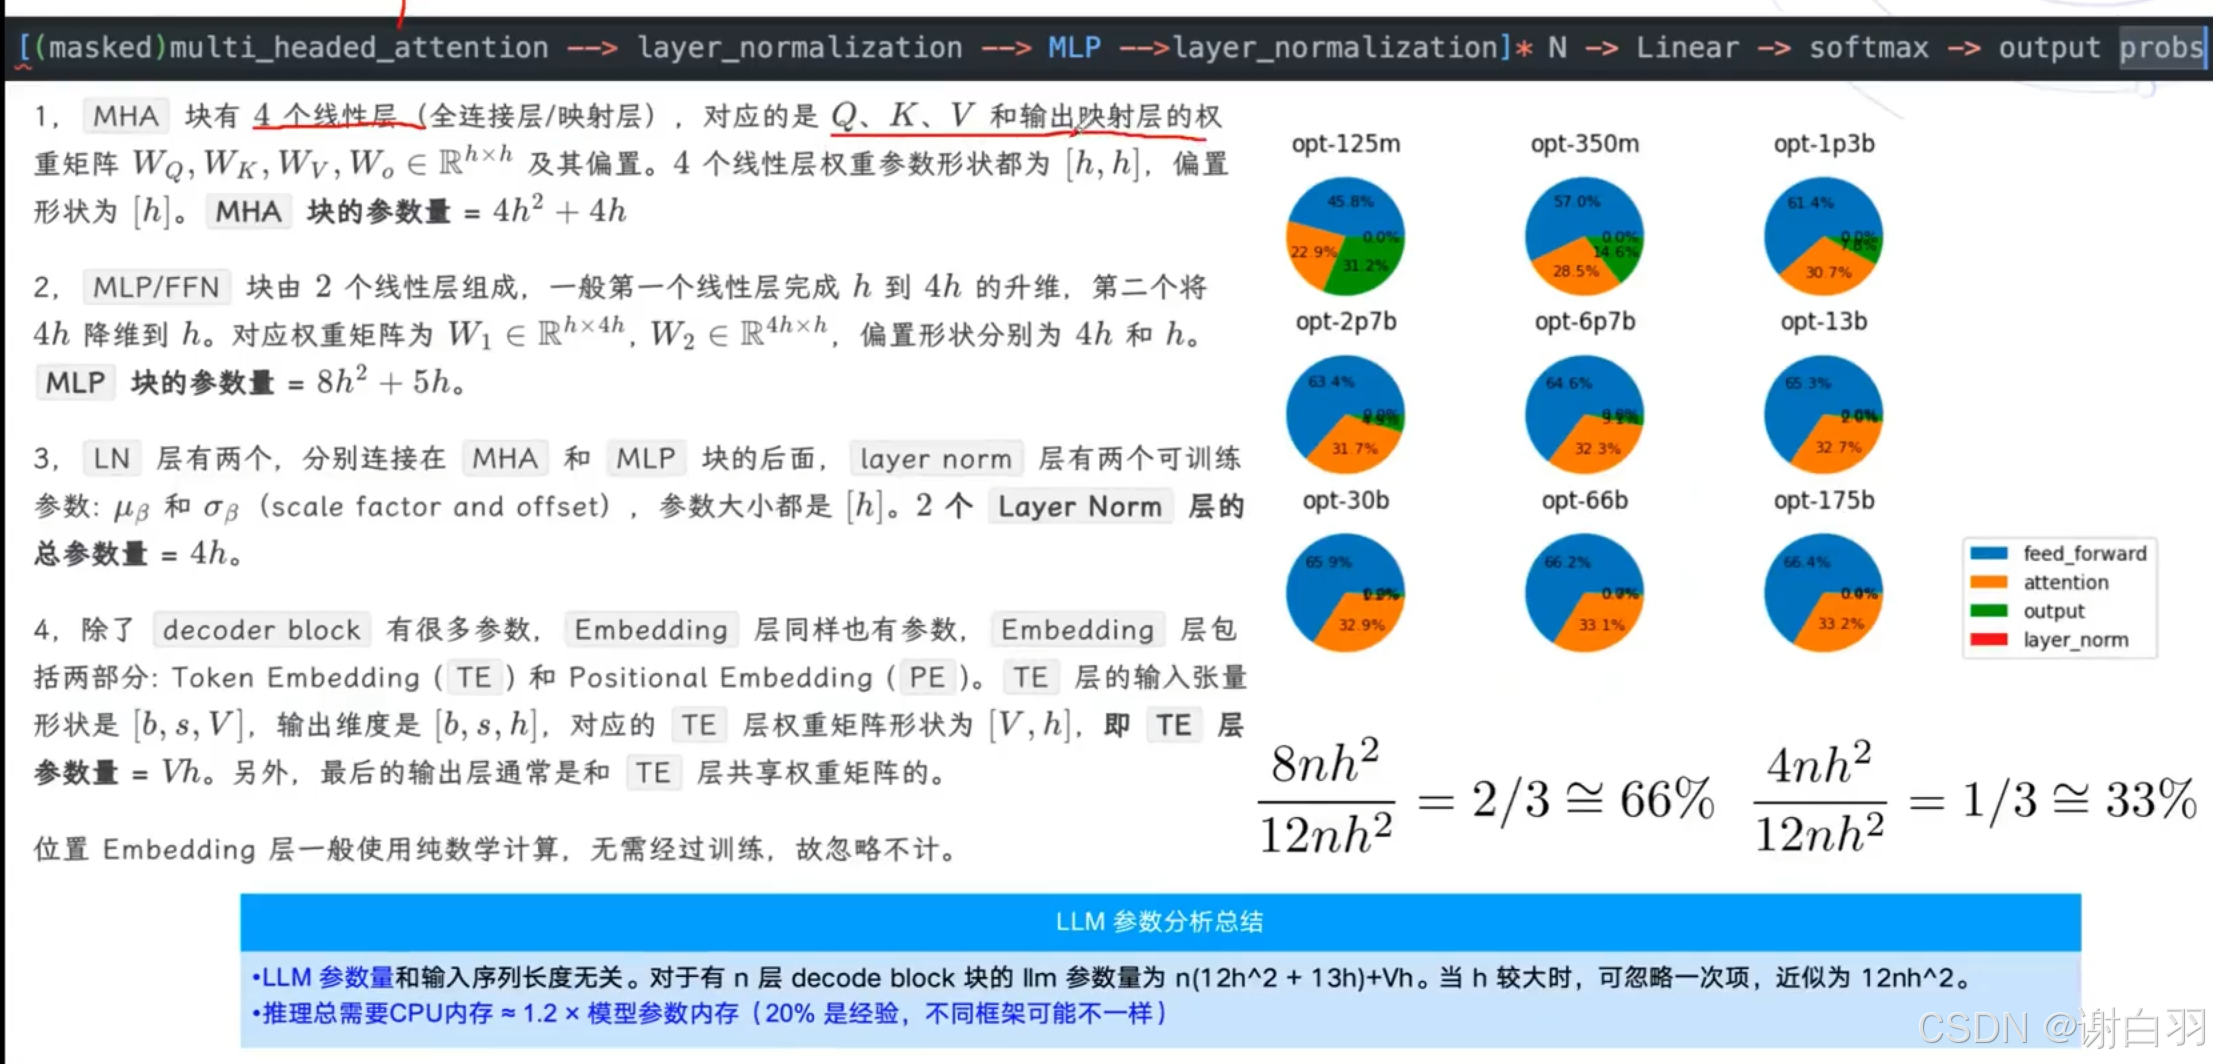
-
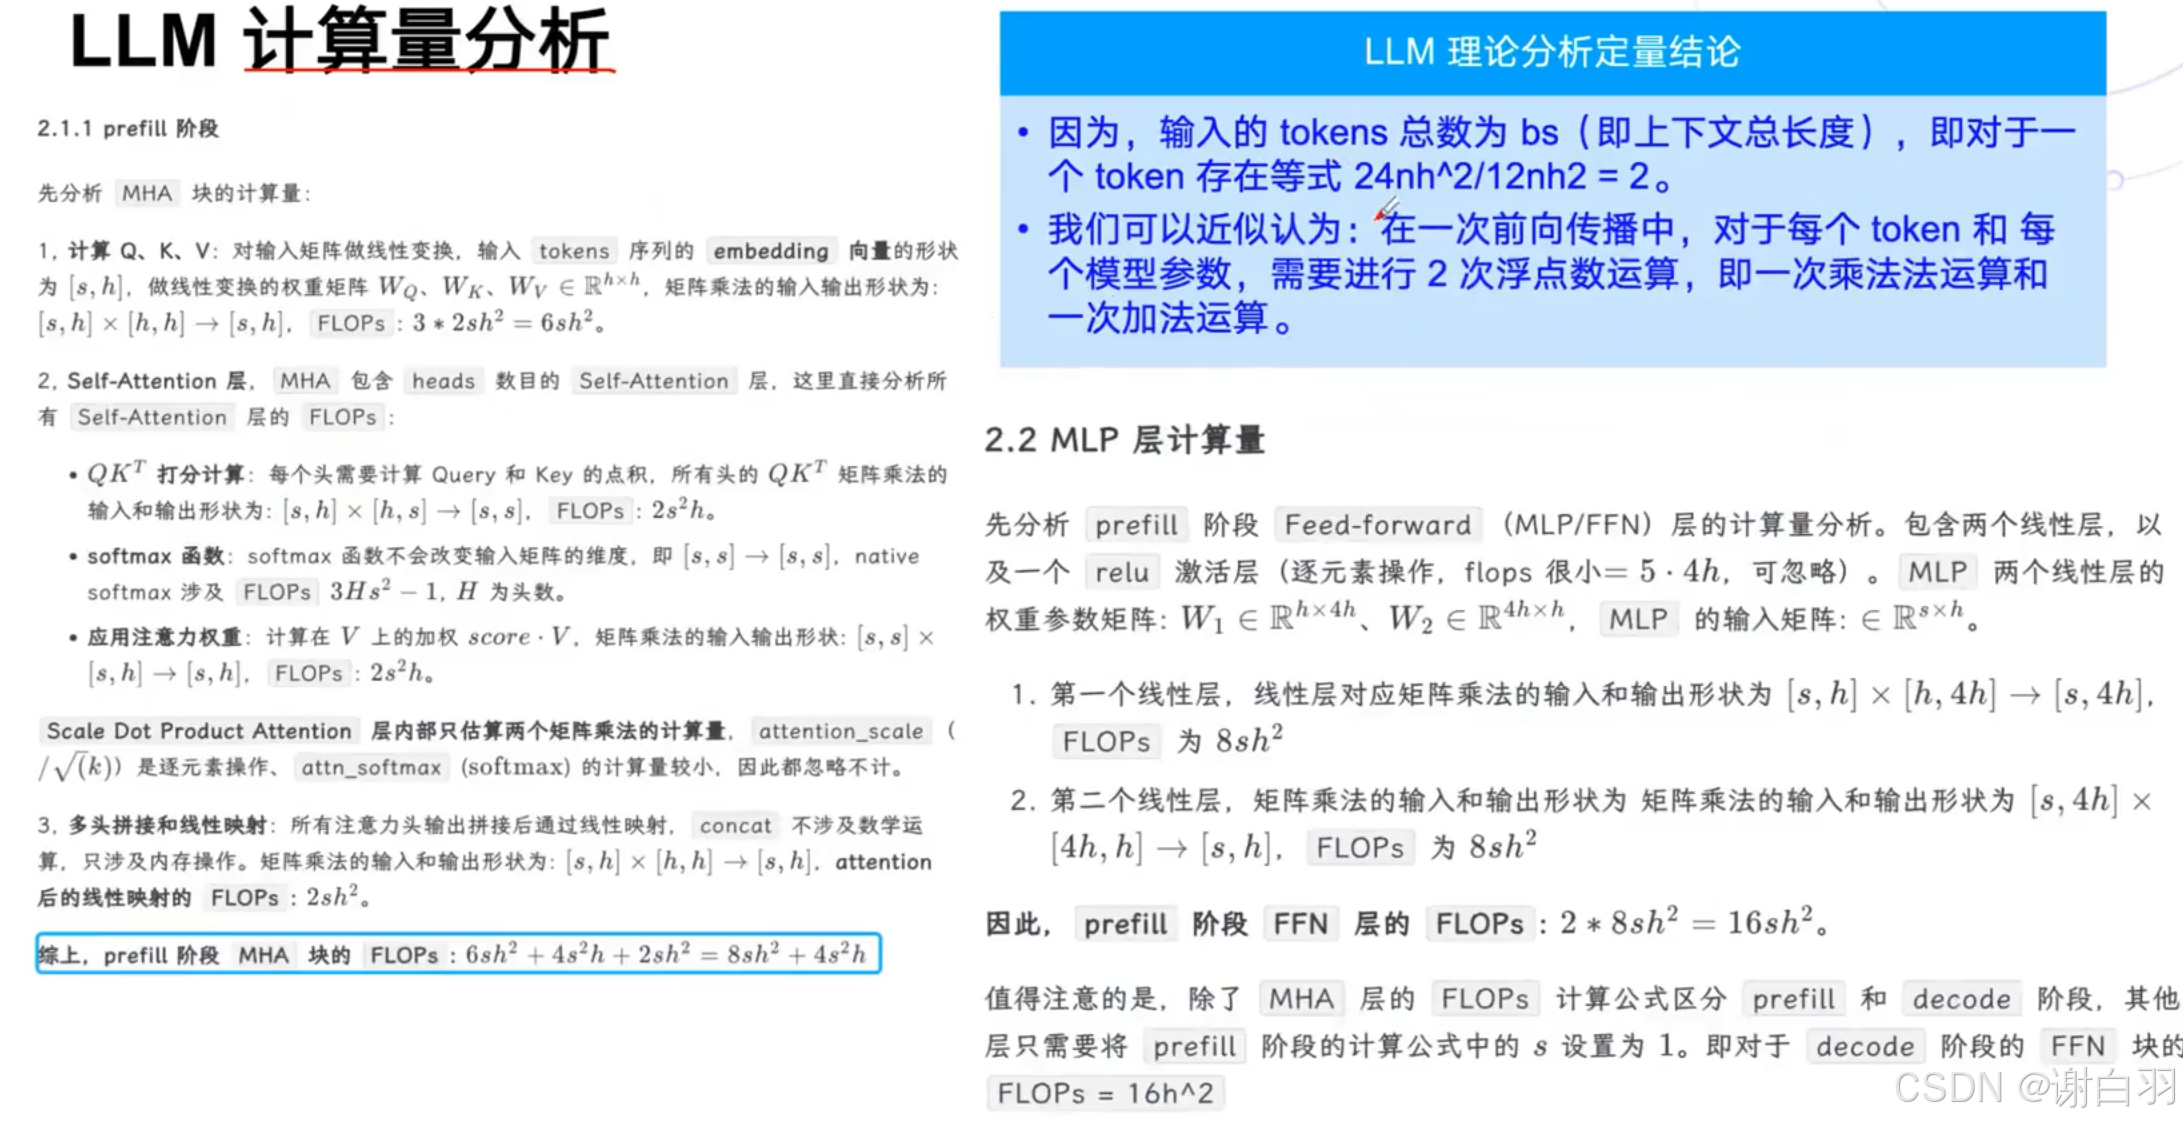
计算量分析
-
LLM定性和定量计算的结论
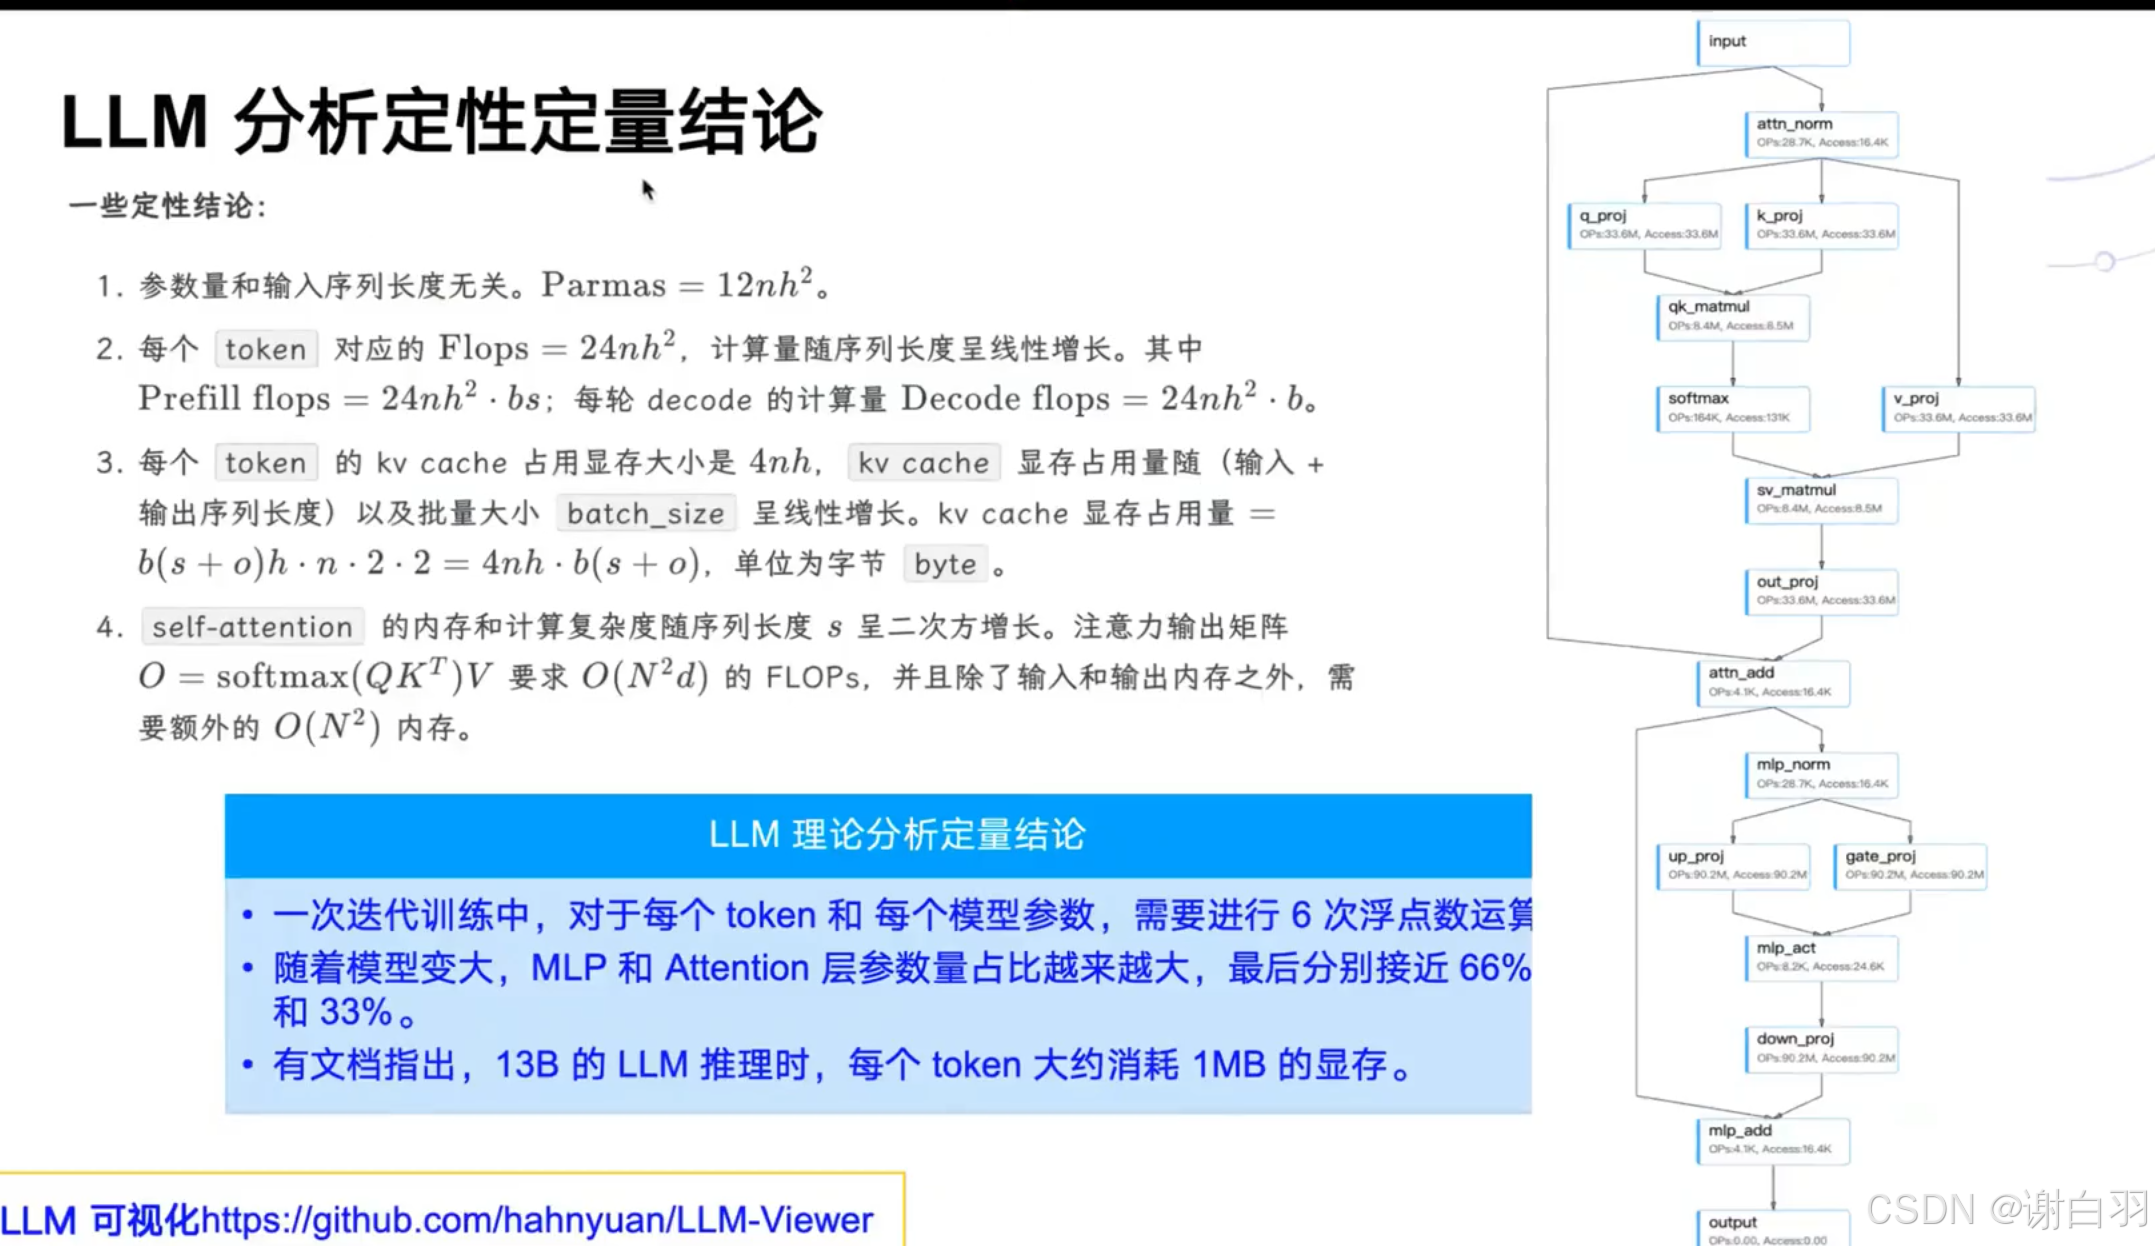
4nh原因:qk需要保存所以是乘2,fp16是需要乘2
7)LLM推理部署概述
prefil
LLM的prefil阶段是计算密集型,一次性处理整个输入序列;自注意力机制 (Self-Attention)+前馈网络 (Feed-Forward Network)+矩阵乘法;decoder阶段是内存密集型:KV缓存,写回到共享内存
- 常见推理框架
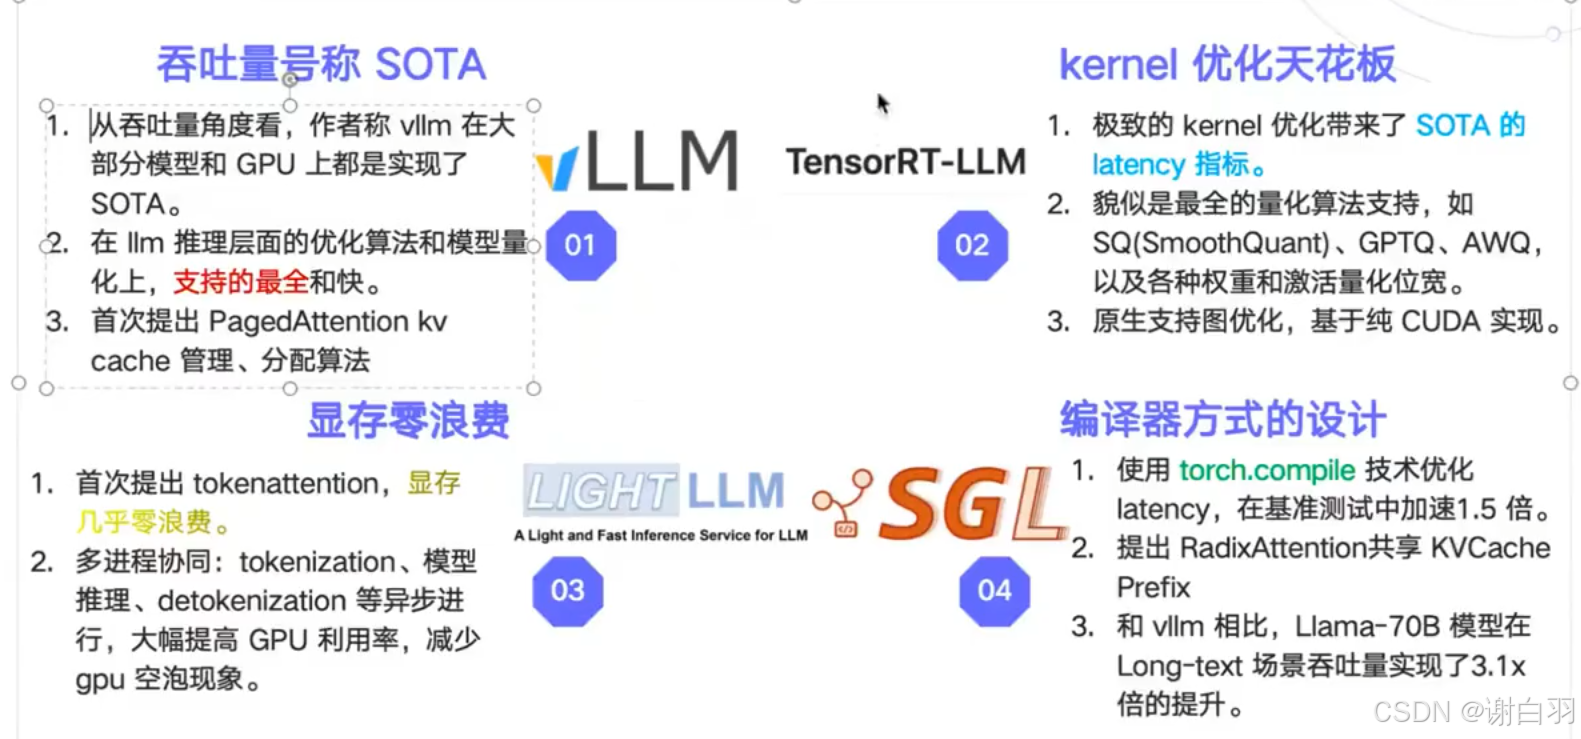
llama.coo主要是应用在安卓端,云端用的不多
SOTA:前沿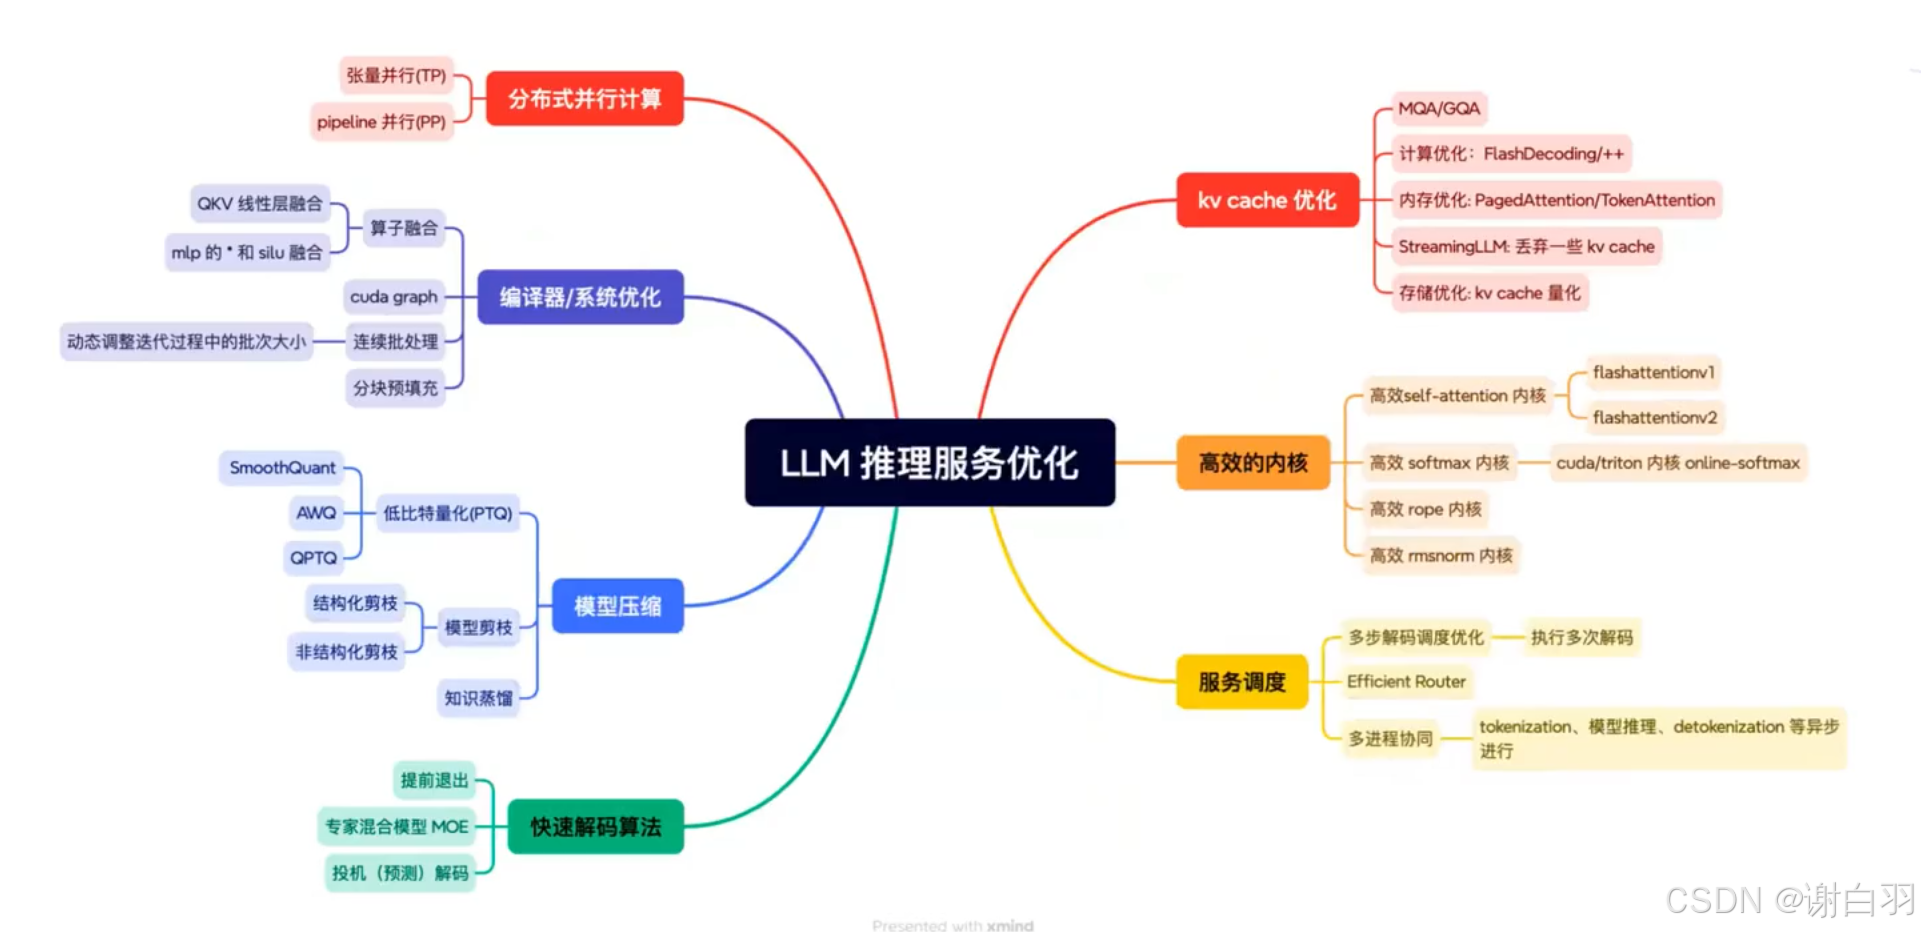
①deepspeek的MOE(Mixture of Experts)结构通常需要专家并行计算
②快速解码:主流是投机解码
③kv cache优化:其中steamingLLM主要是针对文档查询、多轮对话,上下文超级大,丢弃不重要的kv cache。
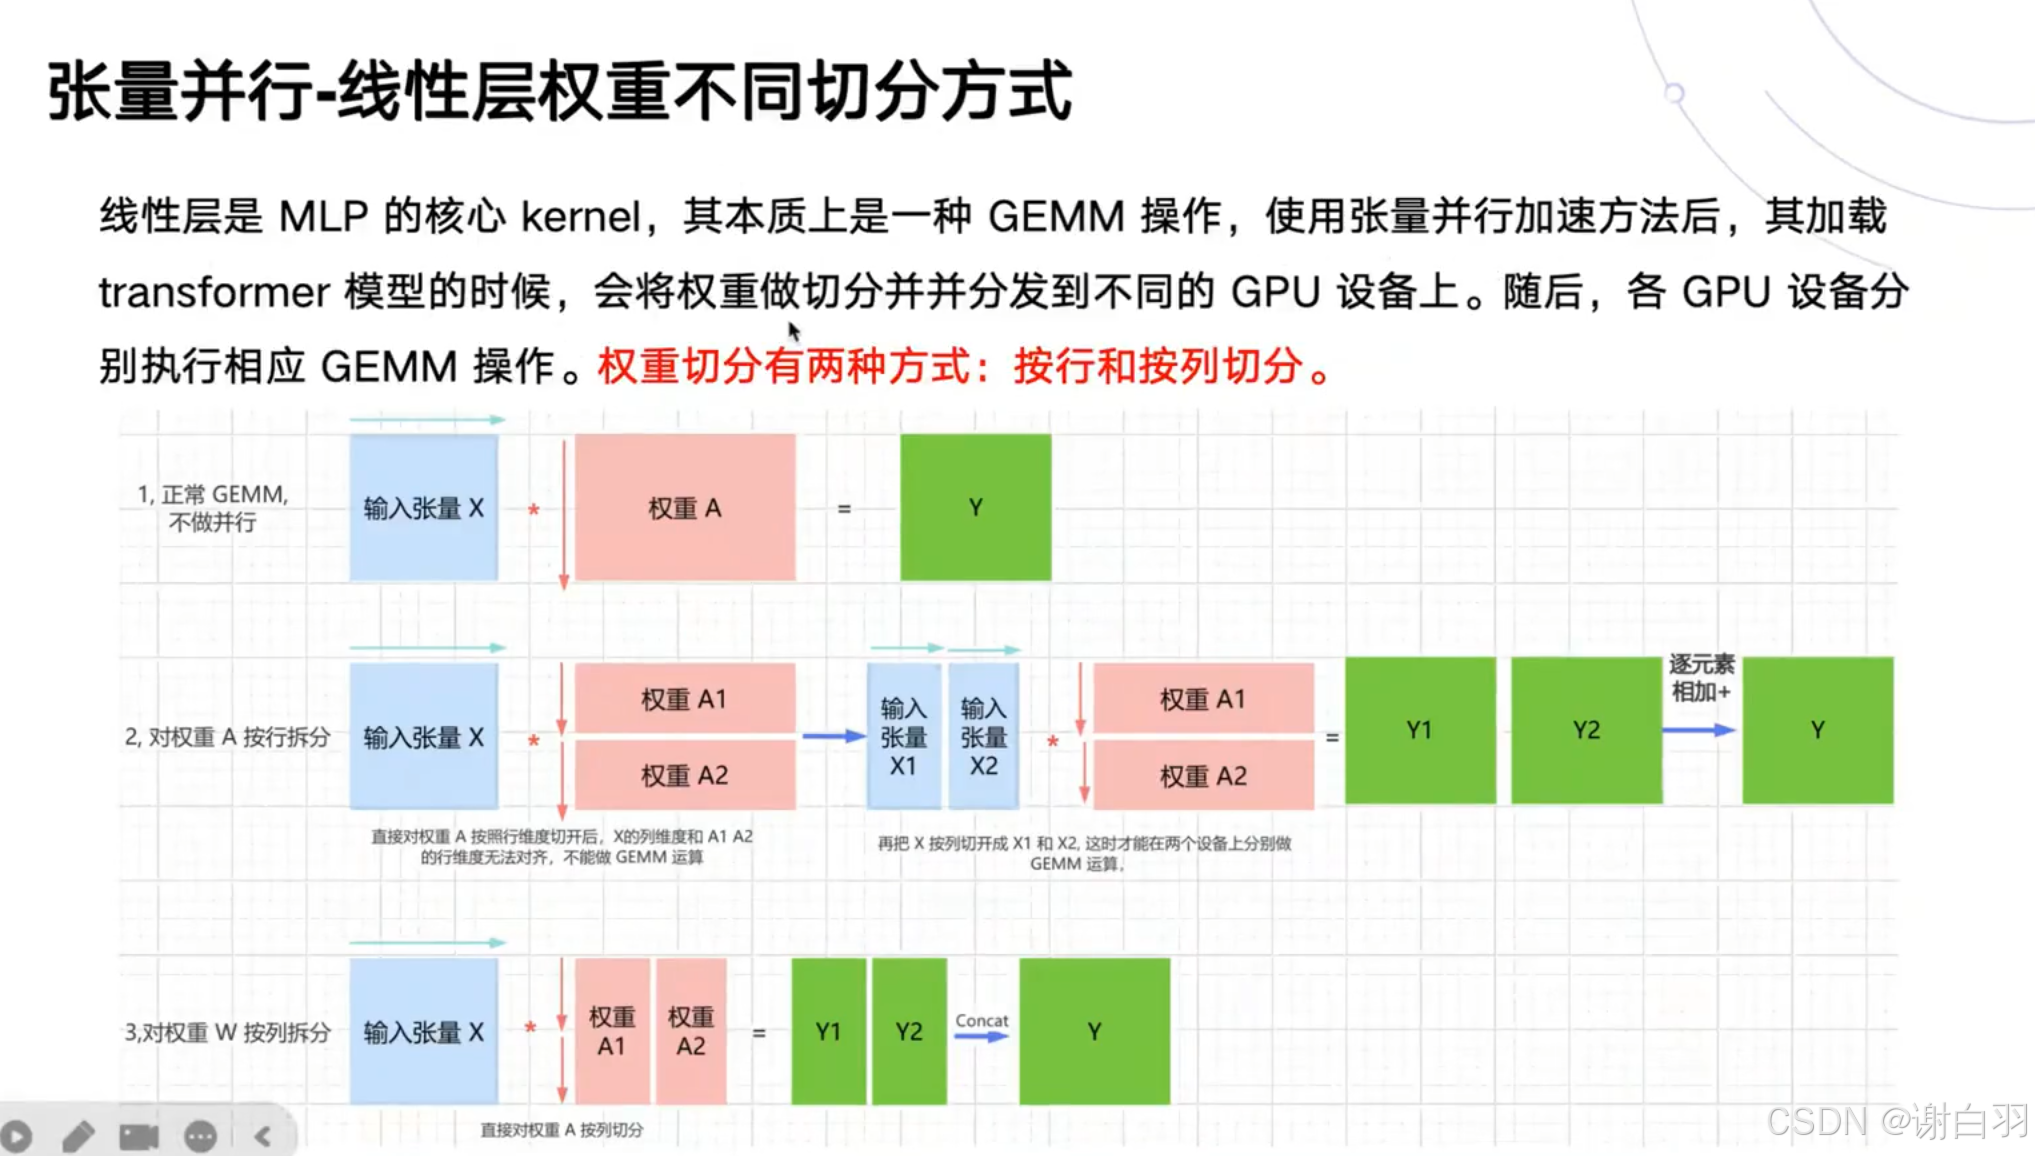
8)优化技术-张量并行
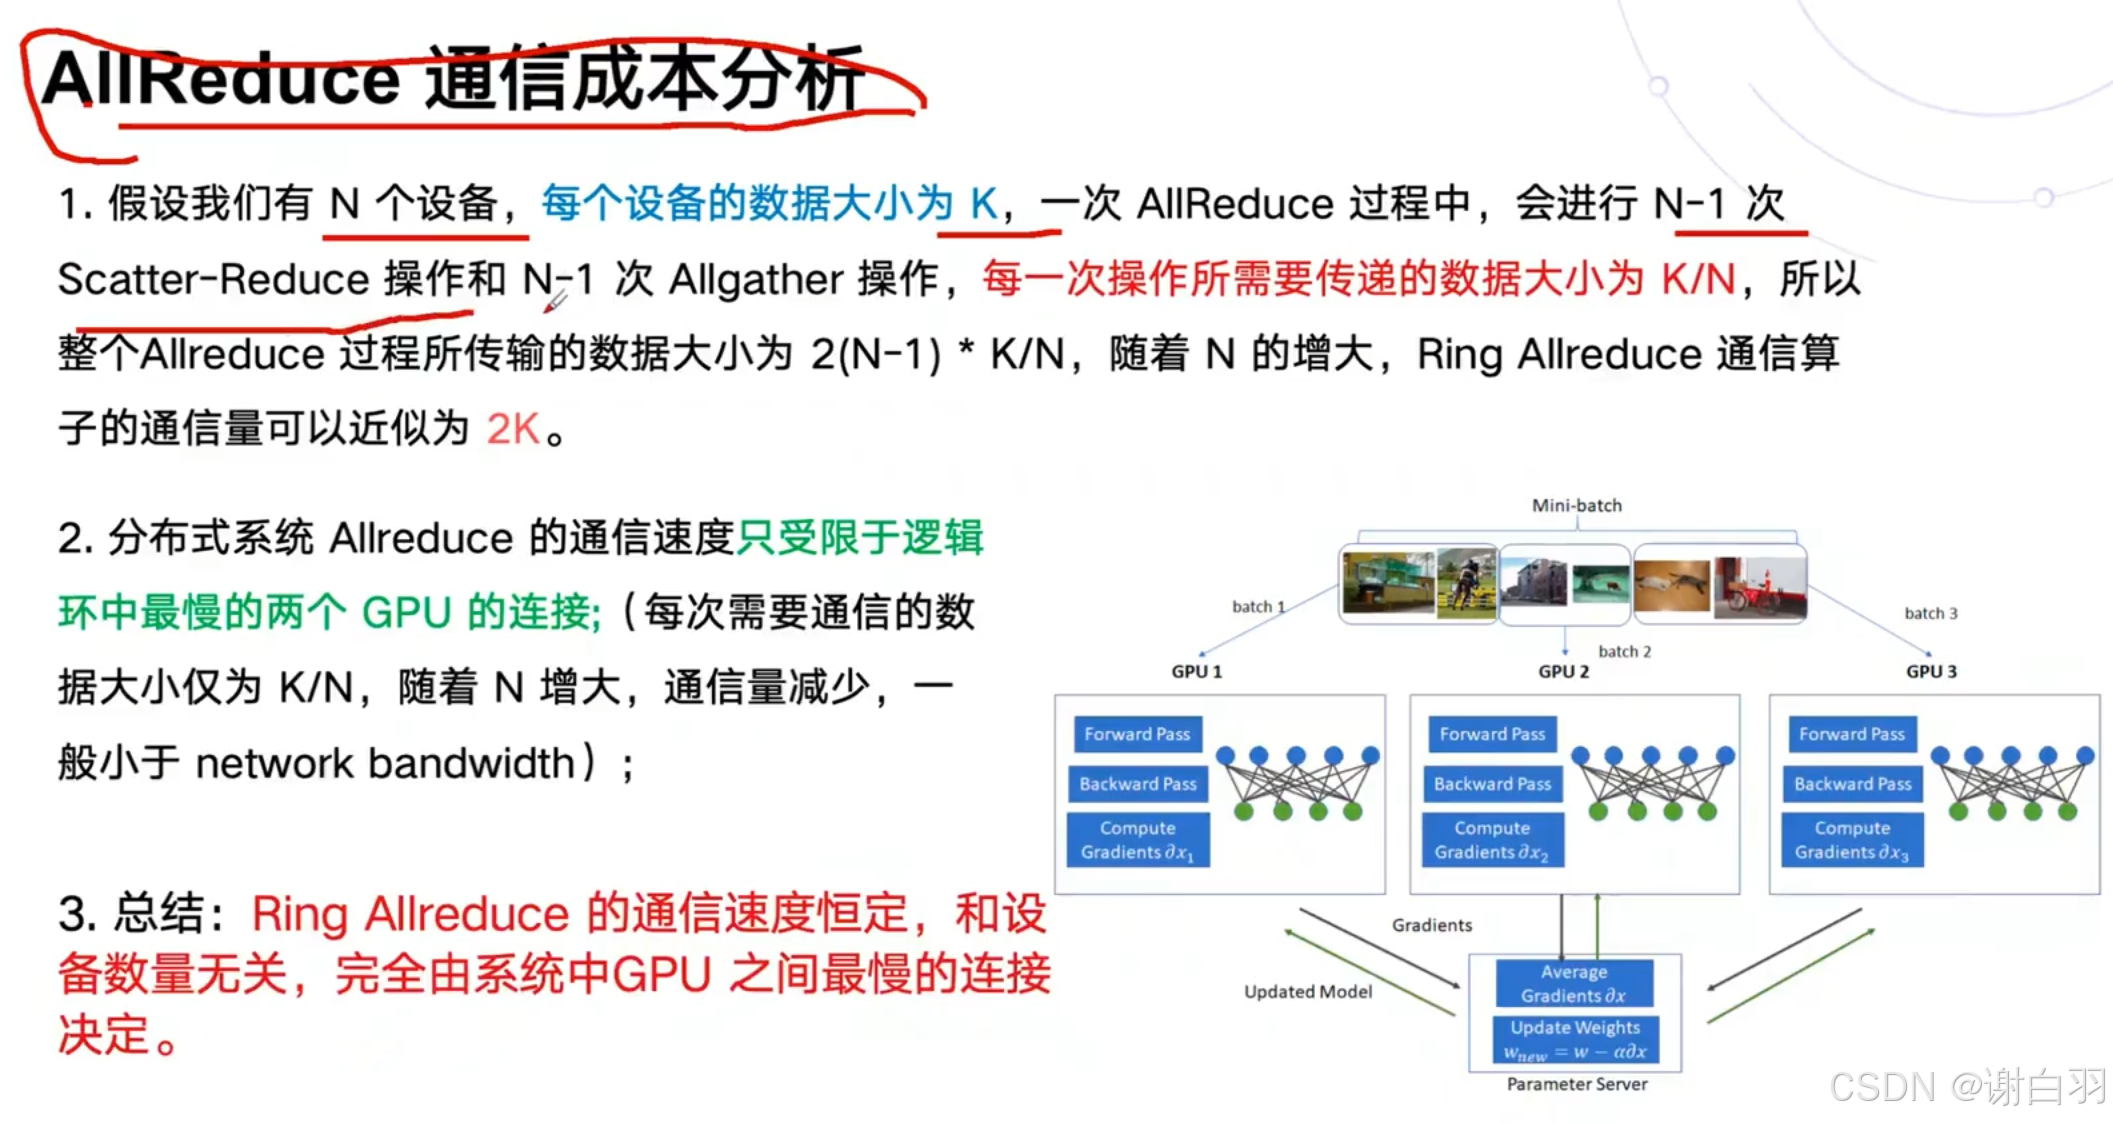
- 集合通信基础概念
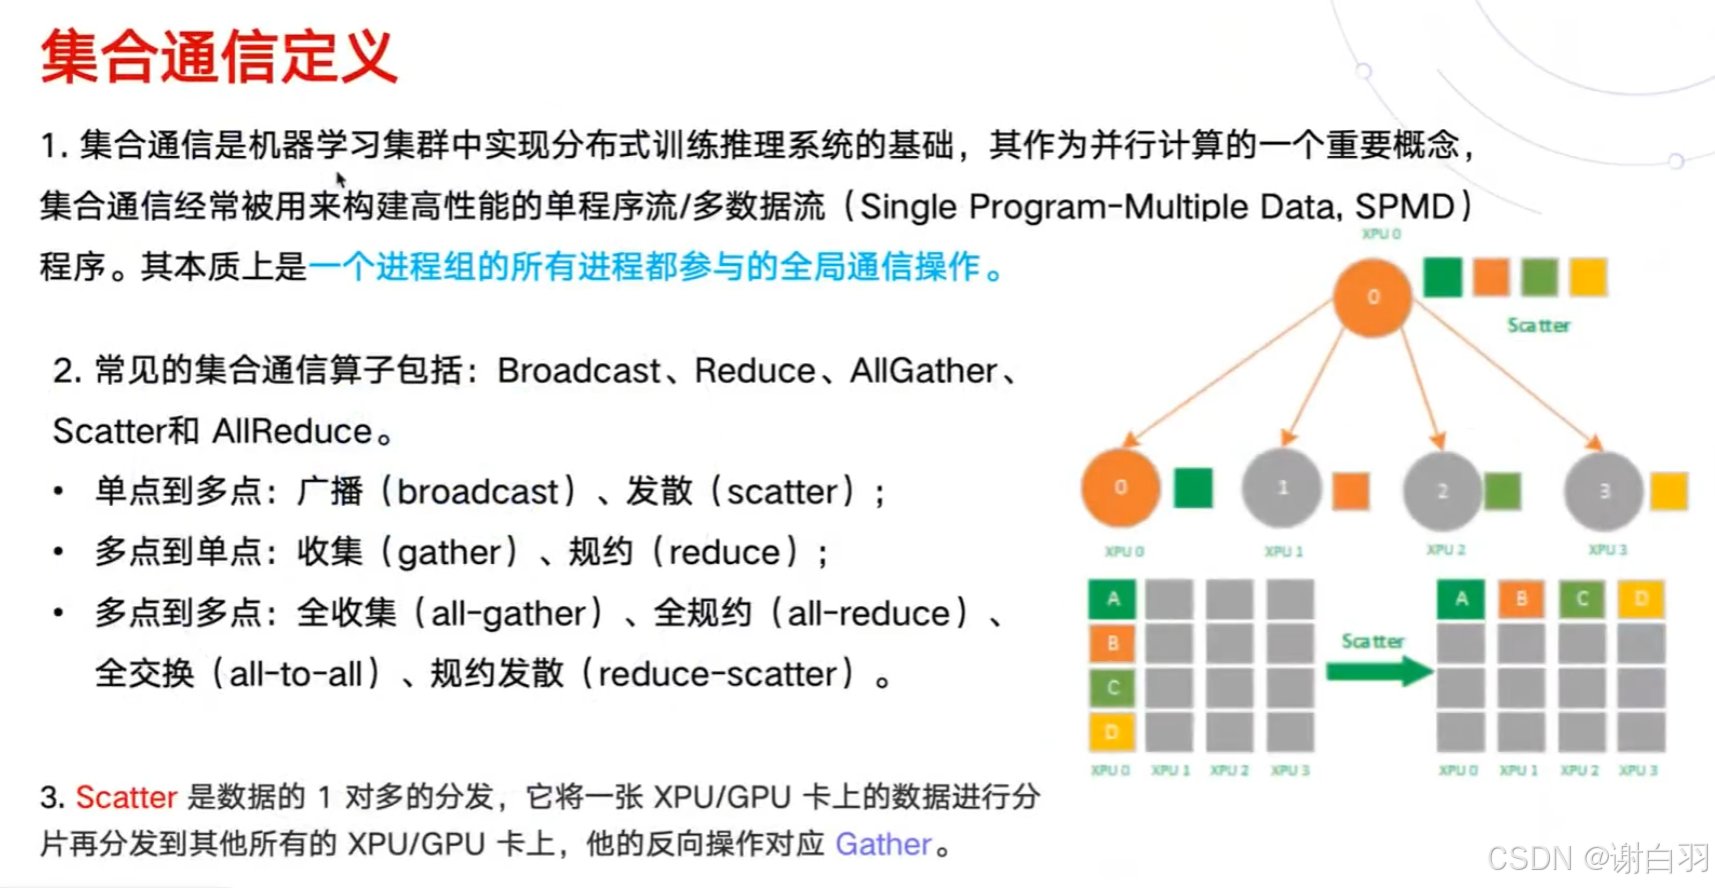
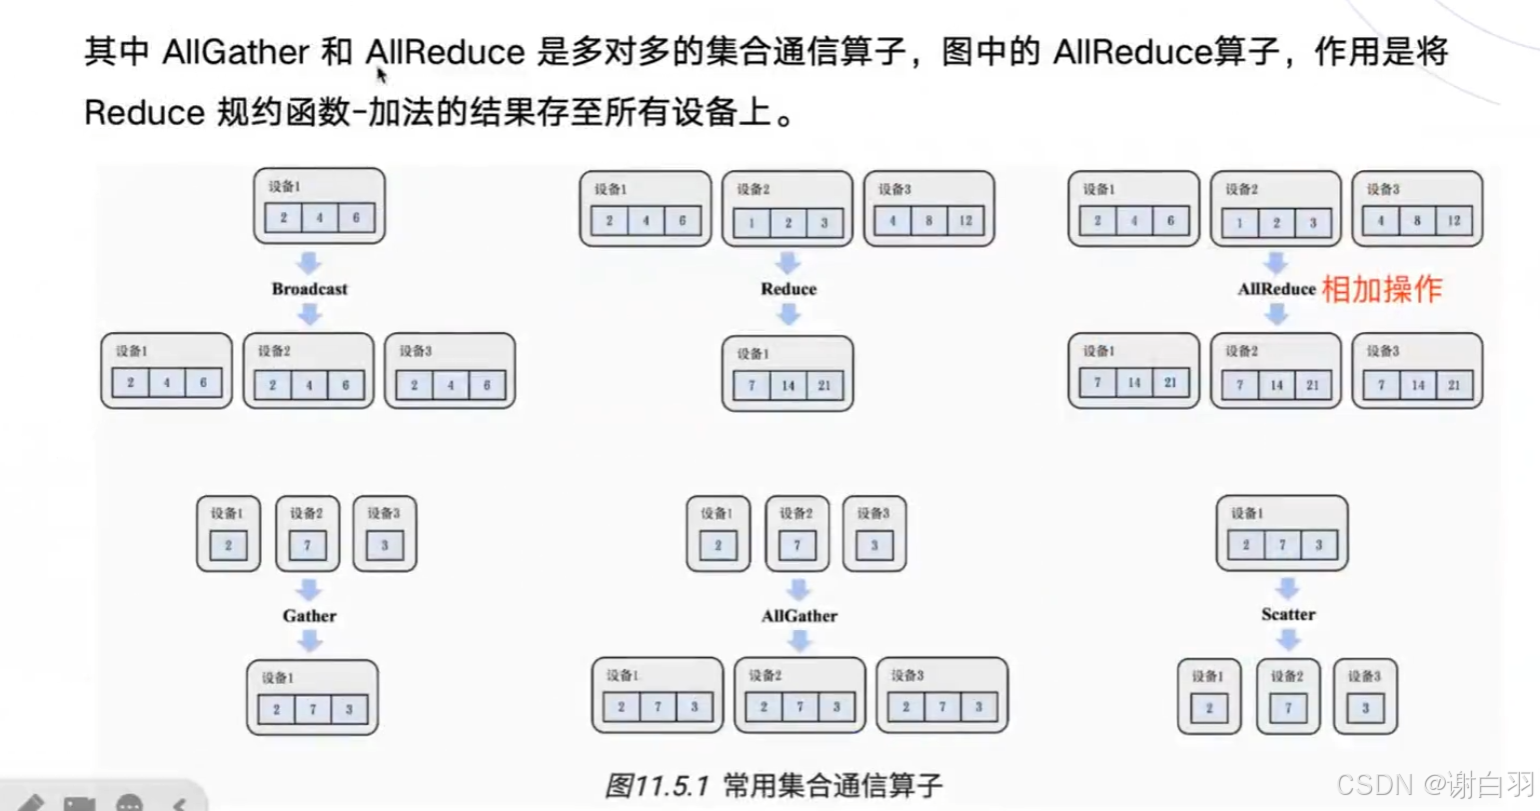
- 成本分析
- 数据并行和模型并行
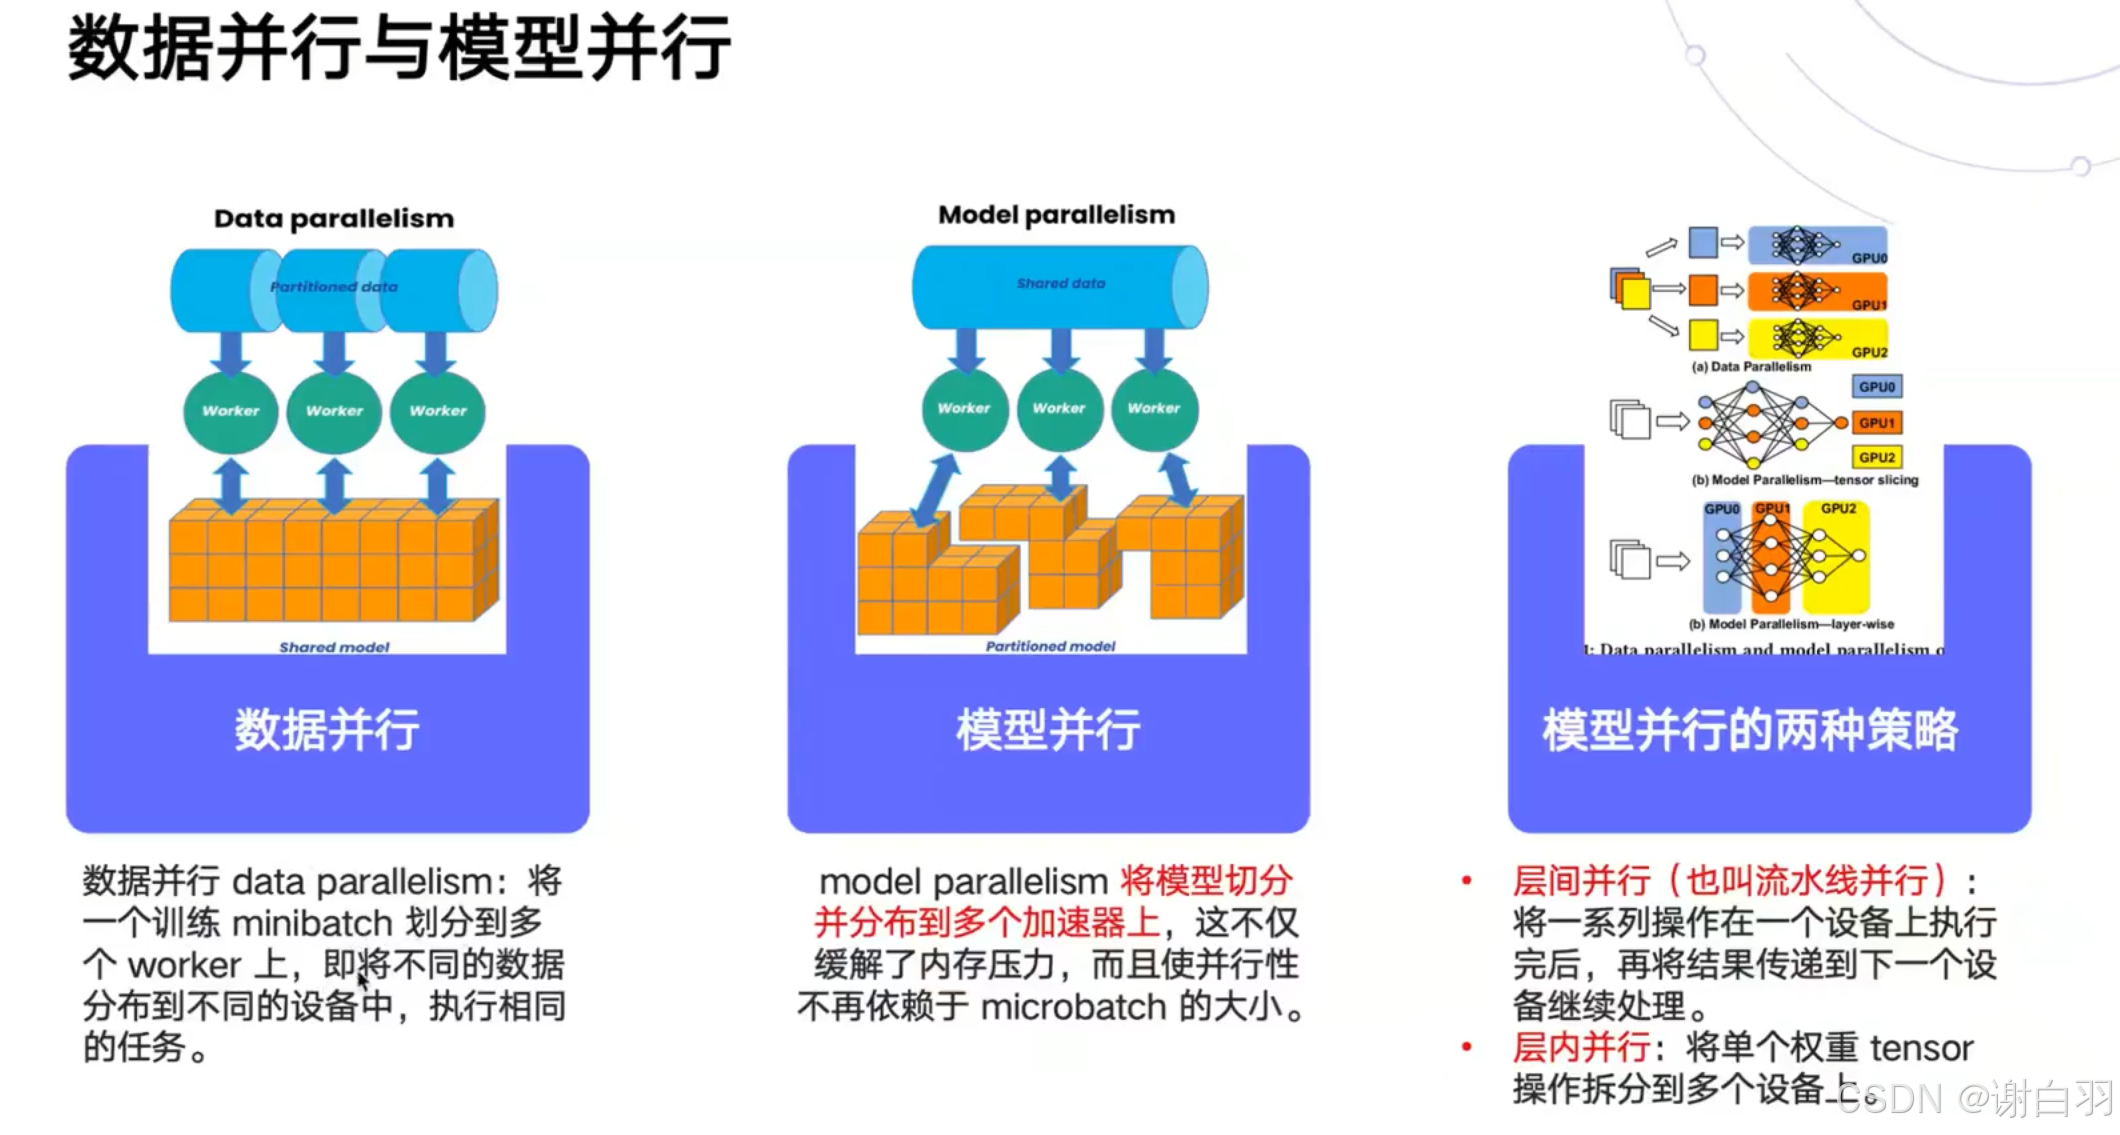
- 张量并行(模型根据权重做切分到不同GPU设备上)
一、环境准备
1)操作系统和编译器
①操作系统
优先选择 Ubuntu 22.04,Ubuntu 18.04/20.04 也可兼容;如果是Windows系统,则可以配置WSL来使用Ubuntu系统,可以参考以下文章:https://zhuanlan.zhihu.com/p/36482795 如果Windows应用商店无法连接,可以考虑关闭代理
②编译器
请检查当前系统的 GCC/G++ 编译器版本。若未安装,可使用 apt 包管理器进行安装;若已安装,可通过执行 gcc -v 或 g++ -v 查看版本信息。本文作者所使用的 GCC/G++ 版本为 11.4,该版本为 Ubuntu 22.04 发行版的默认编译器版本
(base) shuaibi@node5:~$ gcc --version
gcc (Ubuntu 11.4.0-1ubuntu1~22.04.2) 11.4.0
Copyright (C) 2021 Free Software Foundation, Inc.
This is free software; see the source for copying conditions.  There is NO
warranty; not even for MERCHANTABILITY or FITNESS FOR A PARTICULAR PURPOSE.

(base) shuaibi@node5:~$ g++ --version
g++ (Ubuntu 11.4.0-1ubuntu1~22.04.2) 11.4.0
Copyright (C) 2021 Free Software Foundation, Inc.
This is free software; see the source for copying conditions.  There is NO
warranty; not even for MERCHANTABILITY or FITNESS FOR A PARTICULAR PURPOSE.
如果以上命令报错,就使用apt包管理器对C++编译器进行安装。
(base) shuaibi@node5:~$ sudo apt update
(base) shuaibi@node5:~$ sudo apt install gcc
(base) shuaibi@node5:~$ sudo apt install g++
2)NVCC(Cuda)安装(显卡驱动和cuda toolkit的安装)
- 注意点
①如果是使用学校或企业服务器,不建议自行安装驱动,建议联系系统管理员处理。一般来说,学校或企业服务器往往已经安装过了合适的NVIDIA驱动
②本节内容主要适用于尚未安装驱动的个人电脑用户。特别提醒:在WSL(Windows Subsystem for Linux)环境下,NVIDIA驱动由宿主机Windows提供,无需在WSL中单独安装。
查看显卡的型号
首先,我们需要确认个人电脑中的NVIDIA显卡型号。如果已知型号,则无需执行查询命令。以我的设备为例,这是一台配备8张NVIDIA GeForce RTX 3090的服务器。
(base) shuaibi@node5:~$ lspci | grep -i nvidia
1a:00.0 VGA compatible controller: NVIDIA Corporation GA102 [GeForce RTX 3090] (rev a1)
1a:00.1 Audio device: NVIDIA Corporation GA102 High Definition Audio Controller (rev a1)
1b:00.0 VGA compatible controller: NVIDIA Corporation GA102 [GeForce RTX 3090] (rev a1)
1b:00.1 Audio device: NVIDIA Corporation GA102 High Definition Audio Controller (rev a1)
3d:00.0 VGA compatible controller: NVIDIA Corporation GA102 [GeForce RTX 3090] (rev a1)
3d:00.1 Audio device: NVIDIA Corporation GA102 High Definition Audio Controller (rev a1)
3e:00.0 VGA compatible controller: NVIDIA Corporation GA102 [GeForce RTX 3090] (rev a1)
3e:00.1 Audio device: NVIDIA Corporation GA102 High Definition Audio Controller (rev a1)
88:00.0 VGA compatible controller: NVIDIA Corporation GA102 [GeForce RTX 3090] (rev a1)
88:00.1 Audio device: NVIDIA Corporation GA102 High Definition Audio Controller (rev a1)
89:00.0 VGA compatible controller: NVIDIA Corporation GA102 [GeForce RTX 3090] (rev a1)
89:00.1 Audio device: NVIDIA Corporation GA102 High Definition Audio Controller (rev a1)
b1:00.0 VGA compatible controller: NVIDIA Corporation GA102 [GeForce RTX 3090] (rev a1)
b1:00.1 Audio device: NVIDIA Corporation GA102 High Definition Audio Controller (rev a1)
b2:00.0 VGA compatible controller: NVIDIA Corporation GA102 [GeForce RTX 3090] (rev a1)
b2:00.1 Audio device: NVIDIA Corporation GA102 High Definition Audio Controller (rev a1)
(1)下载驱动
确认显卡型号后,前往 NVIDIA 官方驱动下载页面:https://www.nvidia.com/en-us/drivers/ 在页面中,我们通过下拉菜单选择显卡型号、操作系统版本等信息,系统将推荐匹配的驱动程序,随后再下载对应版本的驱动安装包至本地,我这里是要选择RTX 3090对应的显卡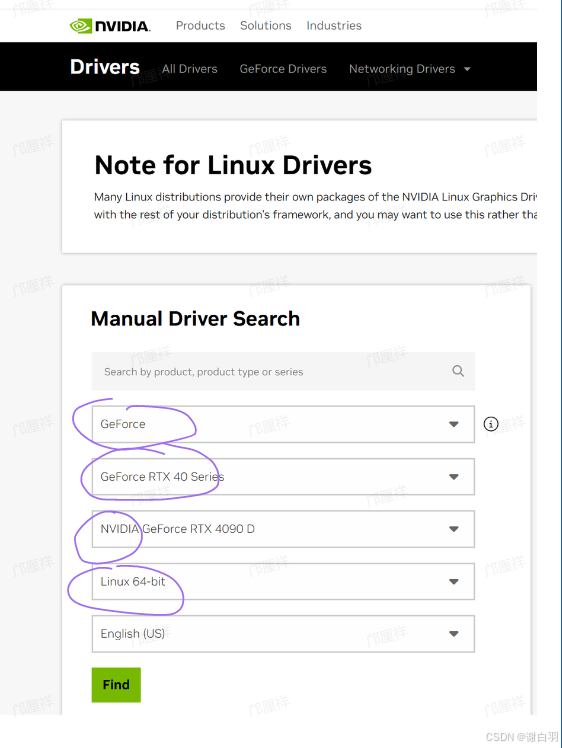
(2)卸载并禁止开源驱动
再次提醒,如果之前安装过N卡驱动,不要再重复本节的内容。尤其是公司或企业服务器,以免对其他用户的正常使用造成影响。
sudo apt purge nvidia*
sudo vim /etc/modprobe.d/blacklist.conf
解释:通过apt purge彻底卸载所有以nvidia开头的软件包(包括配置文件)*为通配符,表示匹配所有相关驱动包(如nvidia-driver-550、nvidia-settings等)删除NVIDIA驱动二进制文件、内核模块及Xorg配置文件(如/etc/X11/xorg.conf)若之前通过.run文件安装过驱动,需额外执行sudo /usr/bin/nvidia-uninstall进行清理
1.在/etc/modprobe.d/blacklist.conf文件的底部添加两行,随后再:wq退出vim
blacklist nouveau
options nouveau modeset=0
- 更新配置并重启主机
sudo update-initramfs -u
sudo reboot
3.待系统重启后,验证显卡驱动是否已成功禁用。若以下命令无输出,则表示屏蔽成功。
lsmod | grep nouveau
(3)安装N卡驱动
1.如果你通过图形界面(GUI)使用服务器,需先停止图形界面并切换至纯文本模式。若服务器本身无GUI(如通过SSH远程操作),可跳过此步骤。这个步骤是为了关闭 X Server 及相关图形进程,避免驱动安装过程中发生冲突
sudo telinit 3
sudo service gdm3 stop
- 执行驱动程序,我们先进入驱动程序.run文件所在的位置并且执行安装
chmod +x NVIDIA-Linux-x86_64-570.172.08.run  # 加执行权限
./NVIDIA-Linux-x86_64-570.172.08.run  # 执行
当执行之后会出现这样的界面,我们选择左边的NVIDIA Proprietary,如果出现第二张图中的提示,说明你的Ubuntu系统中已经有了N卡驱动,不需要再重复安装。但是这里我为了演示,还是选择继续安装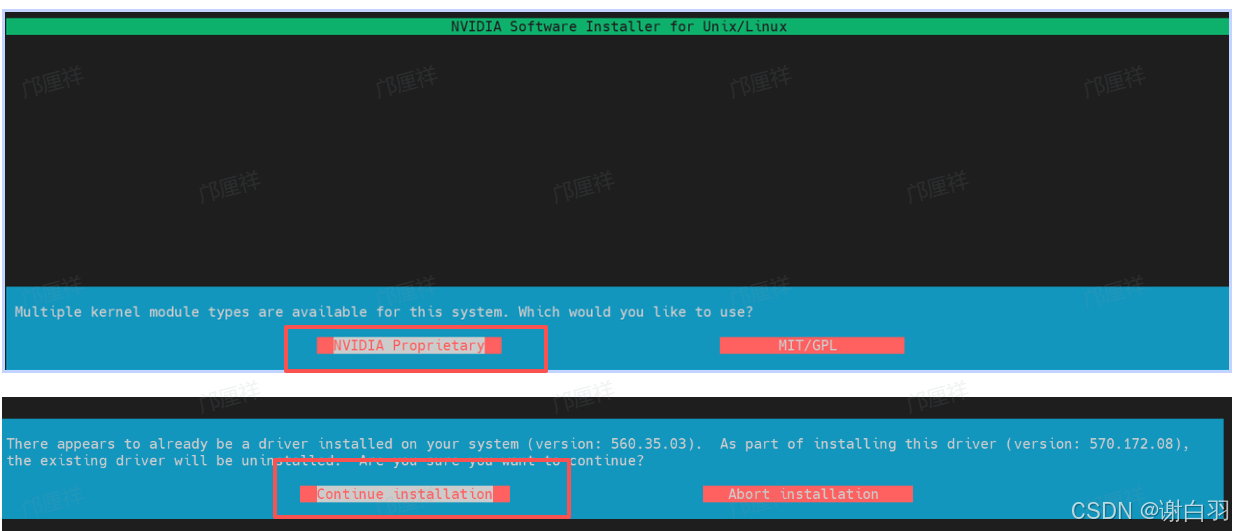
一路点击Continue installation,我们的系统就开始正式安装570版本的驱动。在安装过程中,安装程序会有一系列的问题询问,可以参考这里的文章:https://zhuanlan.zhihu.com/p/680288880。
3. 安装之后,重启服务器并等待重连
sudo reboot
- 安装验证,当安装结束后,我们在终端键入nvidia-smi,有如下的输出说明驱动已经安装完成。
(base) easyai@easyaitexdpkjx:~$ nvidia-smi
Sun Aug  3 17:38:02 2025
+-----------------------------------------------------------------------------------------+
| NVIDIA-SMI 570.172.08             Driver Version: 570.172.08     CUDA Version: 12.8     |
|-----------------------------------------+------------------------+----------------------+
| GPU  Name                 Persistence-M | Bus-Id          Disp.A | Volatile Uncorr. ECC |
| Fan  Temp   Perf          Pwr:Usage/Cap |           Memory-Usage | GPU-Util  Compute M. |
|                                         |                        |               MIG M. |
|=========================================+========================+======================|
|   0  NVIDIA GeForce RTX 3060        Off |   00000000:02:00.0  On |                  N/A |
|  0%   51C    P8             11W /  170W |     448MiB /  12288MiB |      0%      Default |
|                                         |                        |                  N/A |
+-----------------------------------------+------------------------+----------------------+

+-----------------------------------------------------------------------------------------+
| Processes:                                                                              |
|  GPU   GI   CI              PID   Type   Process name                        GPU Memory |
|        ID   ID                                                               Usage      |
|=========================================================================================|
|    0   N/A  N/A            1276      G   /usr/lib/xorg/Xorg                      236MiB |
|    0   N/A  N/A            1452    C+G   ...c/gnome-remote-desktop-daemon        104MiB |
|    0   N/A  N/A            1513      G   /usr/bin/gnome-shell                     19MiB |
|    0   N/A  N/A            1529      G   .../teamviewer/tv_bin/TeamViewer          2MiB |
|    0   N/A  N/A            1764      G   ...l/sunlogin/bin/sunloginclient         10MiB |
|    0   N/A  N/A            2434      G   ...me/58.0.3029.81 Safari/537.36          2MiB |
|    0   N/A  N/A            2455      G   /proc/self/exe                            2MiB |
+-----------------------------------------------------------------------------------------+
(4)Cuda的安装(安装了就跳过)
通过 nvidia-smi 的输出可以看到:
- Driver Version: 570.172.08
- CUDA Version: 12.8
这表示当前驱动最高支持 CUDA 12.8,并不意味着系统已安装 CUDA Toolkit。nvidia-smi 显示的 CUDA 版本仅反映驱动兼容的最高 CUDA 运行时版本。因此,接下来我们需要手动安装 CUDA Toolkit,以进行 CUDA 程序的编译和开发。
下载Cuda开发包
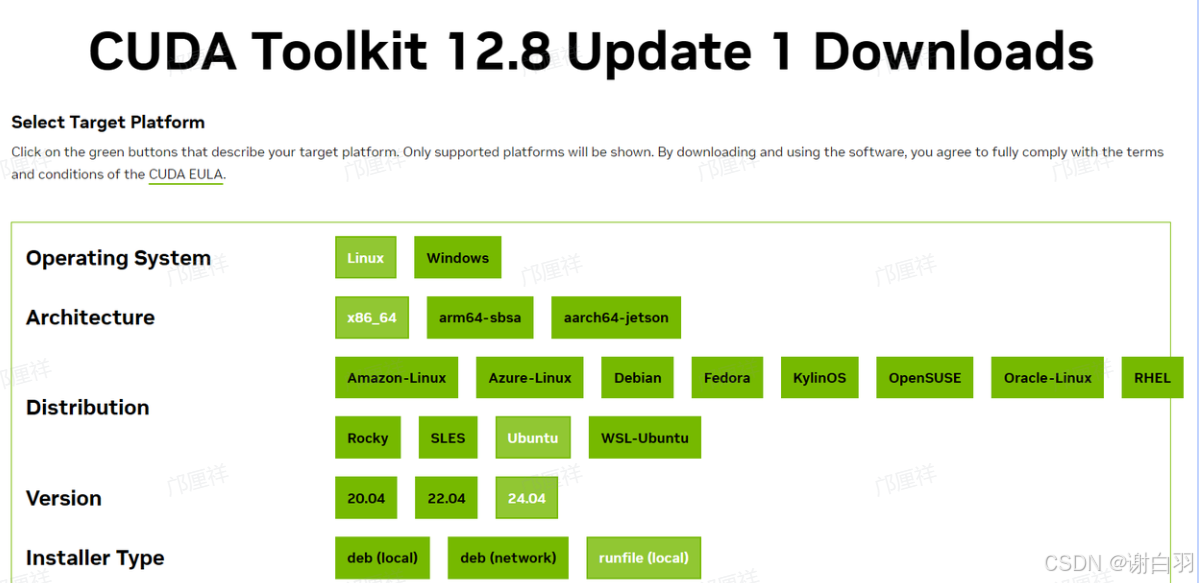
CUDA Toolkit 的下载地址为:https://developer.nvidia.com/cuda-toolkit-archive
- 备注
从nvidia-smi命令的输出我们知道,当前驱动最高支持 CUDA 12.8,因此我们应选择 CUDA Toolkit 12.8 或更低版本。在下载地址页面中,我们根据系统信息(操作系统、CPU 架构、发行版版本)选择合适的安装包。通常建议选择 runfile(.run)格式的离线安装包,便于在服务器环境下独立安装,不依赖包管理器。
启动安装
当我们下载好安装包之后就可以开始Cuda的安装了,如果没有sudo权限可以参考以下的文章,可以将Cuda安装在非/usr/local目录下。https://zhuanlan.zhihu.com/p/198161777
(base) easyai@easyaitexdpkjx:~$ chmod +x cuda_12.8.1_570.124.06_linux.run
(base) easyai@easyaitexdpkjx:~$ sudo ./cuda_12.8.1_570.124.06_linux.run
安装的时候我们需要把这里的Driver选项给取消勾选,光标上下移动并按回车就可以。如果没有sudo权限,需要在options中进行设置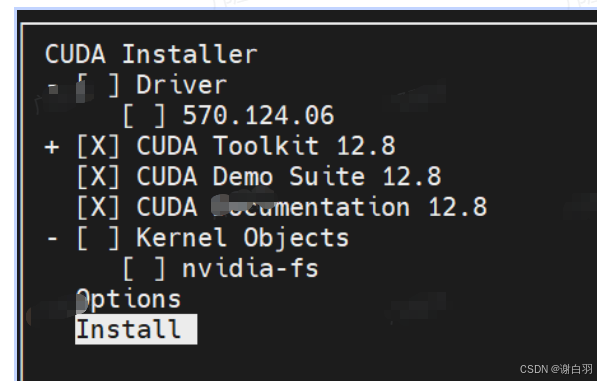
修改环境变量
Driver: Not Selected
Toolkit: Installed in /usr/local/cuda-12.8/
Please make sure that
PATH includes /usr/local/cuda-12.8/bin
LD_LIBRARY_PATH includes /usr/local/cuda-12.8/lib64, or, add /usr/local/cuda-12.8/lib64 to /etc/ld.so.conf and run ldconfig as root
CUDA 安装完成后,终端会显示以上的相关路径提示。接下来,我们需要配置环境变量,在 ~/.bashrc 文件的末尾添加库和可执行文件的路径,确保系统能够正确识别和调用 CUDA 工具
export PATH=/usr/local/cuda-12.8/bin:$PATH
export LD_LIBRARY_PATH=/usr/local/cuda-12.8/lib64:$LD_LIBRARY_PATH
保存后,执行以下命令使配置生效:
source ~/.bashrc
验证安装
等以上步骤都完成之后,我们在终端执行nvcc --version就会有如下的输出。
(base) easyai@easyaitexdpkjx:~$ nvcc --version
nvcc: NVIDIA (R) Cuda compiler driver
Copyright (c) 2005-2025 NVIDIA Corporation
Built on Fri_Feb_21_20:23:50_PST_2025
Cuda compilation tools, release 12.8, V12.8.93
Build cuda_12.8.r12.8/compiler.35583870_0
(5)编译并调试第一个cuda程序
通过 nvcc手动编译该程序。同时为了能够随后使用cuda-gdb对程序进行调试,我们在这里还需要用-O0 -g的模式进行编译,所以就有了
nvcc -g -G -O0 -o hello hello_world.cu
- 代码块
#include <cuda_runtime.h>

#include <iostream>
__global__ void hello_world(void) {
  printf("block idx:%d thread idx: %d\n", blockIdx.x, threadIdx.x);
  if (threadIdx.x == 0) {
    printf("GPU: Hello world!\n");
  }
}

int main(int argc, char **argv) {
  printf("CPU: Hello world!\n");
  hello_world<<<
      1, 1>>>();
  cudaDeviceSynchronize();
  if (cudaGetLastError() != cudaSuccess) {
    std::cerr << "CUDA error: " << cudaGetErrorString(cudaGetLastError())
              << std::endl;
    return 1;
  } else {
    std::cout << "GPU: Hello world finished!" << std::endl;
  }
  std::cout << "CPU: Hello world finished!" << std::endl;
  return 0;
}
nvcc运行Cuda程序
编译完成后,当前目录下会生成一个名为 hello 的可执行文件,直接运行即可得到如下输出:
(base) test_fss@node4:~/code/cuda_code$ ./hello
CPU: Hello world!
block idx:0 thread idx: 0
GPU: Hello world!
GPU: Hello world finished!
CPU: Hello world finished!
cuda-gdb调试Cuda程序
上方已编译生成带有调试信息的 CUDA 可执行程序,可使用 cuda-gdb 进行调试,方法如下:
# nvcc -g -G -O0 -o hello course1/hello_world.cu
(base) test_fss@node4:~/code/cuda_code$ cuda-gdb ./hello
使用 list 5(或 l 5)命令可列出第 5 行附近的 CUDA 源代码。
(base) test_fss@node4:~/code/cuda_code$ cuda-gdb ./hello
...
...
For help, type "help".
Type "apropos word" to search for commands related to "word"...
Reading symbols from ./hello...
(cuda-gdb) l 5
1       #include <cuda_runtime.h>
2
3       #include <iostream>
4       __global__ void hello_world(void) {
5         printf("block idx:%d thread idx: %d\n", blockIdx.x, threadIdx.x);
6         if (threadIdx.x == 0) {
7           printf("GPU: Hello world!\n");
8         }
9       }
10
随后我们将断点打在第5行,使用的命令是b 5
(cuda-gdb) b 5
Breakpoint 1 at 0x8eaa: file course1/hello_world.cu, line 9.
运行程序开始调试,也就是输入run命令,可以看到程序最后会停在第5行,如下所示。
(cuda-gdb) run
Starting program: /home/test_fss/code/cuda_code/hello
[Thread debugging using libthread_db enabled]
Using host libthread_db library "/lib/x86_64-linux-gnu/libthread_db.so.1".
CPU: Hello world!
[New Thread 0x7ffff21c0000 (LWP 3908127)]
[New Thread 0x7ffff0f9c000 (LWP 3908128)]
[Detaching after fork from child process 3908129]
[New Thread 0x7fffe899c000 (LWP 3908268)]
[New Thread 0x7fffd855a000 (LWP 3908269)]
[Switching focus to CUDA kernel 0, grid 1, block (0,0,0), thread (0,0,0), device 0, sm 0, warp 0, lane 0]

CUDA thread hit Breakpoint 1, hello_world<<<(1,1,1),(1,1,1)>>> () at course1/hello_world.cu:5
5         printf("block idx:%d thread idx: %d\n", blockIdx.x, threadIdx.x);
通过查看当前执行的 CUDA kernel 信息,可知该 kernel 启用了 1 个线程块,共 10 个线程。
(cuda-gdb) info cuda kernels
  Kernel Parent Dev Grid Status                 SMs Mask GridDim BlockDim Invocation
*      0      -   0    1 Active 0x0000000000000000000001 (1,1,1)  (1,1,1) hello_world()
如果我们想切换到你其中的第6个线程,可以输入cuda block (0,0,0) thread (6,0,0)
(cuda-gdb) cuda block (0,0,0) thread (6,0,0)
[Switching focus to CUDA kernel 0, grid 1, block (0,0,0), thread (6,0,0), device 0, sm 0, warp 0, lane 6]
5         printf("block idx:%d thread idx: %d\n", blockIdx.x, threadIdx.x);
打印当前的线程号和线程块号,发现已经切换到了block 0, thread 6中。
(cuda-gdb) p blockIdx.x
$1 = 0
(cuda-gdb) p threadIdx.x
$2 = 6
- 总结
- 本文介绍了NVIDIA显卡驱动与CUDA Toolkit的安装与配置流程。首先,下载安装包后,通过命令行赋予执行权限并运行安装程序。若系统已安装合适的NVIDIA驱动,则在安装CUDA Toolkit时应取消勾选“Driver”选项,以避免驱动版本冲突,仅安装CUDA Toolkit。
- 安装完成后,系统会提示工具包的安装路径。为使系统正确识别CUDA工具链,我们还需配置环境变量。
- 另外,本文通过编写和编译首个CUDA程序,验证开发环境配置,并使用cuda-gdb调试,掌握基本编译、运行与调试流程。
3)
二、LLama2模型量化
1)LLama2量化前述
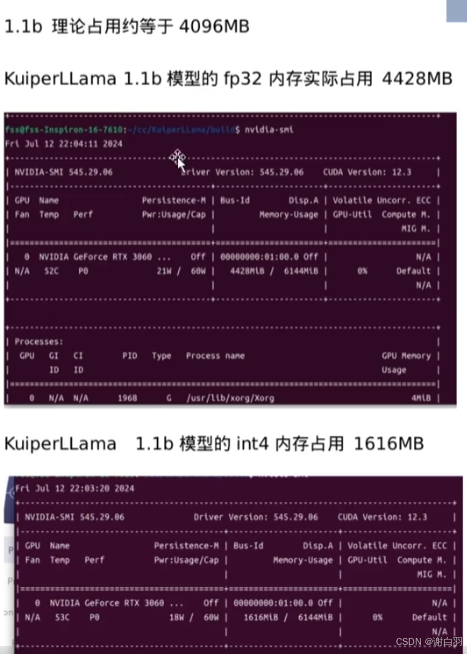
1.1b模型占用显存是4.5G附近,如果是LLama 7B模型的话,那就是28G的显存,量化成int4的话,显存占用是1.6G显存
2)导出模型代码讲解
(1)具体讲解
- 步骤
- 使用transformers库加载llama结构的模型
hf_model = AutoModelForCausalLM.from_pretrained(model_path)
hf_dict = hf_model.state_dict()
- 从模型的配置信息config.json构造模型参数
if any(['config.json' in path for path in os.listdir("./")]):
  with open(os.path.join("./", 'config.json'), 'r') as f:
       config_json = json.load(f)
  config.dim = config_json["hidden_size"]
  config.n_layers = config_json["num_hidden_layers"]
  config.n_heads = config_json["num_attention_heads"]
  config.n_kv_heads = config_json["num_key_value_heads"]
  config.vocab_size = config_json["vocab_size"]
  config.hidden_dim = config_json["intermediate_size"]
  config.norm_eps = config_json["rms_norm_eps"]
  config.max_seq_len = config_json["max_position_embeddings"]
- 根据配置信息创建一个待导出的模型,并从Hugging Face的权重列表中逐一加载权重,将其赋值给该模型;
model = Transformer(config)

model.tok_embeddings.weight = nn.Parameter(hf_dict['model.embed_tokens.weight'])
model.norm.weight = nn.Parameter(hf_dict['model.norm.weight'])
- 为导出的模型配置权重,权重来自Hugging Face的预训练权重
for layer in model.layers: # 把预训练的权重放到model的各层中
    i = layer.layer_id
    layer.attention_norm.weight = nn.Parameter(hf_dict[f'model.layers.{i}.input_layernorm.weight'])
    ...
    ...
    layer.feed_forward.w2.weight = nn.Parameter(hf_dict[f'model.layers.{i}.mlp.down_proj.weight'])
    layer.feed_forward.w3.weight = nn.Parameter(hf_dict[f'model.layers.{i}.mlp.up_proj.weight'])
- 开始导出模型的权重,这里我们需要导出的是int8权重
5.1 首先打开输出的权重文件,filepath是我们要导出的量化模型权重路径
out_file = open(filepath, 'wb')
5.2 导出模型的配置参数
hidden_dim = model.layers[0].feed_forward.w1.weight.shape[0]
p = model.params
shared_classifier = torch.equal(model.tok_embeddings.weight, model.output.weight)
# legacy format uses negative/positive vocab size as a shared classifier flag
if not shared_classifier:
    p.vocab_size = -p.vocab_size
n_kv_heads = p.n_heads if p.n_kv_heads is None else p.n_kv_heads
group_size = 64

header = struct.pack('iiiiiiii', p.dim, hidden_dim, p.n_layers, p.n_heads,
                     n_kv_heads, p.vocab_size, p.max_seq_len, group_size)
out_file.write(header)
5.3 struct.pack简单理解就是把这几个参数(p.dim,hidden_dim,p.n_layers,p.n_heads,n_kv_heads)打包到一起,紧凑地放到header中,比如这几个配置是32,64,128,256,16,那么pack后就是这几个数字的二进制数据
举个例子,32就是0b100000,64就是0b1000000,我们按照每个数字占用4个字节将它们写入到二进制文件out_file中,我们随后需要在C++中把它给读出来。在第10行代码中的,struct.pack(‘iiiiiiii’)表示我们将这8个参数每个都是以int类型排布到header变量的内部存储空间中,每个参数占用4个字节。
import struct
demo_struct = struct.pack('iiii', 399, 7, 21, 33)
print(demo_struct.hex())

输出:8f010000070000001500000021000000
让我们来逐个解析这些数字:
- 399 在十六进制中是 018f。在小端模式下,它会被存储为 8f010000。01占用一个字节,8f占用一个字节。
- 7 在十六进制中是 07,在小端模式下,它会被存储为 07000000。
- 21 在十六进制中是 15,同样地,在小端模式下,它会被存储为 15000000。
- 33 在十六进制中是 21,在小端模式下,它会被存储为 21000000。
因此,当打印 demo_struct 的十六进制形式时,你会看到每个整数都被转换成了一个 4 字节的十六进制数,并且由于小端模式,最高字节(most significant byte)出现在最后。这就是为什么我们会得到 8f010000070000001500000021000000 这样的输出。
- 模型参数部分的量化和导出
for layer in model.layers:
    q, s, err = quantize_q80(layer.attention.wq.weight, group_size)
    serialize_int8(out_file, q)
    serialize_fp32(out_file, s) # layer.attention.wq.weight共有w个权重
我们采用了按组量化的方法。具体来说,将一组浮点数 [3,5,2,4] 分成两个组,每个组中包含两个 fp32 数据:在[[3,5], [2,4]]中,我们计算每个组的最大值,得到 [5,4]。我们将 int8 数据类型的最大可表示值 qmax 设定为 127。基于此,我们计算每个子集的量化比例(scale),即:scale = (5 / 127, 4 / 127) ≈ (0.03937008, 0.03149606),分别记作scale1和scale2,qmax表示int8的一个最大值,是127。
我们将两组中的四个浮点值分别用各自组的量化比例进行量化:quant value 1 = round(3 / scale1),quant value 2 = round(5 / scale1),quant value 3 = round(2 / scale2),我们用宽泛的方式进行分析,在逐组量化中,假设我们有W个权重,我们将它分成G组,每组的权重个数是W/G个。在每组中我们都求得一个最大值,记作RMAX,共有group G个。再举个实际的例子,例如现在有4个权重数据,分别是[1,3,5,-1],每组的权重是两个。我们求出每组的最大值分别是3和5,根据对称量化公式
S c a l e = ∣ r m a x ∣ ∣ q m a x ∣ Scale = \frac{|r_{max}|}{|q_{max}|} Scale=∣qmax∣∣rmax∣
这里的量化系数是按组来求得的,随后我们再对输入数据进行量化,其中r表示原始浮点数据,q表示量化后输出的整型数据。
q = R o u n d ( r s c a l e ) q = Round(\frac{r}{scale}) q=Round(scaler)
第一组:q= r = [3,5] / 该组的量化系数 = 76.19999756, 126.99999594,round之后 76,127
第二组:q = r =[2,4] / 该组的量化系数 = 63.50000603, 127.00001207,round之后 64,127
- 首先将[3,5,2,4] 4个权重分成两组,每组是2个fp32数据。
- 随后对每组求出一个最大值分别5,4
- 随后对各组求出scale , qmax = 127,scale各组分别等于0.03937008, 0.03149606
- 量化的值 round(3/0.039) = 76,round(2/0.031) = 64
- 对应到代码,我们就是
for layer in model.layers:
   q, s, err = quantize_q80(layer.attention.wq.weight, group_size)
   serialize_int8(out_file, q)
   serialize_fp32(out_file, s)
其中q是量化后的整型数据,s是求得的量化系数。比如说原先要保存1024个float32数据,如果不量化的话需要占用4096个字节。如果现在进行量化,并且组的大小(group size)为64,也就是每64个浮点数据共用一个量化系数scale。那么现在占用的只有1024个int8数据,加上1024 / 64 =16个float32数据(scale,每组64个浮点权重共享),总共占用1024 + 64字节,大大减少了空间的占用。当完成以上的步骤时,我们输出的权重文件大致有以下的排布。
----------------
part 1
模型的配置参数
----------------
part 2
w1 layer: [int8权重参数] × layer num + [权重系数] × layer num
w2 layer: [int8权重参数] × layer num + [权重系数] × layer num
----------------
part 3
不参与量化的权重
----------------
如上是模型导出后的模型权重文件的数据排布情况。
- 首先是模型的配置参数,包括layer num,hidden num等信息。
- 随后就是模型中各层的参数,依次存放的是各类型各层量化后的权重和每组共享的量化系数。
- 最后就是不参加量化的权重,例如embedding table和rmsnorm层的权重等。
(2)命令行导出权重的办法(用V3是为了兼容kuiperLLama的项目代码)
python export_llama.py --version 3 --hf TinyLlama/TinyLlama-1.1B-Chat-v1.0 chat_q8.bin
TinyLlama/TinyLlama-1.1B-Chat-v1.0是我们指定的huggingface模型名称,这里要注意的是只能选取LLama系列的模型。export_llama.py是我们要用到的导出脚本,用于llama2模型的导出。
在使用导出的权重文件后,由于是LLama2的推理阶段,所以我们需要关闭Llama3的选项,也就是需要设置
-DLLAMA3_SUPPORT=OFF
其中export_llama.py和config.json文件位于KuiperLlama项目的tools文件夹下。
(3)具体代码
- 具体代码
def load_hf_model(model_path):
    try:
        from transformers import AutoModelForCausalLM
    except ImportError:
        print("Error: transformers package is required to load huggingface models")
        print("Please run `pip install transformers` to install it")
        return None

    # load HF model
    hf_model = AutoModelForCausalLM.from_pretrained(model_path)
    hf_dict = hf_model.state_dict()

    # convert LlamaConfig to ModelArgs
    config = ModelArgs()
    if any(['config.json' in path for path in os.listdir("./")]):
        with open(os.path.join("./", 'config.json'), 'r') as f:
            config_json = json.load(f)
        config.dim = config_json["hidden_size"]
        config.n_layers = config_json["num_hidden_layers"]
        config.n_heads = config_json["num_attention_heads"]
        config.n_kv_heads = config_json["num_key_value_heads"]
        config.vocab_size = config_json["vocab_size"]
        config.hidden_dim = config_json["intermediate_size"]
        config.norm_eps = config_json["rms_norm_eps"]
        config.max_seq_len = config_json["max_position_embeddings"]
    else:
        config.dim = hf_model.config.hidden_size
        config.n_layers = hf_model.config.num_hidden_layers
        config.n_heads = hf_model.config.num_attention_heads
        config.n_kv_heads = hf_model.config.num_attention_heads
        config.vocab_size = hf_model.config.vocab_size
        config.hidden_dim = hf_model.config.intermediate_size
        config.norm_eps = hf_model.config.rms_norm_eps
        config.max_seq_len = hf_model.config.max_position_embeddings

    # create a new Transformer object and set weights
    model = Transformer(config)

    model.tok_embeddings.weight = nn.Parameter(hf_dict['model.embed_tokens.weight'])
    model.norm.weight = nn.Parameter(hf_dict['model.norm.weight'])

    # huggingface permutes WQ and WK, this function reverses it
    def permute_reverse(w, n_heads=config.n_heads, dim1=config.dim, dim2=config.dim):
        return w.view(n_heads, 2, dim1 // n_heads // 2, dim2).transpose(1, 2).reshape(dim1, dim2)

    for layer in model.layers:
        i = layer.layer_id
        layer.attention_norm.weight = nn.Parameter(hf_dict[f'model.layers.{i}.input_layernorm.weight'])
        layer.attention.wq.weight = nn.Parameter(permute_reverse(hf_dict[f'model.layers.{i}.self_attn.q_proj.weight']))
        layer.attention.wk.weight = nn.Parameter(permute_reverse(
            hf_dict[f'model.layers.{i}.self_attn.k_proj.weight'],
            n_heads=config.n_kv_heads,
            dim1=config.dim // config.n_heads * config.n_kv_heads))
        layer.attention.wv.weight = nn.Parameter(hf_dict[f'model.layers.{i}.self_attn.v_proj.weight'])
        layer.attention.wo.weight = nn.Parameter(hf_dict[f'model.layers.{i}.self_attn.o_proj.weight'])
        layer.ffn_norm.weight = nn.Parameter(hf_dict[f'model.layers.{i}.post_attention_layernorm.weight'])
        layer.feed_forward.w1.weight = nn.Parameter(hf_dict[f'model.layers.{i}.mlp.gate_proj.weight'])
        layer.feed_forward.w2.weight = nn.Parameter(hf_dict[f'model.layers.{i}.mlp.down_proj.weight'])
        layer.feed_forward.w3.weight = nn.Parameter(hf_dict[f'model.layers.{i}.mlp.up_proj.weight'])

    # final classifier
    model.output.weight = nn.Parameter(hf_dict['lm_head.weight'])
    model.eval()
    return model
3)加载模型代码讲解
在model.cpp中我们直接从二进制权重文件的首部读取模型的配置文件。也就是刚才我们在Python端导出的一组参数,它们分别是p.dim, hidden_dim, p.n_layers, p.n_heads,n_kv_heads, p.vocab_size, p.max_seq_len, group_size
# ┌─────────────────────────────────────────────────────────┐
# │ Byte 0-3:   dim (4096)                                  │
# │ Byte 4-7:   hidden_dim (11008)                          │
# │ Byte 8-11:  n_layers (32)                               │
# │ Byte 12-15: n_heads (32)                                │
# │ Byte 16-19: n_kv_heads (8)                              │
# │ Byte 20-23: vocab_size (32000 或 -32000)                │
# │ Byte 24-27: max_seq_len (2048)                          │
# │ Byte 28-31: group_size (64)                             │
# └─────────────────────────────────────────────────────────┘


    header = struct.pack('iiiiiiii',  # 8 个 int32
        p.dim,          # 模型维度(例如 4096)
        hidden_dim,     # FFN 隐藏层维度(例如 11008)
        p.n_layers,     # 层数(例如 32)
        p.n_heads,      # 注意力头数(例如 32)
        n_kv_heads,     # KV 头数(例如 8 或 32)
        p.vocab_size,   # 词表大小(可能是负数)
        p.max_seq_len,  # 最大序列长度(例如 2048)
        group_size      # 量化分组大小(64)
    )
    out_file.write(header)  # 写入文件,占用 8×4=32 字节
(1)加载参数
(2)加载权重

有“AI”的1024 = 2048,欢迎大家加入2048 AI社区
更多推荐


 3
3 0
0- 0


 已为社区贡献5条内容

所有评论(0)