多线程使用场景(线程池使用场景)
Java并发编程中的CountDownLatch(倒计时锁)是一种同步辅助工具,用于让一个或多个线程等待其他线程完成操作。其核心机制是通过初始化计数器(如3),每当线程完成时调用countDown()使计数器减1,当计数器归零时,await()等待的线程才会继续执行。典型应用场景如批量数据导入ES:主线程创建多个子线程并行处理数据页,通过CountDownLatch确保所有数据导入完成后再执行后续
CountDownLatch(闭锁/倒计时锁)、Future(未来)
CountDownLatch
概念与原理
翻译:闭锁/倒计时锁。CountDownLatch 是 Java 并发包(java.util.concurrent)中提供的一种同步辅助类,用于让一个或多个线程等待,直到其他线程完成一组操作后再继续执行。
人话:假设有4个线程,分别是线程ABCD。线程A必须等线程BCD执行完之后再执行。countdownlatch就能完成这个工作。怎么完成的呢?很简单,定义了一个数值,假设是3,线程BCD执行完了就让这个数值减1,当三个线程都执行完了,那么这个数值就变成0了,线程A就继续执行。
核心方法
CountDownLatch(int count):初始化计数器。countDown():计数器减1。await():阻塞当前线程直至计数归零。
案例:
package com.example.demo.demos.controller;

import java.util.concurrent.CountDownLatch;

public class CountdownLatchDemo {

    public static void main(String[] args) {
        CountDownLatch countDownLatch = new CountDownLatch(3);

        new Thread(() -> {
            System.out.println("子线程" + Thread.currentThread().getName() + "开始执行");
            try {
                Thread.sleep(3000);
                System.out.println("子线程" + Thread.currentThread().getName() + "执行完毕");
            } catch (InterruptedException e) {
                e.printStackTrace();
            }
            countDownLatch.countDown();
        }, "A").start();

        new Thread(() -> {
            System.out.println("子线程" + Thread.currentThread().getName() + "开始执行");
            try {
                Thread.sleep(1000);
                System.out.println("子线程" + Thread.currentThread().getName() + "执行完毕");
            } catch (InterruptedException e) {
                e.printStackTrace();
            }
            countDownLatch.countDown();
        }, "B").start();


        new Thread(() -> {
            System.out.println("子线程" + Thread.currentThread().getName() + "开始执行");
            try {
                Thread.sleep(1500);
                System.out.println("子线程" + Thread.currentThread().getName() + "执行完毕");
            } catch (InterruptedException e) {
                e.printStackTrace();
            }
            countDownLatch.countDown();
        }, "C").start();

        System.out.println("等待所有子线程执行完毕... 主线程进入等待");

        try {
            countDownLatch.await();
        } catch (InterruptedException e) {
            throw new RuntimeException(e);
        }

        System.out.println("所有子线程执行完毕... 主线程继续执行");

    }
}
上面案例就是:
countDownLatch.await();就是将代码暂停在这里了,直到countDownLatch的count数值为0才继续往下执行。
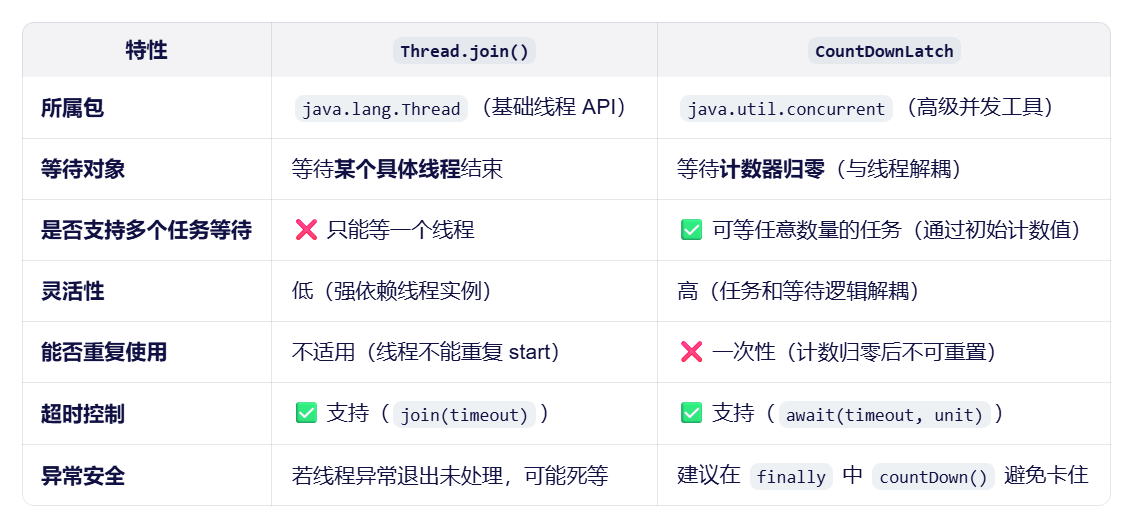
与Thread.join的对比
聪明的小伙伴可能发现了这个好像和Thread.join一样呀,都是阻止一个线程等待另一个线程执行完再继续执行。下面是和join的对比
CountDownLatch实际案例
ps:es是一个用来加快搜索的东西,简单理解成一种搜索很快的数据库。
实际应用
实际应用:es数据批量导入。
当有大量数据需要导入es中的时候,就可以使用Countdownlatch。假设十万条数据,每一页是1万条,就有10页数据。那么就循环10次,每一次循环就意味着一个线程执行插入es操作,在每一次插入之后都让CountdownLatch的值减1。此时主线程使用await进行等待,当CountdownLatch的值等于0的时候,主线程再继续执行。
下面是一段伪代码,介绍上面描述的例子。
// 假设总数据量:10万条,每页1万条 → 共10页
int totalPages = 10;
CountDownLatch latch = new CountDownLatch(totalPages);

// 创建线程池(推荐使用固定大小,避免资源耗尽)
ExecutorService executor = Executors.newFixedThreadPool(5);

try {
    // 循环提交10个任务,每个任务负责上传1页(1万条)数据
    for (int pageNum = 1; pageNum <= totalPages; pageNum++) {
        final int currentPage = pageNum;
        executor.submit(() -> {
            try {
                // 1. 从数据库/文件等获取第 currentPage 页的数据(1万条)
                List<Document> pageData = fetchDataFromSource(currentPage);

                // 2. 使用 Bulk API 批量插入到 Elasticsearch
                bulkInsertToElasticsearch(pageData);

            } catch (Exception e) {
                // 记录错误,但不能中断计数(否则主线程会永久等待)
                log.error("上传第 {} 页失败", currentPage, e);
            } finally {
                // ⭐ 关键:无论成功或失败,必须调用 countDown()
                latch.countDown();
            }
        });
    }

    // 主线程在此阻塞,等待所有10个任务完成(即 latch 计数归零)
    latch.await();  // 可选:加超时 latch.await(10, TimeUnit.MINUTES)

    // 所有数据导入完成后,执行后续操作
    System.out.println("✅ 所有数据(10万条)已成功导入 Elasticsearch!");

} catch (InterruptedException e) {
    Thread.currentThread().interrupt();
    log.error("主线程在等待过程中被中断", e);
} finally {
    // 优雅关闭线程池
    executor.shutdown();
    try {
        if (!executor.awaitTermination(60, TimeUnit.SECONDS)) {
            executor.shutdownNow();
        }
    } catch (InterruptedException e) {
        executor.shutdownNow();
        Thread.currentThread().interrupt();
    }
}
疑问?
这个时候就有小伙伴问:为啥创建了一堆线程执行插入ES的操作,我主线程就必须等你插入完成再继续工作?哪怕主线程提前执行完了,jvm也不会关闭,线程仍然可以继续执行呀。
- 有一些必要的工作,比如打印日志,必须等线程工作完了再打印。
-
CountDownLatch是为了在“正常运行环境”下保证程序的逻辑完整性和资源安全性。
简而言之使用await就是让我们自己知道,线程执行完了,执行对了。

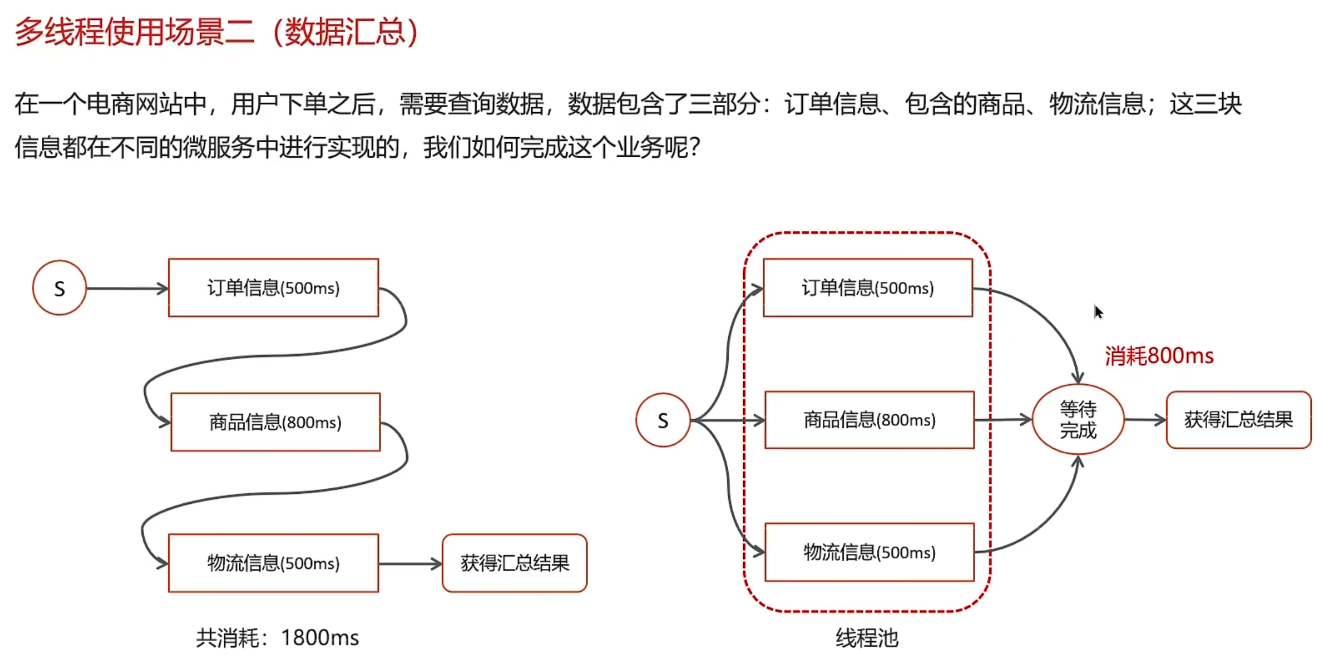
数据汇总
在实际开发中,会出现调用多个接口汇总数据,如果所有接口(部分)没有依赖关系,就可以使用线程池+future来提升性能。
Future
Future 是 java.util.concurrent 包中的一个接口,用于表示异步计算的结果。它提供了一种机制:当你提交一个耗时任务到线程池(或其他执行器)后,可以立即获得一个 Future 对象,稍后再通过它获取任务的执行结果、检查任务状态,或取消任务。
Future是任务提交之后的返回值。泛型就是任务的返回值类型。使用get方法就可以获取到任务的返回值了。
package com.example.demo.demos.controller;

import java.util.concurrent.*;

public class FutureTest {

    public static void main(String[] args) {

        ExecutorService executorService = Executors.newSingleThreadExecutor();
//        提交任务,返回一个Future对象,获取线程的返回值,泛型是String就是线程执行之后的返回值类型
        /**
         * 为什么这里传入一个()->{}可以正常执行?不应该是传入一个Runnable或者Callable对象吗?
         * 这是java中的lLambda 表达式的原因。
         * Lambda表达式本身没有类型,它的类型是由它所处的上下文(context)决定的。这个“上下文期望的类型”就叫 目标类型(Target Type)。
         * 也就是说()->{}会被推断成一个匿名内部类Runnable,而()->{}被推断成一个Callable对象。
         * 如下面的案例,实际上两个一样的。
         */
        Future<String> submit = executorService.submit(() -> {
            System.out.println("张三历险记");
            return "张三是我";
        });
        Future<String> submit2 = executorService.submit(new Callable<String>() {
            @Override
            public String call() throws Exception {
                return "我是匿名内部类";
            }
        });

        try {
            String s = submit.get();
            System.out.println("获取线程的返回值:" + s);
        } catch (InterruptedException e) {
            throw new RuntimeException(e);
        } catch (ExecutionException e) {
            throw new RuntimeException(e);
        }
        ThreadPoolExecutor threadPoolExecutor = new ThreadPoolExecutor(5, 6, 1000, TimeUnit.MILLISECONDS,
                new LinkedBlockingDeque<>(5), new ThreadPoolExecutor.DiscardOldestPolicy());


        Future<String> submit1 = threadPoolExecutor.submit(() -> {
            System.out.println("我是线程2");
            return "法海";
        });

        try {
            Object object = submit1.get();
            System.out.println("获取线程的返回值:" + object);
        } catch (InterruptedException e) {
            throw new RuntimeException(e);
        } catch (ExecutionException e) {
            throw new RuntimeException(e);
        }

    }
}
异步线程
记录用户搜索记录。
用户在搜索的时候,保存用户记录不能干扰用户搜索。保存用户搜索记录就是异步线程来实现。
怎么使用?
在SpringBoot中,我们可以使用注解来实现异步线程。所谓异步线程就是一个方法,新建一个线程来执行这个方法,不影响主线程的执行。
首先创建一个线程池。
@Component
public class ThreadPoolTest {
    @Bean("taskExecutor")
    public ThreadPoolExecutor getThreadPoolExecutor() {
        AtomicInteger threadNumber = new AtomicInteger(0);
        ThreadPoolExecutor threadPoolExecutor = new ThreadPoolExecutor(
                5,
                10,
                1000,
                TimeUnit.MILLISECONDS,
                new ArrayBlockingQueue<>(10),
                r->new Thread(r,"mythread-"+threadNumber.getAndIncrement()),
                new ThreadPoolExecutor.DiscardOldestPolicy()
        );
        return threadPoolExecutor;
    }

}
在启动类上开启异步线程
@SpringBootApplication
@EnableAsync   //用于开启Spring的异步方法执行功能
public class DemoApplication {

    public static void main(String[] args) {
        SpringApplication.run(DemoApplication.class, args);
    }

}
在需要使用异步线程调用的方法上加注解,并指定使用哪个线程池来执行这个方法
@Service
public class TestAsync {
@Async("taskExecutor")
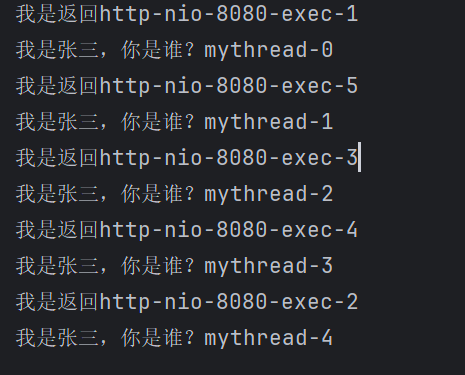
public void testAsync() {
System.out.println("我是张三,你是谁?" + Thread.currentThread().getName());
}
}
在需要执行该方法的地方调用
@RestController
public class AsyncTest {

    @Autowired
    private ThreadPoolExecutor threadPoolExecutor;

    @Autowired
    private TestAsync testAsync;

    @RequestMapping("/test")
    public String test() {
        testAsync.testAsync();
        System.out.println("我是返回" + Thread.currentThread().getName());
        return "success";
    }
}
如何控制某个方法允许并发访问现场的数量
利用JUC包下的工具类Semaphore(信号量),底层是AQS,我们通过其限制执行的线程数量。
场景:通常用于资源明确访问数量限制的场景,常用于限流。
比如一条高速公路是由4条车道,那么就只允许4辆车并排走。资源也是,只允许特定数量的线程来访问。
那么要如何控制呢?使用一个信号量的东西,这个信号量就是许可证,拿到许可证的线程才能执行,没拿到的就阻塞等待。当线程执行完了会释放信号量,这样其他的线程就能来拿了。
    public static void main(String[] args) {
        Semaphore semaphore = new Semaphore(3);//     定义信号量

        for (int i = 0; i < 10; i++) {
            new Thread(() -> {
                try {
                    semaphore.acquire(); // 获取信号量
                } catch (InterruptedException e) {
                    throw new RuntimeException(e);
                }
                System.out.println("running。。。。");
                try {
                    try {
                        Thread.sleep(1000);
                    } catch (InterruptedException e) {
                        throw new RuntimeException(e);
                    }
                    System.out.println("end....");
                } finally {
                    semaphore.release(); //释放信号量
                }

            }).start();

        }

    }
有“AI”的1024 = 2048,欢迎大家加入2048 AI社区
更多推荐


 14
14 0
0- 0


 已为社区贡献2条内容

所有评论(0)