【RealEarthStudio】使用Blender的PythonAPI实现对目标的环绕拍摄
我最开始在写这段程序之后怎么都无法使用GPU渲染(NVIDIA RTX 4060 laptop),一开始以为是程序写错了,来来回回改,但是相同的程序在Blender脚本编辑器里就能用GPU渲染,PyCharm里就不行。各种查资料,通义千问、DeepSeek、Claude Sonnet 4.5、Grok 4.1等等全都问过一遍了,根据AI说的改了程序还是无法解决,搞了一天多也没搞明白什么问题。因为要
使用Blender的PythonAPI实现对目标的环绕拍摄
引言
计算机专业硕士在读,主要研究方向是特定目标大斜视角目标检测与定位。因为要做的是特定目标,公开数据集较少,经过多方考虑还是决定要自建数据集。最终考虑的解决方案还是 Blender + Python API 的方式,项目起名叫 RealEarthStudio。
这系列文章主要对开发过程进行记录,方便我个人后续查看,也给相类似方向的同学提供一个思路。
【项目目录】:项目目录链接
一、主要功能
- 功能:使用Blender的PythonAPI实现对目标的环绕拍摄。
- 背景:上一篇文章已经实现了对光照的控制,现在我希望能够创建摄像机对目标进行拍摄并保存标注信息。这里需要说明的是,由于后续我需要做大斜视角目标检测相关内容,所以需要在确定的仰角下对目标进行拍摄,初步考虑是将该拍摄功能设计为函数形式,方便后续调用。
- 效果:
二、实现步骤
2.1 根据相对位置计算目标遮挡率并输出标注信息
(1)功能需求
- 根据当前设置好的相机参数和模型信息对目标遮挡情况进行判定
- 剔除不可见的图像(这里我设置的是
遮挡率>80%即为不可见) - 输出标注信息
(2)方法研究
使用Blender的PythonAPI进行遮挡情况分析主要有以下几种方式:
方法 1:深度图比对法(Z-Buffer)
方法原理
- 渲染一张仅包含目标物体的深度图(depth_target)
- 渲染一张完整场景的深度图(depth_scene)
- 对每个像素比较:若 depth_scene < depth_target,说明该像素处有其他物体更靠近相机 → 目标被遮挡
方法 2:射线投射法(Ray Casting)
方法原理
- 在目标物体表面采样若干点(顶点或面中心)
- 从相机向这些点发射射线
- 如果射线在到达目标点前击中其他物体 → 该点被遮挡
方法 3:ID Mask法(对象 ID 渲染)
方法原理
- 启用 Object Index Pass
- 给目标物体设置唯一 pass_index
- 渲染后检查图像中该 ID 的像素占比
方法 4:Bounding Box 投影重叠法(粗略估计)
方法原理
- 投影目标物体和所有其他物体的 bbox 到图像平面
- 计算 2D bbox 重叠区域
- 重叠比例 ≈ 遮挡比例(非常粗略)
各方法对比总结:
| 方法 | 精度 | 速度 | 实现难度 | 适用场景 |
|---|---|---|---|---|
| 深度图比对 | ⭐⭐⭐⭐⭐ | 慢(2次渲染) | 高 | 高质量数据集生成 |
| 射线投射 | ⭐⭐⭐☆ | 快 | 中 | 批量处理、实时检测 |
| ID Mask | ⭐⭐⭐⭐ | 中(1次渲染+图像处理) | 中 | 需要像素级可见性 |
| BBox 重叠 | ⭐ | 极快 | 低 | 快速过滤、预筛 |
最后考虑到性能需求,选择射线投射法对目标遮挡情况进行检测。检测完毕后剔除遮挡率>80%的图像,并生成对应的标注信息。
(3)最终实现
该函数如下:
def get_visible_info(camera, target_obj, scene, occlusion_threshold=0.8, sample_rate=0.1):
    """
    使用射线投射快速判断目标是否可见(遮挡比例 <= threshold)
    返回: (is_visible: bool, occlusion_ratio: float, bbox: (cx,cy,w,h) or None)
    """
    cam_loc = camera.matrix_world.translation
    depsgraph = bpy.context.evaluated_depsgraph_get()

    # 获取目标顶点(世界坐标)
    eval_obj = target_obj.evaluated_get(depsgraph)
    mesh = eval_obj.to_mesh()
    vertices_world = [target_obj.matrix_world @ v.co for v in mesh.vertices]
    eval_obj.to_mesh_clear()

    if not vertices_world:
        return False, 1.0, None

    # 随机采样
    num_verts = len(vertices_world)
    sample_count = max(50, int(num_verts * sample_rate))
    indices = np.random.choice(num_verts, size=min(sample_count, num_verts), replace=False)
    sampled_points = [vertices_world[i] for i in indices]

    visible_2d = []
    occluded = 0

    for pt in sampled_points:
        direction = (pt - cam_loc).normalized()
        # 射线投射(忽略目标自身)
        result, location, normal, index, hit_obj, matrix = scene.ray_cast(
            depsgraph, cam_loc, direction, distance=(pt - cam_loc).length - 1e-4
        )

        if not result or hit_obj == target_obj:
            # 无遮挡,或仅击中自己(视为可见)
            co_2d = world_to_camera_view(scene, camera, pt)
            if 0 <= co_2d.x <= 1 and 0 <= co_2d.y <= 1 and co_2d.z > 0:
                visible_2d.append((co_2d.x, co_2d.y))
        else:
            occluded += 1

    total = len(sampled_points)
    if total == 0:
        return False, 1.0, None

    occlusion_ratio = occluded / total
    is_visible = occlusion_ratio <= occlusion_threshold

    # 计算 bbox(仅基于可见点)
    if visible_2d:
        xs = [p[0] for p in visible_2d]
        ys = [p[1] for p in visible_2d]
        x_min, x_max = min(xs), max(xs)
        y_min, y_max = min(ys), max(ys)
        cx = (x_min + x_max) / 2
        cy = 1 - (y_min + y_max) / 2
        w = x_max - x_min
        h = y_max - y_min
        bbox = (float(cx), float(cy), float(w), float(h))
    else:
        bbox = None

    return is_visible, occlusion_ratio, bbox
【输入参数】
camera:摄像机对象
target_obj:目标对象
scene:场景对象
occlusion_threshold:遮挡阈值(超出80%即为不可见)
sample_rate:采样率
【输出参数】
is_visible:(布尔类型)是否可见
occlusion_ratio:(浮点类型)遮挡率
bbox:(cx,cy,w,h)标注框信息
2.2 高效的渲染图像(GPU加速)
(1)功能需求
- 在使用
CYCLES渲染引擎时,能够通过GPU加速
(2)方法研究
Blender内置的渲染引擎主要是 EEVEE 和 CYCLES 两种,简单总结就是:
| 引擎 | 一句话总结 |
|---|---|
| Eevee | “所见即所得”的实时创作利器,适合快速迭代与风格化表达 |
| Cycles | “以时间换真实”的物理级渲染专家,适合最终高质量输出 |
以下是他们在核心定位、技术原理、性能效率、画质能力等方面的对比:
| 特性 | Eevee | Cycles |
|---|---|---|
| 类型 | 实时光栅化渲染器(Real-time Rasterizer) | 离线路径追踪渲染器(Offline Path Tracer) |
| 灵感来源 | 游戏引擎(如 Unreal Engine) | 物理光学模拟(如电影级渲染器) |
| 目标 | 速度 + 交互性 | 物理真实感 |
| 典型用途 | 动画预览、风格化作品、VR/AR、游戏资产 | 影视特效、产品可视化、建筑表现、照片级静帧 |
| 渲染方式 | 光栅化(Rasterization) → 逐三角形绘制,使用“视觉技巧”模拟光照 |
路径追踪(Path Tracing) → 模拟光线在场景中反弹、折射、散射的物理过程 |
| 全局光照 (GI) | 近似模拟: • 烘焙 Light Probes • Irradiance Volumes • 屏幕空间反射(SSR) |
自动计算: • 完整 GI • 多次反弹 • 能量守恒 |
| 阴影 | 阴影贴图(Shadow Maps) → 可能出现锯齿、自遮挡错误 |
光线追踪阴影 → 柔和、精确、支持透明/半透明物体 |
| 反射/折射 | 屏幕空间(SSR)+ 烘焙探针 → 无法反射屏幕外物体 |
全局光线追踪 → 支持无限次反射、焦散(Caustics)、精确折射 |
| 材质 | 基于 Principled BSDF,但部分效果需手动补偿 | 完全基于物理的材质系统,自动处理复杂光学行为 |
| 渲染速度 | 极快(实时,60+ FPS) → 视口即最终效果 |
慢(秒~小时级) → 采样越多越慢 |
| 硬件要求 | 低:普通 GPU 即可流畅运行 | 高:依赖高性能 CPU/GPU(尤其 OptiX/CUDA) |
| 内存占用 | 低 | 高(尤其复杂场景+高分辨率纹理) |
| 动画渲染 | ✅ 非常适合(秒级出帧) | ❌ 成本高(需渲染农场) |
| 写实感 | ⭐⭐⭐(需大量手动调优) | ⭐⭐⭐⭐⭐(开箱即真实) |
| 焦散(Caustics) | ❌ 不支持 | ✅ 支持(需启用) |
| 体积光/雾 | 近似(2D 切片模拟) | 真实体积散射 |
| 景深/运动模糊 | 后处理模拟(可能失真) | 光学精确模拟 |
| 透明叠加 | Alpha 混合有限(排序问题) | 正确处理多次透明穿透 |
(3)最终实现
使用以下代码片段可以实现渲染时的GPU加速。其中 renderer 是我传入的一个参数,指定需要使用的渲染器类型。
# 设置渲染器
if renderer.upper() == "CYCLES":
	# 1. 设置渲染引擎为 Cycles
	scene.render.engine = 'CYCLES'
	scene.cycles.samples = 64  # 降低采样加快速度
	scene.cycles.preview_samples = 16

	# 2. 确保 cycles 插件启用
	if "cycles" not in prefs.addons:
		bpy.ops.preferences.addon_enable(module='cycles')
	cycles_prefs = prefs.addons["cycles"].preferences

	# 3. 【必须】刷新设备列表
	try:
		cycles_prefs.get_devices()
	except Exception as e:
		print(f"⚠️ get_devices() failed: {e}")
		return False

	# 4. 查看可用设备类型
	available_types = {d.type for d in cycles_prefs.devices}
	print(f"🔍 可用的设备类型: {available_types}")

	# 5. 选择后端(OptiX > CUDA)
	backend_selected = None
	for backend in ['OPTIX', 'CUDA', 'METAL', 'HIP']:
		if backend in available_types:
			if hasattr(cycles_prefs, 'compute_device_type'):
				cycles_prefs.compute_device_type = backend
				backend_selected = backend
				print(f"✅ 使用渲染设备: {backend}")
			break

	if not backend_selected:
		print("❌ 无GPU渲染设备可用.")
		scene.cycles.device = 'CPU'
		return False

	# 6. 启用所有非CPU设备
	gpu_found = False
	for device in cycles_prefs.devices:
		if device.type == "CPU":
			device.use = False
			print(f"🚫 禁用CPU: {device.name}")
		else:
			device.use = True
			gpu_found = True
			print(f"✅ 启用GPU: {device.name} ({device.type})")

	# 7. 设置 GPU 渲染
	scene.cycles.device = 'GPU' if gpu_found else 'CPU'
	print(f"🔧 CYCLES渲染设备设置为: {scene.cycles.device}")

else:
	scene.render.engine = 'BLENDER_EEVEE'
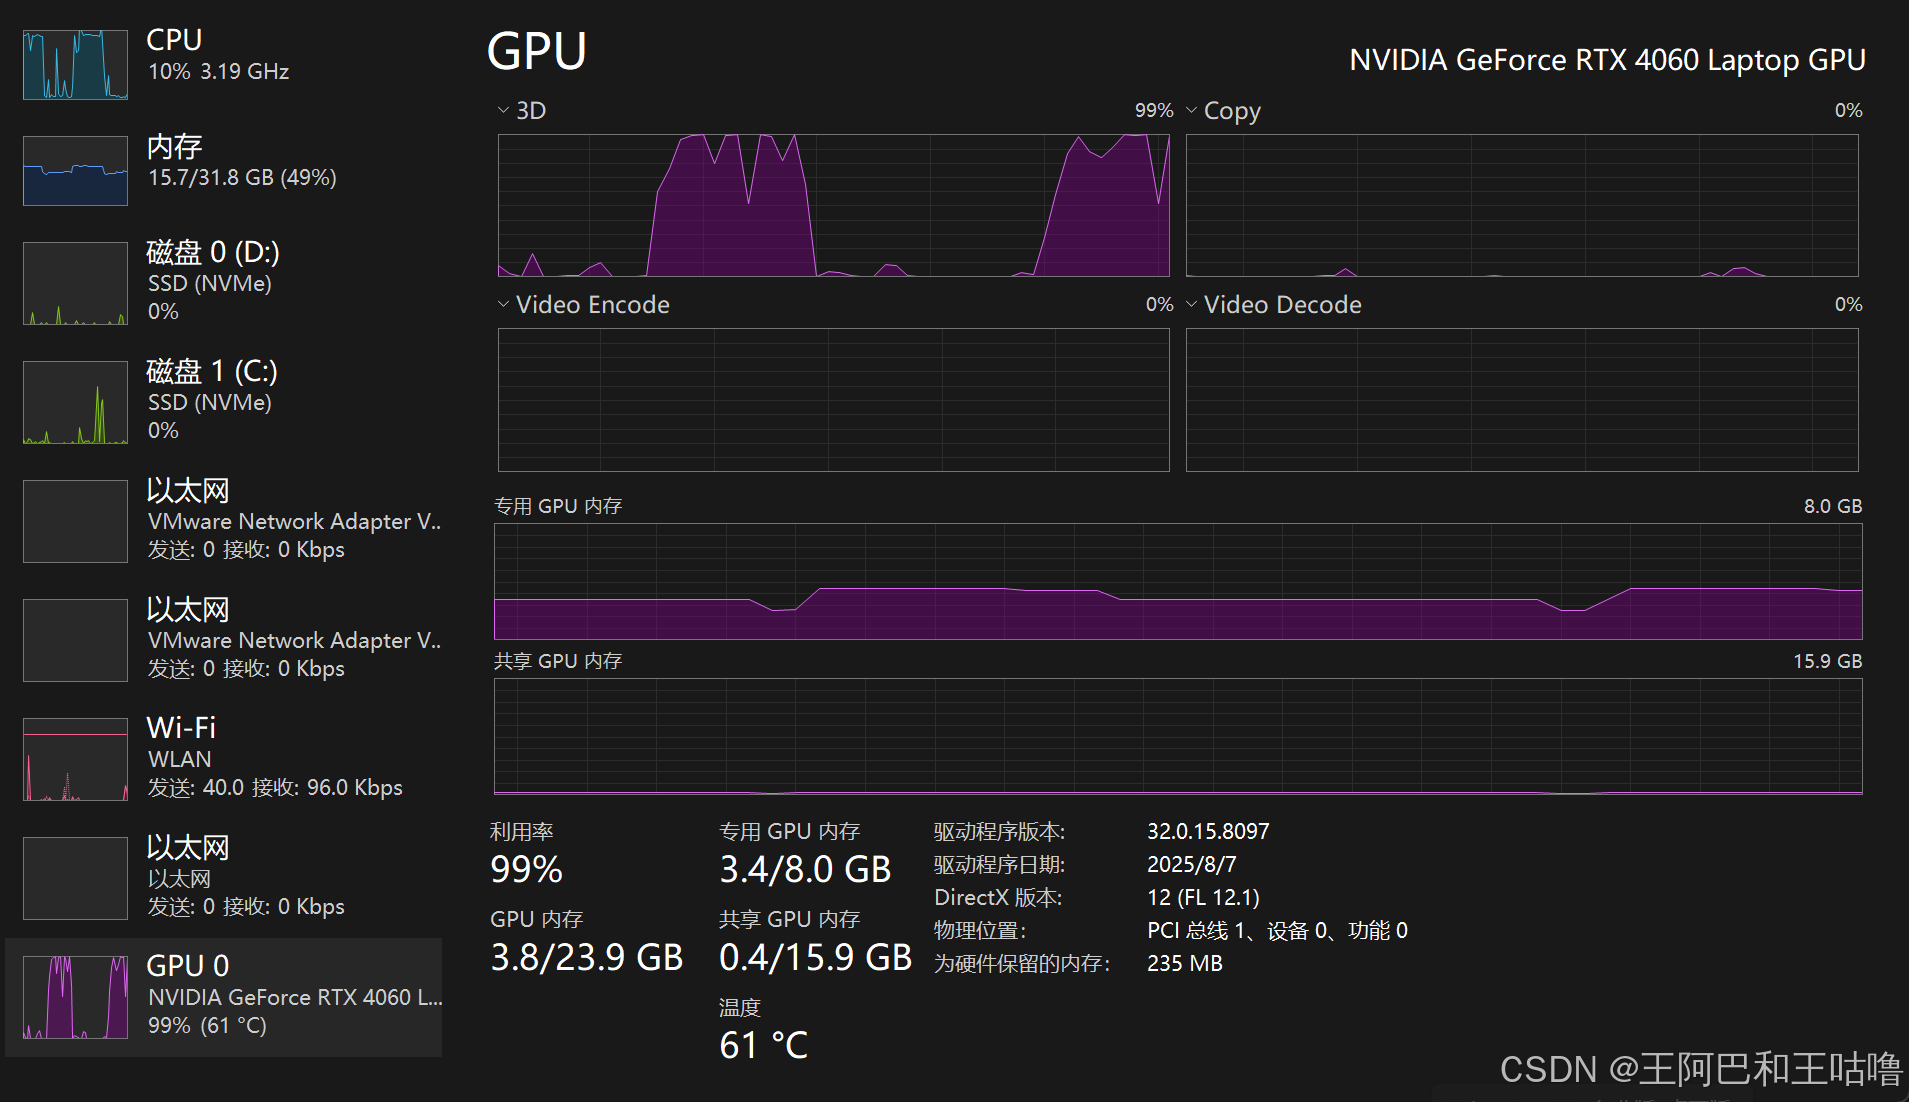
【重要!超级无敌大坑!!!】
这里必须要提醒一点,如果是带独显的笔记本电脑需要启用GPU加速,请务必去BIOS中设置成独显直连模式。否则系统会因为节能设置,禁止Blender在无窗口模式下的GPU运算。
进坑指南:我最开始在写这段程序之后怎么都无法使用GPU渲染(NVIDIA RTX 4060 laptop),一开始以为是程序写错了,来来回回改,但是相同的程序在Blender脚本编辑器里就能用GPU渲染,PyCharm里就不行。各种查资料,通义千问、DeepSeek、Claude Sonnet 4.5、Grok 4.1等等全都问过一遍了,根据AI说的改了程序还是无法解决,搞了一天多也没搞明白什么问题。最后还得是GPT5-Codex,他直接指出程序没问题,可能是背景渲染降级,然后我在BIOS里调整成独显直连之后就解决了(原先设置的是“自动”)。

2.3 对目标进行环绕拍摄
(1)功能需求
- 人工设定摄像机到目标的距离
- 根据仰角确定摄像机的初始位置
- 按照旋转角度间隔对目标进行环绕拍摄
(2)最终实现
功能逻辑比较直观简单,最终写成函数形式如下:
def render_orbit_with_annotations(
        target_class,
        scene_class,
        output_dir,
        distance,
        elevation_deg,
        rotation_step_deg=90,
        renderer="EEVEE",
        resolution_x=1920,
        resolution_y=1080
):
    """
    环绕拍摄 + 遮挡检测 + 标注生成
    :param target_class: 目标模型类别
    :param scene_class: 场景模型类别
    :param output_dir: 输出文件夹
    :param distance: 摄像机与目标模型的距离
    :param elevation_deg: 摄像机与目标模型的仰角
    :param rotation_step_deg: 摄像机环绕拍摄时的角度间隔
    :param renderer: 渲染器类型(EEVEE或CYCLES)
    :param resolution_x: 输出图片尺寸(宽)
    :param resolution_y: 输出图片尺寸(高)
    """
    output_dir = str(os.path.join(output_dir, target_class))
    os.makedirs(output_dir, exist_ok=True)

    scene = bpy.context.scene
    prefs = bpy.context.preferences
    scene.render.resolution_x = resolution_x
    scene.render.resolution_y = resolution_y
    scene.render.image_settings.file_format = 'PNG'

    target_obj = bpy.data.objects.get("targetModel")
    if not target_obj:
        raise ValueError("场景中未找到名为 'targetModel' 的对象!")

    # 设置渲染器
    ...

    # 创建相机(复用或新建)
    cam_obj = None
    for obj in bpy.data.objects:
        if obj.type == 'CAMERA':
            cam_obj = obj
            break
    if not cam_obj:
        bpy.ops.object.camera_add(location=(0, -distance, 0))
        cam_obj = bpy.context.active_object
        scene.camera = cam_obj

    json_filename = "metadata.json"
    label_path = os.path.join(output_dir, json_filename)
    if os.path.exists(label_path):
        with open(label_path, 'r', encoding='utf-8') as f:
            annotation_lines = json.load(f)
    else:
        annotation_lines = {}

    # ===== 1. 顶视图(序号 0000)=====
    top_filename = f"{scene_class}_0000.png"
    top_path = os.path.join(output_dir, top_filename)
    should_render_top = not os.path.exists(top_path)

    if should_render_top:
        # 设置顶视图相机
        cam_obj.location = (0, 0, distance)
        direction = Vector((0, 0, 0)) - cam_obj.location
        rot_quat = direction.to_track_quat('-Z', 'Y')
        cam_obj.rotation_euler = rot_quat.to_euler()

        # 检测遮挡
        is_visible, occlusion_ratio, (cx, cy, w, h) = get_visible_info(cam_obj, target_obj, scene)

        # 保存图像
        scene.render.filepath = top_path
        bpy.ops.render.render(write_still=True)
        annotation_lines = annotations_to_json(annotation_lines, top_filename, target_class, scene_class, distance,
                                               elevation_deg, -1, cx, cy, w, h, occlusion_ratio)
        print(f"✅ 顶视图已保存: {top_filename} | 遮挡比例: {occlusion_ratio:.2%}")
    else:
        print(f"⚠️ 顶视图已存在,跳过。")

    # ===== 2. 环绕视图 =====
    angles = []
    current = 0
    while current < 360:
        angles.append(current % 360)
        current += rotation_step_deg
    angles = sorted(set(angles))

    for i, az_deg in enumerate(angles):
        # 获取不冲突的序号(从 0001 开始)
        index = get_next_index(output_dir, scene_class)
        filename = f"{scene_class}_{index:04d}.png"
        filepath = os.path.join(output_dir, filename)

        # 计算相机位置
        elev = math.radians(elevation_deg)
        azim = math.radians(az_deg)
        x = distance * math.cos(elev) * math.sin(azim)
        y = distance * math.cos(elev) * math.cos(azim)
        z = distance * math.sin(elev)
        cam_obj.location = (x, y, z)

        # 对准原点
        direction = Vector((0, 0, 0)) - cam_obj.location
        rot_quat = direction.to_track_quat('-Z', 'Y')
        cam_obj.rotation_euler = rot_quat.to_euler()

        # 检测遮挡与 bbox
        result = get_visible_info(cam_obj, target_obj, scene)
        print(result)
        if not result[0]:
            print(f"⚠️ 视角 {az_deg}°:目标不可见,跳过")
            continue

        is_visible, occlusion_ratio, (cx, cy, w, h) = result
        if occlusion_ratio > 0.5:
            print(f"❌ 视角 {az_deg}° 遮挡比例过高 ({occlusion_ratio:.2%}),跳过保存")
            continue

        # 保存图像
        scene.render.filepath = filepath
        bpy.ops.render.render(write_still=True)
        annotation_lines = annotations_to_json(annotation_lines, filename, target_class, scene_class, distance,
                                               elevation_deg, az_deg, cx, cy, w, h, occlusion_ratio)
        print(f"✅ 已保存: {filename} | 遮挡比例: {occlusion_ratio:.2%}")

    # ===== 3. 保存标注文件 =====
    with open(label_path, 'w') as f:
        json.dump(annotation_lines, f, indent=4)
    print(f"\n📄 标注文件已保存: {label_path}")


def annotations_to_json(annotation_lines, filename, target_class, scene_class, distance, elevation_deg, azimuth_deg,
                        cx, cy, w, h, occlusion_ratio):
    annotation_lines.update({
        filename: [
            {
                "target_class": target_class,
                "scene_class": scene_class,
                "distance": distance,
                "elevation_deg": elevation_deg,
                "azimuth_deg": azimuth_deg,
                "bbox": [cx, cy, w, h],
                "occlusion": occlusion_ratio,
            }
        ],
    })
    return annotation_lines
【输入参数】
model_class:模型类别
output_dir:输出文件夹
distance:摄像机与目标模型的距离
elevation_deg:摄像机与目标模型的仰角
rotation_step_deg:摄像机环绕拍摄时的角度间隔
renderer:渲染器类型(EEVEE或CYCLES)
resolution_x:输出图片尺寸(宽)
resolution_y:输出图片尺寸(高)
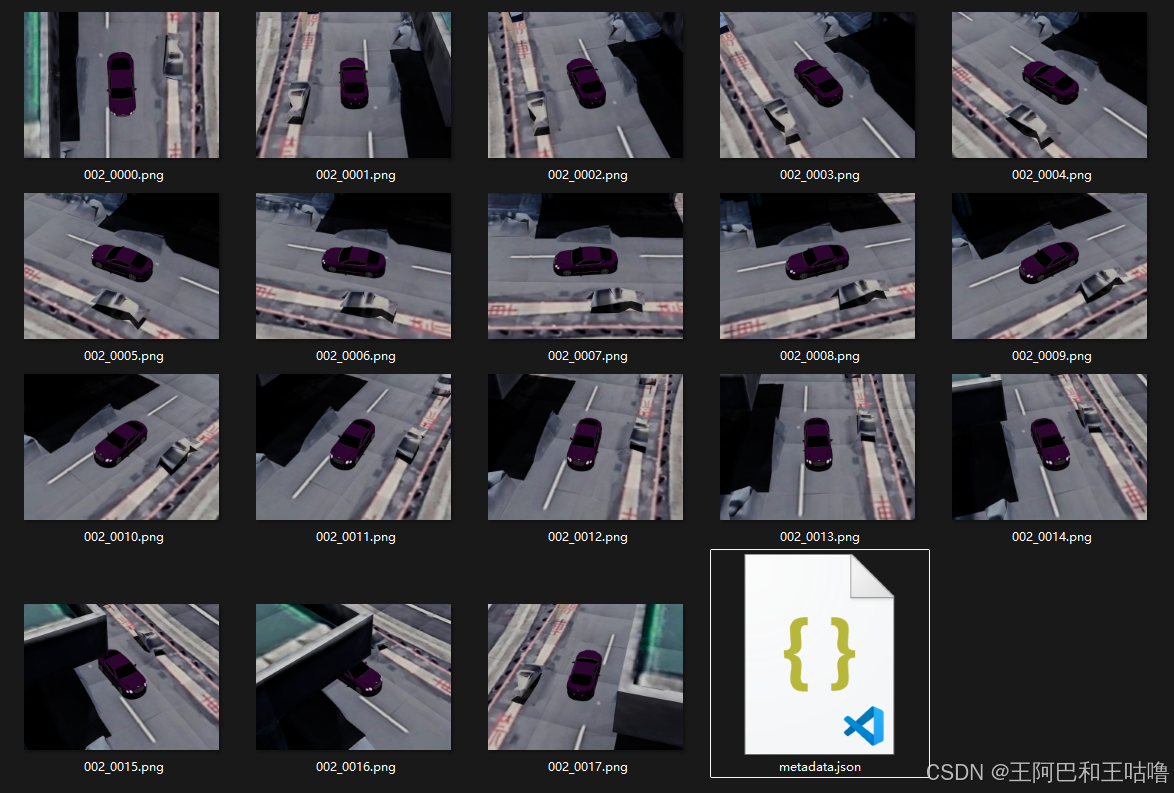
2.4 检验环绕拍摄情况
主函数:
if __name__ == "__main__":
    # 1. 打开工程
    BLEND_FILE_PATH = r"D:\Projects\RealEarthStudio\Blender模型\合并模型(含光照).blend"
    bpy.ops.wm.open_mainfile(filepath=BLEND_FILE_PATH)

    # 2. 配置参数
    TARGET_MODEL_CLASS = "Bentley"  # 目标模型类名
    SCENE_MODEL_CLASS = "002"  # 环境模型名
    OUTPUT_DIR = r"D:\Projects\RealEarthStudio\Blender照片"  # 输出目录
    DISTANCE = 20  # 相机距离
    ELEVATION = 45  # 环绕仰角
    ROTATION_STEP = 15  # 旋转间隔
    RENDERER = "cycles"  # 渲染器
    RES_X, RES_Y = 4000, 3000  # 分辨率

    # 3. 执行
    render_orbit_with_annotations(
        target_class=TARGET_MODEL_CLASS,
        scene_class=SCENE_MODEL_CLASS,
        output_dir=OUTPUT_DIR,
        distance=DISTANCE,
        elevation_deg=ELEVATION,
        rotation_step_deg=ROTATION_STEP,
        renderer=RENDERER,
        resolution_x=RES_X,
        resolution_y=RES_Y
    )
运行结果:
标注信息:文件名,标注框(cx,cy,w,h),遮挡率
{
    "002_0000.png": [
        {
            "target_class": "Bentley",
            "scene_class": "002",
            "distance": 20,
            "elevation_deg": 45,
            "azimuth_deg": -1,
            "bbox": [
                0.5011711716651917,
                0.5024241656064987,
                0.15481305122375488,
                0.4443792402744293
            ],
            "occlusion": 0.0,
            "renderer": "CYCLES"
        }
    ],
    "002_0001.png": [
        {
            "target_class": "Bentley",
            "scene_class": "002",
            "distance": 20,
            "elevation_deg": 45,
            "azimuth_deg": 0,
            "bbox": [
                0.5004879385232925,
                0.5218518227338791,
                0.15431031584739685,
                0.3283562958240509
            ],
            "occlusion": 0.0,
            "renderer": "CYCLES"
        }
    ],
    ...
打印输出:
00:35.812 render | Saved: ‘D:\Projects\RealEarthStudio\Blender照片\Bentley\002_0000.png’
✅ 顶视图已保存: 002_0000.png | 遮挡比例: 0.00%
(True, 0.0, (0.5004879385232925, 0.5218518227338791, 0.15431031584739685, 0.3283562958240509))
01:11.281 render | Saved: ‘D:\Projects\RealEarthStudio\Blender照片\Bentley\002_0001.png’
✅ 已保存: 002_0001.png | 遮挡比例: 0.00%
(True, 4.181301220939956e-05, (0.5050534904003143, 0.5210772305727005, 0.20145279169082642, 0.32305440306663513))
01:47.265 render | Saved: ‘D:\Projects\RealEarthStudio\Blender照片\Bentley\002_0002.png’
✅ 已保存: 002_0002.png | 遮挡比例: 0.00%
(True, 4.181301220939956e-05, (0.5061577409505844, 0.5221357196569443, 0.25180116295814514, 0.30446258187294006))
02:22.546 render | Saved: ‘D:\Projects\RealEarthStudio\Blender照片\Bentley\002_0003.png’
✅ 已保存: 002_0003.png | 遮挡比例: 0.00%
(True, 0.0003763171098845961, (0.5057215243577957, 0.5237158536911011, 0.2919991910457611, 0.2762683629989624))
02:58.296 render | Saved: ‘D:\Projects\RealEarthStudio\Blender照片\Bentley\002_0004.png’
✅ 已保存: 002_0004.png | 遮挡比例: 0.04%
(True, 0.0004181301220939957, (0.5045098960399628, 0.5227789729833603, 0.3173835873603821, 0.2471572458744049))
03:33.937 render | Saved: ‘D:\Projects\RealEarthStudio\Blender照片\Bentley\002_0005.png’
✅ 已保存: 002_0005.png | 遮挡比例: 0.04%
(True, 0.0003345040976751965, (0.5027887225151062, 0.5278141498565674, 0.32932162284851074, 0.21802043914794922))
04:09.515 render | Saved: ‘D:\Projects\RealEarthStudio\Blender照片\Bentley\002_0006.png’
✅ 已保存: 002_0006.png | 遮挡比例: 0.03%
(True, 0.0003763171098845961, (0.5012040734291077, 0.5329868346452713, 0.332442045211792, 0.20089182257652283))
04:45.328 render | Saved: ‘D:\Projects\RealEarthStudio\Blender照片\Bentley\002_0007.png’
✅ 已保存: 002_0007.png | 遮挡比例: 0.04%
(True, 0.00029269108546579696, (0.5002100169658661, 0.527558907866478, 0.3255322575569153, 0.2347208559513092))
05:21.953 render | Saved: ‘D:\Projects\RealEarthStudio\Blender照片\Bentley\002_0008.png’
✅ 已保存: 002_0008.png | 遮挡比例: 0.03%
(True, 0.0002508780732563974, (0.498029962182045, 0.5273079425096512, 0.30754992365837097, 0.2753572165966034))
05:56.734 render | Saved: ‘D:\Projects\RealEarthStudio\Blender照片\Bentley\002_0009.png’
✅ 已保存: 002_0009.png | 遮挡比例: 0.03%
(True, 0.00029269108546579696, (0.4955870360136032, 0.5238898247480392, 0.27689483761787415, 0.31252017617225647))
06:31.703 render | Saved: ‘D:\Projects\RealEarthStudio\Blender照片\Bentley\002_0010.png’
✅ 已保存: 002_0010.png | 遮挡比例: 0.03%
(True, 0.0, (0.49419108033180237, 0.522959440946579, 0.23159676790237427, 0.3402872681617737))
07:06.484 render | Saved: ‘D:\Projects\RealEarthStudio\Blender照片\Bentley\002_0011.png’
✅ 已保存: 002_0011.png | 遮挡比例: 0.00%
(True, 0.0, (0.4952946603298187, 0.5217645615339279, 0.18063420057296753, 0.35422447323799133))
07:41.203 render | Saved: ‘D:\Projects\RealEarthStudio\Blender照片\Bentley\002_0012.png’
✅ 已保存: 002_0012.png | 遮挡比例: 0.00%
(True, 0.0, (0.5010006725788116, 0.5212998241186142, 0.15432840585708618, 0.35740819573402405))
08:16.593 render | Saved: ‘D:\Projects\RealEarthStudio\Blender照片\Bentley\002_0013.png’
✅ 已保存: 002_0013.png | 遮挡比例: 0.00%
(True, 0.0, (0.504847064614296, 0.5223482549190521, 0.20186111330986023, 0.35006028413772583))
08:51.515 render | Saved: ‘D:\Projects\RealEarthStudio\Blender照片\Bentley\002_0014.png’
✅ 已保存: 002_0014.png | 遮挡比例: 0.00%
(True, 0.039136979427997994, (0.5054609328508377, 0.5233142971992493, 0.250334233045578, 0.3310772180557251))
09:26.609 render | Saved: ‘D:\Projects\RealEarthStudio\Blender照片\Bentley\002_0015.png’
✅ 已保存: 002_0015.png | 遮挡比例: 3.91%
(True, 0.44380331159056696, (0.5391809642314911, 0.491969957947731, 0.2202187180519104, 0.23227986693382263))
10:02.062 render | Saved: ‘D:\Projects\RealEarthStudio\Blender照片\Bentley\002_0016.png’
✅ 已保存: 002_0016.png | 遮挡比例: 44.38%
(False, 0.9136561297875899, (0.626675933599472, 0.4621685594320297, 0.06499260663986206, 0.12416031956672668))
⚠️ 视角 240°:目标不可见,跳过
(False, 1.0, None)
⚠️ 视角 255°:目标不可见,跳过
(False, 1.0, None)
⚠️ 视角 270°:目标不可见,跳过
(False, 1.0, None)
⚠️ 视角 285°:目标不可见,跳过
(False, 1.0, None)
⚠️ 视角 300°:目标不可见,跳过
(False, 1.0, None)
⚠️ 视角 315°:目标不可见,跳过
(False, 1.0, None)
⚠️ 视角 330°:目标不可见,跳过
(True, 0.0, (0.49520790576934814, 0.5213552713394165, 0.18065571784973145, 0.326190710067749))
10:41.562 render | Saved: ‘D:\Projects\RealEarthStudio\Blender照片\Bentley\002_0017.png’
✅ 已保存: 002_0017.png | 遮挡比例: 0.00%
📄 标注文件已保存: D:\Projects\RealEarthStudio\Blender照片\Bentley\metadata.json
三、相关附件
- 文章中使用到的合并目标与场景的Blender工程文件
合并模型(含光照).blend:下载链接

有“AI”的1024 = 2048,欢迎大家加入2048 AI社区
更多推荐


 26
26 0
0- 0


 已为社区贡献5条内容

所有评论(0)