Rust 异步编程深度解析:从 Future 到运行时
本文深入解析Rust异步编程的底层机制,从Future trait的设计实现到运行时的工作流程。Rust通过惰性执行的Future状态机、Pin机制解决自引用问题,实现了零成本抽象的并发处理。文章详细剖析了async/await语法糖背后的编译器转换、Waker调度机制,以及Tokio运行时的任务调度和I/O反应器实现。同时提供了性能优化实践和常见陷阱规避策略,帮助开发者充分利用Rust异步编程的
引言
Rust 的异步编程模型在系统编程语言中独树一帜。它通过零成本抽象实现了高性能的并发处理,同时保持了内存安全。本文将深入探讨 Rust 异步编程的底层机制,从 Future trait 的设计哲学到运行时的实现细节,帮助你构建对异步 Rust 的完整理解。
1. Future trait:理解异步的核心抽象
1.1 Future 的本质
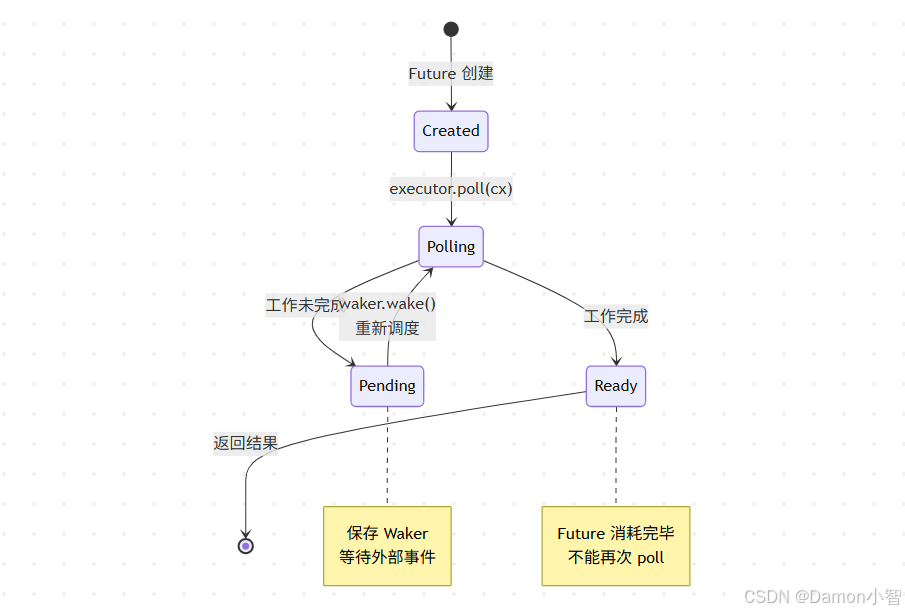
在 Rust 中,Future 并非传统意义上的 Promise。它是一个惰性的、可轮询的状态机:
pub trait Future {
    type Output;

    fn poll(self: Pin<&mut Self>, cx: &mut Context<'_>) -> Poll<Self::Output>;
}

pub enum Poll<T> {
    Ready(T),
    Pending,
}
这个设计有几个关键洞察:
1. 惰性执行:Future 在被 poll 之前不会执行任何工作
2. 零分配:不需要在堆上分配闭包或回调
3. 组合性:Future 可以通过组合器链式组合,编译器会将其优化为单一状态机
1.2 Pin 与自引用结构
Pin 是理解异步 Rust 的关键。考虑这个 async 函数:
async fn read_to_string(socket: &TcpStream) -> String {
    let mut buffer = String::new();
    socket.read_to_string(&mut buffer).await;
    buffer
}
编译器会将其展开为类似这样的状态机:
enum ReadToStringFuture<'a> {
    Init { socket: &'a TcpStream },
    Reading {
        socket: &'a TcpStream,
        buffer: String,
        read_future: ReadFuture<'a>, // 可能持有对 buffer 的引用!
    },
    Done,
}
问题在于:如果 ReadFuture 持有 buffer 的引用,那么移动 ReadToStringFuture 将使该引用失效。Pin 通过禁止移动来解决这个问题:
impl<'a> Future for ReadToStringFuture<'a> {
    type Output = String;

    fn poll(self: Pin<&mut Self>, cx: &mut Context<'_>) -> Poll<String> {
        // Pin 保证了 self 不会被移动
        // 即使内部有自引用也是安全的
        // ...
    }
}核心原则:`Pin<P>` 保证了被 pin 的值在内存中的位置不会改变,除非它实现了 `Unpin`(表示移动是安全的)。

2. async/await 语法糖下的编译器魔法
2.1 状态机转换
每个 await 点都是一个潜在的挂起点。编译器将 async 函数转换为状态机:
async fn complex_operation() -> i32 {
    let x = async_op_1().await;
    let y = async_op_2(x).await;
    let z = async_op_3(y).await;
    z + 1
}
编译器生成的状态机大致如下:
enum ComplexOperationFuture {
    State0,
    State1 { fut1: AsyncOp1Future },
    State2 { x: i32, fut2: AsyncOp2Future },
    State3 { y: i32, fut3: AsyncOp3Future },
    Done,
}

impl Future for ComplexOperationFuture {
    type Output = i32;

    fn poll(mut self: Pin<&mut Self>, cx: &mut Context<'_>) -> Poll<i32> {
        loop {
            match *self {
                Self::State0 => {
                    *self = Self::State1 { fut1: async_op_1() };
                }
                Self::State1 { ref mut fut1 } => {
                    let x = ready!(Pin::new(fut1).poll(cx));
                    *self = Self::State2 { x, fut2: async_op_2(x) };
                }
                Self::State2 { x, ref mut fut2 } => {
                    let y = ready!(Pin::new(fut2).poll(cx));
                    *self = Self::State3 { y, fut3: async_op_3(y) };
                }
                Self::State3 { y, ref mut fut3 } => {
                    let z = ready!(Pin::new(fut3).poll(cx));
                    *self = Self::Done;
                    return Poll::Ready(z + 1);
                }
                Self::Done => panic!("polled after completion"),
            }
        }
    }
}性能优势:
-
零堆分配(状态机是 enum,大小在编译时已知)
-
每次 poll 都是简单的 match 跳转
-
编译器可以内联和优化整个调用链

2.2 生命周期与 async
async 函数的生命周期推导比同步函数更复杂:
// 这个函数借用 data,返回的 Future 必须捕获这个借用
async fn process_data<'a>(data: &'a str) -> usize {
    expensive_async_computation(data).await
}

// 等价于:
fn process_data<'a>(data: &'a str) -> impl Future<Output = usize> + 'a {
    async move {
        expensive_async_computation(data).await
    }
}
关键点:返回的 Future 持有对 data 的引用,因此 Future 的生命周期受 'a 约束。
3. Waker 机制:异步调度的核心
3.1 Waker 的工作原理
Waker 是连接 Future 和执行器的桥梁:
pub struct Context<'a> {
    waker: &'a Waker,
    // ...
}

impl Waker {
    pub fn wake(self);
    pub fn wake_by_ref(&self);
}
当 Future 返回 Poll::Pending 时,它必须确保在将来某个时刻调用 Waker::wake(),通知执行器重新 poll 这个 Future。
典型场景:
struct TimerFuture {
    shared_state: Arc<Mutex<SharedState>>,
}

struct SharedState {
    completed: bool,
    waker: Option<Waker>,
}

impl Future for TimerFuture {
    type Output = ();

    fn poll(self: Pin<&mut Self>, cx: &mut Context<'_>) -> Poll<()> {
        let mut shared_state = self.shared_state.lock().unwrap();

        if shared_state.completed {
            Poll::Ready(())
        } else {
            // 保存 waker,定时器线程会用它唤醒任务
            shared_state.waker = Some(cx.waker().clone());
            Poll::Pending
        }
    }
}

// 在定时器线程中:
fn timer_thread(shared_state: Arc<Mutex<SharedState>>) {
    thread::sleep(Duration::from_secs(1));
    let mut state = shared_state.lock().unwrap();
    state.completed = true;
    if let Some(waker) = state.waker.take() {
        waker.wake(); // 通知执行器重新 poll
    }
}
3.2 Waker 的实现细节
Waker 内部使用虚表(vtable)实现类型擦除:
pub struct RawWaker {
    data: *const (),
    vtable: &'static RawWakerVTable,
}

pub struct RawWakerVTable {
    clone: unsafe fn(*const ()) -> RawWaker,
    wake: unsafe fn(*const ()),
    wake_by_ref: unsafe fn(*const ()),
    drop: unsafe fn(*const ()),
}
这种设计允许不同的运行时实现自己的唤醒机制,而不需要泛型(避免单态化开销)。

4. Tokio 运行时深度剖析
4.1 工作窃取调度器
Tokio 使用多线程工作窃取调度器:
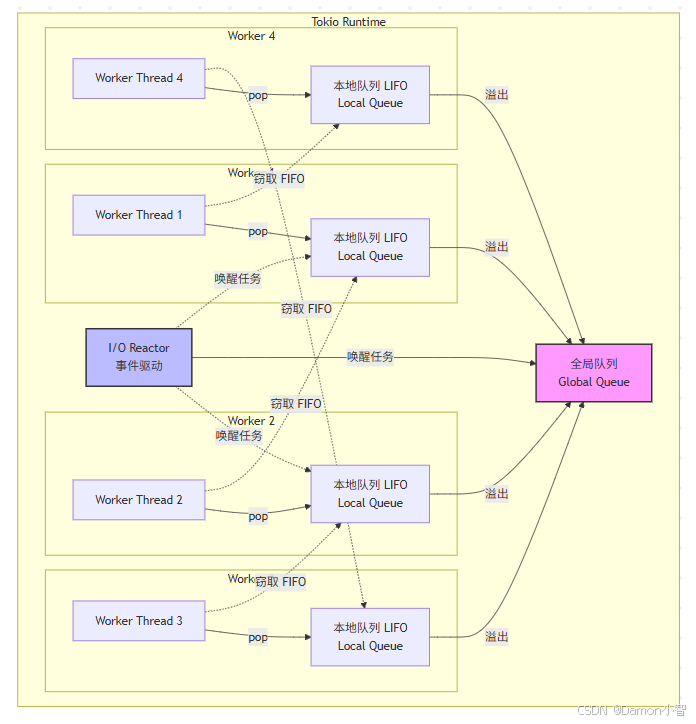
核心组件:
1. 本地队列:每个 worker 线程有自己的任务队列(LIFO,利用缓存局部性)
2. 全局队列:当本地队列满时,任务溢出到全局队列
3. 工作窃取:空闲的 worker 从其他 worker 的队列尾部窃取任务(FIFO)
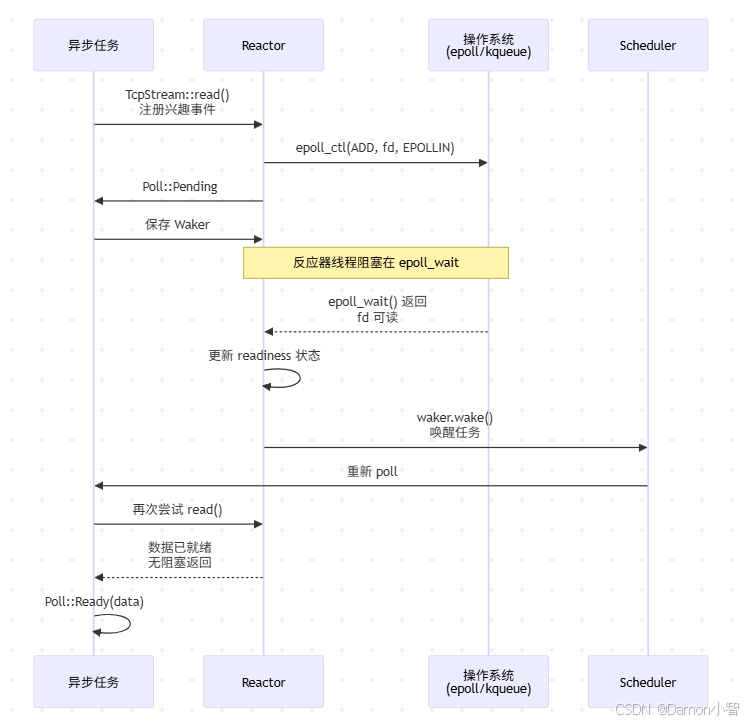
4.2 反应器(Reactor)
Tokio 的 I/O 反应器基于操作系统的事件通知机制(Linux 上的 epoll,macOS 上的 kqueue,Windows 上的 IOCP):
pub struct Reactor {
    // epoll/kqueue/IOCP 的封装
    io_driver: mio::Poll,
    // I/O 资源注册表
    resources: Slab<ScheduledIo>,
}

struct ScheduledIo {
    readiness: AtomicUsize,    // 可读/可写状态
    wakers: Mutex<Waiters>,     // 等待此 I/O 的 Waker 列表
}工作流程:
-
异步 I/O 操作(如
TcpStream::read())向反应器注册兴趣事件 -
操作返回
Poll::Pending,并将 Waker 保存到ScheduledIo -
反应器线程调用
epoll_wait,阻塞等待 I/O 事件 -
当事件就绪时,反应器更新
readiness,并调用所有相关的Waker -
调度器重新 poll 对应的 Future,此时 I/O 操作可以无阻塞地完成
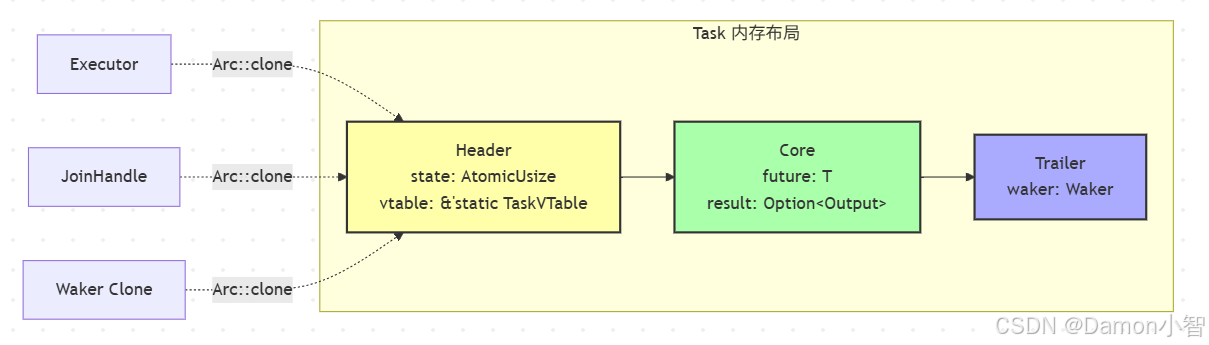
4.3 任务(Task)的内存布局
Tokio 的任务是这样布局的:
struct Task<T> {
    header: Header,
    core: Core<T>,
    trailer: Trailer,
}

struct Header {
    state: AtomicUsize,  // 任务状态(运行中、完成、取消等)
    vtable: &'static TaskVTable,
}

struct Core<T> {
    future: T,           // 实际的 Future
    result: Option<Output>,
}

struct Trailer {
    waker: Waker,        // 用于唤醒任务的 Waker
}
任务通过 Arc 管理生命周期,允许从多个位置(执行器、JoinHandle、Waker)引用同一个任务。
5. 异步性能优化实战
5.1 减少轮询开销
问题:频繁的轮询会带来开销。
优化:使用 `select!` 或 `join!` 时,理解其轮询策略:
// 低效:按顺序轮询,第一个分支会被过度轮询
select! {
    _ = very_fast_future() => {},
    _ = slow_future() => {},
}

// 优化:使用 biased 明确优先级(如果需要)
select! {
    biased;
    _ = critical_future() => {},
    _ = normal_future() => {},
}

// 或者使用 FuturesUnordered 实现公平轮询
let mut futures = FuturesUnordered::new();
futures.push(future1);
futures.push(future2);
while let Some(result) = futures.next().await {
    // ...
}
5.2 避免任务过度生成
问题:每个 `tokio::spawn` 都有开销(堆分配、状态管理)。
优化:批处理或使用流处理:
// 低效:为每个项生成一个任务
for item in items {
    tokio::spawn(async move {
        process(item).await;
    });
}

// 优化:使用流处理
use futures::stream::{self, StreamExt};

stream::iter(items)
    .for_each_concurrent(10, |item| async move {
        process(item).await;
    })
    .await;
5.3 利用`task_local` 避免锁竞争
问题:多个任务共享状态时,锁竞争会降低性能。
优化:使用任务本地存储:
tokio::task_local! {
    static REQUEST_ID: Uuid;
}

async fn handle_request(id: Uuid) {
    REQUEST_ID.scope(id, async {
        // 在此作用域内,所有异步调用都可以访问 REQUEST_ID
        // 无需传递参数或使用锁
        log_with_request_id().await;
    }).await;
}

async fn log_with_request_id() {
    REQUEST_ID.with(|id| {
        println!("Request ID: {}", id);
    });
}
5.4 理解`yield_now` 的使用场景
async fn cpu_intensive_with_breaks() {
    for chunk in data.chunks(1000) {
        process_chunk(chunk);
        // 给其他任务运行的机会,避免独占 worker 线程
        tokio::task::yield_now().await;
    }
}
6. 高级模式与陷阱
6.1 取消安全(Cancellation Safety)
并非所有 Future 都是取消安全的。考虑:
async fn process_messages(rx: &mut mpsc::Receiver<Message>) {
    loop {
        select! {
            msg = rx.recv() => {
                // 如果另一个分支先完成,msg 会被丢弃!
                process(msg).await;
            }
            _ = shutdown_signal() => break,
        }
    }
}问题:如果 `shutdown_signal()` 先完成,已接收但未处理的消息会丢失。
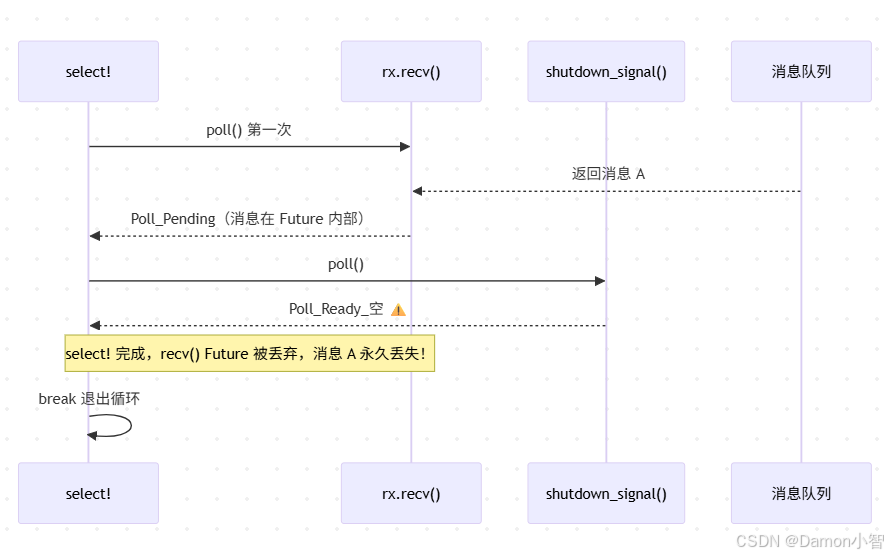
解决方案:使用取消安全的 API 或手动管理状态:
async fn process_messages(rx: &mut mpsc::Receiver<Message>) {
    let mut recv_fut = rx.recv();

    loop {
        select! {
            msg = &mut recv_fut => {
                process(msg).await;
                recv_fut = rx.recv(); // 重新创建 Future
            }
            _ = shutdown_signal() => break,
        }
    }
}
6.2 避免异步锁的死锁
// 危险:持有锁跨越 await 点
async fn deadlock_example(mutex: Arc<Mutex<Data>>) {
    let guard = mutex.lock().await;
    expensive_async_operation().await; // 锁仍被持有!
    drop(guard);
}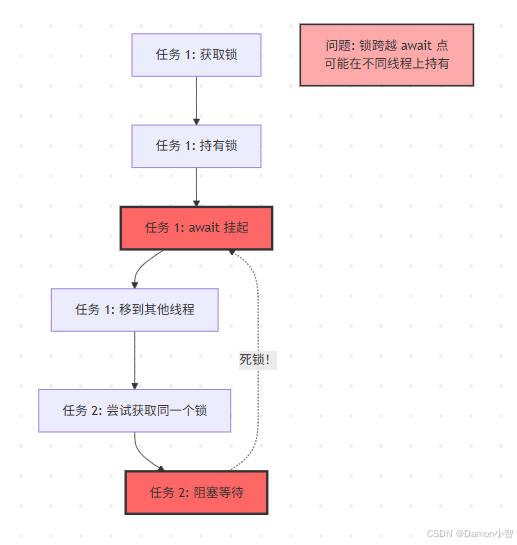
最佳实践:尽可能缩短锁的持有时间:
async fn better_example(mutex: Arc<Mutex<Data>>) {
    let data = {
        let guard = mutex.lock().await;
        guard.clone() // 或提取所需数据
    }; // 锁在此释放

    expensive_async_operation_with(data).await;
}
6.3 实现自定义 Future
有时你需要实现自定义 Future 来实现特殊的控制流:
struct Timeout<F> {
    future: F,
    deadline: Instant,
    delay: Option<tokio::time::Sleep>,
}

impl<F: Future> Future for Timeout<F> {
    type Output = Result<F::Output, Elapsed>;

    fn poll(mut self: Pin<&mut Self>, cx: &mut Context<'_>) -> Poll<Self::Output> {
        // 先检查内部 future
        if let Poll::Ready(output) = unsafe {
            self.as_mut().map_unchecked_mut(|s| &mut s.future).poll(cx)
        } {
            return Poll::Ready(Ok(output));
        }

        // 然后检查超时
        let delay = self.delay.get_or_insert_with(|| {
            tokio::time::sleep_until(self.deadline)
        });

        match unsafe { Pin::new_unchecked(delay) }.poll(cx) {
            Poll::Ready(_) => Poll::Ready(Err(Elapsed)),
            Poll::Pending => Poll::Pending,
        }
    }
}
7. 异步生态系统最佳实践
7.1 选择正确的运行时
- Tokio:功能最全,生态最好,适合大多数场景
- async-std:API 设计更接近标准库,适合快速原型
- smol:轻量级,适合嵌入式或低资源环境
- Embassy:专为嵌入式设计,支持 no_std
7.2 错误处理
使用 ? 操作符在异步代码中传播错误:
async fn fetch_and_parse(url: &str) -> Result<Data, Error> {
    let response = reqwest::get(url).await?;
    let text = response.text().await?;
    let data = serde_json::from_str(&text)?;
    Ok(data)
}
7.3 结构化并发
使用 tokio::try_join! 或 futures::future::try_join_all 实现结构化并发:
async fn fetch_all(urls: Vec<String>) -> Result<Vec<Response>, Error> {
    let futures = urls.into_iter().map(|url| fetch(url));
    futures::future::try_join_all(futures).await
}
8. 总结
Rust 的异步编程模型通过以下设计实现了性能和安全的平衡:
1. 零成本抽象:Future 是惰性的状态机,编译为高效的机器码
2. 类型安全:Pin 和生命周期系统防止了悬垂指针和数据竞争
3. 灵活性:运行时无关的设计允许不同的执行策略
4. 可组合性:Future 可以自由组合,形成复杂的异步工作流

理解这些底层机制不仅能帮助你写出更高效的异步代码,还能让你在遇到问题时快速定位根因。随着 Rust 异步生态的不断成熟,掌握这些核心概念将让你在系统编程领域如虎添翼。
参考资源

有“AI”的1024 = 2048,欢迎大家加入2048 AI社区
更多推荐


 21
21 0
0- 0


 已为社区贡献15条内容

所有评论(0)