【AI应用探索】-11- MCP的Server端和Client开发
1. MCP介绍
之前的学习我们已经知道什么是MCP了,这里简单回顾下:
1.1 MCP是什么
MCP是一种开放标准,它允许开发者安全地在数据源和AI工具之间建立双向连接。其架构非常简单:
- 开发者可以通过MCP服务器公开他们的数据;
- AI应用(MCP客户端)可以连接到MCP服务器,获取所需数据。
1.2 MCP三大组件
- MCP协议规范与SDK,供开发者构建与集成MCP;
- Claude桌面应用中的本地MCP服务器支持,便于开发者测试;
- MCP服务器的开源存储库,帮助开发者快速接入不同系统。
1.3 为什么使用MCP?
MCP让你能够在LLM之上构建智能代理(Agents)和复杂工作流。在智能体交互过程中LLM需要与数据和工具集成,MCP提供了:
- 丰富的预构建集成,LLM可直接对接
- 跨LLM供应商的灵活性,支持随时切换
- 数据安全的最佳实践,确保数据存储在本地基础设施中
1.4 与function call的区别:
-
同步vs异步:点菜与网购的隐喻
- Function Call 是同步调用,如同在餐厅点菜后必须等待厨师完成才能进行下一步操作。调用函数后,程序会阻塞等待返回结果,适合需要即时响应且后续逻辑依赖结果的场景,例如简单的数据查询。
- MCP 则是异步协议,类似网购下单后继续处理其他任务,系统在后台完成请求后通过回调通知结果。这种机制避免了程序阻塞,适用于耗时操作(如网络请求、文件读写)。
-
标准化 vs 私有化:通用插座与专属充电器
- Function Call 由特定厂商(如OpenAI)定义,类似于品牌手机的专属充电协议,功能局限于预定义的函数列表,灵活性较低。
- MCP 标准化协议(基于JSON-RPC 2.0),如同“万能插座”,为不同大模型和工具提供统一的交互规范,开发者只需遵循一次接口标准,即可实现跨平台兼容。
-
交互灵活性:单步执行与多线程协作
- Function Call 通常仅支持单次函数调用,且受限于预定义的操作集合,难以应对复杂多步骤任务。
- MCP 支持动态上下文管理和并行请求,例如同时从多个服务器获取数据并整合结果,显著提升复杂工作流的效率。
1.5 MCP架构
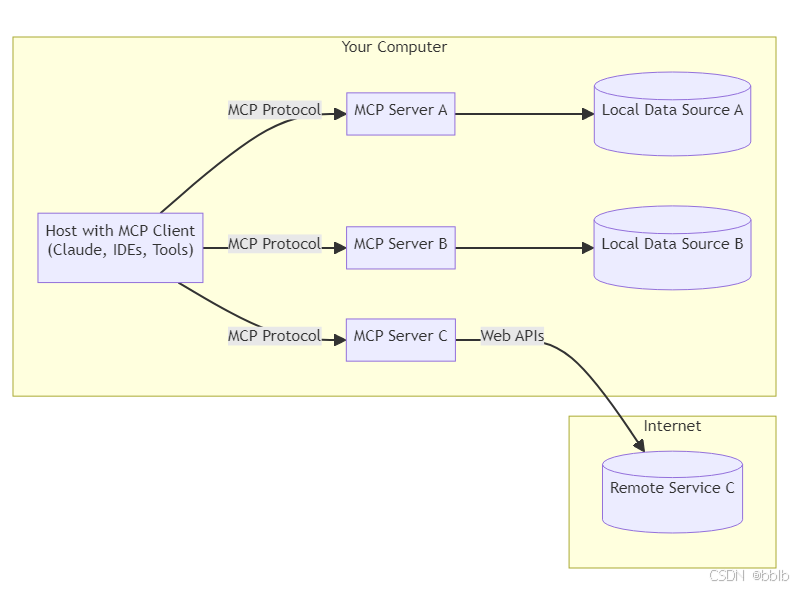
- MCP 主机:希望通过 MCP 访问数据的程序,例如 Claude Desktop、IDE 或 AI 工具
- MCP 客户端:与服务器保持 1:1 连接的协议客户端
- MCP 服务器:轻量级程序,每个程序都通过标准化模型上下文协议公开特定功能
- 本地数据源:MCP 服务器可以安全访问您的计算机文件、数据库和服务
- 远程服务:MCP 服务器可通过互联网(例如通过 API)连接到的外部系统
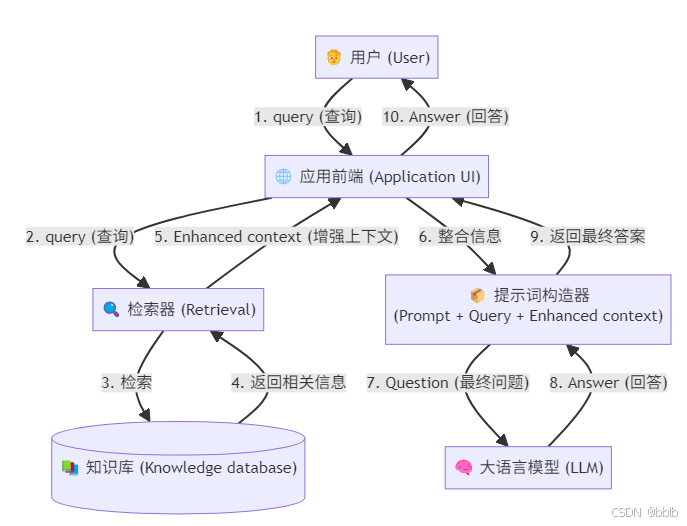
1.6 传统RAG框架
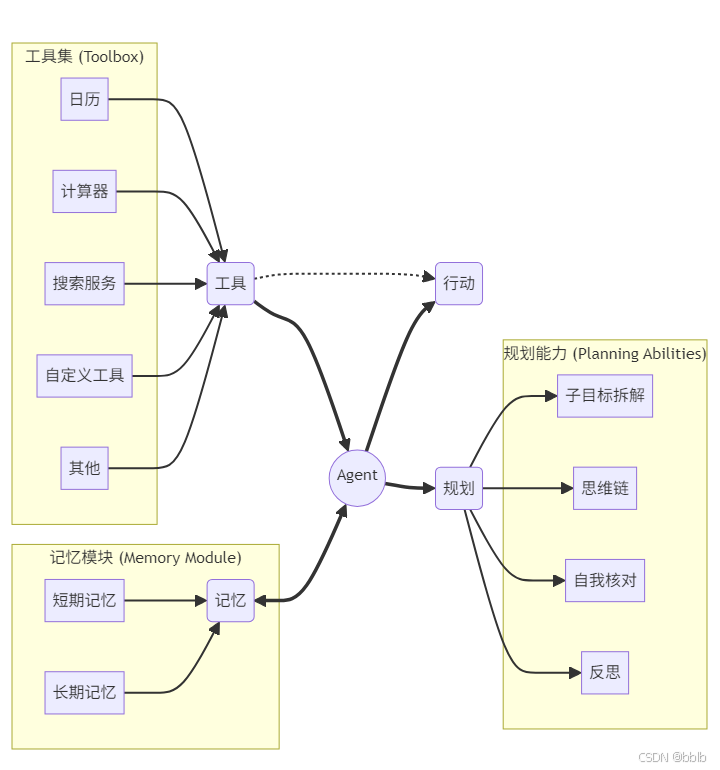
1.7 Agent架构
我们之间已经解析过OpenManus的源码,他其实就是一个标准的很复杂agent架构。
OpenManus 不仅是一个 Agent 架构,更是一个高度专业化和复杂化的 Agent 架构。它模拟了软件工程师的工作流程:接收需求 -> 思考和规划 -> 使用工具(键盘、编译器、浏览器) -> 执行任务 -> 检查和反思 -> 继续下一步。
2 MCP实现
我们之前结合Cursor有用过MCP,当时是规划路线,当时也是作为一个调包侠。
如今我们回看,我们如何自己实现一个MCP应用呢?
2.1 开发计划概述
这个计划分为三个主要部分:
-
MCP 的 Server 端和 Client 开发
- 目标: 搭建基础的客户端-服务器通信框架 (MCP),并实现一个简单的功能。
- 步骤:
- 开发一个自定义服务器(Server),提供天气查询功能。
- 开发一个客户端(Client),该客户端将被一个 Agent 调用,以实现查询天气的能力。
-
GraphRAG + MCP 的智能体 Agent 开发
- 目标: 引入 GraphRAG 技术来增强 Agent 的知识检索能力。
- 步骤:
- 构建一个 GraphRAG 索引库(知识图谱检索)。
- 基于这个索引库开发服务器端,使其能响应 GraphRAG 的查询。
- 定义客户端,并将其封装成一个“工具”集成到 Agent 中,最终实现一个结合了 GraphRAG、MCP 和 Agent 的完整应用。
-
RAG + MCP 的智能体开发
- 目标: 引入传统的向量检索 RAG 技术,作为另一种知识增强方案。
- 步骤:
- 使用本地的向量模型来构建一个 RAG 索引库。
- 基于这个 RAG 索引库开发服务器端。
- 定义客户端,并将其封装到 Agent 中,实现 RAG + MCP + Agent 的应用。
因为openmanus也是用python开发的,所以我们这里也采用python开发
2.2 MCP 的 Server 端和 Client 开发
基本都是看着官网的介绍,我们一步一步实现里面的过程,官网地址:MCP官网
因为我记得我们在之前章节的MCP使用的第一个就是查询天气,所以我们这个也用查询天气来作为我们第一个server端框架的开发。
在理论学习之后,我们进入实战环节。本节将从零开始,构建一个完整的 MCP 应用,包含服务器端和客户端,以实现一个简单的天气查询功能。这将为我们后续集成更复杂的 RAG 和 Agent 打下坚实的基础。
2.2.1 MCP的server端框架开发
我们的第一个目标是创建一个 MCP 服务器,它能像一个微服务一样,对外提供特定的工具——在这里,就是查询实时天气的功能
2.2.1.1 寻找外部数据源:天气 API
因为我们这个是实时查询的web功能,所以肯定需要借助外部api
要查询实时天气,我们需要一个可靠的数据源。我们选用 WeatherAPI,它提供免费的 API,并且文档清晰,使用简单。
通过查阅文档,我们了解到其核心接口 current.json 需要两个关键参数:key(我们的 API 密钥)和 q(我们想要查询的城市)。
查询天气的api网站我们选用:api.weatherapi.com,打开其官网weather.com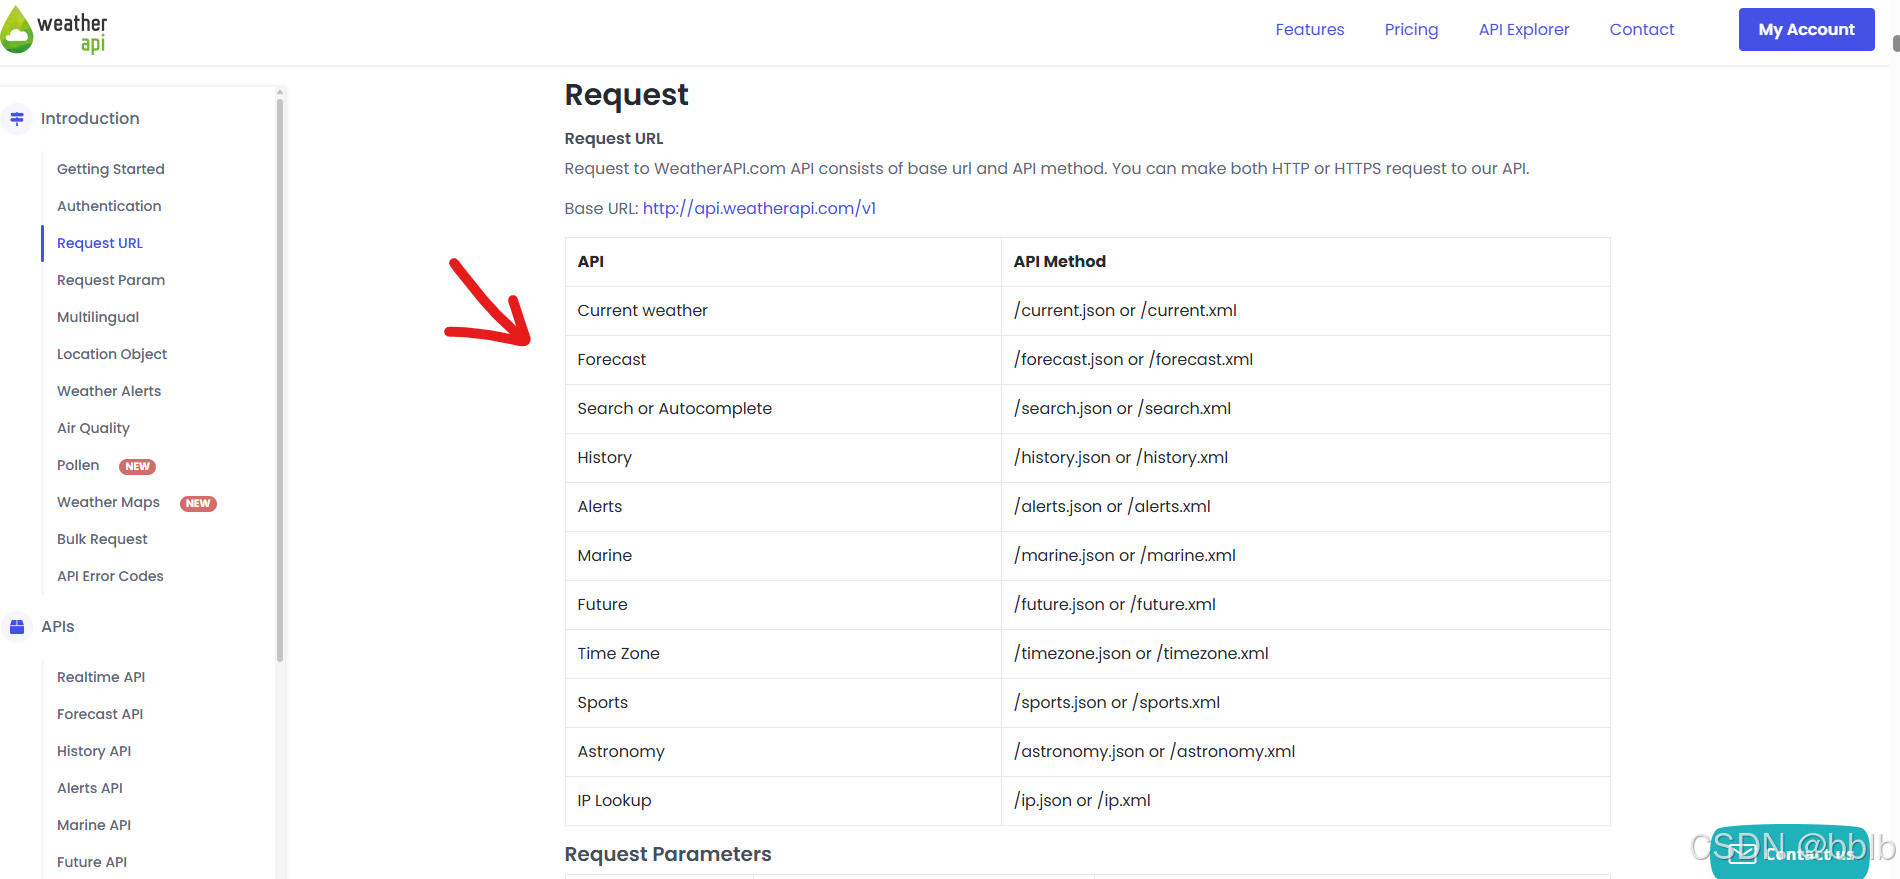
我们可以看到他支持这些,再看看他的必选参数: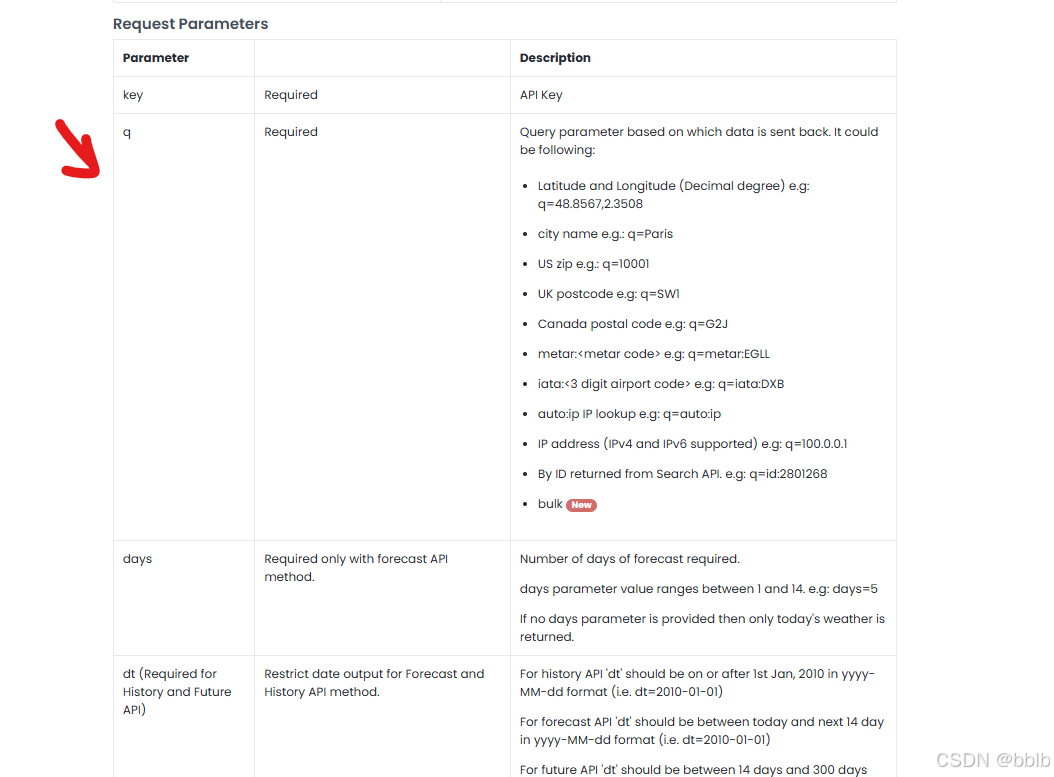
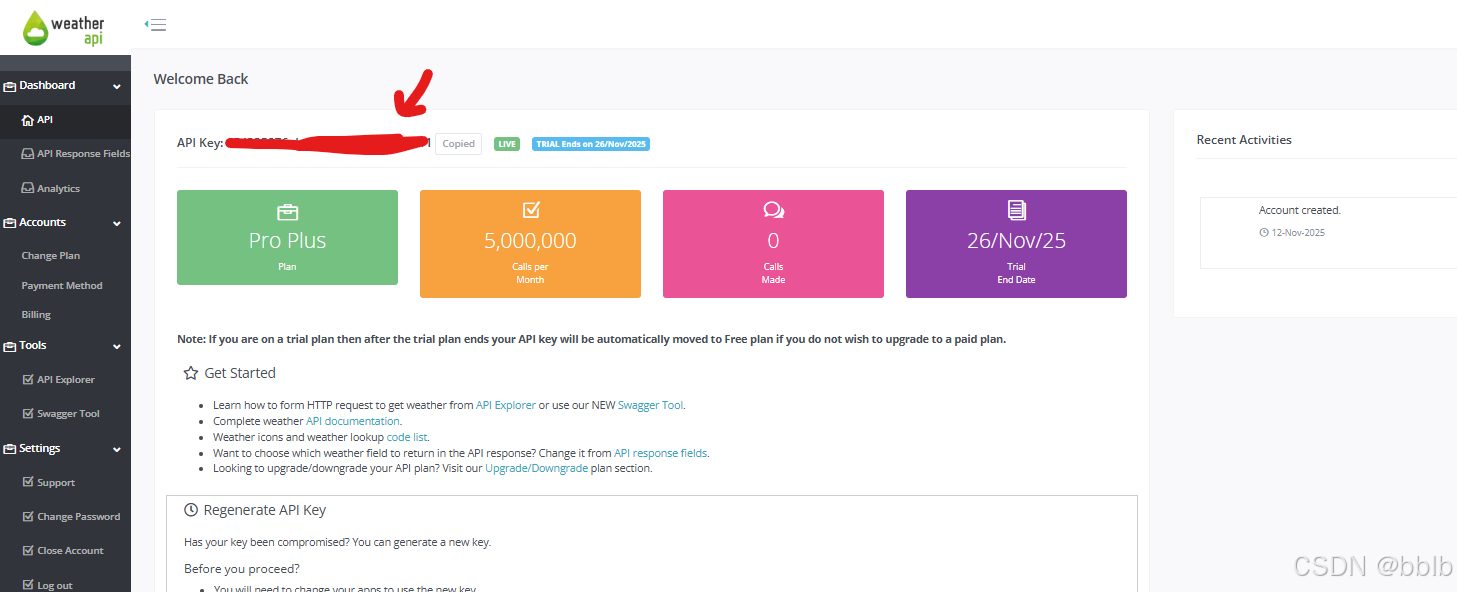
2.2.1.2 获取api_key
2.2.1.3 编写基础代码
这里我们想编写一个mcp的server,我们之前也分析过openmanus的源码,我们看看opnemanus是怎么做的?
我们发现它巧妙地使用了 FastMCP 来快速构建 MCP 服务器,并广泛采用异步(async)模式来处理工具调用。这种设计保证了高效率和非阻塞的执行,非常适合 I/O 密集型任务,比如我们的网络请求。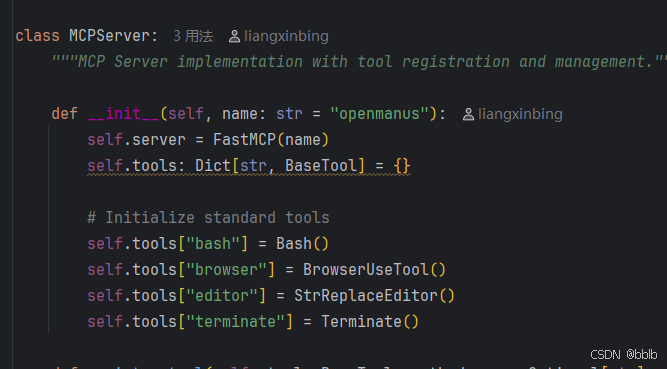
也是使用FastMCP创建后,剩下的工具调用都是异步的,所以我们也可以使用这样的方法。
import asyncio
import httpx
from mcp.server.fastmcp import FastMCP
from typing import Any, Dict
import logging

mcp = FastMCP("weather")

async def get_weather(city: str) -> Dict[str, Any]:
    base_url = "http://api.weatherapi.com/v1"
    current_weather_url = f"{base_url}/current.json"
    api_key = "xxx"
    params = {
        "q": city,
        "key": api_key
    }
    async with httpx.AsyncClient() as client:
        try:
            response = await client.get(current_weather_url, params=params)
            response.raise_for_status()
            return response.json()
        except httpx.HTTPError as exc:
            logging.error(f"HTTP请求失败: {exc}")
            return None

def format_data(data: Dict[str, Any]) -> str:
    if not data:
        return "获取天气信息失败。"
    try:
        city = data["location"]["name"]
        temp = data["current"]["temp_c"]
        condition = data["current"]["condition"]["text"]
        return f"{city}的天气情况:{condition},当前温度:{temp}℃"
    except KeyError:
        return "返回的数据格式不正确,无法解析。"

@mcp.tool()
async def query_weather(city: str) -> str:
    data = await get_weather(city)
    return format_data(data)

if __name__ == '__main__':
    mcp.run()
- 我们使用 @mcp.tool() 装饰器,这非常关键。它能自动将 query_weather 函数注册为 MCP 服务器的一个可用工具,客户端可以通过工具名 query_weather 来调用它。
- 最初的测试可以使用 asyncio.run(query_weather(“Xian”)) 来验证单次功能是否正常。但在最终的服务器代码中,我们必须换成 mcp.run(),这会启动一个持久化的服务,监听并响应来自客户端的请求,而不是执行一次就退出。
我们查看结果
{'location': {'name': 'Xian', 'region': 'Shaanxi', 'country': 'China', 'lat': 34.2622, 'lon': 108.9378, 'tz_id': 'Asia/Shanghai', 'localtime_epoch': 1762941365, 'localtime': '2025-11-12 17:56'}, 'current': {'last_updated_epoch': 1762940700, 'last_updated': '2025-11-12 17:45', 'temp_c': 14.2, 'temp_f': 57.6, 'is_day': 0, 'condition': {'text': 'Partly Cloudy', 'icon': '//cdn.weatherapi.com/weather/64x64/night/116.png', 'code': 1003}, 'wind_mph': 2.2, 'wind_kph': 3.6, 'wind_degree': 195, 'wind_dir': 'SSW', 'pressure_mb': 1024.0, 'pressure_in': 30.24, 'precip_mm': 0.0, 'precip_in': 0.0, 'humidity': 63, 'cloud': 0, 'feelslike_c': 14.9, 'feelslike_f': 58.8, 'windchill_c': 16.0, 'windchill_f': 60.9, 'heatindex_c': 16.0, 'heatindex_f': 60.9, 'dewpoint_c': 5.8, 'dewpoint_f': 42.4, 'vis_km': 6.0, 'vis_miles': 3.0, 'uv': 0.2, 'gust_mph': 6.7, 'gust_kph': 10.8, 'short_rad': 0, 'diff_rad': 0, 'dni': 0, 'gti': 0}}
已经查询到了,说明我们整个mcp的server是没有问题的
稍微格式化一下:
def format_data(data: Dict[str, Any]) -> str:
    if not data:
        return "获取天气信息失败。"
    try:
        city = data["location"]["name"]
        temp = data["current"]["temp_c"]
        condition = data["current"]["condition"]["text"]
        return f"{city}的天气情况:{condition},当前温度:{temp}℃"
    except KeyError:
        return "返回的数据格式不正确,无法解析。"
2.2.2 MCP的client端框架开发
服务器已经准备就绪,现在我们需要一个客户端来连接它并使用我们提供的天气查询工具。
2.2.2.1 OpenManus的解决方案
我们先分析下客户端有什么东西?
在编写我们自己的简单客户端之前,让我们先思考一下像 OpenManus 这样复杂的 Agent 是如何与 MCP 工具交互的。它绝不会像我们稍后编写的脚本那样,硬编码工具名称和参数。其设计哲学更侧重于抽象化、动态化和可扩展性:
- 工具管理器 (Tool Manager): OpenManus 内部会有一个核心组件,负责管理所有可用的工具。无论是本地函数还是远程 MCP 服务,都会被统一封装成标准的“工具”接口。Agent 的主逻辑层只与这个管理器交互,而不需要关心工具的具体实现是 MCP 还是其他协议。
- 动态发现与注册: 一个成熟的 Agent 系统能够动态连接到不同的 MCP 服务器,通过 list_tools 方法查询服务器提供了哪些工具,然后将这些工具动态注册到自己的工具库中。这意味着你可以随时添加新的 MCP 微服务,而无需修改 Agent 的核心代码。
- 会话与生命周期管理: 它会优雅地处理与 MCP 服务器的连接、心跳和断开重连。连接会话的整个生命周期被妥善管理,确保了系统的稳定性和鲁棒性。
- 异步与并行调用: Agent 的“思考”过程不会被工具的执行所阻塞。当需要调用一个耗时工具(如网络查询)时,它会异步发起请求,然后继续处理其他任务。它甚至可以并行调用多个工具,并将结果汇总,极大地提升了决策效率。
2.2.2.2 编写基础代码
理解了上述设计思想后,我们来实现一个简化版的客户端。这个客户端将模拟 Agent 调用工具的基本流程:建立连接、发现工具、执行工具、关闭连接。
编写我们的代码
import asyncio
import logging
from contextlib import AsyncExitStack

from mcp import StdioServerParameters, stdio_client, ClientSession
from mcp.shared.exceptions import McpError

logging.basicConfig(level=logging.INFO, format='%(asctime)s - %(levelname)s - %(message)s')


class MCPClient:

    def __init__(self):
        self.session: ClientSession | None = None
        self.exit_stack = AsyncExitStack()

    async def connect_server(self, server_script_path: str):
        if not server_script_path.endswith(".py"):
            logging.error("服务器脚本路径必须是 .py 文件")
            return

        server_param = StdioServerParameters(
            command="python",
            args=[server_script_path],
        )

        # 建立与子进程的标准输入输出管道
        stdio, write = await self.exit_stack.enter_async_context(stdio_client(server_param))
        # 在此管道上创建MCP会话
        self.session = await self.exit_stack.enter_async_context(ClientSession(stdio, write))

        # 初始化会话
        await self.session.initialize()

        # 列出服务器提供的所有工具,验证连接成功
        response = await self.session.list_tools()
        logging.info(f"成功连接到服务器,可用工具列表: {[tool.name for tool in response.tools]}")

    async def call_tool(self, tool_name: str, params: dict):
        """调用指定的工具并返回结果"""
        if not self.session:
            logging.error("未连接到服务器,无法调用工具。")
            return None

        logging.info(f"正在调用工具 '{tool_name}',参数: {params}")
        try:
            response = await self.session.call_tool(tool_name, params)
            logging.info(f"工具返回结果: {response.content}")
            return response.content
        except McpError as e:
            logging.error(f"调用工具时发生MCP错误: {e}")
            return None

    async def close(self):
        await self.exit_stack.aclose()
        logging.info("客户端连接已关闭。")


async def main():
    server_script_path = "F:/Code/AI/MCP/mcp_agent/server.py"
    client = MCPClient()

    try:
        await client.connect_server(server_script_path)
        await client.call_tool(tool_name="query_weather", params={"city": "西安"})
    except Exception as e:
        logging.error(f"发生意外错误: {e}", exc_info=True)
    finally:
        await client.close()


if __name__ == '__main__':
    asyncio.run(main())
- 通过 StdioServerParameters 将我们的 server.py 脚本作为一个子进程启动,并通过其标准输入/输出进行通信。
- AsyncExitStack 确保了即使发生错误,连接和会话等资源也能被正确清理。
2.2.3 联调
因为我们之前的单次server只会启动一次,所以我们使用mcp.run() 让我们的服务器能接受多次请求。
- 确保 server.py 的 if name == ‘main’: 块中调用的是 mcp.run()。
- 在 client.py 中填入 server.py 的正确路径。
- 运行 client.py。
修改server.py
if __name__ == '__main__':
    mcp.run()
[11/12/25 18:59:43] INFO     Processing request of type           server.py:674
                             ListToolsRequest
2025-11-12 18:59:43,100 - INFO - 成功连接到服务器,可用工具列表: ['query_weather']
2025-11-12 18:59:43,100 - INFO - 正在调用工具 'query_weather',参数: {'city': '西安'}
                    INFO     Processing request of type           server.py:674
                             CallToolRequest
2025-11-12 18:59:44,096 - INFO - 工具返回结果: [TextContent(type='text', text='西安 weather condition:Clear,temperature:12.3℃', annotations=None, meta=None)]
2025-11-12 18:59:44,188 - INFO - 客户端连接已关闭。
我们可以看到成功返回。
- 客户端成功启动并连接到了服务器。
- 它通过 list_tools 发现了我们定义的 query_weather 工具。
- 它成功调用了该工具,并传入参数 {‘city’: ‘西安’}。
- 服务器正确执行了逻辑,并将格式化后的天气信息返回给了客户端。
我们已经成功搭建并联调通了一个基础的 MCP 应用。这个简单的“客户端-服务器”模型虽然功能单一,但它验证了整个通信链路,为我们下一步集成 RAG 和构建更智能的 Agent 奠定了坚实的基础。
2.2.4 MCP封装成Agent工具
在前面的章节中,我们成功地构建了 MCP 的服务器和客户端,并打通了它们之间的通信链路。但这仅仅是第一步。一个真正的智能体(Agent)需要一个大脑来理解用户意图,并决定何时、如何使用我们提供的工具。
这个“大脑”就是大语言模型。本节的核心任务,就是将我们之前创建的 MCP 客户端进行升级,使其能够与 LLM 协同工作,将 MCP 工具无缝集成到 Agent 的决策流程中。
核心思想:让 LLM 成为决策者
我们的目标是实现以下自动化流程:
- 用户用自然语言提出一个请求(例如:“帮我查一下西安的天气”)。
- Agent 将这个请求和它所知道的可用工具列表一起发送给 LLM。
- LLM 理解用户意图后,判断是否需要使用工具。如果需要,它会决定调用哪个工具,并从用户请求中提取出相应的参数(例如:工具 query_weather,参数 city: “西安”)。
- Agent 接收到 LLM 的指令后,通过我们的 MCP 客户端执行这个工具调用。
- Agent 将工具执行的结果返回给 LLM。
- LLM 基于返回的结果,生成最终的、人类可读的答案。
这个流程的关键在于,LLM 并不直接执行工具,而是充当一个智能的“调度中心”。我们的代码则负责实现这个流程的其余部分。
2.2.4.1 集成 LLM 客户端
首先,我们的客户端需要具备与 LLM 通信的能力。我们选择使用 openai 库,并通过配置 base_url 来接入兼容 OpenAI API 规范的任何大模型服务,例如这里的阿里云通义千问。
在 MCPClient 的 init 方法中,初始化 LLM 客户端。
import openai

class MCPClient:
    def __init__(self):
        self.session: ClientSession | None = None
        self.exit_stack = AsyncExitStack()

        self.client = openai.AsyncOpenAI(
            api_key="sk-xxx",  # 替换为你的API Key
            base_url="https://dashscope.aliyuncs.com/compatible-mode/v1"
        )
        self.model = "qwen-plus"
这样,我们的 MCPClient 就同时拥有了与 MCP 服务器和 LLM 服务进行异步通信的能力。
2.2.4.2 动态转换 MCP 工具
LLM 如何知道我们的 Agent 有哪些可用的工具呢?我们需要在每次对话开始时,从 MCP 服务器获取工具列表,并将其“翻译”成 LLM 能够理解的格式。这正是 Function Calling API 规范的作用。
在处理用户查询的核心函数 process_query 的开头,添加工具转换逻辑。
async def process_query(self, query: str):
    messages = [{"role": "user", "content": query}]

    # 1. 从MCP服务器动态获取工具列表
    mcp_tools = (await self.session.list_tools()).tools

    # 2. 将MCP工具格式转换为LLM的Function Calling格式
    available_tools = [{
        "type": "function",
        "function": {
            "name": tool.name,
            "description": tool.description,
            "parameters": tool.model_json_schema()
        }
    } for tool in mcp_tools]
它不硬编码任何工具信息,而是动态地向 MCP 服务器查询,这意味着我们可以随时为服务器增加或修改工具,而无需改动 Agent 的核心代码。
2.2.4.3 让 LLM 选择工具
现在,我们将用户的请求和我们准备好的工具列表一同发送给 LLM,让它来做决策。
# 3. 第一次调用LLM:让模型基于用户输入和工具列表进行决策
    response = await self.client.chat.completions.create(
        model=self.model,
        messages=messages,
        tools=available_tools,
        tool_choice="auto",
    )

    response_message = response.choices[0].message
    tool_calls = response_message.tool_calls

    # 4. 根据LLM的响应进行分支处理
    if not tool_calls:
        # 如果LLM决定不调用工具,直接输出其回答
        print(f"Agent 回答: {response_message.content}")
        return response_message.content

    # 如果LLM决定调用工具,则进入下一步
tool_choice="auto" 授权 LLM 自主判断。如果用户的意图可以通过已有知识直接回答,tool_calls 就会是空的。反之,如果需要工具辅助,tool_calls 中就会包含它决定调用的工具名称和参数。
2.2.4.4 完成工具调用
一旦 LLM 决定调用工具,我们的 Agent 就需要作为执行者,完成以下操作:
- 解析 LLM 的指令,获取工具名和参数。
- 通过 MCP 客户端调用真实的工具。
- 将工具的执行结果反馈给 LLM,让它进行总结。
    # 5. 解析并执行工具调用
    logging.info(f"LLM决定调用工具: {tool_calls[0].function.name}")
    messages.append(response_message) # 将LLM的决策加入对话历史

    tool_call = tool_calls[0]
    tool_name = tool_call.function.name
    tool_args = json.loads(tool_call.function.arguments)

    # 使用我们之前实现的call_tool方法执行调用
    tool_result_content = await self.call_tool(tool_name, tool_args)

    # 6. 将工具执行结果反馈给LLM
    messages.append({
        "role": "tool",
        "content": tool_result_content[0].text,
        "tool_call_id": tool_call.id
    })

    # 7. 第二次调用LLM:让模型基于工具结果生成最终回答
    logging.info("将工具结果返回给LLM进行总结...")
    final_response = await self.client.chat.completions.create(
        model=self.model,
        messages=messages
    )
    final_answer = final_response.choices[0].message.content
    print(f"Agent 回答: {final_answer}")
    return final_answer
这个“决策 -> 执行 -> 反馈 -> 总结”的模式,是现代 Agent 架构的核心工作流。我们的代码完美地实现了这个闭环。
最后,我们提供一个简单的 chat 方法来接收用户输入,并调用 process_query 来处理,形成一个完整的、可交互的 Agent。
async def chat(self):
        while True:
            user_input = input("你: ")
            if user_input.lower() in ["exit", "退出"]:
                print("再见!")
                break
            # 每一次用户输入都触发一次完整的决策->执行->总结流程
            await self.process_query(user_input)


async def main():
    server_script_path = "F:/Code/AI/MCP/mcp_agent/server.py"
    client = MCPClient()

    try:
        await client.connect_server(server_script_path)
        await client.chat()
    except Exception as e:
        logging.error(f"发生意外错误: {e}", exc_info=True)
    finally:
        await client.close()


if __name__ == '__main__':
    asyncio.run(main())
全部代码
import asyncio
import json
import logging
from contextlib import AsyncExitStack

import openai
from mcp import StdioServerParameters, stdio_client, ClientSession
from mcp.shared.exceptions import McpError

logging.basicConfig(level=logging.INFO, format='%(asctime)s - %(levelname)s - %(message)s')


class MCPClient:

    def __init__(self):
        self.session: ClientSession | None = None
        self.exit_stack = AsyncExitStack()

        self.client = openai.AsyncOpenAI(
            api_key="sk-xxx",
            base_url="https://dashscope.aliyuncs.com/compatible-mode/v1"
        )
        self.model = "qwen-plus"

    async def connect_server(self, server_script_path: str):
        if not server_script_path.endswith(".py"):
            logging.error("服务器脚本路径必须是 .py 文件")
            return

        server_param = StdioServerParameters(
            command="python",
            args=[server_script_path],
        )

        stdio, write = await self.exit_stack.enter_async_context(stdio_client(server_param))
        self.session = await self.exit_stack.enter_async_context(ClientSession(stdio, write))

        await self.session.initialize()

        response = await self.session.list_tools()
        logging.info(f"成功连接到服务器,可用工具列表: {[tool.name for tool in response.tools]}")

    async def call_tool(self, tool_name: str, params: dict):
        if not self.session:
            logging.error("未连接到服务器,无法调用工具。")
            return None

        logging.info(f"正在通过MCP调用工具 '{tool_name}',参数: {params}")
        try:
            response = await self.session.call_tool(tool_name, params)
            logging.info(f"MCP工具返回原始结果: {response.content}")
            return response.content
        except McpError as e:
            logging.error(f"调用工具时发生MCP错误: {e}")
            return None

    async def close(self):
        await self.exit_stack.aclose()
        logging.info("客户端连接已关闭。")

    async def process_query(self, query: str):
        messages = [{"role": "user", "content": query}]

        mcp_tools = (await self.session.list_tools()).tools
        available_tools = [{
            "type": "function",
            "function": {
                "name": tool.name,
                "description": tool.description,
                "parameters": tool.model_json_schema()
            }
        } for tool in mcp_tools]

        try:
            # 第一次调用LLM:让模型决策
            response = await self.client.chat.completions.create(
                model=self.model,
                messages=messages,
                tools=available_tools,
                tool_choice="auto",
            )
            response_message = response.choices[0].message
            tool_calls = response_message.tool_calls

            if tool_calls:
                logging.info(f"LLM决定调用工具: {tool_calls[0].function.name}")
                # 将模型的意图加入对话历史
                messages.append(response_message)

                tool_call = tool_calls[0]
                tool_name = tool_call.function.name
                tool_args = json.loads(tool_call.function.arguments)

                tool_result_content = await self.call_tool(tool_name, tool_args)

                if tool_result_content is None:
                    tool_result_text = "工具执行失败。"
                else:
                    tool_result_text = tool_result_content[0].text

                messages.append({
                    "role": "tool",
                    "content": tool_result_text,
                    "tool_call_id": tool_call.id
                })

                # 第二次调用LLM:让模型基于工具结果生成最终回答
                logging.info("将工具结果返回给LLM进行总结...")
                final_response = await self.client.chat.completions.create(
                    model=self.model,
                    messages=messages
                )
                final_answer = final_response.choices[0].message.content
            else:
                # 如果模型决定不调用工具,直接返回其回答
                final_answer = response_message.content

            print(f"\nAgent: {final_answer}\n")
            return final_answer

        except Exception as e:
            logging.error(f"与LLM交互时发生错误: {e}")
            print("\nAgent: 抱歉,处理您的请求时遇到了问题。\n")

    async def chat(self):
        print("智能天气助手已启动!您可以开始提问了(例如:'西安的天气怎么样?')。输入 'exit' 或 '退出' 结束对话。")
        while True:
            user_input = input("你: ")
            if user_input.lower() in ["exit", "退出"]:
                print("再见!")
                break
            await self.process_query(user_input)


async def main():
    server_script_path = "F:/Code/AI/MCP/mcp_agent/server.py"

    client = MCPClient()
    try:
        await client.connect_server(server_script_path)
        if client.session:
            await client.chat()
    except Exception as e:
        logging.error(f"启动或运行Agent时发生意外错误: {e}", exc_info=True)
    finally:
        if client.session:
            await client.close()


if __name__ == '__main__':
    asyncio.run(main())
2.2.4.5 测试
2025-11-12 21:30:21,169 - INFO - 成功连接到服务器,可用工具列表: ['query_weather']
智能天气助手已启动!您可以开始提问了(例如:'西安的天气怎么样?')。输入 'exit' 或 '退出' 结束对话。
你: ’北京的天气怎么样?'
[11/12/25 21:30:25] INFO     Processing request of type           server.py:674
                             ListToolsRequest
2025-11-12 21:30:30,073 - INFO - HTTP Request: POST https://dashscope.aliyuncs.com/compatible-mode/v1/chat/completions "HTTP/1.1 200 OK"
2025-11-12 21:30:30,095 - INFO - LLM决定调用工具: query_weather
2025-11-12 21:30:30,096 - INFO - 正在通过MCP调用工具 'query_weather',参数: {'city': '北京'}
2025-11-12 21:30:30,977 - INFO - MCP工具返回原始结果: [TextContent(type='text', text='北京的天气情况:Clear,当前温度:14.3℃', annotations=None, meta=None)]
2025-11-12 21:30:30,977 - INFO - 将工具结果返回给LLM进行总结...
2025-11-12 21:30:32,958 - INFO - HTTP Request: POST https://dashscope.aliyuncs.com/compatible-mode/v1/chat/completions "HTTP/1.1 200 OK"

Agent: 北京目前天气晴朗,当前温度为14.3℃,体感舒适,适合外出活动。请注意适时增减衣物,以防温差变化。
测试西安
你: ’西安的天气怎么样?'
[11/12/25 21:30:50] INFO     Processing request of type           server.py:674
                             ListToolsRequest
2025-11-12 21:30:54,654 - INFO - HTTP Request: POST https://dashscope.aliyuncs.com/compatible-mode/v1/chat/completions "HTTP/1.1 200 OK"
2025-11-12 21:30:54,656 - INFO - LLM决定调用工具: query_weather
2025-11-12 21:30:54,656 - INFO - 正在通过MCP调用工具 'query_weather',参数: {'city': '西安'}
[11/12/25 21:30:54] INFO     Processing request of type           server.py:674
                             CallToolRequest
2025-11-12 21:30:57,507 - INFO - MCP工具返回原始结果: [TextContent(type='text', text='西安的天气情况:Clear,当前温度:8.0℃', annotations=None, meta=None)]
2025-11-12 21:30:57,507 - INFO - 将工具结果返回给LLM进行总结...
2025-11-12 21:30:59,982 - INFO - HTTP Request: POST https://dashscope.aliyuncs.com/compatible-mode/v1/chat/completions "HTTP/1.1 200 OK"

Agent: 西安目前天气晴朗,当前温度为8.0℃,体感较为凉爽,建议适当增添衣物,注意保暖。

有“AI”的1024 = 2048,欢迎大家加入2048 AI社区
更多推荐


 10
10 0
0- 0


 已为社区贡献5条内容

所有评论(0)